
Chapter 7: Terraform Modules
In our previous chapter, we discussed the core workflow of the Terraform tool, which consists of creating a Terraform configuration file (write), previewing the changes (terraform plan), and then finally committing those changes to the target environment (terraform apply). Once we are done with the creation of the resources, we might be required to get rid of those infrastructures (terraform destroy). In a nutshell, we discussed complete Terraform core workflows, which mainly consist of terraform init, terraform plan, terraform apply, terraform destroy, and the respective subcommands and their outputs.
In this chapter, we will discuss Terraform modules for Amazon Web Services (AWS), Azure, and Google Cloud Platform (GCP) cloud providers. From this chapter, you will learn how you can write modules and how you can publish and consume them. Learning about Terraform modules is important as this will help you to deploy large enterprise-scalable and repeatable infrastructure and will also reduce the total number of hours required for provisioning infrastructure.
The following topics will be covered in this chapter:
- Understanding Terraform modules
- Writing Terraform modules for Azure
- Writing Terraform modules for AWS
- Writing Terraform modules for GCP
- Publishing Terraform modules
Technical requirements
To follow along with this chapter, you will need to have an understanding of the Terraform command-line interface (CLI). You should know how to install Terraform on various machines and need to have a basic understanding of writing a Terraform configuration file. You can find all the code used in this chapter at the following GitHub link: https://github.com/PacktPublishing/HashiCorp-Infrastructure-Automation-Certification-Guide/tree/master/chapter7.
Check out the following link to see the Code in Action video:
Understanding Terraform modules
So far, we have written Terraform configuration code, but have you ever thought about how effectively we can make it reusable? Just consider that you have many product teams with whom you are working, and they wish to use Terraform configuration code for their infrastructure deployment. Now, you may be wondering if it's possible to write code once and share it with these teams so that they don't need to write the same code again and again. This is where Terraform modules come in. Let's try to get an idea of what these are.
A Terraform module is basically a simple configuration file ending with .tf or tf.json, mainly consisting of resources, inputs, and outputs. There is a main root module that has the main configuration file you would be working with, which can consume multiple other modules. We can define the hierarchical structure of modules like this: the root module can ingest a child module, and that child module can invoke multiple other child modules. We can reference or read submodules in this way:
module.<rootmodulename>.module.<childmodulename>
However, it is recommended to keep a module tree flat and have only one level of child module. Let's try to understand about module composition, with an example of a virtual private cloud (VPC) and a subnet of AWS. Here is the resource code block:
resource "aws_vpc" "vpc" {
cidr_block = var.cidr_block
}
resource "aws_subnet" "subnet" {
vpc_id = aws_vpc.vpc.id
availability_zone = "us-east-1a"
cidr_block = cidrsubnet(aws_vpc.vpc.cidr_block, 4, 1)
}
variable "cidr_block" {
default = "10.0.0.0/16"
type = string
description = "provide cidr block range"
}
When we try to write module code blocks, the configuration appears more hierarchical than flat. Each of the modules would have its own set of resources and child modules that may go deeper and create a complex tree of resource configurations.
Here is a code example, to explain how a module can be referenced in another module:
module "aws_network" {
source = "./modules/network"
cidr_block = "10.0.0.0/8"
}
module "aws_instance" {
source = "./modules/instance"
vpc_id = module.aws_network.vpc_id
subnet_ids = module.aws_network.subnet_ids
}
In our preceding example, you can see how we referenced one module in another module. It is always suggested to have a one-level module reference rather than referencing complex modules and submodules.
In simple words, we can define a module as a container with multiple resources that can be consumed together. We will discuss in more detail writing child modules and later consuming them as and when needed by creating a Terraform stack in Chapter 9, Understanding Terraform Stacks.
The syntax for defining Terraform modules, whereby we need to start with the module and provide its local name, is shown here:
module "name" {}
Terraform modules support some key arguments such as source, version, and input variable, and loops such as for_each and count. We can define a module code block in this way:
module "terraform-module" {
source = "terraform-aws-modules/vpc/aws"
version = "2.55.0"
}
In the previously defined code block, we have defined a module with a local name of terraform-module. We can give any name to a module—it's totally up to us, because it's just a local name. You may be wondering what these source and version arguments are doing inside the module code block. An explanation for this follows.
source
This argument is mandatory, referring to either the local path where the module configuration file is located or the remote reference Uniform Resource Locator (URL) from where it should be downloaded. The same source path can be defined in multiple modules or in the same file and can be called multiple times, making modules more efficient for reuse. The next code example will give you an idea of how a module can be defined.
For local referencing, you can define a module in the following way:
module "terraform-module" {
source = "../terraform-module"
}
In the previously defined code block, we are referencing the local path where the module configuration file is located. We have two options for referencing a local path: ./ and ../. We have used ../, which takes the terraform-module directory (that is, the parent directory). In this case, when we run terraform init and terraform plan, the module file doesn't get downloaded as it already exists on the local disk. It is also recommended to use a local file path for closely related modules that are used for the factoring of repeated code. This referencing won't work if you are working in a team and they want to consume a different version of a module. In that case, a remote file path would help because the published version of the code would be there in the remote location, and anyone could easily reference it by providing the respective file URL.
The next aspect you need to know about is the different remote ways of referencing supported by Terraform that can be defined in the source block of the Terraform module. For in-depth learning about remote referencing, you can refer to https://www.terraform.io/docs/language/modules/sources.html. Here are a few ways in which you can reference remotely:
- Terraform Registry
- GitHub
- Bitbucket
- Generic Git; Mercurial repositories
- HyperText Transfer Protocol (HTTP) URLs
- Simple Storage Service (S3) buckets
- Google Cloud Storage (GCS) buckets
Terraform Registry
Terraform Registry has a list of published modules written by community members. This is a public registry, and it's very easy for others to start consuming it directly in their code. Terraform Registry supports versioning of published modules. It can be referenced using the specified syntax <NAMESPACE>/<NAME>/<PROVIDER>—for example, hashicorp/consul/aws, as illustrated in the following code snippet:
module "Terraform-consul" {
source = "hashicorp/consul/aws"
version = "0.8.0"
}
For a detailed understanding about usage of the consul module for AWS, you can read more at https://registry.terraform.io/modules/hashicorp/consul/aws/latest.
If you want to use modules that are hosted in a private registry similar to Terraform Cloud, then you can reference them in code by providing a source path with the syntax <HOSTNAME>/<NAMESPACE>/<NAME>/<PROVIDER>. For a detailed understanding of private registry referencing, you can read more at https://www.terraform.io/docs/cloud/registry/using.html.
Have a look at the following code example:
module "aws-vpc" {
source = "app.terraform.io/aws_vpc/vpc/aws"
version = "1.0.0"
}
In this example, we have shown the Software-as-a-Service (SaaS) version of Terraform Cloud, which has a private registry hostname of app.terraform.io. If you are going to use any other private registry, you can replace this hostname with your private registry hostname.
Important note
You might be required to configure credentials to access modules, depending upon the private registry you are referencing for the module source path.
GitHub
Terraform will able to recognize github.com URLs and understand them as Git repository sources. The following code snippet shows cloning over HTTP Secure (HTTPS):
module "terraform-module" {
source = "github.com/hashicorp/terraform-module"
}
To clone over Secure Shell (SSH), you can use the following code:
module "terraform-module" {
source = "[email protected]:hashicorp/terraform-module.git"
}
GitHub supports a ref argument that helps select a specific version of a module. You would be required to pass credentials to get authenticated to a private repository.
Bitbucket
Similar to GitHub, Terraform manages to recognize bitbucket.org and is able to understand it as Bitbucket repository sources. The following code snippet illustrates this:
module "terraform-module" {
source = "bitbucket.org/hashicorp/terraform-module"
}
If you are using a public repository, then the previously defined code form will help Terraform use the Bitbucket application programming interface (API) to learn whether the defined source is using a Git source or a Mercurial source. When using a private repository, you would be required to have proper authentication.
Generic Git repository
You can define any valid Git repository by prefixing the address with git::. Both SSH and HTTPS can be defined in the following ways:
module "terraform-module" {
source = "git::https://example.com/terraform-module.git"
}
module "terraform-module" {
source = "git::ssh://[email protected]/terraform-module.git"
}
Terraform downloads modules from the Git repository by executing git clone. If you are trying to access a private repository, you would then be required to provide an SSH key or credentials so that it can be accessed.
If you are looking for a specific version of a module from the Git repository, then you can pass that version value into the ref argument, as follows:
module "terraform-module" {
source = "git::https://example.com/terraform-module.git?ref=v1.2.0"
}
Generic Mercurial repository
Terraform will be able to understand any generic Mercurial URL through an hg:: prefix, as illustrated in the following code snippet:
module "terraform-module" {
source = "hg::http://example.com/terraform-module.hg"
}
Terraform is able to install modules from Mercurial repositories by running hg clone, but if you are accessing a non-public repository then an SSH key or credentials need to be provided. Terraform helps you to download a specific version of the module from Mercurial repositories by supporting the ref argument, as illustrated in the following code snippet:
module "terraform-module" {
source = "hg::http://example.com/terraform-module.hg?ref=v1.2.0"
}
HTTP URLs
Terraform has the capability to perform a GET operation if you are providing an HTTP or HTTPS URL. It manages to install modules over HTTP/HTTPS easily, provided there is no authentication required. If authentication is required, then you would be required to provide credential details in the .netrc file of the home directory.
Terraform manages to read the following archival file extensions:
Here is an example that shows how Terraform can access archival files using HTTPS:
module "terraform-module" {
source = "https://example.com/terraform-module.zip"
}
Let's suppose you are not sure about the archived file extension and you want Terraform to be able to read it. In that case, you can define an archive argument to force Terraform to interpret it, as follows:
module "terraform-module" {
source = "https://example.com/terraform-module?archive=zip"
}
S3 bucket
You can publish and store a module in an AWS S3 bucket. If you want to reference a S3 bucket in a Terraform module, just place a S3:: prefix followed by the S3 bucket object URL, as follows:
module "terraform-module" {
source = "s3::https://s3-eu-west-1.amazonaws.com/terraform-modules/tfmodules.zip"
}
Terraform can access S3 buckets using the S3 API, provided authentication to AWS has been handled. The Terraform module installer will look for AWS credentials in the following locations:
- The defined value of AWS_ACCESS_KEY_ID and AWS_SECRET_ACCESS_KEY in the environment variables
- Credentials stored in the .aws/credentials file in your home directory
GCS bucket
As with a S3 bucket in AWS, you can archive your module configuration in a GCS bucket. If you wish to reference it in a module code block, then just place a gcs:: prefix followed by the GCS bucket object URL, as illustrated in the following code snippet:
module "terraform-module" {
source = "gcs::https://www.googleapis.com/storage/v1/modules/terraform-module.zip"
}
The module installer uses the Google Cloud software development kit (SDK) to get authenticated with GCS. You can provide the file path of the Google service account key file so that it can get authenticated.
We have discussed different available sources for Terraform modules. For more information, you can go to https://www.terraform.io/docs/modules/sources.html.
version
This argument is optional—if you are referencing the local path in the source, then you won't able to define a version. Providing a version value is very important if you want to download a specific version of a module when you run terraform init, and it will also protect you from any unwanted outages due to a change in the configuration code. You need to define version arguments in a module code block in this way:
module "terraform-module" {
source = "terraform-aws-modules/vpc/aws"
version = "2.5.0"
}
In the preceding code block, we have defined the version value as "2.5.0" so that whenever we are running terraform init, it will download that specific version of the module. You are probably wondering what will happen if you don't provide this version in a module code block. If you don't define the version in a module code block, then Terraform will always install the latest module version. So, in order to protect infrastructure from any breakage, it's recommended to provide version constraints in a module. You can provide a version value with the simple = operator, but there are many other version constraint operators supported by Terraform, such as the following:
- >= 2.5.0: version 2.5.0 or newer
- <= 2.5.0: version 2.5.0 or older
- ~>2.5.0: any version in the 2.5.x family; version 2.6.x would not work
- >= 2.0.0, <= 2.5.0: any version between 2.0.0 and 2.5.0 inclusive
If you are installing a module from a module registry such as Terraform Registry or Terraform Cloud's private module registry, then you can provide version constraints. Other registries such as GitHub, Bitbucket, and so on provide their own way of defining version details in the source URL itself, which we already discussed in our source section.
The Terraform modules support some meta-arguments, along with source and version. These are outlined as follows:
- count—You can define this argument within a module code block if you willing to create multiple instances from a single module block. For a greater understanding of the count expression, you can refer to the Understanding Terraform loops section of Chapter 4, Deep Dive into Terraform, where we already discussed how you can use count for a resource code block. The same approach is followed in a module block as well, so we won't discuss it again here. For further reading, you can go to the count expression page of the Terraform documentation, at https://www.terraform.io/docs/configuration/meta-arguments/count.html.
- for_each—As with the count expression, the for_each expression is also used for creating multiple instances of a module from a single module block. We already discussed this in Chapter 4, Deep Dive into Terraform, where we discussed for_each loops respective to a resource code block, and you can apply the same approach here as well; therefore, we won't discuss this again here. If you want to read more about the for_each expression, you can visit https://www.terraform.io/docs/configuration/meta-arguments/for_each.html.
- providers—This is an optional meta-argument that you can define within a module code block. You may be wondering why we need to define a providers argument inside a module code block. Basically, you need to define this when you want to have multiple configurations in a module of the same provider. You can then call them by placing alias for the provider in the following way:
terraform {
required_version = ">= 1.0"
required_providers {
aws = {
source = "hashicorp/aws"
version = "~> 3.0"
}
}
}
provider "aws" {
region = "us-east-1"
}
# An alternate configuration is also defined for a different
# region, using the alias "terraform_aws_west".
provider "aws" {
alias = "terraform_aws_west"
region = "us-west-1"
}
module "terraform-module" {
source = "./terraform-module"
providers = {
aws = aws.terraform_aws_west
}
}
In this example, we defined the same provider multiple times, one with an alias and another without an alias. If we hadn't defined a providers arguments in the child module code block, it would have taken the default provider that we defined without an alias. So, in order to use a specific provider within the module, we defined aws=aws.terraform_aws_west. From this expression, you can easily understand that the providers argument inside the child module is a map that will be supporting only the key and the value, without placing them in double quotes.
- depends_on—This meta-argument is an optional one, whereby if we need to define an explicit dependency then we can define a depends_on argument within a module code block. This should be used only as a very last resort because Terraform is smart enough to follow an implicit dependency of resources, but in some cases we need to forcefully tell Terraform that there is a dependency so that Terraform can follow that sequence for the creation or deletion of resources. Let's try to understand how we can define the depends_on argument within a module, as follows:
resource "aws_iam_role" "terraform-role" {
name = "terraform-vpc-role"
}
# We need to create AWS IAM role specific to VPC then we are supposed to create VPC
module "terraform-module" {
source = "terraform-aws-modules/vpc/aws"
version = "~>2.5.0"
depends_on = [
aws_iam_role.terraform-role,
]
}
In this example, we mentioned explicit dependency in the module by defining depends_on, which means that Terraform will deploy the terraform-module module only when we already have the AWS Identity and Access Management (IAM) role in place. Similar to this example, we can even define explicit dependency of one module to other child modules.
There are many more aspects related to Terraform modules and we will try to discuss them in our upcoming sections, providing examples so that you will gain a better understanding. For now, let's try to understand how we can taint a resource within a module. To taint a specific resource within a module, we can use Terraform's taint command, as illustrated in the following code snippet:
$ terraform taint module.terraform_module.aws_instance.terraform_instance
This will tell Terraform to destroy and recreate a specific resource of modules that's been tainted during the next apply operation. Remember—you won't able to taint a complete module; only specific resources within a module can be tainted. For further understanding of the Terraform taint command, you can read Chapter 5, Terraform CLI. You can also read more about the taint command at https://www.terraform.io/docs/commands/taint.html.
From this entire section, you will have gained a fair understanding of Terraform modules, so let's move ahead and try to write some modules for major cloud providers such as Azure, AWS, and GCP.
Writing Terraform modules for Azure
When learning about Terraform modules, we need to understand how we can draft modules for an Azure Resource Manager (azurerm) provider. This will help you out when starting to create azurerm modules and provisioning resources in Microsoft Azure using these modules. For a further understanding about Terraform modules for Azure, let's try to create a virtual machine (VM) with the keyvault module. We have created all the module Terraform files and placed them in our chapter GitHub repository at https://github.com/PacktPublishing/HashiCorp-Infrastructure-Automation-Certification-Guide/tree/master/chapter7/azurerm/azurerm-virtual-machine-module.
The following files are present in our GitHub repository under the azurerm directory, which you can clone to your local machine and then start consuming it:
inmishrar@terraform-lab-vm:~/HashiCorp-Infrastructure-Automation-Certification-Guide/chapter7/azurerm# tree
.
├── azurerm-virtual-machine-module
│ ├── VERSION
│ ├── main.tf
│ ├── outputs.tf
│ └── variables.tf
└── azurerm-virtual-machine-module-use-case
├── main.tf
├── outputs.tf
├── providers.tf
├── terraform.tfvars
└── variables.tf
2 directories, 9 files
In our main.tf file, we have defined the following code block (as mentioned, the entire code can be copied from GitHub):
resource "azurerm_resource_group" "rgname" {
name = var.rgname
location = var.location
tags = var.custom_tags
}
...
In this main.tf file, we have defined one code block named locals, as illustrated in the following code snippet:
resource "random_string" "password" {
length = 16
special = true
min_upper = 2
min_lower = 2
min_numeric = 2
min_special = 2
}
locals {
vmpassword = random_string.password.result
}
locals is just a local variable, having a map data type that contains a key and a value. It is used within the code by referencing local.key. In our example, we are storing a value of "random_string" "password" in vmpassword. So, wherever we want to reference or use this local variable in the Terraform configuration code, we can define local.vmpassword and it will automatically take the content of it. Here is a code example, just to give you an idea of how you can use locals:
resource "azurerm_key_vault_secret" "key_vault_secret" {
name = var.keyvault_secret_name
value = local.vmpassword
key_vault_id = azurerm_key_vault.key_vault.id
tags = var.custom_tags
}
There is a variables.tf file that contains the following code that you can copy from the GitHub repository:
variable "rgname" {
type = string
description = "name of resource group"
}
variable "location" {
type = string
description = "location name"
}
...
One more file with the name outputs.tf contains the following code:
output "nic" {
value = azurerm_network_interface.nic.private_ip_address
}
output "vm_id" {
value = azurerm_windows_virtual_machine.virtual_machine.id
}
output "vm_name" {
value = azurerm_windows_virtual_machine.virtual_machine.name
}
This whole code that we defined inside the azurerm-virtual-machine-module directory explains to you how you can create a module and get this published. In our case, we have kept the code in our GitHub repository so that you can create any modules accordingly and get them published.
Now, a very important question is: How can we consume our created module? So, for this, we have written code and placed this inside our Chapter7/azurerm/azurerm-virtual-machine-module-use-case/ GitHub directory.
In the main.tf file, the following code is present:
module "terraform-vm" {
source = "github.com/PacktPublishing/HashiCorp-Infrastructure-Automation-Certification-Guide.git//chapter7/azurerm/azurerm-virtual-machine-module?ref=v0.0.1"
rgname = var.rgname
location = var.location
custom_tags = var.custom_tags
vm_size = var.vm_size
vm_name = var.vm_name
admin_username = var.admin_username
vm_publisher = var.vm_publisher
vm_offer = var.vm_offer
vm_sku = var.vm_sku
vm_version = var.vm_version
sku_name = var.sku_name
vnet_name = var.vnet_name
address_space = var.address_space
subnet_name = var.subnet_name
nic_name = var.nic_name
keyvault_name = var.keyvault_name
keyvault_secret_name = var.keyvault_secret_name
}
If you notice, we have defined source in the module code block and have put ref in the source URL itself rather than defining any version argument separately because GitHub doesn't support version argument in the module code block. If we want to define versions, then we have to get them defined in the source URL itself.
There is one catch here—in order to define ref in the source URL of a module, you would be required to create a releases/tags in the GitHub repository, which you can see in the following screenshot. We have created release v0.0.1 manually in our GitHub repository and associated it with our master branch. If you wish, you can define a script that can automatically create a specific release version, and you can define this accordingly in the source URL of the module code. You can refer to a given URL (that is, https://stackoverflow.com/questions/18216991/create-a-tag-in-a-GitHub-repository) to get an idea of creating a Releases/Tags on GitHub:

Figure 7.1 – GitHub release v0.0.1
So, depending upon your repository, you can define your source URL accordingly in the module code block.
The next aspect is the values we would be required to provide in order to consume this module. We highlighted all the arguments (such as rgname) on the left side of the module code block. keyvault_name is actually the variable name that we defined while creating the module code block, and this contains all our resources and respective variables. While consuming that module, all those variables will be working as an input argument for us. After that, you can provide respective argument values either through a variable or by hardcoding. We would recommend providing values through input variables. In our case, we are going to provide all modules' variable values from the terraform.tfvars file, as illustrated in the following code snippet:
rgname = "Terraform-rg"
location = "eastus"
custom_tags = {
Environment = "prod"
Owner = "Azure-Terraform"
}
vm_size = "Standard_F2"
vm_name = "Terraform-vm"
admin_username = "azureterraform"
vm_publisher = "MicrosoftWindowsServer"
vm_offer = "WindowsServer"
vm_sku = "2016-Datacenter"
vm_version = "latest"
sku_name = "premium"
vnet_name = "Terraform-vnet"
address_space = ["10.1.0.0/16"]
subnet_name = "Terraform-subnet"
nic_name = "Terraform-nic"
keyvault_name = "terraform-vm-keyvault"
keyvault_secret_name = "Terraform-vm-password"
We have kept the same variable that we defined while creating modules so that it is easy for you to understand. In the variables.tf file, the following code is present. You can copy the full code from our GitHub repository:
variable "rgname" {
type = string
description = "name of resource group"
}
variable "location" {
type = string
description = "location name"
}
variable "vnet_name" {
type = string
description = "vnet name"
}
...
To store the Terraform state file into Azure Blob storage, we have defined a Terraform backend code block inside the providers.tf file. We also mentioned which version of the azurerm provider should be used. The code is illustrated in the following snippet:
terraform {
required_version = ">= 1.0"
required_providers {
azurerm = {
source = "hashicorp/azurerm"
version = "2.55.0"
}
}
backend "azurerm" {
storage_account_name = "terraformstg2345"
container_name = "terraform"
key = "terraform.tfstate"
access_key = "KRqtJIA0Gp4oKBsElDU7RGN..."
}
}
provider "azurerm" {
features {}
}
Important note
While configuring the remote backend with Blob storage, you should pass the access_key value through environment variables. It is not recommended to hardcode the access_key value in your configuration code as this can cause a security risk.
Finally, we want to see whether our VM got deployed or not. So, for that, we have created a file named outputs.tf, which contains the following code:
output "vm_private_ip" {
value = module.terraform-vm.nic
}
output "vm_name" {
value = module.terraform-vm.vm_name
}
output "vm_id" {
value = module.terraform-vm.vm_id
}
In this outputs.tf file, you can see how we defined output values referencing modules. The syntax for defining the output of a module is module.<MODULE NAME>.<OUTPUT NAME>. In our example, while creating the module code, in the resource code block we mentioned the outputs.tf file where all the output names are, so when we are calling them as output in a module, we then need to provide that same name.
Let's try to run the code that is defined in the azurerm-virtual-machine-module-use-case directory of our GitHub repository. After executing terraform init, we can see the following activities being performed by Terraform, and in the listed activities, it has downloaded the following module from our GitHub repository:
$terraform init
Initializing modules...
Downloading github.com/PacktPublishing/HashiCorp-Infrastructure-Automation-Certification-Guide.git?ref=v0.0.1 for terraform-vm...
- terraform-vm in .terraformmodules erraform-vmchapter7azurermazurerm-virtual-machine-module
Initializing the backend...
Successfully configured the backend "azurerm"! Terraform will automatically use this backend unless the backend configuration changes.
Initializing provider plugins...
- Finding hashicorp/azurerm versions matching "2.55.0"...
- Finding latest version of hashicorp/random...
- Installing hashicorp/azurerm v2.55.0...
- Installed hashicorp/azurerm v2.55.0 (signed by HashiCorp)
- Installing hashicorp/random v3.0.0...
- Installed hashicorp/random v3.0.0 (signed by HashiCorp)
The following providers do not have any version constraints in configuration, so the latest version was installed.
To prevent automatic upgrades to new major versions that may contain breaking changes, we recommend adding version constraints in a required_providers block in your configuration, with the constraint strings suggested below.
* hashicorp/random: version = "~> 3.0.0"
Terraform has been successfully initialized!
You may now begin working with Terraform. Try running "terraform plan" to see any changes that are required for your infrastructure. All Terraform commands should now work.
If you ever set or change modules or backend configuration for Terraform, rerun this command to reinitialize your working directory. If you forget, other commands will detect it and remind you to do so if necessary.
Further, we executed terraform plan and terraform apply. We can see the following output, which has been defined in the outputs.tf file present inside the azurerm-virtual-machine-module-use-case directory:
Outputs:
vm_id = /subscriptions/97c3799f-2753-40b7-a4bd-157ab464d8fe/resourceGroups/Terraform-rg/providers/Microsoft.Compute/virtualMachines/Terraform-vm
vm_name = Terraform-vm
vm_private_ip = 10.1.1.4
And finally, our defined module managed to create resources in Azure, which can be seen in the following screenshot:
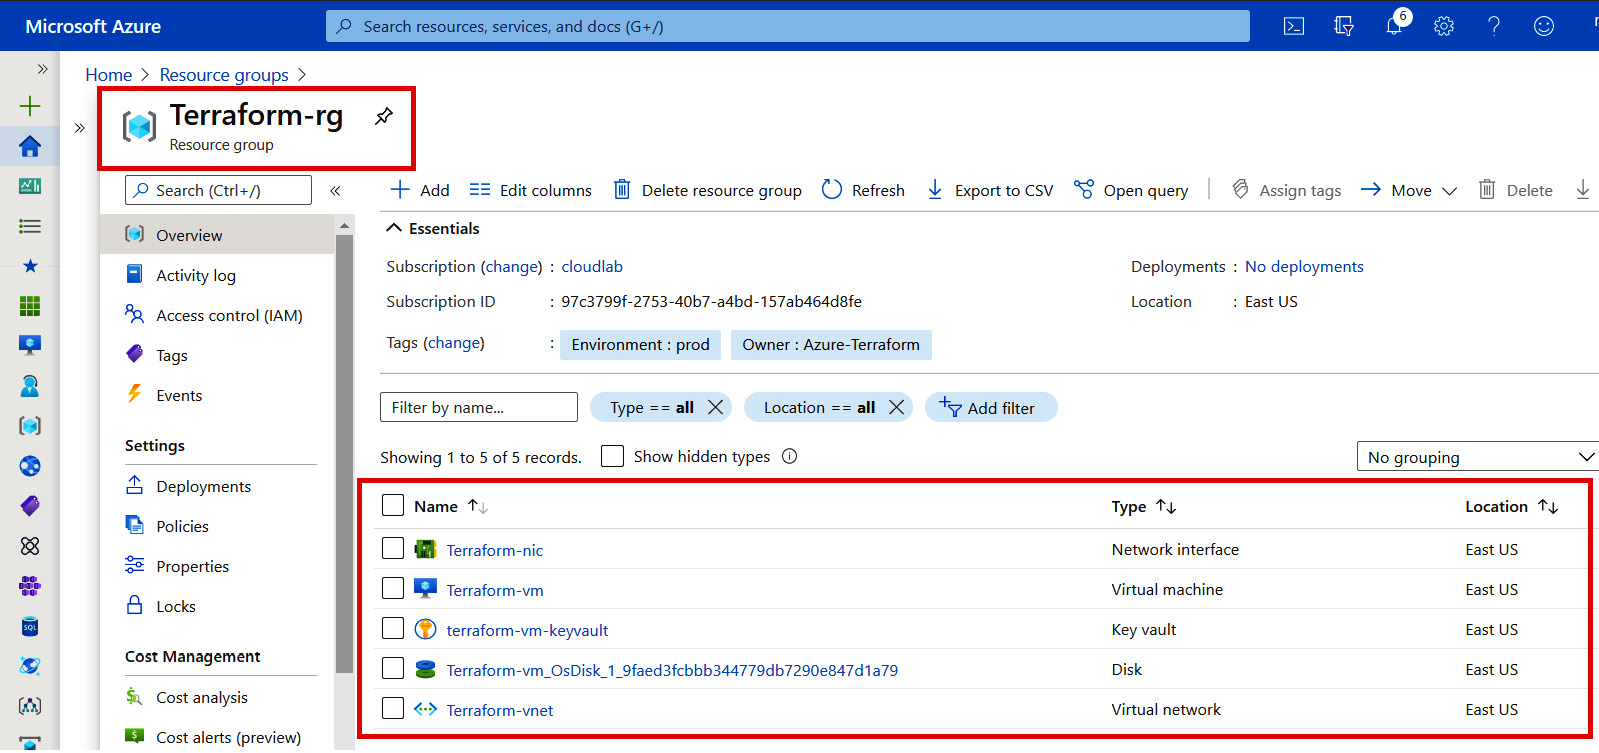
Figure 7.2 – Azure resources
Important note
To execute all Terraform code specific to Azure, you need to have authentication to Azure in place, which we have already explained in Chapter 5, Terraform CLI.
From this section, we managed to write a Terraform module for the Azure VM with keyvault and were easily able to consume it. In the same way, you could write a module for any other Azure resources and get it published to Terraform Cloud or any other repository from where it would be easy for you to consume it as and when needed.
After learning how to write Terraform modules for Azure, you will now be interested in learning about writing Terraform modules for AWS. Therefore, we are going to discuss further how these can be written and consumed in our next section.
Writing Terraform modules for AWS
After successfully writing an Azure module in our previous section, you might be wondering: Is there is any difference between drafting Terraform modules for an AWS provider as compared to an azurerm provider? To answer that question, concept-wise it's the same, but we just need to take care of the specific AWS resource/service arguments supported. Thus, learning about Terraform modules for AWS shouldn't be a big deal for you. We should be able to easily draft AWS modules and consume them for infrastructure provisioning in AWS. Let's try to understand how we can write a module for AWS. To explain this, we have taken an example of a VPC with a subnet. We have written modules and published them into our GitHub repository at https://github.com/PacktPublishing/HashiCorp-Infrastructure-Automation-Certification-Guide/tree/master/chapter7/aws/aws-vpc-subnet-module.
This is a list of the files that have been placed into the aws folder of our GitHub repository:
inmishrar@terraform-lab-vm:~/HashiCorp-Infrastructure-Automation-Certification-Guide/chapter7/aws# tree
.
├── aws-vpc-subnet-module
│ ├── VERSION
│ ├── main.tf
│ ├── outputs.tf
│ └── variables.tf
└── aws-vpc-subnet-module-use-case
├── main.tf
├── outputs.tf
├── providers.tf
├── terraform.tfvars
└── variables.tf
2 directories, 9 files
Let's discuss how we have written that module. In the main.tf file, we have placed the resource code block of the VPC and subnet that's been taken from https://registry.terraform.io/providers/hashicorp/aws/latest/docs/resources/vpc and https://registry.terraform.io/providers/hashicorp/aws/latest/docs/resources/subnet. You can get the following code from our GitHub repository:
resource "aws_vpc" "terraform-vpc" {
cidr_block = var.cidr_block
instance_tenancy = "default"
tags = {
Name = var.vpc_name
}
}
resource "aws_subnet" "terraform-subnet" {
vpc_id = aws_vpc.terraform-vpc.id
cidr_block = cidrsubnet(var.cidr_block, 8, 1)
tags = {
Name = var.subnet_name
}
}
In variables.tf, we need to ensure that we have declared all the input variables. We have defined the following code block, which you can copy from our GitHub repository:
variable "vpc_name" {
type = string
description = "vpc name"
}
variable "cidr_block" {
type = string
description = "address space of the vpc"
default = "10.0.0.0/16"
}
variable "subnet_name" {
type = string
description = "subnet name"
}
In outputs.tf, you see the output name and its respective values that are coming from the attribute that can be exported from the VPC resource (that is, https://registry.terraform.io/providers/hashicorp/aws/latest/docs/resources/vpc). We have defined the following code block; you can define an attribute that can be exported accordingly:
output "vpc_id" {
value = aws_vpc.terraform-vpc.id
}
output "vpc_cidr_block" {
value = aws_vpc.terraform-vpc.cidr_block
}
All this code helped us to develop a module named vpc with subnet and publish that module to our GitHub repository. Now, you may be wondering how we can consume this published module. To understand this, we have defined the next code block.
In our main.tf file, we need to write a small line of code that has all the variables as arguments that have been defined while writing the module, as follows:
module "terraform-aws-vpc" {
source = "github.com/PacktPublishing/HashiCorp-Infrastructure-Automation-Certification-Guide.git//chapter7/aws/aws-vpc-subnet-module?ref=v1.0.0"
vpc_name = var.vpc_name
cidr_block = var.cidr_block
subnet_name = var.subnet_name
}
Here, in our main.tf file, we mentioned source, which is pointing to our GitHub repository and having a version number defined using ref, and which we created as a release/tag to our GitHub repository, as you can see in the following screenshot. This will help us to download a specific version of the module:

Figure 7.3 – GitHub release v1.0.0
In variables.tf, we define the following code block:
variable "vpc_name" {
type = string
description = "vpc name"
}
variable "cidr_block" {
type = string
description = "address space of the vpc"
default = "10.0.0.0/16"
}
variable "subnet_name" {
type = string
description = "subnet name"
}
variable "region" {
type = string
description = "provide region where you want to deploy resources"
}
In the following code block, you see that it has almost the same variables that were defined while creating the module, to make this easy for you to understand. As you can see, there is one variable named region that we have defined in the providers.tf file:
terraform {
required_version = ">= 1.0"
required_providers {
aws = {
source = "hashicorp/aws"
version = "~> 3.0"
}
}
}
provider "aws" {
region = var.region
}
Finally, we have taken all the values of the defined variables from the terraform.tfvars file, as illustrated in the following code snippet:
subnet_name = "Terraform-aws-subnet"
vpc_name = "Terraform-aws-vpc"
cidr_block = "10.0.0.0/16"
region = "us-east-1"
To get output from the module, we have defined an outputs.tf file that contains the following code:
output "vpc_id" {
value = module.terraform-aws-vpc.vpc_id
}
output "vpc_cidr_block" {
value = module.terraform-aws-vpc.vpc_cidr_block
}
When you execute terraform init, you can see the following activities have been performed by the Terraform tool, and it clearly shows that it has downloaded the module from our GitHub repository:
$terraform init
Initializing modules...
Downloading github.com/PacktPublishing/HashiCorp-Infrastructure-Automation-Certification-Guide.git?ref=v1.0.0 for terraform-aws-vpc...
- terraform-aws-vpc in .terraformmodules erraform-aws-vpcchapter7awsaws-vpc-subnet-module
Initializing the backend...
Initializing provider plugins...
- Finding hashicorp/aws versions matching "~> 3.0"...
- Installing hashicorp/aws v3.22.0...
- Installed hashicorp/aws v3.22.0 (signed by HashiCorp)
any changes that are required for your infrastructure. All Terraform commands should now work.
If you ever set or change modules or backend configuration for Terraform, rerun this command to reinitialize your working directory. If you forget, other commands will detect it and remind you to do so if necessary.
After executing terraform plan and terraform apply, we can see the following output that we have defined in the outputs.tf file:
Outputs:
vpc_cidr_block = 10.0.0.0/16
vpc_id = vpc-0636e37e2a87b6d5a
From the AWS Console, we can see that a VPC with subnet got created, as shown in the following screenshot:

Figure 7.4 – AWS resources
From this section, you should have understood how to write a module for AWS, and along with that, you should have learned how modules can be consumed in your day-to-day infrastructure deployment. Let's try to use this knowledge and see how we can write a module for GCP and provision our infrastructure using that module in GCP.
Writing Terraform modules for GCP
We now have a fair understanding of writing modules for AWS and Azure. Now, we have a question for you: What are your thoughts regarding Terraform modules for GCP? Will there be any difference as compared to AWS and Azure modules? If you are thinking that writing Terraform modules for GCP would be difficult and different from your previous experience with AWS and Azure, then you are wrong, as you will able to use this previous learning. Let's try to write a module for GCP. To explain this, we have taken a GCP resource named google cloud storage bucket. We have written all the required Terraform code and placed it in our GitHub repository (that is, https://github.com/PacktPublishing/HashiCorp-Infrastructure-Automation-Certification-Guide/tree/master/chapter7/gcp).
Here is a list of files that have been placed under the gcp folder of our GitHub repository:
inmishrar@terraform-lab-vm:~/HashiCorp-Infrastructure-Automation-Certification-Guide/chapter7/gcp# tree
.
├── gcp-storage-module
│ ├── main.tf
│ ├── outputs.tf
│ └── variables.tf
└── gcp-storage-module-use-case
├── main.tf
├── outputs.tf
├── providers.tf
├── terraform-lab-project-001c988dafca.json
├── terraform.tfvars
└── variables.tf
2 directories, 9 files
While writing the GCP storage module, we created three files: main.tf, outputs.tf, and variables.tf.
In the main.tf file, the following defined code is present:
resource "google_storage_bucket" "gcp-stg" {
name = var.gcp_stg_name
location = var.gcp_location
force_destroy = var.force_destroy
storage_class = var.storage_class
project = var.project
labels = var.labels
versioning {
enabled = true
}
}
We define most of the values as a variable so that the user can provide input variable values in their own way, and this increases the consumption of the Terraform module.
Next, we declare all the variables in the variables.tf file, as follows:
variable "gcp_stg_name" {
type = string
description = "name of the GCP storage"
}
variable "gcp_location" {
type = string
description = "name of the location"
}
variable "force_destroy" {
type = bool
description = "provide whether true or false"
default = true
}
variable "storage_class" {
type = string
description = "Provide Storage Class and Supported values include: MULTI_REGIONAL, REGIONAL, NEARLINE, COLDLINE, ARCHIVE"
}
variable "project" {
type = string
description = "provide project ID"
}
variable "labels" {
type = map
description = "provide name of the labels"
}
Once the Google storage bucket gets created, we need to see its output, so the following code is present in the outputs.tf file:
output "gcs_self_link" {
value = google_storage_bucket.gcp-stg.self_link
}
output "gcs_url" {
value = google_storage_bucket.gcp-stg.url
}
output "gcs_name" {
value = google_storage_bucket.gcp-stg.name
}
So, after writing the module and publishing it on our GitHub repository, we created a release/tag (that is, v2.0.0), which you can see in the following screenshot:

Figure 7.5 – GitHub release v2.0.0
To consume the published module, you can directly take it from our GitHub repository; we won't discuss the code here. Just after that, you can run terraform init, which will provide you a complete insight into all activities Terraform is performing. The code is shown in the following snippet:
$terraform init
Initializing modules...
Downloading github.com/PacktPublishing/HashiCorp-Infrastructure-Automation-Certification-Guide.git?ref=v2.0.0 for terraform-gcp-gcs...
- terraform-gcp-gcs in .terraformmodules erraform-gcp-gcschapter7gcpgcp-storage-module
Initializing the backend...
Initializing provider plugins...
- Finding hashicorp/google versions matching "~> 3.0"...
- Installing hashicorp/google v3.51.0...
- Installed hashicorp/google v3.51.0 (signed by HashiCorp)
Terraform has been successfully initialized!
In the sequence following the Terraform workflow, you can run the terraform plan and terraform apply commands. This will provision the Google storage bucket and show us the following output, which we mentioned in our outputs.tf file:
Outputs:
gcs_name = gcpstg23423
gcs_self_link = https://www.googleapis.com/storage/v1/b/gcpstg23423
gcs_url = gs://gcpstg23423
We can confirm by checking the Google Cloud Console that a Google storage bucket got created, as you can see in the following screenshot:

Figure 7.6 – Google Cloud resources
Important note
To execute all Terraform code specific to GCP, you need to have authentication to GCP in place—this has been already discussed in Chapter 5, Terraform CLI. We published our Google service account credential file on GitHub just for demonstration purposes so that you can see that you need to have a credential file to authenticate Terraform to the GCP cloud platform. It is recommended that you store this credential file in your local system or in environment variables—never push/publish any GCP credential file to a GitHub project.
From this section, we learned about writing Terraform module code for Google Cloud, how it can be published on GitHub, and how effectively we can consume it according to our requirements. We also understood how a specific version of a module can be called by defining a source in the module code block. Using this created GCP module, we managed to deploy GCS. Similarly, we can use this knowledge to write other GCP modules and get them consumed according to our requirements.
What if we want to draft a module and make it available to everyone by contributing and getting our modules published to Terraform Registry? We are going to explain this concept in our next section.
Publishing Terraform modules
We have already learned how to publish Terraform modules to a GitHub repository specific to your project. How about if you want to contribute to the Terraform community? For that, HashiCorp provides you with an option of publishing your well-written code to Terraform Registry.
Anyone can write a module and get it published to Terraform Registry. Terraform Registry supports versioning and generates documentation, and you can even browse all the version history. Always remember to try to write more generic modules so that they are reusable. All the published public modules are managed through Git and GitHub. Writing and publishing a module is very easy and doesn't take much time; once a module gets published, you can get it updated by pushing the updated code with the respective Git tag following proper semantic versioning (that is, either v1.03 or 0.6.0).
Key requirements
To publish a module to Terraform Registry, the following key requirements should be in place:
- GitHub: The module must be available on GitHub as a public repository.
- Named: Naming of the published module should be done properly. It must follow a prescribed syntax (that is, terraform-<PROVIDER>-<NAME>). Examples of this are terraform-google-storage-bucket or terraform-aws-ec2-instance.
- Repository description: A simple one-line description of the GitHub repository is needed because this is used to populate a short description of the module.
- Standard module structure: The module you are publishing should adhere to the standard structure of a module. This will allow the registry to generate documentation, track resource usage, parse submodules and examples, and more.
- x.y.z tags for releases: A published module needs to have proper versioning, which is done using release tags. The Terraform Registry is able to identify specific versions of modules through a release tag. Release tags should follow semantic versioning (that is, v1.0.0 or simply 0.5.0). You can define them either way.
Publishing a module
After writing a module by following the requirements mentioned earlier, you can visit https://registry.terraform.io/ and select the publish module option, which will redirect you to the sign-in page, where you can log in with your GitHub account. If you don't have a GitHub account, then you will be required to sign up for one. There is no other option to log in to Terraform Registry, as this is currently only allowed from GitHub. Once you are logged in, it will ask you to select a specific module that has a proper naming convention, as you can see in the following screenshot:

Figure 7.7 – Select a GitHub repository
After selecting a specific repository on GitHub, you can click on PUBLISH MODULE. Your module will then shortly get published and will be available for use, provided your written modules have followed the correct sort of formatting. The published module will be visible to you on Terraform Registry, as shown in the following screenshot. For your understanding, we have shown a screenshot of the AWS VPC module. Your published module name will vary, depending totally upon the module name and provider:
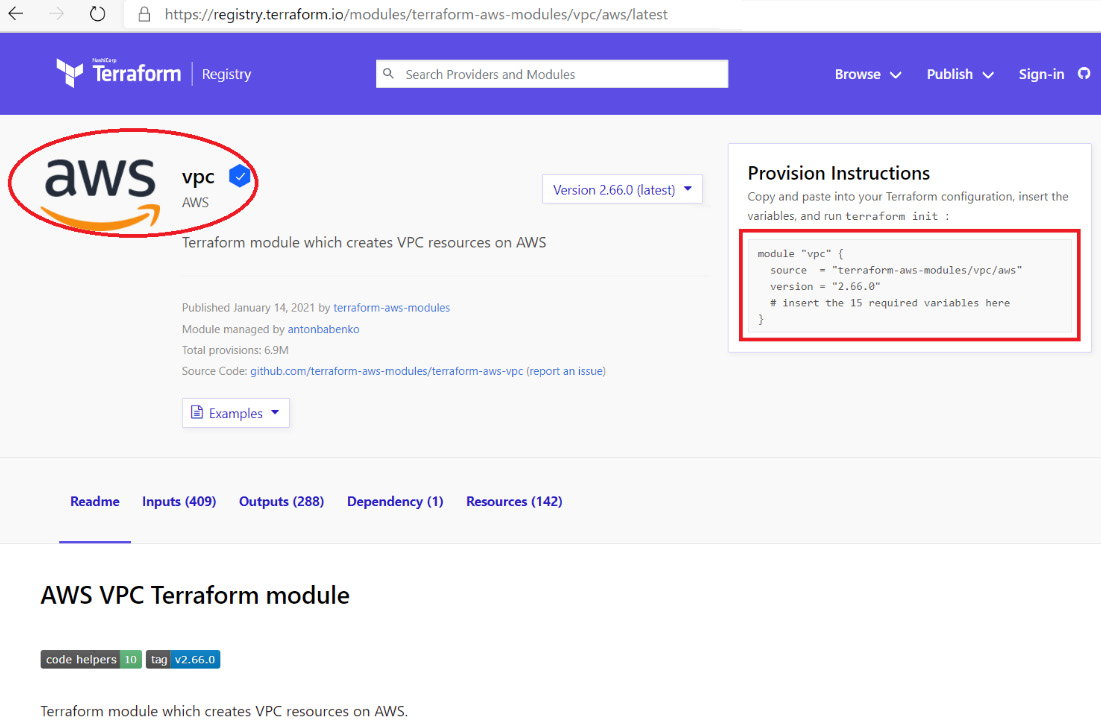
Figure 7.8 – Terraform published module
From this section, you will have got an idea of how you can draft a module and get it published to Terraform Registry. This is one way you can contribute to the Terraform open source community.
Summary
From this complete chapter, you have gained an understanding of Terraform modules and the different arguments and meta-arguments that are supported by Terraform modules, such as depends_on, providers, source, and version. Moving further on, we also discussed how you can write Terraform modules for Azure, AWS, and GCP. We then discussed how they can be consumed, and finally, we discussed how you can contribute to the Terraform community by writing and publishing your modules to Terraform Registry. With this knowledge, you will be able to draft a Terraform module and consume it for the deployment or manageability of an enterprise infrastructure.
In our next chapter, we are going to discuss Terraform configuration files and which industry best practices can be followed while writing Terraform configuration files, covering all three cloud providers, Azure, AWS, and GCP.
Questions
The answers to the following questions can be found in the Assessments section at the end of this book:
- Which of the following source definitions for a module is incorrect?
A. ../../terraform-module
B. github.com/terraform-module
C. github.com/terraform-module
D. bitbucket.com/terraform-module
- You have published an AWS Elastic Compute Cloud (EC2) instance module to the Bitbucket repository. What will happen when you run the terraform init command?
A. It downloads the EC2 module to the local directory.
B. It deletes the EC2 module from the repository.
C. It updates the version of the EC2 module.
D. It moves the EC2 instance module to other subdirectories.
- What is the correct syntax for defining output from a module?
A. module.terraform-aws-vpc.vpc_id
B. terraform-aws-vpc.vpc_id
C. vpc_id
D. terraform-aws-vpc
- You are working with many developers and they are all tired of writing their Terraform Infrastructure as Code (IaC). Which of the following options would you recommend to them so that they can have reusable IaC?
A. Terraform data sources
B. Terraform locals
C. Terraform module
D. Terraform resource
- From the following defined code snippet, see if you can tell what the version of the module is:
module "servers" {
source = "./app-cluster"
servers = 5
}
Which of these options is correct?
A. 5
B. No version
C. >5
D. <5
Further reading
You can check out the following links for more information about the topics that were covered in this chapter:
- Terraform module overview: https://www.terraform.io/docs/configuration/blocks/modules/index.html
- Terraform module sources: https://www.terraform.io/docs/modules/sources.html
- Terraform module publishing: https://www.terraform.io/docs/modules/publish.html
- Terraform tutorials: https://learn.hashicorp.com/terraform?_ga=2.137479925.498906489.1609060300-1551442629.1609060300