Chapter 10: Improving Performance
Following on from what we have described since Chapter 1, Introduction to Productivity in Revit, we would like to close this journey with the same subject that we started with: improving productivity and performance by sharing the best practices when working on a BIM project using Revit.
With the combined knowledge provided across all the chapters, we now complete our objective – changing your productivity in carrying out daily tasks when working in Revit.
This chapter will provide additional best practices to improve Revit's performance and increase your productivity in carrying out daily tasks.
We will explain the best practices to manage CAD imports and views and sheets as well as other tasks to improve productivity.
This chapter will also provide information about Revit content management and additional tasks to optimize Revit's performance, including reviewing warnings and auditing Revit files.
The following topics will be covered in this chapter:
- Revit modeling best practices
- Revit content management
- Optimizing Revit's performance
- BIM 360 best practices
Revit modeling best practices
In a project, during the modeling process, it is important to always follow the best practices to avoid re-work or anything that will affect Revit's performance and cause work to be disrupted.
We will be listing some aspects to always have in the front of our minds when doing specific Revit tasks.
The following Revit modeling best practices will be covered in this section:
- CAD import best practices
- Views and sheet management
- Modeling
CAD import best practices
It is very common to import DWG files (or other CAD files) into a Revit project, but we need to control this process to avoid performance issues. When doing it, users should be aware of what might affect the model performance and what they should constantly be tracking.
CAD files can reduce Revit's performance, and the following tips and tricks can minimize those issues.
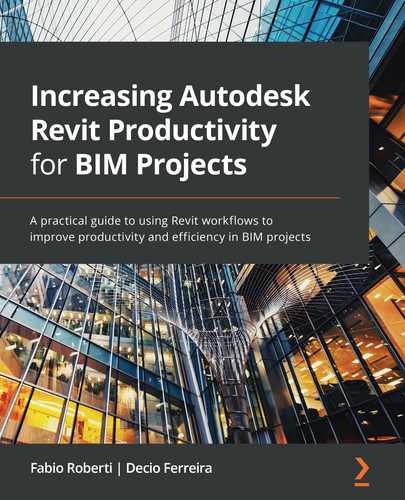
First, import and link CAD. When working with CAD formats, it's important to avoid using the Import CAD option as the file will be part of the model, and it might become challenging to identify which view the file has imported:
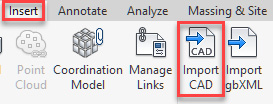
Figure 10.1 – Import CAD
Tip
We might need Revit plugins or a Dynamo script to find imported CAD files.
The following recommendations should be used to avoid reducing performance in Revit:
- When working in a worksharing environment, ensure that all imported/linked CAD files are placed in the correct workset.
- Importing CAD files must be avoided.
- Linking CAD files should be limited to a minimum.
- Before importing or linking a CAD file, ensure it is cleaned and purged and only shows what is required for the project.
- It's not recommended to have CAD files bigger than 10 MB.
- Make sure that you keep CAD files linked that are really needed.
- Ensure that all files have the correct links (links not found take longer to open, save, and synchronize a file). In Manage Links, we can find the link status.
- When working with imported and/or linked CAD files, it is essential to use Zoom Extents in AutoCAD to ensure that we don't have any elements far away from the model (if that happens, the CAD file should be edited to delete the unnecessary elements).
- Before importing and/or linking CAD files, make sure all objects in the file are using Linetype and Colour as ByLayer as this will allow editing these properties from Revit.
- Depending on the project, we recommend creating a Revit model to link all the CAD files needed.
- We should never explode a DWG file inside of a Revit project.
- When setting up CAD elements with Index Colours in the CAD software, defining a line weight during the importing process is possible. The Line Weight settings should be defined before importing and/or linking by clicking the Import Line Weights option:


Figure 10.2 – Import Line Weights settings
- When linking DWGs, use Current view only if possible. When importing a DWG into Revit, it's possible to have it as a 3D element (visible in 3D) or a 2D element (which will be visible only in the current view when imported or linked). By selecting this option, the link file will be flattened into the current view, and it will have less impact on the overall model:
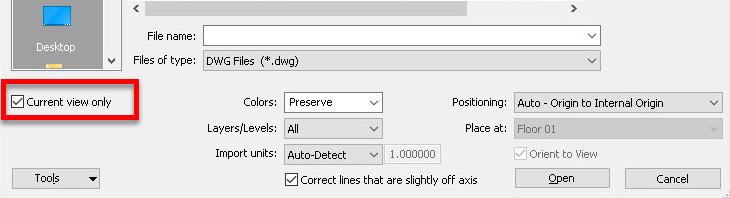
Figure 10.3 – Linking CAD format options
- CAD Import for Detail Components to create construction details. When creating Detail Items families, it is not possible to link CAD files, and we can only import CAD files. As mentioned previously, we can control the line weight before importing DWG files:

Figure 10.4 – Importing CAD files into detail item families
- In the Manage tab, we can find the Object Styles tool, which allows the user to control the CAD layers to change colors and line styles:
Figure 10.5 – Imported objects settings through object styles
Tip
It is possible to have different settings per view by accessing Visibility/Graphics Overrides, which can also be controlled via View Template.
Views and sheet management
Views and sheet management is an essential factor to keep good Revit performance. As the project develops, we need to perform tasks to minimize issues in Revit.
It is very common to create views for specific modeling tasks, and we might have many views created, which will affect Revit's performance.
The following tips and tricks help to manage views and sheets to improve performance.
Close hidden windows
When working with too many views opened, it will affect performance. It is recommended to keep the minimum number of views open. Views can be closed by accessing the View tab and clicking on Close Inactive:

Figure 10.6 – Closing inactive views
Delete unnecessary views and sheets
By deleting unnecessary views and sheets, it will improve the file size and performance.
If a Revit file has too many sheets and the overall file size can't be reduced, we may need to split the model into two volumes and divide the number of sheets present on the models to reduce the file size.
Far clip sections and elevations
When working with sections or elevations, the Far Clipping area should be minimized as required. This will improve performance as the geometry hidden by other elements in the view will not be affected when regenerating the view.
This option can be controlled in two different ways:
- When doing the section or elevation on a floor plan by controlling the depth when the section or elevation symbol is selected:

Figure 10.7 – Section view depth controllers
- In a section view, we can access the properties, change the Far Clipping settings, and define a precise Far Clip Offset value:

Figure 10.8 – Far Clipping options
View the range on floor plans
Like Far Clipping, on a floor plan, there is a parameter where we can control the view depth: View Range.
View Range controls the view depth, affecting how many elements will be displayed and, consequently, affecting performance:
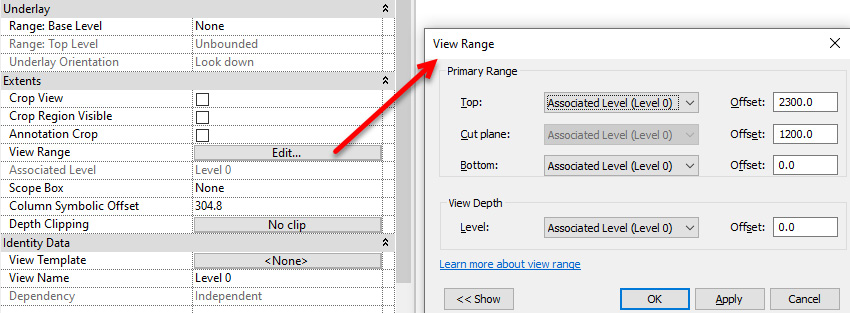
Figure 10.9 – View Range in floor plans
By clicking the << Show button, it is possible to see all the parameters that can be configured:

Figure 10.10 – View Range options
Section boxes in 3D views
When working on a 3D view, a section box will reduce the displayed area, improving performance.
To activate it, in the Properties palette, tick the Section Box parameter, and a section box will become visible:

Figure 10.11 – Section box
After selecting, it is possible to change the section box shape with the arrows to cut what is not needed:
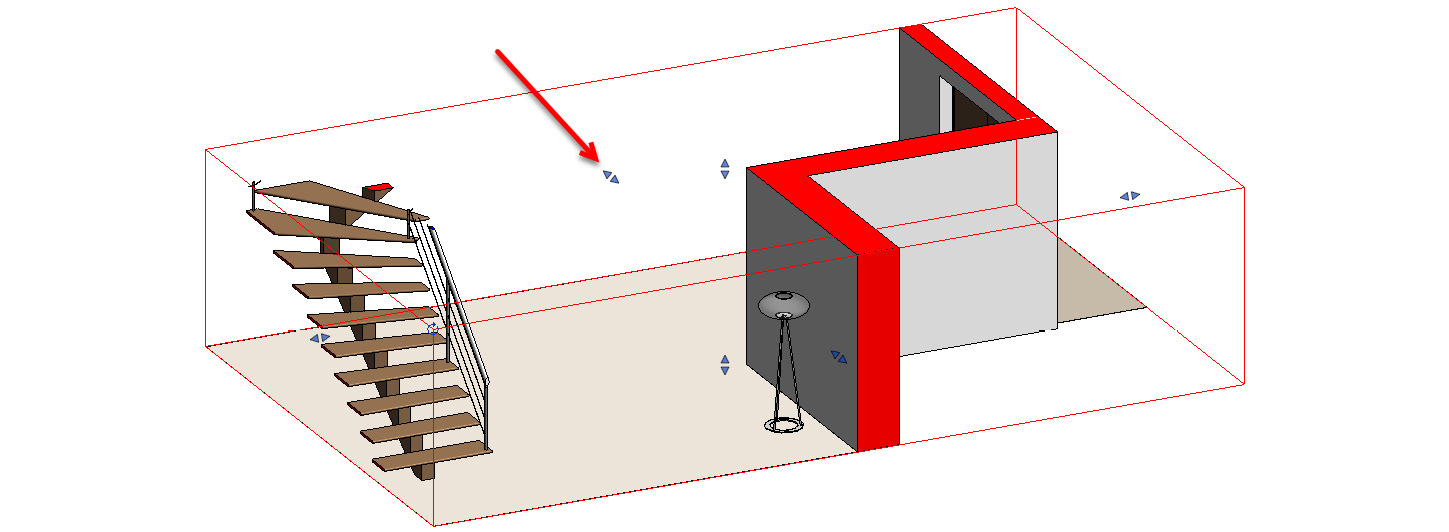
Figure 10.12 – Manipulating a section box
Tip
If Section Box is not visible, make sure that the category is visible.
A quick way to create a section box aligned to a specific view is to right-click the view cube and, under Orient to View, select which view you want to align and make a 3D view:
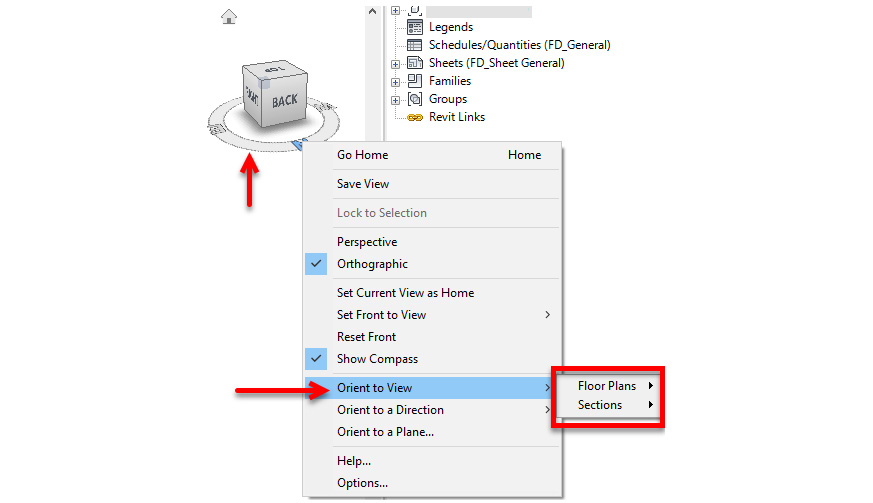
Figure 10.13 – Aligning a 3D view to a specific view
After selecting the specific view, we need to rotate the 3D view to visualize the section box.
Another quick way to create a section box on a specific area or object is by using the Selection Box tool:
- Go to a view and select which elements you want to see on a 3D view.
- In the Modify tab, click Selection Box (shortcut BX):

Figure 10.14 – The Selection Box feature
- Revit creates a 3D view with the elements selected in the section box:

Figure 10.15 – 3D view with a section box defined
Turn on/off unrequired categories
Turning off unrequired categories on a specific view will improve regenerating the views when opening or doing any updates. It is recommended to access the Visibility/Graphics Overrides parameter (shortcut VV or VG) and switch it to off:

Figure 10.16 – Visibility/Graphics Overrides from a view
When we need to control more than one view with the same visibility and graphics, it is recommended to use view templates.
View templates can be assigned to a specific view by accessing the Properties palette and changing the View Template setting:
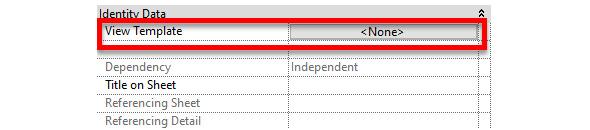
Figure 10.17 – Defining a view template to the view
Tip
View templates can be controlled by accessing the View tab | View Templates.
It is not recommended to hide individual elements in views. By proceeding this way, it will be difficult to find those elements. Users should always use filters in view templates to hide them, if possible.
When we have a view template assigned, it is possible to use the Temporary View Properties options as this will allow users to change the visibility/graphics settings without removing the view template assigned and then restore them back to what was defined before.
Let's follow these steps for a better understanding of how this works:
- Open a view that has a view template assigned.
- From the View Control bar, click on Temporary View Properties and select Enable Temporary View Properties:
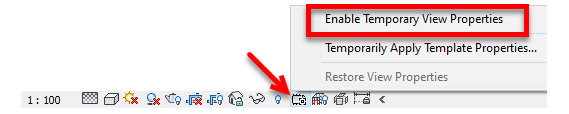
Figure 10.18 – Enabling temporary view properties
- A purple rectangle will be visible wrapping the view, informing us that Temporary View Properties is on:
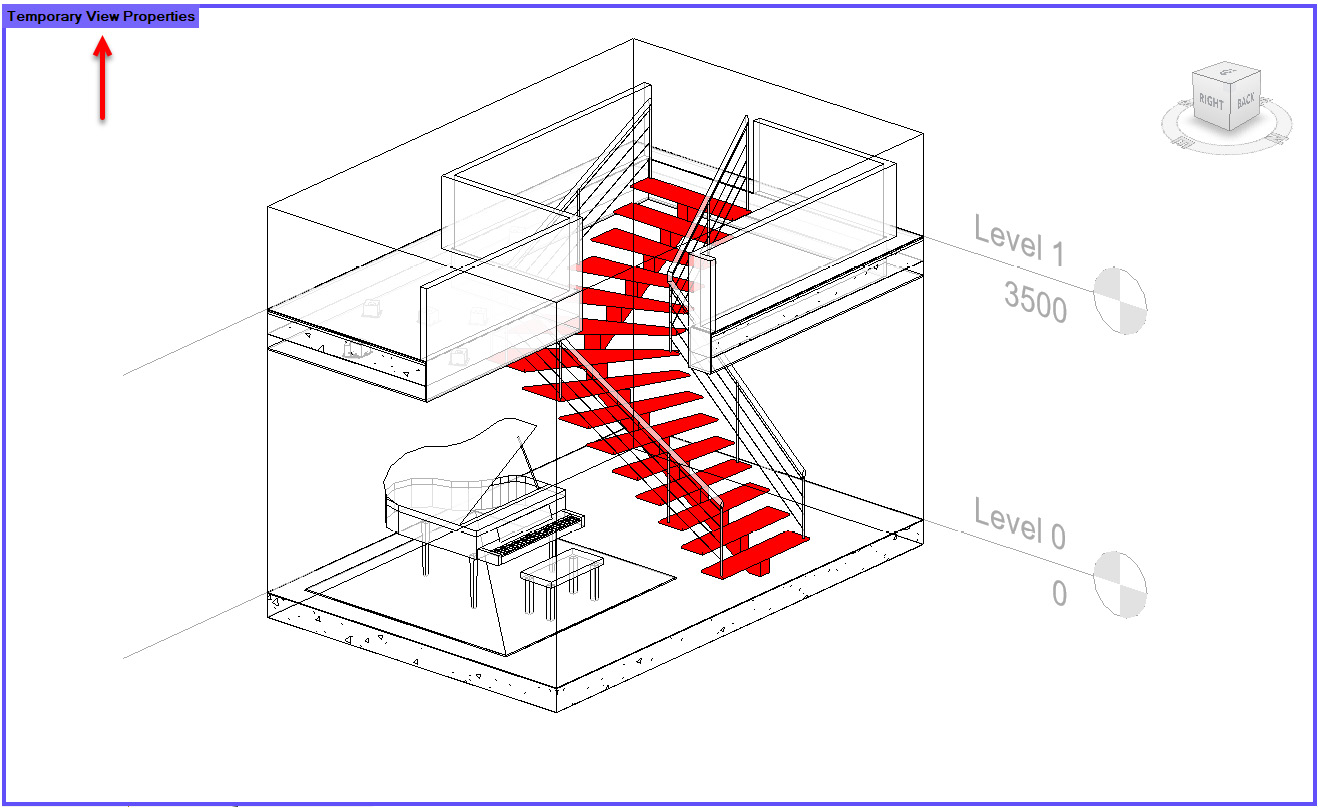
Figure 10.19 – Temporary View Properties on
- Access to all View Properties as needed.
- To restore it to as it was, under the Temporary View Properties option, click Restore View Properties.
Graphic display options
When modeling, the detail level assigned to the view will affect the performance as Revit might need to show/hide more detail to be viewed and consequently need more resources to regenerate any change or update:

Figure 10.20 – Detail level assigned to a view
It is recommended to use Coarse views when modeling.
Tip
This setting might be assigned to a view template, in which case the option to change will be disabled.
The same should be considered regarding shadows as they should be switched off if not required:

Figure 10.21 – Switching on/off shadows
Another important setting related to Display View Settings is the visual style assigned, where the simpler, the better:

Figure 10.22 – Visual style definitions
Raster images
Raster images can affect Revit's performance, and we can find them in two different ways:
- From the Insert tab, by using the Link Image or Import Image option:

Figure 10.23 – Inserting or linking raster images
- When rendering a view in Revit and the view is saved in the browser:
.jpg)
Figure 10.24 – Saving a render as an image to the project browser
Whenever you have imported raster images by using any of the referred ways, consider the following recommendations:
- Keep only the images needed and remove the others.
- Ensure the images have a moderate resolution (a smaller and simplified image should be considered).
By accessing Manage Links under the Insert tab, it is possible to control what is linked:

Figure 10.25 – Manage Links – images
Set the starting view as a 2D view
When opening the model, it is recommended to keep a simpler view defined as a splash screen as this will make the opening process easier and faster.
The starting view can be defined in the Manage tab, under Manage Project; click Starting View:

Figure 10.26 – Defining a starting view
Revit will show a list of all the views available in the model. Select the 2D view created to the splash screen, which contains information about the project:
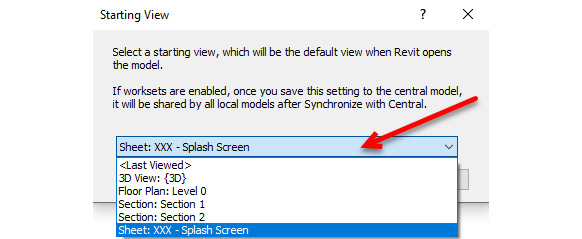
Figure 10.27 – Selecting a starting view
It is recommended to use a view where we can have some relevant project information, such as the following:
- Project name
- Client name
- Design consultant name
- Design discipline
- Project information manager
- Task information manager
- Suitable code and description
This will allow all users to have an overview of the project information.
Modeling
In the previous chapters, we already learned about many aspects of improving productivity and performance in Revit. When modeling, there are many factors that users need to be aware of, and we have highlighted those that will affect performance and productivity the most as follows.
Delete unused design options
In the design process, it is rather common to develop more than one design option. These design options can be in a specific area, the entire cladding, or other significant project areas.
Many design options will affect Revit's performance, and they will slow down the file. We recommend the following tasks to avoid reduced performance:
- Consider using separate files to design different design options, which will be important if the option represents a large area of the project.
- Different design options might be placed in different worksets.
- Preserve design options if they are still active in the project.
- When exchanging models with consultants, make sure the design options are removed or keep only the required options.
- When deleting design options, ensure all views related to the option are removed.
As a good practice, design options need to be checked and controlled.
Purge
Purging the model is crucial for dropping the file size to the minimum possible. As a reference, a single model should be a maximum of around 250 MB/300 MB.
By running the purge command, Revit will delete unused content. To access the command, take the following steps.
- Under Manage, click on Purge Unused:

Figure 10.28 – Purge Unused
- Click Check None.
- From the purge list, expand which categories need to be purged and tick the families and/or instances that need to be removed:
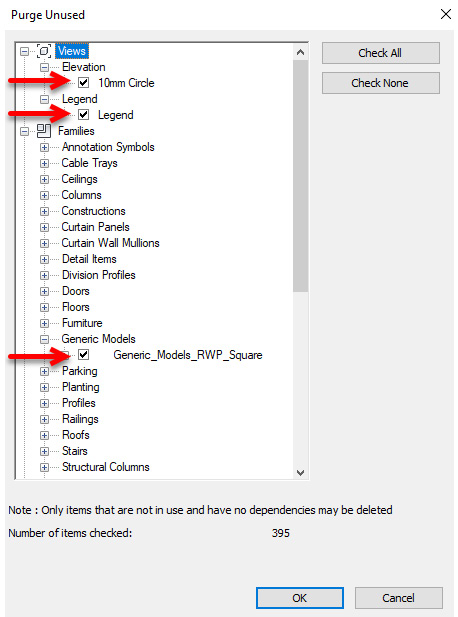
Figure 10.29 – Elements to be removed
- Click OK to start the purge process of removing the items.
This command might need to be executed more than once to purge the project completely.
Model lines
Model lines are lines that appear in the 3D space, and they are visible in all views. These lines should be avoided as they can be used by mistake on a drawing. It is recommended to use detail lines (visible only in the current view) when these lines are needed.
If a model line needs to be converted into a detail line (or the other way around), Revit has a tool to do it. By selecting Model Lines, under the Modify tool, you will see there is a feature called Convert Lines:

Figure 10.30 – Convert Lines
Depending on which line you are selecting, Revit will swap between Model Lines and Detail Lines.
To conclude, we have learned about the best practices for CAD imports, views and sheet management, and additional processes to improve performance during modeling.
In the next section, we will learn about the best practices related to Revit content creation.
Revit content management
Several recommendations should be considered when developing or using families to keep Revit models lower in size and improve performance.
In Chapter 1, Introduction to Productivity in Revit, we provided recommendations for family creation, but there are others that we would like to highlight here.
Although we should follow these recommendations, sometimes we don't follow them 100% during projects. If not, we should use it in a moderated way.
Third-party families
Revit families from the suppliers might be developed with lots of formulas and with many details in the geometry.
Large families' files and multiple instances placed in the project will affect the performance and slow down Revit.
The following screenshot shows a Revit family with many formulas and parameters:
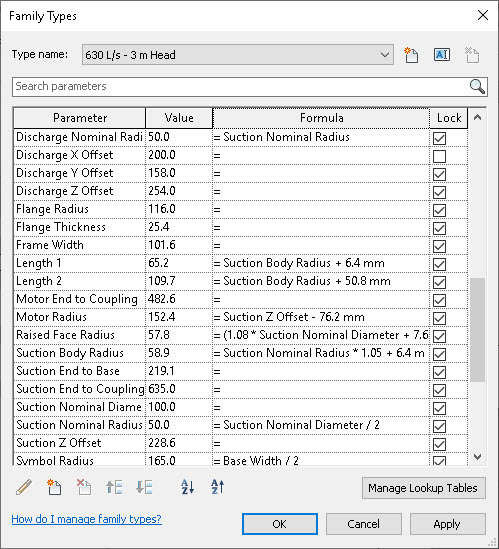
Figure 10.31 – Formulas used in a family
Along with this problem, it may have imported different CAD formats with too much detail, which is unnecessary in certain project stages, and some of these details are not even visible in drawings.
Overmodeling families
This is a widespread problem as suppliers develop their families with too many details that are not useful for most of the design stages, such as screws and bolts.
The following screenshot shows a family with unnecessary details for most of the design stages:
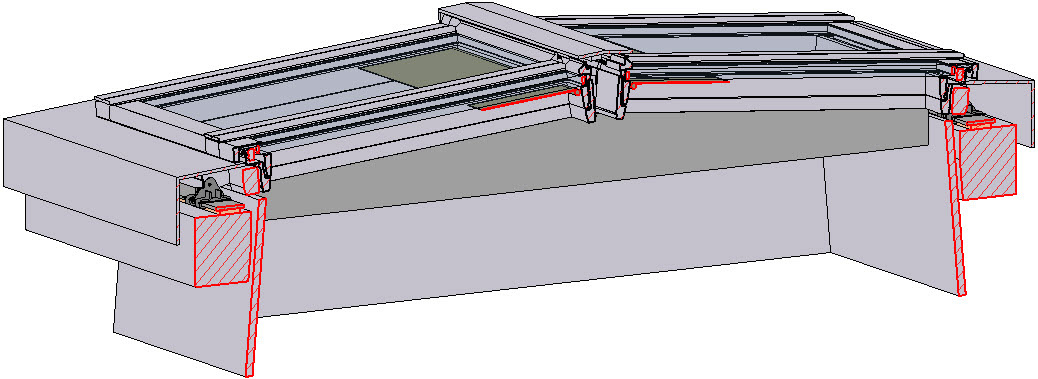
Figure 10.32 – Skylight over-modeled
Frequently, they are over-modeled, and the family needs to be simplified as a single file can have 5 MB, 10 MB, or even 50 MB (depending on formulas, CAD imports, detailing, and nested families).
As a reminder from Chapter 1, Introduction to Productivity in Revit, Revit families should follow these file sizes:
- A Revit family file from 250 KB to 500 KB indicates a suitable file size.
- A Revit family file over 1 MB (1,000 KB) should be reviewed to reduce the size if possible.
- A Revit family file over 2 MB (2,000 KB) should definitely be reviewed.
- A nested family file size tends to be bigger, so we need to check the large family files. It is not recommended to have more than two levels of nested families.
CAD formats imported into families
All imports should be reduced to the minimum as they will directly affect the performance. Some of these geometries can be created with meshes or fabrication software such as Inventor or SolidWorks (these models are generally over-detailed as they have all the information for fabrication).
Avoiding complex shape modeling
Complex geometries created from the Blends, Sweeps, and Sweep Blends commands may affect the project performance and the family file sizes. If possible, use them in a moderated way.
Defining element visibility settings
When creating a family, it´s always recommended to define a visibility setting on the geometry, avoiding the family being over-modeled on a specific view. This can be done by assigning the Coarse, Medium, and Fine levels of detail:

Figure 10.33 – Defining element visibility settings on a family
On this window, it is also possible to set all these detail levels on any 3D view type: Floorplans, RCPs, Elevations, Sections, and 3D Views.
Flexing families
When developing a Revit family, it is highly recommended to always flex the family before loading it into a project. With this, users will ensure that all parameters added into the geometry will behave as expected, and it will not cause the family to break:

Figure 10.34 – Flexing families by changing the parameters
It is recommended to do the same with Materials. It will not change the size of the geometry, but it will change the visuals.
To test whether all the geometry has a defined view detail, depending on the family types defined (dimensions, visibility), and as per the detail level applied, follow these steps:
- Under the View Control bar, click on Preview Visibility.
- Select Preview Visibility On:

Figure 10.35 – Preview Visibility options
- Flex the family as needed.
After flexing the family, users can set the preview visibility as off or simply save and close the family.
To conclude, we have learned about the Revit content management best practices and essential aspects to maintain Revit's performance by keeping the file size smaller.
In the next section, we will learn about customizing Revit shortcuts and other topics to optimize Revit's performance.
Optimizing Revit's performance
Although the projects are getting more and more complex, the technology is not advancing at the same rate, so we have to act accordingly to improve performance.
In this section, we will learn about other aspects to optimize Revit's performance, which includes the following items:
- Keyboard shortcuts
- Warnings
- Compacting Revit files
- Auditing Revit files
- Disabling Revit plugins
Keyboard shortcuts
Using keyboard shortcuts will speed up the user's productivity as it is possible to customize specific shortcuts to the most-used commands. The same tool can have more than one shortcut.
Adding shortcuts
Let's learn how to create new shortcuts using the following steps:
- From the View tab, under User Interface, click on Keyboard Shortcuts:
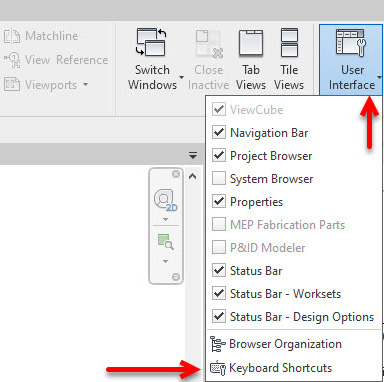
Figure 10.36 – Keyboard Shortcuts
Tip
It is possible to access the Keyboard Shortcuts window by typing KS.
- Using the Search bar and the Filter pulldown, select the command you want to assign a new shortcut.
- Under Press new keys, add the shortcut and press Assign:
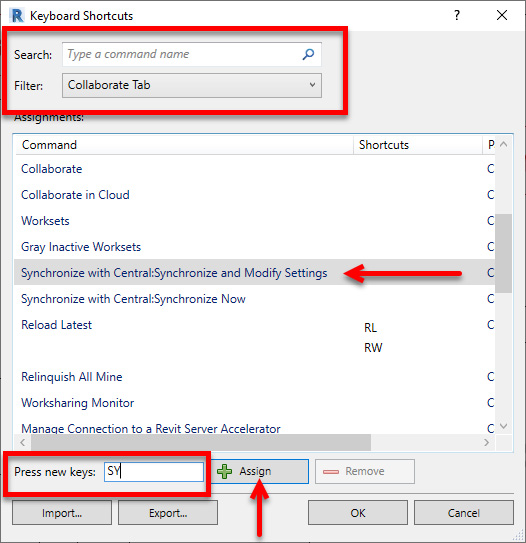
Figure 10.37 – Keyboard shortcut assignment
- After assigning all the shortcuts needed, click OK.
When a shortcut is assigned to a specific tool, by hovering the mouse over each tool in the ribbon, a tooltip pops up with the assigned shortcut:
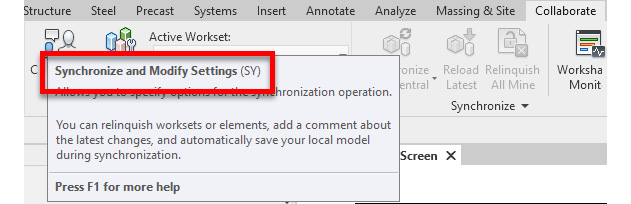
Figure 10.38 – Keyboard shortcut tooltip
Removing shortcuts
The process of removing shortcuts is similar, as explained before. To remove any shortcut, take the following steps:
- Select the shortcut to be removed.
- Select Remove:
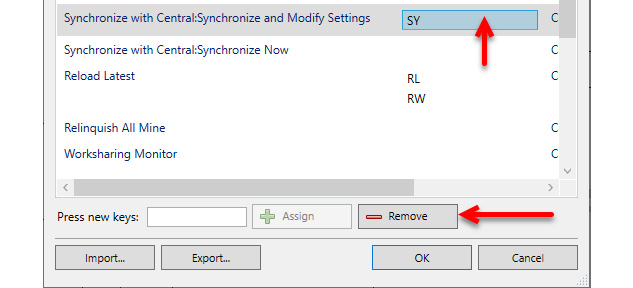
Figure 10.39 – Removing a keyboard shortcut
Exporting/importing shortcuts
When assigning different shortcuts to tools, it is recommended to export the settings to ensure that they can be used on any other computer, or even if we need to import them in future Revit versions.
In the previous screenshot, we can click the Import… or Export… buttons to import or export an .xml file with all the shortcuts.
When a shortcut is created, the .xml file will be saved under the C:ProgramDataAutodeskRVT 2021UserDataCache folder.
Warnings
When working in Revit, it is common to have Revit warnings of multiple types. Some of them can be ignored, but others are more likely to cause performance issues and should be fixed as much as possible.
A good strategy is to classify the Revit warnings by priorities and define which warning should be resolved first.
We could classify the Revit warnings by the following terms:
- High-priority
- Medium-priority
- Low-priority
High-priority
This will include the following warnings:
- There are identical instances in the same place, which means that we have families on top of each other.
- The actual run width of one or more runs is less than the minimum run width specified in the stair type.
- The actual tread depth of the stair is less than the minimum tread depth specified in the stair type.
- Multiple rooms are in the same enclosed area.
- Elements have duplicated type mark values.
- Geometry is imported that extends greater than 20 miles (33 km).
Medium-priority
This will include the following warnings:
- Highlighted walls overlap. One of them may be ignored when Revit finds room boundaries.
- Insert conflicts with joined walls.
- Rooms are not in a properly enclosed region.
- Room tag is outside of its room.
Low-priority
This will include the following warnings:
- Wall and a room separation line overlapping.
- Room separation lines overlapping.
- A line in a sketch is slightly off axis and may cause inaccuracies.
- A line is slightly off axis and may cause inaccuracies.
- Highlighted elements are joined but do not intersect.
Warnings are related to some actions or modeling issues that can occur during the model development. For example, if a room separation line is modeled on top of an existing one, Revit pops up a warning informing the user:

Figure 10.40 – Revit warning
To access all warnings in the model, follow these steps:
- From the Manage tab, click Warnings:

Figure 10.41 – Warnings saved in the model
- By expanding the warnings, it is possible to confirm how many we have in the model:
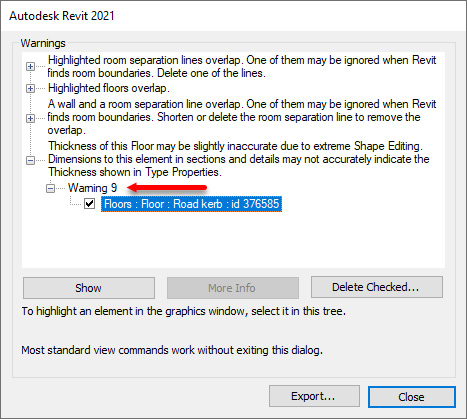
Figure 10.42 – Number of warnings saved in the model
- When selecting a warning, it's possible to select the following options:
- Show: Allows Revit to open views to expose the issue related to the warning
- More Info: Allows users to get more information about the warning
- Delete Checked…: Allows users to delete the element selected that is related to the issue
- Export…: Enables users to export the list of all warnings to an Excel spreadsheet
By accessing the Warnings window, apart from deleting one of the warning elements, it's not possible to fix it automatically. To do so, users need to close the window and then resolve the warning manual as required.
- Click Close to close the window.
In the warning dialog box, we can find the object ID that can be used to find the warning:

Figure 10.43 – Selecting elements by ID
Warnings should be revised regularly and fixed.
Compacting a Revit file
When saving a Revit model, it is possible to compact the file to reduce the size as this re-writes the entire file. It will try to remove old and obsolete parts, which leads to reducing the file size.
Follow these steps to compact a file:
- Go to File and select Save As.
- Under Save As, click Project:
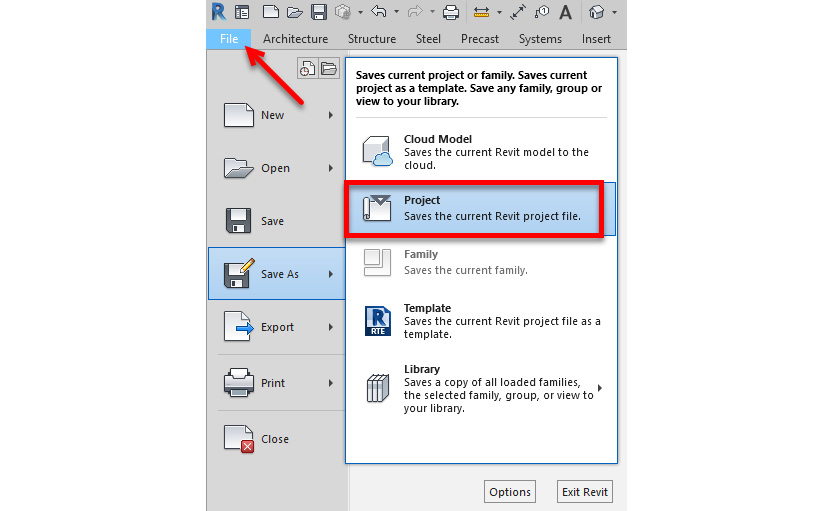
Figure 10.44 – Saving a Revit project
- Click Options….
- Under File Save Options, tick Compact File:
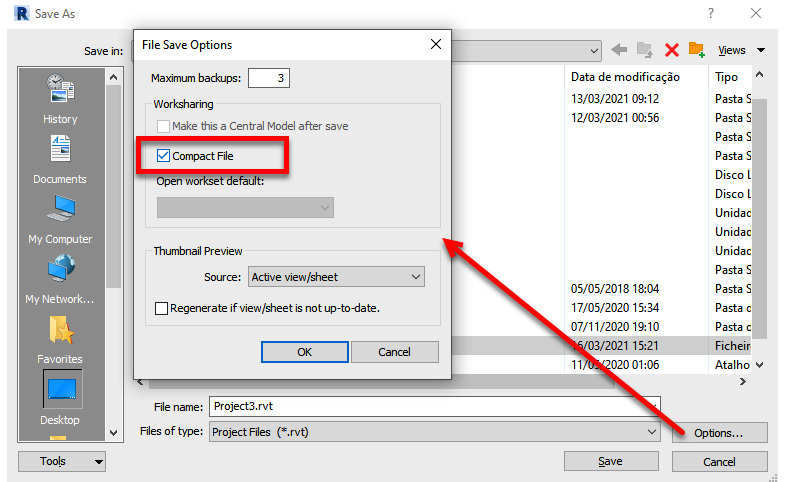
Figure 10.45 – The Compact File option
- Click OK.
- Click Save.
If we are working with Revit files in a worksharing environment (central and local files), we can also compact the Revit file. In the synchronization process, we can compact the file:
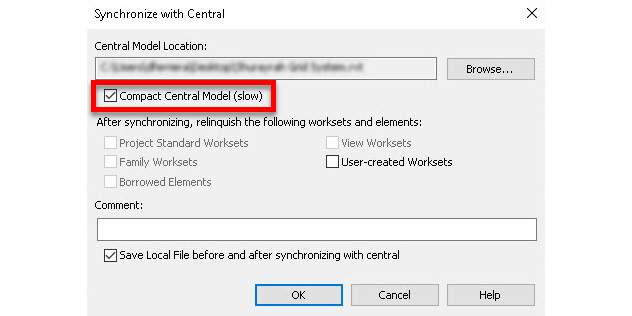
Figure 10.46 – Compact file option
Auditing a Revit file
The audit function allows maintaining the Revit model's health as it will try to fix some issues within the model. It will scan, detect, and fix corrupted elements or information in the model. This audit process can be done with families as well.
We recommend doing an audit of a model every week. If we upgrade the Revit model to a new Revit version, we should run the audit process.
The process of doing an audit is silent as users don't get any feedback or report of what has been done. To start the process, follow these steps:
- Ensure the model that needs to be audited is closed.
Tip
If the model is in a worksharing environment, it is recommended to instruct all users to close the model.
- Go to File and click Open:
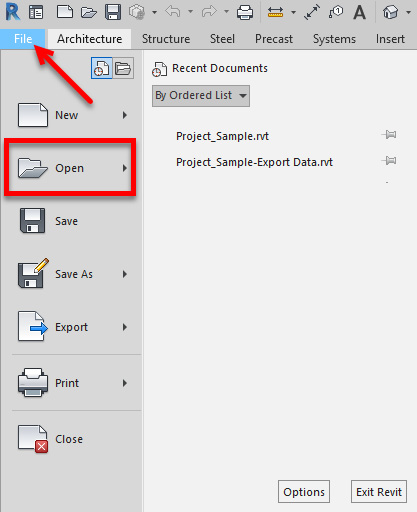
Figure 10.47 – Opening a Revit model
- Select the file to open.
- Tick the Audit option. An audit warning pops up, informing us that the operation might take long:

Figure 10.48 – Auditing a Revit model
- Click Yes to confirm to continue.
- Click Open.
Revit starts the process to open the model, which may take some time depending on the file's size and complexity.
Disabling plugins in Revit
After doing all the tasks to improve performance, it is worth checking whether the Revit plugins are affecting performance.
In Chapter 9, Enhancing Productivity with Plugins, we explained how to manage Revit plugins to install and uninstall for testing purposes.
If plugins need to be disabled, refer to Chapter 9, Enhancing Productivity with Plugins, where we went through the process of deactivating them manually or using a plugin.
It is recommended to use only plugins developed by companies certified by Autodesk.
BIM 360 best practices
BIM 360 is a cloud-based design collaboration platform developed by Autodesk, allowing project teams and all stakeholders to develop projects using a common platform.
BIM 360 is part of the Autodesk Construction Cloud, and it contains multiple modules with different features. The Autodesk Construction Cloud is a collection of applications for superior collaboration and coordination across all design, construction, and operation phases.
It integrates the following seven different modules:
- Document Management: Allows sharing, viewing, and managing all construction drawings, documents, and models on a live and accessible platform, ensuring that all documents are always accessible and updated across all design teams.
- Build: Allows capturing and sharing, viewing, and managing what's happening in the site with all stakeholders involved in the project.
- Collaborate: Allows users to automate the clash detection process and share all issues with all team members by using an integrated Issue Management workflow.
- Collaborate Pro (previously Design): Allows users to work directly with Revit (cloud worksharing), Civil 3D, and Plant 3D models stored in the cloud (Document Management) and share those models automatically by creating an Exchange package to be accepted by any of the stakeholders in the project.
- Layout: Allows users to share project information that can be used on the site by improving accuracy and saving time, speeding up execution, improving quality, and reducing errors.
- Ops: Allows users to connect BIM asset data with the model for better and more integrated facilities management.
- Plan: Allows users to produce and share production plannings using lean construction principles.
There are some best practices that users should consider:
- The internet connection should have at least a bandwidth from 5 Mbps (minimum) to 15 Mbps (performance) of upload and download.
- Set up proper views to be shared in BIM 360 for a specific purpose (view, coordination, drawing revision, and so on) and define them to be published under Publish Settings. Only the views and sheets that should be published need to be selected (by having too many views, when publishing the models, it will take more time as BIM 360 needs to create the views).
- Setting up the project hub correctly is essential to having a clear and understandable workflow in place. It's highly recommended that the setup follows ISO 19650 by defining the WIP area, shared area, published area, and archived area.
- Autodesk Desktop Connector should be used to link non-cloud shared models. (Be aware that when the models are published, BIM 360 will push all the links from Desktop Connector to the cloud or from any local server.)
- Before publishing a model, ensure that there are no unnecessary links.
- When exchanging a package, ensure that we have a proper naming convention to rename the package. It should include a suitable code referred to in ISO 19650.
To conclude, we have learned how to manage shortcuts, control Revit warnings, compact a Revit file, audit a model file, and disable Revit plugins to improve performance.
We also explained what the BIM 360 platform is and shared a list of best practices when working with BIM 360.
Summary
In this chapter, you have learned about Revit modeling best practices to improve users' productivity by managing CAD imports, managing views and sheets, and other tasks to improve productivity and manage design options, the purge process, and model lines.
We explained how to manage Revit content and perform additional tasks to improve productivity. We also learned extra tips for optimizing Revit's performance by reviewing warnings as well as compacting and auditing Revit files.
You learned about the Autodesk BIM 360 services that are part of the Autodesk Construction Cloud, which contains multiple applications for collaboration and coordination across all design, construction, and operation phases.
With this last chapter, we wrapped up the topic of workflows for improving productivity and efficiency in BIM projects using Revit. We hope that you all now have a better understanding of what should be done, checked, and fixed to optimize your daily work in Revit to produce more in less time.
This topic doesn't end here; your learning will continue depending on your project experience and also how Revit and the BIM technology develop over the years ahead.
Hey!
We're Fabio and Decio, the authors of this book. We really hope you enjoyed reading our book and found it useful for increasing your productivity and efficiency in Revit.
It would really help us (and other potential readers!) if you could leave a review on Amazon sharing your thoughts on Increasing Autodesk Revit Productivity for BIM Projects.
Go to the link below or scan the QR code to leave your review:
https://packt.link/r/1800566808

Your review will help us to understand what's worked well in this book and what could be improved upon for future editions, so it really is appreciated.
Best wishes,
