Chapter 7: Where to Go for Help
As you work through building and teaching your Canvas course, you are bound to run into questions or concerns regarding your course. In some instances, you might encounter error messages, broken links, or other problems within your course. Fortunately, Canvas has a vast number of built-in resources that you can utilize to help solve your problems. In addition, there are other resources available online or through your institution that can help you to solve problems and answer any questions you may encounter.
In this chapter, we will discuss a number of options you have, both built into Canvas or available elsewhere, in terms of getting help with Canvas should you run into trouble. Topics covered in this chapter include the following:
- Searching and using the Canvas Guides
- Reporting a problem with Canvas
- Obtaining pricing information for the use of Canvas at your institution
- Requesting a new feature for Canvas
- Finding help from your institution's tech support team
To begin, let's start with the help options that Canvas offers from within the site.
Technical requirements
To complete this chapter, you will need the following:
- A computer with internet access
- A Canvas account (see Chapter 1, Getting Started with Canvas)
Finding help within Canvas
In the Free for Teachers instance of Canvas, the most accessible place to find help within Canvas is the Help icon at the bottom of the left Global Navigation menu, as shown in the following screenshot:

Figure 7.1 – Help icon on the left Global Navigation menu
The help option of the Global Navigation menu is visible on the vast majority of pages within Canvas, with the exception of certain pages, such as the SpeedGrader. The ease of accessibility to support within Canvas allows you and your students to troubleshoot and solve your own problems quickly and easily. Clicking on this icon will open the Help pop-out menu for Canvas, which provides you with the options pictured in the following screenshot:

Figure 7.2 – Help menu
The first option suggested, Search the Canvas Guides, brings you to the hub of Canvas' online support resources. Let's begin by exploring the Canvas Guides within the Help menu and learning how to find what you need within this support resource.
Note
As mentioned throughout this book, institutions have great flexibility in customizing their instance of Canvas, so if you are using an institutional instance of Canvas, the Help feature and menu shown in the previous screenshots may be hidden, may appear differently, or may be in a different place. If you do not see the icons or options shown here, keep an eye out for any help or support options you see within your instance of Canvas or contact your IT department directly for assistance.
Exploring the Canvas Guides
If you need help with Canvas, you can either browse or search the Canvas Guides, or you can ask the Canvas Community for help. To begin, let's examine how to browse and search the Canvas Guides for the information you need.
Browsing and searching the Canvas Guides
The Canvas Guides offer you a huge number of user manuals and instructions. Compared to other websites, the layout of the Canvas Guides closely resembles a Frequently Asked Questions (FAQs) format, wherein you are able to browse or search for the question or problem you are facing, and then click on the question to see the answer. When you click on Search the Canvas Guides in the Help pop-out menu, you are brought to the Canvas Guides page, pictured in the following screenshot, which lists a number of guidance pages that are constantly updated by the Canvas operating team:

Figure 7.3 – Canvas Guides options
From the main Canvas Guides page, you can search for a question or for the feature with which you are having trouble in the Search all content search bar at the top. In addition, you can browse through multiple guides for the product or feature you are having trouble with, including CANVAS, CATALOG, COMMONS, COMMUNITY, MASTERYCONNECT, MOBILE, PORTFOLIUM, and PRACTICE.
While you may use any or all of these products available through Canvas as an educator, we will focus on help with the first option, CANVAS, in this chapter. When you click on the CANVAS icon, a page will open that allows you to browse for help within the sections shown in the following screenshot:
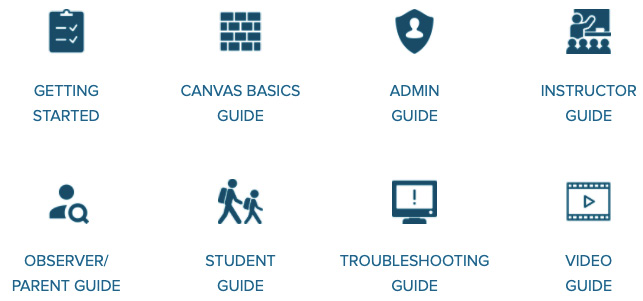
Figure 7.4 – Topics to browse within the Canvas Guides
The preceding sections are described in the following bullet points:
- GETTING STARTED: This section offers an Admin Tutorial that includes an introduction and six lessons focused on helping people at an institution such as members of the IT team set up and configure Canvas appropriately for an institution. The content of this section will likely not be relevant for most instructors using Canvas, but may provide helpful insight for those looking to understand how Canvas works on a technical, behind-the-scenes level.
- CANVAS BASICS GUIDE: This section is a great place to start with basic questions and offers you many guides to view related to General Information, Canvas Features, and Mobile Features. The linked guides under each of these headings provide specific, FAQ-style explorations of various common questions and features you may encounter using Canvas. You can browse these guides to answer questions you may have or to learn more about the features of the desktop and mobile app versions of Canvas.
- ADMIN GUIDE: This section provides guidance on 24 aspects of Canvas that would be helpful for school administrators or IT department members for customizing and configuring Canvas for an institution. This is another section that will likely not be relevant for most instructors using Canvas but may be useful if you wish to explore and understand how various features of Canvas work.
- INSTRUCTOR GUIDE: This section will likely be the most useful to you as an instructor using Canvas. The Instructor Guide section provides guidance on over 33 topics and features you may encounter while using Canvas. Nearly all of these topics are covered in this book, and the Canvas Guides listed on this page provide up-to-date information on the features and tools available to use in Canvas.
- OBSERVER/PARENT GUIDE: This section is a great resource to share with students' guardians to help them understand and effectively engage with Canvas. The Observer/Parent Guide provides streamlined information on 13 topics and features of Canvas for guardians that will help them support their child's education.
- STUDENT GUIDE: The Student Guide is another great resource to share directly with students to help ensure that they know how to use the features of Canvas clearly. It is best practice to explicitly teach your students how to use each feature of Canvas as you provide activities and assignments for them to complete, and this list of Canvas Guides can also help you, as the instructor, know how to introduce and explain over 22 features of Canvas to your students.
- TROUBLESHOOTING GUIDE: This section provides useful information divided into categories related to your user type, including Instructor, Student, Admin, and All Users. The Canvas Guides linked under these headings provide assistance and suggestions to solve problems you may encounter while trying to use certain features based on factors including your device, account settings, internet connection, or browser preferences.
- VIDEO GUIDE: The Canvas Video Guide offers you up-to-date video tutorials for a huge variety of features and tasks you might undertake while using Canvas. These videos are tremendously helpful, so take some time to look through the options available to you on this page.
As you browse through each of these categories, you will be able to read through hundreds of up-to-date pages that show you exactly how to accomplish certain tasks, complete with step-by-step screenshots and, in many cases, video tutorials. While you have already learned much of the information covered in many of the tutorials from the first six chapters of this book, the Canvas Guides serve as an easily accessible and constantly updated resource for you as you experiment and grow in your knowledge of Canvas.
Searching the Canvas Guides
While browsing the Canvas Guides can be very helpful, you also have the option to search the Canvas Guides by entering search terms into the search bar on any of the Canvas Guides pages.
To search the Canvas Guides, complete the following steps:
- At the top of any Canvas Guides page, click into the Search all content bar that appears at the top of the page, as shown in the following screenshot:

Figure 7.5 – Search all content option
- Type in your question or search terms, and you will see a list of suggested Canvas Guide articles appear below the search bar. You can either click on the title of a Canvas Guide directly that you think will help with your question, of you can press the Enter or return key on your keyboard to search for more results.
- If you press Enter or return, you will be taken to a search results page where you will be able to browse through all of the Canvas Guide results that might pertain to your question based on the words included in your search. You can browse through the search results to find the article that will best address your question.
- When you find the article that seems to address your question, click on the boldface title of the article. You will be taken to the article page where you can find instructions and guidance to address your question.
The Canvas Guides are an excellent place to find answers to questions that might arise as you are creating, designing, or teaching your course. While you may be able to find answers to most of your questions in the Canvas Guides, we will explore other resources for help within Canvas in the following sections.
Exploring other resources
Below the Canvas Guides link on the Help menu, you will see Other Resources listed. The first option, Video Conferencing Guides for Remote Classrooms, will take you to a list of Canvas Guides focused on video conferencing for remote learning. Feel free to explore those guides to gain further information on video conferencing. The next option allows you to Ask the Community for help with anything you could not find within the Canvas Guides and post specific questions that other members of the Canvas community can answer.
Browsing and posing questions to the Canvas Community
To access the Canvas Community forums where you can browse and search for answers to questions that other users have posed, complete the following steps:
- Click on the Ask the Community option from the Help pop-out menu on Canvas.
- Alternatively, you can click on the Community link on the top menu of any Canvas Guides page, as indicated in the following screenshot:

Figure 7.6 – Community link
- You will be taken to the Canvas Community page, which displays a number of forums through which you can browse or search. To find the forum in which you can ask a question to the community, scroll down and click on the icon related to your role in Canvas, most likely the Instructor role, as shown in the following screenshot:

Figure 7.7 – Instructor role forum
- Once you have navigated to the appropriate community forum, you can browse the page or search for your question by typing your question into the search bar at the top of the page.
If you are unable to find your question within the Community Forums, you can choose to Ask a question to the community for other users to answer. To post a question, complete the following steps:
- Click on the Ask a question button above the Community Activity section of any Community page, as shown in the following screenshot:

Figure 7.8 – Ask a question button
- A page will open that will allow you to provide a Subject for your post, Select Location to indicate which community forum it should be posted to, and to enter the Body of your post that will describe what you are encountering or wondering about. You will notice when you type in your subject that related topics appear below your question that may assist in answering your question. If none of the related topics meet your needs, proceed to describe what you are encountering in the main textbox.
- You can format the text of your post using the editing buttons underneath the main textbox. These options function the same way as the options in the Rich Content Editor found elsewhere in Canvas.
- When you have finished typing your question, click on the Post button in the bottom-right corner of the screen. Your question will be added to the community forum and other users will be able to see and respond to your question.
Once your question is posted to the community forum, you will be able to see when another Canvas user has posted a reply and the status of your question changes to Solved. Depending on your notification settings, you might receive an email notifying you that another user has responded to your post. While we're in the Community section of Canvas, let's discuss how to respond to questions other users have posted.
Responding to questions from the Community
The Community forums work well when everyone combines their knowledge to help one another in confusing situations, so if you see a question that you know how to answer or that reflects one of your own questions, go ahead and help out the community by responding to that question.
To respond to a question in the Community forums, complete the following steps:
- Navigate to the Community forums in the same way you would to browse or ask questions. Browse the listed posts or look at the Unanswered Topics section on the right-hand side of the screen to view questions that you might be able to answer.
- Once you see a post that you can help with or that reflects your own question, click on the boldface post subject. The post page will open, displaying the subject at the top, the main body of the question below, and any responses that other users have posted in the Replies section below the question.
- One of the options you have in the Community forums is to tell the community that you would also like to know the answer to a question by adding Kudos to the question. Underneath the main body of the question, you will see a button with a thumbs up icon that you can click to add Kudos to the post, as pictured in the following screenshot:

Figure 7.9 – Kudos icon
- If you would like to post a comment on the question answering the question, sharing similar feedback, or responding to other users' comments, scroll down on the page to the reply textbox underneath the Replies section and click Reply… to type your response, as shown in the following screenshot:

Figure 7.10 – Starting a reply to a post
- Once you click Reply…, you will see a comment box with a Rich Content Editor and options below to add an attachment or request notifications when others reply, as shown in the following screenshot:

Figure 7.11 – Replying to a post options
- When your comment is complete, click on the Reply button in the bottom-right corner, and your comment will be posted publicly for other users to see.
The Canvas Guides and the Community forums offer you a huge wealth of knowledge regarding Canvas. In your use of Canvas, you may come up with ideas for new features to add to Canvas, which is the next option on the Other Resources list of the help menu.
Submitting a feature idea
In your use of Canvas, you might come up with an idea for a feature that Canvas does not yet offer. As Canvas is an ever-evolving and constantly improving system that adapts its technology to the needs of the educators who use it, Canvas takes your suggestions very seriously. Before requesting a feature, double-check the Canvas Guides and the Community forums to make sure that the feature does not already exist. If you confirm that your idea hasn't yet been implemented, go ahead and request a new feature.
To request a feature, complete the following steps:
- Open the Help menu from the left Global Navigation menu, and then select the Submit a Feature Idea option, as pictured in the following screenshot:
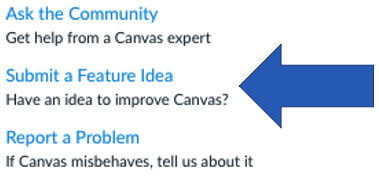
Figure 7.12 – Submit a Feature Idea link
- A new tab or window will open in your browser, and you will see the Community forums page for new feature suggestions. As mentioned previously, make sure that you search the forums for your suggestion before adding a new suggestion. If your idea is not already listed or available, click on the Suggest an idea button, as shown in the following screenshot:

Figure 7.13 – Suggest an idea button
- On the page that opens, you will see suggestions for consideration when suggesting an idea, including a link to Guidelines for creating a new idea conversation that it would be helpful to read before submitting your request. Review this link for specific tips about how to suggest a feature and what you can do to increase the likelihood that your feature will be implemented in the future.
- Once you have read these suggestions, enter a title for your feature to search for any similar features or ideas before submitting your ideas by clicking the Check title button.
- Review any results for similar ideas that appear. If you do not see your idea anywhere in the search results, click Continue and Post to proceed with sharing your idea.
- On the page that opens, enter the Idea Subject for your suggestion, followed by the Body of your suggestion, including a detailed description of the feature you would like to suggest. As with the other textboxes you have used within the Canvas, you can adjust the formatting using the menu below the main textbox.
- Below your description, you can enter other information to help the community find your suggestion such as Idea Labels and Idea Tags with relevant keywords to your feature idea.
- When you have entered all of the details of your suggestion, click on the Post button in the bottom-right corner.
Once you have submitted your suggestion, other users will be able to see your request and personnel from Canvas will file it into the appropriate category on the Idea Conversations page. Should your suggestion be chosen for implementation, you will most likely receive feedback from a Canvas employee. Suggested ideas include statuses such as Open for Conversation, On Beta, or Completed, indicating where the suggestion stands with Canvas.
The following screenshot shows the three suggestions, each with a different status:

Figure 7.14 – Idea Status updates
While your suggestions are very valuable and many user suggestions are later implemented, not all suggested features will be chosen for implementation. Your suggestion might be set aside for later discussion and can be brought back to the forefront if a large number of users express interest in seeing your suggestion implemented.
Now that we have looked into requesting features from Canvas, let's take a look at how to report features that are not working properly within Canvas.
Reporting a problem
While designing, building, or teaching your course, you might run into features that are simply not working. Usually, you will be able to tell if something is not working by means of an error message appearing at the top of your screen or getting displayed on the page you are trying to view. Should you encounter an error message, the message might include a link to report the problem. If not, you can tell Canvas about the issue through the Help menu.
Note
Many institutions have their own helpdesk or support ticket system, and if you are using an institutional instance of Canvas, your school may have integrated a link to their own support system into your instance of Canvas. While the following section explains how to report a problem directly to Canvas, it's a good idea to check with your institution's IT team when you run into errors that may be specific to your instance of Canvas first.
To report a problem, complete the following steps:
- Click on the Help link on the left Global Navigation menu of Canvas.
- From the pop-out Help menu, click on Report a Problem, which appears as the third option in the following screenshot:

Figure 7.15 – Report a Problem link
- This will open a dialog window that allows you to input the Subject, Description, and Priority of your problem. You will notice at the top of the window that you are submitting a ticket for a personal response from a member of the Canvas support team. Also notice that the dialog window includes a link to the Canvas Guides as a reminder to check the Canvas Guides and Community forums first before submitting a ticket. This helps reduce redundant help requests, which in turn allows the Canvas support team to respond to your problems more quickly. The dialog window to report a problem is pictured in the following screenshot:

Figure 7.16 – Report a Problem dialog window
- You can enter the Subject of your problem, which will offer the support team member an instant idea of what you're encountering, and then you can enter a detailed Description of the problem.
Note
When entering a description, make sure that you include each step you went through before encountering the problem. For example, if you encounter an error message every time you try to view a custom content page, describe how you are navigating to the page and exactly what is displayed each time you receive the error message.
- Above the Description textbox, you will see a message requesting that you include a link for a screencast or screenshot that will show the support team member exactly what you're encountering. You can follow the suggested link to download the recommended software that will allow you to create a video screencast for free. Look ahead to the following section of this chapter if you would like to include a screencast.
- When you have finished typing the description of your problem, click on the drop-down menu underneath the question How is this affecting you? to select the priority of your question. From the options that are displayed, you will notice the user-friendly language that helps you gauge the importance of your problem in order to report it to the Canvas support team, though your selection may not directly impact the speed of response to your problem. You will see a number of options, as shown in the following screenshot:
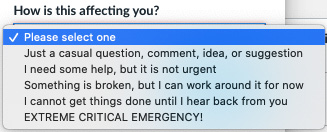
Figure 7.17 – Problem priority options
These options are described in the following bullet points:
Just a casual question, comment, idea, or suggestion: Select this option if your message refers to something that is not directly impeding the building or teaching of your course. This marks your message as the lowest priority for an immediate response; however, the Canvas support team is generally very prompt to reply to even the lowest priority messages.
I need some help, but it is not urgent: Select this option if you are having a problem with Canvas, but it is not directly impeding the building or teaching of your course. This marks your message as the second lowest priority for an immediate response.
Something is broken, but I can work around it for now: Select this option if the problem you are encountering needs to be solved in the future but is not immediately preventing you from building or teaching your course. This marks your message as the middle priority for an immediate response.
I cannot get things done until I hear back from you: Select this option if the problem you are encountering is directly impeding you from building or teaching your course. This marks your message as the second highest priority for an immediate response.
EXTREME CRITICAL EMERGENCY!: Select this option if the problem you are encountering is directly impeding you from building or teaching your course and it is having a significant impact on the success of the participants in your course. This marks your message as the highest priority for an immediate response and should be used only in extreme cases.
- After you have filled in the Subject and Description fields and selected a priority from the How is this affecting you? drop-down menu, click on the Submit Ticket button at the bottom of the pop-up window.
- Again, if you would like to create and link to a screencast or screenshot using TechSmith Capture to include in your description of the problem, please refer to the following section of this chapter before submitting your ticket.
- Once you have submitted your help ticket, you will receive a confirmation email that it has been received and a member of the support team will follow up with you personally to help you resolve the problem.
Next, let's take a look at how to use TechSmith Capture (formerly called Jing) to create a screencast for reporting a problem to Canvas.
Creating a screencast using TechSmith Capture
As mentioned in the preceding section, you can record a screencast or a screenshot using TechSmith Capture, which was formerly called Jing and still appears linked in Canvas by this name. TechSmith Capture is a program that you can download for free and allows you to record a video of your computer screen that shows exactly what your screen looks like when you encounter the problem you are reporting. Please note that the following installation and usage procedures are described based on use with a Mac and might be slightly different for PC users. Note that the screenshots in this section are taken from a Mac computer.
Note
There are a number of screencast and screenshot programs available for free and for purchase online. This section only discusses TechSmith Capture as the Canvas-recommended software, but you are free to use other programs to record and attach your screencasts or screenshots.
To download TechSmith Capture and create a screencast or screenshot to include in your help ticket, complete the following steps:
- Click on the link to Jing that is included in the Report a Problem pop-up window under the Description section, as shown in the following screenshot:
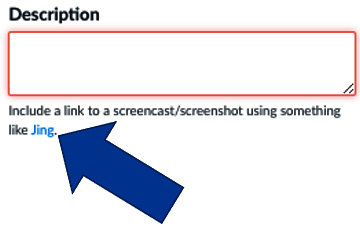
Figure 7.18 – Link to Jing in the Report a Problem window
- Make sure that you leave the Report a Problem pop-up window open in your browser, as you will return to the window at the end of this process to paste the link to your screencast in the description of your problem. At this point, open a new tab or window of Canvas in your browser so that you can recreate the problem you are encountering when you record your screencast. Once you have opened the new window of Canvas, return to the Report a Problem pop-up and click on the link to Jing. You will be taken to this website: https://www.techsmith.com/download/jing.
- On the TechSmith Capture website, click on the Download button that corresponds to the operating system you are using, either Windows Download or Mac Download.
- Follow the standard installation procedures for your operating system to install TechSmith Capture onto your computer.
- Once TechSmith Capture is installed, open the program. If you already have a TechSmith Capture account, you will need to sign in, and if you are new to using TechSmith Capture, follow the link that appears to create a free account, as shown in the following screenshot:

Figure 7.19 – Sign in or sign up for a new TechSmith Capture account
- Once you have created your account or signed in, return to the TechSmith Capture program on your computer.
- You will see a request for additional permissions for TechSmith Capture to capture images from your computer. Enable permissions for the requested items to proceed. Examples of requested permissions are provided in the following screenshot:
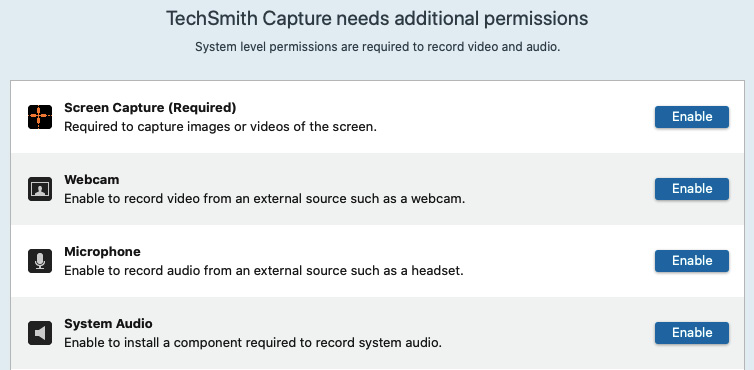
Figure 7.20 – Sample permissions requests
- When you have enabled the requested permissions, you will see a window showing a red circle that reads Capture. To record your screen, click on the Capture option, as displayed in the following screenshot:

Figure 7.21 – Capture button
When you click on Capture, you will be able to select which part of your screen you would like to include in the screen capture. Select the area of your screen that will display your browser window with Canvas and the problem you need to record. You will notice that the outside regions of your screen are grayed out and will not be included in the screen capture.
- Once you have selected the capture area, you will see a menu appear with four icons that allow you to Capture an Image, Capture a Video, Redo Selection, or Cancel your capture, as well as the pixel dimensions of your screen capture, as shown in the following screenshot:

Figure 7.22 – TechSmith Capture screen capture options
- To record a screencast, select the second icon, Capture a Video. The menu at the bottom of your screen capture selection will change, and you will see options to also include a video of yourself using your webcam, to mute or unmute your computer audio, and to include a recording of yourself narrating whatever problem you are recording on Canvas. These options are shown in the following screenshot:

Figure 7.23 – TechSmith Capture video capture menu
- Once you have selected your desired options, click the red circle icon to begin recording. You will see a large countdown starting at 3, which appears over the section of your screen that will be recorded in the video. When the countdown is finished, your recording will begin automatically.
- When the recording starts, you will see a menu appear at the bottom of your screen with seven buttons: a Stop icon, which you will click when you are done recording, a Pause button, a Toggle Webcam button to turn your webcam on or off, a Toggle System Audio button to stop or start recording your computer's audio, a Toggle Microphone button to start or stop recording with your computer's microphone, a Reset button, and a Cancel button. You will also see the duration of your recording shown in seconds. These options are displayed in the following screenshot:

Figure 7.24 – TechSmith Capture video capture recording menu
- As you are recording, you can navigate through the problem you are encountering in Canvas. As you click through each step, you can narrate your actions if you have enabled your microphone.
- When you have finished recording the issue, click on the Stop button. A new menu will appear underneath the preview of your recording. Watch your recording to make sure it includes everything you would like. If you are finished, click on the Upload to Screencast button, as shown in the bottom-right corner of the following screenshot:

Figure 7.25 – Upload to Screencast button
- Your video will automatically begin to upload to http://screencast.com. A notification window will appear once your upload is complete, and you can follow the link in the window to view your video online. In addition, you can click the Save As… button in TechSmith Capture to save your screen capture video to your computer.
- Once you can see the video in your browser, copy the link to your video from the web address bar.
- Return to your Report a Problem pop-up window in Canvas. Paste the link to your recording in the Description of your problem, finish creating your help ticket, as described in the previous section of this chapter, and then click on Submit Ticket.
Now that we have covered how to report a problem, let's summarize the remaining other resources on the Help menu.
Remaining other resources
On the Help menu of Canvas, there are several remaining other resources listed. These options provide specific information or tools to help you with Canvas. The following list provides a brief description of each of the remaining resources listed at the time of writing:
- Request a Demo for Your School: If you are using a Free for Teachers account and your institution does not currently use Canvas, you can use this option to request a demo and pricing information for your school to potentially adopt Canvas as its Learning Management System (LMS).
- Training Services Portal: This link will take you to the Training Services portal, which allows you to complete thorough training videos and course sequences. This is a great option for users who are new to Canvas to get interactive, detailed training on the various features and functionality of Canvas.
- COVID-19 Canvas Resources: The Canvas Community has assembled several helpful resources for teachers using Canvas during the COVID-19 pandemic. These resources provide valuable tips and insights that have helped countless teachers during the unprecedented educational conditions during the global pandemic.
- Show Welcome Tour: This link opens the Welcome Tour discussed in Chapter 1, Getting Started with Canvas, which will guide you through the basic layout and features of Canvas.
At this point, we have been through each of the options that are available to you in the Help menu should you need help with Canvas at any point. Before moving on and addressing alternative options to obtain help outside of Canvas, let's close this section with a list of important contact information, should you need to get in touch with a Canvas employee to help solve your Canvas problems or answer your Canvas questions:
- Canvas Phone Numbers: 1 (800) 203-6755 for general assistance with Canvas
- Canvas Address: 6330 South 3000 East, Suite 700, Salt Lake City, UT 84121
- Canvas Contact Information: https://www.instructure.com/contact-us
Let's now discuss alternative help options from outside of Canvas that you might choose to utilize if the problems or questions you encounter cannot be resolved using the built-in help options.
Finding help outside of Canvas
Should you encounter a problem or question that is not addressed in the built-in help features of Canvas, the best option to consider is contacting your institution's Information Technology (IT) department. Questions or problems that you might choose to direct to your institution's IT department, rather than Canvas directly, might include issues related to an institution-specific internet server or information that is automatically imported, such as student rosters, course content, calendar events, external applications, or grading tools. There are a number of places where you might find the contact information for your institution's IT department, including the following:
- Your institution's phone or email directory
- Your institution's website
- Fellow faculty or staff members
Related to the last bullet point, you can also reach out to fellow faculty members, staff, or students to ask for help with Canvas. If your institution has recently adopted Canvas as its LMS, chances are that other members of your school community have encountered similar problems or questions and might be able to help you find the answers to your questions.
Summary
In this chapter, we discussed how to find help within Canvas. We discussed how to access the Help menu through the Global Navigation menu. Then, we worked our way through each item on the Help menu. We discussed how to search the Canvas Guides for help with features or questions. We learned how to ask the Community and browse community forums to see whether other Canvas users have already posed and answered your questions. Next, we walked through how to Submit a Feature Idea, how to Report a Problem with Canvas, and a discussion of the remaining other resources on the Help menu. After reviewing some of the contact information for Canvas that you might find useful in answering your questions, we closed the chapter with a discussion of other places where you may be able to find help outside of the Canvas website.
In our next and final chapter, we will learn how to export your course content for backup and transferring purposes, and we will also explore the ways in which Canvas can connect to trends and requirements of education in the 21st century.