Chapter 6: Creating Test Validation Scripts
At one company that I worked at, I was trying to figure out the value of some of the test automation scripts that we had. In order to do this, I was analyzing the test results to see which scripts were giving us the most information. One of the rules I used to determine which scripts might not be adding value was to look at scripts that had never failed. My hypothesis was that if a script had been running for some time and had never failed, it was unlikely to fail in the future and so was not giving us valuable information. I had identified several test scripts that had never failed and was looking through them. Imagine my surprise when in several of them I found assertions that where checking things such as whether true==true or 5 == 5? No wonder the tests had never failed. It was impossible for them to fail.
Although these were egregious examples, the reality is that often a well-designed test suite will fail to deliver on its promise because of poor assertions. You can have a test suite that is checking all the necessary endpoints with all the correct inputs. It can have perfect coverage and be impeccably structured, but without good assertions, it isn't doing you much good.
In this chapter, I will show you how to set up good test validation scripts in Postman. Postman uses JavaScript for this. If you are not familiar with JavaScript, don't worry about it. I will walk carefully through the examples so you should be able to follow along. Postman also provides some helpful examples that you can use. You do not need to be an expert in JavaScript in order to follow along in this chapter, but I hope that by the end of this chapter you will be an expert in creating good test validation.
In addition to using JavaScript for test validation, Postman provides ways to create setup and teardown scripts. You can use these to set some things up before you run a test and to do cleanup after a test has completed. By the end of this chapter, you will be able to use all this functionality in Postman. You will be able to create test validation assertions using JavaScript in Postman, validate body and header data in API responses, use the assertions that the Postman team has created, set up variables and other data before sending a request, create workflows that include multiple requests, create loops to run the same request multiple times with different data, run requests in the collection runner, and use environments to manage and edit variables. The following are the topics that we are going to cover in this chapter:
- Checking API responses
- Setting up pre-request scripts
- Using environments in Postman
Technical requirements
The code used in this chapter can be found at https://github.com/PacktPublishing/API-Testing-and-Development-with-Postman/tree/master/Chapter06 .
Checking API responses
Since Postman uses JavaScript for the checks in a test, it has a lot of power and flexibility built into it. I'm going to walk you through various things that you can do with this. In order to do that, it will be easiest to work with actual API calls. For that purpose, I will once again use the Star Wars API (https://swapi.dev). If you don't have one yet, create a collection in Postman called something like Star Wars API – Chapter 6 and in that collection create a request called Get First Person. This request should call the /people/1 endpoint from the Star Wars API. You can also download the collection from the GitHub repository for this course (https://github.com/PacktPublishing/API-Testing-and-Development-with-Postman/tree/master/Chapter06) and then import that package, if you would prefer.
When I made this collection, I also created a variable called base_url that specifies the base URL for this. I will be creating a few different requests as examples in this chapter, so it will be helpful to have that variable. If you set up the collection on your own, you will need to edit the collection and add the variable, giving it a value of https://swapi.dev/api. If you imported the package from GitHub, the variable should already be there for you, but in either case, you will need to go to the Get People request and modify the URL so that it references the variable and starts with {{base_url}}. Once you have that all set up, go ahead and send the request.
Being able to send a request like this is great, but if you automate this, how will you know in the future if it is working correctly? You need to add some checks to this that can verify that it is working correctly! In this section, I will show you how to add these checks. I will also show you how to check data in API response and headers and how to use some of the provided assertions so that you can check anything that you need to. The first thing I want to talk about, though, is how to check the status codes in a response.
Checking the status code in a response
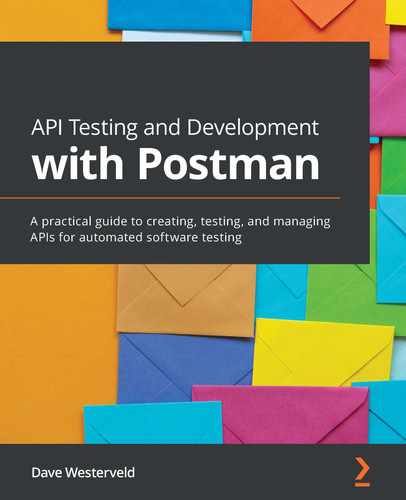
The Tests tab in Postman is where you define the things that you want to check on each request. You can find this tab on each request. Go to the Tests tab for the request you made and as you can see in the following figure, the left-hand panel has several different snippets available for you to use:
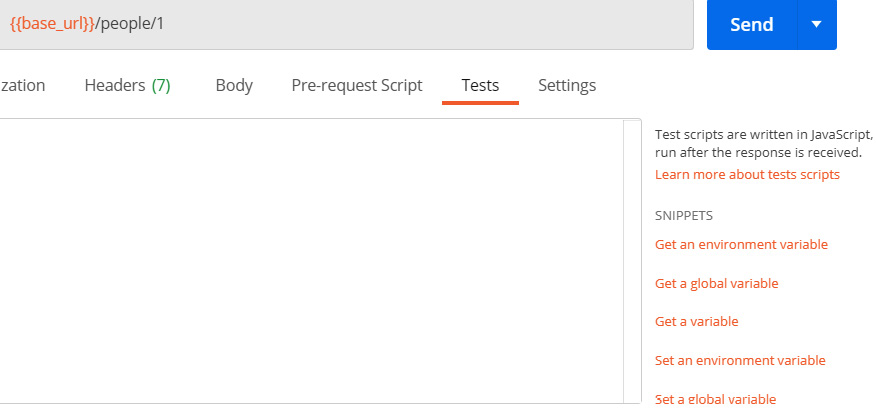
Figure 6.1 – Test snippets
These snippets are little bits of JavaScript code that Postman provides to make it easy to add some common checks to your tests. Scroll down in the list until you see one that says Status code: Code is 200 and click on that one. When you do that you will see that Postman adds some JavaScript code into the test panel. You should see a code that looks something like the following figure:

Figure 6.2 – Snippet checking that the status code is 200
Now, if you send the request, this code will check that the request returns a status code of 200. If the request returns any other status code, this check will fail. If you are not familiar with JavaScript, this might be a bit intimidating, so let's work through this check and see what is going on.
Using the pm.test method
In the first place, we have the pm.test function. The pm object is a JavaScript object that Postman provides that gives you access to data from your requests and their responses. It also lets you access and manipulate variables and cookies. In fact, most of the JavaScript functionality that you will use in Postman is provided through the pm object.
The test method is an asynchronous method that you can use to set up each check that you want to do. It takes in two arguments. The first one is the name of the test as a string, in this case "Status code is 200". Note that enclosing text in double (or single) quotes means that it is a string. This name will appear in the test result output, so you will want to make sure that it accurately describes what the test is doing so that you can better understand your test results.
The second argument needs to be a function that does the actual check that you are interested in. JavaScript gives a lot of shortcuts for this kind of stuff, and so you can define your function directly in the argument to the test method. In this case, the snippet is using an unnamed (or anonymous) function. This is the only spot this function is being used so it does not need a name. The function is defined by function (), which just means that you are creating an anonymous function. Since there is nothing in the brackets, we know that this function does not take in any arguments. However, the pm.test method does expect the function to return a Boolean (a value that is either true or false). It should not return a string, or an integer, or anything like that. You can do whatever checks you want inside the function, but you need to ensure that it returns a Boolean value.
The actual work that the function does is then defined inside the curly braces. So in this case the function is merely calling pm.response.to.have.status(200);. Tests need to take in a function like this because they run asynchronously. JavaScript is built to be asynchronous by default. This can be kind of hard to get your head around (it was for me!), but essentially it means that JavaScript (and hence Postman) will not wait for one test to finish before it goes on to the next one. In other words, if you have two tests set up for a request and the first test is doing something that takes a while to process, that test will start and then while Postman waits for it to finish, it will go ahead and start the next test. This is why we need to give the test a function. Essentially, the test will start, and then once it has the data that it needs, it will call the function that we supplied and execute the code in that function. This function that gets called is sometimes called a callback function, so if you hear that term, it is just referring to a function that gets passed into another function and that will be called once that function is ready. Writing with asynchronous code takes a bit of an adjustment if you are used to writing in languages that are synchronous, but by following along with examples like these you should get the hang of it quickly.
Using Chai assertions in Postman
There is one last piece to this test that we haven't looked at yet. That is the actual code that is being executed. The snippet is using the pm object to access the response data. The pm.response object contains various information about the response. In this example, you are getting the response and then creating an assertion on that response to check that the response has the status 200.
Assertions in Postman are based on the capabilities of the Chai Assertion Library. This is a very common JavaScript assertion library and is used in many JavaScript unit testing frameworks. The Chai framework supports Test-Driven Development (TDD) and Behavior-Driven Development (BDD) approaches. Postman uses the BDD style of Chai assertion. You can read more about the various assertions on the Chai website (https://www.chaijs.com/api/bdd/).
Chai assertions are very nice to read. They match up well with how we would speak about the assertions in natural language English. I'm sure that you were able to figure out that when the snippet said to.have.status(200), it meant that we expect the response to have a status of 200. This readability makes it easy to figure out what a test is checking; however, I have found that it can be a bit tricky sometimes to figure out how to craft these assertions. As we go through this chapter, I will show you several different assertions. As you see (and create) more of them, it will get easier to use.
Try it out
This is very basic check, but I want you to take a couple of minutes to make sure you understand how it works. Try changing the expected status code and ensure that it fails. The test will be run after you send the request and you can view the results on the Test Results tab in the response section. If you click on the Test Results tab, you should see something that looks like this:

Figure 6.3 – Check on the test results
The script is asserting that the response should be 200. Play around with this assertion a bit and make sure you understand what is going on. Can you make it fail? Make sure you understand how it works. I will be showing you some more assertions, but they share many of the same components as this one so make sure you fully understand what is going on here before moving on to look at how to check data in the body of a response.
Checking the body of a response
You have seen how to verify that an API response has the status code you expect it to, but there is a lot more that you can do with tests in Postman. You can check many things in the data of the response itself. I want to show you a couple of examples of how to do that, so that you can have the confidence to create these kinds of assertions on your own.
Checking whether the response contains a given string
For the first example, I will show you how to check that a response contains a string that you expect it to. The snippets are a very helpful way to learn about the available functionality, so let's use another one to look at how you can verify that the body of a request has the correct data. Scroll down in the snippets section until you see a snippet called Response body: Contains string. Ensure that your cursor is on the last line of the tests text field and then click on the snippet to add the code for it to the tests.
You should see a code snippet that looks like this:
pm.test("Body matches string", function () {
pm.expect(pm.response.text()).to.include("string_you_want_ to_search");
});
As you can see, there is a lot of similarity between this snippet and the previous snippet. It once again uses the pm.test method to define the test and we give it a function that does an assertion. In this case, the assertion is a bit different, though. You are still looking for response data with the pm.response object, but now you have the .text() method attached to it. Since the pm.response object is just that, an object; you need to turn it into a string before you can check whether it includes the string you want. This is what the .text() method does. It turns the response object into a string that Postman can search through. Replace string_you_want_to_search with a search term such as Luke. Give the test a more descriptive name as well – perhaps something like Check that the response body contains Luke – and send the request again. In the Test Results tab, you should now see that there are two passing tests.
Checking JSON properties in the response
Now let's look at another example snippet. This time choose the Response body:JSON value check snippet. You will see that the following code is added to the tests:
pm.test("Your test name", function () {
var jsonData = pm.response.json();
pm.expect(jsonData.value).to.eql(100);
});
There are a couple of new things in this snippet. In the first place, you can see the use of the var keyword. This is used in JavaScript to define a variable, so in this case, we are creating a variable called jsonData. The data for this variable is coming from the pm.response object, but this time instead of calling .text() to convert it into a string, the snipped is calling .json(), which will turn it into JSON. JSON stands for JavaScript Object Notation and it is a format that is used for storing and transporting data. It is structurally similar to a dictionary or hash map object and is a very common standard. Many APIs will return data in a JSON structure. The Star Wars API is no exception to this and so you can directly convert the response object for a call to that API into JSON.
The variable can then be used in an assertion. You can see that Postman has put in a default assertion that is expecting the value of the jsonData variable to equal 100. If you send the request, you will see that this test fails with an assertion error where it tells you that it expected undefined to deeply equal 100, as you can see in the following figure:
Figure 6.4 – Test assertion fails
This warning sounds a bit cryptic, but all it is telling you is that it was trying to compare the two values that you gave and one of them was undefined while the other was 100. It was expecting those two values to be equal and hence the assertion failed. This tells you that jsonData.value is undefined. But why? Well, in order to understand that, let's look at the console log.
In JavaScript you can log things to the console. This is similar to printing in other languages. Since Postman is using JavaScript, you can use console.log to print out information. This is very helpful when trying to debug something, so let's try it out here. In the line after the variable definition, add this code:
console.log(jsonData);
Now send the request again. In order to see the data that has been logged, you will need to open the console in Postman. As shown in the following figure, you can do that by clicking on the Console button at the bottom of the Postman app:

Figure 6.5 – Open the Postman console
At the bottom of the console, you should see the jsonData object that you logged:

Figure 6.6 – Logged object
This looks like what you'd expect to see, so why does the assertion think that things are undefined? Well, we need to look for a minute at the .value operator. This snippet is a bit tricky. This looks like it is a valid operator, but it is actually just a placeholder to let you know that you need to get some value out of the jsonData object. In JavaScript, it is easy to do that with dot notation. So, if you want to get the height field, you can just reference it by its name like this:
jsonData.height
You will need to change what you expect it to equal. In this case, it should be equal to "172", so put that in to make the line look this this:
pm.expect(jsonData.height).to.eql("172");
Now if you send the request, it should pass. Don't forget to remove console.log and change the name to something more descriptive.
Important note
You can access the properties of objects in JavaScript using either bracket or dot notation. They both give you access to the same information, but I think that dot notation is more readable than using bracket notation, and so I will stick with that throughout this book. In dot notation, you can access the properties of an object by using the syntax objectname.propertyName. You can also access nested objects in this way, and so you could see something like objectname.subobjectName.propertyName.
This example should give an idea of the kinds of options you have for checking response data. Many APIs send responses in JSON format, and with the options you have learned about in this example, you should be able to create checks for almost anything that you might get in an API response. In order to make sure that you understand what is going on here, though, I would encourage you to explore this a bit more.
Try it out
You have a seen a couple of examples that show how to check for data in API responses. Now I want you to try your hand at this without step-by-step examples. See if you can take what you have learned and put it into practice on your own. You can play around and set yourself a few challenges on your own if you want. To help you get started, here are a few ideas of tests that you could create:
- Create a test that verifies Luke's eye color.
- Create a test that verifies the URL of Luke's home world.
If you get stuck on these, you can check out my solutions in the GitHub repository for this course (https://github.com/PacktPublishing/API-Testing-and-Development-with-Postman/tree/master/Chapter06). Don't look at the solutions until you have tried it out on your own, though!
Now that you know how to check data in the body of a response, it's time to look at how to check the headers of responses.
Checking headers
An API response includes a status code, a body, and a header. Sometimes, there are important things in the header that you want to be sure are getting sent back correctly. As you might guess, you can create assertions in Postman that let you check header data. Once again, the easiest thing to do is to start with a snippet – in this case, the Response header: Content-Type header check snippet. Choosing that snippet should add this code to the tests:
pm.test("Content-Type is present", function () {
pm.response.to.have.header("Content-Type");
});
This is similar to the code in the body snippets. The only difference really is that the assertion has the .header assertion in it. This is an assertion that is specific to Postman. Postman has a Chai plugin that extends the common Chai assertions to give you access to a few custom ones that they provide. You could build this same assertion without using this custom assertion type, but it would be more complicated to do so.
Custom assertion objects in Postman
You may not have noticed, but you actually used another custom assertion object in one of the earlier examples that I went through previously. When checking the status code, the .status assertion is a custom assertion type. Postman has also created several other assertions like this that can make it a lot easier to assert on common response objects. I have listed the custom assertion methods that Postman provides along with examples of how to use them. These assertions are specifically designed to help you verify API response, and so you will probably use them a lot when creating tests in Postman:
- .statusCode: This assertion checks whether the numerical status code of the response matches the one you specify. Here's an example usage:
pm.response.to.have.statusCode(200);
- .statusCodeClass: This assertion checks whether the response code is in the right class. Class 2 is a status code that is in the 200s and 3 is one in the 300s, and so on. Here's an example usage:
pm.response.to.have.statusCodeClass(2);
- .statusReason: This assertion checks whether the reason, which is a text response corresponding to the status code, matches what you specify. Here's an example usage:
pm.response.to.have.statusReason('OK');
- .status: This assertion allows you to verify the status by specifying either the status code or the status reason. It is essentially a combination of .statusCode and .statusReason assertions. Here are two example usages:
pm.response.to.have.status('OK');
or:
pm.response.to.have.status (200);
- .header: If you only input one argument, this assertion will check for the existence of a header that matches that argument. If you specify two arguments, it will check that the given header (specified by the first argument) has the given value (specified by the second argument). Here are two example usages:
pm.response.to.have.header ("Content-Type");
pm.response.to.have.header ("Content-Type", "application/json;");
- .withBody: This assertion checks that the response has a body. Here's an example usage:
pm.response.to.be.withBody;
- .json: This assertion checks whether the body is in JSON format. Here's an example usage:
pm.response.to.be.json;
- .body: This assertion can be used to check whether the response has a body and whether that body contains a given value. You can specify the expected value as a simple string, in which case it will check whether that string is found anywhere in the body. Alternatively, you can specify the expected value as a regular expression or as a JSON key/value pair. In those cases, the assertion will search for a match to your query. Here are some example usages:
pm.response.to.have.body;
pm.response.to.have.body("some text");
pm.response.to.have.body(<regex>);
pm.response.to.have.body({key:value});
- .jsonBody: If no argument is specified, this assertion checks whether the body of the response is in JSON format. Otherwise, it will check for the existence of the given JSON object in the body. Here are some example usages:
pm.response.to.have.jsonBody;
pm.response.to.havejsonBody({a:1});
- .responseTime: This assertion checks how long the request took. It can also be used to check whether a response time was above or below a given value or if it is within a given range. The time values are given in milliseconds. Here are some example usages:
pm.response.to.have.responseTime(150)
pm.response.to.have.responseTime.above(150);
pm.response.to.have.responseTime.below(150);
pm.response.to.have.responseTime.within(100,150);
- .responseSize: This assertion checks the size of the response. It can also be used to check whether a response size is about or below a given value of if it is within a given range. The response sizes are given in bytes. Here are some example usages:
pm.response.to.have.responseSize(50);
pm.response.to.have.responseSize.above(50);
pm.response.to.have.responseSize.below(100);
pm.response.to.have.responseSize.within(50,100);
- .jsonSchema: This assertion checks whether the response follows the specified schema. Here's an example usage:
pm.response.to.have.jsonSchema(mySchema);
These assertions can help you deal with the various responses that you will get when making API requests. This list gives some simple examples to help you get started with using these assertions, but don't stop there. You can use these assertions in combination with standard Chai library as well. For example, you could add .not to the assertions in order to negate any of them. Use these listed examples as starting points for building out your own assertions as you create your tests.
Creating your own tests
I have shown you several examples using the snippets that Postman has created in order to help people get started with creating tests. These snippets are a great place to start if you don't know much about JavaScript as they give very clear examples of how to do certain things. However, they are just a starting point. Since assertions in Postman are built on JavaScript, there is a lot of flexibility and power in what you can do. You may benefit from learning some basic JavaScript, but even without that you should be able to create a lot of your own assertions merely by using the snippets along with the kinds of commands you have learned about in this section.
Try it out
As I keep repeating in this book, the best way to learn is by doing, so try creating a few of your own assertions. Using the Star Wars API, see if you can create assertions to validate the following:
- Check that the server (a header) is nginx.
- Check that the response time for this call is less than 500 milliseconds.
- Check that Luke appears in 4 films.
You can check out my solutions to these in the GitHub repository for this book, but make sure you first try to figure them out on your own. Now that you have a good grasp on how to use assertions in a request, I want to look at how to share them across multiple tests using folders and collections.
Creating folder and collection tests
I have shown you how to create tests that can verify that a request is correct. Some assertions, though, might be the same across multiple tests. For example, you might have a set of positive tests that should all return a status code of 200. You can create an assertion in each of the requests that you set up, but there is an easier way to do it. In Postman, you can add tests assertions to folders and collections.
If you have several requests in a folder and you add a test assertion to the folder, that assertion will run after each request in the folder has completed. Let's look at an example with the following steps:
- Add a folder to the SWAPI collection called Luke.
- Drag the Get First Person request that you were working with earlier into that folder and then add another request to that folder called Luke's home world.
- Set the URL of the request to {{base_url}}/planets/1.
- Now, edit the folder and on the Tests tab, and add a test to check that Luke and his home world both appear in film 1:
pm.test("Check that they are in film 1", function () {
var jsonData = pm.response.json();
pm.expect(jsonData.films).to.contain("http://swapi. dev/api/films/1/");
});
- Go to the Get First Person and Luke's home world requests, and for each of them send the request.
You will notice in each case that the Test Results area shows that Postman has run the check that was defined in the folder. You can set up similar checks at the collection level as well. Any tests that you add to the collection will run any time a request in the collection is sent. Setting up tests in the collection works the same as doing it in a folder, so I will leave it up to you to play around with that.
Being able to share tests with multiple requests is helpful, but you may also need to clean up after yourself sometimes. You might have data or variables that you don't want to persist after a request has complete and so there are times when you will need to clean up after your tests.
Cleaning up after tests
In many testing frameworks, you will have the ability to run teardown scripts. These are essentially scripts that let you clean up any variables or values that you don't want to have persist once your test is complete. Postman does not have an explicit section where you can do something like this. However, if you have stuff that needs to be cleaned up after a test, you can do so right in the Tests tab.
One thing to be aware of here is the order of executions. Where should you put your cleanup scripts? Should you put them in the Tests for a request or in a folder or collection? Scripts created at the folder or collection level will run after each request, but what order should they be run in?
After a request completes, Postman will first execute the test scripts from the collection, and then the script from the folder and finally the scripts from the request. This means that any variables created in a request test script can't be cleaned up in a collection or folder. In general, the best practice would be to clean up any variables in the same place where they are created. So, if you make a temporary variable in a collection that you want to remove when you are done, do so in the collection where you made it. I think this is the easier way to manage test data cleanup, but there may be times when you need to pass a variable around and so need to clean it up elsewhere. When doing so, knowing the execution order will help you avoid errors.
So far in this chapter I have talked a lot about running tests after a request is sent. You have seen how to use the snippets in Postman to help you get started with creating tests. You've seen how to check various parts of a response, ranging from the body to the header, and you've also seen how to use the many built in assertions that Postman provides. You can create your own tests, and now it is time to turn your attention to what you can do before a request has even been sent.
Setting up pre-request scripts
Pre-request scripts work in much the same way that tests do in Postman. In this section, I will show you how to use them to set and get variables so that you can share data between tests. I will also show you how to build a request workflow where you can chain multiple tests together so that you can check more complex workflows. All these things are great on their own, but they do beg the question of how we can effectively run these tests, and so this section will also cover how to run your tests in the collection runner.
The first thing I want to cover, though, is how to get started with pre-request scripts. These scripts use JavaScript to send commands just like the response assertions but, as the name implies, they are run before the request is sent rather than after. Now, why would you want to do that?
I have used pre-request scripts in a couple of different ways. I have had times when I wanted to test something in an API that required sending multiple API calls. In order to check the things that I wanted to check, I needed to be able to pass data that came back from one call into the next call. I could do this by assigning values to variables in the Tests section of the first request and then reading in those variable's values in the next test. However, there were times when I wanted to take one of the variable values and modify it slightly (for example, add one to it) before using it. In that case, I would use a pre-request script to do that.
Another example of a time I have used pre-request scripts is to test with some random data. I could generate a random number or string in a pre-request script and then use that value in the test itself. There are other ways that pre-request scripts can be useful as well, but one thing that you will often want to do with pre-request scripts is read or set environment variables.
Using variables in pre-request scripts
In Chapter 4, Considerations for Good API Test Automation, I explained how variables work in Postman and the different scopes that they can have. In that chapter, I showed how to create and use variables in the user interface. Postman also lets you use variables in scripts. You can use them in test scripts as well as pre-request scripts, but for now, I will focus on using them in Pre-request Script tab. The best way to learn this is with a couple of examples. For the first one, create a new request in the SWAPI collection called Get a Person and then use the following steps to create a pre-request script:
- Set the URL of the request to {{base_url}}/people/{{person_id}}.
The base_url variable should already be defined from previous examples, but the person_id variable will not yet be defined.
- Go to the Pre-request Script tab for the request.
- In the Snippets section, click on the Set an environment variable snippet. This will add the following code to the pre-request script:
pm.environment.set("variable_key", "variable_value");
- In the set command, change variable_key to be person_id and change variable_value to be 1.
Now if you send the command, the pre-request script will first set the person_id variable to have a value of 1 and then when the request is sent, it can use that variable in to set the URL correctly.
This example was a simple and somewhat contrived one. I did this in order to help you understand how this works, but there is a lot more that you can do with this. For the next example, we'll look at how to pass data between tests.
Passing data between tests
In order to pass data between requests, you will need multiple requests. You can use the request from the previous example for one of the requests but you will need to create a new request called Get Homeworld in the Star Wars collection. Once you've done that, use the following steps to set up that request and pass data between the two requests:
- Set the URL of that request be {{base_url}}/planets/1.
- On the Tests tab of that request, add the following code:
var jsonData = pm.response.json();
var planetResidents = jsonData.residents;
pm.collectionVariables.set("residentList", planetResidents);
This will get the list of URLs that represent the people who live on this planet out of the response from the first request and add it to a variable called residentList. Note that in this case, we are saving the variable into the collectionVariables scope. That is so that it will be available to all requests in the collection.
- Send the Get Homeworld request in order to create that variable.
Now that you have a variable with a list of URLs, let's see if you can use it in the Get a Person request to get the information about one of the residents of that planet.
- On the Pre-request Script tab of the Get a Person request, get rid of the previous code and instead add the following code:
var residentList = pm.collectionVariables.get('residentList');
var randomResident = residentList[Math.floor(Math.random() * residentList.length)];
var splitResidentStr = randomResident.split('/');
var personId = splitResidentStr[splitResidentStr.length - 2];
pm.environment.set("person_id", personId);
There is a lot of code here and some of it does things that you might not understand, so I want to walk through this one line at a time and explain what is going on:
var residentList = pm.collectionVariables.get('residentList');
This first line is just getting the data in the residentList collection variable and storing that data in the residentList local variable:
var randomResident = residentList[Math.floor(Math.random() * residentList.length)];
You only need to use one of the URLs in the residentList array, and so this next line picks a random item out of that list. Don't worry too much about the details of how the code in there works. Often when I want to do something like this, I will do an internet search for something like how to get a random item out of a list in JavaScript. Almost always within the first couple of results you will see an example that you can use:
var splitResidentStr = randomResident.split('/');
Once you have one of the URLs, you need to get the person ID out of that URL. There are several ways to do this. The way I have done it here involves splitting the URL at the slashes. This will turn the URL into a list where each item in the list is the text that is between a set of slashes:
var personId = splitResidentStr[splitResidentStr.length - 2];
I can then use that list of the split up the URL and extract the second last item from the list to get the person ID that I need. This kind of thing can a bit tricky to figure out, but once again a bit of searching on the internet will usually help you out with stuff like this. You can also use console.log() to print out values along the way to help you figure out what values a variable has and how you might need to parse it in order to get the data that you need:
pm.environment.set("person_id", personId);
The final line in the script is just doing what we were doing in the previous example, but this time instead of setting the value of person_id to 1, we are assigning it to have the value that we have extracted from our random person URL. You should now be able to send the request and get back data about one of the inhabitants of Tatooine.
I don't know about you, but I think that is pretty cool! At this point, you could create a test for the random person call that check that their home world is planet 1. I won't walk through the details of how to do that, but I would encourage you to try it out for yourself and run the test a few times and prove to yourself that this kind of powerful validation works! Now that you know how to pass data between tests, let's look at how you can leverage that to build workflows in Postman.
Building request workflows
In this next section of the chapter, I will show you how to use environments to help manage data that is shared between tests, but there are also a few other built-in methods that can help you manage tests that are tied together like the example we just set up. In this case, the second request depends on the first request having been run. By default, Postman will run them in the order they appear in the collection, but what if someone moves them around? In order to explicitly tie them together, we can use the setNextRequest method to let Postman know which request it should run next. You could do this by adding a line like this to the test (or pre-request) scripts to tell Postman that the next request to run is the Get a Person request:
postman.setNextRequest("Get a Person");
It is still important to note that you need to have the first request before the other one in the collection. The setNextRequest method will skip ahead to the next test (which means that any tests between them will not be executed). If you had your tests in reverse order (that is, first Get a Person and then Get Homeworld), the execution order would look like this:

Figure 6.7 – Request execution loop
First the Get a Person request would run and then the Get Homeworld request would run. The Get Homeworld request would then call the Get a Person request (using the setNextRequest method). This would bring execution back to the top and so Postman would start running all the tests again. As you can see, this would lead to an infinite loop, so you want to be careful when using this method.
There are specific cases where using this makes sense, but in general I would suggest that you do not use setNextRequest to control flow between requests. You are better off designing your test collections well so that they run as you would want. However, there is one situation where I think looping can be helpful, and this method can help with that.
Looping over the current request
You certainly don't want to set up any infinite loops, but sometimes you might want to use the same request multiple times with different values. The setNextRequest method can be used to help you do this. Go to the Get a Person request, and let's see if you can get it to run once for each person in residentList.
First of all, you don't need to pull a random value out of the list, so you can comment out that line by putting two slashes (//) in front of it, or you can just delete the line altogether. Instead of pulling out a random value, we want to run this test once for each item in the list. In order to know which instance of the loop you are on, you will need a counter. The problem is, you can't just add a variable at the top of the script and initialize it to 0, since then the counter would be at zero every time the request is run. You will need to have a variable that is not a part of the test. I will go over environments in more detail later in this chapter, but we can do this with an environment variable. Add this line to the script:
var currentCount = pm.environment.get("counter");
This counter needs to be initialized to start at 0. You can do this by going to the Get Homeworld request, and on the Tests tab, setting the environment variable to 0:
pm.environment.set("counter", 0);
Now go back to the Get a Person request and set it up to use that counter to access the items in the list:
randomResident = residentList[currentCount];
This will give you the link at the index that currentCount is at. The counter starts at 0, so the first time this test is run, it will give you the first item in the list (don't forget that list indexes start at 0). However, we need that counter to change so that the next time we run this test, it gets the item at index 1. You can do this by set the counter to equal one more than it does right now. Add this code to the bottom of the script to do that:
pm.environment.set("counter",currentCount+1);
You can create the loop by adding this code to the next line in the script:
postman.setNextRequest("Get a Person");
This will tell Postman that the next request you want to run is the Get a Person test, which of course is the current test. Postman will then run this request again, but since you have added 1 to the counter, it will now use the list item at index 1 instead of index 0. The test will continue to loop over and over, but there is still one more problem. When will the test stop looping? You need an exit condition so that you don't end up trying to run more loops than there are items in the list. In this case, the exit condition will be when the counter has accessed the last item in the list. You can create this condition with an if statement that checks whether currentCount is less than the length of the list:
if (currentCount < residentList.length) {
This if statement should be placed right after you get the current value of the counter and you should put everything else in the test inside that if statement. At this point, you should have the script ready to go and it should look like this:
var residentList = pm.environment.get("residentList");
var currentCount = pm.environment.get("counter");
if (currentCount < residentList.length) {
randomResident = residentList[currentCount];
var splitResidentStr = randomResident.split('/');
var personId = splitResidentStr[splitResidentStr. length - 2];
pm.environment.set("person_id", personId);
pm.environment.set("counter",currentCount+1);
postman.setNextRequest("Get a Person");
};
Now that you have this script ready to go, let's look at how you would actually run it. The Postman collection runner allows you to run all the requests in a collection.
Running requests in the collection runner
You can open the collection runner from a few places in Postman, but since you know that you want to run the tests in the Star Wars API collection, you can start it from there by following these steps:
- Click on the collection in the navigation panel.
- On the resulting page, there is a Run button near the top right. Click on that to open the collection runner:

Figure 6.8 – Run collection button
This will show you the order that the requests will be run in along with all the requests that will be run.
- Deselect all the requests except the Get Homeworld and Get a Person requests, and make sure those two requests are in the correct order. Your collection runner should look similar to this:

Figure 6.9 – Collection runner setup
- Once everything is set up correctly, click on the Star Wars API button to run the collection.
You will see that it runs the Get Homeworld request and then it runs the Get a Person request once for each person in the list.
There are some additional things to talk about on the collection runner, and I will go through some of the options in more detail in Chapter 7, Data-Driven Testing, but for now, you can see that you can use the collection runner to easily run multiple tests at once.
Important note
Before running requests in the collection runner, make sure you have saved any changes made to those requests. The collection runner uses the last saved version for each request when running. If you have made recent changes to a request and have not saved them, they will not be reflected in the collection runner. This can be confusing and has puzzled me in the past, so try to get in the habit of always saving requests before opening the collection runner.
Passing data between tests like this can enable some cool and powerful workflows, but there are some things to be careful of with this as well. One of the biggest issues you might run into with these kinds of workflows are challenges with maintaining the tests. It can be a bit of work to track where a variable is being set or modified. In this example, I used the collectionVariables scope to store the variable, but you can also store variables in environments, which can make them a bit easier to manage.
Using environments in Postman
Postman environments are a place where you can create and manage variables. You can set up multiple environments for different purposes. Environments are very helpful when you need to share data between requests, and so in this section, I will show you how to use them to manage your variables. You can also manipulate variables in the environment, and so I'll show you how to do that as well so that you can also use Postman environment to help you explore or debug issues. In the first place, let's look at how to manage variables using environments.
Managing environment variables
Creating an environment is easy. Follow these steps to create one:
- Click on the New button and then select the Environment option.
You can give your environment a name; in this case just call it something like SWAPI Env. You can then start creating variables in the environment. Let's use this environment to manage the person_id variable that you are setting in the pre-request script.
- Type person_id in the first field of the VARIABLE column and set the INITIAL VALUE to 1. The following figure shows what that would look like:
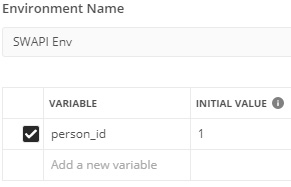
Figure 6.10 – Create an environment variable
- Save this environment and then close the dialog.
- As shown in the following figure, in the upper right-hand corner of the app, you will see a dropdown. Click on this dropdown and select SWAPI Env from the list:
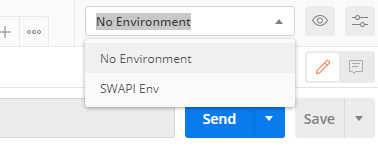
Figure 6.11 – Select environment
- Now that the environment is active, send the Get a Person request.
This request will set the value of the person_id variable to something new.
- Click on the Environment quick look icon to see what value it has been set to and you should see a panel pop up that looks like this:
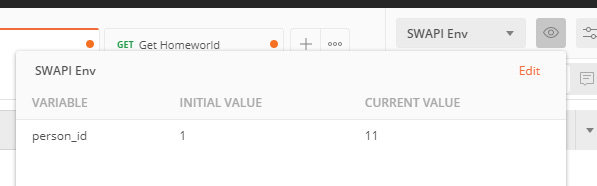
Figure 6.12 – Environment quick look
Since the ID is selected randomly, you might see a different value than me for the current value, but this shows you already how this can help you manage your data. You now have one spot where you can check on what value is being used for your variable. In addition to using this to manage your environment variable, you can also use it to edit them.
Editing environment variables
One of the many benefits of environments in Postman is the ability to have all your variables in one place so that you can see and understand what is going on. However, there may also be times when you want to edit something in the environment. Perhaps you are trying to debug an issue and need to use a specific value for just one time, or perhaps you are exploring the API and want to try out some specific values. Whatever the use case, there are times you might want to do this, so let's take a look at how that works in Postman. In first place, let's add the residentList variable into the environment as well so that you can manage and edit it. You can add it into the environment with the following steps:
- Click on the Environment quick look icon and then select the Edit option to edit the SWAPI Env environment.
- Add a new variable called residentList and set the initial value of it to be an empty list, that is, with two square brackets like this: [].
- Click on Update and then close the dialog.
- Now go to the Get Homeworld request and on the Tests tab, modify the line where you are setting the variable to use pm.environment.set instead of pm.collectionVariables.set.
This will save the variable value into the environment variable that you just created.
Now that the variable is going to be saved into the environment, we also need to read it out of there.
- Go to the Get a Person request and change the pm.collectionVariables.get line to instead use pm.environment.get.
- Go back to the Get Homeworld request and send it. This will save a list of people into the residentList variable. Once again, open the environment quick look and you should be able to see this list:
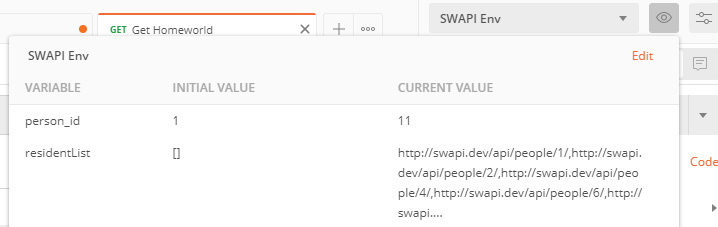
Figure 6.13 – ResidentList current value
This makes it much easier to manage, but you can also edit the environment variable in here as well. Click on the edit icon that shows up beside the variable when you mouse over, and it will open the current value field for editing. If you wanted to, you could edit this variable. For example, you might remove all entries but one from the list if you were trying to check that the loop works if it only has one item in the list.
Environments allow you to edit variables and give you a lot of control and insight into what is going on. They are a helpful tool for you to manage your data with, and I would recommend using them to manage variables whenever possible.
Summary
Sending API requests allows you to inspect the responses and check that the API call is working the way you want it to. This is a manual process, though, and often you will need to create tests that can be run over and over again to check for product regressions. In order to do this, you need to be able to add checks to a request. This chapter has given you the ability to do that. You have learned how to add assertions that check various aspects of an API response. You have also learned about the various built in assertions that Postman provides to help you with this.
Sometimes you need to get some input data into a specific format in order to be able to check the things that you want to check. This chapter has also helped you learn how to set up scripts that can run before a request so that you can have everything in the necessary state. I also showed you how to run a request multiple times so that you can check many things in one request. This chapter also covered how to create request workflows so that you are able to check things that require multiple API requests.
In addition to being able to automatically check that API calls are working correctly, you need to be able to easily run those tests. In Chapter 8, Running API Tests in CI with Newman, I will show you more advanced ways to do this, but in this chapter, I introduced you to the collection runner, which allows you to run multiple tests. The chapter also taught you how to use environments to manage the variables and data that you might create in your testing scripts.
If you worked through the exercises and followed along with the material in this chapter, you should have a good foundation in place for getting started with creating automated tests. In the next chapter, I'll talk about some more advanced things that you can do with automated tests in Postman. We will be working through data-driven testing and how to set it up and use it in Postman.