Chapter 10: Testing an Existing API
APIs come in all shapes and sizes. I have tried to give you a few different APIs to practice on as you've worked your way through this book. If you have worked through the various examples and challenges in this book, you should have a pretty good idea of how to use Postman with various types of APIs. In this chapter, though, I want to get you thinking about how you can use Postman to test an existing API.
Although new APIs are being created every day, the reality is that there are a lot of APIs out there that do not have adequate tests. You might be working on one of those APIs. Perhaps you are even working on an API that has been around for some time. I was recently working on a project that was under a tight deadline and, to meet this deadline, we had to leave some of the API tests until later. It can be a bit overwhelming to have to go back and add tests to an API that already exists and so, in this chapter, I want to walk you through a case study where you can see examples and practice testing existing APIs. These are the topics that we are going to cover in this chapter:
- Finding bugs in an API
- Automating API tests
- An example of automated API tests
- Sharing your work
Technical requirements
The code used in this chapter can be found at https://github.com/PacktPublishing/API-Testing-and-Development-with-Postman/tree/master/Chapter10.
Finding bugs in an API
Finding bugs can be easy. Sometimes they just jump right out at you. However, the easy-to-find bugs aren't usually the ones that matter. Good testers are those who can find the hidden bugs that matter. Doing this is often difficult and takes some practice. In this chapter, I will help you to get started with creating good automated tests, but before going deep into that, I want to give you some practice at the skill of looking for bugs. In this section, I will help you to set up an API locally that you can use for testing.
I will then show you how to do some testing and exploration of this API and help you to find some bugs in it. I will also show you how to reset the service. This API is meant to break sometimes and so you may need to reset it back to its original state. I will also show you the steps to find one of the bugs in the system so that you can get a bit of an idea of how to go about doing this. Let's dive into this by setting up the API that you are going to test.
Setting up a local API for testing
There are a lot of sites that you can practice calling an API on. However, many of them do not give you the ability to practice POST, DELETE, and PUT calls. This is understandable since those calls can change things for other users in the system, but it would still be nice to be able to test on a full-fledged application. To help you out with that, I have created an application that you can use to practice your API testing with. To get started with using this application, you will need to make sure you have a few things in place.
If you have already done some of the other examples in this book, you should have Node.js installed, but if not, you will need to download and install it. You can get it from here: https://nodejs.org/en/download/. Once you have that installed, you can set up the application for local use with the following steps:
- Download the application from the GitHub repository for this course (https://github.com/PacktPublishing/API-Testing-and-Development-with-Postman/Chapter10).
- To install the application, ensure that the downloaded files are in the folder you want them to be in, and then open Command Prompt and navigate to that folder.
- Once you are in the correct folder, call npm install to install the application. This will install all of the dependencies that you need and get everything ready for you.
- After the npm install has completed, you can start the application by calling node application_server.js.
This will start the server for you and you should see a message saying JSON Server is running. Requests can be accessed at http://localhost:3000/, as shown in the following screenshot:

Figure 10.1 – Server running correctly
You can now start making requests to the server using that as the base URL. This application provides a basic API for a blog with the following endpoints:
- /blogposts
- /blogposts/<id>
- /comments
- /comments/<id>
- /profiles
- /profiles/<id>
These endpoints have relationships with each other. For example, comments are children of blog posts. You can include children resources in an API response by using the _embed query parameter. An example of that would be to get the list of all blog posts with the comments embedded in the response with the following call: GET /blogposts?_embed=comments.
You can also look at the relationship from the opposite direction where you are requesting a child resource, but you want the response to also include information of the parents. To do this, you can use the _expand query parameter. This parameter will cause the API to return the requested resource along with information about its parent. For example, if you want to see the first comment in the system along with the information about the blog post that it belongs to, you can do so with the following call: GET /comments/1?_expand=blogpost.
This API is a full CRUD API, so you can use GET, POST, PUT, and DELETE with it. We will use this API throughout this chapter as we learn more about testing an existing API.
Testing the API
The first thing I want you to use this API for is to practice finding bugs. Later in this chapter, we will look at using it to practice setting up automation in Postman. To get started with exploring, though, you will need to first have some familiarity with how this API works:
- Ensure that you have the server running and then create a new collection in Postman called something like ExampleBlogAPI.
- Add a request to this collection called blogposts and set the URL of the request to http://localhost:3000/blogposts. Make sure the request method is set to GET.
- Send the request and you should get back a list with one blog post in the list.
In the blog post data, you will see that there is a profileId variable. Let's check on the profile of the author of this blog post.
- Add a new request and set the endpoint of the request to http://localhost:3000/profiles/1 and the method to GET. Send the request.
This gives you the name of the person who wrote the blog post, but notice that it does not give you any information about what posts this user wrote. On the other hand, if you add another request that looks at the response of the /comments/1 endpoint, you can see that it includes an entry with the blogpostId variable of the blog post it is associated with. This means that you can use the _expand parameter on the comments but not on the profiles.
As I said before, this API is a full CRUD API, which means that you can also create, update, and delete data. For example, if you want to create a new blog post entry, you can use the following steps:
- Set the action to POST and the endpoint to http://localhost:3000/blogposts.
- In the Body tab, set the type selection to raw, as shown in the following screenshot:

Figure 10.2 – Setting the raw body type
- Choose JSON from the drop-down menu, as shown in the next screenshot:

Figure 10.3 – Set the body type to JSON
You can then fill out the actual body of the request. You don't need to specify the ID since the server will automatically create it with the next available ID, but you can set the title, body, and profileId fields by specifying JSON similar to that shown in the following code snippet:
{
"title": "The second blog post",
"body": "This is my second blog post",
"profileId": 1
}
- Send the request and you should see that a new blog post has been created.
You can also check that it has been created by changing the action to GET and sending the request again to see the full list of blog posts in the system.
Similarly, to create a new post, you can use PUT to modify an existing blog post. To do that, you can use the following steps:
- Go back to the request that gets the blogpost information and change the endpoint to /blogposts/1.
When you are modifying a resource, you need to let the server know exactly which resource you are modifying and so you need to specify the blog post ID in the endpoint. The blog post ID (1 in our example) is the resource identifier that tells the server which blogpost we are interested in.
- Set the API action to PUT.
As with creating a new resource, you need to specify the data that you want to modify. You do that in the body of the request.
- Set the Body type to raw and choose JSON from the drop-down menu.
- Specify which fields you want to modify. For example, to modify the body of the blog post, you could specify JSON as shown in the following snippet:
{
"name": "The first blog post",
"body": "This is my first blog post. Look I
modified it!",
"profileId": 1
}
Notice that, although you are only modifying the data in the body field, you need to specify all of the other fields as well. This service is very simple, and so it will blindly apply whatever you give it in a PUT call. It will not just update the fields that you request but rather will replace the entire resource with the data you have given it. This service does not support it, but if you are interested in only changing one property (as we are doing here), you can sometimes use the PATCH method instead of PUT. PUT generally updates a resource by replacing it while PATCH is intended to only modify the specified fields and leave everything else the same. For this book, we will continue to use PUT, but if you see PATCH used in production, just think of it as something similar to PUT but that does a partial update of the resource instead of completely updating it.
Deleting data is simple with this API. Just call the endpoint for the resource that you want to remove and specify the action as DELETE. Now that you know how to call this API, it's time to look at what bugs you can find in it.
Finding bugs in the API
This API is not very robust. It doesn't do much error checking and so it should be pretty easy to break it. Before moving on with this chapter, I want you to do just that. Spend some time exploring how this API works and trying to break it. There are several possible ways to do that, and I would strongly encourage you to spend a few minutes thinking about the kinds of inputs and configurations you could use that might cause problems for this API. See if you can get the server to give you a 500 error!
Note that this is meant to be a challenge, which means that it is OK if you find it a bit tough to do. Stick to it for a while and you might just be surprised at what you can do. It's OK to feel a bit frustrated and lost sometimes as that is often when the most learning is happening! I will share with you one of the ways that you might see an error later on in this chapter, but first, see what you can find on your own.
As a reminder, when you are looking for bugs, don't just try the things that you expect to work. Think about what things you could try that might show you places where the API doesn't work. For example, you could think of things like the following:
- What would happen if I used the _embed and _expand parameters in places where it wouldn't be able to do anything?
- What kinds of inputs to the system might break things?
- Could I create links between different parts of the system that might break stuff?
- Could I remove links between different parts of the system that should be there?
Add your own thoughts to a list like this. What kind of things can you think of that might make this API break? This API is meant to be broken in various ways, so see what you can do to find those broken spots. Since this API is meant to break, let's look at how you can reset it if it does break.
Resetting the service
As you try things out in this API, you might end up causing corruption that the API can't recover from. If you do that, don't worry—it's part of what you are trying to do. However, it could mean that you can't do other exploration and testing that you want, so you may want to reset the service. You can do that with the following steps:
- Go to Command Prompt that the service is running from.
- Hit Ctrl + C to stop the service.
- Call node reset_db.js to reset the data.
- Restart the service by calling node application_server.js.
This will reset all of the data back to this initial state for you.
Now that you have had the chance to do some exploring and find some bugs on your own, it's time to look at an example of the kinds of bugs you can find in this API.
Example bug
There are several bugs that you might have found in this API. I will share the steps to reproduce one of them here so that you can get a better feeling for how to find a bug like this. Finding this bug comes down to combining two ideas. To understand them, let's look at some steps of how you might figure this out.
Let's start with exploring the _expand and _embed query parameters. If you call the /blogposts/1 endpoint with ?_embed=comments, you will get back a response that has the comments for that blog post embedded in it. If you instead call it with ?_expand=comments, it will tell you that you have a bad request.
Comments are children of blogposts and not their parents, so it makes sense that we are not allowed to expand it as if it is a parent. We sent an incorrect request and the server correctly responded to that by giving you an error message and a 400 response. Everything is good so far, but we should keep this in mind. Just because the server was able to handle the error properly here, doesn't mean it will be able to do so everywhere. What would happen if we tried to do this same expansion, but this time, instead of doing it on an individual endpoint, we did it on the blog posts list?
Try calling /blogposts?_expand=comments and you should see a 500 error from the server. It turns out that it doesn't handle the incorrect input correctly in this place. There are other ways to trigger server errors in here as well, but hopefully, this example helps you with thinking about how to search for bugs in an API.
Exploring an API and trying to find bugs interactively is an important testing skill, but often when you are looking at an existing API, you will be interested in adding test automation. It is often important to be able to run a suite of tests against an API every time changes are made, so let's turn our attention to the process of creating automated tests.
Automating API tests
API test automation is often valuable, and in this section, I want to help you to think about how to get started with creating it for an existing API. However, I'm not going to walk you through a step-by-step process of doing this since I want you to practice doing this on your own. You will learn more if you try some things out on your own. I won't just throw you in the deep end though. In this section, I will give you a quick review of some concepts that will help you with creating API test automation. I will then give you a challenge that I want you to try, and I'll also give you some guidance on how you might break down your approach to solving this challenge. If you work through this challenge, you will find that you have learned a lot about how to create good API test automation. So, let's start with a review of some important concepts for API test automation and think about how they could play out in creating tests for this API.
Reviewing API automation ideas
We have already looked at exploring this API and so you should have a pretty good feeling for how it works and what the various pieces of it are. Use that information to help you to put together a well-organized collection of tests. Think about how you are going to organize the tests and how you can set things up to test the various endpoints and available actions for each one.
This API does not have any authorization, so you don't need to worry about that, but you will want to think about how to create test validation. What kind of things do you want to check for each API call? What kind of inputs might you want to use to check these things? It is a bit more difficult to come up with great test cases when you are testing an application that isn't dealing with real situations but try to imagine that this API is for a real blog posting service. What kinds of things would you want to check for something like this?
In this section, I want to challenge you to take this existing API and create a suite of tests for it. That is a pretty big task, so let's take it on one piece at a time. I want to strongly encourage you to do each of these pieces for yourself. Save all of your work into a collection and at the end of this chapter, I will show you how you can share it so that others can see what you have been learning. I will work through examples showing how I approached these challenges, but you will gain much more out of it if you first try to work through this on your own.
This is a big challenge, and so I have a few hints and ideas for you in the next sections that will help you to break down your work and approach it systematically.
Setting up a collection in Postman
I would suggest that you don't just start adding tests right away. First, take a bit of time to think about how you want to set up the collection in Postman that you can use for your testing. Careful consideration of how you are going to organize your collection and set up the tests will help you out a lot later on when you are adding tests. It is also a good practice to think this stuff through as it can have a big impact on how easy it is to run and maintain tests later on.
Here are some things that you might want to consider when defining the structure of your collection:
- What are the various endpoints for this API?
- How does the testing of the different parameters fit into the way I would set up the tests for this collection?
- How am I going to test the various types of actions that are available?
- In what way do the different pieces of this API relate to each other and how might I want to check those relationships in my tests?
You may want to think through these ideas and map out some ideas on a piece of paper first so that you get a good idea of how you are going to approach this. This might feel like it is overkill for this API, and it probably is, but it is a good skill to practice. Real-life APIs will often be much more complex than this and being able to break them down and think carefully about how you will structure the automation is a crucial skill to have. This structure will be helpful when you start adding tests to the requests.
Creating the tests
Once you have the structure in place, you can start to flesh it out and create the tests themselves. You will want to fill in the appropriate URLs for each request, being sure to create parameters wherever it makes sense to do so. You will also want to consider whether there are any places where you could use data-driven testing to simplify your tests. As you create the tests, here are a few questions you might want to consider:
- What kind of things do I want to check for each request?
- How can I reduce the number of inputs to the test while still getting good coverage?
- Am I using variables and environments efficiently?
- Will these checks be stable and consistent?
- Will these checks actually fail if something goes wrong?
- What will happen when this test is run multiple times?
Creating tests for each of the requests is a big job, but it is a critical part of any test automation work. The things that we check for inside each test will, to a large extent, determine how useful the tests are. Take a bit of time to work through this challenge. You will find that as you try to balance out the need for coverage with the need for some degree of efficiency, you will learn a lot. Make sure you also take the time to think about how you can share data between tests. Environments and variables are powerful tools in real-life API testing so be sure to use this challenge as an opportunity to test your skills on these things.
Don't rush through this challenge. There is a lot that you can do with this, and by spending time working through it, you will be learning a lot. I keep repeating this throughout this book, but that's because it is true; the best way to learn this kind of thing is by practicing. Take your time and think about how you are approaching test creation. Try different things until you are comfortable with the structure of your request and with the tests that you've added to them. Once you have put in the effort to do this yourself, it will be helpful to compare what you came up with to another solution. I worked through this challenge myself and I have shared my approach in the next section.
An example of automated API tests
I've laid out a challenge for you around creating test automation for a simple API. I hope you have worked through that challenge on your own and have a robust suite of tests that you can run against this API. In this section, I will show you one possible way that you could go about doing this. This is by no means the only way to do this and perhaps is not even the best possible way. If what you have looks quite different than this, that is no problem at all. There is a lot of benefit to seeing how other people approach their work, and so take this section as a place where you can see the work of someone else and perhaps even learn something from it.
In this section, I will walk you through the process of designing the collection layout, and then I will show you the various tests that I made and how I set things up to share data between them and make them easy to run and maintain. I will also explain my thought process and why I decided to do things the way I did. This will allow you to see what considerations I was using and help you to think about the kind of trade-offs that go into designing API test automation.
Setting up a collection in Postman
The first thing you needed to do was to figure out how you wanted to set up your collection in Postman. I approached this by first creating a collection called ExampleBlogAPITests to store my tests in. Before I started creating any requests in there, though, I decided to diagram out how the API worked and how the various pieces of it related to one another. To do this, I explored how the various endpoints worked and drew out a diagram showing how they are related to each other. The following shows what this diagram looks like:
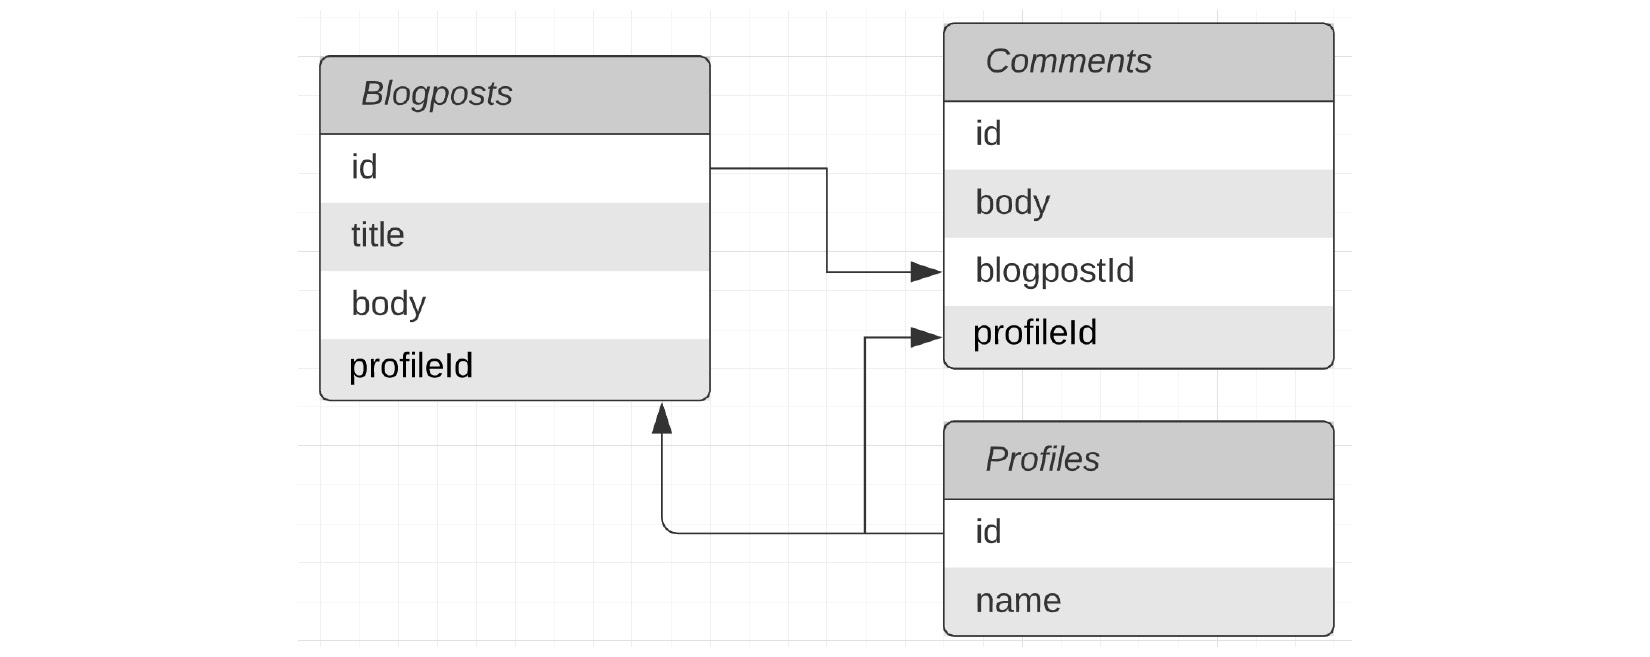
Figure 10.4 – API layout
This diagram shows what data is stored in each endpoint and shows how they relate to each other. So, for example, in this diagram, you can see that comments are children of blog posts. This means that you can use the _embed query for them. Profiles, on the other hand, are parents of blog posts and so if you are looking at blog posts, you would need to use _expand to include them in the response. Of course, inverse relationships exist if you are going in the opposite direction. This is an important consideration that I will keep in mind while designing the test structure.
Now that I have a good grasp of the API structure and relationships, I can look at the actions available on each endpoint. I put together a small table to help me to map that all out, as you can see in the next screenshot:

Figure 10.5 – API actions
Understanding the structure of the API is a good place to start, but it is certainly not the only thing I want to consider when designing my test layout. An API serves a purpose and although this is a fake API, I can imagine that the purpose it serves is to support a blog site. When thinking about that, I want to consider what workflows might be important to consider. For example, when a user posts a comment, maybe we would want the middleware using this API to check whether their profile ID exists, and if not, prompt them to create a profile. At the API level, this workflow might look like making the following calls:
- POST /comments: Giving a profileId that is not yet in the system
- GET /profiles/<profileId>: Where profileId is the one given in the first step
- POST /profiles : Creates a new profile using the next available profileId variable
- POST /comments: The same comment as before, but now the profile ID exists
- GET /blogpost/<blogpostId>?_embed=comments: To refresh the page with the new comment
If I set up each of the endpoints in their own folders and then create tests for this kind of workflow as well, I might end up duplicating some things that I'm checking. After some consideration, I decided that I would still create a folder for each endpoint. I would use those checks as smoke tests to let me know that at least the basic functionality of the API was still working. Smoke tests are a set of tests that can run quickly and give you an early indicator of any potential problems. Much like the saying "where there is smoke, there is fire," smoke tests let you make sure that everything is reasonably stable before you go on with more complex testing. This is a good automation strategy to take so that is how I've decided to implement these tests.
Once I pulled all of these pieces together, I ended up with a folder structure that looked something like this:

Figure 10.6 – Test folder structure
Let's zoom in and take note of a couple of things in this screenshot. You can see that I chose to combine the POST and DELETE tests:

Figure 10.7 – Post and delete combined
This is because I decided that I wanted to try to make it so that tests leave the system in the same state it was in when the test started. This makes it much easier to manage the tests since you don't need to worry about what order tests run in. It can also make debugging much easier since you don't need to do much to get the system into the same state that it was in when the test failed. To maintain the system state when creating new items, I would have to delete them afterward. Since I need to do this anyway, I just combined them both into one test. I should note, though, that a Postman request can only use one action type, and so to do this, I will need to use some background calls. I will show you how I did that in the Creating the tests section.
I also have not included separate requests for each of the query parameters. Instead, I plan to use data-driven testing to exercise those different options. I will, once again, get into that in more detail later in this section.
I included a couple of examples of the kinds of workflows you might check with something like this. In real-life applications, these would be built out based on conversations with project managers and others in the business along with the developers and testers. I included a couple here as examples, but I'll be focusing on the other parts of this collection in more detail and include those just as examples of the kinds of things you might think of when doing this kind of testing. A collection with a bunch of requests is a good start, but it isn't worth much without some tests.
Creating the tests
Now that I have the structure of my requests in place, I'm ready to start creating them. The first thing to do is to fill in the endpoints for each of the requests that I've made. I'm going to need to go through each one and add the URL, but I want to be forward-thinking as well. I'm working on a local build here. What if, in the future, I was to need to test this on a production server somewhere or even just on a different port number? I don't want to have to go through and update every single URL in this test suite. This is where environments are helpful.
Updating the environment
To make future maintenance reasonable, I will make a variable to store the base URL for this collection. I anticipate that I'm going to need other variables as well, so I will go ahead and create an environment that I can use to store the variables, as shown in the following screenshot:

Figure 10.8 – Creating an environment
As you can see in the screenshot, I have also created a variable called base_url that I will use in the URL for each of the requests.
Important note
As shown in the previous screenshot, environment variables have an initial value and a current value. With a newly created environment variable, those values will both be the same, but if you modify the value later, Postman will set that in the current value while keeping the initial value there for your reference.
Once I have added the environment and made sure that it is the active environment, I can enter the request URL for each of the requests. For example, the URL for the GetBlogpostList request would look like this:

Figure 10.9 – Request URL
Using a similar pattern, I can quickly add the URL to each of the requests. I also add a variable to the environment for the id of each object type, as shown in the following screenshot:

Figure 10.10 – Object IDs in the environment
This will allow me to use the same request to potentially call more than one of each object. While going through and adding the URLs, I also updated the call methods so that they are using the correct one for each request. Now that this is all filled out, I'm ready to start adding tests to these requests.
Adding tests to the first request
I know that I will most likely want to share some of the tests and scripts that I make across multiple tests. However, a common mistake that automation engineers (and developers in general) make is to over-generalize. They can often spend too much time making a general solution that will work in a wide variety of contexts. This is great, except that it can take a lot of time to make a generalizable solution like this, which can lead to wasted time and effort. To avoid that, I will first add a test to one of my requests and then as I start adding more tests after that, hopefully, I will be able to see which things make sense to generalize and share between tests.
The first place where I will add tests is to the GetBlogpostList request. At this point, there is only one blog post in the list. I could just check that the entire response body does not change. This is an acceptable thing to check if you are pretty sure that the data will be stable. However, if you expect that it might change, you will want to be more careful with checking something this specific. In this case, since this is a list of requests, I fully expect that it will change over time, so I don't want to just blindly check it.
Instead, I set up a test that ensures that the first blog post in the list doesn't change. This check is based on a few assumptions about the system, but we must make assumptions at some point, so I will go ahead with it. I want to create a couple of tests that will all use the response data, so I will create a variable for that and one that stores the first blog post data that I do not expect to change. These variable definitions look like this:
var jsonData = pm.response.json();
var firstBlogPost = {
"id": 1,
"title": "The FIRST blog post",
"body": "This is my first blog post",
"profileId": 1
}
I can then create a test that will check that the first blog post data stays consistent:
pm.test("Check first Blogpost Data", function () {
//assume that the first blogpost won't change
pm.expect(jsonData[0]).to.eql(firstBlogPost);
});
Now, this is a good start, but if I am checking the list of blog posts, I want to do more than just look at the first item in the list. I also want to check that any other items in the list are correct. I will try to set up my tests so that they don't change the system, but I like to be as careful as possible when creating tests. I don't like having to go and update tests multiple times just because of some small change elsewhere in the system. To create a robust check, I will create a test that checks that all of the blog posts in the list have the correct fields in them. I can do that with a test like this:
pm.test("Check that each blogpost has required fields", function () {
var x;
for (x in jsonData) {
var postKeys = Object.keys(jsonData[x]);
pm.expect(postKeys).to.have.members(['id','title',
'body','profileId']);
}
});
So, now that I have a couple of tests in place for this first request, let's look at some of the other requests and see whether there is anything we can do to share data between the tests.
Adding tests to the second request
The second request I will add a test to is the GetSingleBlogPosts request. This request will get the information about a given blog post, but don't forget that I've parameterized the blog post ID for this, so I don't know exactly what blog post I'm going to get. I can't use the test that checks the first blog post, but I should be able to do a similar test to the one where I check that each blog post has the required fields. In fact, I should be able to directly use that same test in both requests.
Instead of having the same test exist in two different requests, I will move it out of the GetBlogpostList request and into the blogposts folder so that both requests can use it. This can be done with the following steps:
- Highlight the text for that test in the Tests panel of the GetBlogpostList request and cut it, as shown in the following screenshot:

Figure 10.11 – Cut the test out of the first request
- Click on the Edit option on the menu beside the blogpost folder, as shown in the following screenshot:

Figure 10.12 – Editing a folder
- Go to the Tests panel for the folder and paste in the copied test.
- Click on the Save icon at the top-right of the panel to save this test into the folder.
The test is now saved in the folder instead of the request, but if you go to the original GetBlogpostList request and run it, you will see that the test fails with a ReferenceError since the jsonData variable is not defined. To fix this, I will need to copy the line where I defined that variable from the test into the folder. At this point, the code in the folder looks like this:
var jsonData = pm.response.json();
pm.test("Check that each blogpost has required fields", function () {
var x;
for (x in jsonData) {
var postKeys = Object.keys(jsonData[x]);
pm.expect(postKeys).to.have.members(['id','title',
'body','profileId']);
}
});
This test will now run against all of the requests in the blogposts folder. For example, if you go to the GetSingleBlogPosts request and run it, you will see that the test is run too. In fact, if you go and do this, you will see that the test fails with an assertion that looks like this:

Figure 10.13 – Failing test
At first glance, this seems odd until you remember that the test is looping over all of the blog posts in the list and checking each of them. However, when we call the endpoint for an individual blog post, we don't get a list. We just get back that blog post. Does this mean that it won't work after all to share the code? Well, not so fast. We should still be able to share some of it. We know that for any given blog post, the code inside the loop should be valid. I just need to factor that out into its own method and we should be able to use it.
Unfortunately, that is a bit tricky to do with Postman. You can just write a function in a folder and then call it in all tests in that folder. There are some ways to work around this though. I used the following steps to create a function that I could then call in the tests:
- Go to the Test tab of the blogposts folder and create a function called check_blogpost_keys.
- Copy the part of the code that checks the blog post keys into that function.
- Modify the code so that it checks the object that gets passed into the function. The code looks like this:
function check_blogpost_keys (blogpostData){
var postKeys = Object.keys(blogpostData);
pm.expect(postKeys).to.have.members(['id','title',
'body','profileId']);
}
- Call the function from inside the for loop. The for loop now looks like this:
for (x in jsonData) {
check_blogpost_keys(jsonData[x]);
}
- Save the folder, and go to the GetBlogpostList request and run it to make sure that everything still works.
So far, this seems great, but I need to be able to access this function from a request and not just from the folder.
- Edit the folder again and save the function inside of an object. The code for doing this looks like this:
utils = {check_blogpost_keys: function (blogpostData){
var postKeys = Object.keys(blogpostData);
pm.expect(postKeys).to.have.members(['id','title',
'body','profileId']);
}
}
What this code is doing is creating an object called utils. This object maps the name of the function to the definition of the function, which means that I can call this function by calling that key from the function. In other words, calling utils.check_blogpost_keys(<input object>) will call the function. However, the utils object that I am creating here still needs to be made available for the requests in this folder.
Objects defined in the Tests tab of the folder will not be available until too late in the process, but by moving this to the Pre-request Scripts, I can make it available for all of the tests in the folder.
Once the utils object has been moved to the pre-request scripts, I can copy the Check that each blogpost has required fields test back into the Tests tab of the GetBlogpostList request and change it so that it is using the utils.check_blogpost_keys() call to check the results. The test should now look like this:
pm.test("Check that each blogpost has required fields", function () {
var x;
for (x in jsonData) {
utils.check_blogpost_keys(jsonData[x])
}
});
That was a lot of complexity to just make it possible to share a couple of code lines between tests. Given how small this API is, it probably wouldn't make sense to do this normally, but I think that being able to share code like this is important if you want to make good test automation and so I wanted to spend a bit of time explaining how to do this.
Now that we have this shareable code, I can use it when adding tests to the other requests in this folder. The test that I add to the GetSingleBlogPosts request looks like this:
var jsonData = pm.response.json();
pm.test("Check that the blogpost has required fields", function () {
utils.check_blogpost_keys(jsonData);
});
This test also uses the shared function from the util object. A nice thing about this is that if the expected keys in the blogposts responses were to ever change in the future, we would only need to update them in one place. There are more requests to add tests to though, so let's look at the next request.
Adding tests to the POST request
The next request I want to add tests to is the PostAndDeleteBlogpost request. Before I can add tests though, I need to fill the body of the request that will be sent during the POST call. On the Body tab of the request, I will set the type to raw and then select JSON from the drop-down menu and add the following body:
{
"title": "New Blog Post Title",
"body": "This is a blog post that I created with the
API",
"profileId": 1
}
I will then add the same test code to this that I was using in the previous requests.
When I set up the structure for this collection, I wanted this test to POST and then DELETE the newly created blog post so that it wouldn't change the state of the system. Postman allows you to send API calls directly from a script, so you can do that in the Tests tab using the following code:
var post_id = jsonData.id;
var base_url = pm.environment.get("base_url")
pm.sendRequest({url:`${base_url}blogposts/${post_id}`,method: 'DELETE'}, function (err, response) {
pm.test("Delete Response is OK", function () {
pm.expect(response.status).to.eql('OK');
});
pm.test("Delete Response body is empty", function () {
pm.expect(response.json()).to.eql({});
});
});
The pm.sendRequest function allows you to send API calls. You need to specify the endpoint you are calling, the request method that you want to use, and a callback function. You can see that I have defined variables for base_url and post_id. I wanted to ensure that the base URL would automatically update if I ever change it for the collection, so I made sure to use the variable from the environment. I also needed to get the id of the blog post that was just created and use that in assembling the URL. Obviously, I need to set the method to DELETE and then in the callback I've defined the tests that I want to run.
I have defined the tests right inside the callback to the sendRequest function. The first test checks that the DELETE response returns a response status of OK. The second test checks that the body of the response is empty since I do not expect a delete call to return anything.
This gives us tests for the POST and DELETE call, but we aren't done yet. Now, let's look at the UpdateBlogpost request and see how to test a PUT call.
Adding tests to the PUT request
To test the UpdateBlogpost request, I first need to put something in the body of the request so that it will actually update correctly. Once again, I can do so using the raw and JSON options. I decide to set the body to this value:
{
"title": "modified Blog Post Title",
"body": "This is a blog post that I modified ",
"profileId": 1
}
As I am doing this, I realize something. When I mouse over the blogpost_id variable in the URL, I can see that I have set it to 1. However, if you remember, I have a test in the GetBlogpostList request that assumes that the first request will not change. If I change that blog post with the PUT request, the next time I run the request getting the list of blog posts, it will fail. I have a couple of options available to me:
- Remove that test from the POST request—the test probably isn't strictly necessary there, so this is an option.
- Create a new blog post before doing the PUT call—if I did this, I would want to also delete it afterward.
- Get rid of this request and include the PUT call in the PostAndDeleteBlogpost request— this is probably a better choice than turning the PUT request into a POST, PUT, or DELETE request, but it would make that test hard to debug if something went wrong.
- Make sure I set the request back to its initial state after modifying it—I think this is probably the best choice.
I wanted to share this list with you so that you can get a bit of an idea of what kind of thought process goes into designing good test automation. You need to consider things like making one test too big to easily debug and what assumptions your tests might be making.
I think this thought process also highlights why I wanted to make tests that leave the system in the same state it was in when the test started. In this case, I remembered that I had this assumption in one of my other tests, but if multiple people were working on the automation or if it had been a long time since I created that test, I might have accidentally caused another test to fail due to my actions in this test.
So, how do I go about creating this test so that it will not change the system? I used the following steps to set up this test:
- On the Pre-request script tab, I create a request that will GET the data for the blog post and store that response in a variable. The code looks like this:
//get original value
var base_url = pm.environment.get("base_url");
var post_id = pm.environment.get("blogpost_id");
pm.sendRequest({url:`${base_url}blogposts/${post_id}`,method: 'GET'}, function (err, response) {
pm.environment.set("original_get_response",
response.json());
});
- Moving over to the Tests tab, I create the same test as the one on the other requests where I am checking that the blog post has the required fields.
- I can then use the original_get_response variable that I made in the Pre-request scripts to reset the post back to its original state. I will once again use the sendRequest function. Since this time I need to send body data, I need to specify a few more things, as you can see in the following code:
//reset the blogpost back to its original state
var base_url = pm.environment.get("base_url");
var post_id = pm.environment.get("blogpost_id");
var original_response = pm.environment.get("original_get_response")
pm.sendRequest({url:`${base_url}blogposts/${post_id}`,
method: 'PUT',
header:{'Content-Type': 'application/json'},
body:{mode: 'raw', raw: original_response}},
function (err, response) {
console.log(response.json());
});
You can see that I had to specify the Content-Type header and specify that the mode of the body data I was sending was raw. This finishes up this test. So far, I have created a good suite of tests for the requests that I have. These tests should check the things I care about and not fail unnecessarily. They give reasonable coverage of the endpoints, but I still need to think about how to test the query parameters.
Adding tests for query parameters
None of the tests so far are checking what happens when I use the _embed and _expand query parameters. When I initially designed the test layout, I had thought that I could test these using data-driven testing on the existing endpoints. However, after trying a few things, I have discovered that it would be very difficult to do this due to the way the values of the query parameters are named. I have decided that instead, I will need to add new requests to check each of the query parameters.
This is a very common thing in designing test automation. Much like other development work, you can't plan everything accurately upfront. You will almost always need to have some iteration on what you do. It is still very valuable to spend some of that up-front time planning, but don't let the plan exert too much control on what you do. As you discover new things during the process of creating the tests, it is OK to change the plan.
Based on the diagram that I made for the way the different pieces of the API interact, I've decided to add two more requests to the blogposts folder, as shown in the following screenshot:

Figure 10.14 – New requests
I also decided to make the tests for these requests simple. I will just assume that the first blog post, comment, and profile will not change and then hardcode in the expected values for each of those in the tests. For example, the GetBlogpostWithEmbeddedComments request looks like this:

Figure 10.15 – Embedded comments request tests
GetBlogpostWithExpandedProfile takes a similar approach to testing this. Now that I have this in place, I can run all of the tests in that folder. I would then need to work through similar steps to set up tests in the comments and profiles folders, but at this point, you should have a pretty good idea of how to go about that, so I won't walk through it in detail.
We have covered a lot in this section, and you have done a lot of work in thinking through this challenge. You've learned how to create automated API tests including a review of some automation test ideas along with how to set up collections and tests in Postman. You then learned how to create several different tests for different kinds of GET requests as well as tests for POST and PUT requests, tests that use query parameters. Along the way, you've learned a lot of tips and tricks for organizing tests, including how to effectively share code between requests and how to use environments. That's a lot of material and this kind of work should be celebrated and shared so, in the next section, I want to show you how you can do just that.
Sharing your work
If you went through this exercise and built a suite of tests, you will have learned a lot about API test automation. One thing that is important in the modern economy is being able to showcase your work. There are millions of testers and developers working in the industry and you want to be able to stand out from the crowd by showing that you really know your stuff. One great way to do that is by sharing examples of the work you have done and the things you have learned.
I have had a blog for years and have found that to be a helpful way to stand out. I personally love blogging, but it does take time and certainly isn't for everyone. If you want something simpler, there are still ways that you can share your work. You can create a GitHub account, for example, and create public repositories that showcase what you have done and learned.
Within Postman, you can also share what you have done. These features are mostly intended for helping with collaboration between team members, but you can also use them to showcase the work that you have done.
Sharing a collection in Postman
You can share a specific collection in Postman with the following steps:
- Click on the View More Action button beside the collection that you created when doing the previous exercise in this chapter.
- Choose the Share Collection option from that menu:

Figure 10.16 – Share Collection menu option
- If you were trying to share with teammates, you could share the collection to a shared workspace, but in this case, you are trying to share with the public, so choose the Embed tab.
- On this tab, you can click on the Generate Code button to create HTML that you can embed onto a web page. You can also choose the Static button option if you want to generate Markdown code that you can use in something like a GitHub repository.
- Make sure to also pick the appropriate environment from the environment drop-down menu.
You can then copy the code and use it on whatever site or resume you want. If you just want the link, you can go to the Get public link tab as well and get a shareable link from there.
Summary
This chapter has mostly been about working through an example of creating automated tests for a simple service, but it has taught a lot of lessons along the way. After learning about how to set up the testing site, you learned how to explore the API and find bugs in it. Once you were able to do that, we started to look at how you can automate tests. I gave you a challenge: creating a test automation suite for the test API. I hope you took the time to work through the challenge on your own and were able to learn a lot about what API test automation would look like.
I also walked you through an example of how I would have gone about solving the challenge. While going through my solution, you learned about how to set up collections in Postman in a way that organizes the requests so that they will be maintainable. You then learned some more about using environments to set up and share variables. I then walked you through creating tests for the different requests.
The tests that I created for the first request were straightforward although I did show you how to check the properties of multiple items in a list. The tests for the next request built on that and you learned how to set up a test in a folder so that it could be shared across multiple requests. As part of this, you learned how to define a function and save it into an object so that you can call the function from multiple tests.
After that, you learned how to create tests for a POST call. In this section, you learned to use the sendRequest method to send an API call from within a test so that you could clean up the test and leave the state of the system unchanged. The tests for the PUT request then showed you how to get some data in a pre-request script that you could then use while cleaning up after the test completed. The final tests that we looked at showed how test design is an iterative process, and you learned how to update and change your plans based on new information that you learned while creating the other tests.
The last thing you learned in this chapter was how to share your work so that you can show others what you have done. You have learned a lot in this book, so don't be scared to share what you have learned with others!
This chapter has taught you a lot about how to create tests for existing APIs, but sometimes you will be working with brand new APIs. When you get to this, it is exciting because you can follow some design-driven approaches, and so in the next chapter, we will look at how you can design an API specification for new APIs.