Chapter 11: Designing an API Specification
Magic shows are a lot of fun. The magician does something that seems impossible and it thrills and excites us. How can they possibly do that? I could never do that!
From the outside, software development can seem a lot like that. The developer types out some code and, like magic, something happens in the application. How can they possibly do that? I could never do that!
Of course, if you look on the internet, you can find videos that show you some of the tricks magicians use. It turns out that many magic tricks involve a few simple rules. Similarly, with a bit of time, you can understand how software development works. For those of us who have made it through the frustration of learning to code, we realize that actually, we can do that. It's not so complicated after all. It's just the application of a few simple rules.
I kind of felt that way about API specifications and schemas. I'd heard the term before, and I had seen errors come up in my code editor saying that I had a schema validation error. As far as I could tell, though, all this came about by some sort of magic. I did not understand how they worked and how to use them. Well, it turns out that much like magic tricks, this kind of thing can also be learned.
The next couple of chapters in this book will revolve around helping you learn how to use Postman when you design a new API from scratch. The first step in that process will be to use an API specification language to set up an API definition. In Chapter 3, OpenAPI and API Specifications, I introduced you to the concept of API specification languages and how to use them. This chapter will build on those concepts and help you work through much more complex examples of this. If you have not yet read Chapter 3, OpenAPI and API Specification, you may want to go back and review the material in that chapter.
The topics that we are going to cover are as follows:
- Creating an API specification
- Adding the API to Postman
- Understanding API versioning
Technical requirements
The code used in this chapter can be found at https://github.com/PacktPublishing/API-Testing-and-Development-with-Postman/tree/master/Chapter11.
Creating an API specification
I want to keep this practical for you, so in this chapter we are going to walk through the process of creating an API specification from scratch. In order to do this, we will create a specification for the API of an imaginary to-do list application. I want you to imagine that you are going to create the API for an application that can create and display items on a to-do list. This application will allow users to create new to-do items. It will also allow users to mark those items as complete and to make changes to the item after they have created it. They can also delete an item that they no longer want to track.
Our job in this chapter will be to create an API specification that lays out exactly what this API is going to look like. We will then look at how we can use this specification in Postman to create an API and set up tests for it. For the work we are doing here, you don't need to worry about what the user interface will look like.
The approach we will use is the design-first methodology. You will first design the API specification and then once that is laid out, we will look at how to use it to create the API itself. There are several different API specification languages out there, but the most common one is the OpenAPI Specification, so that is what we will use in this chapter.
In this section, I will show you how to set up an API definition file that uses the OpenAPI Specification to define the rules for what that API can do. I will show you how to define the endpoints and the parameters for those endpoints. I'll also show you what a schema is and how to use it with the OpenAPI Specification. In addition, I will walk you through some of the complexity of defining the behavior of request bodies and responses, as well as showing you how to create examples in the specification.
Important note
Although I will show a lot of detail about using the OpenAPI Specification in this chapter, I can't cover everything here. If you need more information on any of this, you can check out the documentation for this specification here: https://swagger.io/docs/specification/about/.
In order to do all that, you are going to need to define an OpenAPI Specification file. Let's look at how to do that next.
Starting the file
OpenAPI Specification files start with some general information about the API. There can be a lot of detail that goes into this, but let's keep it simple for this API. We will define what version of the OpenAPI Specification we are using and then include a few details about the API itself, as shown in the following code:
openapi: 3.0.1
info:
title: ToDo List API
description: Manages ToDo list tasks
version: '1.0'
servers:
- url: http://localhost:5000/todolist/api
I've decided to set the server URL as running on the localhost for now. That can always be changed in the future if you want.
An API specification needs to be saved into a file. There are some different editors and tools available for editing these files, but I suggest that you just use your favorite code or text editor. It can get overwhelming to learn too many things at once. Instead of trying to figure out which editor to use and what features it has, stick with one you know.
OpenAPI Specification files can be saved as either JSON or YAML. JSON, or JavaScript Object Notation, is a common coding format, but it is a bit less readable than YAML, so I prefer to use YAML format for this kind of file. If you have created code similar to what was shown previously, you can save it to a file called todoList.yaml.
With this starting point in place, you are now ready to start filling out the details of the API in this file. The easiest place to start is with defining what endpoints the API needs, so that is where we will turn our attention next.
Defining the endpoints
Endpoint definition is one of the key parts of designing an API. In this case, we know that the API needs to supply a list of tasks for the to-do list. A logical thing to do, then, would be to have an endpoint called /tasks that will give us information about all the tasks in the system.
However, just getting a full list of tasks isn't going to be enough. We are also going to need to be able to get and modify information about individual tasks. In order to do this, we will need another endpoint called /tasks/{taskdId}, where taskId is a number representing the task that we are looking at.
If you think about the different actions that this API supports, we can then start to build out the methods for each of these endpoints. We are going to need to be able to GET the full list of tasks and we will also want to be able to GET individual tasks. We also know that we need to be able to create new tasks, and the best way to do that is by doing a POST on the /tasks endpoint. In addition, we need to be able to modify and delete individual tasks, so we will need PUT and DELETE calls on the /tasks/{taskId} endpoint. If you put all this information into the .yaml file, you should have a section in there that looks like this:
/tasks:
get:
post:
/tasks/{taskId}:
get:
put:
delete:
Now that you have this skeleton in place, you can start to fill out the details of each of these requests. There are several different fields that you can add to each request. You don't need to add all of them, but I would suggest including the description and responses fields. The description field is just a text description of what the endpoint does, but the responses field can contain a lot of information about what you expect the response to look like when that endpoint is called.
For example, if you fill out the GET request for the /tasks/{taskId} endpoint, you might make something that looks like this:
/tasks/{taskId}:
get:
description: Gets the information for the specified task
responses:
‹200':
content:
application/json:
This response is defined as having a response code of 200. It also defines the content type as application/json. This means that an acceptable response from a call to this endpoint is one that has a code of 200 and one in which the data is in JSON format. This is a start, but it doesn't say anything at all about what that data should look like, so it isn't really that helpful in helping you design the endpoint.
In order to do that, you are going to need to define a schema for what you expect these requests to respond with when they are called. Wrapping your mind around what a schema is and how to use it can be a bit intimidating, but like anything else it is something that you can learn, so let's dig into it and see what it is all about.
Understanding the API schema
We can define rules that dictate what the response should look like by defining the schema. At its most basic, a schema is just a set of rules that you can apply to the data of the response. These rules include things like what fields are supposed to be there and what kinds of data are allowed to be in each of those fields. There are many different rules that can be applied to a response with the OpenAPI schema. This schema is based on the JSON Schema specification, which is a widely used description of rules that can be applied to structured data.
Although it can take a bit to wrap your head around, a schema is actually a very important design tool. When we take the time to think carefully about what rules should apply to the data we are sending and receiving, we are working on a design problem. By using a schema to lay out the specific rules for what things an API is allowed to do, we are engaging in a design process.
In real-life application development, you would want to talk to those designing the user interface to see what information they would need. You would have a discussion about what data is needed, what data might be optional, and what data you want to make sure you never get. All of these things can be defined with schema rules. Since we aren't actually developing a user interface for this API, we can just make some reasonable assumptions about what this data should look like.
For example, we can assume that each task will need to have some text—let's call it a title—that defines what the task is. It will also need a way to represent the status that lets the users know what state a task is in. For our purposes, let's say that the status can be either New, In Progress, or Completed. We could get more complex and say that it needs something like a due date, but let's keep it simple for the first pass at this API and just define those two properties. So, now that we know what properties we want each task to have, how do we set up a schema that defines this?
You can define a schema entry under application/json. At this point, you could create the schema directly under that object. However, since most of the responses that we define in this application are going to have similar data in their responses, it would make much more sense to have this schema defined in a place where we can reference it from multiple endpoints. You can do this in OpenAPI by creating a new section in the file called components and then specifying a schemas entry where you will create each type of schema that you need:
components:
schemas:
You can now go ahead and create a schema for what response we should get back when calling the endpoint for an individual task. You know that the content is going to be a JSON object, so you can start with that and define the type as object. We've already decided that it will need to have two properties, a title and a status. The title will need to be a string so we can define its type as string. The status will also need to be a string, but it can't be just any arbitrary string. It is only allowed to have a certain set of values. Specifying that set of values is called enumeration. Pulling this all together, you can create a schema for the task response that looks like this:
components:
schemas:
task:
type: object
required:
- title
- status
properties:
title:
type: string
status:
type: string
enum: [New,In Progress,Completed]
Note the required entry in there. By default, all properties are considered to be optional, so in this case, we will only consider it to be a valid response if it includes the title and status properties. Now that you have defined this schema, you need to reference it from the endpoint. You can do this using $ref, making the content portion of your endpoint definition look like this:
content:
application/json:
$ref: '#/components/schemas/task'
This defines the response for a GET call on the /tasks/{taskId} endpoint, but we would expect to get back the exact same schema when doing a PUT or POST call as well, so we can define those in a very similar way. However, for a DELETE call we would expect things to be a bit different. This call does not return the object that is deleted. Instead, it returns an empty object, so you can set the schema for that to be type: object.
Another endpoint that should give back a different response is when we get the full task list using the /tasks endpoint. Each item in the list will be a task object and can thus use the task schema, but they will all be wrapped in a list so you can't just directly reference the task schema. Instead, you can define a new schema called tasks. The type of this item will be array since we expect it to be an array of items. You can specify the items as a reference to the task schema since each item in the array should have that schema. In the .yaml file, it would look like this:
tasks:
type: array
items:
$ref: '#/components/schemas/task'
With that, you have defined the schema for these API responses. We aren't quite ready to import this specification file into Postman, but when you do, you will be able to use these schema rules to validate that you are getting the correct responses from the API calls that you send.
With the schema defined, it's time to take a step back and look again at the endpoints. You've defined the different endpoints along with the methods that they support, but one of them has a path parameter in it. This parameter needs to be defined in the specification as well, so that's the next thing we will look at.
Defining parameters
In the /tasks/{taskId} endpoint, you have specified a path parameter (taskId) but have not yet defined it. The OpenAPI Specification requires that parameters like this are defined for each request on this endpoint. You can do this by adding the parameters key and then specifying the schema for that parameter. Since this parameter needs to be defined for multiple call types, you can create a new entry for it in the schemas section and define the schema there:
taskId:
type: integer
minimum: 1
This specifies that the taskId must be an integer and that it cannot be less than one. You can then reference this schema from the parameter along with specifying the name of the parameter and the fact that it is a required path parameter. Pulling that all together, the code for it would look like this:
parameters:
- in: path
schema:
$ref: '#/components/schemas/taskId'
name: taskId
description: Id of the task
required: true
This specifies the details for this parameter and is placed under the GET, PUT, and DELETE definitions for the endpoint. Note that the – in parameter has the – in front of it. This is because parameters is considered to be an array object and in YAML, arrays are specified with a dash.
Now that you have a definition in place for the parameter, it's time to look at ways that we can flesh out the endpoint definitions that we have. You have added a response to each endpoint, but most APIs don't just have one response code, so let's take a look at how you can add additional responses to the API definition.
Adding additional responses
So far, all the responses that we have set up in the specification have been about what happens when everything goes OK. But we all know that not everyone uses an API in exactly the way it was meant to be used. What happens if someone sends data in the wrong format? What should the API do then?
The responses object is plural, which indicates that we can add more responses to it. Each response definition that you add starts with a status code. Let's look at adding a 400 response to the /tasks/{taskId} GET call. Just like with the 200 response, we can add a description and then specify what the content of that response should look like. Since a 400 means that the user has specified the data in the wrong format, the API won't be sending back a task object. Instead, you could define the schema as an error string:
'400':
content:
application/json:
schema:
type: string
Since you will probably want all of the endpoints to have a 400 response, it would be a good idea to create an entry in the schema section that you could then reference from all of the endpoints. You could also add responses for other response codes that you want the API to give. We didn't talk about authentication in the API, but if it was authenticated, you might want to put in 401 and 403 responses. We want to walk through creating these responses as they are all very similar to what you have done already. If you want, you can look at the ToDoList.yaml file in the GitHub repo for the book to see this all laid out in one place.
Every API call should have a response of some sort. Not all API calls require data in the body of the request, but some of them do. Let's take a look at how you define that kind of data in the definition file that we are working on.
Describing request bodies
When sending a POST or PUT request, you need to specify some data in the body of the request. In a similar way to defining the responses, you can define the content of a request body for these requests. The request body for the POST response in the to-do list API might look like this:
requestBody:
required: true
content:
application/json:
schema:
$ref: '#/components/schemas/task'
The required: true item means that you must specify a body when sending this request in order for it to be a valid request. The rest of the definition is the same as that for a response. You specify the content type that is allowed (and you can specify multiple content types if the API supports more than one), and then you specify the schema that dictates what rules the body needs to follow. In this case you can use the same task schema that was defined earlier since that same data format is what you will need to specify when creating a new task.
The PUT request body definition is the same as the one we just defined for the POST request. You could directly copy the entry from the POST request into the PUT request. In this case, that would be a fine thing to do, but if you were using the same body definition in a few places, it could get cumbersome to copy and paste it to multiple places. It would also be a pain to update if the requirements of the body ever changed. Instead of pasting the same definition into multiple places, you can create a reusable body definition and reference it from each place. You can do so with the following steps:
- Go to the components section of the specification file and add a requestBodies entry.
- Under the requestBodies entry, create a name for the shared body definition – maybe something like taskBody.
- Cut the requestBody definition out of the POST endpoint section and paste it into the new location. The code should look like this:
components:
requestBodies:
taskBody:
required: true
content:
application/json:
schema:
$ref: '#/components/schemas/task'
- Add a reference to the requestBody entry in both the POST and PUT requests. These entries should look like this:
requestBody:
$ref: '#/components/requestBodies/taskBody'
These definitions will allow validation of the requests that are being sent, and setting them up in this way makes them easy to maintain if the API was ever to change.
We have now covered most of the parts of the OpenAPI Specification, but one other commonly used item is examples. They are not required for an API definition, but they are nice to have, so let's look at how to use them.
Using examples
So far, we have defined the behavior and schema of the API, but it is also nice to give some examples so that API users can understand a bit better how the API works. Examples are just illustrations of possible ways to use the API. They are not rules that must be followed, but they can be really helpful to have in place. They can help human users understand how to use the API, and they can also be used as a basis for creating automated tests.
Examples can be added to a requestBody or to a response. Let's add one to the requestBody that we defined in the previous section. You can do that by adding an example key to the application/json content type item and then specifying examples of the properties that need to be sent. The code for that would look like this:
content:
application/json:
schema:
$ref: '#/components/schemas/task'
example:
title: 'Learn API Testing'
status: 'New'
This example shows you one way to specify the body of the request. In this case, we only added one example, but what if we wanted more—say, one for each different status type? You can do that by changing the key to examples (with an s) and then giving each example a name and value, which would look like this:
examples:
New:
value:
title: Learn API Testing
status: New
InProgress:
value:
title: Learn API Testing
status: In Progress
Completed:
value:
title: Learn API Testing
status: Completed
Examples can also be defined for responses as well as in a few other places in the definition. They are all defined in a similar way, so you should be able to figure out how to do them.
With that, we have covered most of the main features of the OpenAPI Specification. There are, of course, additional details that I haven't been able to show you here, but by using what you've learned in this chapter, you should be able to create your own API definition file. Creating a file like this is helpful for thinking through the API design and for documenting what your API should do, but it can also be used for a lot more than that. In the rest of this chapter, we'll look at how you can use this kind of file in Postman to help you with your testing work.
Adding the API to Postman
Now that you have created a specification file, it's time to see how you can use it in Postman. In this section, I'll show you how to use the OpenAPI Specification to create an API and collection in Postman. You will also learn about the automatic testing that Postman does with this and some of the different ways that you can use the specification file to verify that things are working correctly.
In order to do all this, you will need to import the file into Postman. You can do that with the following steps:
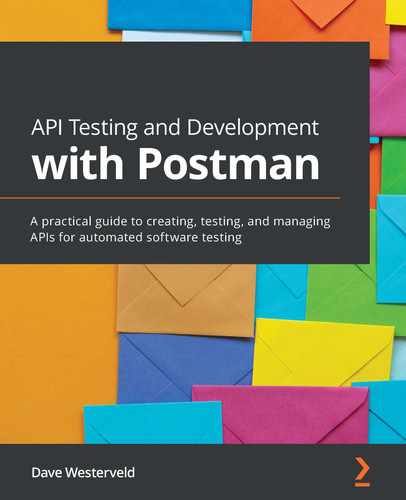
- Click on the Import button and, on the File tab, click on the Upload Files button:
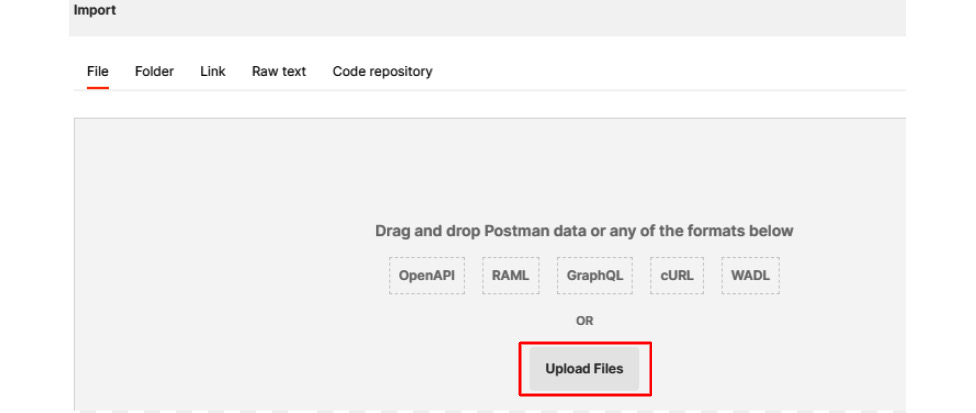
Figure 11.1 – Uploading an OpenAPI file to Postman
- Browse to where you have saved the .yaml file and import it.
- Leave the Generate collection from imported APIs option selected but change the Link this collection as option to Test Suite:
Figure 11.2 – Link imported specification to a test suite
- Click on Import.
Postman will automatically add a collection for you with the title you specified in the specification file. In that collection, it will add requests for each of the endpoints that you've defined. If you edit the collection and look at the Variables tab, you will see that it has also added a variable for baseUrl.
Postman has also automatically created an API from the imported specification file. If you go to the APIs tab in the navigation panel, you can click on the ToDo List API to see what Postman has added for you. The Overview tab shows you a summary of the API, but if you go to the Define tab, you can see the imported API definition.
You may see some errors in there. Although I suggested starting with a simple text or code editor when working with an OpenAPI file, there are certainly some benefits to having an editor that understands more about how the specification works and can give you some feedback. For example, when I imported the file, I got some warnings like these letting me know that description is a required field for some of the entries:

Figure 11.3 – Missing required property
You can make any necessary tweaks to the definition in Postman. Once you have addressed any errors, you can go to the Test tab. You will see the test suite that Postman created for you there, and you can click on the Validate button beside this test suite to validate that everything you need has been specified in the definition.
Postman uses the specification for a couple of different kinds of validation. This particular validation is just to ensure that the collection and specification match each other. It lets you check that you've created the specification correctly and that it is ready to use for creating tests. You may want to re-run this validation if you make changes to your collection or if you update the specification. Although this is a useful check, it is not the only one that Postman does for you. It will also run contract tests for you.
Contract testing
When you import an OpenAPI Specification and create a collection from it, Postman will automatically run schema validation checks every time you make an API for one of those requests. If the API responds with data that is incorrectly formatted, you will get a warning letting you know that there are discrepancies between the specification and the current response. This kind of testing is known as contract testing.
With contract testing, you are essentially ensuring that the data from running your requests matches what is specified in the current contract. In this case, that contract comes from the definition files that you've created. Essentially, the definition file says that if you do a certain action you will get back a response that follows the rules you laid out in the schema for that action. This is a contract that you are providing and when you run the actual requests, Postman will check and see if they are matching that contract and give you a warning if you are not. You can create explicit contract tests in Postman as well, where you manually specify the schema, but since you created this schema in OpenAPI there is no need for that.
You can, however, add some tests of your own if you want. I've covered how to create tests in several other chapters in this book, so I won't go through the details of this again. The point that I want to make here is that you automatically get an entire suite of tests defined for you when you set up an API in Postman using an OpenAPI Specification file.
The enabling of tests like this is an important and powerful part of using an API specification, but there are other ways that it is helpful as well. One of the things that can help you with it is API versioning. This is an important topic in its own right, and so we will dig into it in more detail in the next section.
Understanding API versioning
Contract testing is a powerful concept that allows very fast and robust test automation. However, we shouldn't forget that contract tests are still tests. Sometimes tests fail because of bugs in the code, but sometimes they fail due to expected changes in the code. There are times when we need to update an API so that it invalidates the contract that we have laid out in the specification file. In those cases, we need to update the API definition. However, what if there are people who are still relying on the functionality to work in the way that it used to?
One common way to deal with this problem is by versioning the API. In this section, you will learn about API versioning and when it makes sense to use it.
When you define API versions, you can pick which version of the API you are using when you call the endpoints and it will give back responses that match the specified version. But how do you set that up in Postman? Well, you can create a new version of your API in Postman with the following steps:
- Select the ToDo List API from the APIs list.
- At the top of the page, you will see a tag showing you what version of the API is currently active. The API that was created from the OpenAPI import will be tagged as draft, as shown in the following figure:

Figure 11.4 – Draft API status
- Click on the Show All Versions link beside that tag.
- On the resulting flyout, click on Create another version.
- Call this v1, leave the Schema option selected, and click on Create Version.
Postman will create a new version of your API and make it active. If you look at the Define tab you will see that it includes the API definition, but if you go to the Test tab, you will see that it no longer has a test suite defined since you did not choose to add the element to this version of the API.
If you return to the Define tab, you can update url to append v1 to the end of it so that it looks like this:
servers:
- url: http://localhost:5000/todolist/api/v1
This means that if you include /v1 in any API calls to this service, you will get back responses that match the specification defined in version 1 of your API. If you click on Show All Versions again and pick draft from the list, you can go back to that version of the specification. Any changes that you make to this version of the API will not be reflected in version 1.
API versioning usually only needs to happen for breaking changes to an API, meaning changes that will alter the responses or input parameters in such a way that calls that rely on things being that way will break. You can usually make small changes to your API, such as adding a new error response code, without creating a new version. If you are significantly modifying the structure of an API response, though, you will probably want to create a new version of your API.
Thinking through when to create a new API version
API versioning can add complexity to managing and testing, so let's take a minute to reflect on when you would want to version an API. We will use the to-do list API that we've been working with throughout this chapter to think this through.
Imagine that you need to add in a due date field to the API. The field will be optional when creating or updating tasks and will be returned if it is there when getting tasks. The API is currently at v1. Do you need to create a new version of the API or not?
Well, let's look at how we can modify the definition to accommodate this change. First of all, you will need to add a new property to the task schema called dueDate. The type of this property will be string and it will have the date-time format. You can add an entry like this to the properties of the task schema to define this:
dueDate:
type: string
format: date-time
Since properties are considered to be optional by default, this is all that we need to do to specify that this is an allowable option for any calls that create, modify, or get tasks. So, now that you have updated the specification, what do you think? Should you create a new version of this API?
I would suggest that in this case you do not. This new property is optional, and so any previous calls or tests using this API will not have their contract broken since they can continue to use the API as they were before. In this case, you do not need to create a new version of the API.
Of course, if this was made to be a required field, you would need to create a new version of the API since in that case old calls that did not send that field would fail. This would then be considered a breaking change, which would necessitate an API version change.
API versioning and the ideas around when and how to deprecate old versions is a long and complex topic in its own right. I won't get into the details of it all in this book, but it is something to think about as your API continues to grow and evolve. API versions add complexity, as you can see here. The different versions will have different contracts and will need different tests. You will also sometimes need to update things in multiple places when making a bug fix or other holistic changes. Thankfully, Postman can help you out a lot with managing this on the testing front.
Summary
In this chapter, we explored what it looks like to use an API specification file to drive the design of an API. We saw how to get started with creating files like that and dug into the details of defining the different endpoints for an API. You also learned what a schema is in the context of an API test and learned a lot about how to set one up in an OpenAPI Specification file.
We also covered a lot of examples showing how to define the different parts of an API. You learned how to define parameters and how to create the definitions for request bodies and for the responses that a request returns. In addition, you learned how to use examples in the OpenAPI Specification.
Once we had gone over all of this, you learned how to use the file to help you out with defining an API in Postman. You saw how you can get Postman to automatically create collections and APIs for you, and you used Postman to edit and change the definition. We also went over how Postman uses the specification to automatically run contract tests for you. You also learned how to use API versioning in Postman.
In the next chapter, we will be looking at practical examples of creating and using mocks in an API. We will build on the things that we have covered in this chapter and show you some additional ways that you can use the power of an API specification file to help you with API design and testing.