Chapter 12: Creating and Using a Mock Server in Postman
Mock servers are used to help solve many different testing problems. They can help you control what inputs the UI gets, and they can be used to help drive better designs and to better understand how an API works. In many ways, the ability to create and use mock data is essential to good API testing and development. However, creating and using mock servers can also seem a bit intimidating if you are new to API testing concepts. It seems like a big and difficult thing to understand, let alone create and use.
I remember when I first started learning about mock servers and I thought that it was going to be a difficult and complex thing to use. I was expecting I would need to learn a whole bunch of new and different concepts in order to be able to use them. In some ways I did have to learn a lot of new stuff, but in other ways it turns out that if you have the right tools, creating and using mock servers is actually pretty easy to do. Postman is one of the tools that makes it simple to set up and use mock servers, and so in the rest of this chapter I will walk you through how to do this in Postman.
In this chapter, you will learn about the following:
- Different approaches to testing with mocks
- Setting up a mock server in Postman
- Creating useful mock responses
- Using a mock server
Technical requirements
The code used in this chapter can be found at https://github.com/PacktPublishing/API-Testing-and-Development-with-Postman/tree/master/Chapter12.
Different approaches to testing with mocks
There are a lot of different ways to test things. In this book, we are obviously looking at how to test APIs, but APIs exist as part of a larger ecosystem. Some APIs are used to support external workflows, and some are built to support internal UIs and workflows. When you think about the ways that we use and test APIs, there are two main things that we are doing.
Sometimes, we are the producers of the API. When we are working in this way, we are looking at how to verify that an API works the way it should, but even in this domain there are different ways to approach testing. Although APIs work below the UI, they still can include a lot of the development stack. An API call will be sent via the internet to a server and then the server will do some processing, including in many cases querying databases. It will then package up the information into the correct format and send it back over the network to the client that sent the API request.
One way to test this is at the integration level where you send a request and see what you get back. This kind of testing is great because it lets you see that all the different pieces are working well together. However, it also means that there are many points of failure. If something goes wrong in the network, or if there is a bug in the database query, or if there is a problem in formatting the response, the test will fail. This can make it harder to figure out where the issue is. It can also make each test take some time to run.
Although you should always have some integration tests, it is often more efficient to break up the different parts of the service and test them on their own. So, instead of just doing one call that sends a request through the network, does work on the server, and then sends back a response, you could test the different pieces of it separately. You could create tests on the server that verify that the SQL queries work correctly, tests that check that the server can handle different kinds of API requests, and tests that check that everything gets properly packaged up again.
Other times, we are the consumers of the API. This might be an API that another team at our company has made, or an API that provides information from another company altogether. In this scenario, the API is a black box to you, and you are not able to test the underlying pieces of it. The testing that you do in this situation is often more targeted at making sure that the API gives you the information that you need in the format you need it. These kinds of tests are less about helping you find where bugs are in the API and more about ensuring that any changes to the API won't break your downstream workflows.
In this realm, a full integration test would be doing something like clicking in a UI and ensuring that things go correctly through the system and that the UI responds correctly. There is still further test decomposition that can happen here as well. We could have a set of tests that checks whether the API continues to give back the responses we want, and then another set of tests that checks that the UI works correctly with those responses.
In fact, I need to go on a short rant here if you will indulge me. As testers, we often approach UI test automation in a very foolish way. We act as if it is a good way to test the functionality of a system. The reality is, UI automation is a very slow and error-prone way to check the functionality of a system. It is much better to check low-level functionality in a unit test. However, this does not mean that UI automation is not valuable. It really is. It's just that it needs to be used to test the UI. We shouldn't be trying to verify business logic or database behavior or stuff like that in UI automation. We should be trying to verify UI behavior. UI tests are for testing the UI. OK, I won't rant about this anymore, but it leads nicely into why mocking is such an important part of a good API testing strategy.
As a reminder, a mock is some code that substitutes for some real code and directly returns certain values given a certain input. As a concrete example, imagine an online store that uses a credit card service by calling the API. When testing that store, you might not want to send the credit card details to the credit card service, so you could instead create a mock server that you send these details to. This server could be set up so that it responds with a message that says it was processed, or maybe some different error states. Doing this allows you to test the application without needing to call the actual credit card service and perhaps rack up charges. It also allows you to try out some tests that would otherwise be difficult to do. Now that we understand some of the importance and reasoning behind creating mock servers, let's take a look at how to do it in Postman.
Setting up a mock server
There are a couple of different ways in which you can create mock servers in Postman. In this section, I will show you how to set one up that is based on a specification file. This will be the primary use case that I cover in this chapter, but I will also make sure that you understand some of the other ways that you create mock servers as well.
Creating a mock server from a specification file
In the previous chapter, I walked you through how to set up an API specification for a to-do list API. You may want to go back to that chapter and see how that was done, or you can download the specification from the GitHub repository (https://github.com/PacktPublishing/API-Testing-and-Development-with-Postman) for this book and import it into Postman as a starting point. If you do create the API from the imported OpenAPI definition file, ensure that the Generate collection from imported APIs option is selected and set the Link this collection as option to Test Suite, as shown in the following screenshot:

Figure 12.1 – Imported API specification options
Call the collection ToDo List API. You will also need an environment later on in this chapter, so let's go ahead and make it now using the following steps:
- Click on the New button and choose the Environment option.
- Name the environment ToDoList Mock Env.
This creates an empty environment. Later on, we will add values to this environment, but for now we just need to have one available. Once you've created an environment, you should be ready to create a mock server. You can do so with the following steps:
- Go to the navigation pane and on the API tab, click on ToDo List API.
- Go to the Develop tab, click on the Add Mock Server dropdown and choose the Create new mock server option, as shown in the following screenshot:

Figure 12.2 – Creating a mock server
- From the resulting dialog, choose the Use an existing collection option and then select the ToDo List API collection from the dropdown.
- Click on Select Collection and Continue to proceed.
- Give your mock server a name like ToDo List Mock and choose the ToDo List Mock Env environment from the dropdown.
- Click on Create Mock Server to create the server.
- Once it has created the server, Postman will show you some information about it, including a mock server URL. Click on that URL to load it into a request.
- The request will currently be called untitled request. We are going to use this request to do some tests, so click on the Save button to the right of the request.
- From the resulting dialog, name it something like ToDo List Mock Request.
- At the bottom of the dialog, find the ToDo List API collection and click on it so that this request will be saved in that collection.
- Click on the Save to ToDo List API button to save the request.
- The mock server URL can now be used as the base URL for requests to the to-do list service. If you add /tasks to the end of it, you can send the request and get back a response.
You will notice that it gives you back some values. Depending on the order in which Postman execution happens on your machine, you may see something that says "Bad data sent" or you may see a list of tasks. Either way, where are those values coming from? In this case, Postman has made some assumptions based on the information in the specification file. You can create or modify these values in Postman. I will show you how to do that in the next section when we discuss creating good mock responses, but first I want to take a minute to reflect on what we are doing here.
At this point, we have an API specification file that tells us how the API should behave, and we have this mock server that we can use. However, we don't yet have any code that actually stores or creates to-do items. If we were trying to develop an application, we would still need to develop a UI for it. In order to do that, we would need the API calls to return some data for us. We have not yet created code that passes data through an API interface and so it might seem that we are stuck in the water.
However, this is where a mock server can be very helpful. Once we flesh out what this server is doing, we can use it to give us data to use during the development of the UI. This opens up the possibility of working on the UI and the backend at the same time. In order to do that though, you are going to need to have this mock API send back responses that you can use. Before looking at that, I want to make sure you can create mock servers in other ways as well.
Creating a mock server from a collection
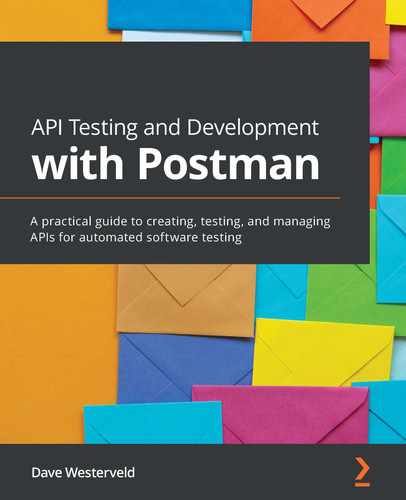
Before showing you how to use examples to customize the responses of your mock server, I want to mention a couple of other ways in which you can create mock servers in Postman. You don't need to go through these steps at this time, but the reality is you won't always have a specification to use when creating a mock server. In that case, you can still create mock servers in a few different ways. One way you can do that is to directly create it from a collection. You can do so with the following steps:
- Go to a collection in the Collections navigation panel and click on the View more actions menu button:

Figure 12.3 – View more actions menu button
- From the resulting menu, choose the Mock Collection option.
This will bring up a panel where you can fill in a name and select an environment for your mock server to use.
- You can then click on the Create Mock Server button to create the server.
At this point, you will have a mock server and could follow through with a lot of the same steps as I've outlined previously. One other common way to create a mock server is with the New button.
Creating a new mock server from scratch
Perhaps the most obvious way to create a mock server is by using the New button in Postman. There is a lot of similarity to things I've already covered, but I will just take you quickly through this so that you are aware of the details of this method as well. You can create a new mock server by using the following steps:
- Click on the New button at the top of the Postman application and choose the Mock Server option.
- On the resulting panel, ensure that the Create a new collection option is selected:
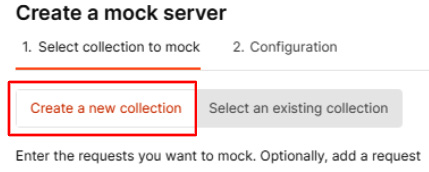
Figure 12.4 – Create a new collection option
- Add a request URL (perhaps something like /test) and a response body (maybe something like "Hello!").
- Click on Next and name the server.
- Click on Create Mock Server.
Postman will create the server for you, but it will also create a collection that the server is using. We will learn more about how these collections work and how Postman uses them to give you the mock server responses in the next section, so let's look at how do that now.
Creating good mock responses
When we created the API specification as shown in the previous chapter, we added a few examples. Postman will attempt to use those examples along with the default values in the specification to create responses for your mock calls. However, the default stuff that Postman sets up will need to be customized a bit to our specific needs.
In this section, I will show you how to use Postman to create good mock responses. We will look at the following topics:
- Using default examples
- Creating your own custom examples
- How to use dynamic variables in your examples
- How to give different responses based on different path parameters
- How Postman picks which example to return to you
This sounds like a lot, but we will work through it one step at a time and by the end of this section, you will have a good grasp of how to use examples in Postman to create useful mock responses. Let's start by looking at some of the default examples that Postman has generated.
Using default examples
Let's return to the question I posed earlier in this chapter: how does Postman know what data to return when we send a request to a mock server? When we created the mock server, we didn't explicitly define what responses it should give back for various requests, so how does Postman know what kind of response is correct? Well, let's take a look and see.
In the Collections navigation tree, go to the GET request on the /tasks endpoint of the ToDo List API collection. This request has two examples. You can find the examples in the navigation panel, as shown in the following screenshot:
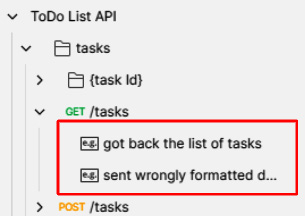
Figure 12.5 – Request examples
If you click on the example called got back the list of tasks, you will see that the body of it has a list of tasks. If you click on the sent wrongly formatted data example, you will see that the body of it is just set to the string "Bad data sent".
Mock servers will return responses based on examples defined in the requests in this collection, and so you will have seen one of these responses in the request that you sent. You can modify these examples if you want and then save the changes. If you then send another request to the mock server, you will then get back the new data in the response. How did this initial data get generated though? Well, to answer that we have to go all the way back to the API specification that you imported.
You can look at the API specification in Postman by going to the API and clicking on the Define tab. If you look at the /tasks path and then the description of the 200 response under that path, you will see that it is called got back the list of tasks. This is the same as the title for the example on the request in Postman, so clearly that is where Postman is getting the data for the response from. But if you look closely you will see that we haven't defined the rest of the data you see in the example, here in the spec, so where is the data in the body of the response coming from?
The answer lies in the schema for this response. If you scroll down to the /components/schemas/task section of the specification, you can see the properties of a task response defined. Postman has used those properties to generate some representative values. So, the title property is defined as a string, and Postman has generated a simple string to use there. The status property, on the other hand, is defined as an enumeration of some specific values and so Postman has picked one of those values to be used in the response. Since the dueDate property is defined as a date-time string, Postman has generated a sample data for that field. Postman has also automatically generated two items for this, since the /tasks field is an array.
All of this adds up to a nice simple example, set up automatically for you. Pretty cool, right?
As you've noticed, there are two different example responses. One of them specifies a 400 response and one of them a 200 response. This is helpful for testing out how an application will respond to different API response codes, but how can you get the mock server to respond with the data for the response code that you are interested in?
In order to do this, you can use the following steps to specify the x-mock-response-code header when sending the mock request:
- Go to the mock request and click on the Headers tab.
- Below the headers that have already been added is a spot to add a key and a value. Type in x-mock-response-code in the Key field and put 400 in the Value field.
- Send the response.
This will ensure that you get back a message that says Bad data sent. By specifying 400 in the x-mock-response-code header, you have told the mock server that you want it to return data for an example that has a 400 response code. Since an example with a 400 response code is defined on this endpoint, the mock server is able to give back that response.
If you change the value of the x-mock-response-code header to be 200, and send it again, you will get back the data from the example with the 200 response code. This header is one way to specify which example you want to use in the response, but there are other headers that Postman provides as well. For example, you could use the x-mock-response-name header to specify a response that you want by name. Postman has a number of x-mock headers that you can use. We'll see a couple more examples of them in this book, but if you want to see more of them, you can see details in the Postman documentation (https://learning.postman.com/docs/designing-and-developing-your-api/mocking-data/mock-with-api/).
These default examples are a good place to get started and are helpful, but there is a lot more that we can do with examples in Postman. Let's look at how you can customize examples next.
Creating custom examples
Although default examples are a great way to leverage the power of your API specification, for some mock responses you will want to do more than what you have defined in the specification. Postman offers a lot of flexibility with how you can set up mock responses. Let's look at some of those options and see how to use them.
We will use the same mock request that we already created, so first of all, make sure that the x-mock-response-code header is set to 200. We are now going to take a look at how to mock a POST call, so go ahead and change the method on the mock request to POST. Before sending this request, you will want to specify a body for it which you can do with the following steps:
- Click on the Body tab.
- Change the type to raw and select JSON from the dropdown.
- Set the body to have something like the following value:
{
"title": "{{title}}",
"status": "{{InProgress}}",
"dueDate": "{{dueDate}}"
}
- You will notice that the values have been defined as variables. These variables need to be added to the environment. Ensure that the ToDo List Mock Env environment is selected.
- Click on the Environment quick look icon and then edit the environment.
- Add the three variables (title, InProgress, and dueDate) to the environment and give them the values shown in the following figure:

Figure 12.6 – Variable values
- Click on Save and close the environment tab.
Return to the ToDo List Mock Request and Send it. When you do that, you should see that you get back a response, but you should also see a little warning icon saying there are two issues as shown in the following screenshot:
Figure 12.7 – Issues with sending the mock request
Postman is highlighting these issues because it is comparing the data you sent and received to the schema specified in the API specification. If you click on the 2 issues link, you will see a flyout that shows you what those issues are. In this case, it tells you that there are some issues with the data returned. This is because when you send the POST request, it expects to get the data back in a way that matches the schema settings, but the data is instead a more generic type.
This can be corrected by updating the example to send back the same data that we are creating. You can modify the saved example to do that using the following steps:
- In the Collections navigation panel, go to the POST /tasks request and choose the created a new task example from the Examples dropdown.
- Modify the example response to use the variables in the same way you set them up in the mock request body. It should look something like this screenshot:

Figure 12.8 – Body of the POST response
- This example is creating a task that is already in progress, so rename it to Create an In Progress Task.
- Click on Save.
If you now return to the mock request and send it, you should see that the body matches what you sent and Postman is no longer reporting any issues with this request.
As you can see, this is a powerful feature. However, if you were to call this mock API from outside of Postman, it would only return data that reflects the current value of the variables. This means that if you are developing something and you want to create new objects, you will not get back an object based on the data you created, but will rather get back an object that is based on these variables that have been defined in Postman. Many mock services have to do this, where they essentially have hardcoded responses for the POST requests that you make, and it is important to note that this is a limitation with this mock server as well. However, you can add a little more flexibility into mock server responses by using dynamic variables in your examples, which we will look at in more detail next.
Using dynamic variables in examples
We've already seen how to use environment variables in request examples, but Postman also has a number of built-in variables that support returning dynamic responses. These variables will generate different kinds of dummy data for you. For example, if you use the {{$randomCity}} variable, you will get back a random city. There is a large list of these variables that you can find at https://learning.postman.com/docs/writing-scripts/script-references/variables-list/. These variables are generated using the faker.js library (https://github.com/marak/Faker.js/) and so will have the same limitations and abilities that this library has. Let's look at how to use them in one of the examples in the to-do list API by using the following steps:
- Go to the GET request for /tasks/:taskId and open the Got back the specified task example.
- In the example response, set title to "{{$randomVerb}} {{$randomNoun}}"
- Set status to "New" and dueDate to "{{dueDate}}".
- Make sure to save the example.
At this point, the example response should look like this:
{
"title": "{{$randomVerb}} {{$randomNoun}}",
"status": "New",
"dueDate": "{{dueDate}}"
}
Postman does have dynamic variables for generating random dates, but they are not in the format that our specification requires and so using them would cause validation errors. Instead, I've just set it up to use the dueDate variables that we created for our last request.
If you go back to the mock request, set the method to GET, and change the endpoint to end with /tasks/1 and hit Send, you will get back a response that includes a random verb and noun in the title. If you hit Send again, you will see that you get back a response that includes a different title.
Important note
Since Postman has created multiple examples for each request, you might not get back the example that you expect. If you are getting back the 400 response instead of 200, don't forget that you can set the x-mock-response-code header to 200 to force Postman to respond with the correct example.
Dynamic variables are a great way to inject some randomness into your mock responses; however, you will notice that I still had to hardcode in the status. Since the status only has three allowed values, we can't just generate a random string for it. Instead, we need to hardcode it to one of those acceptable values. But what if you wanted to be able to get back a response with a certain status code? Maybe you want a response that is the same as this example, but that has an In Progress status instead. In order to do that, you can set up multiple responses based on the path variable.
Responding based on parameters
You may want to create several different responses for a mock server that all return a 200 status code. In this case, you can't use the x-mock-response-code header to pick which response you will get back. Instead, it often makes sense to create different responses based on query parameters or path variables. In order to do this, you will need to create two additional examples, one for the New status and one for the Completed status. You can set that up on the GET /tasks/:taskId request with the following steps:
- Go to the Got back the specified task example.
- Ensure that you are on the Params tab in the example request and in the Path Variables section give the taskId a value of 1.
- Click on the Save button.
- Go to the example response body and copy it.
- Go back to the /tasks/:taskId request, click on the View more actions menu, and choose the Add Example option.
- Paste your clipboard into the example response body.
- Change the status in the data you pasted to be "In Progress".
- Set the Status Code value of the example response to 200 OK.
- Set the value of the taskId path variable to 2. At this point, the request should look like this:
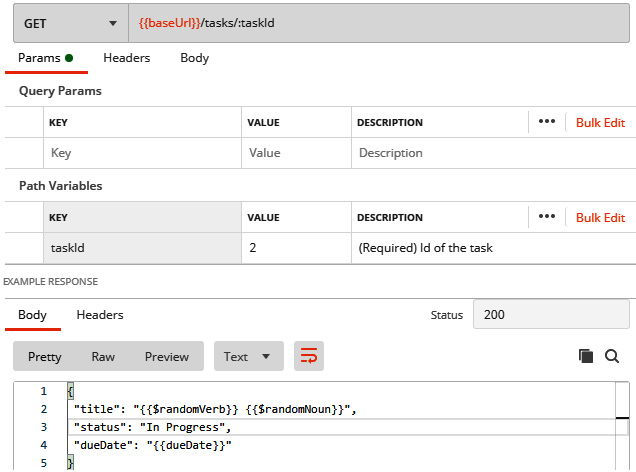
Figure 12.9 – A new example setup
- In the example response, go to the Headers tab and create a key called Content-Type with a value of application/json.
- Set the name of the example to In Progress example and click on Save.
- Go back to the /tasks/:taskId request and create another example.
- Once again, paste in the copied body, but this time set the status in the body response to "Completed".
- Set taskId to 3 and Status for the request to 200 OK.
- Set the Content-Type header to application/json and name this example Completed task example, then save it.
You now have an example for each status type and each of those examples is mapped to a particular task ID. You can try it out with your mock request. If you call /tasks/1, you will get back a response with a status of New, while if you call /tasks/2 or /tasks/3 you will get back responses with statuses of In Progress and Completed respectively.
You've now learned a number of different strategies that you can use when creating examples for mock servers, but it is important to understand how Postman goes about picking which example to respond with when you make a request to the mock server. In order to this, we will need to look at how example matching works in Postman.
Understanding example matching
You have seen how you can back different responses depending on the ID you call, but what happens for other task IDs? What if you call /tasks/4? If you make that request against your mock server, you will notice that it gives back an incorrectly formatted response. Why is this? Well, it comes down to the way that Postman does example matching. When you make a request to the mock server, Postman has to figure out which of the examples it will return to you. It uses a set of internal rules for this.
After applying some obvious filters such as improperly formatted responses and which kind of request method has been specified, Postman will look at the URL and try to find a match. It first looks for an exact match, and if it can't find that, it will make a few guesses at what you might be looking for. One of the things it will try is to remove alphanumeric IDs from the path. So, in the case of the /tasks/4 example, since Postman can't find an exact match for that, it will remove the /4 from the end and try again. In this case, it finds the example for the /tasks endpoint and returns that, which is why you are getting a response that is a list of tasks instead of a single task.
You don't want to have to explicitly specify every ID that you might call though, so what can we do? Well, Postman will also do what is called wildcard matching. With wildcard matching, you can have Postman return the same response regardless of which ID you have specified. You can take a look at a concrete example of what this is like with the following steps:
- Go back to the GET /tasks/:taskId request and choose Add Example from the View more actions menu.
- Fill out the body with an appropriate response, like the ones I showed you when you were creating other examples in this chapter.
- Set the Status response code to 200 and create a Content-Type header that is set to application/json.
- Replace :taskId in the sample request URL with {{taskId}}. It is important that the new {{taskId}} variable be undefined.
- Name the example something like Generic task id Response and save it.
Now, any requests that you send to the /tasks/{{taskId}} endpoint that are not for resources 1, 2, or 3 will give you back that generic response. Hopefully, the examples give you a good understanding of how Postman goes about doing example matching. If you want to see this in more detail, you can check out the documentation on example mapping in Postman at the following URL:
https://learning.postman.com/docs/designing-and-developing-your-api/mocking-data/matching-algorithm/
You should now have everything you need to create a mock server that gives back useful responses, but there is more to it than this. You will want to use that mock server to help you create a good-quality application. I'll show you how to do that in the next section.
Using mock servers
You've now created a mock server that gives back different responses for various situations. The whole point of having a mock server, though, is so that you can use it for testing and development purposes. In this section, I want to show you how you can use a mock server to help out with those things. I will show you how to use mock servers in both frontend and backend development. I will also show you how to use them to help you with continuous planning and give a brief introduction on how to use them for testing purposes.
Let's dive right in by looking at how to develop code against a mock server.
Developing against a mock server
One of the reasons you would create a mock server is so that you can use it to provide data for you while you are creating a UI. This book isn't about UI development, so I won't spend too much time talking about how to develop UIs. However, there are a few things to keep in mind when developing against a mock server.
APIs act as a kind of glue or pipeline between different parts of an application. We've been looking at an example of a to-do list application and if we were developing it in the real world, we would need to have a backend that could store the data about our tasks and that could process the API requests to do what the client wants. We would also want to have a UI where customers could type in their task and set status and due dates. The API is the pipeline between these two things, and you can use a mock server to help out with both of those things.
Developing a UI using a mock
At first glance, using a mock for UI development is straightforward. You should be able to set the base URL that your application will use to the mock server URL and then develop the UI as you normally would. However, there are a few things to consider. At a basic level, once you start using the mock server, you may discover that there are some changes that you need to make to the responses. This is where the API pipeline concept can help you. If you make changes to the mock server and the specification that it is built from, you will be letting everyone else who is using that server know what your needs on the frontend are.
Another thing you will have to take into account is that you might need to add the x-mock-response-code header to some of your calls as well, so that you are sure to get back the response that you are interested in. If you think about it, this means that you will need to do some kind of hardcoding of that in the calls your UI is making. This might not seem like a big deal, but it is important not to gloss over it. Putting in temporary hardcoding of stuff like this can lead to bugs in the future if you do not take care, so you need to make sure that you remember to remove those headers afterward. In this particular case, it is unlikely that they will cause trouble, but it is still good development practice to have some kind of reminder for yourself to ensure that you clean up these kinds of things before the code gets released.
If you were to develop against the mock server that you've built in this chapter, you would also discover that POST and PUT calls are challenging. If you were sending calls to a real server, a POST call would create the resource you send to it. In our mock server, Postman will just send back a static response. You remember that when you created the example for the POST response, you set it up to use variables. When you called the request from within Postman, you could specify the body of your POST request to use those variables. However, when you are developing from an external application, you can't directly control the Postman variables and so you will get back the current values of those variables as defined in Postman.
Since the mock responses are largely static, you will generally need to create quite a few different responses for the different scenarios that you are interested in. For example, if you want to be able to code against a POST response that uses each of the different status values, you would need to create an example in your collection for each of those responses. In fact, let's look at how you could do that with the following steps:
- Go the POST /tasks request and add an example.
- Set the response code to 201 and create a body as you did with the other examples you've made in the chapter.
- Ensure that the status field in the example response body is set to "New".
- Set the Content-Type header in the example response to application/json.
- Name the example Create a New Task and click on Save.
You now have two examples for this request, which is great since it gives you the ability to see how your UI will react to creating these different kinds of tasks, but there is still a problem. How do you tell the server which response to give you? You can't use the x-mock-response-code header since both of them have the same response. You also can't get it to respond based on parameters since this POST call uses the same endpoint for all calls. So, what can you do?
Well, as mentioned earlier, there are a number of other possible mock request headers that you can use. You can see the Run the mock service section of this page in the Postman documentation:
https://learning.postman.com/docs/designing-and-developing-your-api/mocking-data/mock-with-api/
One header that should work well for our purposes is the x-mock-response-name header. You can go to the mock request in Postman and add the header giving it a value of Create a New Task. You will want to make sure that the method is set to POST and that the URL is calling the /tasks endpoint as well as ensuring that the x-mock-response-code header is set to 201. If all that is in place, you can send the request and you should see that you get back the response that you just created.
Developing a backend when using a mock server
When you are developing a backend, you won't use the mock server. The mock is meant to be a replacement for the backend server and so you won't directly use it when creating the backend code, but there are still some things that you should keep in mind when working with a mock during backend development.
When a mock is being used to work on the frontend while development is concurrently happening on the backend, it is important to keep everything in sync with each other. While you will not be using the mock server to code the backend against, you will need to make sure that your backend is producing the same kind of data that the mock server is. If you find that you need to make changes to the way the backend provides data in the API, you need to make sure that the mock server gets updated to reflect that. This will generally be done by updating the specification file and making sure that any examples used in the mock server are updated correctly. It is very important to keep everything in sync when multiple people are working on something at the same time as each other.
Another thing to keep in mind is that although you won't be coding against what the mock server does, you still might be able to use it to help you. It is helpful to break down your code into distinct modules and so you may want to develop one part of the API at a time. There may be times when you are developing one part of the API that has some dependencies on another part. Rather than trying to work on both of them at once, you could use the mock server to replace the dependency and keep working on just the one part you are interested in. This allows you to isolate your work, but don't forget to remove any calls to mock servers and actually implement them once you are done with the part you are working on.
Continuous planning with a mock server
Mock servers help you keep everything in sync, and that is a powerful design tool. It is often hard to know exactly how an application is going to look and what it all needs when you start developing it. However, if you are using a mock server, you can start working on the frontend and backend at the same time. As you learn more and try things out, you will find that you need to make changes. You may also have inputs from clients or other stakeholders that influence what you need to do.
A mock server is very helpful in this situation as it gives you a place that you can update as plans change. If you find that you need to add or remove endpoints to your API, you can do that in the mock server and quickly see how that will influence your application. In Agile development, you want to be able to shift and change as new requirements come up and having a mock server lets you do just that.
Testing with a mock server
In a way, being able to code against a mock server enables testing as it allows you to test out a lot of things in your frontend. You can also use a mock server to create edge cases that would otherwise be very hard to test. There is a lot more that you can do with testing when using a mock server. In the next chapter, we will look at more details around contract testing and how you can use that to drive API quality, so I won't go into that topic here. There certainly is a lot that you can do from a testing perspective when using a mock server.
Summary
In this chapter, I have walked you through a lot of details related to using mock servers in Postman. You saw how to set up a mock server in Postman, but we didn't stop there. I then showed you how to create useful mock responses using examples. I walked you through how to use the default examples that Postman creates for you when you create a mock server from a specification file. I also helped you to learn how to create custom examples that do exactly what you need them to do. I then showed you some powerful options that you can use in these examples including things such as dynamic variables and responses that are specific to URL parameters. I also made sure that you understood how Postman finds the examples that it will respond with so that you can be sure that you will get back the response you are looking for when you make a request to a mock server.
After showing you how to create a mock server that gives back good responses, I dove into the different ways that you can use mock servers. I showed how to use them to help you with developing new code. You learned how to use them when creating UIs or frontends. I also explained some of the things that you should consider when working on a backend while using mock servers. I also walked you through how to use a mock server to help you be flexible and dynamic in the planning process and gave you a quick introduction to testing with a mock server.
In the next chapter, I will show you how you can contract testing in Postman, and you will also get more details on how that kind of testing ties in to mock servers.