Chapter 13: Using Contract Testing to Verify an API
We've all had to sign a contract before. Maybe it was when you were buying a house, starting a new job, opening a bank account, and so on. There are a number of other reasons that we sign contracts. I have a filing cabinet where I keep important paperwork and I suspect that about half of the documents in there are contracts of some sort. Why do we use contracts so much? What exactly is a contract?
Contracts help simplify the way we do things. I've been talking about formal signed contracts so far, but there are many other kinds of contracts as well. Philosophers will talk about a social contract, for example. At its heart, a contract is just an agreement between two (or more) parties that outlines what they will do. They are so widespread because they make things much more efficient.
Think about it in terms of me buying your house. In broad terms, the way it would usually work is that once we had agreed on a price, we would draw up a contract that says that I will buy your house for a certain number of dollars and get possession of it on a certain day. This contract outlines what I will do (give you a certain amount of money) and what you will do (leave the house and give me the key). If we didn't have a contract, the selling process would be much more complicated. I would have to show up with the money in hand and wait while you moved all your stuff out of the house, and then we could trade the money for the key.
The contract is a way of establishing trust. Of course, not all contracts are explicit. If I wanted a load of gravel for my driveway, I could call up a gravel company and ask them to deliver it. They would do so under the implicit contract assumption that I would pay them for the gravel once they'd delivered it and given me an invoice. Implicit contracts like this work well when everyone is clear on the terms of the contract and when there is a high degree of trust. Some implicit contracts are based on cultural understanding, and there may be times when things get confused or forgotten. In general, you will see formal contracts for bigger and longer-term things such as buying a house or starting a new job, while implicit contracts will suffice for many of the ordinary things of life.
But what does all this have to do with API testing? Well, one powerful API testing concept is called contract testing. In contract testing, we create a document that works as a contract that we can test against. Much like the contracts we see in everyday life, they set out the things that each party must do. In the case of API testing, the two parties involved in the contract are two different pieces of code. An example would be the frontend and the backend of a system or two services that communicate with each other. The contract establishes the way that those two parts of the system will communicate with each other. In this chapter, you will learn all about what contract testing is, how to set up contract tests in Postman, and how to create shared contract tests that can be run and fixed by all the affected teams. We will cover the following topics in this chapter:
- Understanding contract testing
- Setting up contract tests in Postman
- Running and fixing contract tests
Understanding contract testing
In this chapter, we will learn how to set up and use contract tests in Postman, but before we do that, I want to make sure that you understand what they are and why you would use them. So, in this section, we will learn what contract testing is. We will also learn how to use contract testing and then discuss approaches to contract testing; that is, both consumer-driven and provider-driven contracts. To kick all this off, we are going to need to know what contract testing is. So, let's dive into that.
What is contract testing?
I have already talked about what contract testing means at a basic level. Contract testing is a way to make sure that two different software services can communicate with each other. Often, contracts are made between a client and a server. This is the typical place where an API sits, and in many ways, an API is a contract. It specifies the rules that the client must follow in order to use the underlying service. As I've mentioned already, contracts help make things run more smoothly. It's one of the reasons we use APIs. We can expose data in a consistent way that we have contractually bound ourselves to. By doing this, we don't need to deal with each user of our API on an individual basis and everyone gets a consistent experience.
However, one of the issues with an API being a contract is that we have to change things. APIs will usually change and evolve over time, but if the API is the contract, you need to make sure that you are holding up your end of the contract. Users of your API will come to rely on it working in the way that you say it will, so you need to check that it continues to do so.
When I bought my home, I took the contract to a lawyer to have them check it over and make sure that everything was OK and that there would be no surprises. In a somewhere similar way, an API should have some checks to ensure that there are no surprises. We call these kinds of checks contract testing. An API is a contract, and contract testing is how we ensure that the contract is valid, but how exactly do you do that?
How to use contract testing
We will learn how to create and run contract tests in Postman shortly, but first, let's look at how the process works. There are a couple of different ways that you could approach contract testing. One possible way to do it is to create a collection of tests that exercise the API in all its configuration. You would then run that set of tests every time a change was made to the API to ensure that nothing has changed. Technically, when you are doing this, you are checking the contract, but this is not what we would call contract testing.
With contract testing, you want to check just the contract itself. You don't want to run a full regression suite. Part of the value of contract testing is that it allows you to just verify that the contract is correct without needing to include full API calls. However, in order to do that, you need to be able to check the contract somehow. How do you do that?
The best way to do this is by having the contract documented somewhere. This is usually done with some kind of specification. In the previous couple of chapters, I've been showing you how to work with an OpenAPI Specification file. If you have a specification that defines all the actions that the API can perform, it will work well as the basis for your contract tests. In fact, in the previous chapter, you learned how to do one half of a contract test.
Mock servers are, in essence, contracts. They provide the frontend, or API consumer, with a contract that they can use. However, as we saw in the previous chapter, there are some limitations to this. Although the mock server tells the consumer what they can do, it doesn't get used when you are working on the backend code. This means that the API might change without the API consumer knowing about it. This is because those who are working on the backend code don't know what things the users or their API are relying on. They could read through various examples in the mock server and try and figure it out, but that would be a time-consuming and low-value process.
What contract testing does is create a set of tests that the API producer can run to verify that any changes they've made are not breaking any of the consumer's needs. These contract tests give the API producer something they can run, without needing to worry about the details of the consumer implementations. Well, this has been a lot of words and might seem a bit abstract, so let's take a look at a more concrete example of what this might look like. In Chapter 10, Testing an Existing API, we worked through creating tests for a simple API. Those tests were not contract tests, but let's consider one of the endpoints from that API and think about what it would look like to have contract tests for it.
As you may recall, one of the endpoints was the /blogposts/<id> endpoint. This endpoint would give back information about a specified blogpost. When you call that endpoint, you get back something that looks like this:
{
"id": 1,
"title": "The FIRST blog post",
"body": "This is my first blog post",
"profileId": 1
}
In Chapter 10, Testing an Existing API, we added tests that checked some of the values in here, but a contract test would be quite different. A contract test would check things such as which fields were available and the data types they have. So, in this example, a contract test would verify that this endpoint has the id, title, body, and profileId fields. It would also confirm that the two id fields return integers and that the other two return strings. Any time changes are made to the backend, these tests can be run to verify that those rules still apply. This gives the users of the API the ability to confidently make assumptions about those fields when they are using them.
There are always at least two parties involved in a contract, but which one of them gets to define what the contract looks like in the first place? Let's take a look at that next.
Who creates the contracts?
Before we get into the details of setting this all up in Postman, there is one more thing we need to discuss. Who creates these contracts? Should the consumer of the API be the one creating the contract, or should it be the provider? Much like a real-life contract, there is probably going to be some need for negotiation and the ability to reject a contract proposal, but somebody has to put the contract forward in the first place. There are two main approaches to this: you can either have consumer-driven contracts or you can have the provider be the one driving them. Let's look at each one in more detail.
Consumer-driven contracts
Consumer-driven contracts are contracts that the consumer makes. In this case, the consumer defines what their needs are from the API and provides contract tests that show the ways in which they will be using this API. These can be defined directly up-front in a design-driven manner, where the consumer needs to define the details of how the API gets designed in the first place. Alternatively, they can be provided for existing APIs by showing them which part of it this particular consumer relies on.
There are several advantages to consumer-driven contracts. The whole point of an API is to provide value to those who consume it. By letting the consumers define what the API does, you are helping to ensure that you are delivering information that is valuable to the users of your API. Another advantage is that it can help the API provider understand the different ways that consumers are using the API.
There is a "law" known as Hyrum's Law, which observes the following:
This means that your system will get used in ways that you did not anticipate it would when you were designing it. However, if the users provide you with contracts that show you how they are using it, you can learn from that and not make changes that break workflows in unintended ways.
There are some downsides to this, though. If you have a lot of people consuming your API, you will have to run contract tests for each of them every time you make changes. There will probably be a lot of overlap between these tests, which leads to redundancy and inefficiency in your testing. Another concern is that, sometimes, the consumers tend to do some unexpected things that can really constrain future development. For example, I recently saw a case where a client was using an API that contained some information about another domain in it. The client wanted this information, so they got it from the API we had provided. However, we wanted to change the API so that it no longer returned the data, and instead returned it from the correct domain. The problem was that the client had come to depend on the data being in the "wrong" spot, which made it much harder for us to change the API to work the way we wanted it to. If you have some feature in your API that you did not put there by design, it might be a lot harder to change in the future, should consumers come to rely on it. You don't want to be in a situation where one client's use case prevents you from creating useful value for others.
Provider-driven contracts
Instead of having the contract primarily driven by the consumers, you could have the API producer be the one providing the contract. In this case, the team creating the API would create a contract that defines what data that API provides and what format that data will be in when clients request it. Consumers could then use that contract to build mock servers that they could use for testing and development.
This approach has some benefits. First, it allows API providers to set out a standard set of actions and data that are supported. According to Hyrum's Law, users will still end up using things in ways that are not defined by the contract, but then at least the API provider can explicitly say that those are not the supported ways to use this API, and they don't have to worry too much about breaking those workflows. Another benefit of this is that it is much more scalable. It doesn't really matter if you have two users or 2 million users. You have the same number of contract tests to run as the API provider.
The biggest downside to provider-driven contracts is the missing feedback loop. In this case, it is much harder for API providers to discover the interesting or unusual ways in which clients are using their APIs. This also means that since those configurations are less understood, they will be easier to break. Even if the provider can point to the contract and let the consumer know that they were using unsupported functionality, it is still never nice to break things that your customers depend on.
Now that you have a good grasp of what contract testing is and how it works, let's look at how to set up contract tests in Postman.
Setting up contract tests in Postman
Creating contract tests is similar to creating any API test: you need to create a collection and then make requests in that collection with tests in them. But what kind of tests do you create when you perform contract testing?
In Chapter 10, Testing an Existing API, I talked about smoke tests. These are a targeted set of tests that you can run quickly to get a good idea of how your API is doing. A contract collection is a similar idea, but with a bit more comprehensive coverage. The idea of contract tests is to describe all the different parts of the API that you need, but not to do things such as look at how to use them in a workflow or other aspects of testing. Contract tests are a good way to set the minimum bar for what needs to be working, but you will need to do additional testing beyond them for it to be effective. Of course, as with any other testing that's done in Postman, you will need to create a collection for your contract tests.
Creating a contract testing collection
Any collection can be used for contract testing, but if you have created an API specification, as I showed you in Chapter 11, Designing an API Specification, Postman provides some nice shortcuts for you. If you have not gone through the exercises in that chapter, you can import the API specification after getting it from the GitHub repository for this book (https://github.com/PacktPublishing/API-Testing-and-Development-with-Postman/tree/master/Chapter11). Once you have imported the specification, you can set up a contract testing collection by following these steps:
- Go to the API by clicking on it in the APIs tab in the navigation pane.
- Go to the Test tab. Then, in the Contract Tests section, click on the Add Contract Test link.
- Choose the Create new contract test option.
- On the resulting dialog, name your contract test something like ToDo List Contract Tests.
There are several options under Advanced settings. These settings are used by Postman when it's creating the collection for you. Since Postman will be programmatically generating a collection with requests in it for you, it needs to make some assumptions. These advanced options let you control how Postman makes those assumptions:
- Naming requests: By default, Postman names requests according to the path name, but if you choose the URL option, it will add the base URL to the request names as well. If you want to have your request name be something different, you can modify the OpenAPI schema. You can do that by going to the schema and setting a unique value called the operationId option under the path you are interested in. Once you've done that, you can choose the Fallback option here.
- Set indent character: With this option, you can choose whether indented lines in the created collection will have Tab or Space indentation.
- Collapse redundant folders: This option determines whether Postman should attempt to collapse redundant folders into one. Folders are redundant if they have only one child element and don't have any folder-level data to persist.
- Optimize conversion: Leaving this option on will help with performance, so there is little or no reason to ever turn it off.
- Request parameter generation: When generating values for the parameters that the requests will use, Postman can either get those values from a schema or from defined examples. If you have examples defined, I would recommend using that option, since that will put actual values into the parameter fields instead of just giving you the data type.
- Response parameter generation: This option works like the request parameter generation option. You can choose to either get the response parameters from a schema or from defined examples. I would recommend using examples when possible.
- Folder organization: By default, Postman will create the folder structure in a collection by looking at the way that the paths in the specification have been defined. You can, however, have it generated in the folder structure using tags if you have defined them in the spec file.
- Include auth info in example requests: If this option is on, the created requests will include authentication parameters in any created examples.
Now that you understand these options, you can choose the ones you want and then click on Create Contract Test to tell Postman to create a collection with requests in place for you. Once you've done that and looked at the Collection tab in the navigation pane, you will see that there is a collection available for you.
This is a great start, but we are not trying to create a contract collection; we are trying to create a contract test, so you still have some more work to do.
Adding tests to a contract test collection
You now have a collection that you can use for contract testing, but you aren't quite done yet. Postman has automatically created the structure and details of the request, but you need to define the actual tests that you want this collection to run. This is the point at which understanding the theory of contract testing becomes helpful. What kind of tests should you add to this collection?
With contract tests, we want to make sure that the API is fulfilling the needs that we have as a consumer. We don't want to create a comprehensive set of tests that checks everything this API can do. We just want to add tests that verify that it provides the data we are interested in. In this case, we are pretending that we have a to-do list application, so we would only want to add tests that verify data for the kinds of requests that our application is running. We would then create tests that check that those specific calls give us back the data that we need.
I covered how to create tests in detail in Chapter 6, Creating Test Validation Scripts, so I won't go through it again in this chapter. However, one thing that can be helpful when creating contract tests is the Postman Interceptor.
Using the Postman Interceptor
Postman can dynamically capture requests for you with its Interceptor. When creating contract tests, you want to create tests that demonstrate the actual needs of your application. The Interceptor allows you to do this. When it is running, it will capture all the requests that your application makes, allowing you to see the actual requests that you need for your contract test. Since we don't have a to-do list application to test against, I will use the swapi.dev API as an example. You can set up the Interceptor in Postman by following these steps:
- First, you will need to have Chrome installed on your computer. I would also recommend that you close all tabs except one so that you don't get too much unwanted data. You can then install the Postman Interceptor by downloading it from the Chrome web store. You can download it directly from this link: https://go.pstmn.io/interceptor-download.
- Click on Add to Chrome and choose Add extension on the verification prompt to install the extension.
- Once the extension has been installed, return to the Postman app and click on the Capture request and cookies with Postman icon, as shown in the following screenshot:

Figure 13.1 – Capture requests and cookies with Postman
- On the Requests tab on the resulting flyout, set Source to Interceptor and enable the Capture Requests option.
- If you want, you can also capture cookies by going to the Cookies tab and enabling the Capture Cookies option.
- Select the Install Interceptor Bridge option to set up the bridge that will facilitate communication between the Postman app and the Interceptor extension that you just installed.
- Once it has completed the setup, you will see that the INTERCEPTOR CONNECTED status is green, as shown in the following screenshot:

Figure 13.2 – Interceptor connected
- Ensure that the Save Requests to option is set to History. You can save the requests directly to a collection, but there will usually be a lot of requests that you don't need in there as well, so I would recommend saving it to your history.
With that, you have the Interceptor set up and running. You can now go to a website such as swapi.dev and perform some actions there. As you do so, Postman will save all the API requests in the History tab. You can go to the tab in the navigation pane and find the requests that you are interested in and add them to your collection. To do so, you can click on the Add request to Collection icon, as shown in the following screenshot:
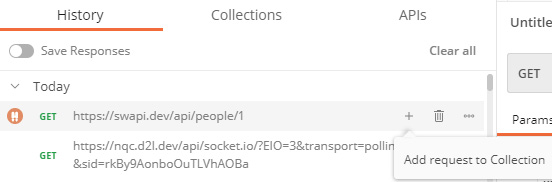
Figure 13.3 – Adding an intercepted request to a collection
This allows you to easily add the requests that your application sends to your contract testing collection. You will still need to create tests to check that the data and data structures are correct, but this can help you figure out what requests to send for contract tests.
As I've already said, I'm not going to walk you through a step-by-step process for creating tests for these requests, but now that you know what requests to include and what kinds of parameters they need to have, you should be able to go through this and fill in the test's details. However, in order to understand this a bit better, let's take a look at what you would do in broad terms.
You would want to use the Interceptor in situations where you do not have an already defined schema for the API that you can create contract tests against. In that situation, you can use the Interceptor to help you "reverse-engineer" how the API works and what things it provides. So, in this example, we could look at the results given back by a couple of different people and, from there, figure out which fields are required (for example, the "name" and "height" fields).
Using that information, we could build out a schema that describes the rules for these fields and then use that to create contract tests. However, even after that is done, you will still need to ensure that these tests are available for everyone who has agreed to use this contract. Everyone involved needs to be able to run and fix these tests; otherwise, they are just ordinary API tests.
Running and fixing contract tests
In many ways, contract tests aren't that different from other tests that you create in Postman. The main difference is in how they are run and what the expectations around them are. Contract tests are meant to establish a contract for how the API should work, so they need to be run primarily by the API provider. Consumers will sometimes run them to double-check the work that the provider is doing, but the main purpose of them is for the API provider to check that they are not violating the contract as they make changes to the API.
Since these tests are meant to verify things as code changes are made, these tests should be run as part of the build pipeline for the API development team. I covered how to run tests in a build pipeline in Chapter 8, Running API Tests in CI with Newman, so you can check that chapter out for more details on how to do this.
On the consumer side, you don't need to run the tests every time you make changes. Changes to the user interface do not affect the way that the API works. However, you might want to occasionally check that the API is still meeting the contract. One way that you can do that in Postman is with monitors. You can check out more details on how to use monitors by going back to Chapter 9, Monitoring APIs with Postman. Setting up a monitor to periodically check that the API is meeting the contract allows you to develop the application frontend with confidence, without needing to concern yourself with what the API development team is doing.
We all know that things need to change in software development. So, what do you do when things break? If you are doing consumer-driven contract testing, what do you do as the API provider when the contract tests fail?
Fixing contract test failures
As with any test, contract tests will fail sometimes. They will fail for the same two main categories of reasons that other tests fail: a bug was introduced or the requirements changed. In the case of a bug, the code just needs to be corrected so that it does what the contract says that it should. In this case, fixing the test failure is straightforward: you just need to change the code so that it does the correct thing.
The other case is more difficult to navigate. Try as we might, the initial design of an API won't always be able to predict the needs of the customer in the long run. There may be times when an API needs to change in ways that break the contract. There may also be times when an API consumer needs the API to do something that is not in the contract yet. In both these cases, contract tests are valuable as they make it very clear that the API contract has changed. They help ensure that the necessary conversations happen. However, this highlights the fact that the contract tests will probably have to change over time, and also that there are two (or more) different groups that might be interested in updating them. How do you go about making those changes to a shared source of truth like this?
This is where collection sharing becomes important.
Sharing contract tests
For contract tests to work well, they need to be accessible by both the provider and the consumers. This applies both from the standpoint of running the tests and from the standpoint of maintaining them. I would suggest that contract tests are shared in their own workspace, so that it is very clear that this is the location for storing those contracts. You can create and share a workspace by following these steps:
- Click on the Workspaces dropdown at the top-right of the application, as shown in the following screenshot:

Figure 13.4 – Creating a new workspace
- Click on the + New Workspace link.
- Name the workspace something like Contract Test Workspace.
- Since the purpose of this workspace is to have people working together as a team, ensure its visibility is set to Team.
- If you wanted to, you could insert the email addresses of the people that you want to invite to join this workspace; then, you can click on Create Workspace.
Once you have this shared workspace, you can easily share your contract test collection to that workspace by following these steps:
- Click on the View more actions menu beside the contract test collection that you want to share.
- Choose the Share collection option.
- Select the shared workspace that you created and click on the Share and Continue button.
- If you wanted to assign different people on the team different roles (for example, to administer, view, or edit) for this collection, you can do this on the next panel and then click on Save Roles.
This shared collection can now be viewed and edited and run by anyone you give the proper permissions to. Setting things up in this way allows you to treat this test as a contract. The shared collection establishes a contract between all the users in this workspace. Anyone in that workspace can run the tests to verify that the API is doing what it should be doing. Also, if you want, you can allow people to make changes to the contract so that things can update and change as the requirements change over time.
Important Note
The free Postman account has limits on how many requests you can share. If your team is doing a lot of contract tests and needs to share a lot of requests in this way, you might need to upgrade to a paid plan.
Contract testing is a powerful concept when put into practice correctly. This chapter should have given you a good foundation of how to do that, but don't forget that the most important thing is good communication. One of the main benefits of contract testing is that it makes it obvious when those conversations need to happen. When a contract test fails and needs to be updated, be sure to engage all stakeholders in a conversation about it. Software development is a very collaborative process and the real power of contract tests comes in its ability to foster that collaboration.
Summary
In this chapter, we did a deep dive into contract testing. You learned about what a contract is and how you can use it. You then learned about the two different approaches to contract testing, where it can either be consumer-driven or provider-driven. In addition to coming to a thorough understanding of the theory of contract testing, you learned how to use Postman to set up these kinds of tests. You also learned how to create a collection designed for contract testing.
I also showed you how to think about the tests that you add to a contract testing request and how to set up and use the Postman Interceptor, which lets you figure out which requests and inputs it makes sense to include in a contract test suite. I also showed you how to share contract tests in Postman so that they can be run and fixed in ways that embrace the usefulness of this testing technique.
With this under your belt, in the next chapter, we are going to put everything you have learned together into one big project that will help you put your Postman skills into practice in the real world!