Chapter 14: Design and Create an API
A few times in this book, I've told you that I think it is important for you to not just read this material, but to actually try it out. I've tried to show you examples that you can follow along with and given you challenges along the way to try out. I want to end this book with a large-scale, hands-on challenge. This challenge will pull together concepts from this entire book, so if you have been following along the entire time, you should have everything you need to be successful with it.
I know, however, that not everyone reads a book linearly from start to finish, and even for those of us that do, we may read it over the course of a few weeks, or perhaps even months, and so forget some of the stuff that we've learned along the way. I will be sure to include references to other chapters in this book that you can refer to along the way as we do this. Go back and re-read them whenever necessary.
I'm going to lay this chapter out as a series of challenges that you can do. I will show solutions along the way and will also have a full end-to-end solution showing my work available on GitHub, but I would strongly encourage you to try and solve this on your own as much as possible. The best learning comes from doing. Don't just read my solution. Try these things out for yourself.
This challenge will involve going through the entire API creation life cycle from start to finish. We will need to design the API and create a specification to encode that design. We will also need to create the API and implement all the organization, tests, and documentation for it in Postman. We will then use that information to help us create a very simple version of the API. The final step will be to share what you have done so that you can show the world what you have learned!
Some of the material that you will see in this chapter is material that you have already covered in this book. This chapter will help to cement it all in your mind so that it is available when you need it. We will cover the following topics in this chapter:
- Designing an API
- Setting up the API in Postman
- Creating tests and documentation for the API
- Sharing what you have done
By the end of this chapter, you will be able to design an API, create an open API specification, set up an API in Postman, create mock servers in Postman, create tests in Postman, add documentation to API and collections, and share your progress with others.
Working through this chapter will give you a broad overview of a variety of concepts in this book and can serve as a self-assessment. I will help you ensure that you have indeed learned the concepts in this book and are able to put them into practice and use them on your own. I have been able to walk with you throughout this book, but as it comes to an end, I want to make sure that you are ready to head out and do your own API testing!
Technical requirements
The code used in this chapter can be found at https://github.com/PacktPublishing/API-Testing-and-Development-with-Postman/tree/master/Chapter14.
Designing an API
Not everyone starts with the API design, but I think it is the most logical place to start. You could dive right into making the API and let the design emerge organically. Some would argue that this is a more agile approach, but I think that there is some amount of planning required even in the most agile of organizations. I want you to start this challenge by thinking about the API design. Of course, to do that, you are going to need some information on what exactly we are designing!
In order to better understand what we are doing in this chapter, let's look at the application we are going to design an API for.
Setting up the challenge
I have worked through a few examples earlier in this book using an imaginary to-do list application, but for this challenge, we are going to try something a bit more complicated. We are going to design, test, document, and create a simple e-commerce store.
The store will have a list of items displayed on a web page. Customers should be able to filter the results based on categories (for example, men's clothes or women's clothes). The site will also need cart functionality so that items can be added to a cart (and removed from it). Of course, it will also need checkout functionality so that customers can purchase items from the cart, and lastly, it will also need a way for users to view their order history.
There is a lot to this application. Some of the functionality will be related to other objects, and so you will need to consider all the different endpoints and how they all fit together. In Chapter 11, Designing an API Specification, we dove right into creating the API specification. That chapter was looking at an API that was much simpler than this one is going to be. With the e-commerce API we are considering in this chapter, we could go right to making the specification, but with a more complex API like this, I want to break down the design process even more than that.
Instead of starting with the specification, I want to start with the even more basic design principles that I covered in Chapter 2, Principles of API Design. You may want to start with a review of the material in that chapter, where I discussed some of the principles and practices that will work well for designing an API. In that chapter, I outlined a three-step process for the design phase:
- Start with the purpose.
- Create usable APIs.
- Document the design.
In this challenge, we will gloss over the first step. In a real-life scenario, it would be very important, and you would want to do research with various stakeholders to understand what the user needs were for the API. However, we can't really do that when working through a challenge in a book, so for now you can just assume the purpose is for the API to provide data that can be used to create a web page for selling items.
The second step in the process is very important, though. The first challenge I will give you in this chapter will be to design a usable API.
Challenge – Design a usable API
The first challenge I want you to work through is to design a usable API. This means that you will need to figure out things such as what endpoints it should provide so that it can meet its intended purpose and how the different endpoints relate to each other. I want you to put together a diagram or drawing that shows the various endpoints. The diagram should include all the following information:
- A list of the endpoints you will need
- Information about how various endpoints will relate to each other
- Information about parameters (including query parameters) that you might need
- A list of methods that each endpoint will need to support
- Explanations of the kinds of data that each endpoint will provide
You can think of this step in the design process as creating a lot of data that you will use in a specification, but with less demanding rigor around how it is defined. You don't need to follow any particular structure or syntax when creating this, but you will be working through a lot of the same kind of information that you will later put into a specification file.
One thing to keep in mind while doing this is that the design process will be a little bit messy. As you figure out different endpoints and how they relate to each other, you will find that you need to modify or change things that you've already done. This is part of the reason I don't want you to put it into a specification file yet. First, get a good idea of what the API needs to look like before doing that. It can be a bit tedious to update specification files when you need to make changes, so it's nice to have a good idea of what you are going to do before you start encoding it into a formal specification.
Try this challenge out. Spend some time on it. I would suggest that you give yourself 30-40 minutes to think this through this part of the challenge. Give yourself time to figure out exactly what you need. I will show you how I approached this, but make sure to try it out on your own first.
Solution – Design a usable API
This is a big design challenge with a lot of moving pieces. When I was thinking this through for myself, I actually did a lot of sketching things on paper first while I tried to figure out these details. The API design that I will show here is just an example. I don't work in e-commerce and so it probably isn't even that great of an example.
In real-world scenarios, there might be things I'm not considering that those who work with APIs like this all the time would notice and consider. The point isn't for you (or me) to have a perfectly designed API; it is to spend some time thinking through how you would design an API. I can tell you different considerations, but when you actually work through something like this on your own, you'll end up noticing a lot of things that I wouldn't be able to teach you explicitly.
Instead of just showing you the end result of what I did, I'll walk you through some of the steps that I took to get there.
Defining the actions
I started with thinking about what actions users would need to perform on the page. Based on the description I shared previously and my experience with purchasing products online, I came up with the following list of actions:
- Get a list of products.
- Get a list of products that is filtered based on a specified category.
- Add a product to the cart.
- View the products in the cart.
- Remove items from the cart
- Pay for the products in the cart.
- View a purchase history.
While creating this list, I thought of some other things that many e-commerce sites have. For example, most sites will let you search the product list. Most sites will also let you modify the quantity of an item in your cart. Those things aren't in the requirements, so I won't include them, but if I was working with a product team on these, I would bring them up as topics to talk about. It probably does make sense to leave them out as part of making the smallest possible viable product, but you would want to make sure that decision was being made deliberately.
There are a couple of other things that came to my mind as well, while I was working through this list. In the first place, there is the question of the categories. In order for users to filter the product list by a category, they are going to need a list of categories that they can choose from. This means that the UI will need to display that list somehow, and so we have another action that our API needs to do where it gets a list of available categories. This highlights an important point in API design. It is great to think of end users when creating it, but don't forget that sometimes the user interface itself is one of your end users.
Another consideration that came to my mind was how to pay for the products. We would need to get a credit card or some other type of payment information from the user and at this point, we don't have a way for them to input that information. We don't need to add that to the API, though. We could just send the users to an external payment processing system such as PayPal or Stripe. This is probably a good design choice for a small e-commerce site, but in real life, this is again a decision that should be noted and discussed with the team.
I started the design process by thinking through the actions, because the whole point of having a website is to allow people to do something, and so I started with the verbs. Now I want to think about the objects users would be doing something with.
Defining the endpoints
I have defined the actions that I think I'll need, but what kind of information is needed for the various actions? I'm going to start thinking about which endpoints I want this API to have. The first thing I need is some endpoints to represent the products:
- I want a /products endpoint that will give a full list of the products.
- I also want a /products/{{productId}} endpoint that will give the information about any one product item in the catalog.
I need an endpoint that can be used to add a specified product to a cart. I thought of a couple of options for this. I could make one called /cart/{{cartId}}/{{productId}}, but that feels a little bit funny to me, the reason being that I would be modifying the cart and so I would want to do a POST or PUT call. If I include productId in the endpoint URL, I would not need to specify a body for the request. This will technically work for a POST or PUT request, but I really don't like that design pattern, so I will try to avoid it in this case. Instead, I will just add an endpoint called /cart/{{cartId}} that can be used to add items to the cart. I also need an endpoint to remove items from the cart, but in that case, I don't need to worry about sending anybody data since I will want to use the DELETE method for it. So, after thinking it through, I decide to add the following endpoints to support the cart workflows:
- /cart/{{cartId}} for adding items to the cart. This can also be used to view all items in the cart.
- /cart/{{cartId}}/{{productId}} for removing items from the cart.
I still have a couple of miscellaneous items that I need to be able to support. I need to support payments, as well as login, history, and viewing by categories. I decide to define the following endpoints to support those needs:
- For the payment step, I won't design an endpoint but will instead plan on sending users to a third-party API that will do the payment processing for me.
- I will also want a /purchaceHistory/{{userId}} endpoint where I can view the purchase history of the specified user.
- In order to get the different categories, I will also want an endpoint called /categories that gives a list of available categories.
Each of these endpoints is going to have a different schema and support different methods. I won't define them in detail at this point, but I do want to flesh out a couple of other details, including the parameters and data that the endpoint will need, so we will do that next.
Defining the input schema
At this point, I have a pretty good idea of what most of the endpoints are going to do, but still want to flesh out in a little more detail what the inputs will look like. I won't define the schema or responses at this point but will instead focus on the methods and inputs that I want each endpoint to support. They are as follows:
- /products will support the GET method and will also need to include support for a query parameter so that users can filter down the results to the categories they are interested in. I will call this parameter ?category.
- /products/{{productId}} will support the GET method and will not have any other inputs.
- /cart/{{cartId}} will support the POST method and the body of it will need to include information about the product that is going to be added to the cart. It will also support the GET endpoint and return a list of the items in the cart.
- /cart/{{cartId}}/{{productId}} will support the DELETE method to remove the specified product from the cart.
- /purchaseHistory/{{userId}} will support the GET method, which will return a list of purchases that the user has made.
- /categories will support a GET call and will return a list of the available categories.
There are some relationships between these various endpoints. For example, the products endpoint will need to know category information when sending filtered requests, and the cart endpoints will need to know something about the products when items are added. I won't explicitly show you those relationships here, but when I was working out a design for this on paper, I drew lines between those parts of the API. Knowing that these relationships are there is helpful because we will want to make sure that we use the same data for those different parts of the API. The next thing I will get you to do is to take this information and encode it into an API specification. Those relationships will show you areas where you can create a shared schema for the different endpoints.
Challenge 2 – Create an API specification file
Now it's time to take all this design work and encode it into a specification file. If you want to refresh your memory on API specifications, you can review Chapter 3, OpenAPI and Other Ways to Document an API. I also went through an exercise in Chapter 11, Designing API Specifications, where I walked you through a similar (albeit simpler) challenge.
For this challenge, I want you to take the design considerations and encode them into an OpenAPI specification file. There are some more advanced OpenAPI features that might be helpful for this. I haven't explicitly covered them in this book, but that is part of the reason I am giving this to you as a challenge right now. You will need to be able to learn things that go beyond what I am able to cover in this book. I want you to be able to take the grounding that you have received while going through this book and apply it to new things that I did not have the space to cover (or that have changed since this book was written). You may need to do some internet searches and reading through the OpenAPI documentation to figure some of this stuff out. I would strongly encourage you to try that before reading ahead to see what I did. The skill of being able to take what you have learned and leverage it to help you with new things that you have not seen before is a hugely important skill. Take the time to practice it now!
Solution 2 – Create an API specification file
I hope that you have tried this out on your own. If you have a specification file already and you want to just skip ahead to see the end solution of what I came up with, you can find the file that I made on GitHub (https://github.com/PacktPublishing/API-Testing-and-Development-with-Postman/tree/master/Chapter14). However, if you aren't quite sure about your solution or if you just want to see my thought process in creating this, I have broken down the way I think about this. I haven't covered every step that I took as that would get repetitive, but I have highlighted some of the more complex things that needed to be done along the way.
The first thing I started with was the boilerplate at the top, and then I defined the paths. At this point, the file looked like this:
openapi: 3.0.1
info:
title: Example Ecommerce API
description: Provides data for an ecommerce page
version: '1.0'
servers:
- url: http://localhost:5000/ecommerce/api/v1
paths:
/products:
/products/{{productId}}:
/cart/{{cartId}}:
/cart/{{cartId}}/{{productId}}:
/purchasehistory/{{userId}}:
/categories:
I then filled out the data for each of the endpoints based on the design decisions that I made there. The /products endpoint needed a query parameter. A query parameter can be described like this:
parameters:
- in: query
name: category
schema:
type: string
In the parameters section for the path, I specified that I wanted an input parameter and that this parameter was a query parameter. I also specified the name and then made a reference to the schema for it. However, before creating the schema, I remembered that in the design process I had identified a dependency between this parameter and the /categories endpoint. I want to explicitly reference this link between the two endpoints, and I can do that with the links feature in OpenAPI.
This is a new feature in OpenAPI 3 and it can be difficult to understand. In fact, the complexity and length of the documentation for this feature, which you can read here, https://swagger.io/docs/specification/links/, shows just how challenging this feature can be. I'll work through this example in a bit of detail so that you will be able to understand and use this in the future.
The starting place for using the links object is in the response of the endpoint that will provide the data. In our case, we are going to be able to get the list of categories from the /categories endpoint, and so that is also where we will need to define the links object. I will first fill out some of the basic items for the /categories endpoint, and in the 200 response section, I will add a links section at the same level as the content section. It should look something like this:
/categories:
get:
summary: gets a list of available categories
responses:
'200':
description: got a list of categories
content:
application/json:
schema:
$ref: '/#components/schemas/categories'
links:
Now I can start filling in the links section. The first thing to add is a name for this link. You are not required to give this any particular name, so I will choose to name it ListOfCategories, as shown here:
links:
ListOfCategories:
The next thing that needs to be specified is where the responses link to. In other words, what request or endpoint is going to use the data that this response gives? In this case, we know that we want to use the list of categories as the list of possible inputs to the category parameter in our /products endpoint. There are two different ways we can reference that endpoint. We can either use operationRef or operationId. With operationRef, you can specify the path to the request that you want the data to be linked to. In our case, this would look like this: operationRef: '#paths/~1products/get'. However, I will instead use operationId since using it is simpler and less error prone. In order to use it, I must first define it on the /products GET request, which I can do right under summary like this:
paths:
/products:
get:
summary: gets the list of products
operationId: GetListOfProducts
operationId is an optional unique string that you can use to identify an operation in the description file. In this case, I have decided to name the identifier for this operation GetListOfProducts, and now I can simply reference that identifier in my link like this:
links:
ListOfCategories:
operationId: GetListOfProducts
Now that I have specified what operation this response is linked to, I still need to specify what data in the response is linked and also what part of the /products request it is linked to. In our case, I need to pass the values of the /categories response body to the category query parameter of the /products request. I can specify this with the parameters keyword under which I can specify key/value pairs where the key is the name of the parameter that is receiving the data and the value is the value that is being sent. In our example, that would look like this:
links:
ListOfCategories:
operationId: GetListOfProducts
parameters:
category: '$response.body'
The category key points back to the category parameter in the /products endpoint and the '$response.body' value is a runtime expression that will return the body of the /categories response. There are a number of different runtime expressions that you can create to give you the values you want, and you can see the full syntax that is available for them in the documentation here: https://swagger.io/docs/specification/links/.
Now that we have finished filling out the link between these two endpoints, we can fill out the schema for them. This is pretty much the same as in other examples that I've done in this book, so I'm not going to walk through it in detail this time. I'll share a couple of examples here, but if you want to see the rest, you can look at the example file on GitHub to see the full solution.
One example that's worth looking at is the POST response of the /cart/{{cartId}} endpoint:
post:
summary: add an item to the cartId
responses:
'201':
description: add the specified item to the cart
requestBody:
required: true
content:
application/json:
schema:
$ref: '#/components/schemas/product'
As you can see, this one is simple to make since you can directly reference the body as having the same schema as the product. This is an example of how you can use references to share data between different parts of the API. When we were designing it, we realized that there was a relationship between the different parts of the API, and the shared schema is a way that we can enforce that relationship and ensure that the different endpoints are all using the data in the same way.
Setting up the API in Postman
As you can probably anticipate, the next thing I want you to do is to set this API up in Postman. Think of this as a review of the different things that you have learned about setting up APIs with Postman. I think that the best way to check whether you really know something isn't with a test or a quiz, but rather by getting you to do it. In this section, I will once again give you a challenge that I want you to work through on your own and then show you how I went about solving it.
Challenge – Add an API and mock server in Postman
For this challenge, I want you to take the specification file that you've made and import it into Postman. I want you to then set up an environment and a mock server for this API.
This challenge should be straightforward, but if you need to review how it should be done, you can look at Chapter 12, Creating and Using a Mock Server in Postman, to see how to do this. I will, of course, also show the solution in the next section, but as always, you will learn the most if you work through this on your own first.
Solution – Add an API and mock server in Postman
The first thing to do here is, of course, to import the specification file. I did this by clicking on the New button and then choosing the API option as shown in the following figure:
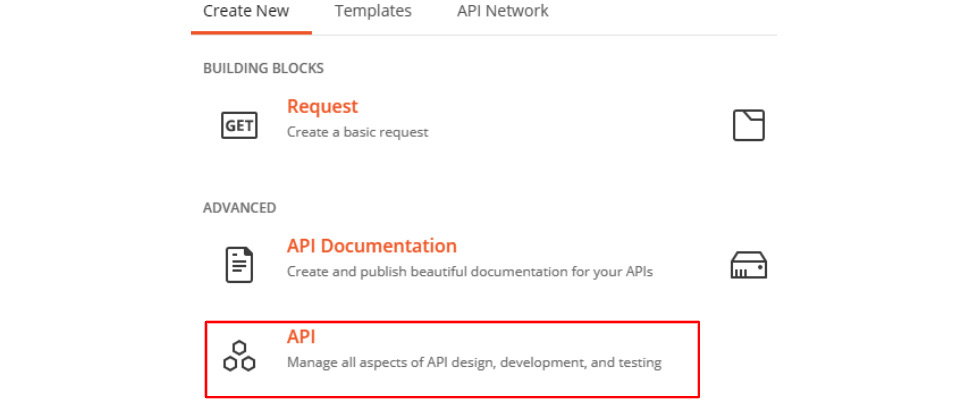
Figure 14.1 – Adding an API
I then named the API eCommerce and set the version to 1.0.0, and then, under the Import API schema (optional) section, I used the Select File button to browse to and select the API definition file that I had created earlier. I clicked on Create API and Postman made the API for me.
After the API was made, the first thing I did was to check that everything was working OK. I did that with the following steps:
- I went to the APIs tab on the navigation panel on the left and selected the eCommerce API that I had just created.
- I then clicked on the Define tab and checked that the specification did not have any syntax errors in it. Postman shows you this by showing a green checkmark and the words Schema validated at the bottom of the schema view:
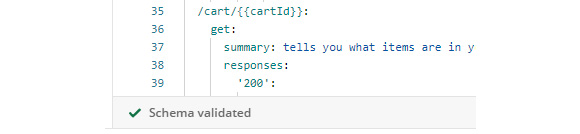
Figure 14.2 – Schema validated option
In my case, there were no errors, but if there were, I would fix them at that point.
The next thing I decided to do was to create an environment. It is nice to have an environment to use with mock servers, but the mock server setup wizard does not allow you to create environments directly from it. You need to create an environment ahead of time as it is much easier to associate a mock server with an environment when creating the server than it is to do so after the server has been created.
I added the environment to the server with the following steps:
- I clicked on the New button and selected the Environment option.
- I named the environment My eCommerce Env.
- At this point, I just wanted to have an environment available. I will add variables into it later, so for now, I closed the Manage Environments tab and went back to the eCommerce API.
- I navigated to the Develop tab and clicked on the Add Environment link as shown in the following figure:

Figure 14.3 – Add Environment
- On the resulting popup, I selected My eCommerce Env from the Select an Environment dropdown and then clicked on Add Environment to associate that environment with the API.
Now that I had an environment set up and associated with the API, I decided to create a collection that I could use with the mock server. I did that with the following steps:
- I clicked on the Generate Collection button as shown in the following figure:

Figure 14.4 – Generate Collection
- I named the collection eCommerce Mock Collection and selected the API Mocking option:
Figure 14.5 – Adding a mock collection
- I then clicked on the Generate Collection and Continue button.
- I named the mock server eCommerce Mock Server and chose My eCommerce Env from the Use an environment (optional) dropdown.
- I then clicked on Create Mock Server to create a mock server based on the collection.
- I clicked on the mock server URL to open it up in a new request.
- I then added /products to the end of the URL in the request and hit Send to test things out.
I got back a response that had a list with a couple of product objects in it, so everything seemed to be working. There was one more thing I wanted to verify, though, so I returned to the eCommerce API and, on the Develop tab, clicked the Click to validate button beside ecommerce Mock Server:
Figure 14.6 – Click to validate button
Once the validation was completed, I clicked on the Review Issues button. This opened a tab where Postman highlighted some issues for me. For example, one of the highlighted issues looked like this:
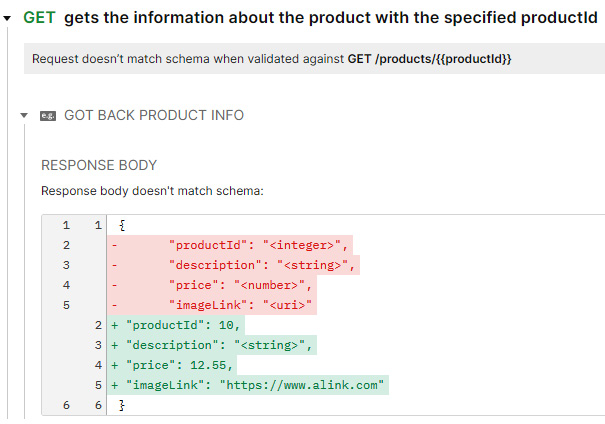
Figure 14.7 – Schema validation issues
This issue is being highlighted because when Postman is doing the schema validation, it is using the example in the schema and comparing that to the example defined in the collection. When it created the collection example, it created the response for it in a generic way. If you look at the request in the collection called gets the information about the product with the specified productId and open up the example for it (by clicking on it in the navigation tree as shown in the following figure), you will see that the example is set to return the values shown in red in the preceding figure:

Figure 14.8 – View request example
You can update the example here in Postman, but it is quicker and less error prone to let Postman take care of it for you, and so I went back to the Review Issues tab. If you have already closed it, you can easily get back to it by going to the Develop tab of the API, clicking on the Issues found button beside the mock server, and then selecting the Review Issues button as shown in the following figure:

Figure 14.9 – Review Issues
Once you are back on the page for reviewing issues, you can choose the Make this change to the request for the requests option that you want to update. In my case, all of the highlighted issues were this same kind of issue where the examples in the specification were not the same as the examples in Postman, and so the Postman examples needed to be updated. Since that was the case, I could choose the Select all changes option at the bottom of the page and then click on the Confirm Changes to Collection button to update all the requests:
However, I think it is a good idea to review changes more carefully, and so I looked through the list of changes and checked each one to see whether it made sense. If it did, I selected the Make this change to the request option beside that change:
Figure 14.10 – Making request changes
This ended up being really helpful for me, because it turned out that I had made a small mistake in my API definition file. In the schema definition for the cart data, I had said that it was an array of product items. Take a look at this schema, though, and see whether you notice anything wrong:
cart:
type: array
items:
$ref: '#/components/schemas/products'
Did you notice it? I missed it too, until I was reviewing the updates. The reference should be to the product schema and not the products (with an s) schema. What alerted me to this was that the examples that Postman was trying to update were made up of a list of lists instead of a list of objects:
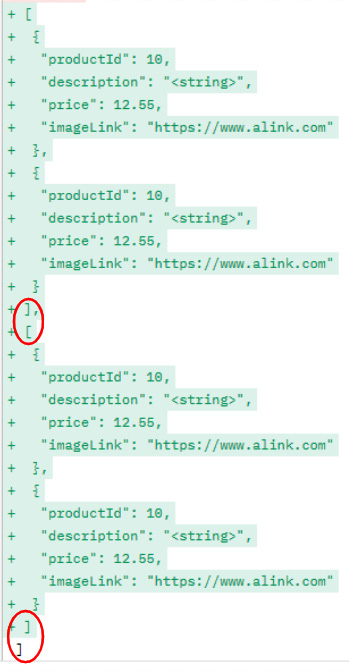
Figure 14.11 – List of lists
As you can see in the preceding figure, there is a list (square brackets represent lists) that is made up of a series of lists, which then have the product objects inside. I did not intend for that to be the case. I wanted just a list of product objects. However, since I had both a product and a products schema, it was valid to reference the products one even though it was not the one I wanted.
I think there are a couple of important lessons to learn from this. In the first place, an API definition file is not a magic bullet. They are helpful, and there are a lot of ways to validate that they are correct, but at the end of the day, you can still make mistakes with them. That leads to the second observation, which is that you should be careful to check through your work. Although Postman has the Select all changes option on this page, it is a good idea to be cautious of using it. Check your work.
In this case, the fix was easy. All I had to do was go through the following steps:
- Go back to the Postman app and in the Define tab of the API, update the schema reference to use product instead of products and save it.
- Go to the Develop tab and click on the Issues found button, and this time choose the Validate Again option.
- Click on Issues found again and click the Review Issues button.
- Review the issues, choosing the Make this change to the request option for each request that it makes sense to update.
Note that this time when I got to the /cart/{{cartId}} request, the suggestion was what I would have expected:
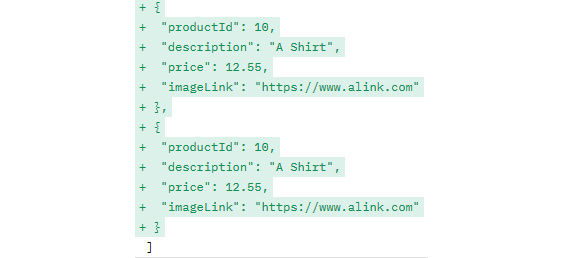
Figure 14.12 – Correct example
- Once all the requests are selected, click on Confirm Changes to Collection and close the tab.
I then did a couple of quick checks to make sure everything had updated correctly. On the Develop tab, I checked that the mock server validation was OK. Postman had nicely updated it for me with a green checkmark to let me know that everything was in order. I then went back to a couple of the examples for a few of the requests and checked that they had the updated values in place. Everything looked good, so there was just one last thing I wanted to check before considering this to be done. I wanted to make sure that I could make calls to the mock server. I went through the following steps in order to check that:
- I went back to the API Develop tab once again and hovered my mouse over eCommerce Mock Server and clicked on the Copy URL button:

Figure 14.13 – Copy URL
- I then clicked on the + button beside the currently open request tabs at the top of the app:

Figure 14.14 – Adding a new request
- I then pasted the mock server URL in the request URL field.
- I then added /products to the end of the request URL and clicked on Send.
Everything worked as expected and I successfully created a mock server. Now that we have a mock server in place, we can start adding additional things such as tests and documentation to the API. We will look at that in the next section.
Creating tests and documentation for the API
Now that you have the basic structure of the API in place, the next challenge I want you to do is to set up some tests and documentation in Postman. As with all of these challenges, consider this to be a review of the things that you learned in this book and so try to work through this on your own. You can review the materials in Chapter 6, Creating Test Validation Scripts, to see ways to set up tests. You can also look through some sections of Chapter 2, Principles of API Design, to review how to document an API within Postman.
Challenge – Add tests to the API
For this challenge, I want you to add some tests to your API. Add some functional tests and some contract tests. You could spend a lot of time doing this, but don't go into excessive detail. Try to create a contract test collection and a test suite for your functional tests. Although you don't need to add a complete suite of tests, make sure to still add a few tests so that you can practice adding test validation scripts. Working through this might take you a half-hour to an hour or so.
Solution – Add tests to the API
While working through this challenge, I started on the Test tab of the API and created a test suite with the following steps:
- I added a test suite by clicking on the Add Test Suite button and choosing the Create new test suite option.
- I named the test suite eCommerce Functional Tests and clicked on Create Test Suite to create the collection.
Once I had this collection, I could start creating tests in it. I went over to the Collections tab on the navigation pane and went to the functional tests collection. I chose the request that gets the list of products. At this point, I want to add a test to this request, but before I do that, I need to set it up so that I can get data for it. Postman has automatically created a baseUrl variable that references the server URL that I specified in the API definition. However, I haven't yet created this API, so that server isn't ready for calls yet. I can, though, tell it to use the mock server instead, with the following steps:
- Go to the Develop tab of eCommerce API.
- Mouse over eCommerce Mock Server and click on the Copy URL button.
- Go to the eCommerce Functional Tests collection and choose Edit from the view more actions menu for that collection.
- On the Variables tab, replace the current value of the baseUrl variable with the copied mock server link.
- Click the Save button to save the changes.
With that set up, I can once again go to the request that gets the list of products, and now I can send that request and get back the data from my mock server. I have some data, but in order to create functional tests, I will need a little bit more. For the /products endpoint, I want to be able to check some different categories, so I will create a couple of examples. I can create an example by using the following steps:
- Modifications to mock responses need to be done in the collection that the mock server is generating its data from. In this setup, I have that in eCommerce Mock Collection, so I need to navigate to the collection and then click on the request that gets the list of products.
- I then click on the View more actions menu and choose the Add example option:

Figure 14.15 – Add example
- I will name this first example get list of men's clothes.
- I'll set Status as 200 OK.
- I will set the example response to have a list of product items, each of which has a category value set to "Men's Clothes".
- I also need to set the response header to have a Content-Type value of application/json, which I can do on the Headers tab of the example response:
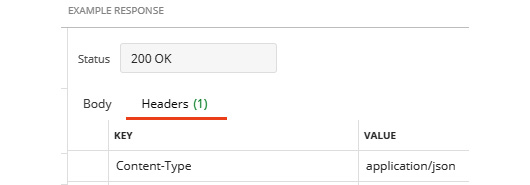
Figure 14.16 – Setting the example response header
- One other thing that I need to set is the query parameter. I want this example to be returned when the category query is set to "Men's Clothes", so in the Query Params section, I set the value of category to "Men's Clothes":

Figure 14.17 – Setting the category value
- I then click on Save to apply all the changes
Now that I have this example set up, I can try it out in the eCommerce Functional Tests collection. I go to the gets the list of products request and set the category parameter to have a value of "Men's Clothes" and click Send to verify that I get back the example I just made. I also try removing the category query from the endpoint so that I can see what I will get back without it, and I notice that I get back the data from the example I just made. I want it to give me back the data from the other example, so need to make some slight modifications using the following steps:
- I once again open up eCommerce Mock Collection and go to the example in the gets the list of products request that is called got back the list of products.
- I uncheck the box beside the category query parameter to remove it from the request URL definition before saving the example.
Now, if I return to the functional tests and send the request without a query parameter, I get back the data from the example I expect.
With this additional data set up, I can start to set up some tests. I want to create a test that uses the query parameter, and so I make sure I have it enabled. I then go to the Tests tab for the request. I want to check that all the items in the list have the same category as the category specified in the query. In this case, I decide to just hardcode the value, and so I add the following test to the request:
pm.test("Check that men's clothes category filter gives back the correct products", function () {
var jsonData = pm.response.json();
var i;
for (i in jsonData) {
pm.expect(jsonData[i].category). to.eql("Men's Clothes");
}
});
This test will check that each product item in the list has the correct category. Of course, at this point, we are using data from the mock server so we know this is correct, but once we have a live API to test against, we can modify the baseUrl variable to point to the live API and verify that its behavior is correct. We could have set up this test without a mock server, but it is nice to be able to have some real data to look at when creating tests. I could add many more functional tests to the request, but I will leave that as an exercise for you. At this point, I want to move on to looking at adding some documentation.
Documenting an API in Postman is done at the collection and request level, so I will document the eCommerce Functional Tests folder. I will first add some documentation to the collection itself with the following steps:
- Click on the collection in the navigation panel.
- Click on the Documentation icon on the right-hand side, as shown in the following figure:

Figure 14.18 – Documentation
- Click on the edit icon on the flyout and enter the documentation that you want:

Figure 14.19 – Editing the documentation
There is some documentation automatically put in there based on the summary that was specified in the specification file, but I add in a little more detail:
Provides data for an eCommerce site.
This site is for demonstration purposes only and should not be used in production.
### Owner
Please contact Dave Westerveld with any questions or concerns
You'll notice that I put several # tags before the word Owner. Since this is written in Markdown, that will turn the word Owner into a title. After you click Save, it will look something like this (notice how the word OWNER is rendered as a title):

Figure 14.20 – Rendered documentation
Once I've made some changes to the collection documentation, I click on Save to apply them and then go to the individual requests and add documentation to them as well. For example, I add the following documentation to the /products request:
This request will give back a list of all the products in the system. If you specify the category query parameter, it will only return those products that have the given category.
In addition, Postman will automatically add examples to the documentation based on the examples that you have saved for the request. This is another reason why it is important to check through your examples and make sure they are accurate and make sense. Often, that is the first thing developers using your API are going to look at when they are trying to understand how the API works.
Sharing what you have done
As we get to the end of this book, I want to make sure that you have the opportunity to showcase what you have learned. You have your own set of reasons for working through this book and trying to understand API testing, but I suspect that you probably want to be able to show others what you have done and learned. Perhaps you want to share your learning with other teammates and colleagues, or perhaps you want to be able to show interviewers that you have been able to acquire skills related to API testing and Postman. Whatever the reason for it, I want you to be able to show others what you have done and learned.
You can use the Share API option on the show more actions menu beside your API to create a shareable API:

Figure 14.21 – Share API
When you do this, you can select a workspace to share this with. If you share your API with a public workspace, you can let others know where that workspace is so that they can see the work you've done as you have gone through this book. Similarly, you can share collections. You can also, of course, create a GitHub repository and add things such as your OpenAPI definition files to demonstrate what you have done with those. There are a lot of options for sharing what you have done and I would encourage you to look into them. If you have worked through this entire book, or even just this chapter, you have covered a lot of ground related to API testing and you should take a moment to celebrate and share what you have done!
Summary
I wanted this entire chapter to work as a review and summary. Learning new things takes some time and looking at things from a few different angles can help to make the learning stick in the long term. I have taken you through worked examples of many of the concepts that I've covered in this book to help you get a solid understanding of them.
We've covered how to design an API, including how to think about and approach defining the actions and endpoints that an API should have. We also looked at how to think about the kind of inputs that the API might take.
After that, we looked at taking our design thoughts and codifying them into an OpenAPI specification file. In doing this, we went over some material that had already been covered in previous chapters, but we also learned about some additional advanced features of this specification, including things such as how to link together outputs from one part of the API that serve as inputs to other parts of the API.
Once we had a definition file set up, we used it to set up an API in Postman. We also set up a mock server and created examples that the server could use. Along the way, we learned how to validate a schema and how to debug issues that might come up.
The final area we reviewed in this chapter was how to add tests and documentation to an API. While doing this, we also expanded the data in the mock server so that we could test the things we wanted. We reviewed how to use documentation in Postman and also covered ways to share everything that you've learned.
As we come to the end of our API testing journey together, I hope that you have learned a lot along the way. We have come a long way in this book. We started with the basics of what an API is and how to use one. We also learned how to think about API test automation and how to design APIs. We, of course, learned how to do this all in Postman and learned how to use many powerful Postman features, such as data-driven testing and mocking. We covered API authorization and how to create good test validation scripts. We looked at how to run tests in continuous integration build environments and saw how to monitor APIs in production.
Along the way, I have taken you through challenges and examples that have helped you learn and apply these ideas. You really have learned a lot! As you finish this book, I want you to stop and take a moment to reflect on how far you have come. It is a big accomplishment and you should feel confident in your ability to tackle any API testing challenges that come your way.
A learning journey is just that, a journey. Don't let your learning journey end at the end of this book. I have given you a good grounding, and if you have worked through the examples, you have been able to see a lot of the details of how to use Postman, but the more you use it in real-life scenarios, the more you are going to learn. Keep using this tool. Keep reading about API testing. Keep testing and exploring and never stop learning.
Happy testing!