Chapter 9: Installing Solutions from Nonprofit Cloud
At last, we are ready to get down to the details of installing solutions from Nonprofit Cloud. Although you may not need every solution for your use case, this chapter will walk you through the installation of the standard solutions available.
By the end of this chapter, you will have this knowledge base:
- How to install Nonprofit Success Pack (NPSP) or upgrade it to the current version
- How to install Program Management Module
- How to install Volunteers for Salesforce
- How to implement Case Management
As we work through each of these areas, remember how vitally important it is to truly understand the organization and what its goals are with the Nonprofit Cloud implementation. To do this well, you need to understand all the Nonprofit Cloud components we have already discussed and the information about change management and discovery.
In this chapter, when we begin with the installation of NPSP and the other components, you will see where all of this must be done before the implementation can begin.
Technical requirements
- Nonprofit Success Pack 30-day trial:
https://www.salesforce.org/trial/npsp/
- Metecho installation of NPSP:
https://install.salesforce.org/products/npsp/latest/install
- Metecho installation of PMM:
https://install.salesforce.org/products/program-management/latest
- Metecho installation of V4S:
https://install.salesforce.org/products/v4s/latest
- Metecho installation of Case Management:
https://install.salesforce.org/products/case-management/latest
First things first: Where do you install NPSP?
The first step for installing NPSP is the decision of where to install it. Here is a quick way to identify what needs to be done next:
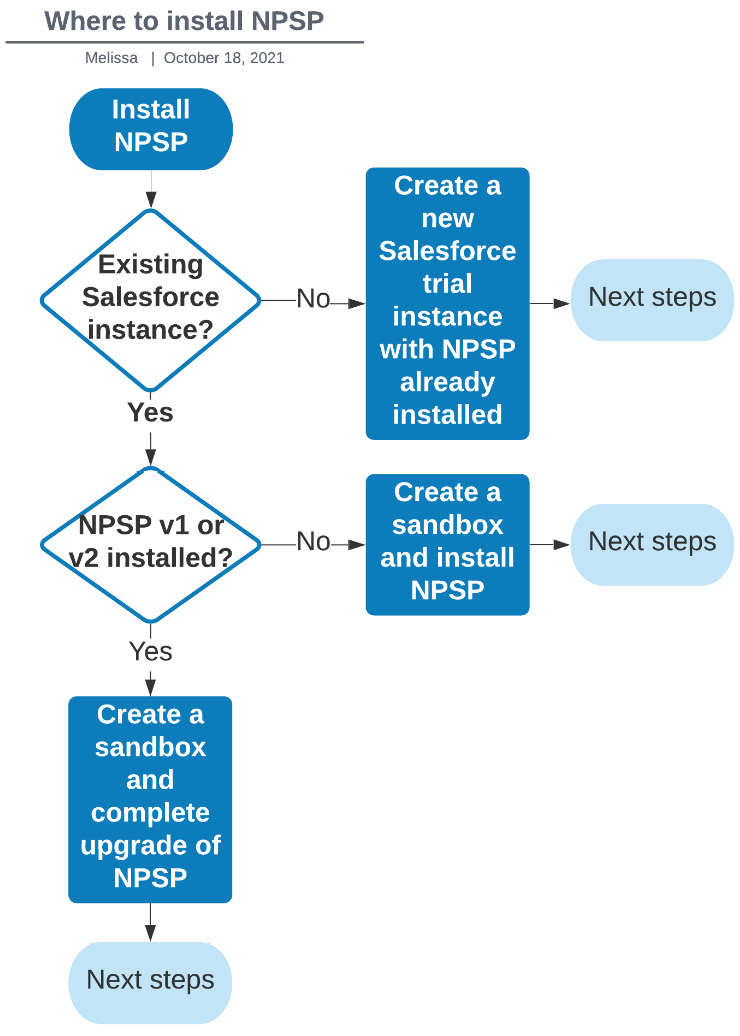
Figure 9.1 – Where to install NPSP decision chart
Let's walk through the thought process for where to install NPSP by following these recommendations:
- Does a Salesforce instance already exist?
If the answer is No, create a new Salesforce trial instance with NPSP already installed. The 30-day free trials are available at https://www.salesforce.org/trial/npsp/. Then you can skip to the section on configuring NPSP in your Salesforce instance.
- If you already have a Salesforce instance, there are additional questions that need to be answered before you create a sandbox and install the latest version of NPSP:
- Have you enabled My Domain?
You must enable My Domain before you install NPSP.
- Is your Salesforce instance an Enterprise edition?
Enterprise-level or above is required for NPSP to work as expected. You can check from the Salesforce Setup menu by going to Company Information and looking at the Organization Edition field.
- If you have a Salesforce instance without any version of NPSP installed, create a sandbox, preferably a Full Copy Sandbox, so you have readily available native data to test and install NPSP using the installer listed in the Technical requirements section. If a full copy sandbox is not available or feasible, a Partial Copy Sandbox is acceptable and would be the next best option. Then you are ready for the section on configuring NPSP.
- If you have a Salesforce instance with a previous version of NPSP installed, there is no need to uninstall any of the older versions. Create a sandbox, preferably a Full Copy Sandbox, so you have readily available native data to test and install NPSP using the installer listed in the Technical requirements section. The installation process will update any older versions and add any missing sections. An in-depth NPSP Upgrade Guide is available with detailed instructions at https://s3-us-west-2.amazonaws.com/sfdo-docs/npsp_upgrade_guide.pdf thanks to the Open Source Commons Sprint team.
The installation of NPSP is handled very simply through the install page. You will need to log into the Salesforce instance where you want to install NPSP. The installer will run a pre-install validation and prompt you to begin the actual installation.
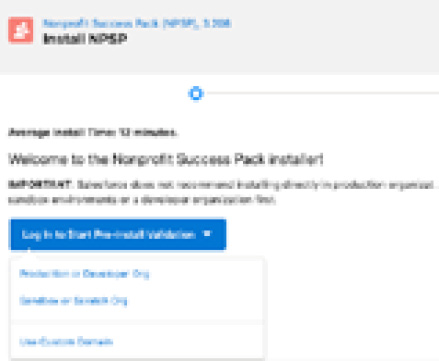
Figure 9.2 – NPSP installer with pre-install validation example
Because every case where you do an install into an existing Salesforce instance can be different, for this case we will start with a brand-new trial instance of Salesforce Nonprofit Cloud.
Starting with a 30-day trial Salesforce instance and NPSP
To get started, go to https://www.salesforce.org/trial/npsp/ and fill in the required information. You will receive an email for the new trial you have created; click to verify and reset your password and password hint. The new Salesforce instance will open at the Get Started with NPSP – Admin page.
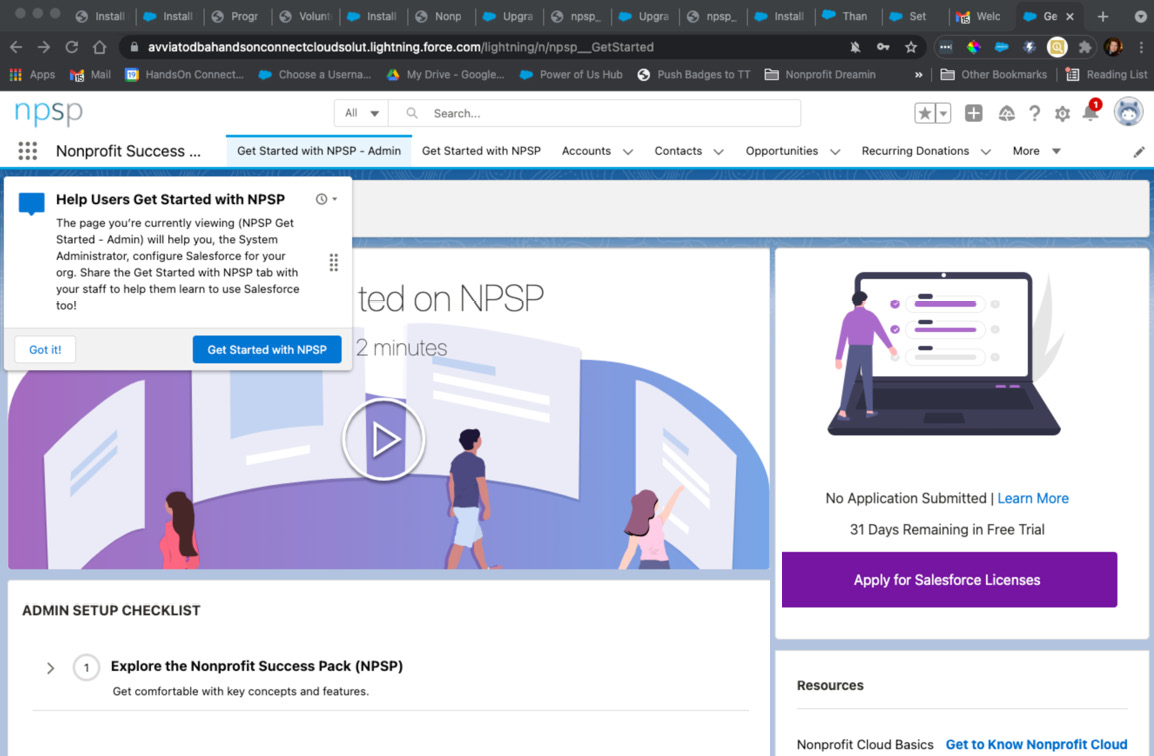
Figure 9.3 – Sample landing page when logging into a new Salesforce Nonprofit Cloud instance
Whether you are using a new instance as just created or whether you are installing NPSP in an already existing instance of Salesforce, check to make sure that the post-installation configuration is done. We will come back to this interesting-looking page in Chapter 10, Configuring Fundraising Features.
Permissions configurations
First, you will need to grant the appropriate access to manage the NPSP settings. Add the following system permissions to the profile that will be managing the NPSP Settings. Go to Setup > Profiles > System Permissions and confirm that the boxes are checked for the following:
- Author Apex
- Customize Application
- Modify All Data
If the boxes are not checked, you may need to clone the profile. If it is a standard Salesforce profile, check the boxes, and reassign the appropriate users.
Remember
Modify All Data applies to all the data in the Salesforce instance. Assigning this permission makes it possible for users to edit and delete data.
Required configurations
Because we created a Salesforce instance from the trial signup form, most of the configuration has already been done in advance. However, when installing NPSP, whether it is a new Salesforce instance or an established one, there are several post-installation configurations to be considered. Let's walk through the post-installation configurations that are required and compare them to the trial instance we just created.
Organization record types
In NPSP, there are two Account Record types:
- Household Account
- Organization
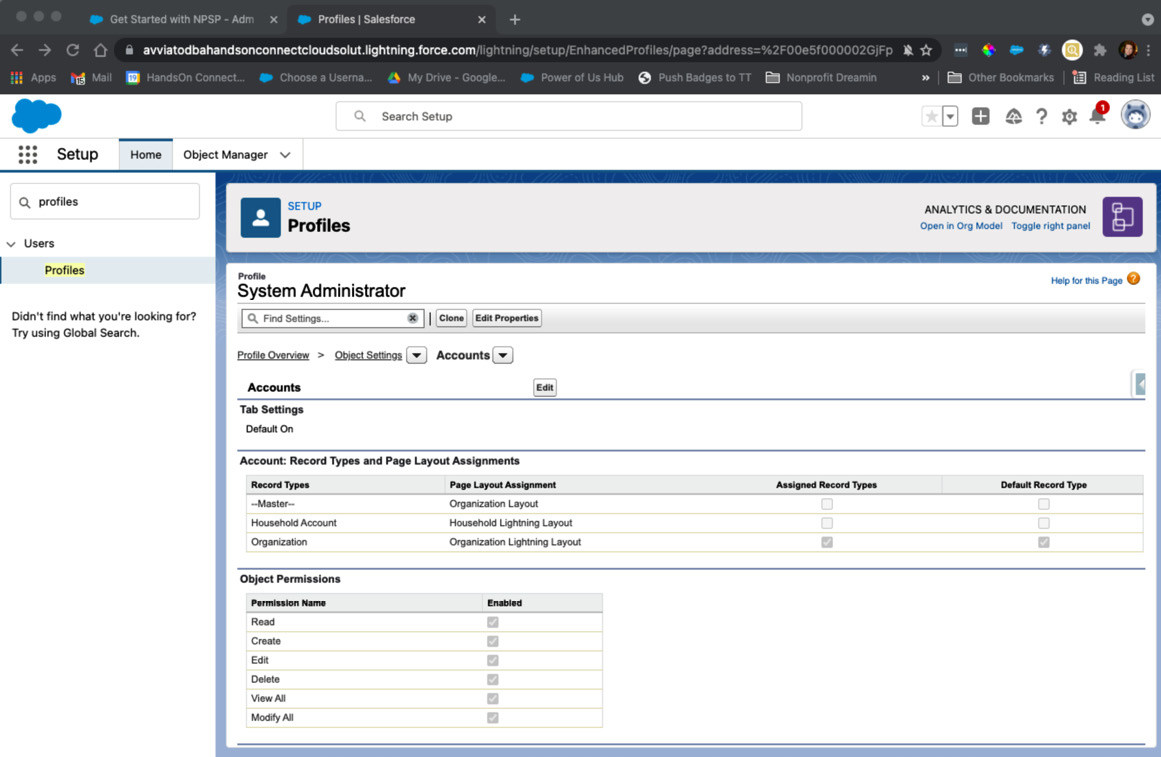
Figure 9.4 – This is a view of the Accounts settings in a profile using NPSP
NPSP automatically creates a Household Account for any new contact where the account name is left blank.
You need to remember the following steps:
- You must confirm that the record types are available in the Account object.
- Then, confirm that the profiles using NPSP are set with the Organization record type as the default by going to Setup > Profiles > Accounts.
As a rule, the Organization record type should be set as the default for users in NPSP. Household accounts are created automatically for Contacts.
Page layouts
NPSP also comes with preconfigured page layouts. A general recommendation is to assign the standard NPSP page layouts now based on Profile and Record types. As we continue the process of implementing NPSP for specific use cases, we will look at how those page layouts may be redefined or changed.
The recommendation is to assign standard page layouts for Account, Opportunity, Contact, and Campaign objects. Go to Setup > Object Manager > Account > Page Layout > Page Layout Assignment and edit as shown:
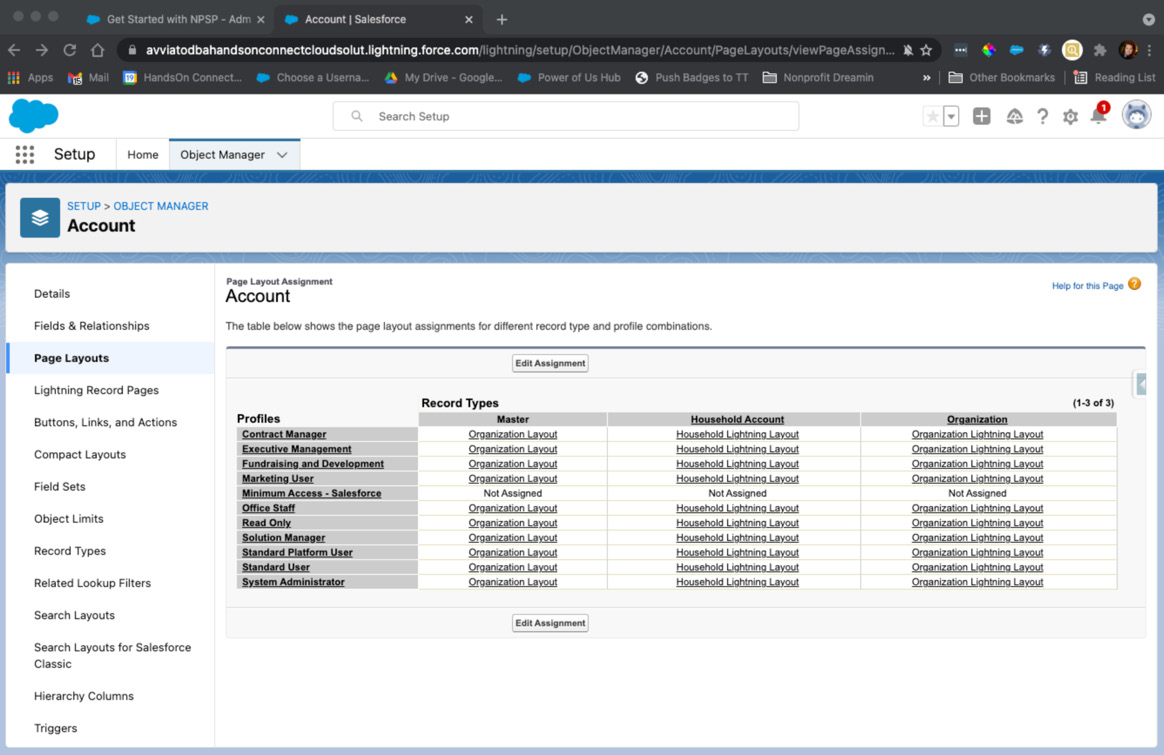
Figure 9.5 – This is an example of the Account Page Layout Assignment by profile and record type for NPSP
Repeat these same steps for Opportunity, Contact, and Campaign objects to make the NPSP standard page layouts available.
Account View, Edit, and Manage Household buttons
If you are working in an existing Salesforce instance, you need to confirm that the Account View and Edit buttons are set to No override, if you intend to use the Salesforce Lightning Experience:
- Check by going to Setup > Object Manager > Account > Buttons, Links, and Actions.
- After confirming the View and Edit buttons, confirm that the Manage Household button is enabled.
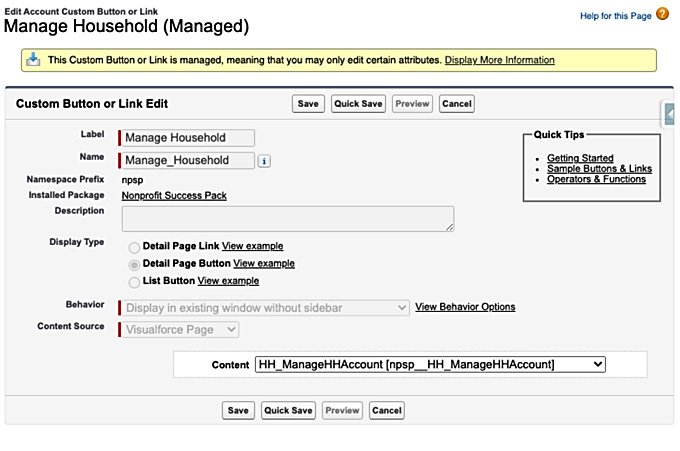
Figure 9.6 – This is how the Management Household configuration looks on the Account object in NPSP
If you do not see the Manage Household button on your Household Account page layout, you may need to add the button in the page layout itself.
Lead Convert override
Confirm that the Convert button on the Lead object is set to the Visualforce page override.
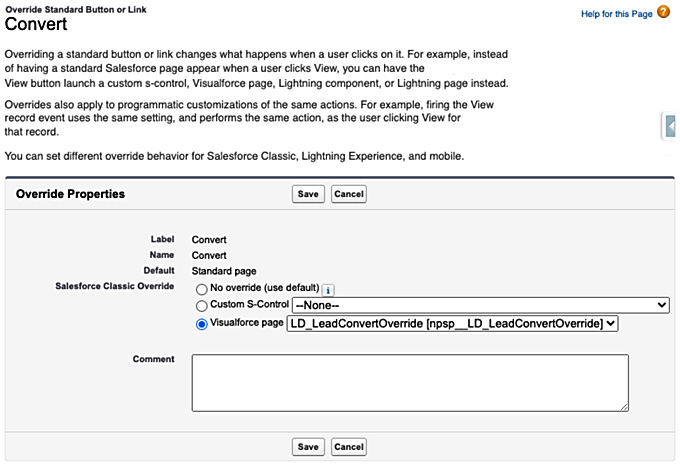
Figure 9.7 – Convert button override in Lead in NPSP
The VisualForce page provides a much better user interface for users in the Salesforce instance.
Contact Delete button
Confirm that the Contact Delete button is set to the Visualforce page with the following text: CON_DeleteContactOverride[npsp__CON_DeleteContactOverride].
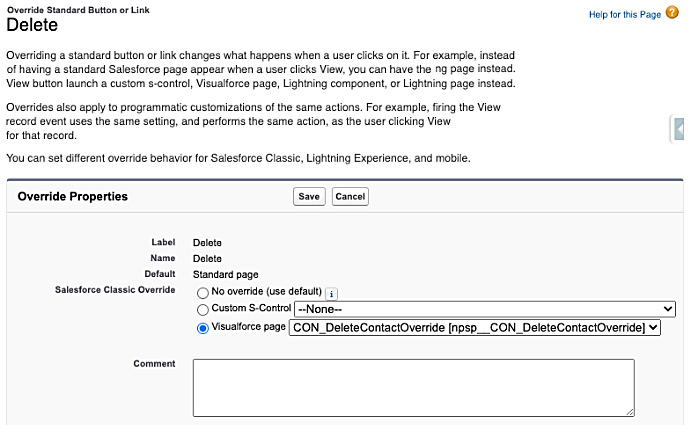
Figure 9.8 – Contact Delete button override screenshot
Unless the Contact Delete button is configured this way, it is possible to delete the Contact and leave a Household with no members.
Relationship settings
Relationships are custom objects in the NPSP package. Relationships show how two people (or contacts) are connected to each other. Following are the standard reciprocal relationship records from NPSP:

If these do not exist in your Salesforce instance, you can create them. You can use some or all of these or create your own:
- Click the App Launcher and find NPSP Settings.
- Click Relationships and then click Relationship Reciprocal Settings to see the following interface:
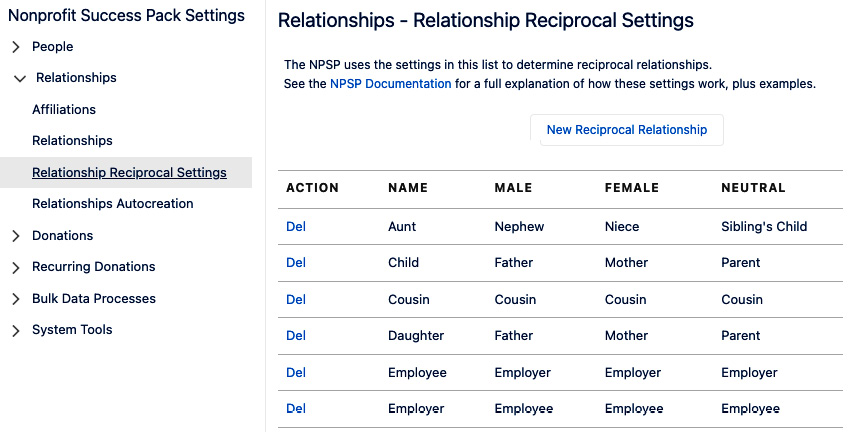
Figure 9.9 – Relationship Reciprocal Settings page in NPSP
Note
This is for Contact-to-Contact relationships and not for Contact-to-Account or Account-to-Account relationships.
The only additional required configurations are in conjunction with the fundraising functionality of NPSP. Those configurations will be covered in Chapter 10, Configuring Fundraising Features.
Installing Program Management Module
Once you have NPSP installed and the required configurations are done as noted in the previous section, you can begin to install the other Nonprofit Cloud modules.
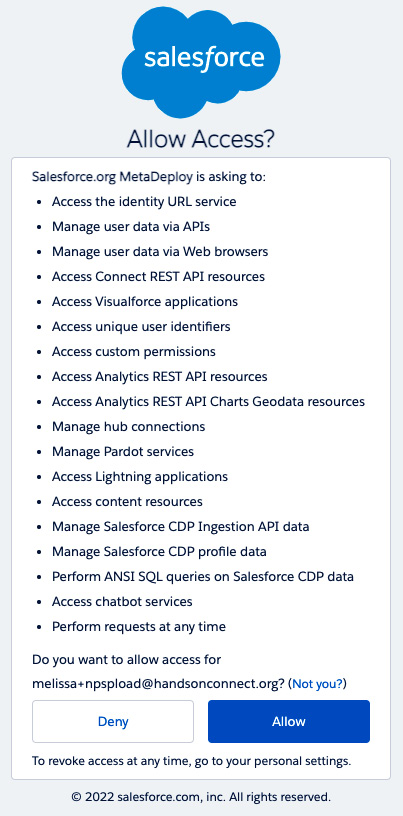
Figure 9.10 – Allow access screen for installation
Steps for installing PMM
We will start with Program Management Module (PMM). The same guidelines apply as with NPSP regarding where you should install Program Management Module. In this case, we are working with a brand-new trial instance that has NPSP installed in production, so we install PMM in production as well:
- The install is found at https://install.salesforce.org/products/program-management/latest.
- When you click the blue bar to begin the installation, you will be asked to log into the instance where you want to install the PMM package.
- Once you are logged in, a page will open requesting you allow several Salesforce accesses to a variety of resources.
- Confirm you are installing in the appropriate location and click Allow.
- When the pre-install validation is completed, the Install button will appear. Click it and PMM will be installed in an average of 3 minutes.
This will complete the installation of PMM itself.
Post-installation required configuration
There are a few post-installation configurations that are required for PMM to function as expected. These need to be done before any other additional setup, configuration, or customization.
Program Management Standard User
PMM installs a Program Management Standard User profile. Users who will be accessing PMM need to be assigned the User profile.
Go to Setup > Users > Profile > Program Management Standard User and click Assigned Users.
Assign the appropriate users to the profile.
Program Management permission sets
There are three different levels of permissions that can be assigned to users in relation to PMM. Permission sets should be assigned depending on how the user will interact with PMM. The permission sets are as follows.
PMM Manage
Assign this permission set to the Salesforce admin as well as other users who will be configuring programs, services, and engagements. These users are generally program managers or directors:
- Go to Setup > Users > Permission Sets > PMM: Manage and click Manage Assignments.
- Choose the users who need this level of permission and add them.
- See the following figure:
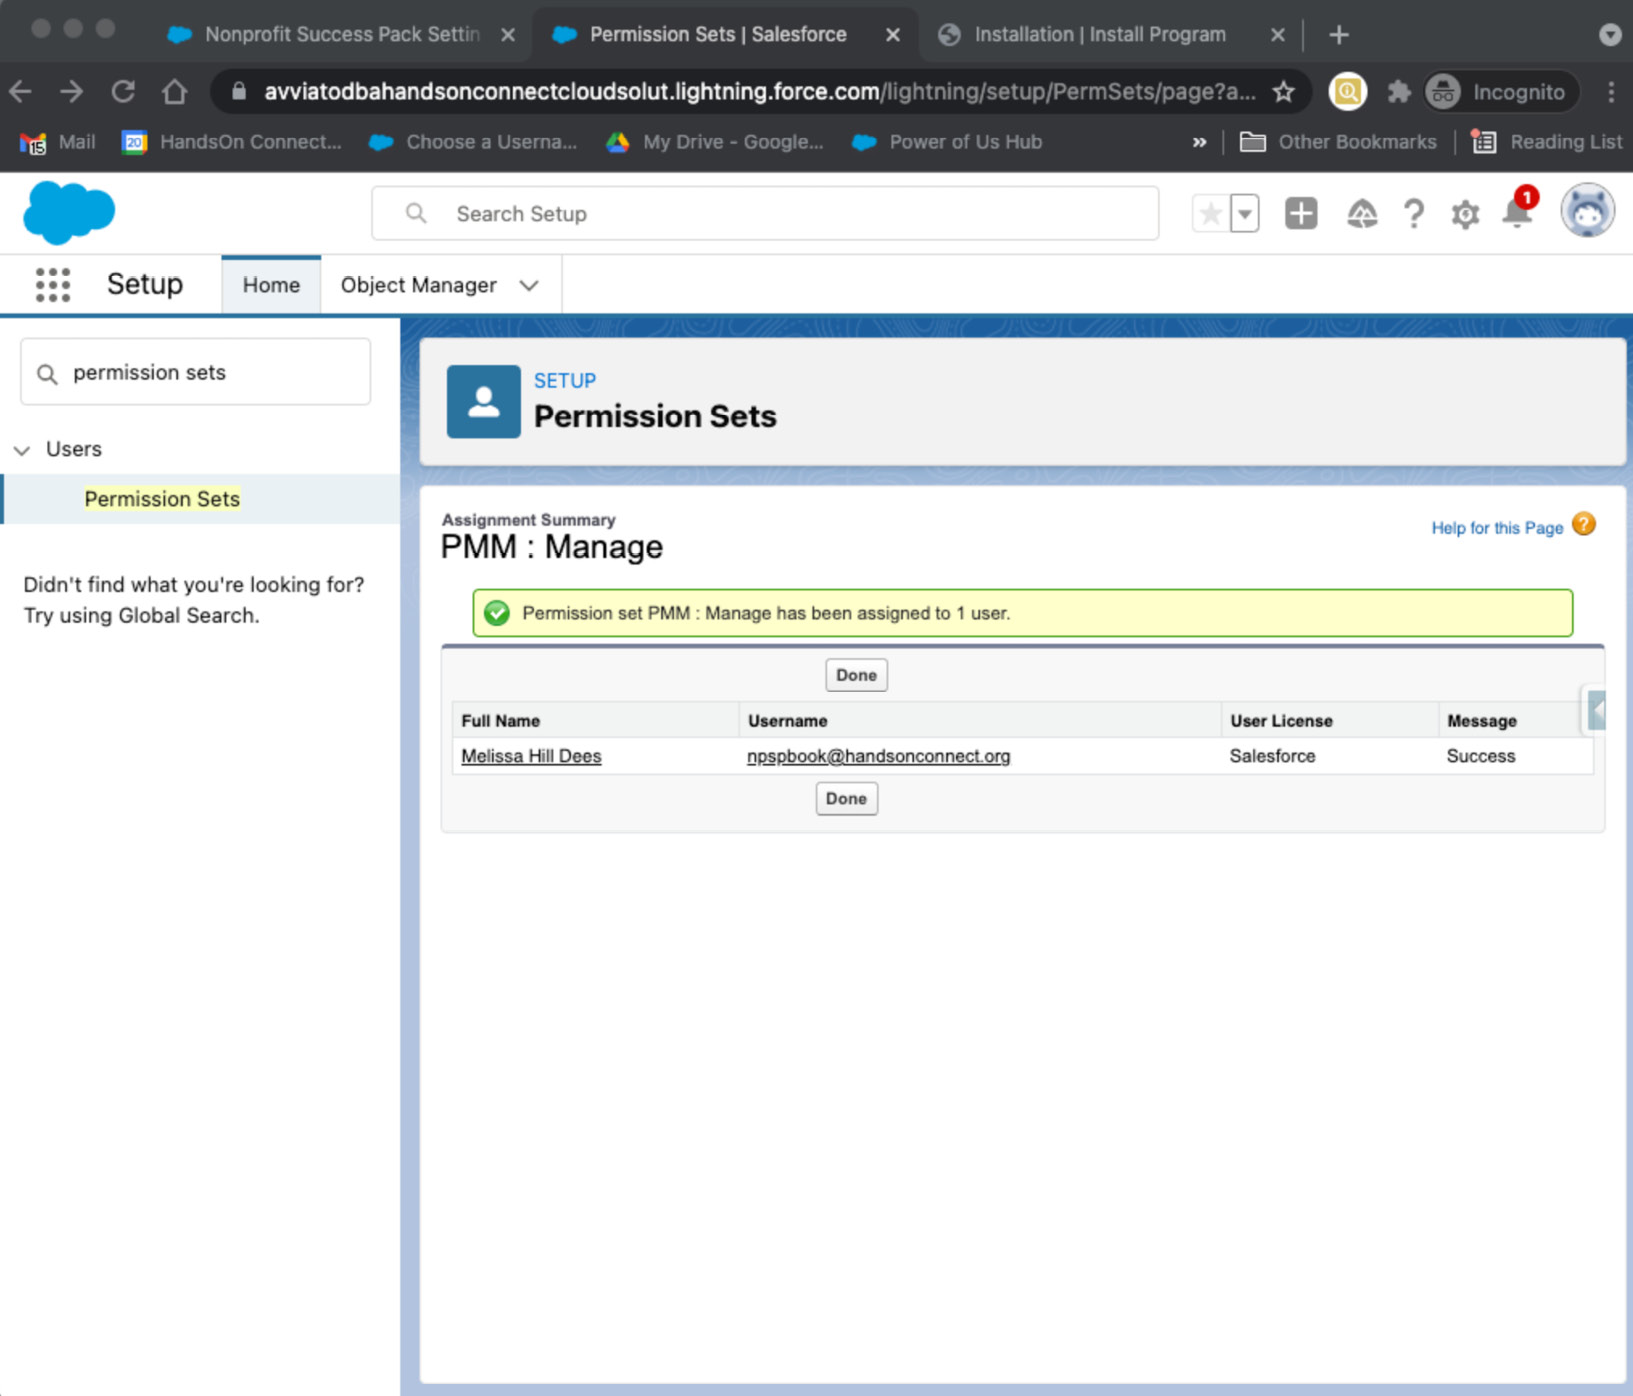
Figure 9.11 – PMM: Manage permission set example for the system administrator assignment
Repeat this process for any users who need PMM Deliver or PMM View.
PMM Deliver
This permission set is for users who normally fulfill the role of Case Manager or deliver services. These users have limited capabilities for creating and editing.
PMM View
Assign this permission set to those users who need to view information but have no need to modify any of the PMM data.
In Chapter 11, Configuring Additional Features and Security, additional configuration work will be outlined depending on the use case for PMM.
Installing Volunteers for Salesforce
Installing V4S is very similar to installing PMM. Let's get started.
Steps for Installing V4S
Go to https://install.salesforce.org/products/v4s/latest and click the blue bar that says Install Volunteers for Salesforce.
This will run the pre-install validation. You will notice that there are four different steps that the installation can take; Install Page Layouts (NPSP) is optional but recommended. Unless you already know that you will not be using the preconfigured page layouts, install all four by clicking the blue Install button.
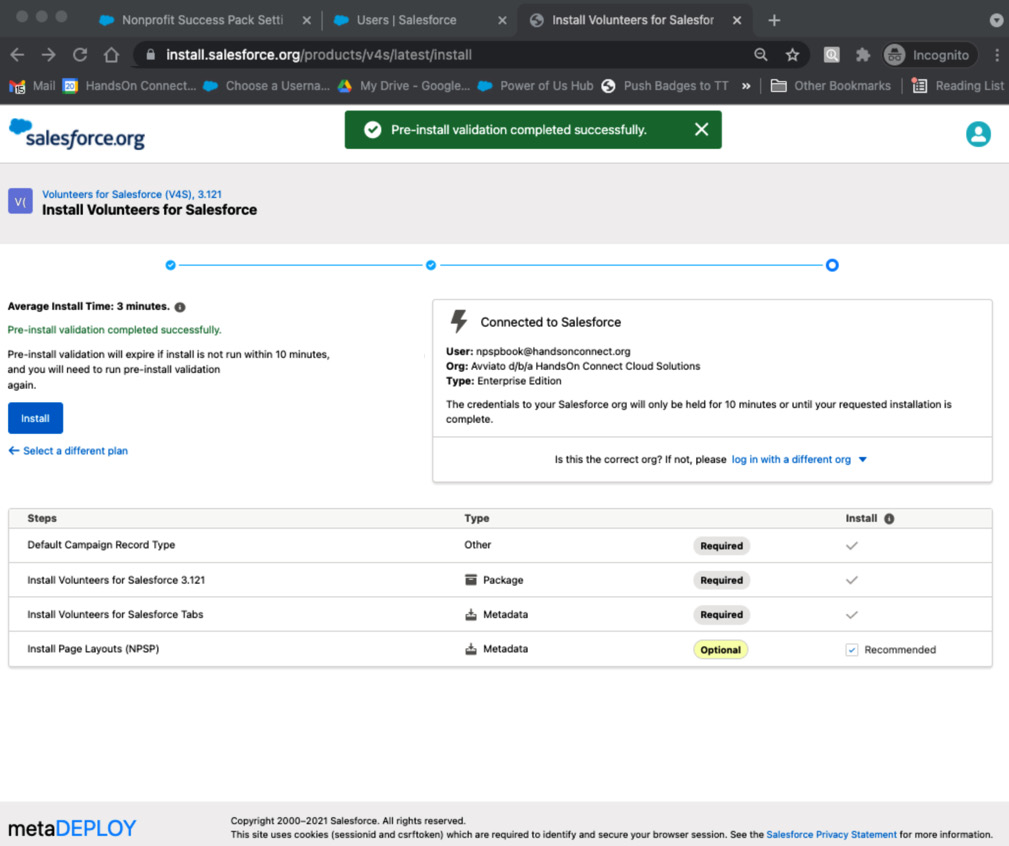
Figure 9.12 – Options for steps to install V4S using metaDEPLOY
The average installation time is approximately 3 minutes. There are no additional post-install configurations; optional configurations can be found in Chapter 11, Configuring Additional Features and Security.
Installing Case Management
Because Case Management is a paid product, the licenses for it must be provisioned and available in the Salesforce instance before you begin the installation.
Note
Case Management only works in Lightning Experience, therefore, it is not available in Salesforce Classic.
Once you have confirmed that the Nonprofit Cloud Case Management licenses are available, install Case Management from https://install.salesforce.org/products/case-management/latest/install by clicking the blue button to start the pre-installation validation as done for the previous installs in this chapter.

Figure 9.13 – Case Management installation page
Once the pre-install validation is done, click the blue bar that says Install Nonprofit Cloud Case Management to complete the installation.
Post-installation required configuration
There are only two required post-installation configurations for Case Management.
User access
Grant users access to Case Management by assigning them the Case Management Permission set. This permission gives users access to the Case Management app.
Additionally, there are three levels of permission sets to be assigned to users based on the functionality the user will need. They are very similar to the permission sets in PMM and follow the same pattern:
- Manage: This is the highest level of permission and generally is assigned to the Salesforce Administrator and Program Managers.
- Deliver: This level is assigned to case managers with less create and edit permissions.
- View: This level is view-only.
Assigning page layouts
Installing Case Management provides three pre-configured page layouts. Assign the following page layouts to the appropriate Case Management users:
- Account: Branch page layout
- Contact: Case Management page layout
- Case: Incident layout
With this, we have completed the required configurations for Case Management.
Summary
This chapter and the next two chapters – Chapter 10, Configuring Fundraising Features, and Chapter 11, Configuring Additional Features and Security – cover installing and configuring the most common Nonprofit Cloud components in a Salesforce instance. In this chapter, we installed components in a Salesforce instance and went through the required post-installation configurations.
Chapters 9 to Chapter 11 comprise the bulk of the work on implementing and configuring the various Nonprofit Cloud components we explored in the early chapters of this book. You have learned how to ascertain where to install the Nonprofit Cloud components depending on whether there is an existing Salesforce instance or if a new trial instance is being created that already has NPSP installed. Armed with the knowledge of what NPSP, PMM, V4S, and Case Management features provide, we have taken a hands-on look at getting those components installed and configured in a Salesforce instance.
In Chapter 10, Configuring Fundraising Features, we will focus solely on the additional configurations and practical uses cases for the fundraising features found in NPSP. This chapter will call on all the areas of knowledge gained up to this point to make decisions about which configurations will be necessary and how to make the fundraising features work best.
Resources and additional reading
- Nonprofit Success Pack Upgrade Guide: https://s3-us-west-2.amazonaws.com/sfdo-docs/npsp_upgrade_guide.pdf
- Convert to the Nonprofit Success Pack Household Account Model: https://s3-us-west-2.amazonaws.com/sfdo-docs/npsp_account_model_conversion.pdf
- Feature Configuration Overview: https://powerofus.force.com/s/article/NPSP-Feature-Configuration-Overview#topic-3670
- NPSP Basics: https://trailhead.salesforce.com/en/content/learn/modules/nonprofit-success-pack-basics?trail_id=explore-nonprofit-success-pack
- Program Management with Nonprofit Cloud: https://trailhead.salesforce.com/en/content/learn/modules/program-management-with-nonprofit-cloud
- V4S Basics: https://trailhead.salesforce.com/en/content/learn/modules/nonprofit_volunteer_basics
- Human Services with Nonprofit Cloud Case Management: https://trailhead.salesforce.com/content/learn/modules/human-services-with-nonprofit-cloud-case-management?trailmix_creator_id=pwhite39&trailmix_slug=get-started-nonprofit-cloud-case-management