Chapter 11: Configuring Additional Nonprofit Cloud Features and Security
In Chapter 9, Installing Nonprofit Cloud Solutions, we installed NPSP and the additional features that are available for PMM and V4S. In Chapter 10, Configuring Fundraising Features, we configured the fundraising features for NPSP. In this chapter, we will finish configuring PMM and V4S. Although we may not perform every configuration in detail, we will walk through the configurations for the most common use cases. Case Management is a paid add-on for PMM where we will make these configurations.
After completing this chapter, you will know about the following:
- Configuring permission sets in PMM
- Implementing configurations in V4S for volunteers and staff
- Setting up Case Management
The last two sections in this chapter will be about data management and security and any additional permissions considerations that are relevant to implementing Nonprofit Cloud. Here, we will do the following:
- Maintaining data integrity and security
- Understanding additional permissions for NPSP administrators and other profiles and roles in NPSP
So, let's start by looking at the permission sets for PMM.
Configuring Program Management Module (PMM)
For a detailed recap of the functionality of PMM and its use cases, see Chapter 3, Tracking Impact with the Program Management Module. The following diagram shows the data structure of PMM before we begin configuring it:

Figure 11.1 – PMM entity relationship diagram
Wherever you installed NPSP and PMM in Chapter 9, Installing Nonprofit Cloud Solutions, you will need to complete these additional configurations to adequately set up PMM. Upon logging into your Salesforce instance, you should be back at the Get Started with NPSP – Admin page.
Let's complete the required configurations.
Required post-installation configurations
As a Salesforce administrator, you should already be familiar with Profiles and Permission Sets. Post-installation configuration for PMM involves these two settings. Let's take a look at them in more detail.
Profiles
When we installed PMM, Program Management Standard User Profile was installed alongside it. At this point, profiles need to be assigned to users who want to use PMM:
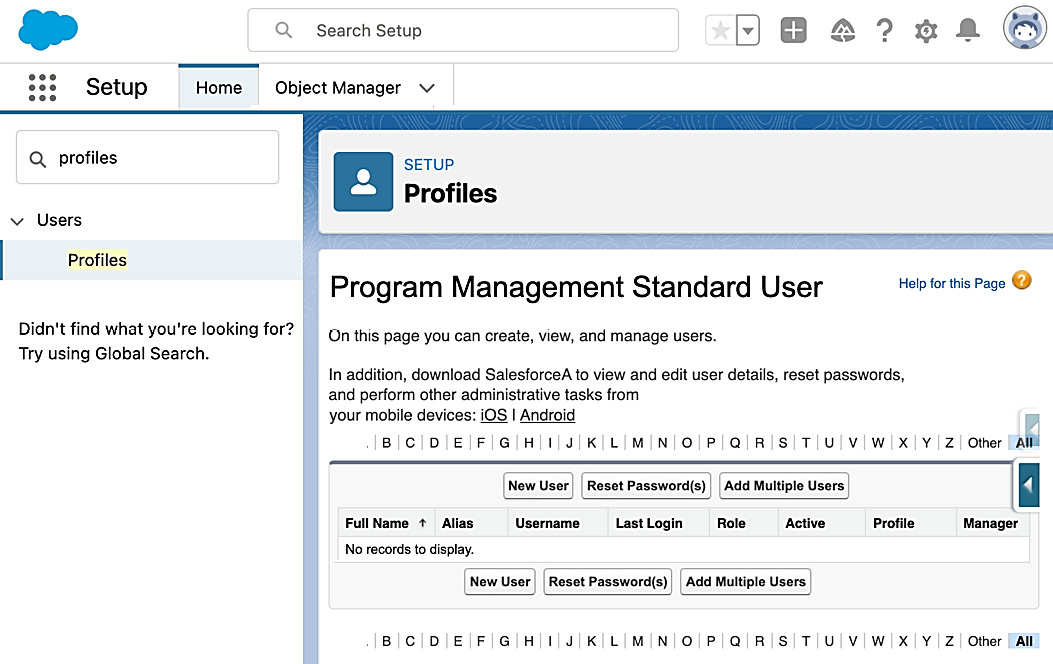
Figure 11.2 – Program Management Standard User profile management
Let's understand the steps for user management:
- To add new users or assign one or more users to the profile, click Setup > Users > Profiles > Program Management Standard User > Assigned Users.
- Assign the appropriate users to this profile.
One additional consideration for the Program Management Standard User profile is to add the functionality to View Dashboards in public folders and View Reports in public folders. This can be done in the profile itself by checking the appropriate boxes under System Permissions. Alternatively, create a Permission Set with the desired access and settings. Permission sets are gaining popularity as the best way to provide access to users regardless of their profile or role.
Permission sets
Next, the appropriate Permission Set for PMM's functionality needs to be assigned. The PMM package provides three different permission sets based on the tasks a user needs to complete. You can access these permission sets by clicking Setup > Users > Permission Sets, as shown in the following screenshot:

Figure 11.3 – PMM Permission Sets to be assigned as part of the post-installation configuration
Each permission set provides different levels of access in PMM. You can assign these permission sets to the appropriate users based on the access they need:
- PMM: Manage is the least restrictive level of access. This permission set is normally assigned to the Salesforce administrator, directors, and managers. It gives create, read, edit, and delete access to the Programs, Services, Program Engagements, Program Cohorts, Service Deliveries, Service Participants, Service Schedules, and Service Sessions objects and fields.
- PMM: Deliver is the level of access that most of the staff who deliver programs will need. It can also apply to case managers. It provides create, read, and edit access to the Program Engagements, Services Deliveries, and Service Participants objects and fields; read and edit access to the Service Sessions objects and fields; and read-only access to the Programs, Program Cohorts and Services, and Service Schedules objects and fields.
- PMM: View provides read-only access to the custom objects that make up PMM. This permission set is helpful for executives who need visibility for PMM.
Note
These permission sets only apply to the custom objects that make up PMM. Ensure that read, create, edit, and delete access is granted for standard objects for Accounts, Contacts, and Cases.
Configuring sharing rules for PMM
As a Salesforce administrator, sharing rules are an important part of configuration and security in a Salesforce instance. The same is true if you're using sharing rules for PMM and the task is just as simple. Follow these steps:
- Create a public group by clicking Setup > Users > Public Groups > New, filling in the group's Label and Group Name, and specifying the appropriate users under Available Members:

Figure 11.4 – The Public Groups creation page
- Then, create the sharing rules for the public group by clicking Setup > Sharing Settings. Choose Program from the dropdown list and click New under Program Sharing Rules.
- See the recommended configuration that's shown in the following screenshot:
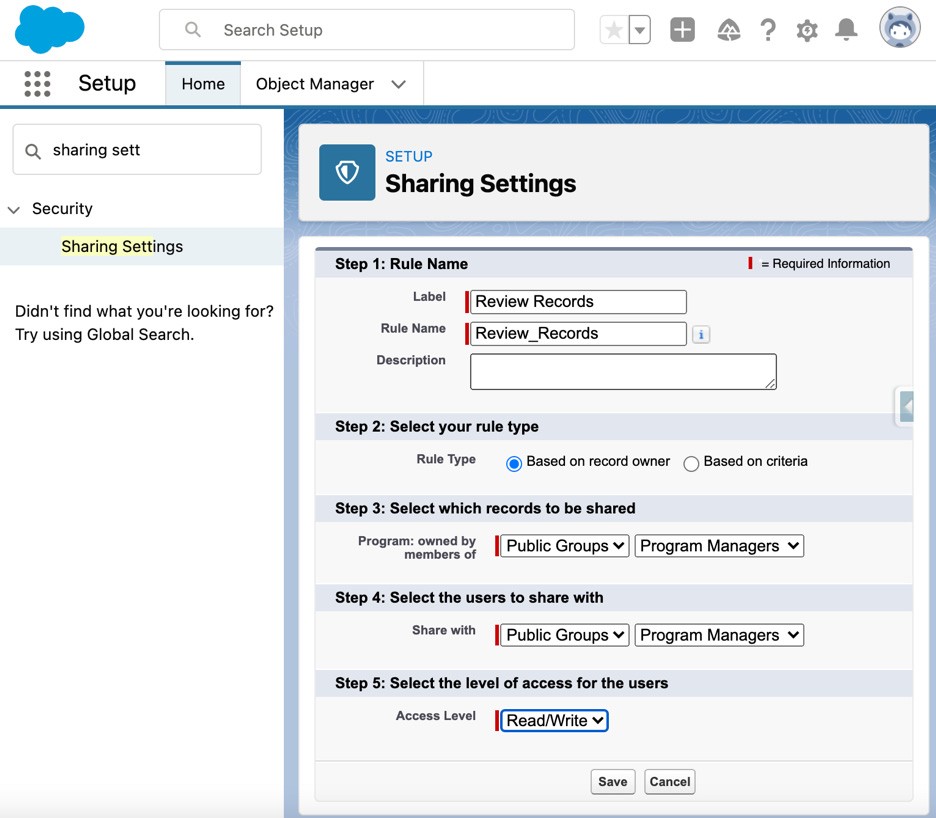
Figure 11.5 – Recommended Sharing Settings page setup for PMM program managers
- Click Save.
Repeat these steps to define the sharing rules for other objects in the PMM, such as Program Engagements, Program Cohorts, Services, and Service Deliveries.
Experience Cloud configurations (optional)
If you wish to use Experience Cloud for the PMM audience to engage and interact with Salesforce, then you will need to build an Experience Cloud site, as we discussed in Chapter 5, Tracking Volunteer Impact. Experience Cloud is another certification altogether; learning how to build out Experience Cloud will not be addressed here. However, it is important to note that when you are configuring PMM, additional configurations are required if you wish to use Experience Cloud.
Let's look at some of these configuration options:
- You will need to assign the appropriate permission set to Experience Cloud user licenses. A quick way to make sure they have the access they need to do this is to do the following:
- Clone the PMM: View permission set.
- Name the cloned permission set Site Participant: View.
- Assign it to users as needed.
- Attendance and Service Schedule are two components that are available in Experience Cloud. Use Sharing Rules to further define and refine what your external Experience Cloud users will see.
PMM can be used without a participant interface, depending on the organization's specific use cases.
Customizable configurations for PMM
PMM is a very robust and flexible tool that can be configured and customized to fit almost any program. Let's take a high-level look at some of the ways PMM can work with different use cases.
Who are the recipients of programs and services?
Two of the use cases that we looked at in Chapter 3, Tracking Impact with the Program Management Module, involved recipients who were not individuals or contacts; they were entire households and animals. So, how do we configure PMM to work in those cases? For both cases, where a Client (Contact) is not served, the first step is to remove the Client field from the Program Engagements and Service Deliveries objects.
The configurations that are required for households include adding a new field to the Program Engagements and Service Deliveries objects. The field will be a lookup field to Account, for a household, or to a custom object that has been created, such as Animal. This process will not relate the appropriate object to the programs and services you are tracking.
Note
Be sure to include these new fields in the appropriate page layouts and include the related lists on Accounts and custom objects.
Additionally, you will want to customize the Bulk Service Delivery object to reflect the change in the related service recipient, as well as customize Quick Actions and Record Naming.
Automating Program Engagement and Service Delivery naming
PMM also includes two process builders that can be updated or customized to reflect the specific use cases for PMM. As an administrator, you should already be familiar with process builders and how to access them. The two PMM process builders are called Program Engagement Object and Service Delivery Object:
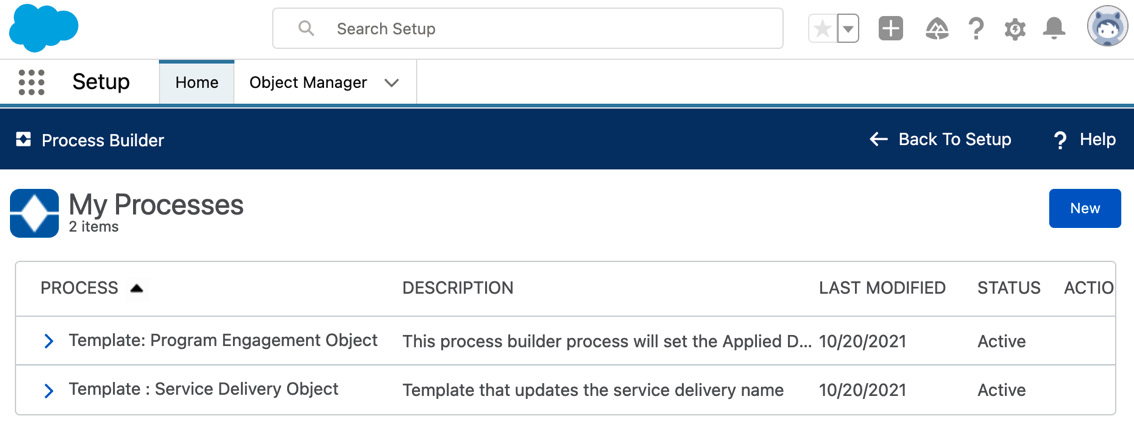
Figure 11.6 – PMM process builders installed
The default formula for the Update Name part of the Program Engagement Object process builder can be edited by cloning the process builder and making the necessary adjustments. Depending on the use case, you may want to remove Anonymous from the auto-naming process or replace it with an account name or a custom object, such as Animals. The default formula is as follows:
IF(
NOT(
ISBLANK(
[pmdm__ProgramEngagement__c].pmdm__Contact__c
)
),
IF(
LEN(
[pmdm__ProgramEngagement__c].pmdm__Contact__c.FirstName + ' ' + [pmdm__ProgramEngagement__c].pmdm__Contact__c.LastName + ' ' +
IF(
NOT(
ISBLANK(
[pmdm__ProgramEngagement__c].pmdm__StartDate__c
)
),
TEXT(
[pmdm__ProgramEngagement__c].pmdm__StartDate__c
),
LEFT(
TEXT(
[pmdm__ProgramEngagement__c].CreatedDate
),
10
)
) + ': ' + [pmdm__ProgramEngagement__c].pmdm__Program__c.Name
) > 77,
LEFT(
( [pmdm__ProgramEngagement__c].pmdm__Contact__c.FirstName + ' ' + [pmdm__ProgramEngagement__c].pmdm__Contact__c.LastName + ' ' +
IF (
NOT(
ISBLANK(
[pmdm__ProgramEngagement__c].pmdm__StartDate__c
)
) ,
TEXT(
[pmdm__ProgramEngagement__c].pmdm__StartDate__c
) ,
LEFT(
TEXT(
[pmdm__ProgramEngagement__c].CreatedDate
),
10
) ) + ': ' + [pmdm__ProgramEngagement__c].pmdm__Program__c.Name ),
77
) + '...',
[pmdm__ProgramEngagement__c].pmdm__Contact__c. FirstName + ' ' + [pmdm__ProgramEngagement__c].pmdm__Contact__c.LastName + ' ' +
IF(
NOT(
ISBLANK(
[pmdm__ProgramEngagement__c].pmdm__StartDate__c
)
),
TEXT(
[pmdm__ProgramEngagement__c].pmdm__StartDate__c
),
LEFT(
TEXT(
[pmdm__ProgramEngagement__c].CreatedDate
),
10
)
) + ': ' + [pmdm__ProgramEngagement__c].pmdm__Program__c.Name
),
IF(
LEN(
$Label.pmdm__Anonymous + ' ' +
IF(
NOT(
ISBLANK(
[pmdm__ProgramEngagement__c].pmdm__StartDate__c
)
),
TEXT(
[pmdm__ProgramEngagement__c].pmdm__StartDate__c
),
LEFT(
TEXT(
[pmdm__ProgramEngagement__c].CreatedDate
),
10
)
) + ': ' + [pmdm__ProgramEngagement__c].pmdm__Program__c.Name
) > 77,
LEFT(
( $Label.pmdm__Anonymous + ' ' + IF ( NOT(
ISBLANK(
[pmdm__ProgramEngagement__c].pmdm__StartDate__c
)
) ,
TEXT(
[pmdm__ProgramEngagement__c].pmdm__StartDate__c
) ,
LEFT(
TEXT(
[pmdm__ProgramEngagement__c].CreatedDate
),
10
) ) + ': ' + [pmdm__ProgramEngagement__c].pmdm__Program__c.Name ),
77
) + '...',
$Label.pmdm__Anonymous + ' ' +
IF(
NOT(
ISBLANK(
[pmdm__ProgramEngagement__c].pmdm__StartDate__c
)
),
TEXT(
[pmdm__ProgramEngagement__c].pmdm__StartDate__c
),
LEFT(
TEXT(
[pmdm__ProgramEngagement__c].CreatedDate
),
10
)
) + ': ' + [pmdm__ProgramEngagement__c].pmdm__Program__c.Name
)
)
Update this formula to automate the appropriate name without Anonymous or with the account or custom object name for the Program Engagement object.
Similarly, for Service Delivery naming, clone the process builder and update the AutoName formula. The default formula is as follows:
IF(
NOT(
ISBLANK(
[pmdm__ServiceDelivery__c].pmdm__Contact__c
)
),
IF(
LEN(
[pmdm__ServiceDelivery__c].pmdm__Contact__c.FirstName + ' ' + [pmdm__ServiceDelivery__c]. pmdm__Contact__c.LastName + ' ' + IF (
NOT(
ISBLANK(
[pmdm__ ServiceDelivery__c].pmdm__DeliveryDate__c
)
) ,
TEXT(
[pmdm__ ServiceDelivery__c].pmdm__DeliveryDate__c
) ,
LEFT(
TEXT(
[pmdm__ ServiceDelivery__c].CreatedDate
),
10
) ) + ': ' + [pmdm__ServiceDelivery__c].pmdm__Service__c.Name
) > 77,
LEFT(
[pmdm__ServiceDelivery__c].pmdm__Contact__c.FirstName + ' ' + [pmdm__ServiceDelivery__c].pmdm__Contact__c.LastName + ' ' + IF (
NOT(
ISBLANK(
[pmdm__ServiceDelivery__c].pmdm__DeliveryDate__c
)
) ,
TEXT(
[pmdm__ServiceDelivery__c].pmdm__DeliveryDate__c
) ,
LEFT(
TEXT(
[pmdm__ServiceDelivery__c].CreatedDate
),
10
) ) + ': ' + [pmdm__ServiceDelivery__c].pmdm__Service__c.Name,
77
) + '...',
[pmdm__ ServiceDelivery__c].pmdm__Contact__c.FirstName + ' ' + [pmdm__ServiceDelivery__c].pmdm__Contact__c.LastName + ' ' + IF (
NOT(
ISBLANK(
[pmdm__ServiceDelivery__c].pmdm__DeliveryDate__c
)
) ,
TEXT(
[pmdm__ServiceDelivery__c].pmdm__DeliveryDate__c
) ,
LEFT(
TEXT(
[pmdm__ServiceDelivery__c].CreatedDate
),
10
) ) + ': ' + [pmdm__ServiceDelivery__c].pmdm__Service__c.Name
),
IF(
LEN(
$Label.pmdm__Anonymous + ' ' + IF ( NOT(
ISBLANK(
[pmdm__ServiceDelivery__c].pmdm__DeliveryDate__c
)
) ,
TEXT(
[pmdm__ServiceDelivery__c].pmdm__DeliveryDate__c
) ,
LEFT(
TEXT(
[pmdm__ServiceDelivery__c].CreatedDate
),
10
) ) + ': ' + [pmdm__ServiceDelivery__c].pmdm__Service__c.Name
) > 77,
LEFT(
$Label.pmdm__Anonymous + ' ' + IF ( NOT(
ISBLANK(
[pmdm__ServiceDelivery__c].pmdm__DeliveryDate__c
)
) ,
TEXT(
[pmdm__ServiceDelivery__c].pmdm__DeliveryDate__c
) ,
LEFT(
TEXT(
[pmdm__ServiceDelivery__c].CreatedDate
),
10
) ) + ': ' + [pmdm__ServiceDelivery__c].pmdm__Service__c.Name,
77
) + '...',
$Label.pmdm__Anonymous + ' ' + IF ( NOT(
ISBLANK(
[pmdm__ServiceDelivery__c].pmdm__DeliveryDate__c
)
) ,
TEXT(
[pmdm__ServiceDelivery__c].pmdm__DeliveryDate__c
) ,
LEFT(
TEXT(
[pmdm__ServiceDelivery__c].CreatedDate
),
10
) ) + ': ' + [pmdm__ServiceDelivery__c].pmdm__ Service__c.Name
)
)
Updating the value in the Service Delivery Name field in the process builder automates the auto-naming process to reflect the specific use case. Don't forget to activate the new version!
Initial setup for Service Delivery summary data
Attendance and the most recent date of service for a client are contained in rollup fields and are automatically calculated on the Contact, Program Engagement, Service, and Service Session objects. However, PMM requires these automations to be set up for them to work as expected. Follow these steps:
- The first step is to make the appropriate triggers active. Go to Setup > Custom Code > Custom Metadata Types and click Manage Records for Feature Gate. Four rollups will be listed, as follows:
- ServiceDeliveriesToContact
- ServiceDeliveriesToService
- ServiceDeliveriesToServiceSession
- ServiceDeliveriesToProgramEngagement
Click Edit next to the features and click Active for the summary features you want to see. Then, click Save.
- The second step ensures that the summary fields stay up to date. Go to Setup > Apex Classes and click Compile All Classes. This may take some time to complete. Once it has, click Schedule Apex. Again, four Apex classes correlate with the features in Step 1; they are as follows:
- ContactRollupsSchedulable
- ProgramEngagementRollupsSchedulable
- ServiceRollupsSchedulable
- SessionRollupsSchedulable
Choose the appropriate name and Apex class and schedule; best practice is to schedule the job when the fewest users will be working with Service Delivery records – perhaps every Saturday at 2:00 A.M.
- Confirm that the summary fields are available on the appropriate page layouts and that they are Read Only.
- The attendance statuses, by default, are as follows:
- Present
- Excused Absence
- Unexcused Absence
If your use case requires additional or different statuses, add the status(es) to the picklist values in the Attendance Status field in the Service Delivery object. Then, go to Setup > Custom Metadata Types and click Manage Records in the row for the bucketed value. Click New and create each picklist value and indicate whether the bucket it belongs in is Absent or Present. Then, click Save.
Additional optional configurations
PMM is highly configurable from both a Salesforce administrator standpoint and from the Nonprofit Cloud view. Examples of additional administrator configurations that you may make based on the use case include customizing the home tab, buttons, and picklist values. From a Nonprofit Cloud viewpoint, you can enable mass program cohort updates and mass creation of program engagements, as well as customize bulk service deliveries. Each of these configurations will vary based on the specific use case.
Note
PMM is also available in Dutch, English (UK), French, German, Japanese, Spanish, and Spanish (Mexico) during the org-wide setup. Alternatively, you can use the Translation Workbench to override translations.
Setting up Case Management for NPSP
Case Management is a paid add-on. It works with or without NPSP. The following diagram shows the data architecture for Case Management and how it expands PMM and NPSP:
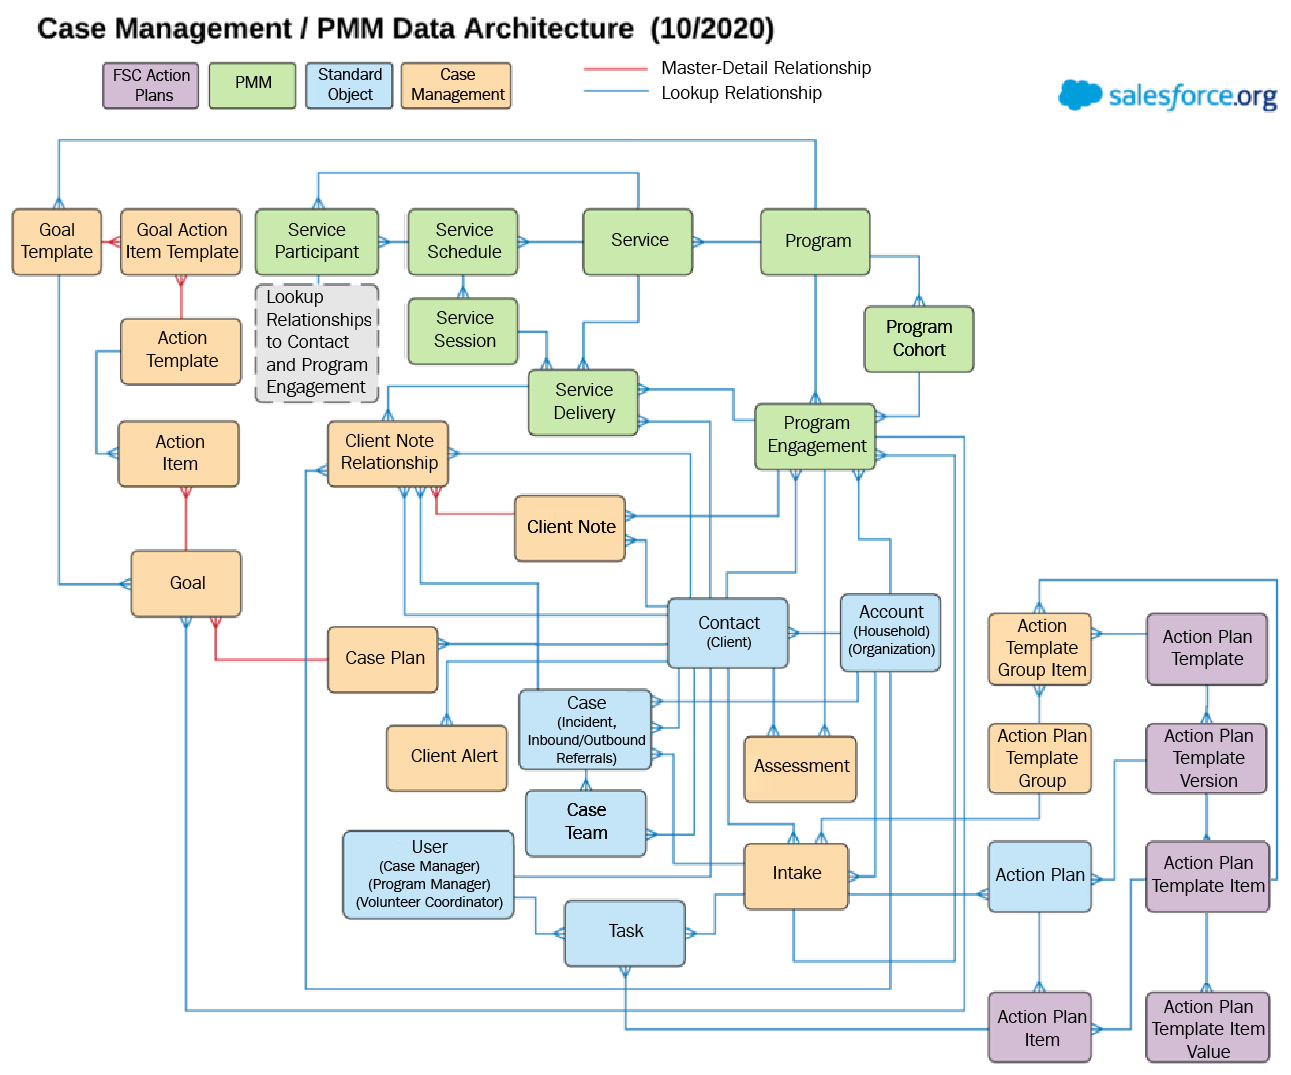
Figure 11.7 – Case Management extension for the PMM and NPSP data architecture
Setting up Case Management for the first time requires very few steps and is like setting up PMM. Let's take a look:
- Assign users the Case Management permission set that comes installed with Case Management.
- To refine these permissions, there are three functional permission sets that we can use with similar use cases to the permission sets in PMM. Assign these to the appropriate users:
- Case Management: Manage
- Case Management: Deliver
- Case Management: View
- Confirm that users have the correct page layouts assigned to their profiles. Best practice suggests the following:
- Account layout = Branch page layout
- Contact layout = Case Management page layout
- Case layout = Incident layout
These are the basic setup steps. Now, let's look at other ways Case Management may need to be configured for an organization's specific business processes.
Additional configurable elements of Case Management
With the new objects introduced by Case Management, there are additional configurations that can be used to automate and streamline the user experience. Case Management also introduces new interfaces.
The client card and client notes
As a Salesforce administrator, editing page layouts is something you already have experience doing. The client card component allows you to configure the client details that appear on the Contact page. These details may include the client's photo, mailing address, alerts, ID, pronouns, badges, and watchlists. What is shown will depend on the business processes and use cases.
Likewise, as a Salesforce administrator, you can configure the Client Note layout to add custom fields, display fields based on record types, and maintain Client Note relationships.
Configuring and customizing additional Nonprofit Cloud Case Management features
Because we are using a brand-new instance of Salesforce Nonprofit Cloud, referrals and intakes should already be configured. Just be aware that older instances may need some additional setup. Be sure to check the Intake Checklist configuration. If no intake checklist exists, one can be created under Action Item Templates.
Incidents and assessments can be customized using standard Salesforce administrator skills. Here, you can add custom fields, assign the fields to page layouts, and create field sets. Assessments are based on the organization's business practices and use cases. Customizing case plan goals and action items follows a similar pattern.
V4S configurations for staff and volunteers
As we explore the configurations that are available for staff and volunteers in V4S, let's review the underlying data structure, which consists of Contacts, Leads, Campaigns, Volunteer Jobs, Volunteer Shifts, Volunteer Hours, Job Recurrence Schedules, and Volunteer Recurrence Schedules:
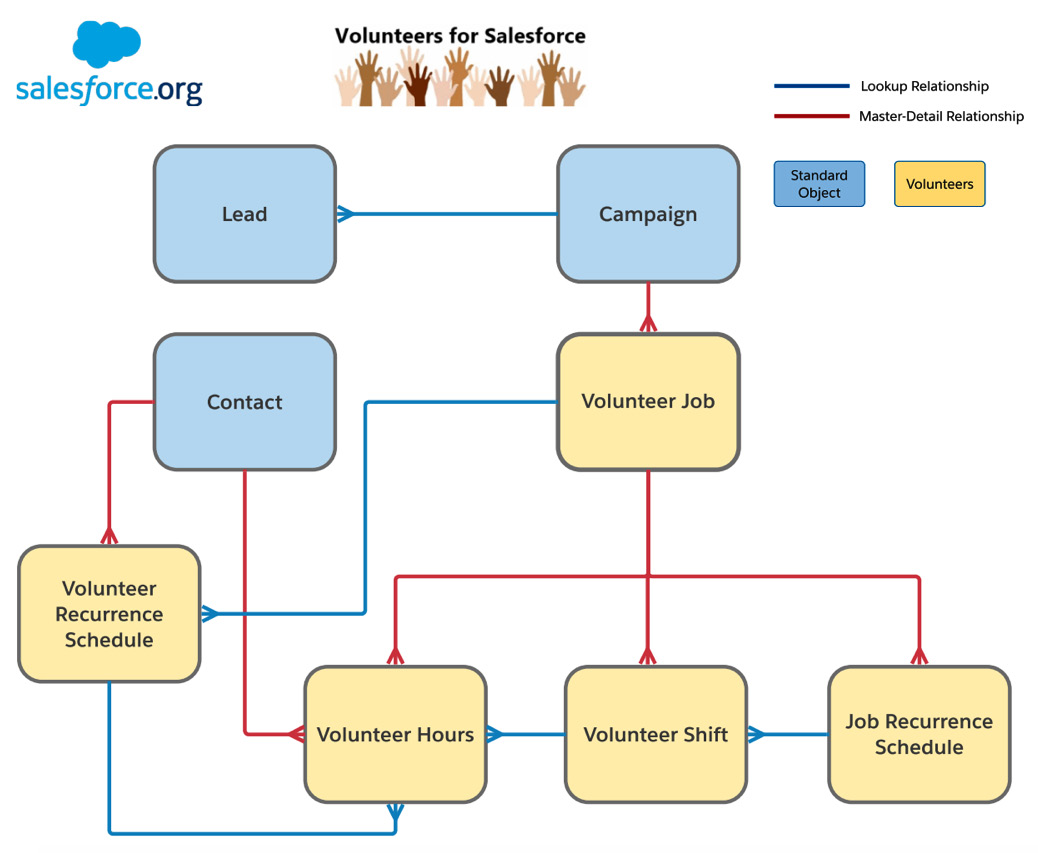
Figures 11.8 – The V4S data architecture
From here, we can begin to configure specific aspects of V4S based on the business processes of the organization.
Leveraging volunteer skills
Volunteer skills are an important part of matching the right volunteer to the right job. Matching those volunteers to the right time slot is also important. Volunteer Skills are picklist values in the Contact and Lead objects. Adding new skills that you can choose from is as easy as updating those two fields. Although you may think that updating the Availability field is also a good plan – it isn't!
In the next section, you will see that recurring schedules rely on the Availability values just as they are. Just say no to changing them.
Automating recurring jobs and volunteers
Some volunteer jobs happen on a repeated basis with repeat volunteers. How can you automatically create those recurring jobs without creating each shift individually? Use your Salesforce administrator skills to go to Setup > Apex Classes and click Schedule Apex. Give the job a descriptive name and choose VOL_BATCH_Rucurrence for the Apex class. Running this job once a week is the best practice. By creating this scheduled job, the system automatically does all the heavy lifting for you, up to 4 months into the future.
Notifying volunteers
V4S provides out-of-the-box email templates for the most used volunteer communications such as reminders, notifications, and thank you emails. Be sure to go to Setup > Email Templates and select the Volunteers Email Templates folder to review the available emails. You can edit the text of the emails or turn an email off entirely. You can also edit when the emails are sent by cloning the workflow rule and editing it to your desired preference.
While you are thinking about communications, there are two more things you will want to confirm:
- Organization-Wide Address: Do you have an org-wide email address configured for the volunteer coordinator (or your choice of display name)? This will ensure that volunteers receive emails from the appropriate email address rather than an individual's email address.
- Brand Consistency: Do you need to update the letterhead for your volunteer emails? Are the subject lines consistent in your email templates? Are you addressing emails to {!Contact.FirstName} for all volunteers? This is a quick check that will present a unified, friendly experience for your communication.
Configuring for your staff's ease of use
V4S makes use of field sets to align with the organization's use case and business processes more closely. Review the following three pages to provide an optimal user experience:
- The Volunteers' wizard page displays a group of Campaign fields; edit the VolunteersWizardFS field set to meet the business processes.
- The Mass edit volunteer hours page provides an interface where you can mass edit volunteer hours. Edit the MassEditVolunteerHours field set to match the use case.
- The Find volunteers page can be used to search for volunteers and display contact fields. Depending on the use case, edit the VolunteersFindCriteriaFS and VolunteersFindFS field sets to surface the appropriate fields.
Note
There are two important limitations regarding V4S: it requires that a user license has, at a minimum, read access to the object, and V4S is not optimized for mobile devices.
What are the best practices for data integrity and security?
The discovery discussions that we provided in Chapter 7, Is Change Difficult for Your Organization?, encompass the security model. This includes profiles and how sharing rules and permission sets are assigned to them. But, wait! There's more. Let's look at additional ways to secure your data.
Multi-factor authentication
Multi-factor authentication (MFA) is the next iteration of two-factor authentication (2FA). Salesforce has made it easy to implement with its Multi-Factor Authentication Assistant, which is built right into Setup. MFA will be available in the Spring 2022 release. Multi-factor means that users prove their identity in multiple ways – a username and password combination, plus an authenticator app:
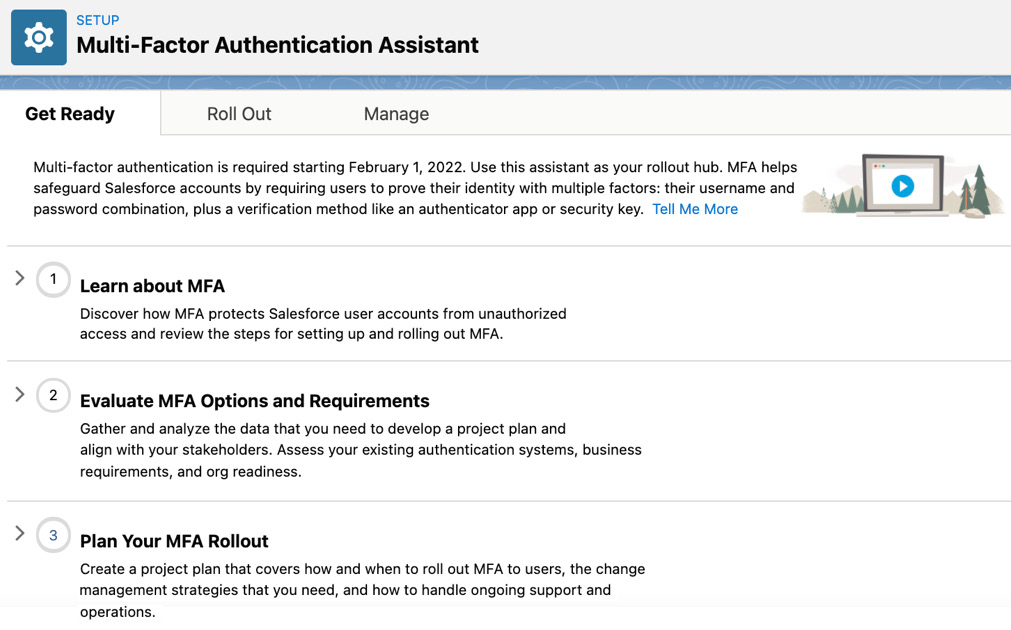
Figure 11.9 – Multi-Factor Authentication Assistant in Salesforce's setup
As you can see, there is a vast amount of documentation on MFA within the Salesforce instance itself. It just takes a bit of time to go through it all. Some of this will depend on how many users your organization contains and how many system admins there are.
How many system admins do you need?
As you're aware, the Salesforce administrator has all the superpowers. The System Administrator profile should only be assigned to trained Salesforce users. Depending on the size of the organization and the business use case, there may be more than one Salesforce administrator. However, best practices stipulate reserving the System Administrator profile for those users who set up, configure, and maintain the Salesforce system. It is never a best practice for every user to have a System Administrator profile.
What about users who leave your organization?
The appropriate steps to take when a user is no longer active are dependent on the permissions the user has. The more permissions and dependencies that are related to a user, the more time it takes to deactivate that user. This is another excellent reason to limit system admins to those who truly need those permissions.
The following are two important best practices around users that are no longer part of your organization:
- Deactivate the users' Salesforce account. Do not simply change the user's name so that it's different.
- Be sure to migrate ownership of records to an active user in your Salesforce instance. Leaving records to be owned by inactive users can cause your applications to stop functioning as expected.
There are many additional ways to encourage data integrity and secure your data in Salesforce. NPSP provides Health Check, a no-code tool that's designed to identify challenges that may affect the integrity of your data. Health Check can be accessed in NPSP by going to Settings > System Tools > Health Check. Data privacy laws in your area may affect how you set up security. Salesforce offers features such as field encryption, field history tracking, and paid features such as Salesforce Shield to help you protect your data.
Summary
In this chapter, we configured PMM, Case Management, and V4S. We looked at various customizable standard options for each of the three applications. We also looked at the most important best practices for data integrity and security.
As with all Salesforce tools, many new options and updates are made available in every release to help you configure and customize applications so that they suit business processes and use cases. This chapter has also illustrated how important a Salesforce administrator's knowledge of standard Salesforce functionality is for configuring profiles, permissions, sharing rules, and streamlining the user interface for the best results.
In Chapter 12, Declarative Tools and Modules, you will require your Salesforce administrator skills to understand the options for customizable rollups, matching gifts, and the Open Source Commons Outbound Funds module.
Further reading
- Who sees what video: https://salesforce.vidyard.com/watch/kXk6BaNlWJP27UyFO8vNUg