Chapter 12: Declarative Tools and Modules
In the previous three chapters, we installed NPSP and the additional features available for PMM and V4S, configured the fundraising features for NPSP, and completed the configuration for PMM and V4S. Declarative tools and Open Source Commons modules are additional ways to extend the functionality of NPSP based on a nonprofit's specific use cases and business processes.
In this chapter, we will learn the following:
- What customizable rollups are and when they should be used
- Matching gifts – how and when they apply to donations
- Grantmaking capabilities and how to use the Open Source Commons' Outbound Funds Module
None of these tools are required for NPSP to work; however, when they are needed, understanding what they do and how they do it will make NPSP tremendously better.
Technical requirements
All we need for this chapter is the Outbound Funds installer: https://install.salesforce.org/products/outbound-funds/latest.
What are customizable rollups?
NPSP customizable rollups give us the ability to adapt out-of-the-box NPSP rollups and create new rollups. As a Salesforce administrator, you are familiar with rollup summary fields that roll up information from related records to another record. More than 80 rollup summary fields come already created in NPSP when you install it. However, each organization has specific metrics and business processes they are trying to measure. Customizable rollups provide a way to create a newly defined rollup field and the filter to use on that rollup field:
Note
There are two types of rollups: aggregate rollups, which sum, average, or count data; and single-result operation rollups, which find a specific record that is the smallest, largest, most recent, or oldest.

Figure 12.1 – The donation information and donation totals fields on a contact page are examples of standard rollup fields.
What do you do when you need a rollup field that does not already exist?
When do you need a customizable rollup?
Because you have installed NPSP, you might never need a customizable rollup. However, consider these user stories. We will also look at how to configure each one.
A custom rollup to sum data
As a program manager, I want to see which family has provided the most in-kind donations so that I can thank them on social media:
- To configure this customizable rollup, create a new custom field on the Account record to hold the information. This should be a currency field.
- Next, go to NPSP Settings > Donations > Customizable Rollups.
- Customizable Rollups should already be enabled. (If it is not, enable it now.) Here, you should see the list of all Customizable Rollups that come already created as a part of NPSP:
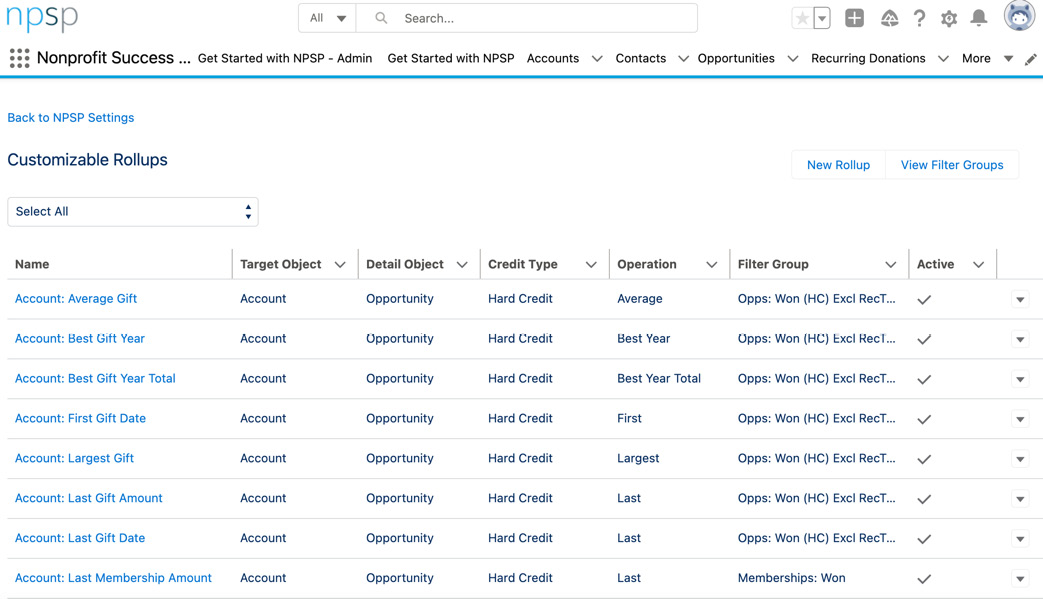
Figure 12.2 – A Customizable Rollups example page from NPSP
- Click View Filter Groups. Since we are creating a new filter group, click New Filter Group. Name the filter group and give a description.
- Next, create two filters for this rollup. In this story, we want to filter the rollup by opportunities that are Closed Won and whose record type is In-Kind Gift. Click Save:
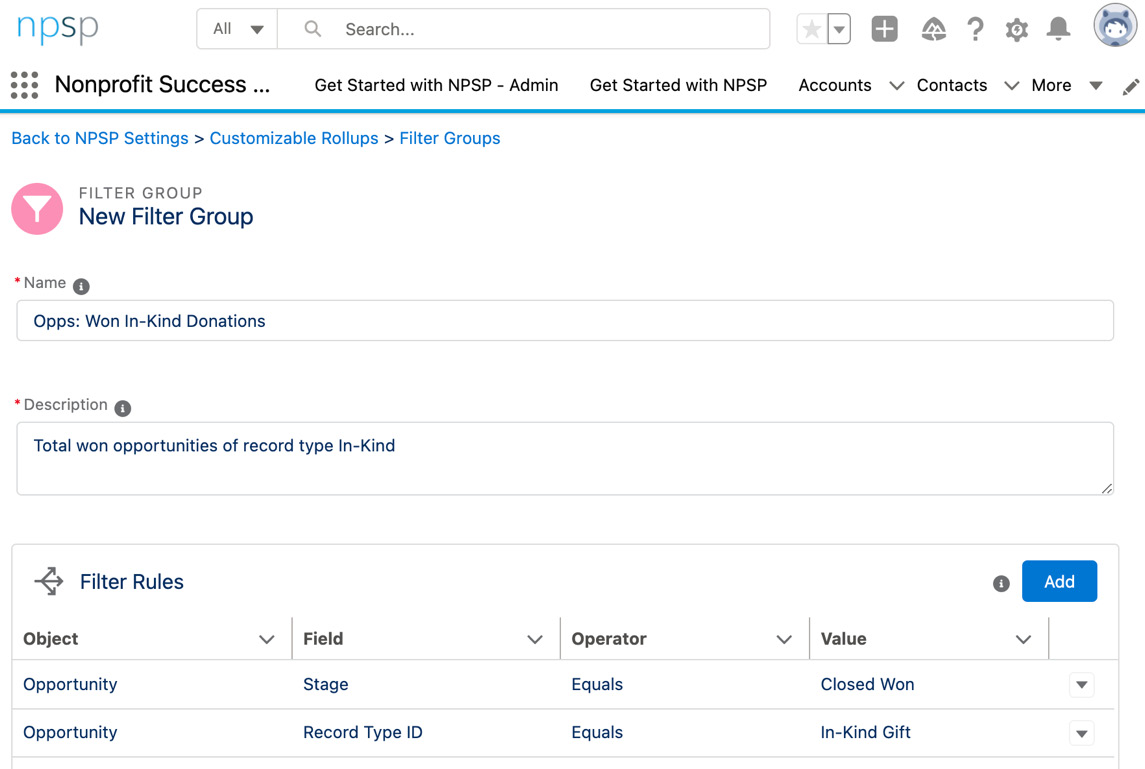
Figure 12.3 – An example filter group created for a customizable rollup
- Next, we will create the customizable rollup itself. Go back to the Customizable Rollup page and click New Rollup.
- Enter the target object where you want the rollup to show, and select the target field where the data should appear.
- Fill in the description.
- Choose Operation; because we want a sum of all the in-kind donations here, choose Sum. The timeframe defaults to All Time. Designate the rollup type; we want to roll up opportunities with hard credits using the filter group we just created – Opps: Won In-Kind Donations. Leave Amount Field as Opportunity: Amount. Click Save. Your entries should look like Figure 12.4:
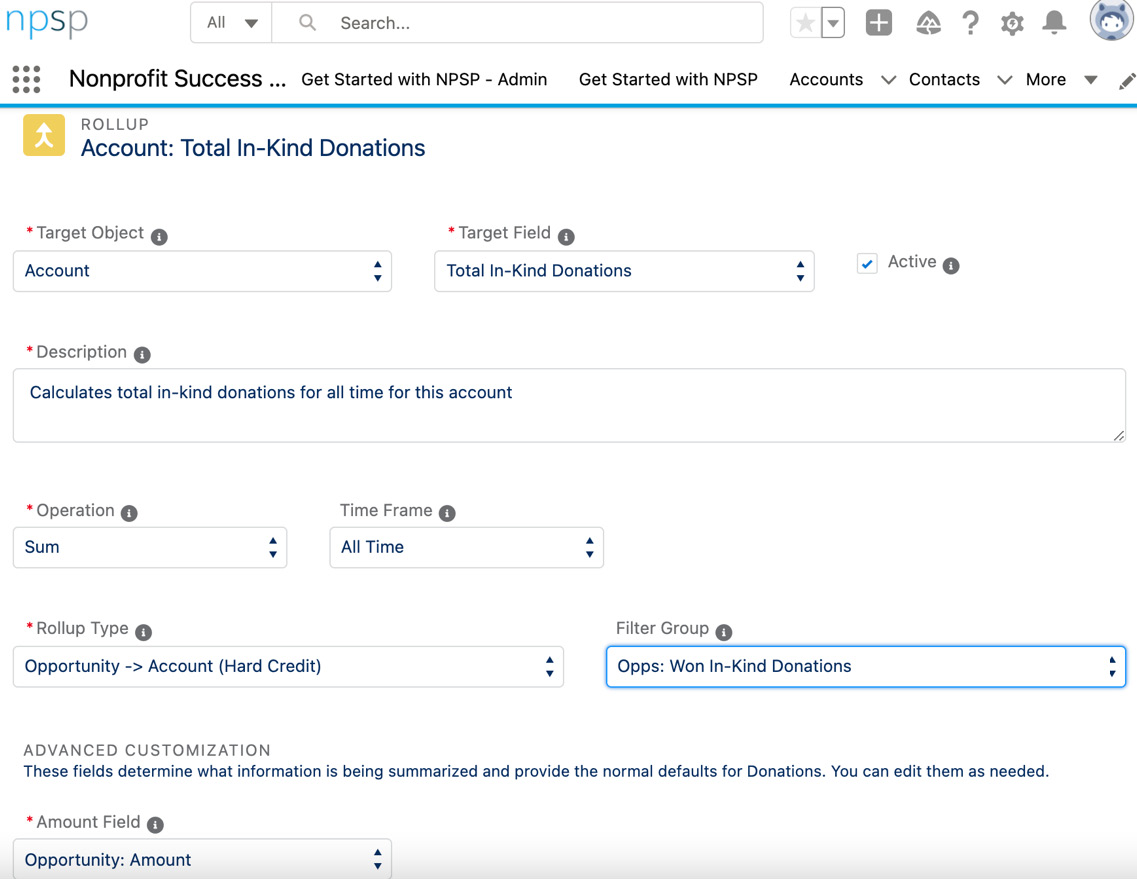
Figure 12.4 – An example of customizable rollup creation to sum in-kind donations
Now that everything is configured, the rollup will run overnight each night. If you need to immediately see the rollup summary information, go to NPSP Settings > Bulk Data Processes > Rollup Donations Batch and click Run Batch. This will automatically process rollups in the queue.
A custom rollup for the last or most recent date
As a program manager, I need to see the date of the most recent in-kind donation that a family has contributed to prioritize asks for new in-kind donations.
This custom rollup is configured very similarly to the previous one:
- First, create the field where you want to view the data on the Account record – for example, create a data field titled Last In-Kind Donation.
- Go to NPSP Settings > Donations > Customizable Rollups and click View Filter Groups. You should see the Opps: Won In-Kind Donations filter group that we just created. We can use this filter group again.
- Go back to Customizable Rollups and click New Rollup. The target object will again be Account and the target field is the field just created – Last In-Kind Donation. Add a description.
- The operation this time will be Last, and the time frame is All Time. The rollup type is still Opportunity -> Account (Hard Credit), and we reuse the filter group we created – Opps: Won In-Kind Donations. In advanced customization, the field to roll up is Opportunity: Close Date. Your work should look similar to Figure 12.5:
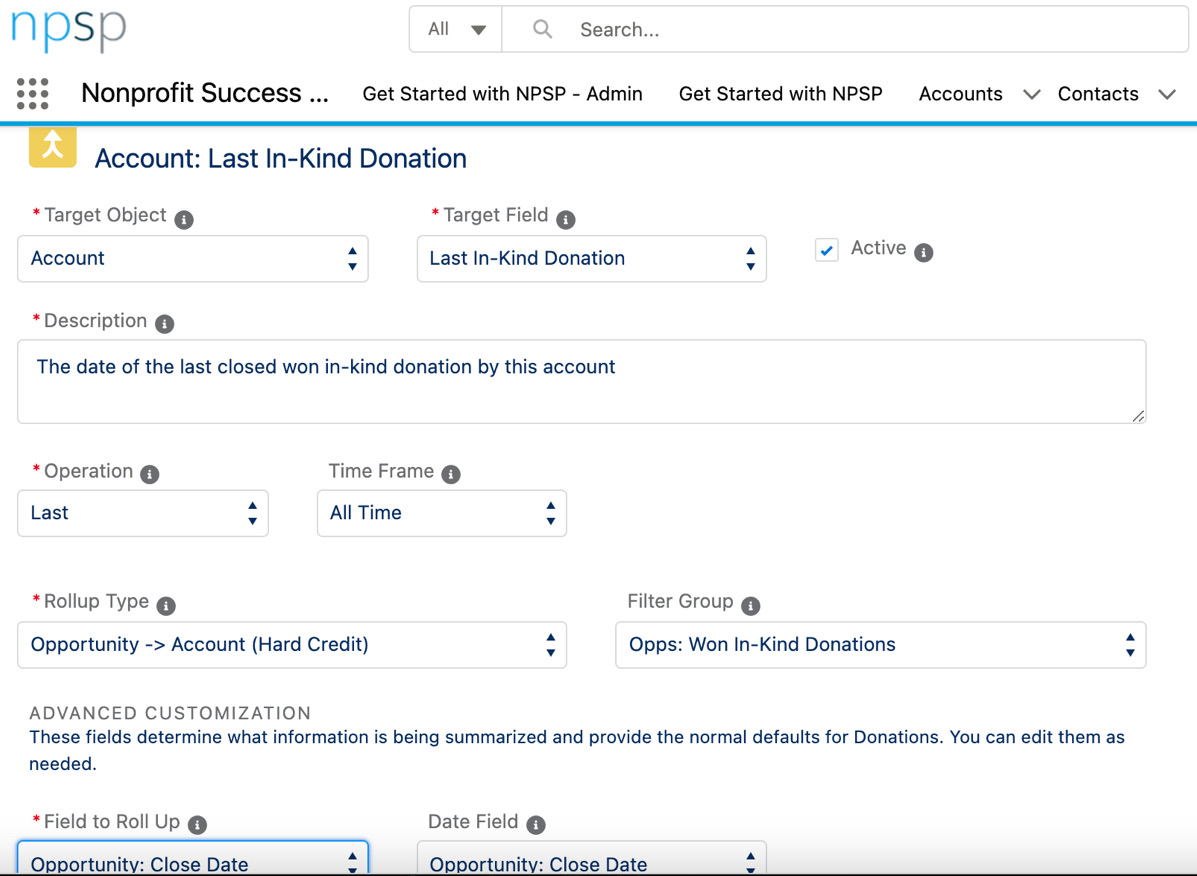
Figure 12.5 – An example of the creation of a customizable rollup to show the last date that an in-kind donation was made
Again, the rollup batch will run overnight unless you force the updates via the batch process. There are a wide variety of use cases for customizable rollups, and there is a great deal of documentation to help with more complex filters and options. Helpful links are listed in the Resources section at the end of this chapter.
Apply matching gifts to donations
Matching gifts are a fundraiser's best friend. It's like shopping with buy one, get one free. It's the easiest money you can possibly raise. How do you track all the lovely donations that come in with the possibility of a matching gift? And, when that matching gift arrives, how do you make certain the right donor gets credited? Let's get started on learning more about matching gifts.
Confirm the matching gifts configuration
Depending on when your Salesforce instance was created, these configurations may already be in place. Be sure to confirm each step:
- First, be aware that matching gifts uses standard objects that are already available: Opportunity, Opportunity Contact Role, Account, and Contact. Configuration is quick and simple.
- Second, we configure soft credits, as we did in Chapter 10, Configuring Fundraising Features.
- Third, add the matching gift fields in Accounts, Contacts, and Opportunities. The fields and related lists should also be added to the appropriate page layouts in a section entitled Matching Gifts:
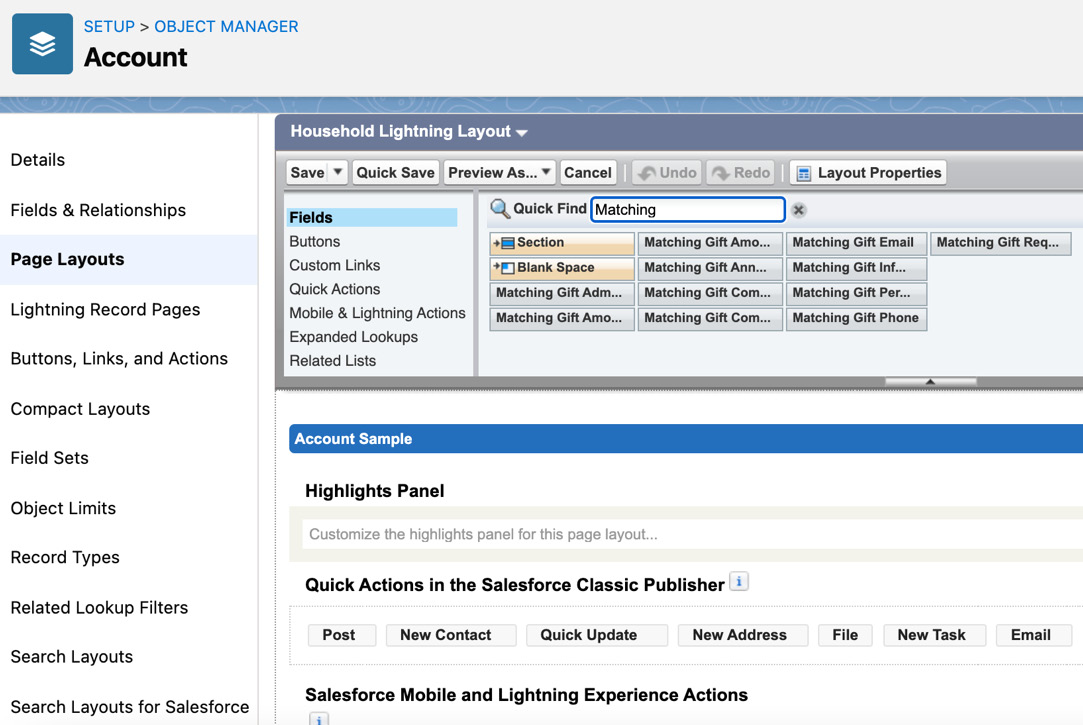
Figure 12.6 – The matching gift fields to be added to the Account page layouts
Once the fields are added and the page layouts are complete, we can look at how to create the gifts appropriately.
Creating matching gifts
For companies or organizations that will contribute matching gifts, be sure to check the Matching Gift Company checkbox on the relevant Account record:
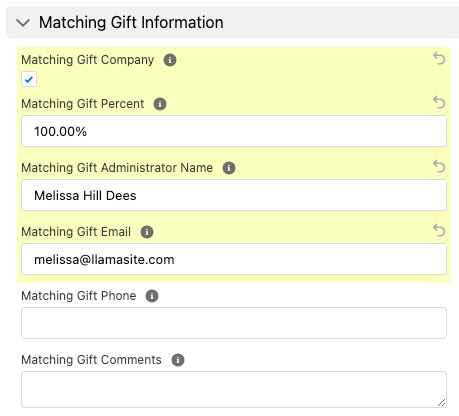
Figure 12.7 – An account record sample for a company that provides matching gifts
Now, a new donation that is eligible for a matching gift can be created when the donation from a contact arrives:
- Create a donation, a standard Donation record type, and in the Matching Gift section, indicate two pieces of important information:
- The Matching Gift account.
- The Matching Gift status should be either Potential or Submitted.
2. Save the donation.
When the matching gift arrives from the donor's company, you will want to create the donation appropriately:
- Go to the Account record of the company.
- Click New Matching Gift to create a new donation of the record type matching gift.
- Complete the information and click Save.
- Go to the opportunity just created and click Find Matched Gifts.
- Select the opportunity that should be matched and click Save.
The rest is automated for you by NPSP:
- You can see the donation by the company on the related list for the company.
- Contact roles are automatically created.
- Soft credits are created.
- The contact original donation is listed in the matching gifts-related list.
Note
Soft credits are not seen immediately. These calculations are populated overnight.
How to leverage Outbound Funds Module
Outbound Funds Module is another special extension of NPSP because it was community-inspired and created through the Open Source Commons Community sprints. The module was designed to meet the needs of nonprofit organizations that work with grants and scholarships. There are four main areas where Outbound Funds Module is useful:
- Managing requests for funding
- Tracking an applicant journey
- Scheduling payments
- Maintaining relationships
In Chapter 6, What Else Is Needed from Nonprofit Cloud?, we took a high-level look at the data architecture and use cases of Outbound Funds Module. Now, let's install and configure the module based on some specific use cases.
Installing and configuring Outbound Funds Module
In Chapter 6, What Else Is Needed from Nonprofit Cloud?, we learned that NPSP is not required for Outbound Funds Module to work, unless the connection object, GAU Expenditure, is needed to connect the disbursements with the general account unit. For our purpose, we will assume that NPSP has already been installed and configured.
Outbound Funds Module is available to install from Salesforce's AppExchange, https://appexchange.salesforce.com/appxListingDetail? listingId=a0N3u00000OMYvzEAH, or via the installer at https://install.salesforce.org/products/outbound-funds/latest.
Before we install the module, let's confirm these steps:
- The Salesforce instance is at the minimum an Enterprise edition.
- Lightning Experience is enabled.
- My Domain is enabled.
- Chatter is enabled.
- (Optionally) Digital Experiences is enabled.
Because Outbound Funds Module is from Open Source Commons, there is no cost to install or use it. However, if an organization is interested in using the fund seeker starter portal template, digital experience must be activated, and digital experience partner community plus licenses must be purchased from Salesforce before the template can be installed.
There are only two configurations left to do:
- Page assignments:
- Go to Setup > Object Manager > Disbursement > Page Layouts > Page Layout Assignment.
- Click edit assignment.
- Assign the profiles to use the Disbursement NPSP Layout page and click Save.
- Repeat the steps for the General Accounting Unit object and assign GAU Outbound Funds Layout to the appropriate profiles. Don't forget to click Save.
- Go to Setup > Object Manager > Disbursement > Lightning Record Pages > Disbursement NPSP Record Page and click Edit.
- At the right-hand corner, click Activation and assign it as the app default for Outbound Funds. No other changes are needed; just remember to save.
- Follow the same steps for the GAU Outbound Funds Record page and the GAU Expenditure Record page.
Now, you are ready to use Outbound Funds Module.
Using Outbound Funds Module
From Chapter 6,What Else Is Needed from Nonprofit Cloud?, you will remember that the funding foundation for our use case has funds available for organizations working to make an impact in a situation where cases were rising due to childhood hunger. To get started, we will create a funding program, the highest level in the fund's hierarchy, and use additional records to track the necessary information.
Setting up the funding program
To understand the functionality and test the configuration, start by creating a new funds request:
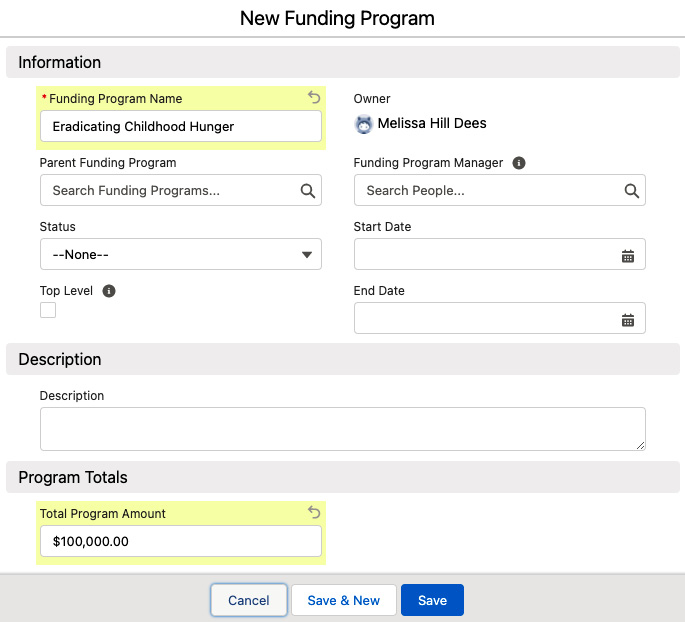
Figure 12.8 – An example of the creation of a new funding program in Outbound Fund Module
- Next, we need to create a funding request to track the applications from organizations. Still in the Outbound Funds app, go to Funding requests and click New. Fill in the appropriate name, and the funding program is a lookup field, as shown in Figure 12.9. In this example, the funding program is Eradicating Childhood Hunger:
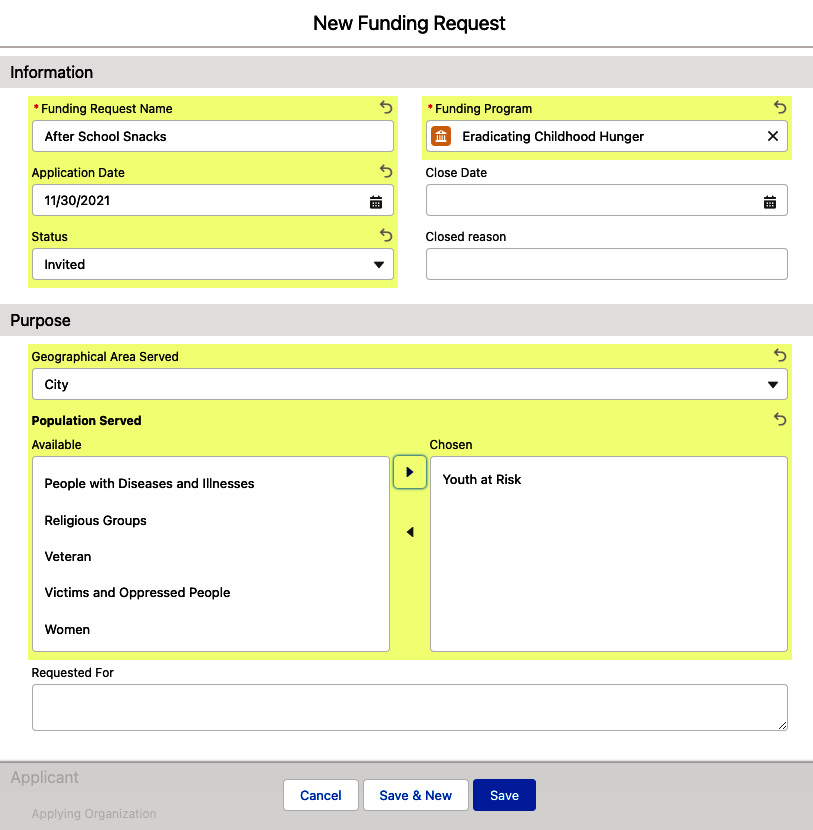
Figure 12.9 – An example of the form to create a funding request in Outbound Funds
- Additionally, you can create funding request roles for contacts associated with the funding request. On the funding request record page, click Create Funding Request Role and fill in the appropriate information:
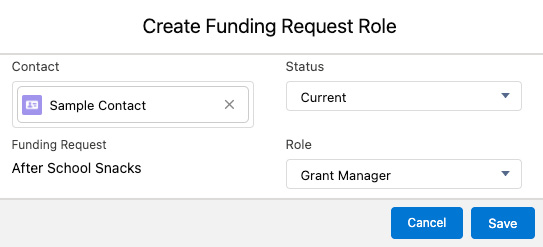
Figure 12.10 – A sample funding request role creation for a funding request record
- You may also have step-by-step requirements that need to be fulfilled in the request for the funding process. In this use case, an application is required to get started:
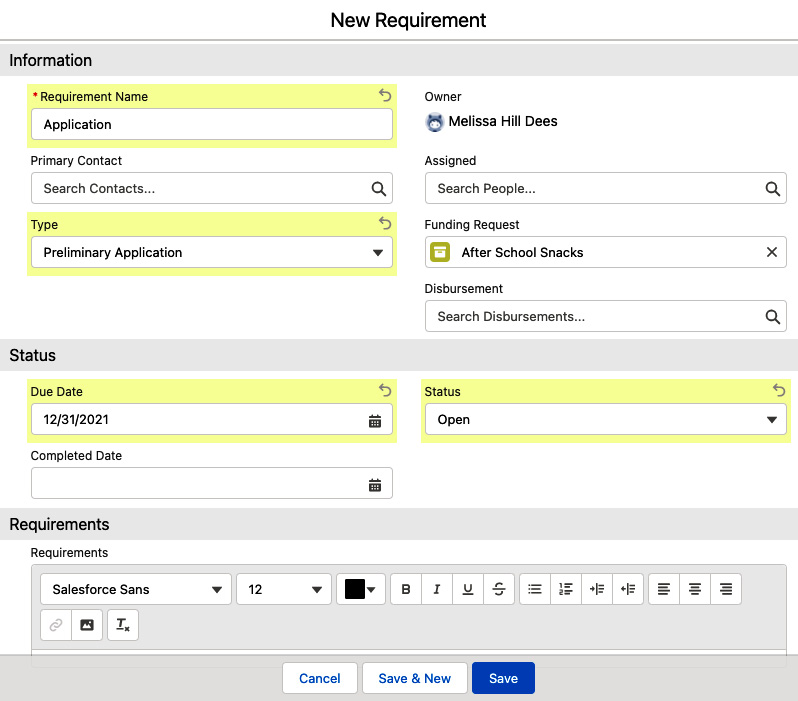
Figure 12.11 – A sample requirement creation for a funding request record
- Separately, the organization's letter from the government stating that they are a registered nonprofit, a 501(c)3 from the IRS in the United States, is required, as well as a roadmap of how the organization intends to use the funds specifically:
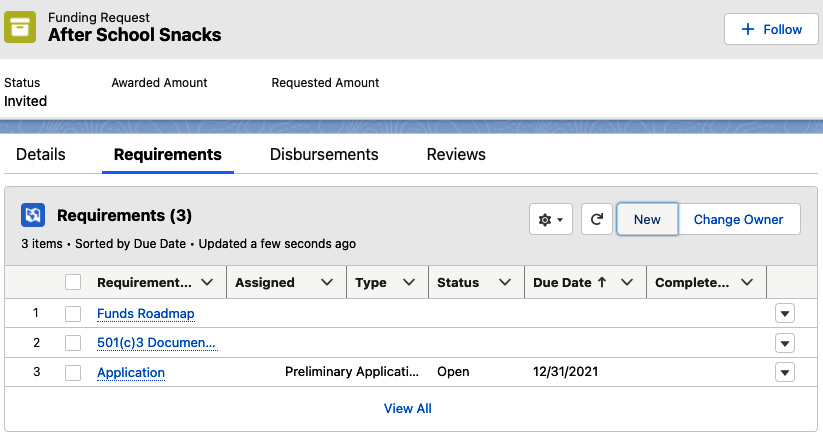
Figure 12.12 – A sample requirements listing for a funding request in Outbound Funds
Once the requirements are completed, the request needs to be reviewed.
Creating reviews
Create a review and assign it to a reviewer to understand the review process and its configurations:
- Click Reviews in the Outbound Funds app and click new to request feedback from a reviewer on a funding request. The Review Name and Funding Request fields are all lookup fields from information already in your Salesforce system, and the Assigned To field is a lookup to a user record:
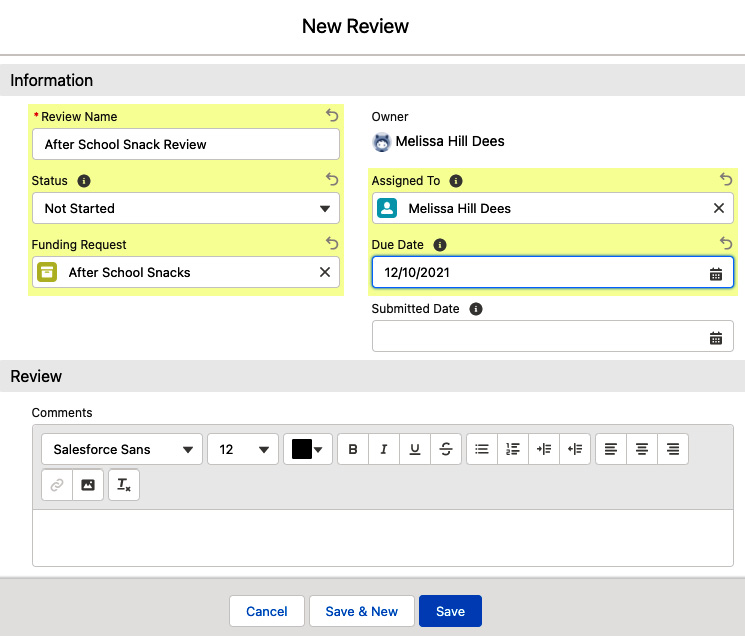
Figure 12.13 – A sample review creation for a funding request
- Now, you are ready to share the review with the appropriate reviewer for their feedback. Go to the review record that you just created and click Share. Select the user you are inviting to review the funding request and give them the appropriate level of access to complete the review:
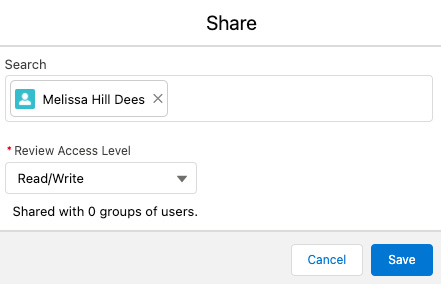
Figure 12.14 – A sample of sharing with a reviewer for a funding request
- Now, the reviewer can complete and submit the review simply by clicking Submit Review:
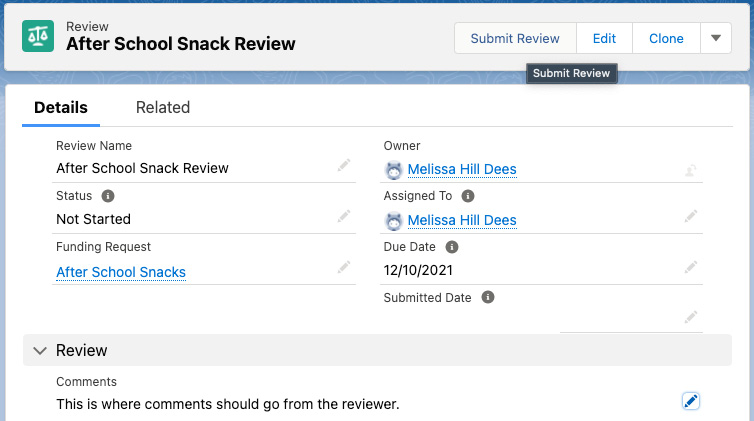
Figure 12.15 – A sample review submission for a funding request
Once all the requirements are met and the reviews are submitted, the foundation can decide which organizations should be awarded the funding they've requested.
Disbursing the funds
Now comes the fun part – parceling out the money itself. To create a disbursement, there is a button on the funding request page called Create Disbursements. Click that button to schedule the disbursements:
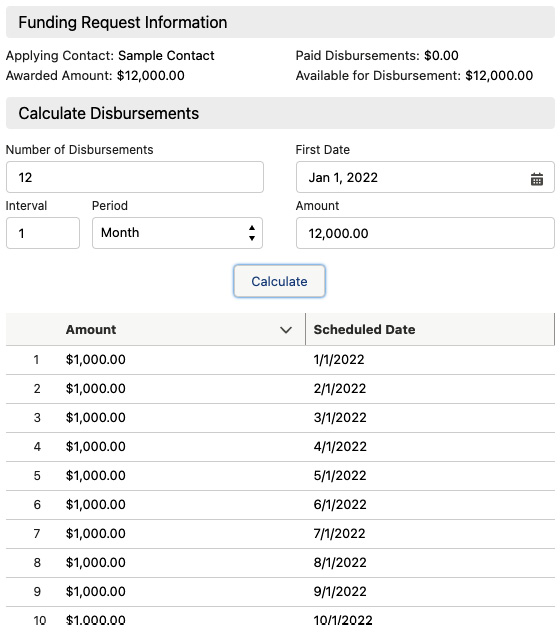
Figure 12.16 – A sample disbursement creation page in the funding request
All the information is on the funding request record to track the request itself, the organization and contact, the fulfilled requirements, the reviews, the award, and the disbursement of the awarded funds. Outbound Funds Module also comes with 10 helpful reports already created for the organization, including the following:
- Awarded Requests Sorted by Program Codes
- Funding Requests by Program and Status
- Awarded Requests by Year by Program
- Requests with Open Disbursements
- Parent Funding Program Analytics
- Funding Program Analytics
- Requests with Upcoming Milestones
- Overdue Disbursements
- Unscheduled Disbursements
- Upcoming Disbursements
These reports make it simple and streamlined to share information in real time with the foundation's stakeholders.
Summary
In this chapter, we have configured customizable rollups, applied matching gifts, and explored the grantmaking capabilities of Outbound Funds Module. Each of these is unique and individual and is called for in the specific use cases we discussed in this chapter.
Salesforce releases updates for standard functionality such as customizable rollups and matching gifts every two weeks, and new features are released three times per year. Open Source Commons applications such as Outbound Funds Module may require some manual updates, since it is not a standard part of the Nonprofit Cloud package. This is where your skills as a Salesforce administrator are important as well.
Throughout the previous chapters, what we have done is configuration. In Chapter 13, To Customize or Not to Customize, the emphasis will be less on configuration and more on customizing Salesforce itself, using the TDTM, including disabling code or creating custom code. As a part of this process, we will review the order of execution of operations in a Salesforce instance. Sometimes, it just takes some Apex code to automate at the scale that is needed.
Resources and additional reading
- Create a Customizable Rollup:
https://powerofus.force.com/s/article/NPSP-Create-Customizable-Rollup#topic-7412
- Customizable Rollups Recipes:
https://powerofus.force.com/s/article/NPSP-Custom-Rllps-Recipes
- Donation Soft Credit Management with Nonprofit Success Pack: https://trailhead.salesforce.com/en/content/learn/modules/donation-soft-credit-management-with-nonprofit-success-pack
- Outbound Funds Module documentation: https://powerofus.force.com/s/article/OFM-Meet-Outbound-Funds-Module