
Chapter 10: How to Leave Your Mark on Arrow
So, you've got some ideas to make Arrow better, or maybe you've found a bug. Either way, you want to communicate your needs and ideas to the Arrow project and/or you want to contribute code changes upstream. Well, this chapter is a primer on how to go about doing so. Whether this is your first contribution to an open source project or you're a seasoned veteran, we're going to cover everything you'll need to know to make some contributions. Arrow, like any open source project, lives and dies through community involvement and developer usage. The more people that get involved, the better off the project will be.
Here's what we're going to cover in this chapter:
- How to interact and contribute to open source projects, specifically Apache projects
- The architecture of the Arrow repository, build scripts, and automation jobs
- Finding something you can contribute
- The life cycle of a pull request in an Arrow project
Much of the content for this chapter is my own spin on the information from the official Arrow documentation for contribution and development. If you find that you want additional information about any of the topics covered here, you can probably find it there: https://arrow.apache.org/docs/developers/contributing.html. Now, without further ado, let's get down to business.
Technical requirements
Here are the things you'll need for this chapter:
- An internet-connected computer and web browser.
- Python 3.6 or higher.
- Go 1.16 or higher.
- Access to the command line on your computer. On Windows, PowerShell is preferred and can be installed from https://docs.microsoft.com/en-us/powershell/.
All other necessary applications have instructions for installation at the time they are mentioned.
Contributing to open source projects
The world relies on open source software, full stop: Linux, Android, Mozilla Firefox, Chromium (the underlying code for Google Chrome and Microsoft Edge), Visual Studio Code, WordPress, Vue.js, React, and others. Everyone likely interacts with some sort of open source technology almost every day, even if they aren't aware of it. You can find a ton of really interesting open source code too! Even the original Apollo 11 guidance computer source code has been open sourced (https://github.com/chrislgarry/Apollo-11/)! But without people using and contributing to these projects, they wouldn't survive and propagate as they have.
Contributing to and participating in the open source community has changed a lot over the years, particularly with the advent of GitHub. In many ways, it's easier than it ever was before. GitHub has great search functionality, standardized source code management, and common terminology. Unfortunately, this has also resulted in a lot of participation in open source communities being just surface-level single contributions. Regardless, there are some things you need to keep in mind when contributing to any open source project.
Communication is key
Most open source communities have a code of conduct. All Apache Software Foundation projects follow the Apache code of conduct, which can be found on its website: https://www.apache.org/foundation/policies/conduct.html. The goal is collaboration, which means that people are going to have to interact with each other a lot. Make sure you're patient and friendly when interacting with the other members of a project. If you're trying to report a bug or error, give some context! Explain what you're trying to do and give steps that can be reproduced. If you're suggesting an enhancement, explain what the use case is and why it would be useful not just to you but also to others.
It's okay not to know things; no one knows everything. But make sure you show that you've at least done some leg work. Before you ask for help, make sure you've read the README.md file and documentation of a project. Do a quick Google search. People will appreciate that you're showing that you want to learn, not just have someone do your work for you. There's a difference between a request like X is broken! Please fix it! and I'm not sure how to do X; I've checked the docs and can't find any references to it. The latter is much more likely to be responded to than the former. Remember, it's very difficult to convey tone and mood through written text, particularly when collaborators on a project may be from different countries with different cultures. Assume good intentions in conversations until proven otherwise, respect community decisions, and be patient. Trust me – people will appreciate it.
You don't necessarily have to contribute code
Yes. That's right. You can contribute to and improve an open source project without ever writing a line of code. The non-code aspects are often the most overlooked or neglected portions of a project. Maybe you could improve or enhance some of the documentation (or write new documentation that was missing!). Maybe you have an eye for design and want to improve a project's usability and design. You could write a translation for the documentation in another language to increase adoption or curate a folder of examples, showing how to use a project. Just like a commercial project, open source projects often have a lot of needs above and beyond the source code itself. Starting by helping out with some of these areas is often easier and gets you acquainted very quickly with the other contributors of a project. Often, this ends up opening the door to other opportunities to contribute in different ways if you want to, including using code if that's your preference.
There are a lot of reasons why you should contribute!
If you're still not sold on the idea of contributing to open source projects in general, let's cover a few reasons why you absolutely should! Contributing to open source projects can be a rewarding method for learning, teaching, and/or building experience in just about any skill set you can think of:
- You can improve the software you rely on! If you find a bug in some software or library that you use, maybe you want to dig in and patch it yourself instead of waiting for someone else to do it. Not only do you potentially get a fix faster but now everyone else also gets to benefit.
- If there's a skill you want to practice, there's a project that needs someone with that skill! Whether you want to improve your UI design, writing, organizational skills, API design, or coding skills for a particular language, you can find a project that needs someone to do it. You just need to look for it.
- Find people with shared interests! Open source projects with welcoming, active communities can result in friendships that span around the world. You might form a friendship or just find someone interesting to talk to when collaborating on a project.
- Work on your people skills! Collaboration on open source projects offers many opportunities to practice leadership and interpersonal skills, such as prioritization of work, conflict resolution, and working as part of a team/organizing a team of people.
- Find a mentor or teach other people! Maybe you're a highly experienced engineer, or maybe you're new to coding. Either way, sharing work on a project and collaborating requires everyone to explain how they do things and potentially ask for help with concepts and implementation. Teaching can be worthwhile and fulfilling to all parties involved; don't knock it until you try it.
- Build your reputation and (possibly) your career! By definition, any work you contribute to an open source project is publicly available for anyone to see. Working with and contributing to multiple projects can build a significant public reputation for yourself, along with a portfolio of work and examples you can easily share. Over time, you might find opportunities to attend or present at conferences relating to the work and expand your professional network. It's literally how I ended up writing this book!
These aren't the only reasons why people contribute to open source projects; they are just a few that I was able to come up with. Ultimately, there's something very satisfying about having the ability and opportunity to spot a problem or have an idea and just fix it yourself. Maybe you'll want to contribute to the Arrow project; maybe you'll find an entirely different project that suits you better. Find what works for you!
For the rest of this chapter, we're going to focus on how you would specifically orient yourself within the Arrow code base and contribute to the project. But conceptually, many open source projects will be organized very similarly: Continuous Integration (CI) configurations, build and deploy scripts and tooling, issue tracking, mailing lists, and rules for how to contribute. Once you start contributing to open source projects, hopefully you'll enjoy it and keep doing so! Here we go!
Preparing your first pull request
Apache Arrow is a big project. Really big. It's a large-scale project that includes many different languages, build systems, concepts, and interactions. This means that everyone who contributes will eventually be faced with stuff they will need to learn. You might have been writing C++ code for 10 years, but you might still need to ask basic questions about R or Ruby. Among the contributors to Arrow, you'll find experts, engineers, and data scientists, but there are also users, new engineers, and enthusiasts learning too!
The primary method of communication for looking for help with Arrow is either subscribing to the user or dev mailing lists or creating a GitHub issue. For more information about the mailing lists and instructions to subscribe to them, you can go to the Arrow website here: https://arrow.apache.org/community/. When it comes to tracking bugs, feature requests, and other tasks that need to be done, Arrow utilizes JIRA. If you're reporting a bug, proposing a new feature, or proposing a large documentation change, you should likely file a JIRA issue.
Navigating JIRA
Since JIRA is the primary issue tracker that the project uses, you can easily sift through proposed and planned work by searching through the issues. Creating a JIRA issue will let you connect with other developers and discuss the context around your issue or how you plan on implementing a fix or enhancement. You don't want to spend a ton of time on something only to be told that the other developers don't think it's a good idea.
Creating a JIRA issue
The only thing you need to do to create a JIRA issue is make an account, which you can do at this URL: https://issues.apache.org/jira/secure/Signup!default.jspa. Once you log in, you can create an issue and just select the Apache Arrow project and the type of issue, as shown in Figure 10.1:
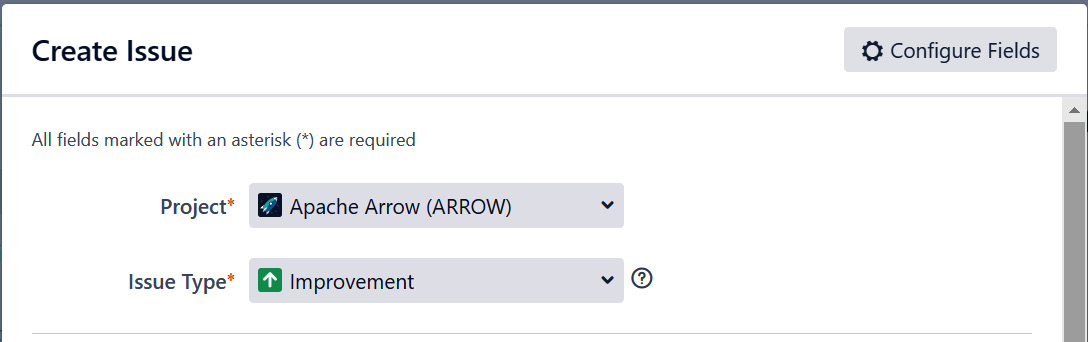
Figure 10.1 – Creating a JIRA issue
After you get more involved in the project and want to assign yourself to issues or simply get more involved with JIRA, you'll need contributor permissions. Just ask on the mailing lists or comment on the JIRA issue you created to get those permissions.
Whether you're creating a JIRA issue, GitHub issue, or emailing one of the mailing lists, make sure you use an appropriate title. What is an appropriate title? First and foremost, you need to prefix your title with the related components using brackets. For example, if you are referring to something about the Python libraries, you should include [Python] as the prefix of your title. When on JIRA, make sure the corresponding Component/s field of the issue is set for the prefixes you're using. Figure 10.2 has an example of a properly titled and setup JIRA issue, with both a prefixed title and Component/s field set:
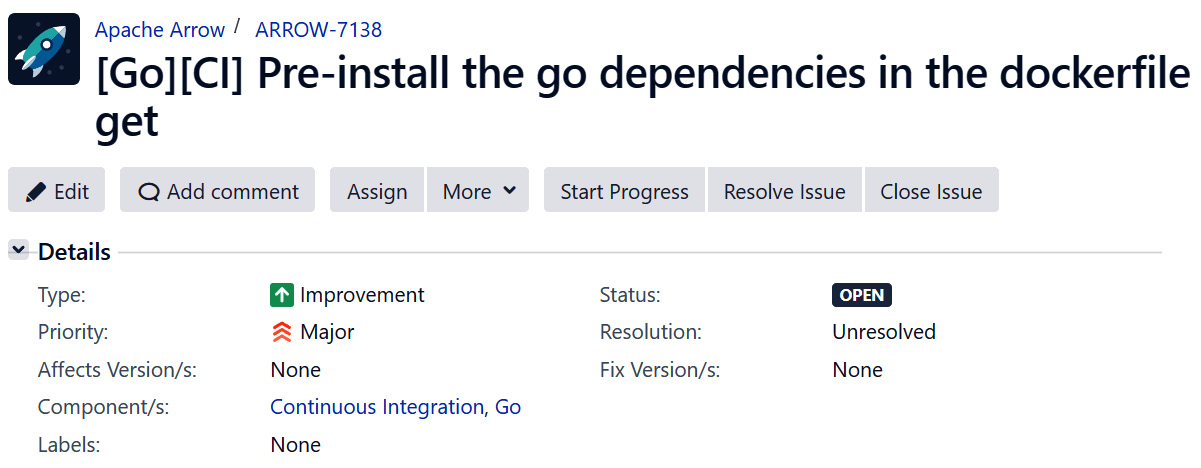
Figure 10.2 – A JIRA issue with the components set
Setting these components makes it easy for everyone to search through issues and have context regarding them. Before you go and create an issue, it's highly recommended that you first search through the existing issues so that you don't create a duplicate.
Finding Your First Issue
There are a few labels used on issues for new contributors, providing good starting issues to tackle. Look for issues labeled beginner, beginner-friendly, good-first-issue, good-second-issue, newbie, easyfix, or GoodForNewContributors. Typically, issues with these labels should take no more than a couple of days or a weekend at most to fix. That said, don't be afraid to ask questions in comments on an issue. After spending some time on it, you may find that the issue is more difficult than whomever originally filed the ticket thought it was. Make sure you add a comment to that effect! We're friendly!
So, let's assume that you've found an issue to work on. Maybe it's code, or maybe it's documentation. Either way, you've decided what you want to work on to contribute. What's the next step? Let's get set up!
Setting up Git
As you may have guessed by now, Git is used for version control of Arrow and is easily available on almost any operating system. You can go to GitHub's website and find easy instructions to install it if you don't already have it installed. Once you've got Git all set up, if you haven't already done so, don't forget to configure your name and email with these commands:
$ git config --global user.name "Your Name"
$ git config --global user.email [email protected]
Helpful Tip!
You can also follow the documentation on the GitHub site for how to authenticate your local Git installation with GitHub (https://docs.github.com/en/get-started/quickstart/set-up-git#next-steps-authenticating-with-github-from-git). That way, you don't need to retype your username and password with every Git command you run.
To contribute to the Arrow repository, you first need to create a fork of the repository under your own GitHub account. Fortunately, it's really easy to do this! Just go to the Arrow GitHub repository at https://github.com/apache/arrow and click the Fork button, as shown in Figure 10.3:

Figure 10.3 – How to fork the Arrow repository
The easiest route is to choose to fork it to your username, creating the forked copy of the repository with the https://github.com/<username>/arrow URL. Now you can clone the repository and set the upstream remote, referencing the official Apache Arrow repository. Assuming you've configured the authentication with GitHub from the documentation, there are two ways to clone the repository. You can clone it over HTTPS:
$ git clone https://github.com/<username>/arrow.git
Alternatively, you can clone it using Secure Shell (SSH):
$ git clone [email protected]:<username>/arrow.git
By default, when you clone a repository, you refer to it by the name origin. The convention when developing Arrow is to reference the official Arrow repository as upstream. You can configure it with a simple command:
$ cd arrow # first enter the cloned directory
$ git remote add upstream https://github.com/apache/arrow
You can easily confirm that you have set it up correctly! Running this command should give you similar output to what you see here:
$ git remote -v
origin https://github.com/<username>/arrow.git (fetch)
origin https://github.com/<username>/arrow.git (push)
upstream https://github.com/apache/arrow (fetch)
upstream https://github.com/apache/arrow (push)
You should now have a copy of the Arrow source code locally on your machine in a directory named arrow, with two remotes referring to your own fork (named origin) and the official Arrow GitHub repository (named upstream). Now, you're all set up and ready to start poking around the code and documentation!
Orienting yourself in the code base
The implementations for most of the languages supported by Arrow are included in the arrow repository in their own corresponding subdirectories:
- cpp – C++
- csharp – C#
- js – JavaScript
- c_glib – GLib
- go – Golang
- java – Java
- julia – Julia
- matlab – MATLAB
- python – Python
- r – R
- ruby – Ruby
Note
The Rust implementation is in a separate GitHub repository located at https://github.com/apache/arrow-rs.
Automation and configuration scripts along with documentation are in the other subdirectories:
- .github: The definition files for the CI workflows of GitHub actions. These workflows are triggered by various actions, such as opening a Pull Request (PR) and filing an issue.
- ci: The scripts and configuration files used by the CI tasks. This includes Docker definition files and build and testing scripts.
- dev: Scripts for developers used for packaging, committing, deploying, and testing the Arrow packages. It also contains definitions for CI tasks that are run on demand rather than triggered by actions, such as fuzzing tests.
- docs: The documentation and scripts to build the code base.
- format: The FlatBuffer and Protocol Buffer files for the binary protocol definitions of the Arrow format itself, such as the inter-process communication (IPC) protocol and Arrow Flight RPC definitions.
- experimental/computeir: The FlatBuffer definitions for the experimental intermediate representation (IR) format that is being developed (more on that in the next chapter!).
For any issue that you've decided to work on (writing a test, adding a new feature, fixing a bug, and so on), the next step is going to be figuring out what files to start looking at. Knowing which directory to start in is one thing, but sometimes, you'll need some help figuring out exactly which files you need.
GitHub Search is very powerful, with a lot of special syntax that you can utilize to find precisely what you need. Make sure you're using the search while looking at the official Arrow repository (not a fork) and leverage the language-specific search features and more to find function definitions or specific references. You can also use it to find specific issues or commits that reference a particular keyword! It can be extremely helpful to look at other PRs, commits, or issues that reference a similar issue to what you're working on. Looking at existing unit tests for a particular feature is an invaluable resource for finding out how to use it.
Another alternative is to use extensions and search features in your IDE of choice. Since you have the code locally copied onto your machine, most IDEs have available extensions and functionality to make it very easy to search large code bases.
If you're making a code change, then the obvious important thing you need to do is know how to build the Arrow libraries!
Building the Arrow libraries
So far in this book, we've focused on three languages that Arrow has libraries for: C++, Python, and Golang. We're going to continue with that here by building the libraries and running the unit tests in these three languages. First up is going to be the C++ library!
Building the Arrow C++ libraries
Most of the Arrow libraries are distinct and separate implementations of Arrow. But for C (GLib), MATLAB, Python, R, and Ruby, the libraries are actually built on top of the C++ Arrow implementation with bindings for those languages. If you're looking to make a contribution or change in one of those languages, you might have to make C++ changes or at least locally compile the C++ code. So, regardless of whether or not you're looking to work on the C++ library directly, this section can still be important to what you're doing.
Arrow utilizes a tool called CMake for managing its C++ library builds. CMake is a build-system generator that exists on multiple platforms; it generates configurations and then defers to another program such as make or ninja to perform the building. If you're using CMake version 3.21.0 or higher, you can utilize provided preset build configurations. So, let's get started!
Technical requirements for building C++ libraries
Building the C++ libraries requires the following:
- A C++ compiler capable of C++11 or higher. Using a Linux/Unix-style system such as gcc version 4.8 and higher will work. If you're using Windows, you'll need at least Visual Studio 2017 or newer.
- CMake version 3.5 or higher:
- Building the benchmarks requires version 3.6 or higher.
- Building the zstd library requires version 3.7 or higher.
- Building the Gandiva JNI bindings requires version 3.11 or higher.
- On Linux or macOS, you'll need either the make or ninja build utility.
- Performing a minimal build will need at least 1 GB of RAM. A minimal debug build along with the tests will require at least 4 GB of RAM. If you want to use Docker and perform a full build, you'll need at least 8 GB of RAM. Thankfully, most modern machines come with at least 8 GB or more RAM by default!
Installing these minimum requirements is pretty easy on most systems:
- For Ubuntu/Debian systems, you can install these minimum requirements with the following:
$ sudo apt-get install build-essential cmake
$ sudo apt-get install python3-dev autoconf flex bison # if you want to build the Python pyarrow module
- For Alpine Linux, you'd use this command:
$ apk add autoconf
bash
cmake
g++
gcc
make
- For CentOS/RHEL, use the following:
$ sudo yum install gcc gcc-c++ make cmake3
$ sudo yum install autoconf bison python39-devel # if you want to build the Python module
- If you are using Fedora Linux, use the following:
$ sudo dnf install
cmake
gcc
gcc-c++
make
$ sudo dnf install autoconf bison python39-devel #if building pyarrow
- Using macOS? Not a problem! Use Homebrew (https://brew.sh/):
$ git clone https://github.com/apache/arrow.git
$ cd arrow
$ brew update && brew bundle --file=cpp/Brewfile
- If you are using vcpkg (https://github.com/Microsoft/vcpkg), use this:
> git clone https://github.com/apache/arrow.git
> cd arrow
> vcpkg install
--x-manifest-root cpp
--feature-flags=versions
--clean-after-build
- If you are using the conda utility, use the following:
$ conda create -y -n pyarrow-dev -c conda-forge
--file arrow/ci/conda_env_unix.txt
--file arrow/ci/conda_env_cpp.txt
--file arrow/ci/conda_env_python.txt # for building pyarrow
--file arrow/ci/conda_env_gandiva.txt # for gandiva
compilers
python=3.9 # for building pyarrow
pandas # only needed for Python
$ conda activate pyarrow-dev
- And finally, if you're using MSYS2, here you go:
$ pacman --sync --refresh --noconfirm
ccache
git
mingw-w64-${MSYSTEM_CARCH}-boost
mingw-w64-${MSYSTEM_CARCH}-brotli
mingw-w64-${MSYSTEM_CARCH}-cmake
mingw-w64-${MSYSTEM_CARCH}-gcc
mingw-w64-${MSYSTEM_CARCH}-gflags
mingw-w64-${MSYSTEM_CARCH}-glog
mingw-w64-${MSYSTEM_CARCH}-gtest
mingw-w64-${MSYSTEM_CARCH}-lz4
mingw-w64-${MSYSTEM_CARCH}-protobuf
mingw-w64-${MSYSTEM_CARCH}-python3-numpy
mingw-w64-${MSYSTEM_CARCH}-rapidjson
mingw-w64-${MSYSTEM_CARCH}-snappy
mingw-w64-${MSYSTEM_CARCH}-thrift
mingw-w64-${MSYSTEM_CARCH}-zlib
mingw-w64-${MSYSTEM_CARCH}-zstd
Phew! Okay. Now that you've got your minimum requirements all set up, make sure you've cloned the Arrow Git repository and have navigated to the cpp directory. All set? Let's get building!
Let's build this thing!
Before we do anything else, let's take a look at the available CMake build presets!
Remember
CMake presets were a feature introduced in CMake version 3.20. While you can use an older version of CMake to build the Arrow libraries, you can only utilize the provided presets if you are using CMake version 3.20 or higher!
You can use the cmake --list-presets command to get the list of presets. It'll look a bit like this:
$ cmake --list-presets # make sure you're inside the 'cpp' dir
Available configure presets:
"ninja-debug-minimal" - Debug build without anything enabled
"ninja-debug-basic" - Debug build with tests and reduced dependencies
"ninja-debug" - Debug build with tests and more optional components
...
If you want to look at the options that are being enabled by a particular preset, you can run the cmake -N --preset <preset name> command:
$ cmake -N --preset ninja-release-minimal
Preset CMake variables:
ARROW_BUILD_STATIC="OFF"
ARROW_WITH_RE2="OFF"
ARROW_WITH_UTF8PROC="OFF"
CMAKE_BUILD_TYPE="Release"
Note
These presets are all referencing the ninja build utility, rather than using make. While make is more readily available and standard, many developers will use ninja instead for faster builds. It is particularly effective at speeding up incremental builds. In most cases, you can just add ninja to the list of packages to install in the previous Technical requirements for building C++ libraries section to install it with everything else. To use ninja with CMake, pass the -GNinja option.
When you are building the C++ libraries with CMake, there are two primary types of builds with the following terms:
- In-source build: Running cmake directly in the cpp subdirectory. If you plan on maintaining more than one build environment (such as separate release and debug builds), then this can be more difficult and less flexible.
- Out-of-source build: Running cmake from a different directory to keep builds isolated from one another. The common method for this would be to create a subdirectory such as cpp/debug-build and run cmake $ARGS .. from that directory. This is the recommended approach and the one we're going to take.
Let's create a build from the ninja-debug-minimal preset:
$ mkdir debug-build # from the 'cpp' directory
$ cd debug-build
$ cmake .. --preset ninja-debug-minimal
Preset CMake variables:
ARROW_BUILD_INTEGRATION="OFF"
ARROW_BUILD_STATIC="OFF"
ARROW_BUILD_TESTS="OFF"
ARROW_EXTRA_ERROR_CONTEXT="ON"
ARROW_WITH_RE2="OFF"
ARROW_WITH_UTF8PROC="OFF"
CMAKE_BUILD_TYPE="Debug"
-- Building using CMake version: 3.22.1
...
-- Configuring done
-- Generating done
-- Build files have been written to: /home/matt/arrow/cpp/debug-build
You can also pass custom options to be used in addition to the preset options:
$ cmake .. --preset ninja-debug-minimal -DCMAKE_INSTALL_PREFIX=/usr/local
Assuming there are no errors or problems, you can then compile the libraries with a single command:
$ cmake --build . # inside the debug-build directory
[143/143] Creating library symlink debug/libarrow.so.800 debug/libarrow.so
And voila! You've built the base Arrow C++ library!
While the presets are provided to help people get started and understand the most common build configurations and options, they aren't guaranteed to stay the same. Individual developer feedback might result in the presets changing over time. If you are preparing any sort of automated build, CI, or scripts, you should manually configure your build and explicitly specify the options you want instead of relying on a preset.
Configuring the build manually
There are three types of builds you can pass to the CMAKE_BUILD_TYPE option:
- Debug: No compiler optimizations and adds debugging information in the resulting binaries.
- RelWithDebInfo: Applies the compiler optimizations but still adds the debug information to the compiled binaries.
- Release: Applies the compiler optimizations but removes the debug information from the final binaries. This produces the smallest output.
There's also another option that you can set, -DARROW_EXTRA_ERROR_CONTEXT=ON, which will provide additional context and debugging output inside of the error checking code.
Developing on Windows?
If you're building the libraries on Windows using Visual Studio, there are more steps that you'll have to perform and more options that you will have to set. The best resource for this is the Arrow documentation itself: https://arrow.apache.org/docs/developers/cpp/windows.html#developers-cpp-windows.
For the most minimal release build, you can simply pass no options and let all the defaults get used:
$ mkdir build-release # in the cpp directory
$ cd build-release
$ cmake ..
$ make -j8 # for 8 CPU cores, otherwise swap out the 8 accordingly
The unit tests are not built by default but instead require a specific option to enable them. On some Linux distributions, you might run into locale-related errors when running the test suite. If you see any of these, try setting the LC_ALL environment variable like so (this requires the locales package or an equivalent):
$ export LC_ALL="en_US.UTF-8"
So, let's change our build options to build and run the unit tests:
$ git submodule update --init --recursive # pull down the test data
$ export ARROW_TEST_DATA=$PWD/../testing/data
$ export PARQUET_TEST_DATA=$PWD/cpp/submodules/parquet-testing/data
$ mkdir debug-build # only needed if you didn't already create it
$ cd debug-build
$ cmake -DCMAKE_BUILD_TYPE=Debug -DARROW_BUILD_TESTS=ON ..
$ make -j8 # for 8 CPU cores, otherwise change 8 accordingly
$ make unittest # runs the unit tests
There are quite a large number of optional components in the Arrow project. By default, you'll get a minimal build, but you can pass a multitude of Boolean flags to the cmake command to enable the components you want. I'll cover a few here, but for the full list, you can check the Arrow documentation. Alternatively, the last portion of the output from cmake will contain a build configuration summary, listing all the options and what values you got from the cmake command. This makes it easy to double-check what options you've set before you start building.
Here's a small selection of component options that I think will be useful:
- -DARROW_BUILD_UTILITIES=ON: Build the Arrow command-line utilities.
- -DARROW_COMPUTE=ON: Build the Arrow compute library; we covered this in Chapter 5, Crossing the Language Barrier with the Arrow C Data API.
- -DARROW_CUDA=ON: Enable GPU development with CUDA integration. This depends on the NVIDIA CUDA Toolkit, customized by setting the $CUDA_HOME environment variable.
- -DARROW_DATASET=ON: Enables building the Datasets API we covered in Chapter 7, Using the Arrow Datasets API. This implies -DARROW_FILESYSTEM=ON, which builds the Filesystem APIs.
- -DARROW_FLIGHT=ON: Build the Arrow Flight libraries that we covered in Chapter 8, Exploring Apache Arrow Flight RPC, which depends on gRPC.
- -DARROW_GANDIVA=ON: Build the Gandiva expression compiler that we briefly touched on in Chapter 9, Powered by Apache Arrow, when discussing Dremio Sonar.
- -DARROW_ORC=ON: Build the Arrow integrations with the Apache ORC file format.
- -DARROW_PARQUET=ON: Build the Parquet libraries and the Arrow integration with Parquet.
- -DARROW_PYTHON=ON: Build the Python C++ library, required for building the Python pyarrow module. You need to build this against the same Python version that you want to build the pyarrow module for, which requires the NumPy module to also be installed. This also enables several other options that are required for Python bindings, such as ARROW_COMPUTE, ARROW_DATASET, ARROW_FILESYSTEM, ARROW_CSV, ARROW_HDFS, and ARROW_JSON.
- -DARROW_IPC=ON: Build the IPC extensions, which can be switched off to improve build times if you don't need them.
Nearly all of the other dependencies that Arrow has can be built from source as part of the C++ build, taken care of by CMake. For a full list of these dependencies, you can go to the Arrow C++ documentation located at https://arrow.apache.org/docs/developers/cpp/building.html#build-dependency-management. The important thing here is that you can control how CMake resolves the dependencies. To control the dependency resolution, you use the CMake ARROW_DEPENDENCY_SOURCE option. Here are the available options to resolve dependencies:
- AUTO: CMake will attempt to find the dependencies in the default system locations, building them from source if it cannot find them.
- BUNDLED: Ignore the system and only build all dependencies from source.
- SYSTEM: Use CMake's built-in find_package functionality to locate dependencies; use pkg-config for any that aren't supported by it.
- CONDA: Similar to SYSTEM, but use $CONDA_PREFIX instead of the SYSTEM path.
- VCPKG: Use VCPKG to find dependencies, or install them with vcpkg install if it can't find them.
- BREW: Similar to SYSTEM but using Homebrew's default paths as an alternative to the SYSTEM path.
By default, AUTO is used for the dependency resolution unless the $CONDA_PREFIX environment variable is detected by developing in an active conda environment. In that case, CONDA is the default. This option sets a global default for all packages, but you can override the resolution for individual dependencies too! Each package can be overridden by setting an option with the -D<package name>_SOURCE=<value> pattern.
Note
Unfortunately, the package names for setting individual resolution strategies are case-sensitive. You can find the up-to-date listing of package names with the proper casing in the file located at cpp/cmake_modules/ThirdpartyToolchain.cmake in the repository. For example, to override the Protocol Buffers library to force building from source, you'd set the -DProtobuf_SOURCE=BUNDLED option. But it won't recognize PROTOBUF_SOURCE or protobuf_source; you must use the right casing of Protobuf_SOURCE.
Now that we've got everything all configured and ready to build, you can run make or ninja to start the build. With the C++ libraries built and installed, as long as you passed the ARROW_PYTHON=ON option, we can go and build the Python library now! If you didn't use the ARROW_PYTHON=ON option, you can go back and rerun the cmake command with it, and then rebuild. It should only build what is required for the new options rather than rebuilding everything. You can even use the ninja-release-python preset if you like.
Building the Arrow Python module
If you've followed the previous section, you should have a local version of the Arrow C++ libraries that you've built. Huzzah! Now, we can set up our environment for building the pyarrow Python module. There are a couple of possibilities for what your environment might be like based on the toolchain you are using. For the example commands following this, we will assume that the $ARROW_DIR environment variable represents the path to where you cloned the Arrow repository. You can even set the environment variable accordingly to make it easy to copy and paste the code snippets!
Before You Go Any Further!
Make sure you added the packages that were marked as needed for pyarrow development for your environment in the previous Building the Arrow C++ libraries section. These dependencies are necessary for building the Python module. You may even have gotten errors if you tried building the C++ libraries with the ARROW_PYTHON=ON option without them.
Why all this talk about C++? I thought this was the Python module?, I hear you cry. Like several of the other Apache Arrow library implementations, the Python module is largely a wrapper around the C++ library itself, with bindings to Python classes and functions to provide the functionality.
pyarrow's Architecture – Cython is more than just a clever name
The pyarrow module mostly tries to take what is available in the C++ Arrow library and expose it as a Pythonic interface that is less complex to utilize. In some cases, it maps almost one to one between a Python class and a C++ class, but in other cases, the C++ classes and functions are used as a foundation for easier-to-use objects and structures. Cython (https://cython.org) can be used to make this easier to manage and is significantly easier to create.
For all intents and purposes, Cython is a programming language. Its goal is to essentially be a superset of the Python language while providing support for static type declarations. Simply put, it translates specialized Cython code into optimized C/C++ code and compiles it as a Python extension module. As a result, you can get the performance benefits of a compiled C/C++ program and tight integration with other libraries while still, for the most part, writing Python code. I'm not going to go into the nuances of the technical details for how it does this here, but it's really interesting, and I highly recommend reading up on it if that's the sort of thing you're interested in! You can find the documentation at https://cython.readthedocs.io. For now, you can easily install Cython using pip (which is included in the requirements files that we'll install packages from shortly).
What this means for the pyarrow module though is that the architecture of the code looks like Figure 10.4:
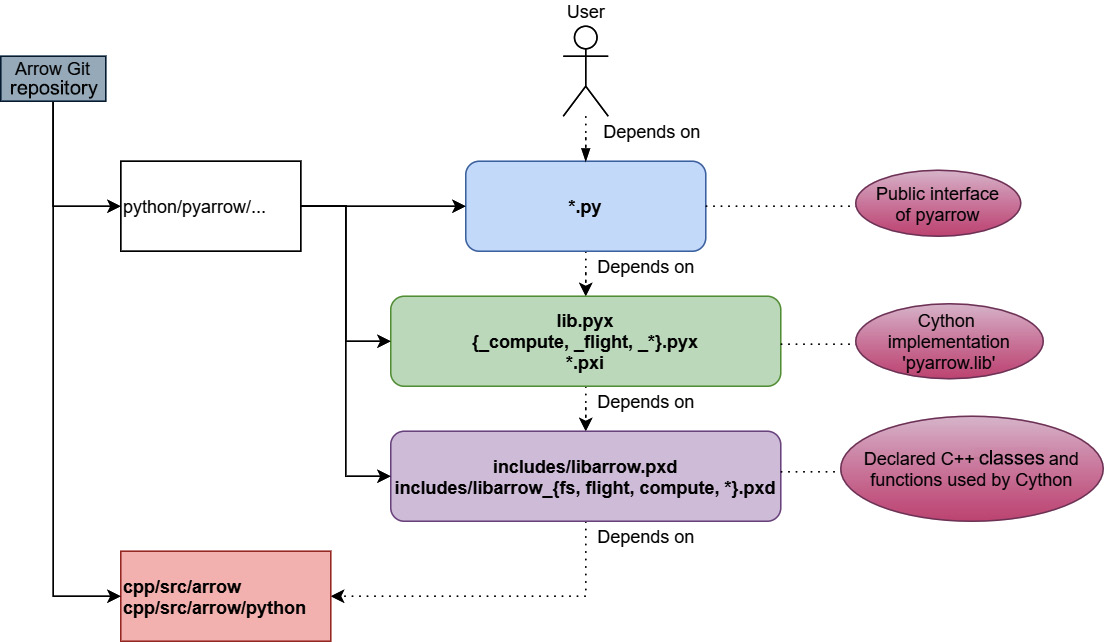
Figure 10.4 – pyarrow code architecture
As you can see, there are four layers to the design of the code (from top to bottom):
- The *.py files form the public Python interface of the pyarrow module. Everything below this should be considered "internal" to the pyarrow module.
- The lib.pyx file exposes most of the core C++ Arrow library functionality to Python. It includes the *.pxi files for specific implementations, and the *.pyx files contain the glue code to expose C++ functionality as Python classes and methods. The file is exposed to Python as pyarrow.lib.
- The includes/*.pxd files contain the declarations for the raw C++ APIs from the Arrow library. They are similar to C++ header files in this regard; they are included and used in other *.pyx files to implement classes, functions, and helpers.
- Finally, the C++ Arrow library itself and dedicated code in the cpp/src/arrow/python directory of the C++ source code. These provide lower-level capabilities such as converting to and from numpy or pandas objects, along with classes for using Python objects and callbacks in the C++ code. This is what is compiled by adding the ARROW_PYTHON=ON option with CMake, producing the libarrow_python.dll/.so library.
Now that we've finished our little side trip to explain Cython, we can get back to building.
Back to building the module…
For managing our Python environment, we're going to use a utility called venv. If you're using the conda utility, you should instead use conda-activate to activate the development environment instead. To set up our environment with venv, we can use the following commands:
$ python3 -m venv pyarrow-dev
$ source pyarrow-dev/bin/activate
$ pip install -r $ARROW_DIR/python/requirements-build.txt
-r $ARROW_DIR/python/requirements-test.txt
$ mkdir dist # this is where we are going to install our Arrow libraries
If you're on an Ubuntu/Debian-based system, you may need to run the following command to install venv separately:
$ sudo apt-get install -y python3-venv
Now that we've installed the Python dependencies, let's set a couple of environment variables for Arrow's build toolchain. We have to tell the Python build where it can find the Arrow libraries:
$ export ARROW_HOME=$(pwd)/dist
$ export LD_LIBRARY_PATH=$(pwd)/dist/lib:$LD_LIBRARY_PATH
Now, go back to the directory you created and built the Arrow C++ libraries in. We need to tell it where we want to install those libraries; don't worry – it's not going to rebuild them. You just need to run cmake again, passing two new options:
$ cmake -DCMAKE_INSTALL_PREFIX=$ARROW_HOME
-DCMAKE_INSTALL_LIBDIR=lib
..
Then, just run make install or ninja install, depending on which one you were using previously. Running the install command will now populate that dist directory we created with the Arrow headers and compiled libraries, making them available to the Python build. This is also a good time to ensure that any features you want to have available to you in the Python module have the corresponding feature flags set to ON in your C++ build. For instance, if you want to use Arrow Flight with the pyarrow build, you need to make sure you built the C++ libraries with the -DARROW_FLIGHT=ON option passed to cmake, and so on.
Dealing with Build Issues
If you run into any issues with the C++ build or the install command, refer to the previous Building the C++ Arrow libraries section or the official Arrow C++ Development documentation, which is located at https://arrow.apache.org/docs/developers/cpp/index.html. You will also find Windows-specific instructions there for necessary modifications to these instructions if building on Windows.
Assuming you now have the dependencies handled and the C++ libraries installed to the directory referred to by ARROW_HOME, you can finally run the Python build. If you built any of the optional C++ components such as Flight or Gandiva, you need to set a corresponding environment variable of PYARROW_WITH_<COMPONENT>=1 for each to enable them in pyarrow. Let's build!
$ cd $ARROW_DIR/python
$ export PYARROW_WITH_PARQUET=1
$ python3 setup.py build_ext –inplace
If you want, you can also build a self-contained Python wheel that bundles the Arrow and Parquet C++ libraries into it for easy distribution. You just need to set the --bundle-arrow-cpp option like so:
$ pip install wheel # if you don't already have it installed
$ python3 setup.py build_ext --build-type=<release|debug> --bundle-arrow-cpp bdist_wheel
If everything is built successfully, you should see the pyarrow whl file in the dist directory we created. You can install the wheel by running pip install <whl file>. If you're having difficulty with building the Python libraries, take a look at the Docker-based examples in the Arrow repository. The Docker files are located in the $ARROW_DIR/python/examples/minimal_build directory.
With the pyarrow module built, you can run the unit tests now. The pytest utility is used for running the unit tests, which can be run using pytest $ARROW_DIR/python/pyarrow. There's a variety of options that can be passed to control what tests are run and how to run them. You can see all of the options by running pytest pyarrow --help.
Only one build left to do! Let's build the Arrow Go modules.
Building the Arrow Go modules
Personally, I find that the module management of Go makes building the Go modules significantly simpler than the C++ and Python builds. At the time of writing, the minimum version of Go required is version 1.16. If you don't have Go installed, you can follow the instructions at https://go.dev/doc/install to do so.
Performing the minimal build of the Arrow Go modules is this simple:
$ cd $ARROW_DIR/go
$ go build ./...
It's that easy. Running the go build command will automatically download the dependencies before attempting to compile the modules. You can then run the unit tests with the go test utility:
$ git submodule update --init --recursive # if you haven't already pulled the test data down
$ export PARQUET_TEST_DATA=$ARROW_DIR/cpp/submodules/parquet-testing/data # if not already set
$ go test ./...
ok github.com/apache/arrow/go/v8/arrow 0.015s
...
The Go modules also utilize a few different Go build tags to control some features, which can be enabled by adding -tags "tag1,tag2,…" to the build and test commands. The available tags are as follows:
- assert: Enable debug asserts in the libraries that can panic or otherwise print information in specific instances, such as calling Release on an Array too many times.
- cdata_test: Build/run the tests to use the C Data API in the cdata/test directory.
- test: Build and run additional tests requiring cgo.
- ccalloc: Build CgoAllocator, which requires having the C++ Arrow libraries accessible to link against.
- noasm: Disable the optimized assembly and force usage of pure Go implementations of several low-level modules.
Finally, to install the integration test command-line binaries, you can use the go install command:
$ go install ./...
This will install several command-line utilities such as parquet_reader and parquet_schema, along with the binaries used for running the integration tests.
Regardless of whether you want to make some changes in the C++ code, Python code, or Go code, we've covered how you can build your changes and test them using the unit tests. Once your changes are ready, there are just a couple of steps left involving using Git!
Creating the PR
If you haven't used Git before, it can be a lot to wrap your head around. Essentially, you have your copy of the repository (your fork that was created in the Setting up with Git section) and the official copy (we called it upstream). Within the repository, there are various branches, effectively a pointer to a snapshot of a set of changes. The "source of truth" as it were is the main or master branch. When you create a PR, you're requesting to merge your changes into the official repository's master branch. To encapsulate your changes and isolate workspaces, you should create branches in your own repository.
When you create branches, you obviously have to name them! When working on the Arrow libraries, the common convention is to name your branch after the JIRA card number. For example, if the JIRA card you've chosen to work on is arrow-12345, you can use the following command:
$ git checkout -b arrow-12345-<clever descriptive name>
Following this convention makes it easy to keep track of which of your working branches is associated with a specific issue in JIRA. Of course, over time, your local version will fall behind the official repository. As long as you've created branches on your fork to work in rather than making changes directly to the master branch, you can easily update your fork! On the GitHub page for your fork, there is a very convenient Fetch upstream button that you can press, as shown in Figure 10.5:
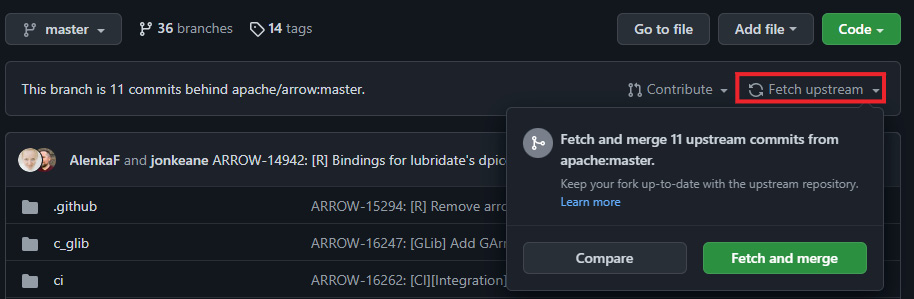
Figure 10.5 – GitHub with Fetch upstream
Clicking the Fetch and merge button that appears will automatically update your fork's master branch to the current commit of the official repository. After doing this, you'll be able to update your local version with git:
$ git checkout master
$ git fetch
$ git pull
Finally, you pull all those changes into your working branch using the rebase command – nice and simple:
$ git rebase master arrow-12345-<clever descriptive name>
If there aren't any conflicts, you're all set! Everything will be updated, and you can simply push the updated branch with git push -f. If there are conflicts, then you'll have to go to each file and manually fix the conflicts. Afterward, you re-add the fixed files with git add and continue your rebase with git rebase --continue. For more of the nuances of using git and other fancy stuff, you can likely find any help you need via https://stackoverflow.com or the git documentation.
Once you've committed some changes on a branch in your local git repository and pushed them to your fork, you can create a PR. When you do, a whole bunch of automated jobs will be triggered, performing builds in different environments, running tests, and checking the formatting of the code. If any of those jobs fail, you'll need to look into what happened. So, the next thing we're going to cover is the main components of the CI workflows and automated jobs.
Understanding the CI configuration
Arrow tries to be compatible with as wide a range of platforms, compilers, operating systems, and package managers as possible. As a result, the automated workflows are fairly complex to account for all of these variations.
Automated action-triggered jobs
Most of the automated jobs for Arrow are defined in the YAML files located in the .github/workflows folder. Most of the workflows are specific for particular Arrow implementations and only run on changes to the corresponding code, such as running C++ builds if C++ source files are in a PR. These are generally easy to find as they are named appropriately, based on the language they operate on. There are also a few other workflows to keep in mind:
- archery.yml: Validation checks to run for changes to the Archery utility or its tasks.
- comment_bot.yml: Allows the manual triggering of actions by making a comment on a PR. It listens for the following comment strings:
- @github-actions crossbow submit …: Crossbow is a utility for packaging and testing deployments of Arrow; a comment of this form will run the specified crossbow command.
- @github-actions autotune: This will run a series of code stylers and formatting on a PR and commit them back to the branch. It will also build some of the documentation and commit those results back. This is useful, and necessary, when making any documentation changes.
- @github-actions rebase: Automatically performs a rebase for the PR onto the master branch.
- dev_pr.yml: All PR have a series of checks run on them. The title of the PR should always be of the ARROW-####: [Components] Title form, where ARROW-#### is the JIRA ticket that the PR is tied to. If the title is incorrectly formed, a comment is added to the PR, asking the user to fix the issues. It will also add relevant GitHub labels such as lang-c++ or lang-go, based on which files have been modified in the PR.
- dev.yml: Whenever any activity happens on a PR, this job will run the linters and test whether the PR can be merged or not.
In the root folder of the Arrow repository, there are two more configuration files for automated jobs:
- .travis.yml: Uses https://travis-ci.com to run automated tests for Arm and s390x architectures
- appveyor.yml: Defines appveyor jobs to run Windows builds on Python and C++ commits
To make many development tasks easier to configure and perform, the Arrow repository is also home to a Python utility called Archery. Archery can be utilized to run the benchmarks, perform linting of Arrow source code, and build the various Docker images that are utilized in the CI tasks. If you want to run these jobs and checks locally before you submit your PR, you can use the Archery utility to do so, along with several other common development tasks.
Development using Archery
Archery requires Python 3.7 or higher to run, along with the Docker and Docker Compose utilities. You can find installation instructions for these at https://docs.docker.com and https://docs.docker.com/compose. To make sure that any changes to the Arrow repository (such as when you pull down the latest version of the repository) are reflected and automatically updated with your Archery installation, you should install Archery in editable mode. This will retain the reference to the working directory of your Arrow repository rather than copying everything into your Python installation. You can do this by running the following:
$ cd $ARROW_DIR
$ pip install -e "dev/archery[all]"
You can then run the archery command on your command line and pass the --help option to print the usage instructions. Each of the subcommands is independent and frequently has its own help output, so have a look around and explore the options, since we're only going to cover a subset of them here.
Running local builds with Archery and Docker
The Docker builds are designed to be reusable containers defined in a hierarchy of components. While this does make the Docker Compose configuration a bit complex, it reduces duplication by allowing the configuration of, for example, the C++ environment to be reused across the various language bindings that rely on it, rather than being duplicated in all of them. I'm not going to cover all of the build parameters and options here, but I'll cover enough to help you understand what's going on. As usual, if you want more detailed information, you can go to the Arrow documentation site, specifically this page: https://arrow.apache.org/docs/developers/continuous_integration/docker.html.
The basic commands for manipulating the Docker images using Archery are the following:
- List the available images – archery docker images.
- Execute a build – archery docker run <build name>:
- An example is archery docker run debian-go-cgo.
- Running a build will pull down all dependent images, with them being built locally if the build can't pull them down, and then run the requested build.
- Show the commands instead of executing – archery docker run --dry-run <build name>.
- Disable image pulling and only build locally – archery docker run --no-cache <build name>.
- Add environment variables to the build – archery docker run --env VAR=value <build name>:
- An example is archery docker run --env CMAKE_BUILD_TYPE=release ubuntu-cpp, which forces a release build instead of debug.
- Run a custom command instead of the default – archery docker run <build name> <command>:
- An example is archery docker run ubuntu-cpp bash, which will start an interactive Bash session, allowing you to debug the build interactively.
Most, if not all, of the Docker images will invoke build and test scripts. These scripts live in the ci/scripts directory and typically are appropriately named to encapsulate what they do. For example, cpp_build.sh builds the C++ libraries without running the tests, and cpp_test.sh will then get called to run those tests.
The scripts will leverage environment variables to ensure parameterization for easy configuration. All of the Docker images are defined in the docker-compose.yml file in the root of the repository. This file is extremely well commented on, describing how to add new images and where everything is defined. Looking in this file and seeing how the variables are passed is the quickest way to understand how the pieces fit together.
You are now armed with the knowledge of how to make changes, test them, and check the automated jobs. But what should you do if you want to contribute but don't know how or where to start? Well, I'm getting to that!
Find your interest and expand on it
In the first section of this chapter, Contributing to open source projects, we looked at a bunch of ideas about how and why you could, or should, contribute to an open source project. At this point, I'd like to provide just a bit of friendly advice about finding a good place to start if you want to contribute to the Arrow project specifically. Yes, there's the obvious case of looking at the implementation in your preferred programming language. But most of the code bases are still quite large, even when limited to only looking at code relevant to one language. My first piece of advice is to figure out what you are interested in. I've put a small flowchart together in Figure 10.6 to help with some ideas:
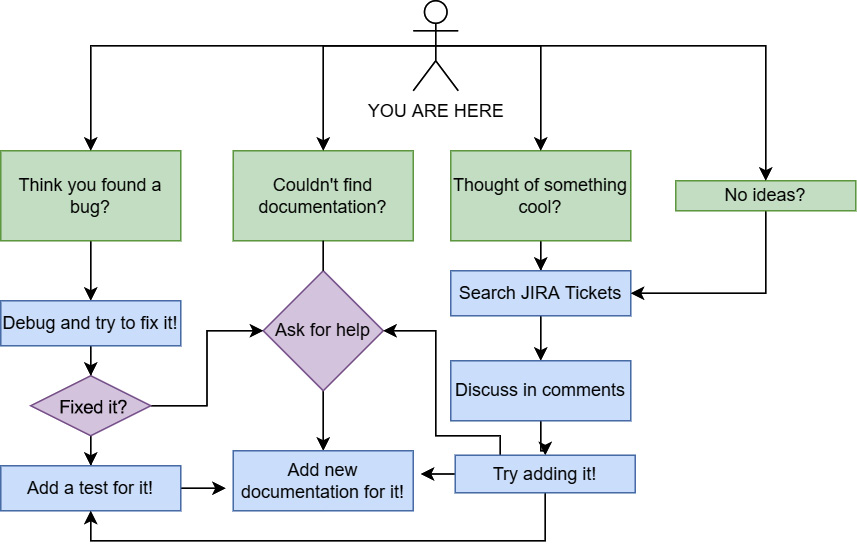
Figure 10.6 – A flowchart of ideas
Of course, it doesn't cover everything. It's not supposed to. The Arrow libraries house many different ideas and different ways of doing things. If you're interested in data transportation, look at the Flight RPC and IPC. If you're interested in performance, look at the benchmarks and read comments to find the code relevant to what you want to improve. Maybe the libraries for your preferred language are missing a feature? Well, the implementations for other languages are immensely helpful in figuring out how you might go about adding that functionality to the library you want.
Above all, subscribe to the mailing lists! There are always interesting discussions going on in the arrow-dev mailing list. It's a great place to form the kernel of an idea and expand on it before searching through the JIRA tickets. If you're unsure where to start or how to do something, just ask on the mailing list, and you'll likely get a helpful response. The next best place to look is the existing unit tests and examples, which are frequently great sources of how to utilize newer features that have yet to get updated documentation.
Just remember – I may not have met you, but I believe in you. You've got this! Come join the community of contributors!
Getting that sweet, sweet approval
So, you found the perfect issue to work on, made a PR, and got the CI tests to succeed. What next? How do you get your contribution to be accepted and merged?
Well, core Apache Arrow developers and possibly others who have a stake in the particular area of the Arrow libraries you're modifying will review your PR. To ensure a good review, keep the following in mind:
- Aside from passing existing unit tests, it's expected that new functionality also adds new unit tests to ensure that it is properly tested.
- As much as possible, break your work into smaller single-purpose patches. It's significantly more difficult to get a larger change with disjointed features merged.
- Follow the style guide for the library you're modifying (more on that in the Finishing up with style! section next).
Once any feedback has been addressed and the PR is approved, one of the committers will merge your PR. Congratulations! You've just contributed your first patch!
Finishing up with style!
Before we wrap this chapter up, I'd be remiss if I didn't broach one last topic – code style!
To avoid wars and arguments about most aspects of code style, most of the implementations of the Arrow library have very well-defined style checking and linting rules. These rules are checked using the automated CI checks that we covered and are required to pass, in order to merge a PR. We're not going to spend a ton of time on this, since this is enforced and automated with tooling, but it's good to know what tooling is in use.
C++ styling
Arrow follows Google's C++ style guide (https://google.github.io/styleguide/cppguide.html) with a few exceptions:
- Line length is relaxed to 90 characters.
- The NULLPTR macro is used in header files, rather than nullptr, for wider C++ version build support.
- There are relaxed rules regarding structs for convenience.
The style is enforced using the clang-format and clang-tidy utilities, which can be run using Archery with the following command:
$ archery lint --cpplint --clang-format --clang-tidy –fix
Source files and header files should use underscores for word separation while compiled executables will use hyphens. For more details specifically regarding the code styling for C++ along with comment style and so on, please read https://arrow.apache.org/docs/developers/cpp/development.html#code-style-linting-and-ci and https://arrow.apache.org/docs/developers/cpp/conventions.html.
Python code styling
Arrow's Python code follows a PEP 8-like coding style that is similar to the pandas project. Just like the C++ linting checks, Archery can also be used to run the local Python linting and style checks using the following command:
$ archery lint --python
If you add the --fix argument, some of the issues found will automatically be fixed – simple and straightforward.
Go code styling
The code for Arrow's Go modules is expected to be formatted using the standard go fmt utility. The Go code will be linted during the CI, using the staticcheck utility. You can install this tool locally with the command:
$ go install honnef.co/go/tools/cmd/staticcheck@latest
The staticcheck utility will get installed in $GOPATH/bin, with the easiest way to invoke it being to ensure that this path is added to your PATH environment variable. You can then run the tool on your local code by simply using the staticcheck ./... command from the go/ subdirectory of the Arrow repository.
Summary
Contributing to any open source project can be an enriching experience. As long as a project can build up a community of its developers and users, it can continue to sustain itself indefinitely. These contributors and users are the lifeblood of any successful open source project, so if you have a stake in the continued existence of a project, contribute! The Apache Arrow project is a fairly active project currently, with a lively community of individuals who are passionate about data and analytics. The easiest way to see the features you want to get prioritized is to become part of the conversation or, better yet, contribute them yourself if you can! This community is how new features and releases happen. Votes are held publicly on the development mailing list by the Arrow Project Management Committee on whether new proposed features get accepted or new versions are released. Join the conversation!
Coming up to the end of our journey here, we've got one more chapter left – Chapter 11, Future Development and Plans. We've just finished looking at the process in which people contribute and expand the Arrow libraries. So, the last thing we're going to do is get you all excited about the upcoming features, discussions, and technologies. We're going to look at upcoming enhancements for Flight SQL, a distributed scheduler and query execution framework called Ballista, and work being done to create a cross-language specification for compute engines.
Welcome to the community, and enjoy your stay! Now, come help us grow!