Chapter 8: Creating Custom CMS Pages
In the previous chapters, we learned how to create documents and objects and implement very simple websites using such features.
In this chapter, we will have a deep dive into the creation of custom CMS pages. In fact, if you are templating a document or creating a standalone page, you have many tools that make the development experience in Pimcore great for you. This chapter will cover many aspects that are fundamental for a full overview of Pimcore's CMS capabilities; such features are basic tools for creating custom web pages, which we have combined to discuss user inputs and templates for creating content.
The chapter is structured as follows:
- Using the MVC Model
- Using Editables
- Using Blocks
Let's see Pimcore in action!
Technical requirements
As with the previous chapters, there is a demo that you can find in our GitHub repository, which you can find here: https://github.com/PacktPublishing/Modernizing-Enterprise-CMS-using-Pimcore.
All you need to do to run the demo connected with this chapter is to clone it and navigate to the 8. Creating Custom CMS Pages folder and start the Docker environment.
To do so, just follow these instructions:
- Run Docker with the following command:
docker-compose up
- Then, to restore all the settings from on your local machine, type the following:
docker-compose exec php bash restore.sh
- Navigate to http://localhost/admin and log in with your admin/pimcore credentials.
What you will get with this setup is the following:
- A class definition called MyObject
- Two instances of the class, My Item 1 and My Item 2
- The Editables page, a page with a demo of editables (see Using Editables)
- The Template page, a page with a demo of the templating helpers (see Using the MVC model)
- A thumbnail preset called MyThumbnails
Now you are ready to play with the demo related to this chapter!
Using the MVC Model
In this section, we will learn how the MVC (Model View Controller) model works and how to use it for creating a standalone web page that works outside the document scope. This is very important for covering all possible needs that you may encounter on your path with Pimcore as a Content Management System.
The MVC principle is very easy. When a URL matches a set of rules (Routing), a controller class is activated and this will compute data (Model) using certain business logic (Controller). The data is then sent to the View that implements the presentation logic and shows content to the user.
In this section, we will cover the most important concepts relating to building embedded web pages using the MVC pattern:
- Controllers
- Views (template helpers)
- Routing
Let's see them in detail.
Controllers
Pimcore Controllers implement the "C" part of the MVC pattern. Controllers are responsible for business logic or, in simpler words, are the part of your source code that reads, manipulates, and prepares data to be passed to the presentation layers (views). It is good practice to keep all the reusable logic in service classes, but the point that connects presentation with the business layer is, in fact, the controller element.
Pimcore offers an abstract class (FrontendController) that can be used as a base for your controller implementation. This simply means that all your controllers will usually inherit from the frontend controller. The naming convention of your files will follow the generic Symfony rules. In a simple scenario where you use Symfony's standards for your website, you will have the following rules:
- Controller class name: /src/Controller/[Controller].php
- View filename: /templates/[Controller]/[action].html.twig
Inside controllers, you can create any action you want. Each action is responsible for a single functionality and is linked to a URL. We usually create a controller for each topic or homogeneous group or function (that is, CustomerController, which manages all the customer's features). If you invoke a controller omitting the action name, default will be used.
As we explained in Chapter 4, Creating Documents in Pimcore, we can choose a controller for each document and Pimcore comes out with a ready-to-go controller called DefaultController. We can create controllers that are unrelated to documents and simply implement custom web pages.
Inside controllers, you can access some special variables that can help you to define how to build the desired output:
- $this->document: If you are working on a document, this is the document that you are manipulating.
- $this->editmode: Indicates whether you are in edit mode or not, and can be used for diversifying the output based on the case. This applies when you are working with documents.
In the next sections, you will find some examples of controller actions that cover all the most common use cases.
Passing data to a view
The following example is an action that adds a variable into the view with a value. In this case, the value is just text, but imagine that you could use the input from $request for computing data and add a more complex data object:
public function dataAction(Request $request)
{
$input=$request->get('data');
return array(
'content' =>$input
);
}
Setting HTTP headers
Another requirement that we may have is to set some HTTP headers. If these values are fixed, you can add them using an annotation, or you can access and programmatically alter the response object using the addResponseHeader helper:
/**
* @ResponseHeader("X-Foo", values={"123456", "98765"})
*/
public function headerAction(Request $request)
{
$response = new Response();
// using code:
$response->headers->set('X-Foo', 'bar');
return $response;
}
The previous code adds three values for the same header: the first two from the annotation, and the other from the piece of code inside the method.
Specifying the template path
If you are scared about the fixed conventions of templating, we will reassure you with the next example. In the following snippet, we will override the normal template path by setting it manually:
public function differentPathAction()
{
return $this->render("Default/default.html.twig", ["foo" => "bar"]);
}
Alternatively, you can manually specify the template path to the @Template() annotation and just return the data, as in the following snippet:
/**
* @Template(Default/default.html.twig)
*/
public function differentPathAction()
{
return return ["foo" => "bar"];
}
Generating JSON output
Even though Pimcore comes with a powerful API engine and Datahub Change this throughout the chapter lets you make anything using GraphQL, you may need to produce APIs manually. This scenario is easy to manage with controllers and the json function. In the next example, you will see how to create a json response starting from plain data:
public function jsonAction(Request $request)
{
return $this->json(array('key' => 'value'));
}
This outputs the json serialization of data as the body of the response and sets the content type to application/json.
For all other cases
As a final fallback, if none of the standard solutions offered by Pimcore will satisfy your needs, there is the bare option to create a Symfony response object manually and return it to the MVC engine. Using this option, you will be free to set all response parameters, for mime type to the raw content without any limitation. In the next example, we will return fixed text:
public function customAction(Request $request)
{
return new Response("Just some text");
}
}
The previous block of code returns a response with text content as an example. Given the Request object, you can implement all the code you want and then produce a custom Response.
All the preceding actions are intended to be contained in a controller class like this:
<?php
namespace AppController;
use PimcoreControllerFrontendController;
use SymfonyComponentHttpFoundationRequest;
use SymfonyComponentHttpFoundationResponse;
use PimcoreControllerConfigurationResponseHeader;
class MyController extends FrontendController
{
// Add your actions here
}
This set of samples is not exhaustive but contains the most important features and is a great starting point. You can find more details in the official documentation: https://pimcore.com/docs/pimcore/current/Development_Documentation/MVC/index.html.
Views
This section covers the "V" component of the MVC pattern. Views are the components that receive data and render it by implementing presentation logic. A views file can be written using Twig or a PHP template but, as we told you in Chapter 4, Creating Documents in Pimcore, we will focus only on the Twig solution, which allows a more strict separation between business and presentation logic and makes Pimcore a real detached CMS. The downside of this solution is that the logic that you can implement in a Twig file is limited as it forces you to implement all the business logic in the controller. This strict separation may seem limiting at the beginning, but when you are confident with the pattern, you will agree that it's more clean, reusable, and maintainable. Other than all the platform-specific features, called helpers, Pimcore's Twig files support all the standard features of Twig.
Here is a list of the most important Pimcore helpers.
pimcore_object
In the following code, we loaded an object by its id (in our case, 2) and we displayed the Title property:
{% set myObject = pimcore_object(2) %}
{{ myObject.getTitle() }}
Our object has a Title property accessed by the standard getTitle method, so the value will be printed.
pimcore_document
In the next snippet, we have loaded a document and printed the title:
{% set myDoc = pimcore_document(3) %}
title: {{ myDoc.getTitle}} </br>
url: {{ myDoc}}
The myDoc element is Pimcore's document and all its properties can be accessed.
pimcore_asset
This helper loads an asset that can be used in the template. In the next example, we loaded one asset and we displayed the filename and url:
{% set myDoc = pimcore_asset(2) %}
url: {{ myDoc}} <br>
filename: {{ myDoc.getFilename}}
Alternatively, you can find an asset by its path, using the following shortcut:
{% set asset = asset('/path/to/image.jpg') %}
As usual, the assigned variable can be used in the template file for implementing any presentation logic.
Render controller output
This function calls an arbitrary action and prints the result. In the next example, we used the /custom/json example and we rendered the output, passing items=11 as the parameter:
{{ render(controller('App\Controller\CustomController::jsonAction', { items: 11 }))
}}
The parameter order is action, controller, bundle, and parameters.
pimcore_cache
Pimcore's cache simply implements an in-template caching functionality. You can use this to cache some parts of the HTML page directly in the template, independent of the other global definable caching functionality. This can be useful for templates that need a lot of calculation or require a huge amount of objects (such as navigations, and so on). In the next block of code, we will see caching in action:
{% set cache = pimcore_cache("cache_key", 60, true) %}
{% if not cache.start() %}
<h1>If you refresh the page this date will remain the same</h1>
{{ 'now'|date('y-m-d') }} v{{ 'now'|date('U') }}
{% do cache.end() %}
{% endif %}
The parameter order is the name of the key, the timeout in seconds, and an optional flag for forcing the cache in admin mode.
pimcore_device
The pimcore_device function helps when implementing adaptive designs. The next piece of code displays the usage of this helper in a template snippet:
{% if pimcore_device().isPhone() %}
I'm a phone
{% elseif pimcore_device().isTablet() %}
I'm a table
{% elseif pimcore_device().isDesktop() %}
I'm a desktop device
{% endif %}
If you are running this script on your PC, the output will be I'm a desktop device.
Request
From the default Symfony objects, you can access the request data. This can be done using the app.request item that contains all the information that we need. In the next example, we used this method to get the "_dc" URL parameter that you usually have in a page preview:
{{ app.request.get("_dc") }}
This is just a sample, and you can access all the request parameters. You can look at the official documentation for more information, here: https://symfony.com/doc/current/templates.html#the-app-global-variable.
Glossary
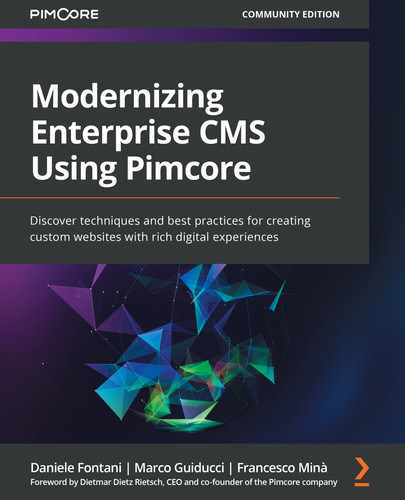
This helper replaces glossary terms with links. The glossary module is a powerful tool, making internal and external linking easy and smart, and which Pimcore has out of the box. As an example, you can connect the word "Pimcore" with the official website, so that each time you use it in HTML, it will be replaced with a link to the website. The pimcore_glossary helper will be used by this helper to render links. To test this feature, follow these steps:
- Go to Tools | Glossary.
- Click Add.
- Enter the term PIMcore in the Text column and then the link to the page in the Link column. In this example, we added PIMcore and CMS words with the related links. In the next screenshot, you will find the result:
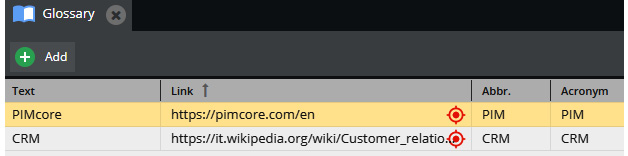
Figure 8.1: Glossary terms
- Now the glossary is set and we can use it on any web page using the pimcoreglossary helper. We can do this by placing the following snippet in a web page template:
{% pimcoreglossary %}
My content PIMCore loves CMS
{% endpimcoreglossary %}
In the previous snippet, we surround the text with the glossary function. Because we defined the words PIMcore and CMS inside the glossary, they will be transformed into a link on the web page. This is the final result:

Figure 8.2: The glossary helper in action
This was a simple example to explain the concept, but it shows how powerful this feature is.
pimcore_placeholder
This helper adds custom placeholders into the template. The next snippet defines a placeholder called myplaceholder, which is configured for building an H3 tag surrounding the "My content" value:
{% do pimcore_placeholder('myplaceholder')
.setPrefix("<h3>")
.setPostfix("</h3>")
.set("My content") %}
{# Print placeholder #}
{{ pimcore_placeholder('myplaceholder') }}
The output of this is <h3>My content</h3>.
pimcore_head_link
This helper collects a list of head links (stylesheet or any other head link tag) and prints them on the head section of the web page. Based on the presentation logic, the links are collected (you may or may not include a file based on some special conditions) and then printed once.
In the following example, the snippets append a favicon (favorite icon – the logos you see in browser tabs when you surf websites) to the link list:
{% do pimcore_head_link({'rel' : 'icon', 'href' : '/img/favicon.ico'},"APPEND") %}
{# Print head links#}
{{ pimcore_head_link()}}
In the example, we appended a favicon to the list. Using the correct configuration of pimcore_head_link, we can also define the order using relative inclusion (for example, add x file after y file).
pimcore_head_meta
This helper prints HTTP meta tags. It can collect a set of items that will be printed once in the header section. In the next block of code, like in the HeadLink helper, the data is collected and printed to the function by the final call:
{% do pimcore_head_meta().appendName('description', 'My SEO description for my awesome page') %}
{# adding addictional properties #}
{% do pimcore_head_meta().setProperty('og:title', 'my article title') %}
{# Print tags #}
{{ pimcore_head_meta() }}
pimcore_head_script
This is the same as HeadLink and Style, but for a JavaScript file. The next block of code adds a script to the list and then prints it on the page:
{% do pimcore_head_script().appendFile("/myscript.js") %}
{# Print tags #}
{{ pimcore_head_script()}}
pimcore_head_style
This helper manages inline styles. It is like HeadLink, but with inline scripts. In the next piece of code, we add a file called ie.css with conditional wrapping that, in this case, limits the CSS action to Internet Explorer before version 11:
{% do pimcore_head_style().appendStyle("ie.css", {'conditional': 'lt IE 11'}) %}
{# Print tags #}
{{ pimcore_head_style() }}
pimcore_head_title
Creates and save the HTML document's <title> for later retrieval and output. The following script adds the special title tag into the page:
{% do pimcore_head_title('My first part') %}
{# Print tags #}
{{ pimcore_head_title() }}
pimcore_inc
This helper includes a Pimcore document in the page. In the next snippet, we see how the MySnippet document is rendered and added to the page:
{{ pimcore_inc('/MySnippet') }}
pimcore_inline_script
This helper adds inline scripts to a page. The usage is very similar to HeadScript, but intended for inline usage. The next piece of code adds myscript.js to the list and then prints it on the page:
{% do pimcore_inline_script().appendFile("/myscript.js") %}
{# Print tags #}
{{ pimcore_inline_script() | raw }}
Navigation
This helper is responsible for generating and adding a navigation menu. In the next piece of code, you will find an example that prints a menu based on the document hierarchy:
{% set mainNavStartNode = document.getProperty('mainNavStartNode') %}
{% set navigation = pimcore_build_nav({
active: document,
root: mainNavStartNode
}) %}
{# Print tags #}
{{ pimcore_render_nav(navigation) }}
In the snippet, it rendered a menu that starts from mainNavStartNode, which is the root document, and uses the current document as the active one.
You can refer to the official documentation for more information on navigation: https://pimcore.com/docs/pimcore/current/Development_Documentation/Documents/Navigation.html.
include
This helper directly includes a template inside the page. Look at the following script:
{{ include("Default/include.html.twig", {'par':'value'}) }}
This script includes the Default/include.html.twig template, where you can use the set of parameters passed as the input.
Translations
This is a Symfony feature integrated within Pimcore's engine. With the pipe filter, you can transform text using the translations database and replace the original text with the translated version. To do this, do the following:
- Create a document and assign a template to it.
- Add the following snippet to the template:
{% set message ="my-test-key" %}
{{ message|trans }}
This script sets a variable with a string value (my-test-key) and then prints it using the trans filter.
- After the first usage of the label, an entry will be created in your backend, and you will be able to set a value for each language. Go to Tools | Shared Translations. Set the value of the label for each language by entering data into the table:

Figure 8.3: The Shared Translations panel
- Open the web page and see the translated text.
The translation functionality is very useful and easy to manage with its visual interface.
Website config
Pimcore has a bucket of configuration keys that are easily editable via the web interface. You can add them from Settings | Website Settings and then you can insert the value into the template or controller. To do this, do the following:
- Create a document and assign a template.
- Open the website settings administration from Settings | Website Settings.
- Enter a key for your settings in the top editing bar and choose the Text option.
- Click the + button and the value will be displayed in the table. You will be able to edit it just by entering text into the grid. In the next screenshot, you will see the final result. In this example, we added a key called mykey with the value My Value:
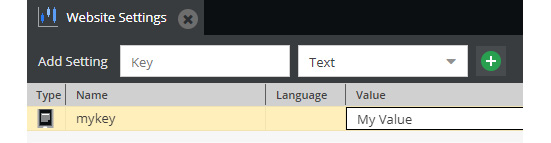
Figure 8.4: The Website Settings panel
- Now add the following snippet to the template:
{{ pimcore_website_config('mykey') }}
Using the preceding code, you will get MyValue as the result of the helper.
The visual editing of settings is very useful because it lets us create configurable templates and websites that can be easily managed centrally.
instanceof
The instanceof construct is useful for checking whether an object is of a given type. In the next piece of code, we will check whether an asset instance is of type Image or not:
{% if item is instanceof('\Pimcore\Model\Asset\Image') %}
{# print the image #}
{% elseif is instanceof('\Pimcore\Model\Asset\Video) %}
{# print the video #}
{% endif %}
This feature is important because you can alter the code flow so it either completes or doesn't complete a task based on the object type. In the previous example, we get an object that could be a video or an image, and we can display it properly based on the type.
Thumbnails
When you are working with images, printing them at the right size is fundamental. The Pimcore thumbnail feature helps a lot with templating. What we can do is to define the asset thumbnails from the administration; you should have already discovered this topic in Chapter 5, Exploring Objects and Classes. Let's see this feature in action in a few simple steps:
- Create a web page and assign a template to it.
- Go to Settings | Thumbnails | Image Thumbnails.
- Add a thumbnail configuration with the settings shown in the following screenshot:

Figure 8.5: The thumbnail settings
We used the PNG format, and we set Scale by Height to 200. Now the images that we will upload will have a proper thumbnail.
- Upload an image into the DAM section. Right-click in the Assets section of the menu and choose the Upload Files option:

Figure 8.6: Uploading an image
- The demo example already ships a Pimcore logo image with ID 2. To get a thumbnail, you just have to get the asset by path or ID, then render it. The next snippet does that. Copy the snippet to the template:
{% set asset = pimcore_asset(2) %}
{{ asset.getThumbnail('MyThubnails').getHtml() | raw }}
The scripts get the thumbnail (the files generated at the first usage) for the image and print the image tag to the document.
- The next example gets an on-the-fly thumbnail without having a configuration defined. Copy this code to the template and see the result:
{{ asset.getThumbnail({
width: 50,
format: 'png'
}).getHtml() | raw }}
This example is quite similar to the previous one but uses settings that are not predefined by a thumbnail configuration.
That whole list of functions covers the set of features that Pimcore offers to us out of the box. In addition, you will have all the default Symfony functions, which you can discover using the official documentation: https://symfony.com/doc/current/reference/twig_reference.html.
But what should you do if neither Pimcore nor Symfony implements what you need? The easier solution, if we are talking about business logic, is to manipulate data inside the controller, and produce a clean output for the view. In some cases, we may need to implement some complex presentation logic that is hard to manage with Twig syntax. Moreover, we do not want to move this logic to the controller (where it will be easy to implement) because it will create coupling between the template and controller, and this is not what we want (do you remember when we talked about the benefits of a detached solution in Chapter 1, Introducing Pimcore?). The solution to the problem of implementing complex presentation logic inside templates is provided in the next section where we will see how to add methods to the template engine and implement reusable helpers for our project.
Implementing your own template helper
In the previous section, we learned how to use template helpers to generate dynamic content. Now it is time to learn how to extend the template helper system and add your own function inside the set. In the next example, we will create a template helper that will display the current date and time in a given format. You may object that the Twig templating already offers a feature more or less like this, but remember that this is an example to explain the template helper extension, so it is better to keep our case study as simple as possible. Now, follow the next steps:
- Create a file in /src/Templating/Helper/Timestamp.php.
- Then copy the following snippet inside the Timestamp.php file:
<?php
…
class Timestamp extends AbstractExtension
{
public function getFunctions()
{
return [
new TwigFunction('timestamp', [$this, 'timestamp']),
];
}
public function timestamp(String $format)
{
echo date($format);
}
}
getFunctions is a special function that lists all the helper extensions exposed from this extension. In our case, we have one function, called timestamp. This function computes a textual date representation based on the format that's received from the user. This function is mapped to a command called timestamp and can be used inside the template engine. For simplicity, I used for the helper name the function that computes the result, but you can choose your own.
- Register the snippet using the YAML configuration. Open the / config/services.yml file and add the following:
Services:
…
AppTemplatingHelperTimestamp:
public: true
tags:
- { name: templating.helper, alias: timestamp}
- Now the timestamp helper is registered inside the templating engine, so we can call it inside our Twig files. Copy the following piece of code:
{{ timestamp("Y-m-d") }}
You will get something similar to 2020-11-03.
In this section, we learned how to add functionality to the template engine. This is good for reusing code and overcomes the Twig syntax limitations. In the next section, we will learn how to master routing rules to connect URLs with controllers.
Mastering Routing and URLs
The last step of mastering custom pages is routing. We learned in Chapter 4, Creating Documents in Pimcore, that each document has a path that can be changed by the document editing interface. What if we are not working with documents, but with custom pages? In this section, we will learn about the options that Pimcore offers, which are the following:
- Hardcoded Routes, as per Symfony standard.
- Static Routes, configurable routes that can be changed by the admin interface.
- Redirects, which can set HTTP redirection using a nice admin interface. For those who are not familiar with redirection, imagine it as a way to redirect the browser from one URL to another. This is very common when a page changes its URL or we have to move a website from one domain to another.
Let's look at them in detail.
Hardcoded routes
To add a route, there isn't anything more complex than adding it to the configuration. These settings are contained inside the routing.yml file, and these rules follow the Symfony standard that you can find here: https://symfony.com/doc/current/routing.html.
In the next code fragment, we can see an example of a rule:
custom_rule:
path: /custom/actionname/{parameter}
controller: AppControllerCustomController:myaction
defaults:
parameter: "my default value"
The most relevant settings for our purpose are the following:
- name: The rule has a name that must be unique; in our example, it is custom_rule.
- path: This is the path that the rule is listening on; this can contain regular expressions and fetch parameters (in our case, parameter).
controller: This is the controller, including the action name; it supports the Symfony syntax. In the case that you write AppControllerCustomController:myaction, you will activate myaction inside the CustomController controller of the application.
- For each parameter, you can give a default value in the case the parameter was optional.
Note that even if we used names with an understandable naming convention, you could define any rule as you want. The parameter inside the URL (or query path) is parsed and delivered to the action.
If you prefer, the second option is to use routing as an annotation of the controller's actions. The equivalent of the previous rule is the following:
/**
* @Route("/custom/actionname/{parameter}", name="custom_ rule")
*/
public function myaction(string $parameter)
{
// ...
}
The routing rule is bidirectional, so it can both produce a URL from the parameter values and give the parameters values from a URL. For example, consider that you have the /product/{id} rule for the product URL. If the user enters /product/5 in the browser, the routing engine is able to tell you that the ID parameter is 5. On the other hand, you can ask the engine to generate a URL for the product with ID 5 and you will get back /product/5. In simple words, you can build the URL automatically from the rule name and parameter. This is easy to do with the path helper:
{{% pimcore_path('custom_rule', {'parameter': 67}); }}
This will generate the full URL, /custom/actionname/67.
Configurable routes
The hardcoded rules used in the previous section are a good solution but are static, and you need access to the source code to understand or change them. The other solution offered by Pimcore is to define them visually, using the admin UI. Under Settings | Static Routes, you can find a table where you can enter all values of a routing rule (including the name, pattern, parameter names, and building rules). This makes rule management very easy and you can monitor how many rules you have and their configuration without accessing the source code.
You can follow these steps to see this method in action:
- Create a controller caller, CustomController.
- Add an action called data into the controller, similar to this:
/**
* @Template()
*/
public function dataAction(Request $request)
{
$input=$request->get('data');
$content = "data to show $input";
return array(
'content' => $content,
);
}
This code will take the data parameter from the URL and will pass it to the view using the content variable.
- Create a view in the controller folder called data.html. Twig and add the following code inside:
{{ content }}
This script will print the content variable.
- Open the Static Routes section, where we can see the Static Routes table:

Figure 8.7: The Static Routes admin
In this editor, we can add rules. Each column lets you set the parameter, so enter the values in the previous figure using the following instructions:
- Name: The name of the rule. Hardcoded case is needed for computing reverse URLs. Enter custom.
- Pattern: The regular expression that matches the URL managed by this rule. It can contain many placeholders, and each one is parsed and saved to a variable. Enter //custom_data/(.*)//. Note that / is for escaping the / char in the regular expression, so a URL such as /custom_data/anything/ will be matched. The parameter matched by the selector (.*) is the anything part.
- Controller: The controller that is used by the URL. Click on the cell and choose CustomController.
- Action: The action that is used by the URL. Click on it and choose data.
- Reverse: The rule that generates a URL from the rule name and parameter. Enter /custom_data/%data/. With this value, the routing engine will be able to generate the URL, /custom_data/value/, if you use use the editable, {{% pimcore_path('custom', {'data': 'value'}); }}.
- Variables: A comma-separated list that is used when fetching parameters. It is positional, so the first regex placeholder value takes the first value in the list, and so on. Enter data. This will mean that the value of (.*) will be named data.
- Defaults: A list with default data for optional parameters. Enter empty. In this case, if the parameter will be omitted, the parameter data will have the text empty as its value.
- Open your browser and navigate to http://localhost/custom_data/myvalue. You will see the myvalue parameter printed on the page.
Similar to the previous example, we can generate a URL using a rule name and parameters with the template helper.
The settings that you edited through the admin UI are saved in a PHP configuration file (var/config/staticroutes.php), so it's also possible to edit the code directly or save them by committing it to a Git repository. The next piece of code shows what we obtained by adding the previous rules:
<?php
return [
1 => [
"id" => 1,
"name" => "custom",
"pattern" => "/\/custom_data\/(.*)?\//",
"reverse" => "/custom_data/%data/",
"module" => NULL,
"controller" => "@App\Controller\ CustomController:dataAction",
"variables" => "data,",
"defaults" => "empty",
]
];
Configurable routes are very useful when you want to keep URL routing flexible, letting the user choose the paths at runtime. This is essential for matching specification changes from the customer about URLs (maybe due to the SEO requirement changes) without touching a single line of code.
Redirects
Redirects are a useful feature of Pimcore for directing the user to the correct pages – whether it be for marketing URLs, for redirects after a website's relaunch, or redirects for moved documents.
The process for creating a redirect is very simple. Just follow these steps:
- Navigate to System | Redirects. This menu opens a table similar to this one:

Figure 8.8: The Redirects table
- Click the Add button. You will be prompted with the following popup:

Figure 8.9: Adding a redirect
The Type dropdown lets you choose the type of redirection, while Source and Target allow you to choose the mapping rule that redirects the source to the target URL.
- Enter //redirect/(.*)/ in the Source box and /custom_data/$1 in the Target box, like in Figure 8.9.
- Open a browser and navigate to http://localhost/redirect/xxx/. You will be redirected to http://localhost/custom_data/xxx/ instead.
In this section, we learned how to create custom web pages using the MVC model. In particular, we covered all the most important topics:
- Controllers: We understood how controllers interact with request parameters and pass data to the view. Inside a controller, we can implement our business logic without any limitations.
- Views: We learned how the template engine works and how we can use the helpers to implement presentation logic.
- Routing and URLs: We learned how to manage the page's URL properly. We didn't limit ourselves to Symfony's standard routing but also covered static routes and redirect options. With all these options, we can choose the right solution based on our use case. The most important thing to know is that this wide set of options give us the power to solve any URL problems that we may face.
In the next section, we will have a deep dive into Pimcore editables and we will learn how to combine them to get results without writing tons of lines of code.
Using editables
As we introduced in Chapter 4, Creating Documents in Pimcore, Pimcore's editables are a set of visual components that can be used to enter information in the CMS page and are able to render the output to get the web page ready. You should remember the pimcore_input and pimcore_wysiwyg components; well, the good news is that Pimcore has a lot of components like that and covers most of your user needs. In this section, we will take a look at these.
Important note
In the Editables list, we should have Area and Areablock components, but we won't discuss these in this chapter. These elements, in conjunction with Bricks, are the pillars of code reuse in Pimcore and will be covered in Chapter 10, Creating Pimcore Bricks. The motivation is that without discovering what bricks are, the Area, Areablock, and Block components would be hard to understand.
In the next sections, we will discover a list of the editables available. For each one, we will add a snippet of code to show you how to add it to your code and, for the more complex items, we also have some screenshots to explain the interaction.
The process for testing an editable in your live Pimcore environment is the following:
- Add a document into your CMS and link the document to a template. This process is well described in Chapter 4, Creating Documents in Pimcore.
- Copy the snippets that you find in the following subsections.
- Enter the page editor and see how the component looks.
- Open page preview and see the data that is saved inside the editable. Remember that by using {{ pimcore_xxx('name') }}, you will print the data, but you can also set it to a variable using {% set var = pimcore_xxx('name') %} and then implement your own presentation logic.
All these examples are contained in the editable.htm.twig template, used in The Editable Pages that you will find in the demo related to this chapter.
Checkbox
The following editable adds a checkbox that can be checked by the page editor:
{{ pimcore_checkbox('myCheckbox') }}
The value can be used to implement some rendering logic (that is, showing or not showing something basing on the myCheckbox value).
Date
This snippet adds a DateTime picker to the web page:
{{ pimcore_date('myDate', {
'format': 'd.m.Y',
'outputFormat': '%d.%m.%Y'
})
}}
When editing the page, you will see an editable DateTime picker like the one shown here:
Figure 8.10: The date picker in action
During the page rendering, when you are not in edit mode, the function outputs the value that the user selected in the editor. This value can be displayed or be used for implementing presentation logic.
Relation (Many-To-One)
This editable provides the opportunity to add a relation to an object. You can select which types of elements you want to add (for example, asset or object) and which subtypes. In the following example, we allowed only classes of type MyObject:
{{ pimcore_relation("myRelation",{
"types": ["asset","object"],
"subtypes": {
"asset": ["video", "image"],
"object": ["object"],
},
"classes": ["MyObject"]
}) }}
This component, once added to the page, is displayed as a simple edit box where you can drag the items that you want to show, as in the following screenshot:

Figure 8.11: Relation configuration
Then the relation named myRelation will contain your selection value, and you can use it in the template for rendering data.
In the following example, we will add a Link button that navigates to the selected item:
<a href="{{ pimcore_relation("myRelation").getFullPath() }}">{{ "Go to" }}</a>
The previous snippet will display a link in the text.
Relations (many-to-many relation)
This editable is like the many-to-one relation but allows you to select references to multiple other elements (such as documents, assets, and objects). The following snippet is the same as the previous use case, but because this editable has multiple references, we used a for loop to list all the selected options:
{% if editmode %}
{{ pimcore_relations("objectPaths") }}
{% else %}
<ul>
{% for element in pimcore_relations("objectPaths") %}
<li><a href="{{ element.getFullPath }}">{{ element.getTitle }}</a></li>
{% endfor %}
</ul>
{% endif %}
Now we can drag and drop multiple items:
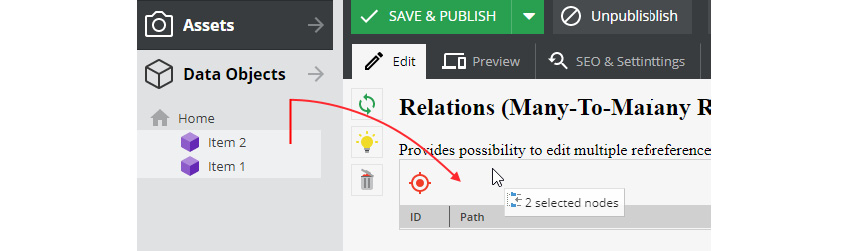
Figure 8.12: Relation configuration
The result of the selection is shown in the following table:

Figure 8.13: Relations in edit mode
With the data in our sandbox, we will have something like this:

Figure 8.14: The output of relations
Image
This editable gives you a widget where you can upload an image. If you drag a file from the asset folder and drop it on the component, the image will be displayed. The advantages compared with the Relation component are that the image is easier to use and integrated with the thumbnail system.
The next piece of code allows you to upload an image:
{{ pimcore_image("myImage", {
"title": "Drag your image here",
"thumbnail": "myThumbnails"
}) }}
You can upload images or drag and drop them to the widget as shown in the following screenshot:
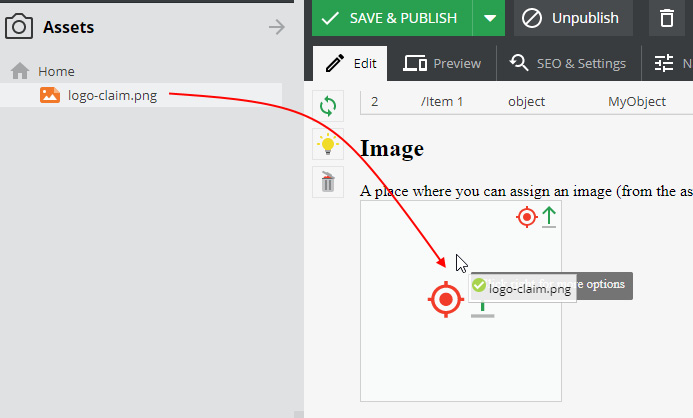
Figure 8.15: Image configuration
Input
Input allows the user to input a single line of text, and we can use the input for rendering HTML:
{{ pimcore_input("myHeadline") }}
We used it in Chapter 4, Creating Documents in Pimcore; there isn't anything more to add about this editable.
Link
This is a component for rendering a link:
{{ pimcore_link('blogLink') }}
The following screenshot shows the link in edit mode:
Figure 8.16 – The link component in edit mode
The component comes out with two buttons: the folder that opens the selected link, and the edit button (pencil icon) that opens the settings form. The next screenshot shows the popup and the parameters available for a link:
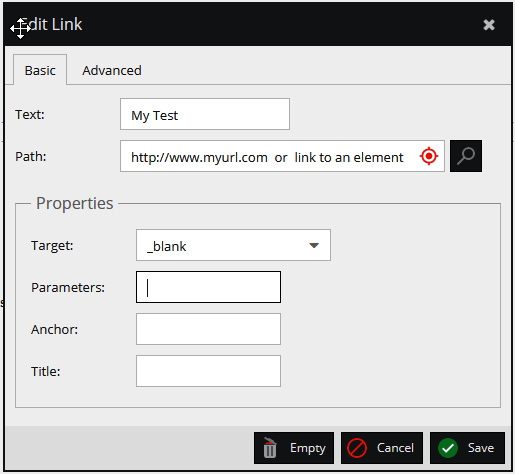
Figure 8.17: Link configuration
Once completed, the result is an HTML link with the text and the destination provided.
Select
This snippet adds a select component that lets the user choose between a set of items. The following snippet shows how it works:
{% if editmode %}
{{ pimcore_select("myItem", {
"store": [
["option1", "Option One"],
["option2", "Option 2"],
["option3", "Option 3"]
],
"defaultValue" : "option1"
}) }}
{% else %}
Your choice:{{ pimcore_select("myItem").getData() }}
{% endif %}
The store parameter contains a list of arrays. Each item is composed of an array of two elements: the first is the key, the second is the value. The defaultValue setting configures the default value for the selected list item.
This is what is shown in edit mode:

Figure 8.18: Select configuration
Multiselect
The Multiselect component is very similar to the Select one, but it allows multiple choices:
{{% pimcore_multiselect("categories", [
"width" => 200,
"height" => 100,
"store" => [
["cars", "Cars"],
["motorcycles", "Motorcycles"],
["accessories", "Accessories"]
]
]) %}}
This is what is shown in edit mode:

Figure 8.19: Multiselect configuration
Numeric
This editable is like the Input one, but specifically for numbers:
{{ pimcore_numeric('myNumber') }}
This is what is shown in edit mode:

Figure 8.20: Numeric editor
And in edit mode, it returns the number chosen.
Renderlet
The Renderlet is a special container that is able to render an object. It uses a controller and an action to process the selected items, and the resulting HTML is provided to the user:
{{
pimcore_renderlet('myGallery', {
"controller" : "App\Controller\ CustomController::galleryAction",
"title" : "Drag an asset folder here to get a gallery",
"height" : 400
})
}}
In this case, we need some extra steps to test it. Follow the next steps:
- Add a template file inside the /app/Resources/views/Default folder called gallery.php, and add the following code to render your data:
{% if assets %}
{% for asset in assets %}
{% if asset is instanceof(
'\Pimcore\Model\Asset\Image') %}
<div style="border: 1px solid red;
width:200px; padding 10px;
margin:10px;">
{{ asset.getThumbnail(
'MiniIcons').getHTML()|raw}}
</div>
{% endif %}
{% endfor %}
{% endif %}
- Add an action to the default controller with the following code:
/**
* @Template()
*/
public function galleryAction(Request $request)
{
$result=array();
if ('asset' === $request->get('type')) {
$asset = Asset::getById($request->get('id'));
if ('folder' === $asset->getType()) {
$result["assets"] = $asset- >getChildren();
}
}
return $result;
}
- Then add a Renderlet editable into the page with the following configuration:
{{
pimcore_renderlet('myGallery', {
"controller" : "App\Controller\ CustomController::galleryAction",
"title" : "Drag an asset folder here to get a gallery",
"height" : 400
})
}}
This configuration tells Pimcore to use the action galleryAction from the Default controller to render the data.
- Drag and drop a folder into Renderlet; this is what is shown in edit mode:
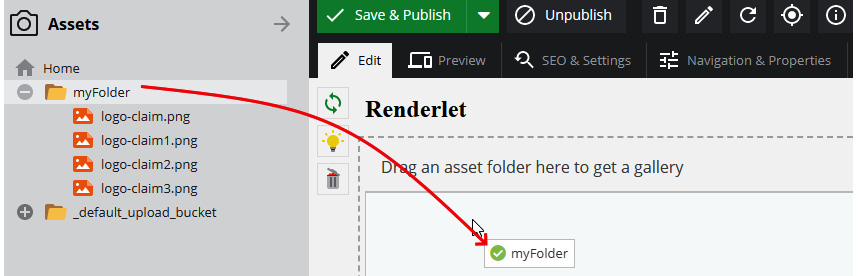
Figure 8.21:Dragging a folder to Renderlet
View the page as a normal user and see the result of your template:
Figure 8.22: Output with the sample template
Snippet
This component is used to include a document or snippet (a special document type) inside the document; this is useful for reusing scripts or pieces of the website on your page:
{{ pimcore_snippet("mySnippet", {"width": 250, "height": 100}) }}
Once you have entered the code, this is how to add a snippet to the web page:

Figure 8.23:Configuration of the snippet control
And this is what you will see as a website user:

Figure 8.24: The output of the snippet control
In the previous screenshot, the text I'm the default template comes from the snippet.
Table
This editable creates a table and lets the editor define the data inside of it. You can specify the default number of columns (cols) or rows (rows). You can also add a matrix of data (array of array) into the data parameter. The user will be able to add rows and columns by itself. Here is an example of the editable:
{{ pimcore_table("productProperties", {
"width": 700,
"height": 400,
"defaults": {
"cols": 3,
"rows": 3,
}
})
}}
This is the resulting editor interface:
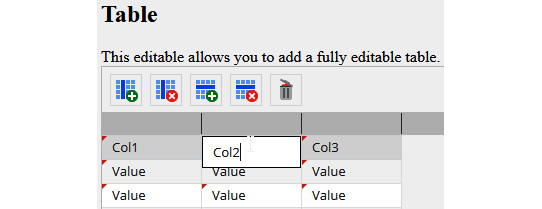
Figure 8.25: Configuration of the table control
And this is the default rendering result:

Figure 8.26: Table output
The previous figure doesn't look nice because the component outputs a simple HTML table without any styles. Of course, based on your CSS theme, you can apply all the styles you want to make it coherent for your website design.
Textarea
This is very similar to the Input editable but uses a Textarea component instead:
{{ pimcore_textarea("myTextarea",
{"placeholder": "My Description" })
}}
Video
This editable allows you to insert movie assets into your page content. It is very similar to the image component but works with video. You will need to add the following snippet to activate it:
{{ pimcore_video('campaignVideo', {
width: 700,
height: 400
}) }}
Then you will be able to define the source (local assets or an external link) and fine-tune some options:
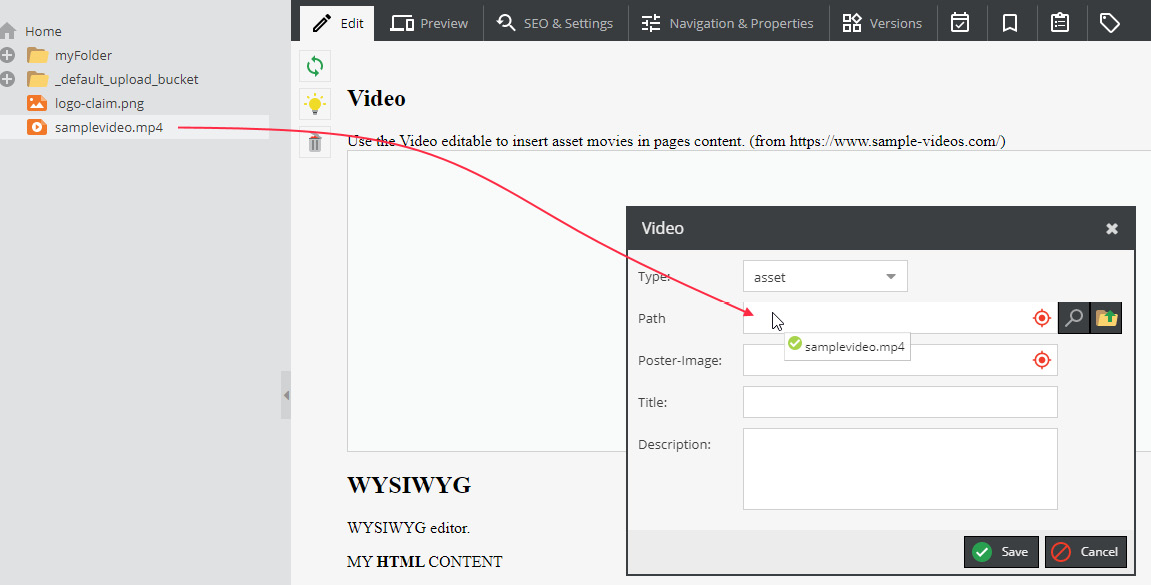
Figure 8.27: Video control
On the web page, you will see it inside a video player as in the following screenshot:

Figure 8.28: Video control output
The video editable is a very powerful solution for letting the user be autonomous in terms of uploading and managing videos without asking for help from a developer.
WYSIWYG
This WYSIWYG editor is used for entering HTML content. In the next piece of code, there is a sample of editable usage:
{{ pimcore_wysiwyg("specialContent") }}
We used it in Chapter 4, Creating documents in Pimcore; there isn't anything more to add.
In this section, we saw an overview of the most important editables. Using them as base components for the web pages that we create gives us absolute power to customize any aspect of our HTML. Moreover, with this large set of options, cases when you need something more than adding input for the user and then templating the data that you collect are very few. Generally speaking, you do not have to code to satisfy the customer's needs but just template the pages.
For more information about editables, you can consult the official documentation at the following URL: https://pimcore.com/docs/pimcore/current/Development_Documentation/Documents/Editables/.
In the next section, we will discover the usage of blocks, which are simple tools that help to create dynamic pages.
Using blocks
Pimcore blocks are a very clever system for iterating parts of a page. For example, if you have a standard page composed of horizontal bands or titled paragraphs, you can define a piece of HTML that explains how each item should look and let the user add as many items as they want. As another example, you can define a block composed of an H2 title and text, and this will create many titled paragraphs on your web page. Alternatively, you could use a block with an image and create a gallery iterating the blocks. Moreover, you can also manage the visibility of blocks by scheduling their publication.
Regular Blocks
pimcore_iterate_block can return the list of blocks. All the code that is wrapped inside the for loop can be replicated as many times as the user wants.
The difference between a block iteration and a regular for loop is that in the case of a block, the user defines how many items they want, and all the data input inside the editables is persisted.
The syntax for defining a block is very easy and we can see in the next snippet the usage of the previously mentioned functions:
{% for i in pimcore_iterate_block(pimcore_block('block name')) %}
My content
{% endfor %}
In the next example, we will see a block in action that iterates over a small template with a header and text that builds a web page with titled paragraphs:
- Create a page and link the page with a template, as we have done many times before. If you have any doubts, just refer to Chapter 4, Creating Documents in Pimcore.
- Copy the following snippet into the template:
{% for i in pimcore_iterate_block(pimcore_block('contentblock')) %}
<h2>{{ pimcore_input('title') }}</h2>
<p>{ pimcore_wysiwyg('content') }}</p>
{% endfor %}
- The template part is composed of a title, surrounded by a H2 tag and a paragraph. In the next screenshot, you will see the result of our code in edit mode before adding the blocks:

Figure 8.29: Adding a block to the list
- Go to the page editor and click the green + icon to add one block to the block list. Now the block is visible in the editor and you will be able to enter data. You can add as many blocks as you want; you will be able to edit them one by one in the backend.
- Now enter data into the editables. In this example, I put My first item as the title and value inside the long text. The output will be something like the following screenshot:

Figure 8.30: Editing the element in the block list
- Iterate this for as many blocks as you like.
The final result will look like this on the web page:

Figure 8.31: The result after adding more elements
Scheduled Blocks
The scheduled block component is very similar to the block, but it has the option to define an expiration date for the contents. The syntax is the same, as you can see in the next snippet:
{% for i in pimcore_iterate_block(pimcore_scheduledblock('block')) %}
<h2>{{ pimcore_input('blockinput') }}</h2>
<p>{{ pimcore_image('myimage') }}</p>
{% endfor %}
The process for testing this snippet is exactly the same as the standard block that we saw in the previous section.
In the next screenshot, we will see the edit mode for the scheduled block, where we have a DateTime picker near the green + icon that allows the user to define when the content will expire:
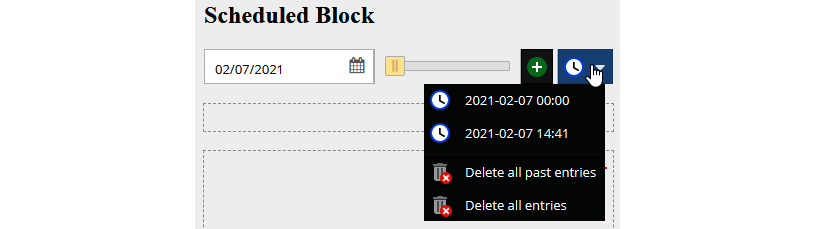
Figure 8.32 – Editing a scheduled block
The block engine is a very powerful system that allows a lot of opportunities for making dynamic pages easily editable by the user. We will appreciate this feature more in Chapter 10, Creating Pimcore Bricks, when we will use blocks in conjunction with bricks to create fully dynamic templates. Anyway, what we have learned so far is very interesting: we can give the user the opportunity to manage a repetitive template with a well-structured approach.
Summary
In this chapter, we learned all the information needed for creating a custom CMS page. We gained an understanding of the MVC model, and we had a deep dive into the templating engine of Pimcore, discovering all the helpers and how to create our own. We also learned how to write backend code in the controller and make it work by defining routing rules. We saw that there are many ways to manage URLs in Pimcore (Hardcoded, Static Route, and Redirect) and they cover all the use cases for a website. Then we had a complete overview of editables, which left us able to master any custom web page just by templating it. Finally, we discovered the block system that allows the iteration of pieces of a template by giving the user the opportunity to manage repetitive patterns in web pages.
This was an intense chapter that provided us with full knowledge of custom CMS pages. What we learned here will be very useful in the next chapter, Chapter 9, Configuring Entities and Rendering Data, where we will use it to render web pages for implementing a simple blog engine.