Chapter 9: Configuring Entities and Rendering Data
In the previous chapter, we learned how the model-view-controller (MVC) development pattern works and then learned what views and model controllers are. We have also seen how the Pimcore routing system works and how to create relationships between elements. Finally, we saw how to modify the content of our entities, adding images, text, and date fields.
In this chapter, we're going to create a blog, and we will cover the following topics:
- Defining blog classes
- Creating blog Users and Roles
- Routing
- Editing the Controller for our blog
- Rendering blog views
- Differences between Pimcore and WordPress
By the end of this chapter, we will have built our first blog with Pimcore, with articles grouped by categories and authors. We will have also learned how to create suitable templates for each page, inserting the necessary code to display the content created.
Technical requirements
As with the previous chapters, there is a demonstration that you can find on our GitHub repository, which you can access here:
https://github.com/PacktPublishing/Modernizing-Enterprise-CMS-using-Pimcore/
All you need to do to run the demo connected with this chapter is to navigate to the Full Demo folder and start the Docker environment.
To read this chapter, the only requirement is to have an up-and-running Pimcore installation and be able to access it via the command line.
If you have installed Pimcore with Docker, just run these simple instructions:
- Run Docker with the following command:
docker-compose up
- Restore the local installation settings by running this command:
docker-compose exec php bash restore.sh
- Navigate to http://localhost/admin and log in with your admin/pimcore credentials.
You are now ready to put into practice all the aspects related to this chapter.
Defining blog classes
As we said, a blog is made up of articles and categories, so the first step we need to do is to create two classes relating to these. In addition to these two classes, we have to create a third class: BlogAuthor.
All the field types that we are going to use in our classes have already been seen and described in depth in Chapter 5, Exploring Objects and Classes, so what interests us in this chapter is to define them with their name and type.
The only new element we use is the slug field, which for this reason we will briefly describe.
A slug is a part of a Uniform Resource Locator (URL) that identifies a particular page on a website in an easy-to-read way. In other words, it's a part of a URL that explains a page's content—for example, for a URL of https://demo.pimcore.fun/slug, the slug simply is /slug.
Using a slug thus allows us to identify a page through a readable and more identifiable text, compared—for example—to its numeric identifier (ID). Furthermore, this improves the indexing of a page by search engines, which prefer text-based URLs rather than URLs with numbers.
Let's take a look at each class we plan to create now.
Defining a BlogArticle class
The BlogArticle class is where we will generate articles for our blog. The creation of this class has already been discussed in Chapter 4, Creating Documents in Pimcore; the fields in the following list are standard for any article, but nothing prevents you from adding more as needed:
- Title: An input field
- Content: A what you see is what you get (WYSIWYG) component
- Category: A many-to-one relation of the BlogCategory class
- Slug: A slug field
- Author: A many-to-one relation with the BlogAuthor class
- Image: An image component
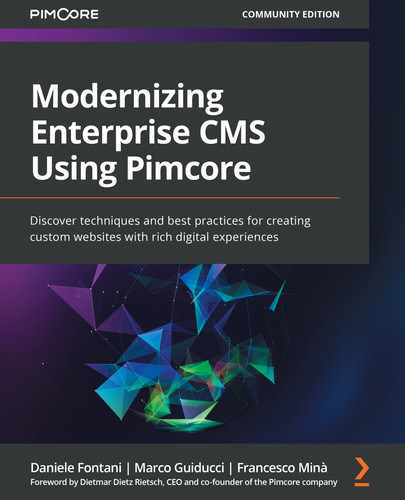
Let's jump directly to what our created class will look like. For convenience, we have grouped the fields in tabs, to make data entry more linear. In the next screenshot, here's what the newly created class looks like:
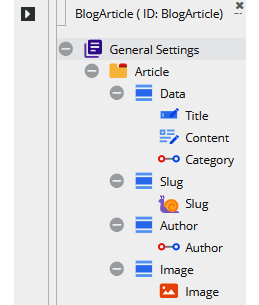
Figure 9.1: BlogArticle class
As you can see in the preceding screenshot, all fields are organized and are easy to recognize thanks to their respective icons.
Defining a BlogCategory class
The category class is relatively simple—it is, as we said, a container of articles. It is used to group articles by topic, so only a few simple fields will be needed, as follows:
- Title: An input field
- Slug: A slug field
- Description: A text-area field
- Image: An image component
We will see how to link articles with categories in the Putting it all together section.
Defining a BlogAuthor class
As we said, an article is written by a person—or user, in computer terms—so, each article will have an author; that is, it must be associated with the user who wrote it. And in fact, in the Article class, we created an Author relationship field for just that.
In Pimcore, on the other hand, user management is minimal and does not allow us to extend the user directly. Instead, it allows us to create a relation between a user and one or more Pimcore objects. This can be used to add information to a user or to associate one or more objects directly with a system user.
To do this, we then create an additional class, BlogAuthor, so that we can extend the Pimcore user with other properties, such as FirstName and LastName, a photo, and a biography.
The BlogAuthor class is composed of the following fields, whose names are already self-describing:
- FirstName: A text field
- LastName: A text field
- User: A user field
- Slug: A slug field
- Bio: A text-area field
- Photo: An image component
- User: A user field
A small clarification should be made for the User field. This field uses a component of Pimcore—the User type. In the next screenshot, we thus see what the User field looks like:
Figure 9.2: User type field
As you can see from the preceding screenshot, the configuration is not particularly complicated, and in fact, the only fields that we can populate will be the name and title of the field itself.
When creating an object instance of the member class, you can see the input widget for the user property. This is a combo box where a user can be selected from all available Pimcore users. Let's see how to associate an author with a Pimcore user. The following screenshot illustrates the process:

Figure 9.3: Linking author to Pimcore system use
In this example, the user Bob was selected.
Now that we have created all the necessary classes for our blog, we still have to configure Pimcore with the users and roles necessary to ensure that the articles can be associated with their respective authors.
Creating blog Users and Roles
The creation of users and roles has already been explained in Chapter 7, Administrating Pimcore Sites, so we just have to go back to the notions learned in that chapter to create the necessary users and roles.
For this example, we can create two users, our dear Bob and Tom (our authors), and an author role to be assigned to our users.
Creating an Author Role
First, we will create a role for the authors. The role configuration is shown in the next screenshot:
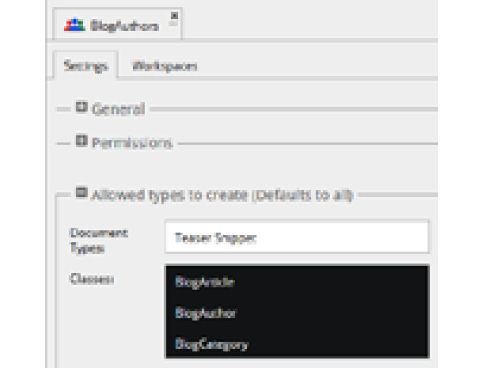
Figure 9.4: BlogAuthor role configuration
As you can see from the preceding screenshot, we have assigned the creation permission for the three classes of the blog: BlogArticle, BlogCategory, and BlogAuthor. This is because we need to allow users who are part of this role to manage these objects. In the Permissions section (which in Figure 9.4 is compressed for reasons of space), we have selected the following items: Assets, Classes, Objects, and Users. This will allow users to upload images for their articles, and view the categories and articles created.
A final configuration for the role, as you can see in the next screenshot, is the permissions for each class inside the Workspaces tab:
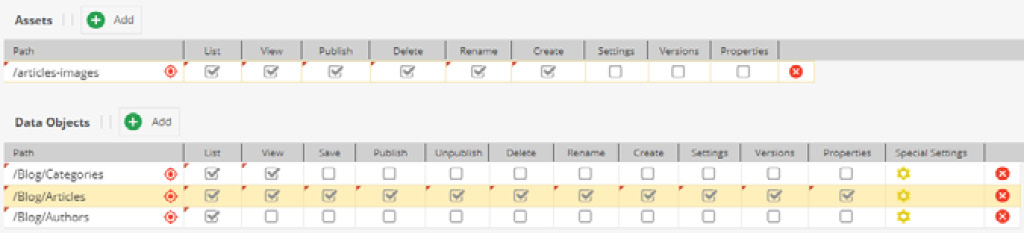
Figure 9.5: BlogAuthors role workspace configuration
As you can see in the preceding screenshot, which represents the configuration of the role for each class, it will be necessary to set the permissions for users—in particular, for the possibility of creating articles, uploading or selecting images, or being able to see a list of authors and categories.
Creating Users
Now that the configuration is complete, we can move on to create the actual entities, based on the classes we created.
First, we need to create users Bob and Tom and assign them the author role. We have already learned how to create users and roles in Chapter 7, Administrating Pimcore Sites, so all we have to do is repeat the same operations already done.
Once that's done, let's create authors. The creation of an author, as well as an article or a category, is done from the Pimcore interface, in the Data Objects section.
For convenience, we have grouped the created objects into folders and subfolders, as you can see in the next screenshot:

Figure 9.6: List of data objects and author Bob configuration
As you can see in the preceding screenshot, we have created three folders that must contain the objects we are going to create. In particular, the Blog/Authors folder will contain all the authors we will create, the Blog/Categories folder will contain all the blog categories, and the Blog/Articles folder will contain all the articles written by the authors.
In Figure 9.6, we can also see that the User field is a selection box, where it is possible to associate a user, and in our case, we have selected the system user Bob. We then finished filling in the FirstName, LastName, Slug, and Photo fields and completed a short biography in the Bio field. These fields will be displayed on the author page.
Putting it all together
Once we have created classes for the blog, user, and author, we need to create data objects to represent on the pages: categories and articles. The creation of objects has already been seen in detail in Chapter 4, Creating Documents in Pimcore, and Chapter 5, Exploring Objects and Classes, so it will not be necessary on this occasion to go into detail on how to do this. For our blog, however, we have created author categories and also uploaded the necessary images for the categories and articles. In the following example screenshot, we see the creation of a first article, with the necessary information and relationships:
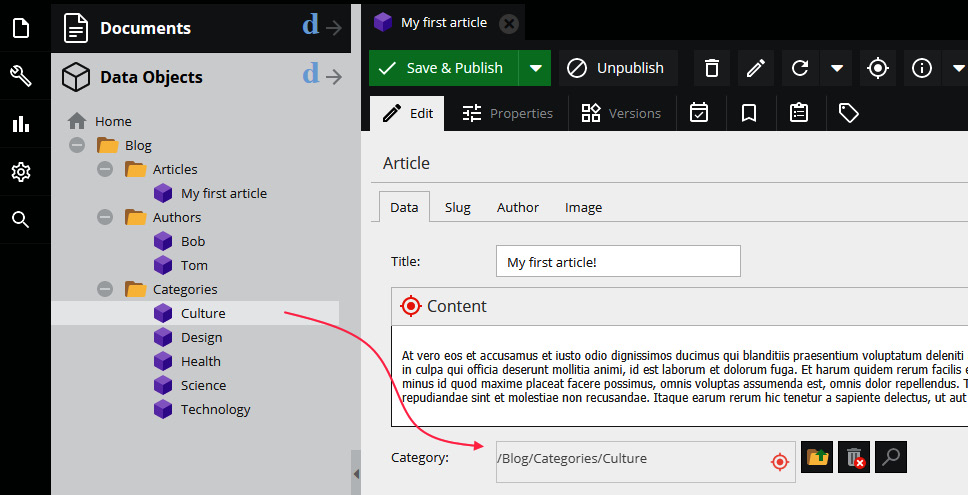
Figure 9.7: Creating our first article
As you can see in the previous screenshot, all the elements have been created, and therefore it is possible to create an article and assign it an author, a category, and an image previously loaded into the asset. The arrow drawn in Figure 9.7 identifies the drag-and-drop operation of the category in the Category field of the article. The same drag-and-drop method can also be used to link the author and image to the corresponding fields in the article.
It is also possible to see how we have grouped objects and assets in different folders. Organizing the directory structure is not mandatory, but it certainly helps to keep the objects we create grouped by type. As you can see from the next screenshot, it is possible to create folders to organize our items by right-clicking on Home or any other folder already created:

Figure 9.8: Creating our first article
In the preceding screenshot, you see how we organized our folders, starting from the Blog folder, and inside it creating folders for articles, authors, and categories.
The next step we must do is define the rules for navigation around our blog—or, in other words, the routing.
Routing
Routing is a key part of setting up our blog and was discussed in detail in the previous chapter, Chapter 8, Creating Custom CMS Pages. We will therefore go on to create hardcoded routes, going directly to the routing.yml file to modify this.
Let's create a set of rules that are needed in order to identify articles, categories, and author pages. In addition, we want pages to be accessed by using either our ID or our slug.
As an example, we report the two routing rules related to the article, in this following piece of code:
blog_article_by_id:
path: /blog/article/{page}
controller: BlogBundleControllerBlogController:articleAction
requirements:
path: '.*?'
page: 'd+'
blog_article_by_slug:
path: /blog/article/{page}
controller: BlogBundleControllerBlogController:articleAction
requirements:
path: '.*?'
page: '[w-]+'
As you can see in the preceding code snippet, we have defined a path for the display of an article, and we have also set the controller and the parameters needed to identify the article by the ID (blog_article_by_id) or by the slug (blog_article_by_slug).
By analyzing the two rules, we can see that they differ only in the path parameter. In the case of the rule to identify the article by ID, in the path we have to search for an integer, which is the ID of the article. This is possible through the use of regular expressions (regexes). The regular expression that filters an integer is d+. In the case of the rule that identifies the page through its slug, we must identify a string, and to do this we use the regex defined as [w-]+. This last regex filters all strings composed of words, divided by the minus sign.
Important note
A regular regular expression, also called a regex is a method of matching patterns in text—for example, a regular expression can describe the pattern of email addresses, URLs, telephone numbers, employee identification numbers, social security numbers, or credit card numbers, and of course routes to pages on a site. The use of regular expressions is standard practice in many system and scripting languages. Regular expressions can be simple or very complex. There are hundreds of guides on the subject, easily available on the internet, simply by looking for regex on any web search engine.
We have seen how the rules for articles are defined. The routing.yml file also contains routing rules for categories and authors, which are defined in exactly the same way, except for the actions to be called on the BlogController controller.
Now that we have completed the routing configuration, we must create actions on the controller so that our pages can contain and display the data that interests us.
Let's go now to see how BlogController and its actions are written, which we have up to now seen in the routing rules.
Editing the Controller for our blog
Everything about the controller has been explained in the previous chapter, Chapter 8, Creating Custom CMS Pages, and therefore in this chapter, we limit the scope to just see which changes we need to make for the blog to work properly.
What we are interested in doing now is to create actions that correspond to the rules we have just finished configuring in the previous section. In fact, if we look at the configuration, we can see that the Controller field contains the name of the bundle (BlogBundle), followed by the Controller keyword, followed by the name of the controller (BlogController). The last part is the name of the action (articleAction) to be called when the browser URL matches the routing rule.
To clarify these ideas, imagine we write this URL in our browser: https://myblog.com/blog/article/my-first-article. We uniquely identify a blog_article_by_slug rule. This rule, written in the configuration, indicates that the articleAction action is called in the BlogController controller of the BlogBundle bundle. So, with the URL that we have just written, we have identified an action that is called, which is the ArticleAction action. So, let's see how this action is written.
Action for an article (ArticleAction)
As we have just mentioned, this action is called when the URL identifies the route that must display an article, by the ID or the slug. The first thing to do, therefore, will be to retrieve the article, based on the input parameter, as illustrated in the following code snippet:
/**
* Get detail of article. route: /blog/article/id|slug
* @Template()
*/
public function articleAction(Request $request,$page) {
if (intval($page)) { // by id
$article = DataObjectBlogArticle::getById($page);
}
else { // by slug
$slug = UrlSlug::resolveSlug("/$page");
if ($slug instanceof UrlSlug) {
$id = $slug->getObjectId();
if (intval($id) && $id > 0) {
$article = DataObjectBlogArticle::getById($id);
}
}
}
if ( !( $article instanceof DataObjectBlogArticle || $article->isPublished() ) ) {
// article not found, redirect to blog
return $this->redirect('/blog');
}
return $this->renderTemplate(
'@Blog/Blog/article.html.twig',array(
// get all categories for widget
'categories' => $this->getAllCategories(),
'article' => $article
));
}
As you can see from the preceding code snippet, the articleAction function takes two parameters: request and page. The page parameter is what interests us, to understand whether we have an ID or a slug in the URL.
First of all, we need to check whether the input parameter in the $page variable is of the integer type and retrieve the value it represents. To read an integer from a string, we can use the intval function of the PHP language, which gets the integer value of a variable. If the intval function returns us an integer value, it means we have an ID. To retrieve an object through its ID, you can use the getById function, which Pimcore makes available in all objects. If instead, the $page variable is not an integer, then free text has been entered in the URL, which can be the slug of the article. We must then retrieve the object ID via the slug, and once retrieved, we are able to retrieve the object via its ID, exactly as we have just done.
Once the object has been retrieved, we verify that it is an object of type article. This is done with the following if statement:
if ( !( $article instanceof DataObjectBlogArticle || $article->isPublished() ) ) {
The first part, the instanceof construct, is useful for checking whether an object is of the BlogArticle type; the second part of the if statement uses a specific Pimcore function, isPublished(), which checks whether the document is published. At this point, if everything is correct, we just have to call the RenderTemplate function, a function that accepts two parameters: first, the path of the Twig template file, and second, an array of objects to pass to the view. In our example, we passed the path to the article page template (@Blog/Blog/article.html.twig) and an array with the two objects necessary for rendering the page view: the article and the list of categories (we will see shortly how to use these variables in the view). For further details on how the MVC pattern works, and about the passage of data from routing to the controller and from the controller to the view, please read Chapter 8, Creating Custom CMS Pages.
Other Actions
We have just seen how to write an ArticleAction action, linked to the routing rules. The other rules that are present in the routing.yml file, which identify the categories and authors, will have their actions, which are written exactly like the action article just seen.
Inspecting the BlogController code, we can easily see that all actions have the same structure because they perform the same operations. The purpose of these operations is to identify an object by its ID. The only thing that changes is the object that is recovered, which in one case is the article, in another the category, and in yet another, the author.
Since the code for each action is very similar between actions, it is not necessary to see in detail the other actions, but we only report a list of actions that must be present in the controller, outlined as follows:
- blogAction
- articleAction
- categoryAction
- authorAction
All the files used for this demo—such as routing.yml, BlogController.php, and all the *.html.twig files of the views—can be downloaded from our Git repository related to this book: https://github.com/PacktPublishing/Modernizing-Enterprise-CMS-using-Pimcore/.
We have seen how routes are defined and what the actions related to them are within the controller. Now, let's go through the files and the code needed to view the data we have recovered in this section.
Rendering blog views
Once we have identified which page a visitor requested, through the routing rules seen before, and after the data has been extracted and passed to the view through the controller, it remains for this to be displayed correctly on the page. In Pimcore, this can be done using a templating system called Twig, which as we said in Chapter 4, Creating Documents in Pimcore, is the solution with which Pimcore keeps the business logic separate from the presentation logic.
Briefly, Twig is a modern template engine for PHP supported by Symfony (and therefore by Pimcore) that allows you to process code directly in the view page, through its own syntax. The official page of the project, from which it is possible to read the complete documentation, can be reached here: https://twig.symfony.com/.
The template is useful and necessary because it is possible to create a single view for different content. In other words, the templating allows us to create a single HTML page to view all the articles of our blog, whether they are a few or in the millions. The view of the page will be the same for everyone—only the content will change. This saves us from having to create a page for each article, which would be a long and useless job.
So, there are four templates we need to create, as follows:
- blog: This is the main page of the blog, which will contain a list of categories.
- category: This is the category page, which will contain all the articles under this category.
- article: The actual article page, where the user can read the article content.
- author: A page containing information about the author, with a name and photo, and a list of their articles.
We will talk about these four templates shortly; however, first, we will mention how the pages were created in HTML and Cascading Style Sheets (CSS).
Stylization and layout of HTML pages with Bootstrap
Before talking about the blog template page, we need to understand how the pages were made. The pages were written in HTML, with some Twig code snippets, while using Bootstrap for graphic styles and layouts. Bootstrap is a collection of graphic, stylistic, and layout tools that allow you to have a large number of features and styles that can be modified and adapted according to your needs. You can learn more about this framework on the official project page here: https://getbootstrap.com/.
The main component of Bootstrap is the Grid System. This component allows you to create layouts, dividing the space into rows and columns. These layouts will be the starting point for building our template. In addition to the classes for creating a layout, Bootstrap provides a set of CSS classes that stylize the elements of the HTML, such as titles, paragraphs, tables, buttons, and so on. Then, there are the other JavaScript components—that is, elements such as drop-down menus, tab interfaces, tooltips, alerts, accordion menus, sliders, and navigation banners.
After this brief but necessary introduction to Bootstrap, let's get back to our blog. Using the Bootstrap system grid, we have created some layouts, dividing the pages into columns. In the next screenshot, you can see the three types of layouts we used:

Figure 9.9: Template layouts
As you can see, we have three different layouts for the page, outlined as follows:
- In the first layout, the content has not been divided, and therefore we have a column that occupies twelve-twelfths of the space.
- In the second layout, the content has been divided into two columns—one with four-twelfths of space and the other with eight-twelfths.
- In the third layout, as in the previous layout, the content is divided into two columns of different sizes, but in reverse order compared to the second layout.
We used the first layout with no division for the main blog page, the second with the small column on the left for the author page, and the third for the article and category pages.
Let's see how this was done in the HTML page. To make the layout, we used Bootstrap classes to define the size of the columns. For the first layout, we have the following:
<!-- Page Blog Content -->
<div class="container">
<div class="row">
<!-- Post Content Column -->
<div class="col-lg-12">… here the content
</div>
</div> <!-- row -->
</div> <!-- container -->
For the second layout, we have the following:
<!-- Page Content -->
<div class="container">
<div class="row">
<!-- Post Content Column -->
<div class="col-md-4">… here the content
</div>
<!-- Sidebar Widgets Column -->
<div class="col-lg-8">… here the content
</div>
</div> <!-- row -->
</div> <!-- container -->
Finally, for the third layout, we have the following:
<!-- Page Content -->
<div class="container">
<div class="row">
<!-- Post Content Column -->
<div class="col-lg-8">… here the content
</div>
<!-- Sidebar Widgets Column -->
<div class="col-md-4">… here the content
</div>
</div> <!-- row -->
</div> <!-- container -->
In this section, we have briefly but clearly seen how the layouts for our template were created. In the next section, we will see how to write the code inside the view files that make up our template.
Templating
The template files are *.html.twig files, and with Twig, we are able to insert the data coming from the controller. The layout and graphic style part is done via Bootstrap, as we saw in the previous section. We can report the four templates we have already defined as the following list, with the route to which they respond and the corresponding template file:
- Blog:
- Route: /blog
- Twig file path: BlogBundle/Resources/views/Blog/blog.html.twig
- Category:
- Route: /blog/category/{page}
- Twig file path: BlogBundle/Resources/views/Blog/category.html.twig
- Article:
- Route: /blog/article/{page}
- Twig file path: BlogBundle/Resources/views/Blog/article.html.twig
- Author:
- Route: /blog/author/{page}
- Twig file path: BlogBundle/Resources/views/Blog/author.html.twig
So, let's see how a complete template is made. As an example, we will take the template of the article.
Inspecting the Article view
In order to understand how the template was made, the best thing is to report the code and describe the parts one piece at a time. So, let's start with the complete template code of the article.html.twig file, as follows:
{% extends '@Blog/Layout/layout.html.twig' %}
{% block content %}
{% include '@Blog/Layout/header.html.twig' %}
<!-- Page Content -->
<div class="container">
<div class="row">
<!-- Post Content Column -->
<div class="col-lg-8">
<!-- Title -->
<h1 class="mt-4">{{article.getTitle()}}</h1>
<!-- Author -->
<p class="lead">
by <a href="/blog/author{{article.getAuthor(). getSlug()[0].getSlug()}}">{{article.getAuthor(). getFirstName()}}</a>
</p>
<hr>
<!-- Date/Time -->
<p>Posted on {{article.getModificationDate() | date("F jS \a\t g:ia") }}</p>
<hr>
<!-- Preview Image -->
<img class="img-fluid rounded" src="{{article. getImage()}}" alt="">
<hr>
<!-- Post Content -->
{{article.getContent() | raw}}
<hr>
</div>
<!-- Sidebar Widgets Column -->
<div class="col-md-4">
{% include '@Blog/Widget/widget.html.twig' %}
</div>
</div>
<!-- /.row -->
</div>
<!-- /.container -->
{% endblock %}
Let's start with the first line: the extends command indicates to Twig that the page extends the page identified by the @Blog/Layout/layout.html.twig path. Extending a page is like saying that the current page is somehow included within the page it extends. In this case, the layout.html.twig file contains the definition of the block content that we find in the article.html.twig file we are analyzing. We've already talked about blocks in Chapter 4, Creating Documents in Pimcore, so we can go further and describe the next lines.
Immediately after the start of the content block, we have another include statement, which is used to load the content of the @Blog/Layout/header.html.twig file. In this file, we find the HTML for the construction of the site header—that is, the image at the top and the title.
Scrolling the file, we see the data relating to the article in the main column: this data is retrieved through the getTitle(), getAuthor(), getModificationDate(), getSlug(), and getImage() functions. These elements are rendered using Twig commands, which we will see in more detail in the next section of this chapter. However, we can see how all the data is extracted from the article variable, which as we recall was passed to the view by the controller in the RenderTemplate command.
The other templates differ slightly from this one just seen, and therefore we will not describe them, but all the files are available in the repository related to this book, at https://github.com/PacktPublishing/Modernizing-Enterprise-CMS-using-Pimcore.
Rendering the Categories Widget
As we saw in Figure 9.9, we have created three types of layouts, two of which have two columns of different sizes. We thought of inserting a component in the narrower columns, called a widget, which would contain a list of categories. In the next screenshot, you can see how the Categories widget is displayed on the right of the page:
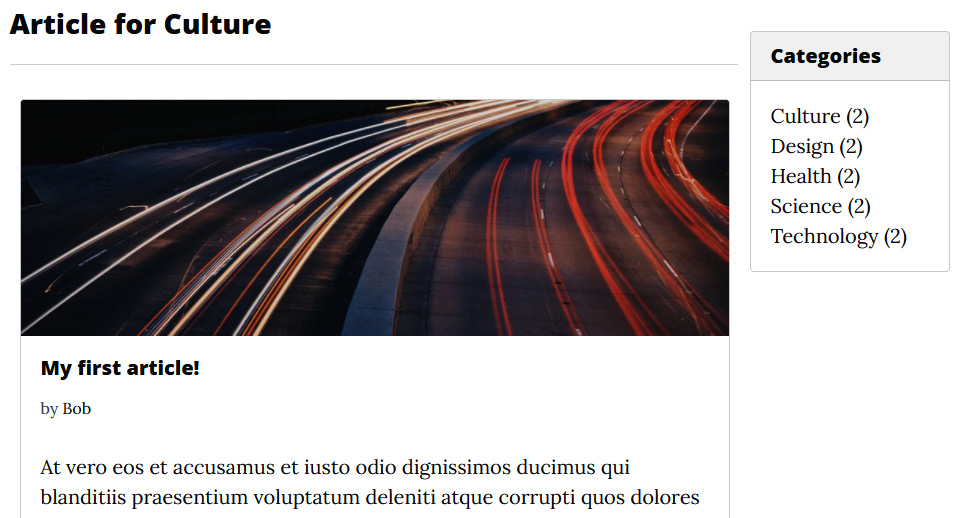
Figure 9.10: Template layouts
As you can see from the preceding screenshot, the Categories widget contains a list of all the blog categories, with the number of articles within each category in parentheses.
The Categories widget is a recurring element in the various pages, and since it is a recurring element, we have placed it in a separate template under the Widget folder. The inclusion of the widget is done through Twig's include command. The include command expects at least one parameter, which is the path of the file to include, as you can see in the following code snippet:
<!-- Sidebar Widgets Column -->
<div class="col-md-4">
{% include '@Blog/Widget/widget.html.twig' %}
</div>
The function to retrieve the list of categories is written in the BlogController controller, as can be seen in the following code snippet:
/**
* get a complete list of categories for blog
*/
public function getAllCategories() {
$categories = new DataObjectBlogCategoryListing();
foreach ($categories as $category) {
$articles = new DataObjectBlogArticleListing();
$articles->setCondition('Category__id = ' . $category- >getId());
$category->ArticleCount = $articles->getTotalCount();
if( !empty( $category->getSlug()[0]->getSlug()) ) {
$category->link = $category->getSlug()[0]->getSlug();
}
}
return $categories;
}
Inside the widget file, we created a bulleted list of all the categories through the for Twig statement, as illustrated in the following code snippet:
<ul class="list-unstyled mb-0">
{% for cat in categories %}
<li>
<a href="/blog{{cat.link}}" >
{{cat.getTitle()}} ({{cat.ArticleCount}})
</a>
</li>
{% endfor %}
</ul>
To get the data, we used the getTitle() function, and we read the ArticleCount property we created and passed to the view in the controller. We have not used the Category Description field, but we leave this as an exercise to you to retrieve this field and display it on the page.
Understanding Twig filters
Filters are functions that change the value of a variable—for example, think of all those PHP functions that transform the value of a string: strtoupper, strtolower, and so on. In Twig, they are used through the pipe, |, and some arguments are accepted. Here are some examples:
{{textWithsomeCharUpperCase | lower}}
{{arrayOfStrings | join (',')}}
The first example converts the value of the string to lowercase, while the second prints the contents of the arrayOfStrings array by separating the elements with a comma. You can consult a list of filters in the official documentation here: https://twig.symfony.com/doc/.
Now, let's see in detail the filters we used to create our templates.
Formatting dates with the date filter
The date filter formats a date to a given format. Here's how we used this filter:
<p>Posted on {{article.getModificationDate() | date("F jS \a\t g:ia") }}</p>
As you can see from the preceding code snippet, we used an F jS \a\t g: ia date format. The F jS part indicates how we want to format the date, while g: ia indicates the time format. The middle text, \a\t, is just there to write "at" between the date and time. For all possible formatting types for the date and time, you can consult the PHP online guide at https://www.php.net/manual/en/datetime.format.php.
Content ellipsed with the slice filter
In some cases, the text we have to display is too long, such as in the article list, where we want to display only an image of the article and the first two or three lines of the content. What we would like is to truncate the text and replace the cut text with three ellipses, to make the visitor understand that the article is not complete. To do this, we use the slice filter. The slice filter extracts a slice of a sequence, an array, or a string. Here's how we used this filter:
{% set content = cat.getContent() | length > 100 ? cat.getContent() | slice(0, 100) ~ ' ...' : cat.getContent() %}
…
<div class="card-body">
…
<p class="card-text">{{ content | raw }}</p>
</div>
As you can see from the preceding code snippet, we have set a content variable, which we will then use in the content of the template, with the value of the article content, applying a condition and a filter on the length. In particular, if the text exceeds 100 characters, we apply the slice filter and take the first 100 characters, and concatenate the three continuation points to the string. If instead, the content is not more than 100 characters, we take it in its entirety. We also used the length filter to get the length of the string in characters. One last trick: we used the tilde character (~) to concatenate the string.
Rendering text with the raw filter
The raw filter marks the value as being "safe," which means that in an environment with automatic escaping enabled, this variable will not be escaped if raw is the last filter applied to text. As we have just seen, we used the raw filter to view the article content, as illustrated here:
<p class="card-text">{{ content | raw }}</p>
If you want to see exactly how the raw filter behaves, you can try removing the raw filter from the content of an article, and see the result.
Filters are very useful tools because they allow us to modify data directly during the presentation phase. In this section, we have seen some of the filters available and how to use them. For all the other filters, it is possible to go to the official page of the Twig project, following this link: https://twig.symfony.com/doc/.
Differences between Pimcore and WordPress
We have seen how to create a blog with Pimcore. However, some may wonder whether making a blog using Pimcore is the right choice. There are many content management systems (CMSes) that already do this job—WordPress, above all.
We mentioned WordPress because, for those who don't know of it yet, this is a powerful open source software solution that you can use easily and freely to create blogs. It is certainly the most popular CMS, due to its ease of installation and configuration. Almost all website-hosting solutions offer the option of having WordPress pre-installed in your domain. Even the use of it does not require any special knowledge—it is very intuitive and comes with a simple and effective administration page. It is also possible to extend its functionality through the installation of plugins, and for the frontend, it is possible to download and install thousands of graphic themes with nothing more than a click. All these features have made WordPress the preferred choice for 40% of the sites currently online on the web.
So, why use Pimcore to create a blog, instead of WordPress? If, as we said, WordPress is the reference blog CMS, what are the reasons that can lead us to use Pimcore? Let's try to analyze the advantages and disadvantages (if any) of this choice.
Unlike WordPress, Pimcore is based on an MVC development pattern, and this allows the decoupling of business logic with presentation logic. In the view part, in addition, Pimcore uses a rendering engine (Twig) that facilitates the insertion of data into the pages, without having to use PHP code. Among other things, this simplifies user interface (UI) changes (with a much lower development cost) because the data is passed to the view by the controller, rather than extracted and processed inside the view itself.
Another aspect in favor of Pimcore is the fact of being able to have structured data, while in WordPress, the metadata linked to entities (articles, categories, users...) is not typed. In order to have typed data, it is necessary to install one of the many plugins available. The downside is that plugins store data and typing configuration in their metadata, so if—for example—we want to change or remove a plugin, we will also lose the data we saved with it.
Another thing to take into consideration in our choice is that Pimcore is a complete framework, so it is possible to create features inside it. In WordPress, everything is feasible too, but only with the use of plugins.
Someone will rightly think: But WordPress already has all the elements to create a blog—articles, users, categories, tags. True. But it is also true that the effort to create the same structure of a blog in Pimcore, seen in this chapter, is minimal. And once you invest the time it takes to create a blog, the rewards become substantial because at this point, we will have the functionality of WordPress, but with the ability to customize and modify every aspect at will to make it suitable for our needs. Let's take an example: if we want to add the work field to the user, what should we do? Well, on Pimcore, as we created the other fields, we just have to add one, and we did. On WordPress? It is obviously possible to do this on WordPress, but by installing a plugin.
We have talked several times about plugins for WordPress. We don't need to know how they work, but what we are interested in saying is that there are thousands of plugins, suitable for all purposes. Many of them are paid, almost all will do many more things than needed, and in general, installing plugins on WordPress requires attention to any conflicts between plugins, as well as configuration, updating, and maintenance. Being created by third-party developers, a plugin is not necessarily up to date; maybe it is not compatible with the latest version of WordPress, or a developer may decide to abandon it. In other words, it is always better and more advantageous to do the development directly inside the platform than to use external third-party tools.
Now, let's see the additional features that Pimcore offers. First of all, it is possible to create multilingual sites. WordPress still does not allow this, so to do this it is necessary once again to install a plugin.
Pimcore allows you to create multisites—that is, manage multiple sites and multiple domains in the same Pimcore installation. Even on WordPress, it is possible to create multisites but only on third levels, so not on different domains. For example, in a multisite WordPress installation, it is possible to manage mysite.domain.com and mysite2.domain.com, but it is not possible to manage mysite.com and mysite2.com in the same WordPress installation—a limitation that could be annoying for the management of a site with many connected domains.
Pimcore allows you to easily create perspectives, to limit access to parts of the administrative backend, based on the profile or roles of the user who accesses them. On WordPress, this is not possible, and often access to the administrative area by users must be done through ad hoc views, and therefore without being able to reuse the WordPress backend.
The advantages of having Pimcore, regardless of whether we will use it as a blog or not, will still be greater than using WordPress because with Pimcore, we will have support for business functions such as product information management (PIM), which we will see in Chapter 12, Implementing Product Information Management, or digital asset management (DAM), seen in Chapter 6, Using Digital Asset Management.
With this, we are not saying that Pimcore is better than WordPress, but we are just evaluating and comparing the two systems and what they can do. This will surely help the end user in adopting the most suitable platform for their purposes.
Summary
In this chapter, we have seen how to build a blog, which classes we need to create, how to create files for the pages, how they should be structured as HTML, and how it is possible to render the data thanks to the Twig framework. We have also seen how the routes of a site are built and how it is possible to choose which content to display based on the request, through the use of the routing.yml file and the BlogController controller. Finally, we learned how to build Bootstrap layouts for our site and learned how to create templates with the Bootstrap framework.
In the next chapter, we will learn how to build reusable components called Bricks that can be placed in CMS or Multiple Virtual Storage (MVS) pages and, moreover, can be ported from project to project using bundles.