Chapter 4: From Redux to Rematch – Migrating a To-Do App to Rematch
In this chapter, we'll learn how to migrate the application that we have created to Rematch step by step. We'll see the main differences that we have already seen theoretically put into practice, and we'll see how Rematch simplifies our code base.
This chapter will explain the main changes that will be required for any type of application, from small ones to enterprise-grade ones, for a successful migration to Rematch.
Rematch simplifies migration in a few steps because, under the hood, it uses Redux internals, so practically all Redux code is compatible with Rematch. Some methods are renamed or simplified to be easier to use.
In this chapter, we will cover the following topics:
- Introducing the Rematch library
- Migrating a Redux store to Rematch init
- Migrating Redux reducers to Rematch reducers
- Migrating dispatch actions to effects
By the end of this chapter, we'll become proficient in refactoring Redux applications to Rematch, and we'll know intuitively which methods need to change and how to resolve all the conflicts.
Technical requirements
You will need the following to complete this chapter:
- Basic knowledge of ES6 features
- Basic knowledge of HTML5 features
- A browser (Chrome or Firefox, for instance)
- A code editor (Visual Studio Code, for instance)
You can find the code for this chapter in the book's GitHub repository at https://github.com/PacktPublishing/Redux-Made-Easy-with-Rematch/tree/main/packages/chapter-4.
Let's start by introducing the Rematch library and learning how to install it in our to-do website.
Introducing the Rematch library
To introduce the Rematch library in our application, we'll be using the same method that we used previously in Chapter 3, Redux First Steps – Creating a Simple To-Do App, in the Creating our first store section. As we did then, we will be using unpkg.com. Let's modify the <script /> element under the closing body tag:
<script src="https://unpkg.com/redux@latest"></script>
<script src="https://unpkg.com/@rematch/core@latest"></ script>
<script src="./todo-app.js"></script>
</body>
</html>
Rematch, like Redux, ships in a bundle with ES Modules (ESM), Common JS (CJS), and Universal Module Definition (UMD) builds. You can use Rematch anywhere where you can use Redux.
Rematch is less than 2 kilobytes in size, which means the impact on performance and the most important indicators for measuring that our website is going in the correct direction aren't affected.
The two key concepts when we analyze whether our page is responsive enough and sufficiently fast are as follows:
- Time to Interactive (TTI): The time it takes for the website to be responsive
- First Contentful Paint (FCP): The time once all the JavaScript has been downloaded and evaluated
We got the same results with Redux and Redux + Rematch on our Lighthouse suite, as shown in Figure 4.1. Lighthouse is an automated tool for improving the quality of web pages. It audits a lot of metrics, but we focused on performance:
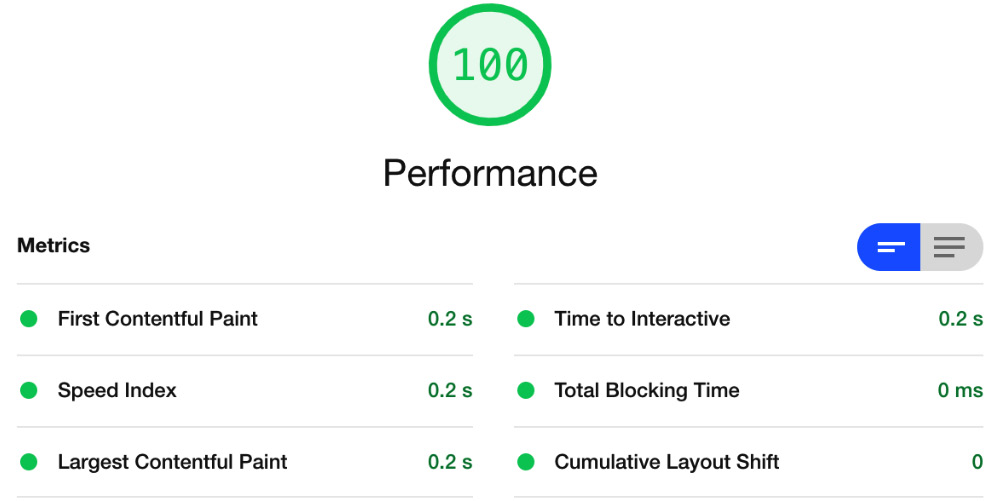
Figure 4.1 – Metrics of Lighthouse with Redux and Rematch
Now that we have seen that the performance of our website won't be affected by the bundle size of Rematch, let's take the first step of migrating to Rematch.
Migrating a Redux store to Rematch init
Redux's most relevant method is the createStore() method, as you'll remember from Chapter 3, Redux First Steps – Creating a Simple To-Do App, in the Creating our first store section, and is responsible for initializing our store and passing any additional configuration:
const store = window.Redux.createStore(
reducer,
window.__REDUX_DEVTOOLS_EXTENSION__ && window.__REDUX_ DEVTOOLS_EXTENSION__()
);
createStore() doesn't exist in the Rematch library, being replaced instead by the init() function, which allows us to pass any Redux and Rematch configuration.
A best practice with Rematch is to think about the logic and split it inside models, but if our current application has too many reducers that can't be simplified or unified into single file models, it's a good practice to start with this simple step.
We're just using Rematch's init() function in the same way as createStore():
const store = window.Rematch.init({
redux: {
reducers: {
todos,
},
},
});
These snippets are equivalent and will work in the same way, but we want to simplify this even more.
We can replace the Redux property by just adding the following lines of code:
const store = window.Rematch.init({
models: { todos }
});
But now, we must modify our reducers a bit more to become more familiar with the Rematch model.
Migrating Redux reducers to Rematch reducers
Rematch models contain a state property, a reducers property, and an effects property. We can use state to add the initial state, and inside reducers, we can move our Redux reducers directly to the reducers' model property:
const INITAL_STATE = {
todos: []
}
function reducer(state = INITAL_STATE, action) {
switch(action.type) {
case "ADD_TODO": {
const newTodo = {
id: Date.now(),
title: action.title,
completed: false,
}
return {
...state,
todos: [...state.todos, newTodo]
}
}"
case "REMOVE_TASK": {
const newTodos = state.todos.filter(todo =>
todo.id !== action.id
);
return {...state, todos: newTodos }
}
case "TOGGLE_COMPLETED": {
const newTodos = state.todos.map(todo =>
todo.id === action.id ? { ...todo, completed: !todo. completed } : todo
);
return { ...state, todos: newTodos };
}
case "CLEAR_COMPLETED": {
return INITAL_STATE
}
default: return state
}
}
A common task when migrating to a Rematch model is removing the switch statements and instead using state or payload parameters on each reducer function:
const INITAL_STATE = {
todos: []
}
const todos = {
state: INITAL_STATE,
reducers: {
addTask: (state, title) => {
const newTodo = {
title,
id: Date.now(),
completed: false,
}
return {
...state,
todos: [...state.todos, newTodo]
}
},
removeTask: (state, id) => {
const newTodos = state.todos.filter(todo => todo.id !== id);
return {...state, todos: newTodos }
},
toggleCompleted: (state, id) => {
const newTodos = state.todos.map(todo =>
todo.id === id ? { ...todo, completed: !todo.completed } : todo
);
return { ...state, todos: newTodos };
},
clearCompleted: (state) => {
const filteredTodos = state.todos.filter(todo => !todo. completed)
return { ...state, todos: filteredTodos }
}
}
}
As you can see, the Rematch method is more readable because each reducer is just a pure function instead of a case inside a switch. Plus each reducer is automatically inferred with a first parameter, which is the global state, and the second parameter is an optional payload. This is very useful if we need to pass extra values for filtering and removing data.
With these changes, our application still won't work because we have changed the naming of our function reducers. We could decide to keep the reducer names the same as the switch statement names (ADD_TODO), instead of creating a reducer like this:
addTask: (state, title) => {
We could use the switch statement with double quotes:
"ADD_TODO": (state, title) => {
By keeping the reducer's name the same as the Redux application, instead of a simple camelCase function (addTask), the application will work as we expect from the beginning.
But in Rematch, we strongly recommend using simple camelCase functions for reducer names. In this way, everything becomes easier to maintain and to read.
In the next section, we'll see why Rematch recommends this naming convention and why it simplifies our code.
Migrating dispatch actions to effects
In our to-do app, we had four actions:
- Adding a task
- Removing a task
- Toggle completed
- Clear completed
Let's look at each one in more detail.
Adding a task
The following code snippet shows how to add a task to our store:
store.dispatch({
type: "ADD_TODO",
title: inputValue
});
With Rematch, this type of dispatch works out of the box, but it isn't recommended to use because it isn't type-safe and isn't very readable.
In Rematch, we adopt an alternative strategy of what Redux offers initially with the dispatch method. When Rematch initialises the store through the init() function or we add a new model using the store.addModel() function, we iterate over all the models and we create shortcuts for each reducer and effect for each model of our store. This means that we can access any reducer or effect of our store using direct access, such as an object. We recommend this method:
store.dispatch[MODEL_NAME][REDUCER_NAME|EFFECT_NAME](payload)
Taking the previous code snippet as an example, given a model name called todos and a reducer called ADD_TODO inside this model, we could execute the following:
store.dispatch.todos.ADD_TODO(inputValue)
This code snippet is equivalent to the previous code snippet with the store.dispatch({ type : "todos/ADD_TODO", title: inputValue }) method.
Removing a task and toggle completed
In Chapter 3, Redux First Steps – Creating a Simple To-Do App, in the Dispatching actions section, we created a function for unifying the logic of creating a button. We had four parameters. What if we can refactor this to just three parameters?
Our Redux code for creating generic buttons is as follows:
createButton(task, "Remove", "REMOVE_TASK", todo.id);
createButton(task, "Toggle done", "TOGGLE_COMPLETED", todo. id);
function createButton(parent, text, type, id) {
const btn = document.createElement("button");
btn.textContent = text;
btn.addEventListener("click", () => store.dispatch({ type, id }));
parent.appendChild(btn);
}
Now, just migrate it to Rematch dispatch callbacks:
createButton(task, "Remove", () => store.dispatch.todos. removeTask(todo.id));
createButton(task, "Toggle done", () => store.dispatch. todos.toggleCompleted(todo.id));
function createButton(parent, text, cb) {
const btn = document.createElement("button");
btn.textContent = text;
btn.addEventListener("click", cb);
parent.appendChild(btn);
}
We're just passing a third parameter as a new function that executes the reducer methods in the Rematch way of doing things. All this code is equivalent to the Redux code and works in the same way, but readability and maintainability are increased.
Clear completed
In our Redux application, we had this:
const clearTodosButton = document.getElementById("clear-todos");
clearTodosButton.addEventListener("click", () =>
store.dispatch({ type: "CLEAR_COMPLETED" })
);
Now, we just need to replace store.dispatch() with store.dispatch.todos.clearCompleted() because, as we saw in the previous section, in Rematch, we recommend using this shorthand:
const clearTodosButton = document.getElementById("clear-todos");
clearTodosButton.addEventListener("click", () =>
store.dispatch.todos.clearCompleted()
);
Now, everything should work as expected in our Redux application, but we have reduced tons of boilerplate if the application scales up in the future. We went from 100 lines of code to just 85 lines with the easiest implementation of Redux, but when our application needs to store data in a database or data needs to be persisted on a browser, things become complex and the Redux complexity increases drastically. But with Rematch, all this complexity can be easily handled via effects.
If we have our live server turned on, we can easily check that our functionality is back and that every functionality we developed with Redux works in the same way in Rematch:

Figure 4.2 – Redux and Rematch example working
Now that we are proficient in migrating small Redux applications to Rematch, in Chapter 5, React with Rematch – The Best Couple – Part I, we'll see how to migrate asynchronous code from Redux to Rematch.
Summary
In this chapter, we learned the first steps of using Rematch and proved that Rematch reduces Redux complexity just by using pure functions and ES6 basic features. We also learned how to rename some methods, such as renaming createStore() to init(), and we covered migrating our Redux reducers from switch statements to Rematch reducers, which are easier to read and easier to maintain. We also migrated our dispatch actions from the dispatch({ }) Redux method to the Rematch shorthand.
In the next chapter, we will go deeper into a React and Rematch application with complex situations, such as listing products, creating a shopping cart, making calls to an external API, in summary, building a real-world web app with the best practices and performance.