
Chapter 5: Generating and Configuring Quote Templates
So far, we have learned how to create opportunities, associate them with quotes, and add product configurations. We also learned how we can automate pricing and provide accurate discounts to customers. The next step is to finalize the quote, which is then sent to customers for approval and to have their signatures added. Quotes contain information about products and pricing. Reps can generate multiple quotes as per customer requirements and easily share them.
In this chapter, we will learn about generating CPQ documents. Salesforce CPQ provides out-of-the-box features to customize quote documents. Reps can send quotes to customers in an email, and we can also have third-party integrations for eSignatures.
In particular, we will be covering the following topics:
- Generating PDF quotes using quote templates
- Creating quote templates and template content
- Creating template content and linking quote templates
- Integrating DocuSign for eSignatures
Generating PDF quotes using quote templates
The formatting and the content of a quote document are controlled by the Quote Template. Templates contain different sections, and both the template and sections can be customized to configure which line items are displayed, what fields and signature fields can be added, what terms and conditions can be added, and so on. Templates can contain any number of sections, and we can reuse sections between multiple templates. Quote templates contain information about quotes, quote lines, products, pricing, discounts, and much more. These quote templates can be customized and used to present this information in a professional-looking document, which can be in the form of a PDF or Microsoft Word document.
In the next subsection, let's learn how an administrator can generate quote documents in Salesforce CPQ.
Generating a quote document
To generate a quote document, navigate to any quote that you have created in your Salesforce org. Navigate to App Launcher Salesforce CPQ Quote. Then, select any quote that you have created previously. On the quote page layout, you will find two buttons: Preview Document and Generate Document.
In this example, we will select the Preview Document button. Once the user selects this button, it opens the following screen:
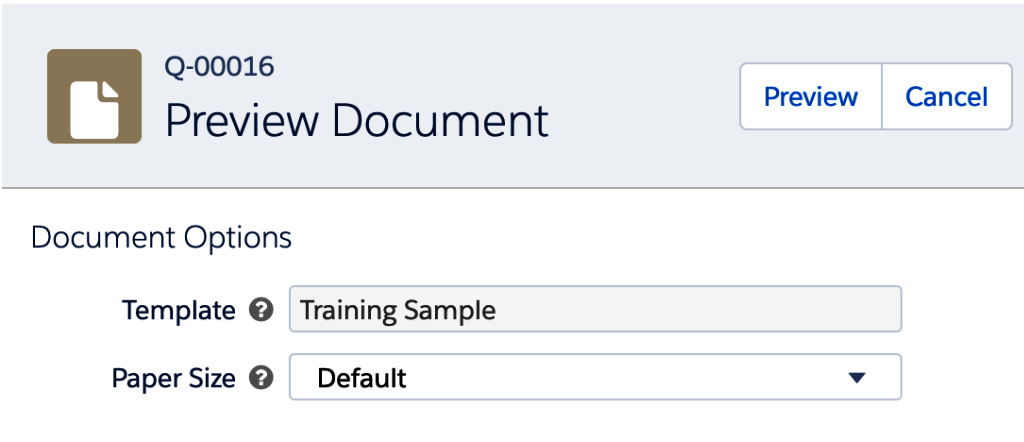
Figure 5.1 – The quote Preview Document dialog in Salesforce CPQ
Reps can select the template name and the paper on which the quote PDF needs to be printed. For this example, we are selecting Training Sample for the template and Default for the paper size.
When you click on the Preview button, the preview document opens, as shown here:
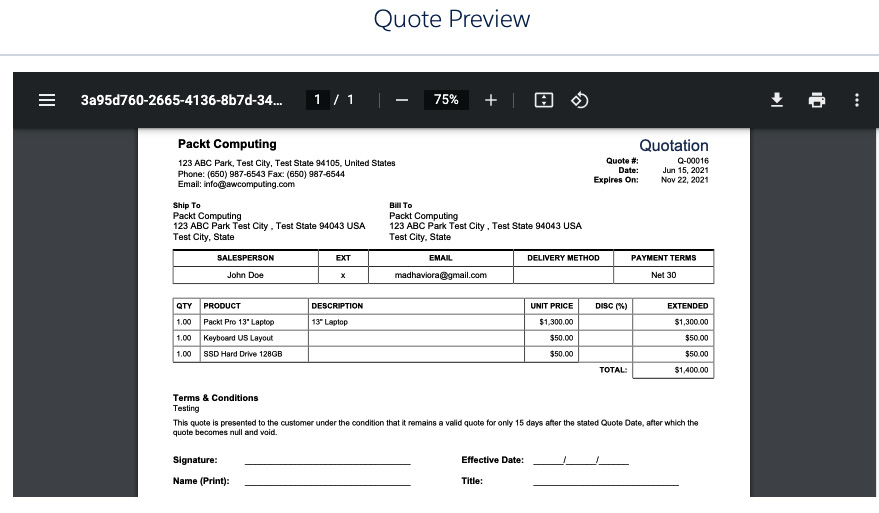
Figure 5.2 – The Quote Preview document
Here, you can see the header, company logo, shipping and billing addresses, and much more. You can see the quote line items, terms and conditions, and signature fields. The quote preview mode helps reps to validate all of this information. They can ensure that all details are accurate, or they can make changes before generating the actual quote. Once the rep validates everything, the quote document can be generated by using the Generate Document button on the Quote page layout.
Salesforce CPQ provides a sample template that can be either used as it is or customized as per your business needs. The template that we used to print the quote in Figure 5.2 is a sample out-of-the-box template that Salesforce CPQ provides. Administrators can create different templates and add content as required.
In the next section, let's learn how administrators create new templates.
Creating quote templates and template content
A quote template controls the format of your company's quotes. Templates can be created as per your company's quote generation requirements. They contain different sections, which can be customized. You can create multiple quote templates as per your business requirements and set one as the default.
To create a new template, navigate to App Launcher Quote Template New. This will open the following screen:
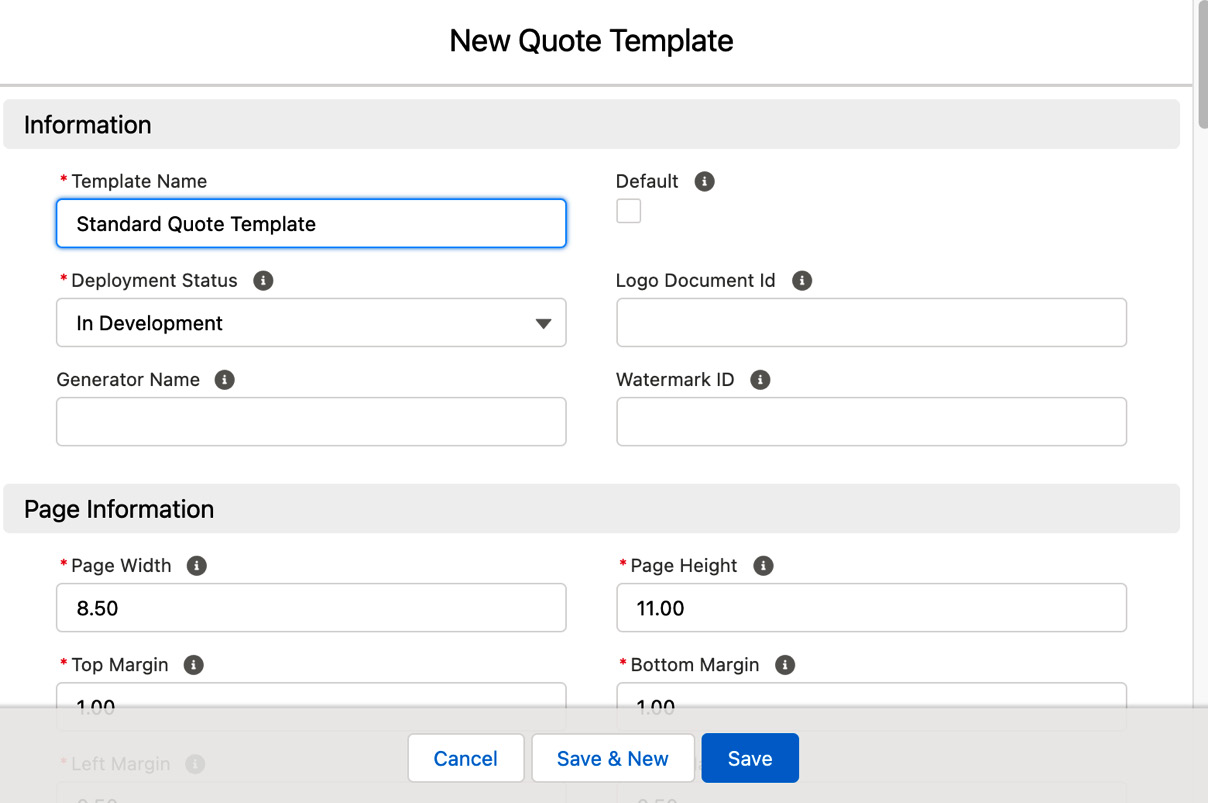
Figure 5.3 – The New Quote Template form
As shown in Figure 5.3, there are a few important fields in the New Quote Template form:
- Template Name: This field is used to provide a meaningful name for your quote template.
- Default: You can select this checkbox if you want to set this template as the default template for reps when they are creating new quote documents.
- Deployment Status: While your administrator is working on building the template, this status can be set to In Development, and once the template is built, this status can be set to Deployed.
- Logo Document Id: If you want to add a company logo, then you can add the record ID corresponding to the logo stored in Salesforce documents in this field.
- Watermark ID: Here, you can provide the record ID of the watermark image that you want to use in your PDF. The watermark can be conditionally displayed for specific quotes. You have a Watermark Shown checkbox on the quote that needs to be selected for the watermark to get printed on the quote template. You can upload the watermark image in Salesforce Files to get the record ID. This checkbox can also be updated using a salesforce flow or apex that is based on business requirements, rather than reps updating it manually for every quote. For example, whenever the quote status is approved, this field can be automatically updated using apex code logic in the backend.
- Page Information: This section contains many formatting options, such as height, width, margins, and much more.
The rest of the quote template contains the sections Header/Footer Information and Corporate Information for the company details. It also includes a section to define the font and styling, including group styling, section titles, and print options. Most of these details are for formatting the template. You can fill in these details as required and save the template.
Attaching additional documents
Apart from sending a quote to customers, we can send them additional documents. For example, if you have product specifications, installation instructions, special instructions, a company overview, and anything else that you would like to send to your customers, you can upload those documents to Salesforce Files and capture the record ID, which will be later used to attach the documents. Additional documents can be attached to a quote in three different ways:
- We can attach additional documents to the quote template. To link the additional documents to the quote template, navigate to any Quote Template Related Additional Documents Reference to add the record ID in the External Id field and enter details into the Document Name and Display Order fields, as shown here:
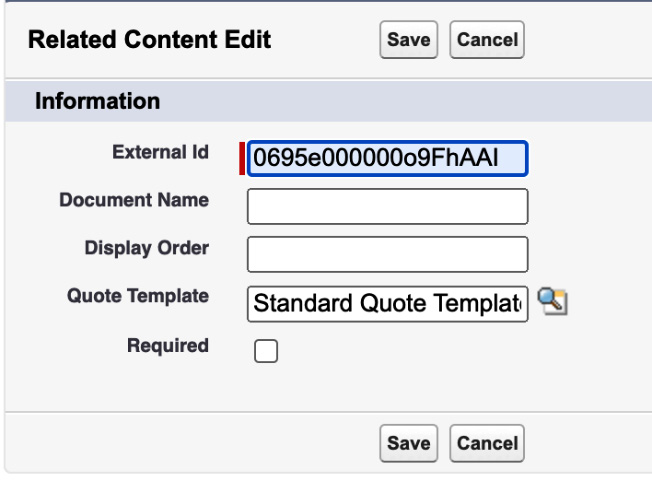
Figure 5.4 – Attaching an additional document to a quote template
- Instead of attaching the additional documents to the quote template, you can also attach them directly to the quote. To do this, navigate to any Quote Related Additional Documents New. The record ID of the additional document can be updated here. This will be useful if you want to send a specific document or any promotional info to your customers.
- Additional documents on a quote can be associated with the Product, Opportunity, or Quote fields. Attaching it to the Product field provides dynamic behavior. For example, based on the specific product, a related document can be attached. Quote templates and additional documents can be selected by the rep while previewing or generating the quote documents.
In the next section, let's learn how quote templates can be customized in the backend by administrators. Template content can be created in a Template Content object in Salesforce.
Creating template content and linking quote templates
First, we need to build the content and then link the content to create the quote template. The created content, such as the cover page, customer information, signature blocks, and much more, can be reused in multiple templates. A template's content can be adjusted and displayed in a quote template, and the same content can be displayed in a completely different order in another template. Based on the content, templates are formed and template sections are how content is added:
- Quote templates define the layout of the documents that your reps generate from a quote.
- Template content is created to store specific data in the quote sections.
- Template sections are used to position and style the template content in the quote document.
The types of content
Six types of content can be generated in Salesforce CPQ:
- HTML: This is static text, with or without merge fields. This type of content is mainly used for the cover letter, cover page, customer information, company information, signature block, and much more.
- Line items: These display details about the quote line fields such as products, quantities, discounts, and so on. Line items can be displayed in a tabular format. We can also group them by a field or display them in separate blocks and display columns dynamically. The quote template should be a representation of the products purchased without changing the product catalog to meet the needs of the template.
- Quote terms: These contain the terms and conditions for the quote. This can also be dynamic and based on the quote type. The quote terms can also be stored and presented using product records.
- Custom: Custom content allows us to display a Visualforce page within the section of our quote template.
- Template top: The template top and bottom can be used in a similar way to a header and footer in any document. The template top can contain the company logo, the billing and shipping addresses, and so on.
- Template bottom: The template bottom can include notes, signatures, dates, and much more.
Now, let's learn how to create each of these types of content in the Salesforce instance.
Creating HTML content
We can create HTML content as per the company's requirements and add it to the relevant section of the template. Let's learn how an administrator can create HTML content. In this example, we want to create template content named Prepared For. To build the template content, navigate to App Launcher Template Content New HTML Continue. This will open the following screen:
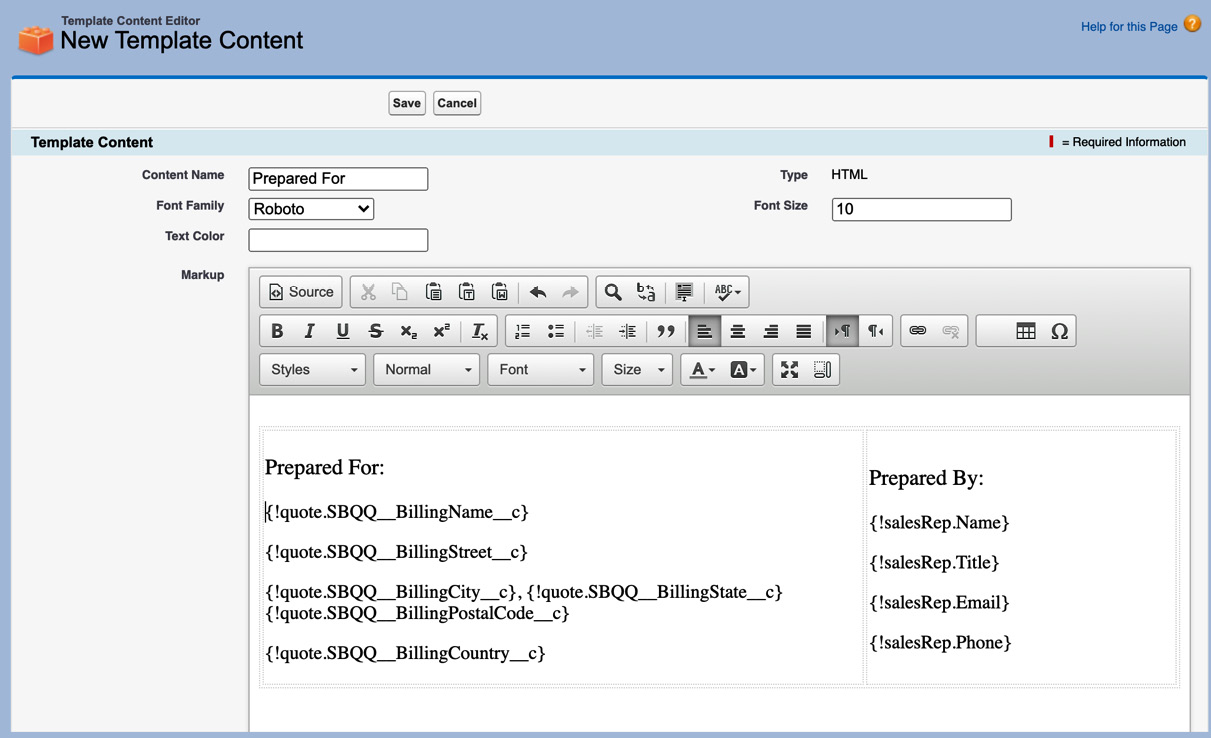
Figure 5.5 – Creating HTML content in Salesforce CPQ
Let's learn about a few important fields in the New Template Content form:
- Content Name: This field allows us to enter a meaningful name for the template content.
- Type: This field indicates the type of content you choose to create. In this example, we are creating HTML content.
- Font Family, Font Size, and Text Color: These controls are for formatting options that can be chosen as per your requirements.
- Markup: This field is where we will create and customize the content. We have a lot of formatting options here. This field can contain static and dynamic content. Merge fields can be used to create dynamic content. Merge fields are automatically updated in your content when the referenced field is updated on the object.
The syntax for a merge field is {!objectName. FieldName }. For example, if you want to reference the Billing Name field on the quote object, then the merge field syntax would be {!quote.SBQQ__BillingName__C}.
The data in the HTML section can be sourced from the Salesforce objects, as shown in the following table:
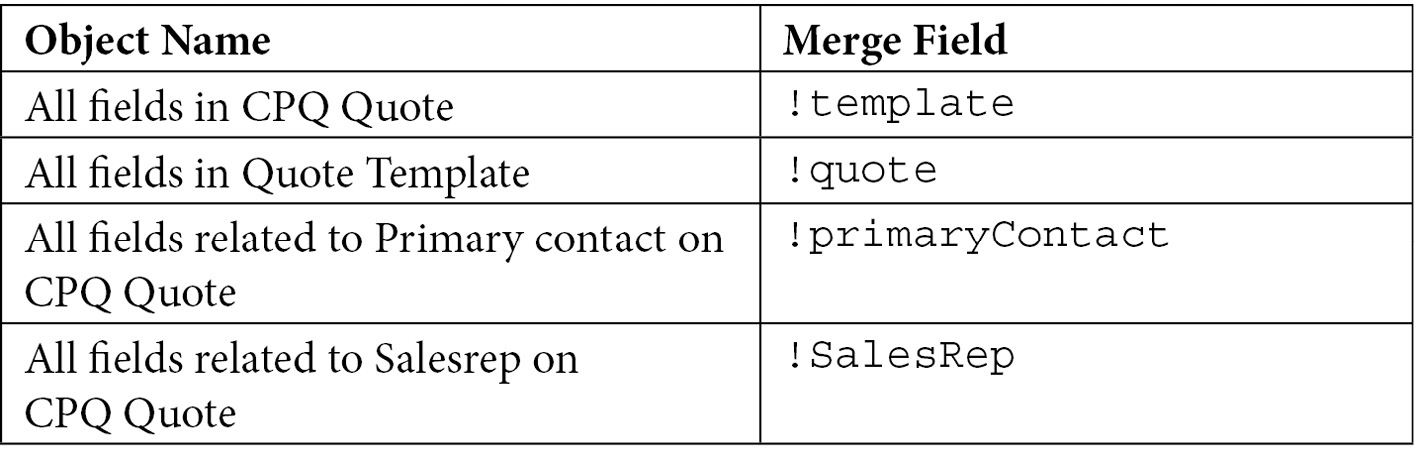
Table 5.1 – Merge field objects
It is important to note that for a field to be available as a merge field, it must exist on the quote. If you need to reference fields from other objects, such as opportunities or accounts, you can create a formula field or use any other automation to move the related field to the quote. We cannot reference quote line data in the HTML section. Instead, it's always going to be referenced in the quote line section.
- Source: We can use this button if the administrator wants to work directly in CSS and HTML to perform the edits.
Linking the HTML content to a quote template
The content that you have created can be linked to a quote template. Content can be reused in multiple templates in the order and format that you need. To link the HTML content, open the quote template that you want to customize. In this example, let's use the template named Standard Quote Template that we created in Figure 5.3. To do this, navigate to Quote Template. Click on the Related tab. Select Sections New. This will open the following screen:
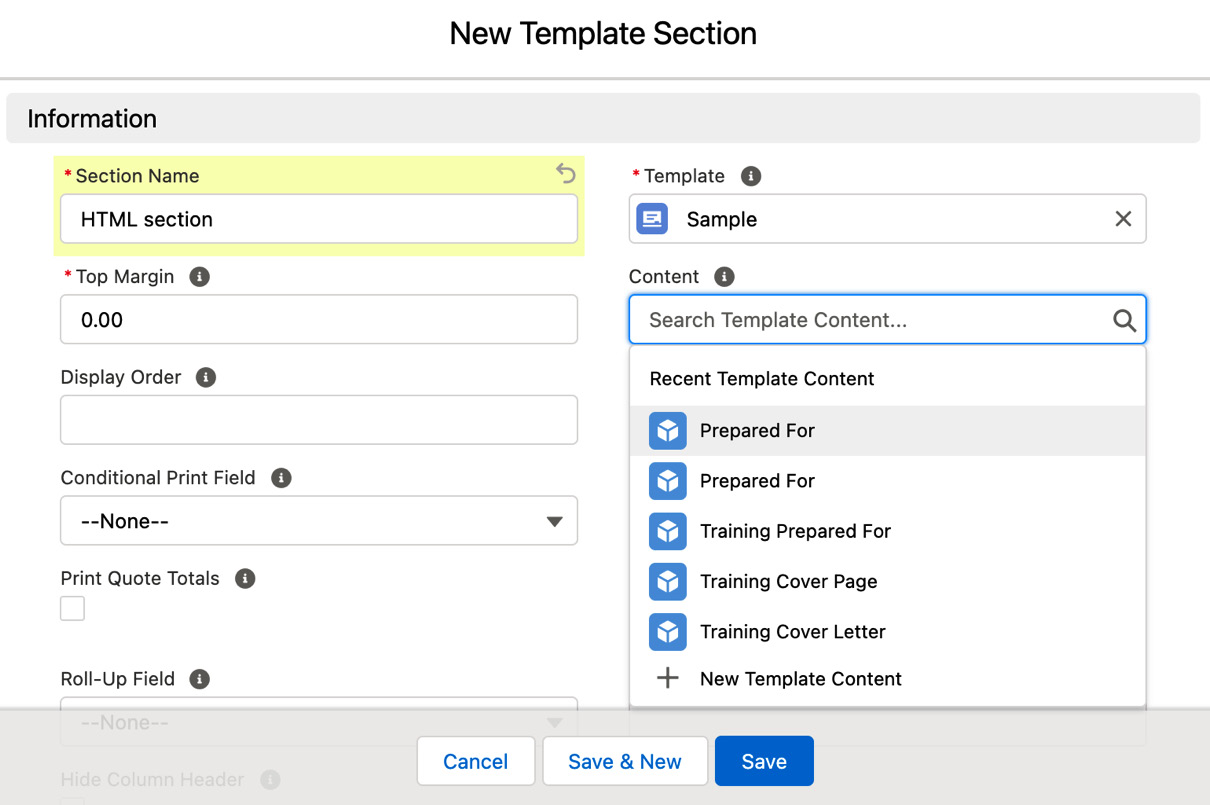
Figure 5.6 – The New Template Section dialog
Template sections are the links between the template content and the quote template itself. They contain the Section Name and Template fields. The Display Order field shows the order in which this section is rendered, related to other sections. As a best practice, leave enough gaps (for example, 10, 20, and so on) so that additional template sections can be rendered in between, as required. The Content field is where we link the HTML content to the template. When we click this dropdown, it displays all of the template content that we have created in our Salesforce instance. In this example, we can see the Prepared For HTML content that we created in Figure 5.4. There are a lot of other display and formatting fields that can be filled as required. Template sections also include page breaks and filtering information that determine the formatting when we print the quote.
Creating line item content
Line item content is used to display quote line data in tabular format. This shows the quote line product, discount, unit price, and much more.
We can use the Quote Line Group field in the line items to group fields and display the related subtotal. For example, we can group our quote lines based on the Product Family field (that is, hardware, software, service, and so on). Rather than creating multiple line item sections, we can group the line items in one line item section to display on the quote.
Conditional print fields can be used to dynamically show or hide fields – for example, if we want to show the discount only when applicable and not include a blank field in our quote template. We can create a checkbox and, based on the Boolean value, we can hide or show a field. Template sections can also be printed conditionally.
To create the piece of line item content, navigate to App Launcher Template Content New Line Items Continue. Fill in the Content Name field, the formatting options, and the Table Style field. Then, click Save, as shown here:
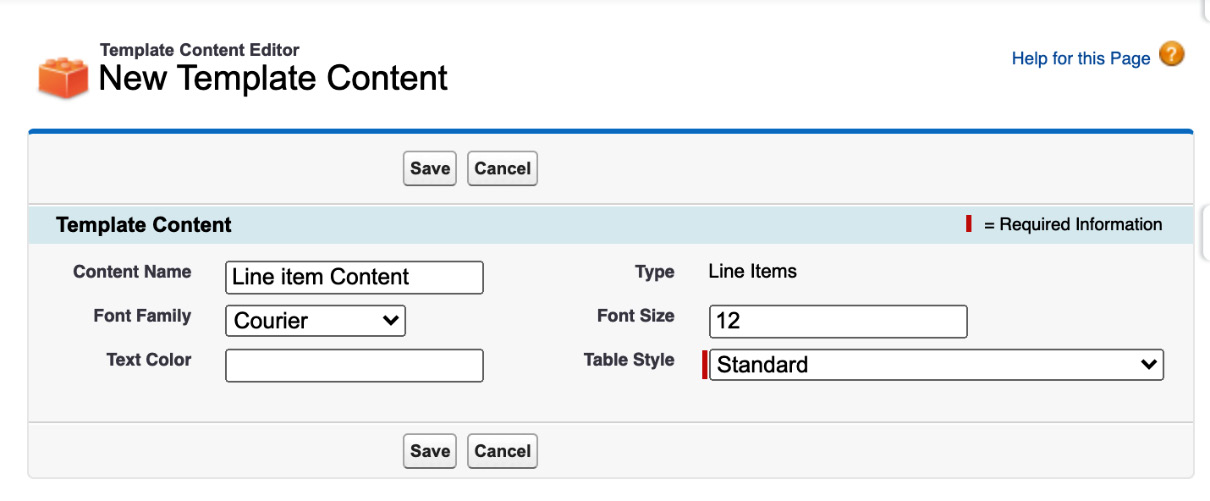
Figure 5.7 – Creating a New Template item content
The template content can be linked to one or more quote templates as required.
Linking the line item content to a quote template
Now, let's link the line item content created in Figure 5.7 to a quote template. To do this, navigate to any Quote Template. Click on the Related tab. Select Sections New. This will open the following screen:
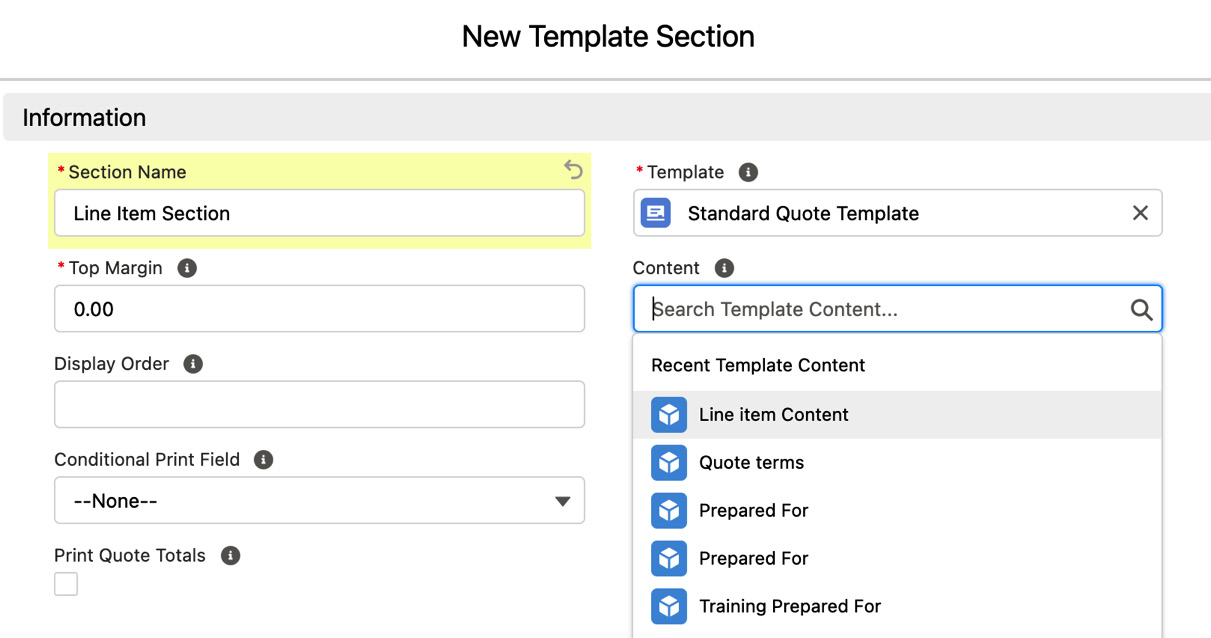
Figure 5.8 – Linking line item content to a quote template
As shown in Figure 5.8, using the Content dropdown, we select Line item Content, which we created previously. The other optional fields in the New Template Section dialog can be selected as per the business requirements. There are a lot of formatting fields that the administrator can use to create these template sections and adjust the formatting.
Once the section content is saved, go back to the Related section in the quote template. There is another related section in the quote template, which is called Line Columns. In the Line Columns section, we can define the columns we want to be displayed in the table.
We can create a new line column by navigating to Quote Template Related Line Columns New. This will open the following screen:
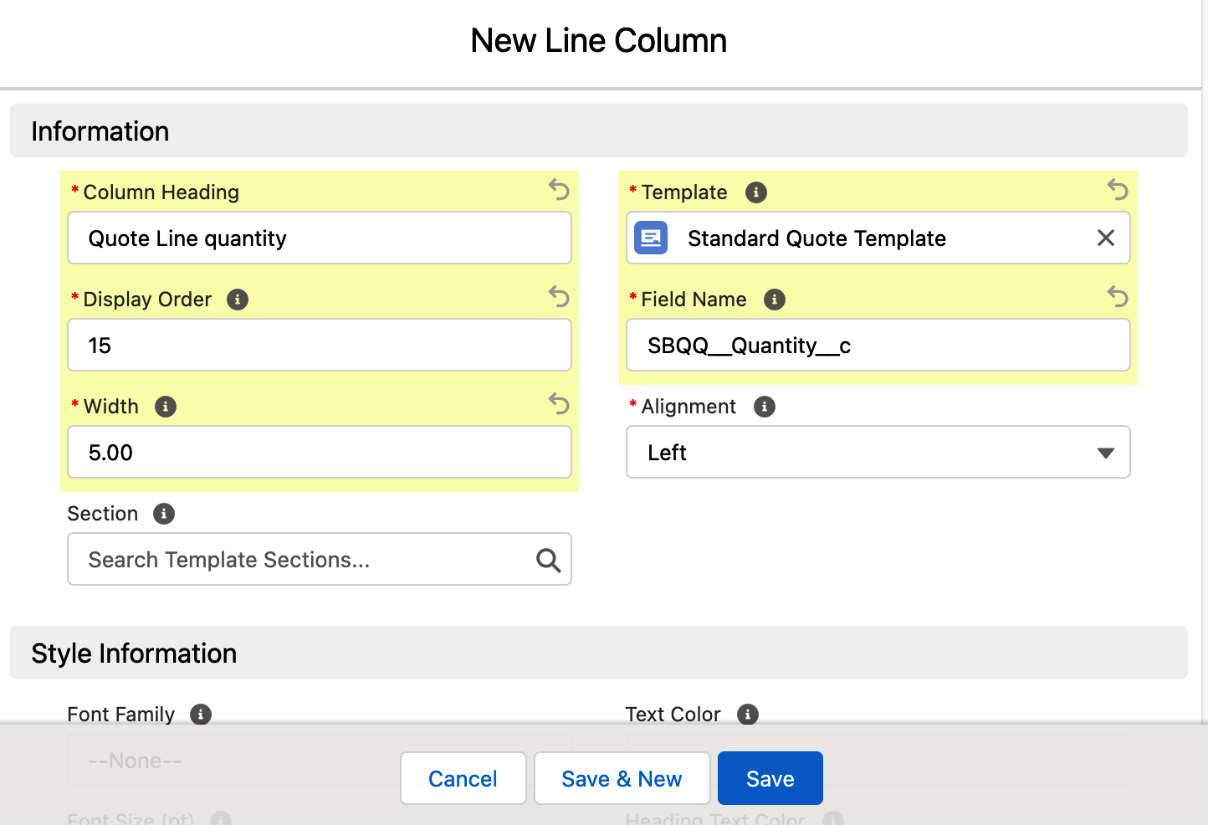
Figure 5.9 – Creating New Line Column
Let's learn about some of the mandatory fields that an administrator needs to update in the New Line Column dialog:
- Column Heading: This is the heading that will be displayed for the quote line table column field when you print the quote.
- Display Order: This is the order in which this field will be displayed on the quote. Add some gaps when creating display orders so that new fields can be inserted as needed.
- Width: This field describes the column width. The width of all the columns in the table should add up to 100.
- Template: This is the name of the template for which you are creating the line item column.
- Field Name: This is the API name of the quote line object field.
- Alignment: This option lets you format the alignment for a specific field when you print the quote.
The rest of the fields are optional, and most of them are formatting fields. A few of them are useful for customizations, such as the Conditional Print field. This field can be used to conditionally render a field onto the quote template. For example, if we want to display the discount field only when the value is greater than zero, we can create a custom field checkbox – Display_Discount__c (API name) – and add the field to the quote page layout. We can also use CPQ price rules to automate this.
A sales rep can manually check this checkbox, or we can update this field automatically based on the condition we set for the discount to be greater than zero. This custom field can be used in the Conditional Print field. The column will be displayed only when the custom field checkbox is set to true. The Conditional Print field can also be used to show or hide template sections.
For example, when there are no discounts applied to a quote, we do not want to send the quote document with blank discount columns. This column can be conditionally rendered only when the discount values are present. For this example, let's use the additional discount field on the quote as a conditional field. Copy the API name of the field on the quote – in this example, that's the additional discount field API. Now, navigate to Object Manager Line Column Fields & Relationships Conditional Print Values New and paste here the API name we copied from the quote object, and click Save. Next, navigate to the Quote template Related Discount Percent Conditional Print Field and select the picklist value of the additional discount field API name. Now, when we print the quote document, the discount column can be controlled with the conditional print field.
To test the content, navigate to any quote in our Salesforce org and preview the quote template, as shown previously in Figure 5.1.
Creating quote terms content
Salesforce CPQ provides out-of-the-box functionalities to generate several Term Conditions. These can be displayed in all quotes, or they can be customized to only appear in specific quotes as per the business needs. For example, the terms and conditions for hardware products might be different from software products. The Term Conditions field on a quote determines when to display the terms and conditions. The Condition Met field is used to display the relevant terms only when the associated conditions are met. Using this feature, the quote terms can be dynamically displayed. When we have multiple terms, they are displayed in the template based on their print order values. For example, when our quote contains software products, we might want to display the terms and conditions for software purchases.
We can allow users to modify the quote terms by using the Modified Terms feature in a quote. This feature needs to be used with caution, depending on your company's business needs. Modified quote terms are only applicable to the specified quote and will not apply to other quotes. For reps to modify terms, they may require approval from their managers.
Important Note
Modified quote terms will not apply to amendments and renewals.
To create quote terms content, navigate to App Launcher Template Content New Quote Terms Continue. This will open the following screen:

Figure 5.10 – Creating quote terms content
Enter a meaningful name in the Content Name field, set your preferred formatting options, and save the record.
Linking quote terms to a template
The quote terms content can be linked to a quote template using the Sections related list. To do this, navigate to Quote Template Related Sections New. Let's use the Quote Terms Sample content created in Figure 5.10 and link it to Standard Quote Template, which we created in Figure 5.3.
A quote term object can be used to create terms and conditions. To do this, navigate to App Launcher Quote Term New. This will open the following screen:
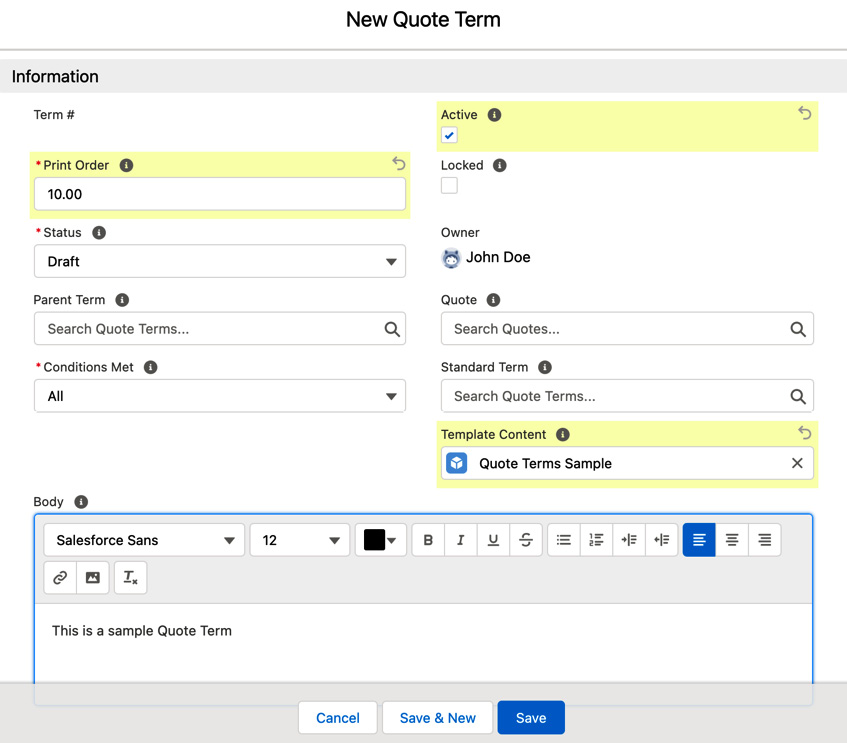
Figure 5.11 – Creating a quote term
Let's learn how to configure a few important fields here:
- Term #: This will be autogenerated once you save the new term record.
- Print Order: This specifies the order in which the terms are displayed when we preview or generate the quote document.
- Status: This determines the status of the quote term.
- Parent Term: If you have multiple terms, you can link all of the child terms to a parent.
- Conditions Met: This field is used when we have quote terms that need to be printed based on a condition. If we have more than one condition, we can specify whether we need all, any, or a custom number of conditions to be met.
- Active: This checkbox is used to activate a quote term.
- Locked: This checkbox is used to control the edit functionality for quote terms by end users. A best practice is to keep terms locked unless there is a very compelling reason not to.
- Template Content: This is used to link the content for which the term is applicable. We can define standard terms that apply to all templates and specific terms that apply to only some quotes.
- Body: This is where the actual terms and conditions text is updated.
Fill in all the required fields and save the quote term created in Figure 5.11. To dynamically display a quote term, navigate to the related section of the quote term and create a new term condition by clicking Term Conditions. Administrators can use a tested variable or a summary variable (that is, the configurations we learned about in previous chapters) to evaluate the term condition.
Now that we have learned how to create and customize quote templates, let's see how they can be sent to customers to be signed with eSignatures.
Integrating DocuSign for eSignatures
Prior to the development of eSignatures, a sales rep would email a quote template to customers, which would then be printed by the customer to sign before returning. Today, using eSignatures is becoming the standard way quotes are signed by customers. However, Salesforce CPQ allows automating this process by integrating with third-party tools such as DocuSign. These tools can be used to directly email the quote document to customers, which can then be signed electronically. Then, the documents can be saved in Salesforce objects. Both administrators and customers can save time by using these integrations. So, let's learn how DocuSign can be integrated with Salesforce CPQ.
Your administrator can create a case with Salesforce support for the installation of the DocuSign package. The DocuSign for Salesforce CPQ package uses the SBQQDS namespace. The DocuSign for Salesforce plugin requires the DocuSign Business Pro edition. To install DocuSign for Salesforce, you need to follow these steps:
- Log in to your Salesforce org where you want to enable eSignatures using DocuSign.
Update the electronic signature field in the package settings to the DocuSign plugin. To do this, navigate to Setup Quick Find Installed Packages Salesforce CPQ Configure Plugins Electronic Signature Plugin SBQQDS.DocusignPlugin Save.
- Now, Salesforce CPQ will add a Send with DocuSign button to your Generate Document page on the quote.
- In the quote document page layout, create a DocuSign information section and add a Notes & Attachments related list.
- In your Quote Template page layout, add a DocuSign recipients-related list.
- Next, we need to configure the remote site settings for DocuSign. To do this, navigate to Setup Quick Find Remote Site Settings New. Enter the name in the Remote Site Name field without spaces, and then navigate to Remote Site URL. For this example, it will be https://app2.docusign.com. Then, select Active.
- The next step is to set up the DocuSign custom settings. We need a DocuSign account ID to configure these settings. The account ID can be found in your DocuSign user profile. Select the user profile in the drop-down menu located on the upper right-hand corner of your DocuSign home page. To update the custom settings, navigate to Setup Quick Find Custom Settings DocuSign for Salesforce CPQ Settings Manage New. Enter the DocuSign account ID in the Account ID field, then, update the Batch Size field to 5 and update the Endpoint field from https://docusign.net/ to https://docusign.net/restapi/v2.
- Finally, click the Save button.
- Next, set up the DocuSign user profiles. This can be done in two ways:
- Adding a custom links section: Navigate to Setup Quick Find Users Edit Layout Custom Links Drag. Here, drag the DocuSign for Salesforce CPQ object to the desired position in the Custom Links section, and then, click Save. This takes you back to the user detail record. Administrators can click the DocuSign for Salesforce CPQ setup link in the Custom Links section of the user profile and enter their DocuSign credentials.
- Adding a Visualforce page in the user profile: Navigate to Setup Quick Find Users Edit Layout Visualforce Pages. Drag and drop the SetUpUser object to the desired position on your page layout, and then, click Save.
Users can go to their profile and enter their DocuSign credentials on the DocuSign for Salesforce CPQ setup Visualforce page.
- Next, set up DocuSign recipients for CPQ quotes. To do this, navigate to Quote Template Related DocuSign Recipients New. Update the recipient Role Name field, which is unique within the template, and match the appropriate recipient's name in your DocuSign template. Enter a value in the Role Type field and save the record.
- Connecting DocuSign to Salesforce CPQ creates a relationship between the DocuSign account and your Salesforce CPQ DocuSign package. To define this connection, log in to DocuSign. Then, click the profile icon on the upper-right corner of the page, then, use the drop-down arrow to navigate to My Preferences Connected Apps Connect Salesforce, and then, provide the credentials of the Salesforce org that you want to connect with DocuSign.
- For DocuSign to push updates from the signature process back to Salesforce CPQ in real time, we need to add a quote document object. To set this up, navigate to DocuSign Account User Profile. Select Go To Admin in the Integrations sidebar. Next, click Connect in the Salesforce Connection sidebar, select Actions Edit on the Salesforce Object page Connect Objects section New Object Salesforce Object update Object to Active update the Select Salesforce Object picklist to Quote Document Update Object Name to Quote Document.
- When you install DocuSign for Salesforce CPQ, it creates a few fields in your Quote Document object:
- Envelope
- ID
- Error Message
- Signed Date
- Voided Reason
By default, DocuSign links the Envelope ID field on the quote document with the DocuSign envelope ID field. You can also link additional fields as required, based on what additional fields you would like to see on the quote document object from DocuSign. You can find the complete details on the DocuSign documentation at this link: https://support.docusign.com/en/guides/docusign-for-salesforce-cpq.
Summary
In this chapter, we learned how to create and customize quote templates in Salesforce CPQ, and we explored the out-of-the-box features that administrators can apply to configure quote templates. Quote templates can be created, customized, and reused multiple times. Also, Salesforce CPQ allows us to create multiple templates, and reps can choose the right template based on their business requirements. We have also learned how third-party applications for eSignatures can be integrated with Salesforce CPQ. This helps reps to directly send quote documents using eSignature plugins, and this means they can avoid relying on manual emails for quote signatures. This improves the overall quote-to-cash process efficiency, as we can complete deals and receive signatures with no errors in minutes.
In the next chapter, we will learn about guided selling, which is another out-of-the-box feature that Salesforce CPQ provides for the sales process.