
Chapter 8: Configuring CPQ Package Settings
In the previous chapters, we learned about different CPQ configurations and how the CPQ package can be customized as per specific business needs. CPQ's out-of-the-box functionality is dependent on the package settings that provide global control across the CPQ platform. With these settings, we can enable or disable certain CPQ features, configure aspects of a specific feature, and control the overall package behavior.
When implementing CPQ, we need to make sure we capture the high-level requirements that will help in selecting the right configurations, as making these changes later becomes difficult and very involved. In this chapter, we will discuss different package settings and how these settings will affect automation.
We will be covering the following topics:
- Configuring the CPQ package
- The Documents tab
- The Groups tab
- The Line Editor tab
- The Plugins tab
- The Pricing and Calculation tab
- The Subscriptions and Renewals tab
- The Quote tab
- The Order tab
- Additional settings
Configuring the CPQ package
CPQ package settings can be configured to control the Salesforce CPQ functionality. These settings can be enabled or disabled as per the business needs and govern how the CPQ installed package functionality is available. These settings are at the organization level and apply to the entire package. When implementing CPQ for any business, we need to understand the business process and the high-level requirements. This will help administrators configure the package settings correctly so that CPQ's out-of-the-box functionality can be used with minimum customizations. For example, an electric panel for a home would control the power for the whole home. This is similar to the org-level configuration. When power to a specific room needs to be controlled, then a specific switch panel can be operated.
Let's learn about these configurations and how they can be customized in a Salesforce CPQ test instance. These settings can also be configured and tested in a sandbox instance before configuring them in a production instance.
To create or modify package settings, navigate to your Salesforce instance where you want to configure the settings: Salesforce CPQ setup Quick find Installed packages. In the list of installed packages, search for Salesforce CPQ and then click Configure. This will open the package configuration screen, as shown here:
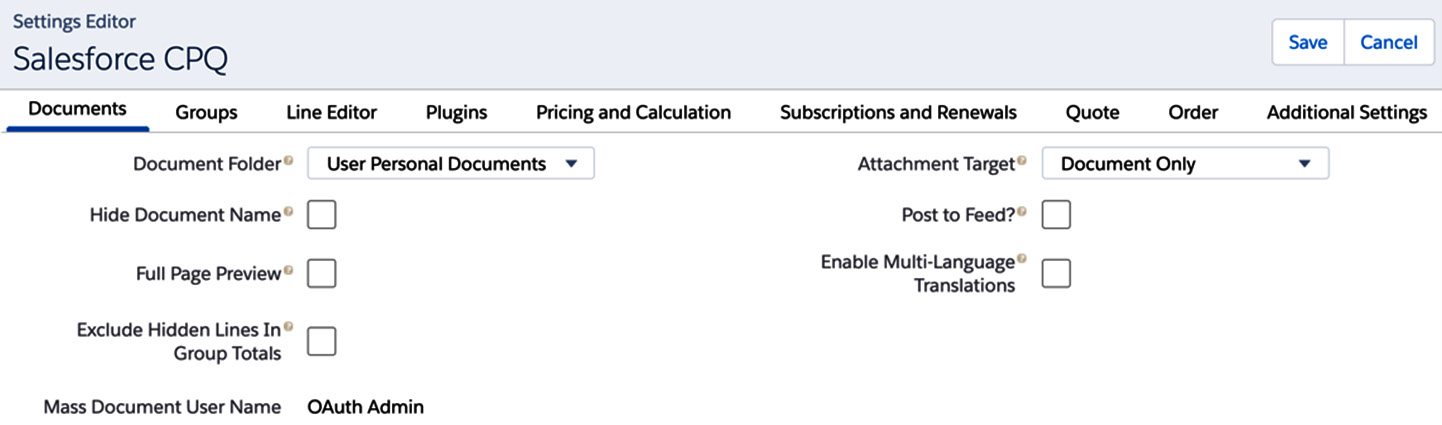
Figure 8.1 – CPQ package settings
As shown in the preceding screenshot, the package settings are grouped into different tabs. Each of these settings controls different functionalities of CPQ. Most of these settings have Salesforce help: when you hover over the question mark symbol next to the label, you can see what that setting refers to. In the following sections, we will learn about some of the important settings. Not all these configurations are required for implementation; only a few of these may be applicable as per your business process. Let's begin by looking at the Documents tab.
The Documents tab
This tab includes settings that will help you customize the creation, distribution, and storage of your quote documents. Let's learn about a few important configurations in the Documents tab. This is not an exhaustive list, and we can refer to Salesforce Help for additional details:
- Attachment Target: This field determines where to store the generated quote documents, based on the target object chosen. We can select the following values:
- Document Only: Choosing this value means that the quote documents will be available in the chosen Salesforce document folder only. Users even without a Salesforce CPQ license can access the quote documents when this picklist is selected.
- Quote: If you choose this value, the quote document will be available in the notes and attachment section of the quote. This setting allows those with access to the record to have access to the document.
- Opportunity: When this option is selected, the quote documents will be available in the notes and attachment section of opportunities. This will grant any user with permissions to the opportunity object the ability to view the quote document without a CPQ license.
- Enable Multi-Language Translations: This setting allows your reps to generate CPQ quotes in one of the languages supported by your org. Enabling this setting will add a local Document Language picklist to the Generate Document page. Before getting the translated content, you must have the translated values stored for the intended language.
- Hide Document Name: This setting allows you to hide the filename when generating the document. This setting prevents reps from changing the default filename that is specific to your organization.
Important Note
The aforementioned list is not exhaustive and we can refer to the Salesforce Help for additional details: https://help.salesforce.com/s/articleView?id=sf.cpq_package_settings.htm&type=5.
Next, we'll look at the Groups tab.
The Groups tab
Settings in this tab will determine the quote line group and solution group management and their functionalities. This tab has the following settings:
- Solution Groups Enabled: This setting is helpful when your business has a standard set of predefined products in a quote line group. For example, you may want to group hardware and software items separately in your quotes. Solution groups allow you to group and create subtotals that are independent of other quote lines and quote line groups.
- Require Group Name: Selecting this checkbox will make the group name mandatory in the QLE.
Now that we have learned about the settings on the Groups tab, let's learn about the Line Editor tab.
The Line Editor tab
This tab contains all the configurations related to the line editor. We have already seen some of these settings during the QLE configuration in Chapter 2, Configuring Opportunities and Quotes. A few important settings are as follows:
- Visualize product hierarchy checkbox: This setting will help indent the components of bundle products, including nested bundles. By selecting this checkbox, you will see the breakdown of products and their components in the Quote Line Editor (QLE). When you add a product bundle in the QLE, the indentation will help reps see the parent bundle and all the components associated with it.
- Keep Bundle Together: When this setting is enabled, the bundle's components will always be displayed along with the bundle. When the bundle is dragged and dropped to a new location in the QLE, all the corresponding components will also move automatically.
- Preserve Bundle Structure: Selecting this setting will display the product options in the same order as they exist in the renewal quotes. This setting can also be enabled at the contract level if your business only needs this functionality for renewals under a specific contract. Enabling this setting at the package level means it will be applicable globally.
- Quote Batch Size: CPQ loads and saves quotes in the QLE in batches of the quote line. This setting controls the number of lines in a batch. When this field is blank, CPQ engines use a default value of 150. This value can be edited as per business requirements. A smaller batch size is optimal and less likely to hit a governor limit. It's recommended not to have a bigger value to avoid performance issues. Post-implementation, once the number of quote lines is known for most scenarios, this field can be set to increase performance.
- Large Quote Threshold: This is a user-defined number. For user interface (UI) calls, CPQ will send all quote lines to be evaluated until it hits this threshold. If the number of quote lines meets/exceeds the threshold, then the quote line batch size setting is utilized to parse the QLE calculation. Once the threshold is reached, CPQ will also ignore the quote scoped product rules for that quote. If we need to include these validation rules, and then we need to enable another package configuration: Enable Large Quote Threshold Validations. This field has a null value by default. This setting needs to be enabled only if your business uses large quotes with several lines. This value can be adjusted when you start hitting the governor limit.
- Enable Large Quote Experience: Enabling this setting will enhance the user experience for quotes containing large quote lines.
- Enable Expand/Collapse Bundles: Admins can choose this setting if product bundles in the QLE can be expanded or collapsed. This feature will be useful for bundles with several products enhancing the rep experience. To make use of this functionality, make sure the following CPQ settings are also enabled:
- Enable Large Quote Experience
- Visualize Bundle Hierarchy
- Keep Bundles Together
- Enable Multi Line Delete: When this setting is enabled, reps can select multiple quote lines and delete them.
Next, we will learn about the Plugins tab.
The Plugins tab
Using this tab, we can link optional third-party plugins. These plugins help extend the CPQ features and integrate the package with third-party tools.
Important Note
Plugins require either APEX or JavaScript skills.
Let's learn about a few important configurations in the Plugins tab:
- Electronic Signature Plug-in: This will integrate Salesforce with electronic signature plugins, which can be used to e-sign a quote document automatically. The e-signature tool will have instructions for how to fill in this detail.
- Quote Calculator Plug-in (QCP): This feature extends the Salesforce CPQ quote calculator by adding a JavaScript quote calculator plugin. Never use the legacy calculator as it is no longer supported by Salesforce.
- Additional functionalities can be added to the QLE with custom JavaScript code. Certain third-party AppExchange applications such as Vertex will provide the QCP to integrate with CPQ. You can refer to the Salesforce developer guide documentation for further information on how to use the QCP at https://developer.salesforce.com/docs/atlas.en-us.cpq_dev_api.meta/cpq_dev_api/cpq_dev_jsqcp_guidelines.htm.
The next tab we will learn about is the Pricing and Calculation tab.
The Pricing and Calculation tab
These settings manage the price calculations on CPQ quotes:
- Unit price scale: By default, this is set to 2. Unit prices are rounded to two decimal places.
- Calculate Immediately: By enabling this field, you can enable real-time calculations. In previous chapters, we saw that reps can click the Calculate button in the QLE to see the calculated values. With this setting, the calculations are performed automatically. This has a huge impact on QLE performance. Do not enable this setting unless this is absolutely necessary and the impact is validated. Reps can click the Calculate button to see the changes, but they still need to click Quick Save and Save to update the changes.
- Enable Quick Calculate: This improves the quote calculation time by disabling price rules and quote line formula fields that depend on parent relationships, and displaying roll-up summary fields in the QLE. This setting needs to be enabled only if you are not using the affected features, such as price rules, quote line formulas, or displaying roll-up summary fields.
- Use legacy calculator: By default, this configuration will be enabled in the org when you install CPQ. Admins need to disable this setting as it is no longer supported by Salesforce. When you disable this, you need to authorize the new calculation service. This will appear only once and disappear after you authorize the new calculation service. This enables the CPQ Advanced Quote Calculator.
Next, let's learn about the Subscriptions and Renewals tab.
The Subscriptions and Renewals tab
These settings are related to contract subscriptions and renewals. Let's learn about a few important settings in this tab (this list is not exhaustive – please refer to the Salesforce Help documentation (https://help.salesforce.com/s/) for the complete list):
- Renewal Model: This field can have two values:
- Contract Based: For contract-based renewals, the admin configures the order or opportunity with at least one subscription product. A contract-based renewal model creates subscription records for subscription products and asset records for non-subscription products with asset conversion. The contract-based model is useful for businesses that sell a lot of subscription products and want to keep track of contract details such as the subscription start date and end date.
- Asset Based: In the asset based renewal model, only an asset record is created for non-subscription products when an order or an opportunity is contracted. The asset-based method is mostly used for non-subscription products.
The renewal model that you set at the package level will be applied to all accounts by default. Alternatively, the renewal model can be changed at the account level to a different value, and this overrides the renewal model that was set at the package level. Changing the renewal model after records are created is nearly impossible, it is advised to make the appropriate selection at the beginning of the implementation.
- Contract in Foreground: Enabling this setting can help perform immediate user actions right after the contract is created, but it increases the risk of CPU timeout. By disabling this setting, CPQ runs the contract process in the background. Users can continue working on the Salesforce contract amendment process in progress.
- Enable Evergreen subscriptions: When this setting is enabled, CPQ creates contract subscriptions that do not have an end date. Customers can cancel or terminate the contracts at any point. The product's Subscription Type can be Evergreen or Renewable/Evergreen when this setting is enabled. Admins cannot disable this setting once enabled. To prevent users from creating evergreen subscriptions, admins need to remove the picklist values from the product subscription type field. CPQ will create evergreen subscriptions on a different contract than renewable subscriptions.
- Re-evaluate Bundle Logic on Renewals: Selecting this package setting will automatically reconfigure a bundle on renewal. Renewing a bundle with this setting enabled executes all configuration rules and automatically adds the required products. This setting provides the same functionality as a user manually finding the renewal quote, reconfiguring the bundle, and then saving it. This setting will prevent users from manually re-configuring bundles.
- Bypass Preserve Bundle Structure: This setting removes the requirement to keep the original bundle structure on amendments. Enabling the Preserve Bundle Structure setting on contracts is not required when this setting is selected on the package setting, but it is advised not to use this setting and continue to use Preserve Bundle Structure on contracts to avoid unexpected price changes and unforeseen product and price rule changes.
- Subscription term unit: This field can have two values, Month and Day. This setting defines how your company is selling its subscriptions. When your company is selling services such as Amazon Prime and video streaming, it makes sense to set this value to a month, whereas if you are renting an industrial product, this can be set to days. Even though this value is set to a month or day, the unit of time for adding these subscription products to a quote can be customized.
CPQ determines the subscription length by evaluating this package-level subscription unit with the quote's subscription term. For example, you can set a yearly subscription by setting the subscription term unit to Month and your quote subscription term to 12. For this same example, when the yearly subscription term is set to Day, then your quote subscription term needs to be set to 365.
- Subscription Prorate precision: This field is applicable when you have a start date and an end date for your subscription that includes partial months. For example, when you have the subscription term unit as Month, but the time duration between the start date and end date is greater than a month, this picklist tells CPQ how to calculate the prorate multiplier. When the subscription term is a month, the subscription prorate has values: Day, Calendar monthly + Daily, Day With Calendar Month Weighted, Month, and Monthly + Daily. When the subscription term unit is Day, the subscription prorate has only one value, Day.
Let's look at the prorate multiplier in more detail in the following subsection.
Prorate multiplier
When a rep adds subscription products to a quote, the pricing is calculated by the CPQ engine in the backend using the prorate multiplier. It is important to understand how integrated systems handle part-period proration. An admin should understand what systems may be consuming CPQ data, commonly, revenue recognition engines and billing engines. The CPQ proration calculations should be evaluated against proration logic in these engines to ensure that bookings and billings match.
Let's learn how the CPQ prorate calculation works. It's important to choose which subscription term best suits your business when implementing CPQ and it is advisable not to change this setting as old quotes are not retroactively changed. Also, this affects how renewals and active quotes are calculated. Changing this could have a substantial impact on forecasting. The subscription term unit that is configured in package settings applies to all the subscription products. A quote's prorate multiplier is calculated based on the default subscription term and the length of the subscription. For example, let's imagine Packt Subscription is a subscription product in a Salesforce instance with a unit price of $30. We have a quote with a 24-month term in this subscription product and the Default Subscription Term (DST) for this quote is 12.
The prorate multiplier is calculated by dividing the subscription term (24) by the default subscription term (12), which is 2. So, the price of this product on the quote will show as 2*30, which is $60.
The prorate multiplier is easy to calculate when subscription terms are used for subscription lengths. This gets complex when we have start dates and end dates to calculate the term, as these calculations need to consider the number of days in a month, partial months, leap years, and so on. To handle various business needs, CPQ provides five different methods of prorate calculations. Each of these calculations is applicable by setting the Subscription Prorate precision field accordingly. Let's consider the same example of the Packt Subscription product with a 12-month DST. But now, instead of a 24-month term, we have the quote start date as Jan 5, 2020, and the end date as May 10, 2021. Let's see how the prorate precision is calculated for this use case:
- When Subscription Prorate precision is set to Day in the CPQ package settings, the prorate multiplier is calculated as days divided by the number of days necessary to complete the DST from the start date. In this example, it will be 492 / 366 = 1.3442.The price of the product in the QLE will be 1.3442 * 30 = 40.326.
- When Subscription Prorate precision is set to Calendar monthly + Daily in the CPQ package settings, the prorate multiplier is calculated as ([Partial days in start month / days in start month] + Whole months + [Partial days in end month / days in end month]) / DST. In this example, it is ([27/31]+16+[21/31]) /12 = 1.4623. The price of the product in the QLE will be 1.4623 * 30 = 43.869.
- When Subscription Prorate precision is set to Day With Calendar Month Weighted in the CPQ package settings, the prorate multiplier is calculated as Years + (Remaining days / X), where X = 366 if the remaining days include February 29, otherwise X = 365. In this example, it is 1+(121/365) = 1.3315. The price of the product in the QLE will be 1.3315 * 30 = 39.945.
- When Subscription Prorate precision is set to Month in the CPQ package settings, the prorate multiplier is calculated as Months (rounded up) / DST. In this example, it will be, 17/12 =1.4166. The price of the product in the QLE will be 1.4166 * 30 = 42.498.
- When Subscription Prorate precision is set to Monthly + Daily in the CPQ package settings. The prorate multiplier is calculated as (Months + [Remaining days / {365/12}]) / DST. In this example, it will be (16 + {6/{365/12}])/12 = 1.3497. The price of the product in the QLE will be 1.3497 * 30 = 40.491.
Now that we have learned about the prorate multiplier, let's look at the Quote tab settings.
The Quote tab
These settings manage quote creation and maintenance for CPQ quotes:
- Disable Initial Quote Sync: When a rep creates the first quote from an opportunity, by default, Salesforce CPQ creates quote lines for each of the opportunity products. When this setting is active, CPQ will not create these quote lines.
- Primary Quote Keeps Opportunity Products: In the previous chapters, we have seen that when a quote is marked as primary, the quote products are synched from quote to opportunity. When the primary quote is moved from quote A to quote B, the related products are pushed to the opportunity.
For example, let's think that quote A has two products, product A and product B, and quote B has two other products, product C and product D. When quote A is set as primary, product A and product B will be synched to the opportunity. When the primary quote is moved from quote A to quote B, the opportunity products will be automatically changed to product C and product D. With this setting, if there is no primary quote associated with an opportunity, the previously synched products will not be deleted from this opportunity.
- Default Quote Validity (Days): This field describes the time duration for which a rep is allowed to edit a quote. This depends on your company's business process and how you would want your reps to edit quotes. By default, this is set to 30 days. Using customization, admins can enforce security to lock the quote so that reps cannot edit the quotes past this limit.
Next, let's learn about the Order settings.
The Order tab
The following are the settings related to orders:
- Allow Multiple Orders: This will allow reps to split a quote into multiple orders. If your business requires this functionality, then using this configuration, the quote can be split into orders, as per the inventory available, or as per the location, and much more. This setting is available only in CPQ +.
- Create Orders Without Opportunities: This setting allows you to create an order from the quote without an opportunity. This is useful for organizations with high volumes of orders.
- Default Order Start Date: This will allow the order to default with the quote start date or the current date.
- Require Approved Quote: If this setting is enabled, sales reps cannot create an order until the quote's Status field is set to Approved.
After learning about the various settings, let's now look at some of the additional settings that CPQ offers.
Additional settings
The following are the additional settings available in the CPQ package settings:
- Triggers Disabled: This setting disables CPQ triggers temporarily. This is useful when you are performing data migration or when you are debugging or testing in CPQ. This needs to be enabled once the activity is completed.
- Multiple Bundle Views: This configurator has two values, Wizard and Classic, for quotes with multiple bundles. The wizard option displays each bundle separately. With the classic option, all the bundles are displayed together on one page, separated by the section layout.
- Enable Large Configurations: This setting allows users to include more than 400 products in product bundles. This setting has a performance impact as it slows down processing for all bundles.
- Execute Scripts: This setting needs to be enabled during the installation or upgrade. Post CPQ implementation, executing scripts is very helpful.
Important Note
Whenever there are configuration changes made and CPQ functionality doesn't work, it is advisable to execute scripts. This is very helpful for troubleshooting, when CPQ throws an error related to "Field Metadata," or when a price rule or any configuration stops working. Also, when you add a new field summary variable or picklist values, executing scripts will resolve the issue.
Summary
In this chapter, you have learned how to configure the CPQ package settings. You have also learned how the package settings can control the other configurations in CPQ. You saw that these settings apply across the entire package. It is very important to thoroughly understand these settings for successful CPQ implementation. With these master configurations, you should be able to minimize the customizations and leverage the out-of-the-box functionality.
In the next chapter, we will learn about CPQ data model and Migration concepts.