
Chapter 10: Salesforce Billing
In the quote to cash process that you have learned about so far, you have seen how the sales process progresses by creating opportunities and configuring products, prices, and quotes. Your business generates contracts, orders, amendments, and renewals as needed. Finally, an invoice needs to be sent to the customer for processing payments and recognizing revenue.
Traditional business models store invoicing, payment, and financial functionalities in a third-party system in Enterprise Resource Planning (ERP) systems. Extending these models for subscription and usage products requires a lot of customization and has its own challenges. When sales and finance are disconnected, invoices are often sent with errors. There will be a lot of manual complexities to integrate sales and finance and support new business models. Transforming the business process to subscription- and usage-based products therefore calls for a new revenue model.
Salesforce Billing is a part of Revenue Cloud, which is designed for recurring customer relationships. It helps with automating invoice creation and payment processing. Billing is just not a finance function; it is a customer touchpoint and impacts sales in a subscription model, unlike traditional one-time sales. Having Billing on the same platform where we maintain the rest of the customer relationship has many advantages. Sales reps can collect billing-related data early in the sales process and Billing can use this data seamlessly.
Salesforce Billing connects sales and finance in one unified system. Billing enhances CPQ capabilities with invoice generation, payment, and revenue recognition functionalities. Implementing Billing provides the ability to create quotes, orders, and invoices all in a single system without integration with an off-platform billing application.
In this chapter, we will be covering the following topics:
- Salesforce Billing overview
- Installing Salesforce Billing
- Creating invoices
- Creating payments
- Understanding the revenue recognition process
Salesforce Billing overview
Salesforce Billing is an add-on package for CPQ. The order object acts as a bridge between Salesforce CPQ and Billing. Billing uses the order object to create invoices, payments, and revenue recognition.
Billing can help automate the invoicing process. Debit and credit memos can be generated for any change required to the invoices. The invoice contains all the products and services for which the customer has been billed. In the previous chapters, we saw that after a primary quote with the required products has been created and the opportunity is set to Closed Won, an order and a contract will be created.
Contracts serve as a source of truth for future customer transactions including amendments and renewals for subscription products. The order serves as the source of truth for all the billing transactions. It is recommended to create an order from the quote, and then create a contract from the activated order. In Chapter 7, Creating Contracts, Amendments, and Renewals, we learned how to create a contract from an order object.
Salesforce Billing assesses several fields and settings to determine when an order product is ready for invoicing. Invoices can be created for the different types of products that we learned about in Chapter 3, Configuring CPQ Products. These invoices include the following:
- One-time products: This charge is invoiced once for the total order quantity and price.
- Subscription products: Salesforce Billing creates recurring invoices for subscription products. Order Products' date fields and billing fields determine how frequently a recurring invoice will be created.
- Evergreen subscriptions: For order products of the evergreen subscription type, Salesforce Billing creates invoices for each billing period indefinitely. Customers will be charged for subscription products until they cancel the subscriptions.
- Products with billing schedules: Salesforce Billing invoices an order product based on the billing schedule with pre-determined dates. For example, you can create a billing schedule to invoice 20% upon order activation and the remaining 80% after 3 months.
- Usage summaries: A usage summary is used to invoice usage independently from its parent product. The customer pays a given amount based on their usage. An order may have multiple consumption schedules. Salesforce Billing can create usage summaries for each of the consumption schedules and store them in the usage summary object. Each usage summary represents the period where the usage is captured and billed.
Salesforce Billing can also prevent an order product from being billed by setting the order product's Hold Billing field to Yes. Billing creates invoices for different groups of order products by matching their billing account fields. If the billing account has order products with different payment terms, then it groups order products by matching the payment terms. Admins can define more levels of groupings using the order product's Invoice Group field.
Configuring products for Salesforce Billing
The standard product object that you have configured for Salesforce CPQ can be configured for Billing by updating several Billing-related fields. Let's navigate to a sample product, the Packt Pro 13" Laptop, in your Salesforce organization and view the billing data, as shown in the following screenshot:

Figure 10.1 – Product billing data
Some of the important Billing fields on the product object include the following:
- Charge Type: This field defines whether the product is billed one time, as a recurring subscription, or based on usage.
- Billing Type: This field can have one of these two values: Advance or Arrears. Advance billing bills a product or service before you provide it. Arrears billing charges a product or service after you provide it. Salesforce Billing evaluates the billing type while calculating the product's next billing date.
- Billing Rule: Billing rules influence invoice creation. Pricing and date values on invoice lines will influence the billing period's dates and the billing cycles. In this example, we are using a sample billing rule, Combine Partial Periods.
- Billing Frequency: This determines how often an order product will be invoiced. For this example, we selected Monthly. You can override this on the Quote Line and Order Product so you do not have to create a new product record for the same product to support different billing frequencies.
- Revenue Recognition Rule: This determines whether Salesforce Billing creates a revenue schedule for an order product. This also contains the revenue treatments and provides revenue recognition reporting through a revenue schedule.
- Tax Rule: This field defines tax calculations and also determines whether to calculate tax or not for a specific product. Tax rules determine how to calculate tax based on tax integrations. In this example, we are using Standard Tax Rule.
The billing fields defined under products will flow to the quote line and eventually, to the order product.
Advantages of Salesforce Billing
Using Salesforce Billing, you can create and automate invoices, payments, and revenue recognition. Sales reps can create accurate quotes with any revenue model. Here are some of the advantages of implementing Billing:
- Salesforce Billing helps to streamline the quote to cash process. It also helps the ongoing customer relationship. Salesforce Billing is a unified transactional billing engine that helps with recurring time-bound customer events. Using Salesforce Billing, we can handle the change orders, co-terminated add-ons, prorated pricing, and so on.
- It can be used to generate error-free billing for subscription and usage-based products and allows billing data to flow seamlessly and accurately from order to invoice.
- It helps to configure complex billing and tax rules.
- It accelerates the payment collection process and improves cash flow. Billing can also create powerful revenue recognition systems.
- Salesforce Billing helps with data and reporting to understand profitability across systems.
- It improves sales performance by automating billing data transfer from CPQ to billing objects.
- It eliminates the need to integrate with a third-party system for invoices and payments and improves customer satisfaction.
- Salesforce Billing can integrate with payment gateways that process credit card and ACH transactions.
- The native quoting and pricing schemas are supported by the billing package. If you can quote it, you can bill it.
- It provides a 360-degree customer view to the rep and eliminates the need to log into multiple systems for financial details.
In the next section, let's learn how to install Salesforce Billing.
Installing Salesforce Billing
We need to install Salesforce CPQ before installing Salesforce Billing. It is recommended to install the same version of Billing as CPQ.
The following CPQ package settings need to be configured before installing Billing:
- In the Subscriptions and Renewals settings, if your organization uses Percent of Total (PoT) products that cover assets, the PoT Renewals (Contracting from Orders) setting must be unselected.
- Within the Subscriptions and Renewals settings, the Subscription Term Unit field must have a value of Months.
To install Salesforce Billing, navigate to https://install.steelbrick.com/, search for Salesforce Billing, and click on the Production or Sandbox instance based on where the package needs to be installed. Follow the similar installation steps you saw in Chapter 1, Getting Started with Salesforce CPQ Implementation, for installing Salesforce CPQ.
Once the installation is complete, the package can be configured by navigating to Setup Quick Find Installed Packages Salesforce Billing Configure.
For testing billing functionality in a test environment or creating a Proof of Concept (PoC) for business users, the admin can insert sample data that can be added by navigating to Setup Quick Find Installed Packages Salesforce Billing Configure Additional settings Insert Sampledata Save.
Important Note
Salesforce CPQ and Billing have separate proration settings in package configurations. Make sure that the proration settings in both packages are aligned to ensure accurate order product and invoice line totals.
Salesforce Billing also provides separate page layouts for account, order, order products, product, consumption schedule, and order product consumption schedule objects. These page layouts can be assigned to the required Salesforce profiles. The standard Billing page layouts can be cloned or customized as needed.
Salesforce Billing consists of a permission set that grants permissions for the package custom objects. Admins can customize permissions for standard objects as needed. Orders and order products are standard objects that contain standard fields, CPQ fields, and Billing fields. In the next section, let's learn how an invoice can be created in Billing.
Creating invoices
An invoice is a legal document that denotes the customer's agreement to pay you for services. Invoices display the products or services sold, and the amount that the customer needs to pay. The invoice record contains important information such as the balance, due date, and payment status.
Salesforce CPQ Billing invoices support multiple revenue types, such as one-time, recurring, or usage-based models. Multiple invoices for multiple orders can be consolidated using billing configurations. To make sure customers are billed efficiently, invoices for a single order can be split as required.
Invoices can be created in two ways:
- Salesforce Billing allows you to create an invoice manually from a single order when you select the Bill Now checkbox on an order and save the record. This is recommended only for testing. For the actual implementation, it is advisable to automate invoice creation based on business rules. The reason it is advised only for testing is Salesforce Billing can bill multiple orders together based on configuration, but the Bill Now checkbox only looks at that order, so you risk having multiple orders (that bill together) getting out of sync.
- Invoice creation can also be automated using an Invoice Scheduler. Based on the user-defined rules in Billing, the Invoice Scheduler creates invoices for unbilled order products.
Creating a sample invoice
Let's see how we can create an invoice manually using the Bill Now checkbox on an order. We learned about creating orders from opportunities in the previous chapters. Let's take an example where we have a sample opportunity.
Imagine the sales process has progressed. We have a primary quote created for this opportunity and have added a sample product, Loss and Damage Warranty. This is a subscription product with recurring billing. Selecting the Ordered checkbox on the opportunity and saving the record will create an order. All the quote lines will be translated to order products. The order needs to be activated to generate an invoice.
Each order product will be converted to an invoice line. The invoice inherits the Service Start Date, Service End Date, Subscription Term, Payment Terms, and Order Products from its parent order. A few prerequisites to create an invoice include the following:
- The Order Product must be activated.
- The following Order Product fields should be populated:
- Charge Type.
- Billing Rule.
- Tax Rule.
- Revenue Recognition Rule.
- Next billing date.
- Billable unit price.
- The Hold billing field must be set to No.
- The Invoice run processing status should be Pending Billing.
Selecting the Bill Now checkbox on an order and saving the record will create an invoice as shown in the following screenshot:
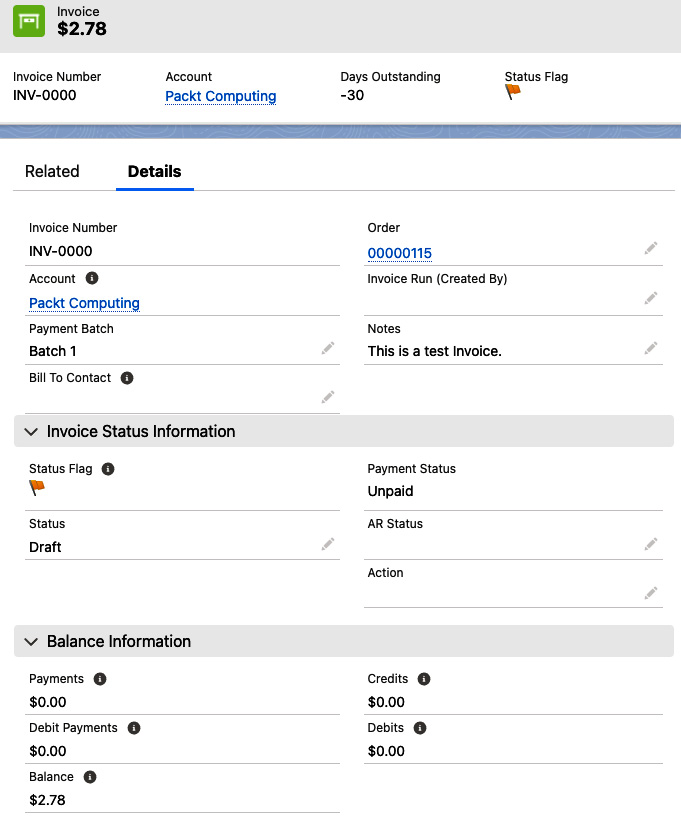
Figure 10.2 – Invoice created from an order
Let's look at a few of the important fields on an invoice:
- The Related tab contains all the invoice lines related to this invoice.
- Invoice Number contains a unique number generated by Salesforce Billing.
- Account and Order are related to this invoice.
- Notes can be used to hold information related to the invoice.
An invoice can have the following Status values:
- Draft: By default, invoices are generated with a Draft status. This will allow admins to review and correct any errors before sending them to customers.
- Error: During the calculation, if there are any errors, the invoice status will be set to Error. The errors can be reviewed in the invoices' error log-Related List.
- Initiated: The status of the invoice will be set to Initiated when Salesforce Billing is calculating the field values for invoice lines and invoices.
- Posted: Salesforce Billing has finished posting and the invoice is ready to be sent to a customer. Once the invoice is posted, you cannot make any changes to the invoice or invoice lines. Changes to the invoices will be handled by creating credit or debit notes. This will ensure that the organization will have a record of all the legal requirements.
- Canceled: When a user process has canceled an invoice, the status is set to Canceled and a credit note will be created for the remaining balance.
- Rebilled: When an invoice is canceled, it can be rebilled using the Cancel and Rebill button.
- Post In Progress: This is the status while the posting is in progress. When the posting is successful, the invoice status is set to Posted. If there is any error, it will be set to that Error.
Invoices contain the tax information that Salesforce Billing provides, an internal tax engine, and an ability to integrate with external tax engines. Invoices also contain the payments and the balance information. Posting an invoice will lock it, preventing any changes from being made to it. A posted invoice is ready for payment and revenue recognition. Posting an invoice will initiate the following actions:
- Payments: Allocate payments to the invoices and invoice lines. Customers can select the payments in the Payment Center and complete the invoice payments. Customer payments can be handled manually or processed via a third-party payment system. The payment terms defined in the quote will flow to the order.
- Revenue Recognition: Creates a revenue schedule for invoice lines covered by a revenue schedule creation action set. Salesforce Billing allows the revenue schedules to be managed through specific rules associated with each product.
Once the invoice is posted, it cannot be changed as the transaction will be recorded in financial books. Changes to the posted invoice can be made by using credit notes and debit notes. This will be useful when we have errors in paid or partially paid invoices. Both the credit note and debit note objects have a lookup relationship to the account object.
Credit note lines and debit note lines track the actual amount to be allocated to one or more invoice lines. A credit note will decrease the invoice line balance and a debit note line will increase the invoice balance. A credit note can be created by clicking the Cancel and Rebill, Credit, or Convert Negative Lines buttons on the invoice. A credit note can be created with tax or without tax as needed. Credit notes and credit note lines can also be created manually.
Debit notes can be created from the Debit Note tab by clicking on the New Debit Note button or can be created from Related List on the account.
In the next section, let's learn how to automate invoice creation.
Configuring an Invoice Scheduler
Using an Invoice Scheduler, Billing can automatically create invoices. An Invoice Scheduler uses an invoice run to evaluate when to invoice an order product. It considers all the unbilled order products and evaluates the user-determined criteria to generate invoices and invoice lines. Order products will be mapped to invoice lines. To create an Invoice Scheduler, navigate to Setup Quick Search Invoice Scheduler New. You'll see the following:

Figure 10.3 – Automate invoice creation using an Invoice Scheduler
Let's look at some of the important fields in creating an Invoice Scheduler:
- Invoice Scheduler Name: The name of the invoice scheduler.
- Type: This defines the time frame for the invoice run. This can be set to Daily, Weekly, Monthly, or Once. In this example, we are creating a monthly invoice scheduler.
- Batch: This is a multi-select picklist on Invoice Scheduler and Order objects. This is mainly used to distribute the load of invoice generation and reduce time-out errors. This batch value is compared against the Invoice Batch value on the order record. Only orders with matching invoice batch values will be picked up for the invoice run. The batch value selects the orders to be considered for invoicing. If required, additional values can be added to the invoice Batch fields. Make sure these values are added to both Invoice Scheduler and Order objects. When you use invoice batches, they need to be defined on every order for the batch to be selected for invoice generation.
Important Note
Using invoice batches will result in separate invoices being generated for the same account if the orders have different batches, so you need to make sure the batches won't result in invoice splits. If needed, use Salesforce automation to set batch values to their defaults.
- Start Date Time: The Invoice Scheduler process begins at this date and time.
- Invoice Date: This field is for one-time invoice creation. An invoice will be created on this date.
- Target Date: All eligible active order products before or equal to the target date will be invoiced.
- Invoice Day Of Month: This is used for monthly invoices to specify the day of the month that will be invoiced.
- Automatically Post Invoices: By default, all invoices are generated in draft mode. If there are any corrections, draft invoices can be edited and corrected. No changes will be allowed once an invoice is posted. At the beginning of the Billing implementation, it is advisable to create all the invoices in Draft status, and once the system stabilizes after going live, this can be changed as needed.
The invoice run object stores all the information related to invoice execution. This is a Related List on the Invoice Scheduler.
An invoice run is created when the Invoice Scheduler hits the target date. All the unbilled order products meeting the invoice run criteria will be selected for invoice generation. Salesforce Billing keeps invoice run criteria as a record in the Invoice Scheduler's invoice-run-Related List. Invoice runs are subject to Salesforce governor limits. If the invoice runs and processes many order products, you may encounter Apex errors.
Make sure the invoice runs are tested in a sandbox environment for scalability. Invoice Scheduler target dates can be used to generate invoices ahead of the actual invoice date. The invoice run's Clean Up Invoices button cancels any invoices that have a status of Error, Initiated, or Draft, and rolls back the order product status to Pending Billing. This will be useful for resetting when there are a lot of incorrect invoices.
Salesforce does not publish benchmarks for Invoice Scheduler performance because the overall performance is dependent on the specific implementation. Invoice creation can trigger the creation of records related to revenue recognition and payments.
Salesforce Billing provides several options to create invoice documents. If you have any third-party tools such as Conga or DocuSign for quote document generation, it is advisable to use the same application for invoice document generation as well. Salesforce Billing out of the box does not create and send invoice documents. Now that you have learned creating invoices in Billing, next let's learn how to create payments.
Creating payments
Salesforce Billing can be used to manually collect and allocate payments, or alternatively to automate the payment process. Payments can then be posted to keep the books up to date. Salesforce Billing allows multiple ways to create payments:
- Payments can be manually created by accounts receivable users.
- Admins can create a payment run that evaluates the posted invoices at scheduled intervals. Payments will be processed based on the given account's payment methods.
- Customers can directly pay invoices using their own payment methods in the Salesforce Billing Payment Center.
- Using external payment gateways – payment gateway records in Salesforce contain information for establishing the connection between Salesforce Billing and an external gateway.
- Salesforce Billing also supports self-service payment options using the Salesforce Billing API or Salesforce Communities.
Once the payment is completed, Salesforce Billing creates a payment record in the payment object. Once Billing verifies the funds, the Payment Status field will be updated to Completed. Admins can also import payments using the data loader or by updating payments manually.
The following diagram shows a high-level billing data model:
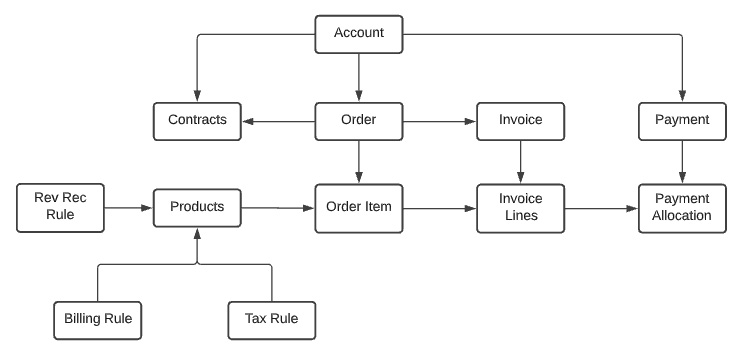
Figure 10.4 – Billing data model
Salesforce Billing tracks payments using several objects. Each product has an associated Billing Rule, Tax Rule, and Revenue Recognition Rule that defines how these transactions are scheduled for the product. Payments have an optional lookup relationship to the invoice record.
A payment object represents a payment event such as receiving a check or a credit card payment. A payment record stores information about the payment amount and payment-related details. Payments can be applied to any posted invoice with a balance. A payment has a master-detail relationship to an account. Payment allocation represents the payment amount applied to an invoice line's balance. When a payment is created for an invoice, it automatically creates allocations against the full balance of each invoice line. Let's learn about the revenue recognition process in Billing.
Understanding the revenue recognition process
Billing offers support for ERP systems by converting the Salesforce CPQ quote to cash data into transactional data. This conversion helps ERP systems to inherit matching data that can be used for accounting functions for general ledger and financial reporting. Salesforce Billing uses several objects to manage the revenue recognition system. Revenue recognition is controlled by accounting standards and can be complex.
For example, revenue for a warranty subscription product of 120 dollars for a period of 12 months can be recognized as 10 dollars a month. Revenue can also be partially recognized. For example, 50% of the revenue can be recognized in full and the remaining 50% is based on the product subscription start date and end date. The revenue recognition process in billing can be automated by configuring the following:
Let's create a sample revenue distribution in Salesforce Billing by navigating to Setup Quick Find Revenue Distribution Methods New. This will open the screen shown in the following screenshot:

Figure 10.5 – Creating a revenue distribution method
Let's look at a few important fields in the revenue distribution method creation process:
- Name: Provide a meaningful name for the revenue distribution method.
- Revenue Transaction Creation Process: This can have two values: Automatic and Manual. Select Automatic to automatically create the revenue recognition.
- Type: This determines the record based on which revenue can be distributed. In this example, we are choosing Invoice.
- Distribution Method: This determines how the revenue can be recognized. This can have three values: Daily, Monthly, and Full Recognition. For this example, we are selecting Full Recognition.
- Full Recognition Date: This is required if the Distribution Method is Full Recognition. This is the date on which the revenue will be recognized. When the Distribution Method is set to Daily or Monthly, then the Revenue Schedule Term Start Date and Revenue Schedule Term End Date fields are mandatory.
Additional revenue distribution methods can be defined as required for your company's financial requirements.
- Revenue Recognition Rule: These rules specify whether Billing creates a revenue schedule for an invoice order or invoice line. Using Revenue Recognition Rules, Billing creates revenue transactions for a specific time. Products for which we need to recognize revenue require a lookup to a Revenue Recognition Rule.
To create a Revenue Recognition Rule, navigate to Setup Quick Find Revenue Recognition Rules New. This opens the following window:

Figure 10.6 – Creating a Revenue Recognition Rule
Provide a meaningful name and set Create Revenue Schedule? to Yes.
Admins can create additional Revenue Recognitions Rules as required by your company's finance team.
- Revenue treatment: This controls how and where Salesforce Billing identifies a product's revenue. Revenue recognition treatments specify how Salesforce makes revenue schedules. They also describe how Salesforce Billing records revenue transaction data in finance books and general ledgers.
A Revenue Recognition Rule can have numerous treatments. To create a sample treatment, navigate to Setup Quick Find Revenue Recognition Treatments New. This will open the following window:
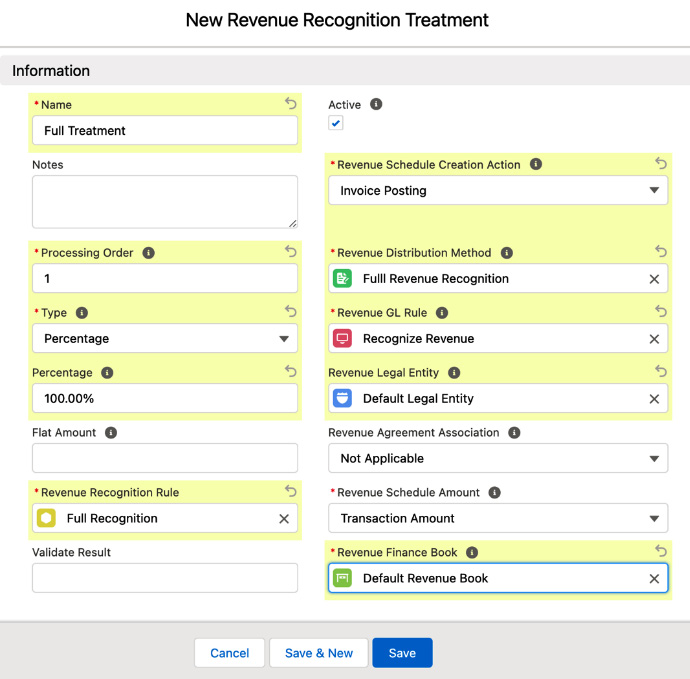
Figure 10.7 – Revenue recognition treatments
Let's look at a few important fields when creating a revenue treatment:
- Name: Provide a meaningful name.
- Processing Order: When we have multiple revenue recognition treatments, you can provide a processing order. This is the sequence in which revenue treatments will be processed. A Processing Order value of 1 will be executed before 2.
- Type: This can have three values: Percentage, Flat Amount, and Remainder. This is how the amount will be calculated.
- Revenue Recognition Rule: We are using the revenue rule that we created in Figure 10.6.
- Revenue Distribution Method: This sets the revenue distribution method used for assigning revenue. In this example, we are using the revenue distribution method created in Figure 10.7.
- Revenue GL Rule: All transactions administered through this treatment record journal entries founded on this GL rule.
- Revenue Legal Entity: Legal entities can be created in Salesforce Billing. All the treatments applied to order products under the parent Revenue Recognition Rule will have a matching legal entity.
- Revenue Finance Book: Finance books are helpful for organizing your transaction records into several groups for reporting and recordkeeping purposes. Finance books can also be created in Salesforce Billing.
This will create a full revenue recognition transaction based on the invoice start date. We have seen how revenue recognition can be automated in Salesforce Billing. Next, let's learn how General Ledger (GL) accounts can be created.
Creating GL accounts
Salesforce Billing can also be used to configure general ledger accounts for financial transactions. To summarize the financial transactions for invoices, tax, and revenue, we need an Account Receivable (AR) account, a revenue account, and a tax payable account. These are generic accounts chosen to demonstrate the account creation in Salesforce Billing. In a real-world implementation, the accounts required by your organization's finance department need to be created and configured as required.
GL accounts can be created by navigating to Setup Quick Find GL Accounts New. This will open the following window:

Figure 10.8 – New GL Account
Let's learn about some of the important fields in GL account creation:
- GL Account Name: This is the name of the GL account we are creating. In this case, we are creating a Revenue Account.
- GL Account Number: This is a unique number for each business. A company's Financial Management System (FMS) will provide this unique number. This value will be mapped to the FMS.
- GL Account Description: Add an appropriate description to provide users with more information as to what this account is for.
- Active: Click the checkbox next to this option to activate the account for use in Salesforce Billing transactions.
Saving this will create a GL account. Repeat the same process for different GL accounts that you need to create as per your organization's FMS requirements. After creating the GL accounts, let's learn how to create GL rules and GL treatments. GL rules define how Salesforce Billing records transactional data in your finance books. You can create a GL rule by navigating to Setup Quick Find GL Rule New. Next, you can create the GL treatment by navigating to Setup Quick Find GL Treatment New. This will open the following screen:
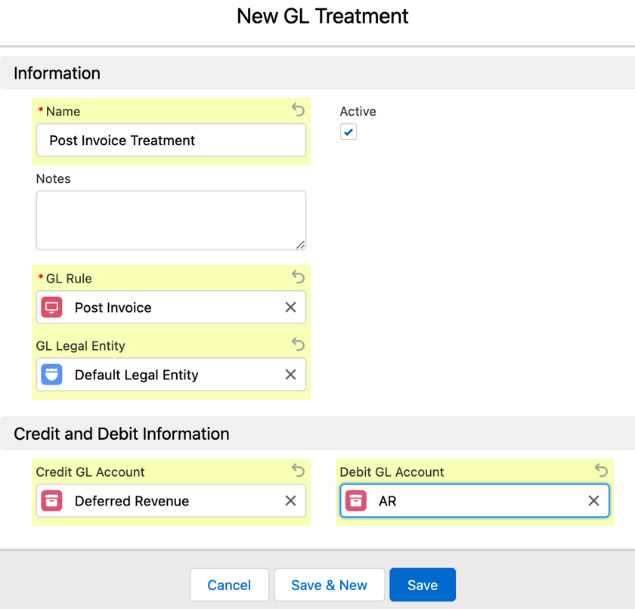
Figure 10.9 – New GL Treatment
A few important fields in the GL treatment creation process include the following:
- Name: Provide a meaningful name for the GL treatment.
- GL Rule: This is the GL rule to which we want to apply this treatment.
- GL Legal Entity: When a GL rule evaluates an order product, Salesforce Billing applies one of the rule's treatments if the order product and GL treatment are part of the same legal entity.
- Credit and Debit Information: GL treatments contain lookups to a credit GL account and a debit GL account.
GL rules can be organized by GL treatment. Similarly, we can also create tax rules and tax treatments in Salesforce Billing to define how Billing processes taxes for the transactions.
Invoice lines contain lookups to revenue recognition rules, GL rules, and tax rules. These lookups help to establish the relationship between a transactional object and a GL account every time a transaction is performed. These relationships can be used for finance bookkeeping in external GL systems.
Salesforce Billing provides finance books, which are an out-of-the-box Billing object to store transactional data such as invoice lines, payment allocations, credit note lines, and revenue schedules. Finance books can be used to track this transactional data by organizing them into different groups based on the finance period for reporting and recordkeeping. Billing can help group a finance book's transaction records by date and legal entity into finance periods. Finance books can be used to ensure a seamless handoff to an ERP or accounting system.
Summary
In this chapter, we have learned how Salesforce Billing helps to unify the sales and finance teams in any business and helps to improve the customer experience. We also gained an understanding of the advantages that Salesforce Billing provides in the quote to cash process.
We have just scratched the surface here – a lot of finance-related features can be configured using Salesforce Billing. We have seen how to create invoices and invoice lines in Billing using the CPQ order object for different types of products. We have realized that Billing offers a lot of out-of-the-box configurations for setting up GL accounts. We have learned about revenue recognition rules, GL rules, tax rules, and the corresponding treatments. With this, the sales, finance, and service teams will be able to work from the same connected system. This helps reduce invoicing errors, creates an empowering customer experience, and allows us to close the books faster.
In the next chapter, we will learn about Salesforce Industries CPQ.