
Chapter 4: Configuring CPQ Pricing
In the previous chapter, we discussed how product configuration and CPQ automation help reps sell the right products at accurate prices. Adding the correct combination of products to a customer's quote is crucial for all businesses. It is equally important to sell products at the right price. For example, you may have a few customers who are eligible for special pricing and additional discounts. The same pricing structure may not be applicable for all your other customers. Also, you may be using different currencies in various countries. In addition, you may be selling products at a different price to your retail customers, compared to your wholesale customers. In these cases, how do you make sure the rep is always able to add the right pricing? Salesforce CPQ provides a lot of out-of-the-box functionalities that allow administrators to configure and tailor prices as per their needs. This helps reps automatically price products and add appropriate discounts. In this chapter, you will learn about the important pricing functionalities that CPQ offers.
In this chapter, we will be covering the following topics:
- CPQ pricing
- Learning about pricing methods
- Creating Multi-Dimensional Quoting (MDQ)
- Understanding the pricing structure
- Discounting in CPQ
- Creating price rules
CPQ pricing
We know that Salesforce provides price books to maintain the list prices of products. A price book is a standard object, which is also available for non-CPQ users. When a rep is working on an opportunity, they can choose the price book from which the products and pricing data will be pulled. Most businesses have different pricing requirements based on the customer to whom they are selling – retail, wholesale, government, commercial, and so on. These requirements can be handled by creating different price books but maintaining this data takes more work. For instance, you may need to change a price book entry only for a specific customer, or price a product based on the volume the customer is buying. Businesses too typically need to adjust pricing year on year. In these and many more such complex scenarios, CPQ pricing helps rather than creating new price books for these scenarios.
When your reps create a quote from an opportunity, it uses the standard selected price book. However, pricing exceptions can be added automatically when needed using CPQ configuration. The same product from the same price book can show two different prices when added to a quote based on the business requirements. The same product can also be added at zero-dollar cost when sold in a bundle and can be changed when sold separately. This configuration could be used in a scenario where you are selling laptops. You don't want your rep to add a price for a charger when sold with the laptop. But you want to charge your customer for the same product when sold outside the bundle. CPQ can help configure these use cases using price rules and other automations.
Price books are mandatory for all products. Make sure the products are active and have been assigned to a price book. If a product entry is missing from your price book and a rep creates a quote using that price book, then that product won't be available until you add it to the price book.
Salesforce CPQ provides several pricing methods. A product's price is defined using the associated price method. Based on your business process, admins can decide which pricing method is appropriate. In the next section, let's learn about pricing methods in detail.
Quote the Price Book
At any point, a quote can be associated with only one price book and one currency. Only active price book entries can be added to quotes. A quote should have the same price book as the related opportunity. Incongruous price books will cause syncing from quote lines back to opportunity products to fail.
Learning about pricing methods
CPQ can adjust and modify the price of a product that is derived from the price book. Pricing methods can be used to perform price changes when a rep adds a product to a quote. In the previous chapter, while creating products, we saw that we had a section related to pricing, where we can define product pricing attributes. A pricing method is a standard field in the product object. Salesforce CPQ offers the following four pricing methods out of the box:
- List price
- Cost
- Block
- Percent of total
Let's learn more about each of these pricing methods and how an admin can configure them in CPQ. Each pricing method is a picklist value in the product object.
Setting a list price
For the list price value, the price is retrieved from the price book entry of a product. This leverages the native price book and multi-currency features.
To set up the list price for a product, navigate to App launcher Products (select any product from your org). In this example, we are setting the price of the product Packt Pro 13 Laptop by navigating to Packt Pro 13" Laptop Edit Details Salesforce CPQ Pricing List.
Creating the cost price
The cost price is the cost of a product plus the markup. Unlike the list price, the cost price starts with a base price and the rep can adjust this price by an amount or a percentage. For example, when customers have raw materials like wood, metal, and gas, the pricing may often change but not the markup that reps have agreed with the customer. So, the cost plus markup allows an organization to control raw material pricing outside of a price book (which is unfortunately challenging) and into cost records, which allows for the integration of an admin process to keep them up to date.
In CPQ, the cost is a child object of the product object and is very similar to a price book entry as there can be only one cost per product per currency. CPQ selects the cost based on the currency of the quote. Even though there is no price book associated with the cost price, we still need price book entries for these products. Without the price book entries, these products won't be available for selection while adding to a quote. As an admin, let's create a product with the cost price. In this example, let's create a sample product Cost Price. To do this, first, we will create the product by navigating to App Launcher Products New Product Name. Enter Cost Price in the Product Name field and click Save.
Once the product is created, we can set the cost price by navigating to the product: Cost Price Salesforce CPQ Pricing Pricing method Cost Save.
Once you save the record, the product gets created, as shown here:
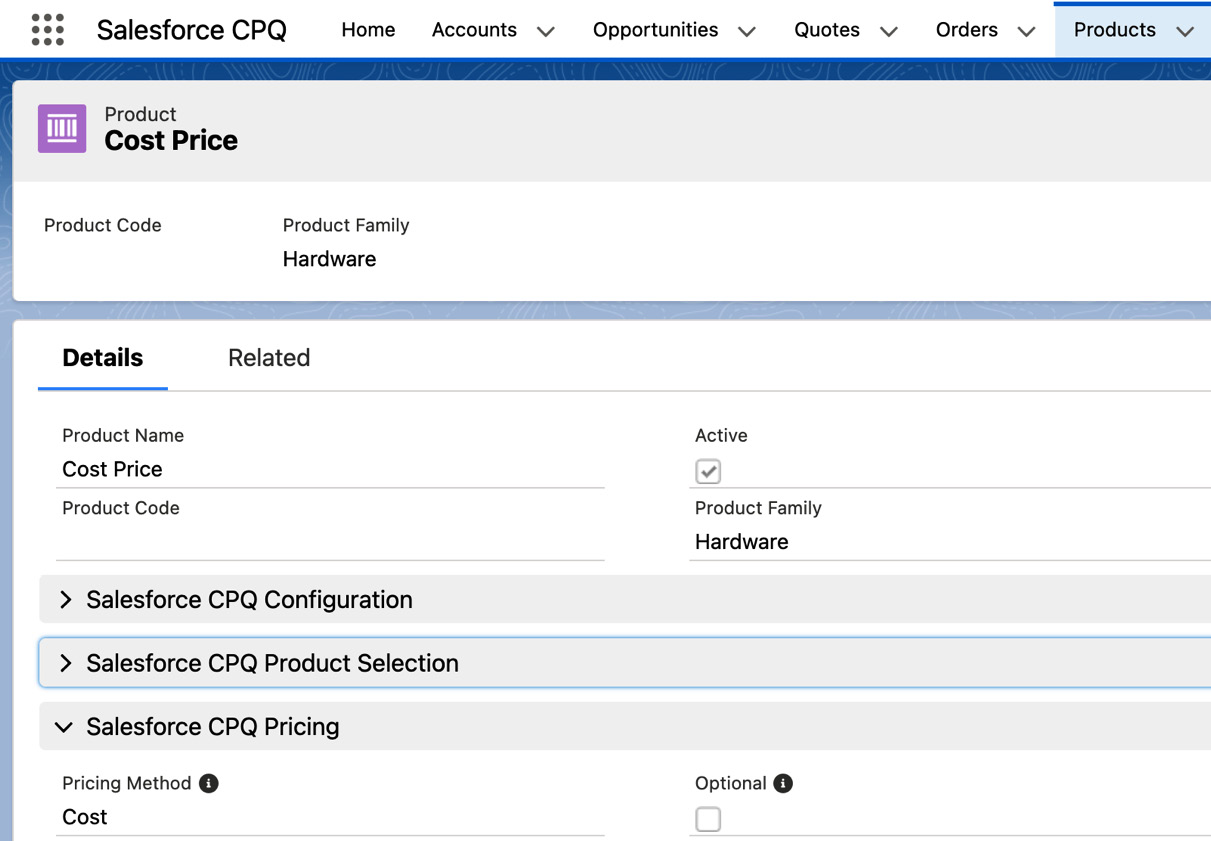
Figure 4.1 – Creating Cost Price
To add the product to the price book, click on the Related section of this product and then click on the button Add to Price Book. To define the cost for this product, create a cost record by clicking the New button. The following screenshot shows the price book entry and the cost record for our sample product, Cost Price:
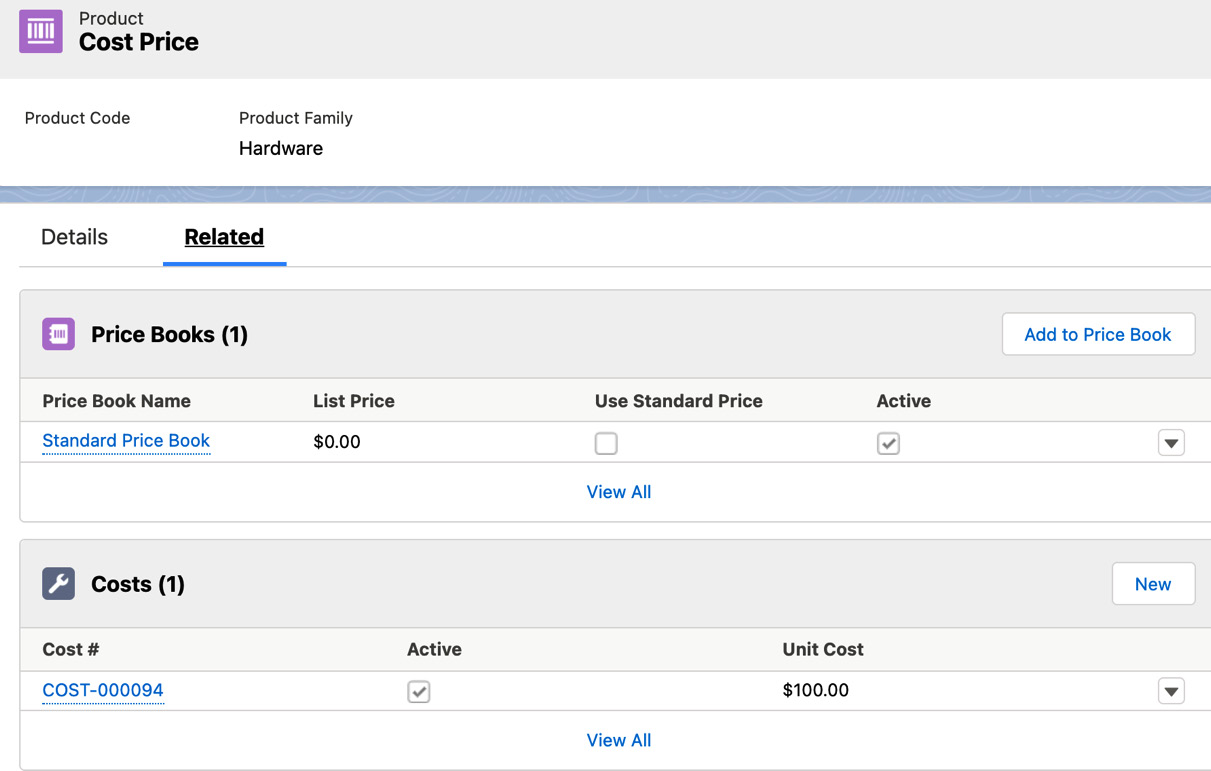
Figure 4.2 – Creating Cost Price
When the cost price is configured for a product, the list price in the price book is set to zero.
Now, this product is ready to be added to a quote. A rep can add this product to a quote by navigating to any sample quote using the path Quote Edit lines Add Products Search Cost Price Select. This will take you to the Quote Line Editor (QLE) page, as shown in Figure 4.3. If the UNIT COST and MARKUP fields are not available in the QLE field set in the Salesforce org that you are working on, make sure your admin adds these fields to the field set.
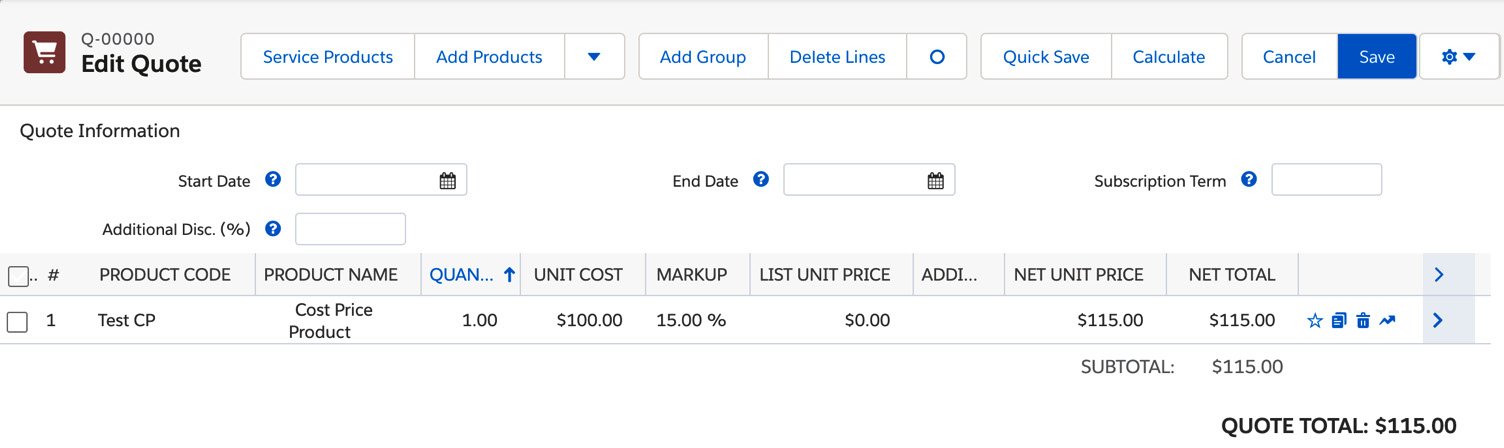
Figure 4.3 – Cost Price QLE
As you can see in the preceding figure, the UNIT COST for our sample product, Cost Price, is $100.00, and when a rep adds a MARKUP of 15%, the NET UNIT PRICE is calculated automatically. The rep can also edit the MARKUP field in the QLE as needed.
Creating the block price
The block price is tier-based pricing. Tier-based pricing means that the price of the product depends on the quantity that a customer is purchasing. The price is also based on the range of the quantity and not the individual product. This is similar to applying volume-based discounts. Let's consider an example where your company is selling printer paper and you want to set a block price for this product. To configure block pricing, let's define the size of the range and prices for the printer paper as per the range. An admin can set up block pricing as shown here:
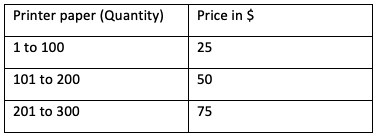
Figure 4.4 – Block price example
Salesforce provides out-of-the-box functionality for block price configuration, which can be defined in the block price object. We are using the example shown in Figure 4.4 to configure the block price of our Salesforce instance. For this example, we are selecting Printer Paper A4, which is a sample product in the Salesforce org. To set up block pricing for this product, navigate to App Launcher Salesforce CPQ Products Related list Block Price New. This will open the screen shown here:
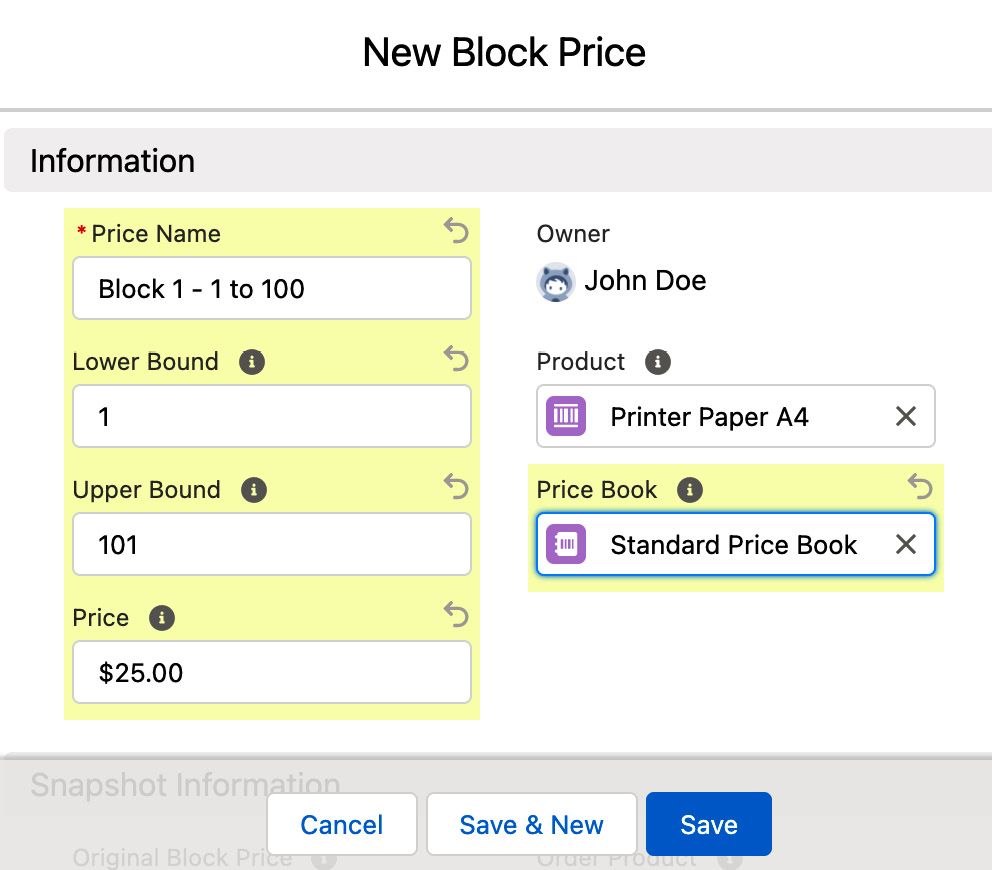
Figure 4.5 – Create a block price
Following are a few important fields included in the block price configuration:
- Price Name: The name of the tiered pricing.
- Lower Bound and Upper Bound are the tier ranges. We cannot have any gaps between the lower bound and the upper bound values while defining the block price. The upper bound is excluded and the lower bound is included in the price calculation. When the final tier's upper bound is left blank, it is treated as infinite. It is a common practice when defining price tiers to leave the final tier's upper bound blank so that block pricing scales to any quantity.
- Price: The price for each block. For example, any quantity from 1 to 100 will cost $25.
- Multi-Currency: When this field is enabled, you will see additional columns for block pricing in each currency when configuring the price.
Similarly, we can create the other blocks and save the record. The following screenshot shows all three blocks in our example:
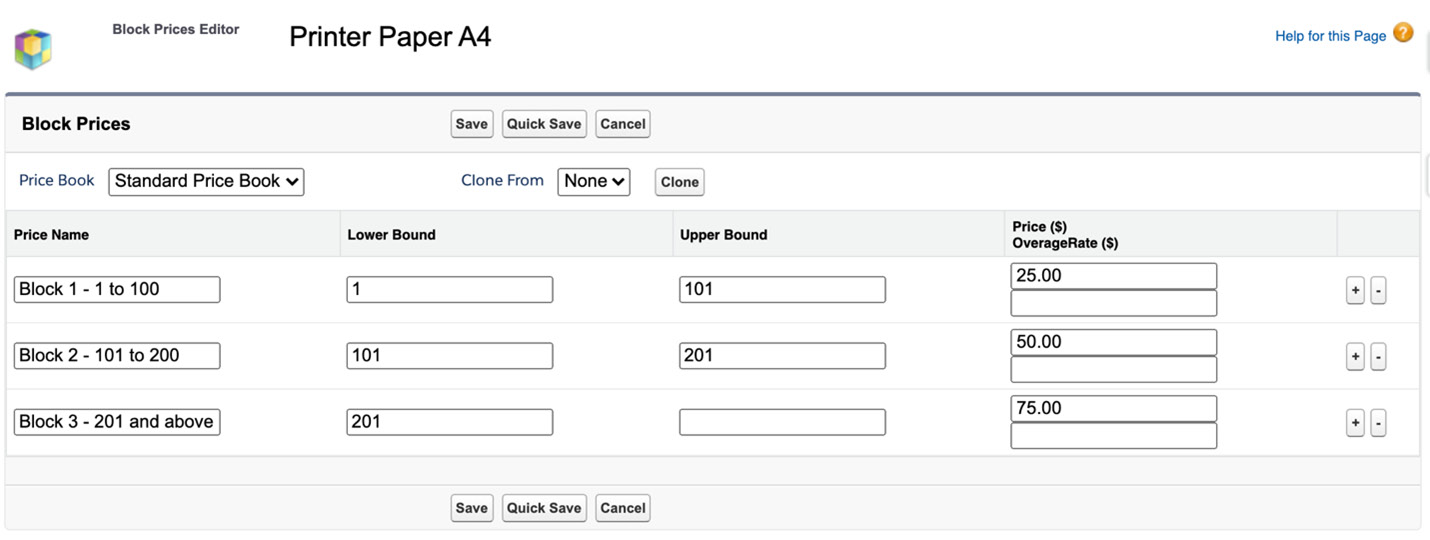
Figure 4.6 – Block price example
Any quantity between 1 and 100 will have a price of $25 when added to the QLE. Similarly, the price for other blocks will be applied as configured in Figure 4.6. Block price is the absolute price for the quote line and NOT the unit price that gets multiplied by quantity to arrive at the final price.
Adding a block price product to a quote
Let's see how the pricing is displayed when a rep adds a product to the QLE. For this, navigate to any sample quote and search the product you want to add to this quote. In this example, let's choose Printer Paper A4 by navigating to Quote Edit Lines Add Products Search Printer Paper A4 select.
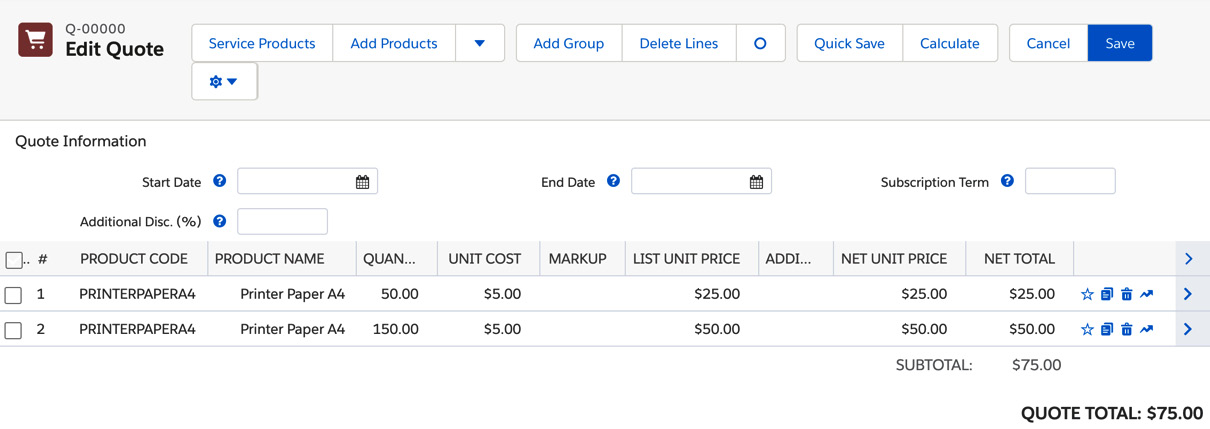
Figure 4.7 – Block Price in QLE
We have added the same product two times, as shown in the preceding figure, to show the block price. For the first line, the quantity is 50 and it falls into tier 1, hence the list price is $25. For the second line, the quantity is 150, which falls into tier 2, and the price is $50.
What if your customer wants to buy just a few more additional units than the last block? In this example, let's say tier 3 ends at 300 and the customer wants to buy 305 units of paper. To help with this, CPQ provides another feature called OverageRate pricing. This is a CPQ special field. This feature allows us to define the per-unit price for any quantity above our highest tier.
The block price is the price for the applicable block + (additional units *overage rate).
In our example, let's set the OverageRate price as a dollar for each additional unit. The price for 305 units of paper will be the tier 1 block price ($75) + OverageRate per unit ($5).
To configure the OverageRate, admins need to create a special custom currency field in the block price object. To do this, navigate to App Launcher Object Manager Block Price Fields & Relationship New Currency Next Field Name OverageRate (API name OverageRate__c) Next Save. This is a one-time setup.
In this field, admins can define the additional per unit price beyond the final block. For this example, we are creating an Overage Rate for Printer Paper A4. To do this, navigate to App Launcher Salesforce CPQ Products Related list Block Price Edit and update OverageRate. The following figure shows the OverageRate configuration:

Figure 4.8 – Block Prices OverageRate
In this example, we have added an OverageRate of $1 for the final block.
Creating a percentage of the total price
In this pricing method, the price is calculated as a percentage of its parent quote, quote line group, or bundle total price. For example, when you go to a restaurant, you calculate the tip as a percentage of your total bill amount. A percent of total (PoT) method is generally used for the subscription product sales process. When the pricing method for a product is set as a percentage of the total, Salesforce CPQ automatically calculates the price.
For example, your company is selling electrical equipment, and Electrical Installation is a product in your Salesforce org. The cost of the installation will be a percentage of the total cost of the electrical equipment. Admins can configure this by navigating to App Launcher Products Electrical installation Edit. This will take you to the following screen:
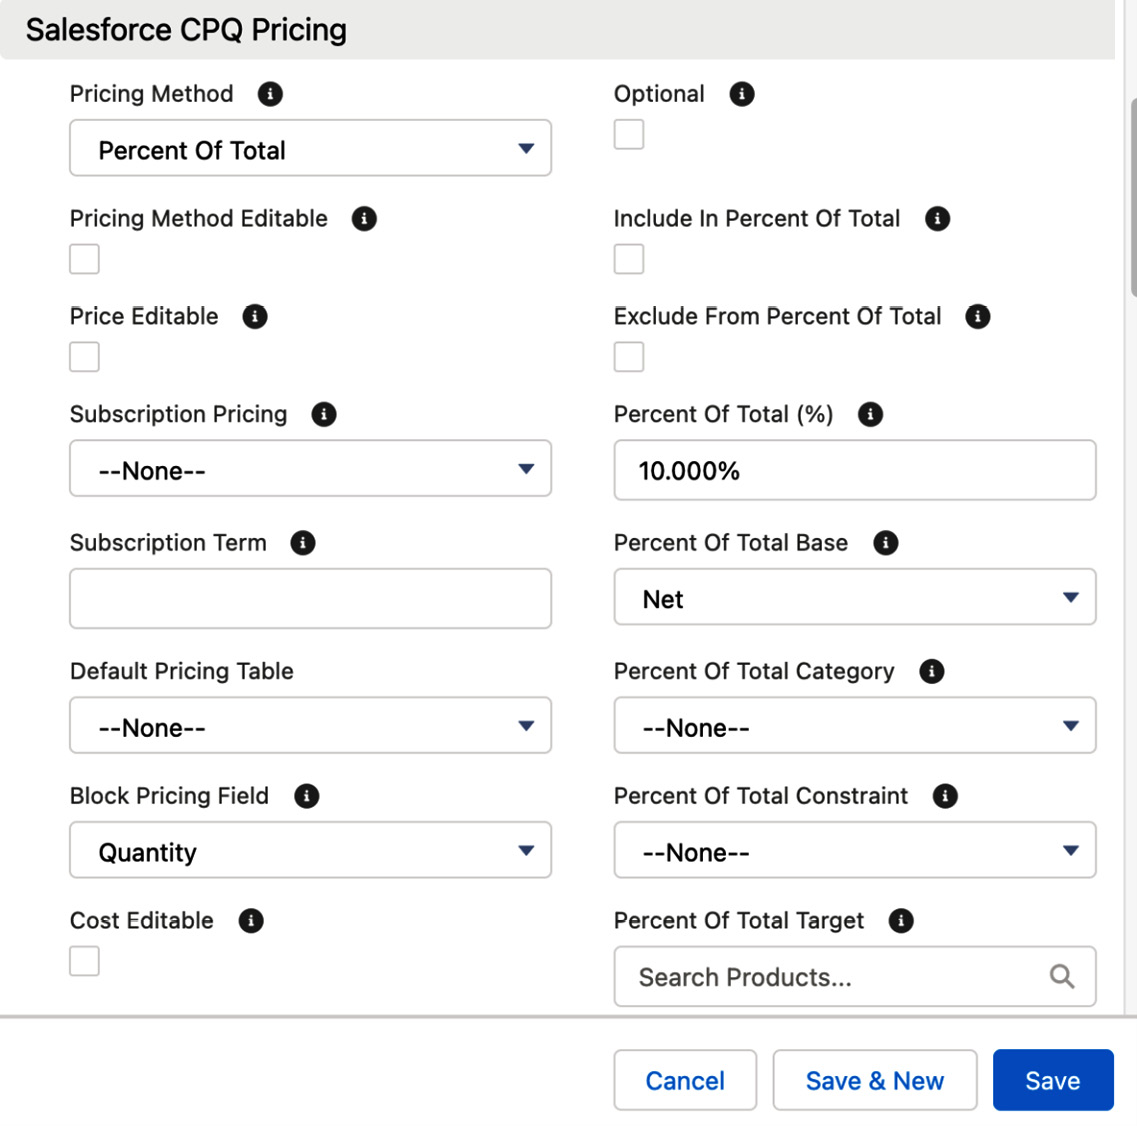
Figure 4.9 – PoT pricing method
On the preceding screen, let's learn about a few important fields related to PoT calculations:
- Include In Percent Of Total: This checkbox needs to be selected for fixed-price subscription products so that they are included in the PoT price calculations. This field does not affect non-subscription products.
- Exclude From Percent Of Total: When you select this checkbox, CPQ does not use the product (Electrical Installation in our example) for calculating the price of the PoT product.
- Percent Of Total (%): This is the percentage that will be used based on the Percent of Total Base field. In this example, this field is set to 10 percent (you can set it to any value, as per your business requirements).
- Percent Of Total Base: If this field is set to Net, then the percentage of the total will be calculated based on the net price, and if it is set to List, then the percentage of the total will be calculated based on the list price. In this case, let's calculate it based on the net price. These fields can be set as per the company's price calculation requirements.
- Percent Of Total Category: PoT with a category calculates the price based on only the products of this specific category. For example, if you want a hardware maintenance PoT product to cover only hardware products, then this value can be set to Hardware.
Let's see how the price gets calculated when the rep adds the example product Electric Installation to a quote. To do this, navigate to any quote in your organization: then go to Edit Lines Add Products Search Electrical Installation Select.
When you add only Electrical Installation (a product in the Salesforce org) to the QLE without any other products, the price will be zero as there is no base price to calculate the percentage of the total. Now, let's add another product, Electric Door lock (this product has a pricing method of List). When you are implementing this in your org, you can add the product as required for your implementation. As shown in the following figure, the price of the product Electrical Installation is calculated as 10% of the net price of the other products (in this example, Electric Door lock):
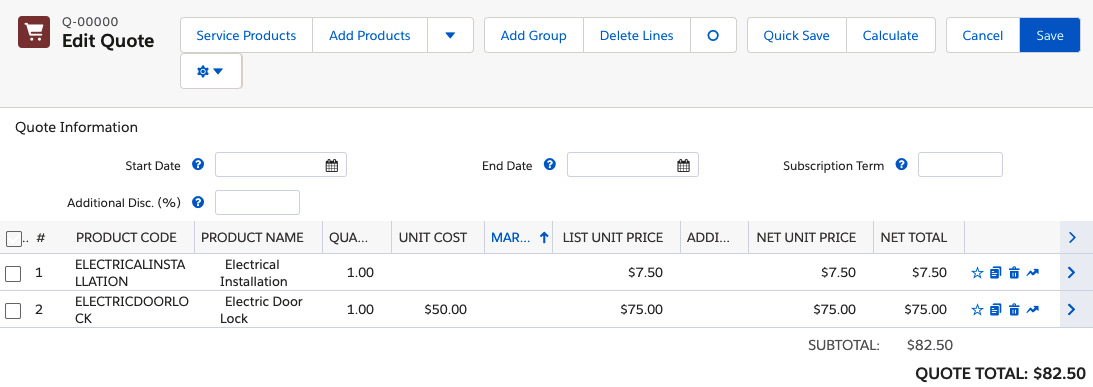
Figure 4.10 – PoT in QLE
The pricing methods that we have seen so far are configured by the Salesforce admin and a rep can use the automated calculations. CPQ also allows reps to manually override price settings. In this scenario, the rep can adjust the prices in the QLE. If your business process needs this functionality, admins can select the field Price Editable in the product record. Use this setting with caution as all reps may not be aware of the implications of incorrect pricing. Price editable is often used in negotiated selling environments and paired with appropriate approval rules. This allows sales reps to modify pricing as a negotiation tactic while ensuring all sales are financially sound by requiring appropriate approvals.
We now have learned how to customize the different out-of-the-box CPQ pricing methods. In the next section, we will learn about another pricing functionality that is specific to subscription products and the associated pricing.
Creating Multi-Dimensional Quoting (MDQ)
MDQ allows you to break a long subscription into smaller blocks. This will be useful for scenarios where you have a subscription for 2 years and you want to provide a special discount only for the first year. This flexibility in special-term pricing will help reps to negotiate and close deals faster. Ramp billing and milestone billing contracts are common use cases for MDQ.
MDQ allows you to segment a subscription product multiple times within a single quote in the QLE. Each segment will have its own quantity and discount. For each segment, a separate quote line will be created. Admin can define the segment duration, for example, as either monthly, quarterly, or yearly.
Let's see how an admin can set up a product as an MDQ product. Navigate to the product for which you want to set up an MDQ using the path App Launcher Product Related Price Dimension New. In this example, we are selecting the sample product VPN License. This will open the New Price Dimension screen as shown here:
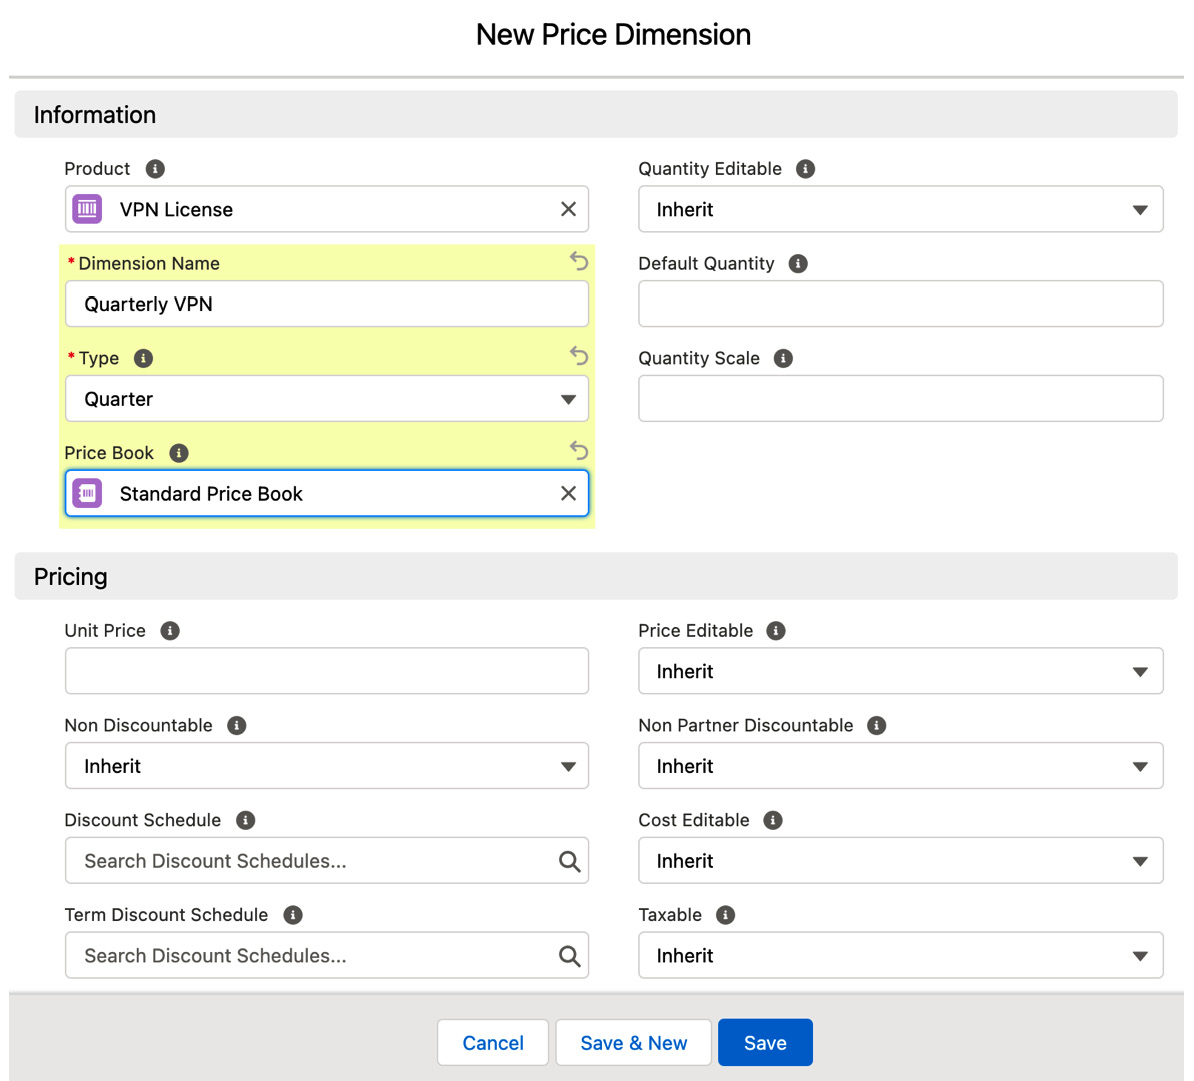
Figure 4.11 – New Price Dimension
Let's learn how to configure a few important fields during price dimension creation:
- Dimension Name: This field provides a meaningful name.
- Type: This field is used to select the time segment. It defines how the quote line can be segmented and can have the values Year, Quarter, Month, Custom, or One Time. When you select Custom, your sales rep gets to select the segments in the QLE. In this example, we selected Quarter. For subscription billing, we can only have one type of price dimension for a product. There is only one way you can segment a product. For one-time billing, you can have multiple dimensions.
- Price Book: This field is used to associate a price book and a currency.
Important Note
There must be a dimension created for each combination of price book/currency/time period. You cannot have multiple time-based price dimensions for the same currency.
For most of the fields under the Pricing section, as shown in Figure 4.11, you can inherit the values from the product. However, these values can be overridden when needed. If you set the field Unit Price, then this price will override the price inherited from the price book.
Let's see the end user experience for MDQ. To do this, navigate to any quote, then Edit Lines Add Products and add the MDQ product that your admin has configured. As shown in the following figure, when an MDQ product (in this example, VPN License) is added to the quote, the price dimensions are displayed as configured:
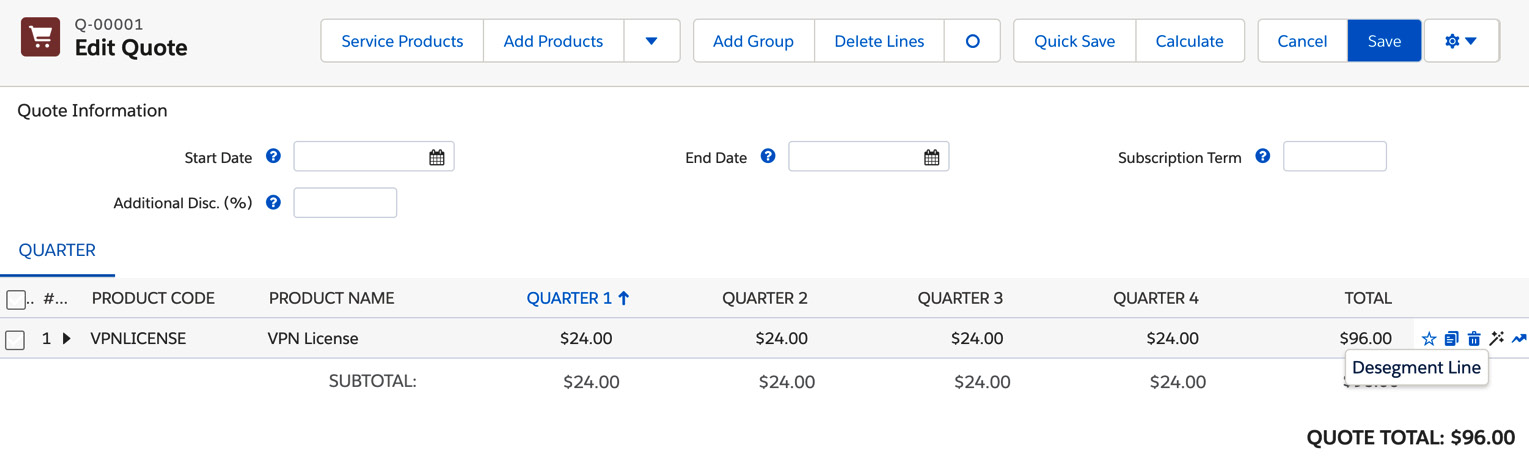
Figure 4.12 – MDQ in the QLE
In this example, the price for each quarter is displayed. Clicking the desegment icon shown in Figure 4.12 will hide these segments in the QLE. When we click the same icon again, the segments reappear. A rep can display the segments as needed. CPQ creates a quote line for each segment. So, for the aforementioned example, this would be represented as four quote lines. This can have implications downstream with reporting and should be taken into consideration. We will learn more about subscriptions in Chapter 7, Creating Contracts, Amendments, and Renewals.
Before we learn about discounting, it's important to understand how CPQ calculates the net price from the original price. There is a specific order in which the CPQ pricing engine calculates net prices. Let's learn about the pricing structure in the next section.
Understanding the pricing structure
This pricing structure describes how Salesforce CPQ applies different prices and discounts to calculate the net price from a list price. The prices defined in each box, such as the original price, list price, and so on, are out-of-the-box features provided by CPQ. This model follows the top-down approach for calculating prices and is also called the price waterfall.
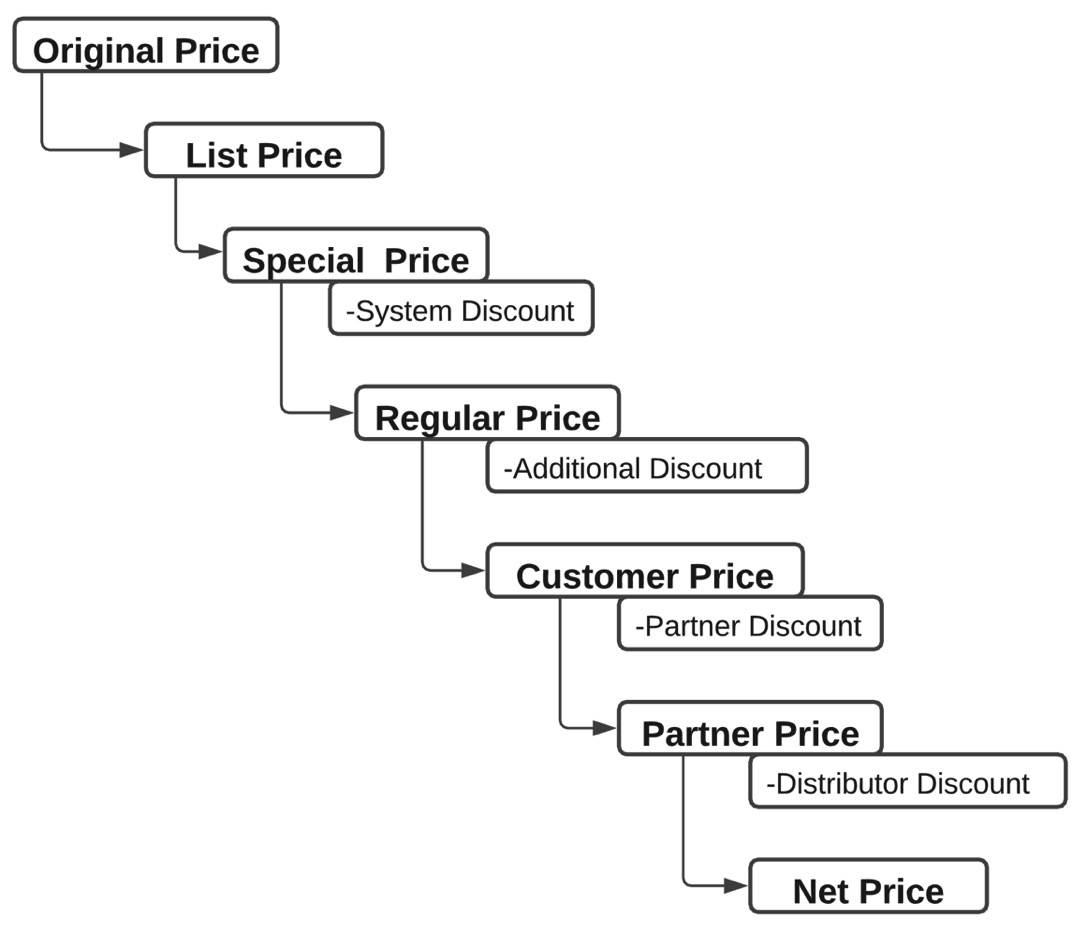
Figure 4.13 – CPQ price waterfall
As shown in the preceding figure, let's learn what each of these prices refers to:
- Original Price: A copy of the price of a product from the price book.
- List Price: This is also a copy of the price, but it can be updated with a price rule or other automation.
- Special Price: This is used for specific situations. The contracted pricing approach described earlier can be used to set a special price. Special prices can also be used in price rules.
- System Discount: When someone purchases a bulk quantity or configures a bundle and so on, then system discounts are applied to the special price. This gives the regular price of the product.
- Regular Price: The special price minus the system discount.
- Customer Price: A sales rep may apply a discretionary discount using a percentage value or an amount. This will be taken off the regular price and the difference is the customer price.
- Partner Discount: Partners may have specific discounts that are applied as needed.
- Partner Price: Calculated by subtracting the partner discount from the customer price.
- Distributor Discount: Applied to the partner price, which gives a final net price.
Out of the box, waterfall prices will be calculated as applicable. If we need to switch the waterfall order, it's not a standard process – admins need to use special fields and customization. Special Fields are a specific CPQ feature and admins need to consult Salesforce Help (https://help.salesforce.com/s/articleView?id=000312751&type=1) to access the details to use this functionality.
We have just learned how admins can set different pricing methods at the product level and how the price waterfall applies these prices. Let's learn about CPQ discounting and how it can be configured and customized for various business scenarios.
Discounting in CPQ
When a rep is adding products to a quote, most business scenarios will need discounting. These discounting requirements may be specific to a product, customer, partner, quote, or the quantity of the products. CPQ provides several out-of-the-box features for configuring discounts. Let's look at some of the main configurations in the following subsections.
Discount schedules
Discount schedules are system discounts based on the following:
- Volume: CPQ can apply discounts based on the volume of products a customer buys.
- Term: CPQ provides discounts based on the term length of a subscription product.
- Cost: Discounts can be applied directly to a product's cost instead of the list price.
While configuring discount schedules, the upper bound is excluded, and the lower bound is included in the discount tiers, like block pricing. A discount schedule must be assigned to a product's Term Discount Schedule field for it to be based on subscription term. Salesforce CPQ evaluates the schedule's discount tiers by subscription term length instead of quantity. To create a discount schedule, navigate to App Launcher Discount Schedule Object New. This will open the New Discount Schedule screen, as shown here:
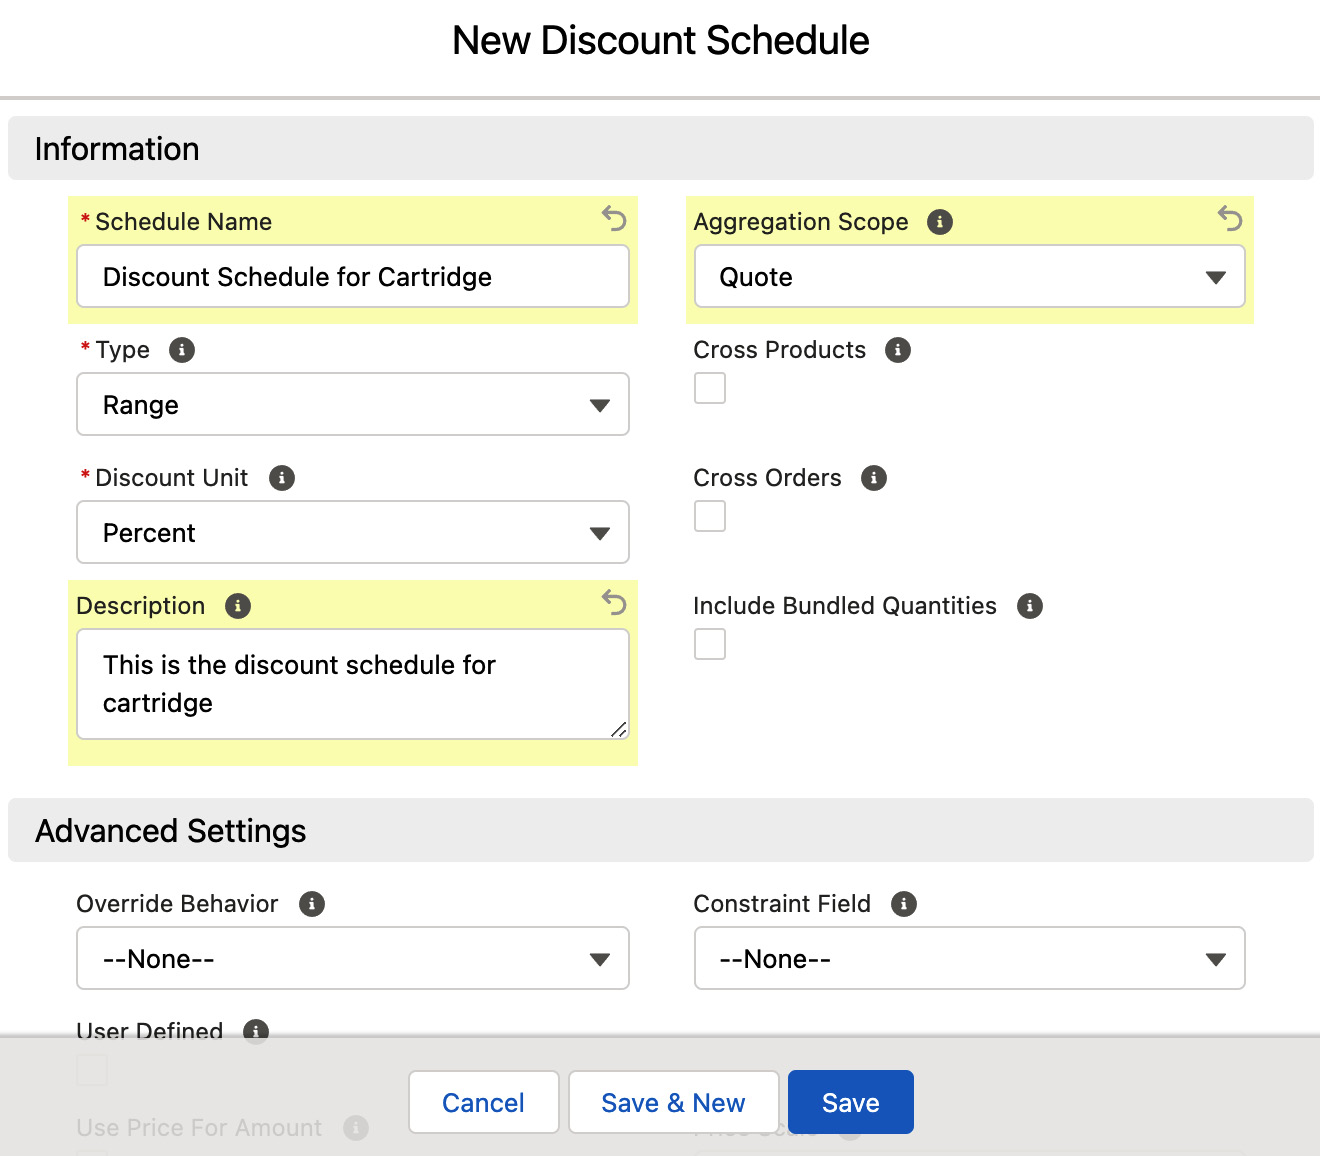
Figure 4.14 – New Discount Schedule
Following are a few important fields in discount schedule creation:
- Schedule Name: This field provides a descriptive name for the discount schedule that you are creating so that you are aware of its purpose.
- Type: CPQ provides two values for this field. These two values determine how discounting calculations are applied:
- Range: Based on the range in which the product quantity falls, a corresponding percentage discount will be applied. For example, let's assume there is a product called Packt Subscription and the monthly subscription costs $250. The discount for this product is set to Range. The discount schedule is as follows:
- 1 to 5 Months – 10%
- 6 to 10 Months – 15%
- 11 to 15 Months – 20%
- Range: Based on the range in which the product quantity falls, a corresponding percentage discount will be applied. For example, let's assume there is a product called Packt Subscription and the monthly subscription costs $250. The discount for this product is set to Range. The discount schedule is as follows:
If the buyer purchases a 5-month subscription, then a 10% discount will be applied to the list price. In this example, if there are no additional discounts, the net price is calculated as ($250 - ($250 x 10%)) x 5 months = $1,125.
- Slab: Units with certain bounds receive discounts equal to the tiers' discount value. Let's take the example of the Packt Subscription product whose list price is $15. A volume-based slab discount is configured as follows:
- 1 to 25 courses – 10%
- 26 to 50 courses – 20%
- 51 to 75 Courses – 25%
If the buyer purchases 60 courses, the pricing will be calculated as follows:
- For 25 courses – 25 * [15 – (10 % of 15)} = $337.5
- For the next 25 courses – 25 * [15 – ( 20 % of 15)] = $300
- For the next 10 courses – 10 * [ 15 - (25 % of 15)] = $112.5
If there are no additional discounts, the net price amounts to $337.5 + $300 + $112.5 = $750.
- Discount Unit: Reps can provide discounts either by percentage or by amount, which can be set with this field.
- Aggregation Scope: Discount schedules work on a single quote line. If the same product is added across multiple quote lines in the same quote, this field allows us to aggregate the discounts across a quote or a group within the quote.
- Cross Products: When this checkbox is selected, CPQ combines the quantities of all products on the quote for calculating the line quantity against the volume discount tiers. All the products need to share the same Discount Schedule. This checkbox can only be set for the Type range and not for Slab.
- Cross Orders: If you want to extend discounts by considering past orders, we can use this checkbox. We will learn more about this in Chapter 7, Creating Contracts, Amendments, and Renewals.
- Include Bundled Quantities: Selecting this checkbox will take into consideration bundle options. Sometimes, bundled products are included free of charge when the Bundled checkbox is enabled on the product options. For example, a keyboard may be free when included in the laptop bundle. By default, the quantities for these free products are not included in the discount schedule calculations. The Include Bundled Quantities checkbox can be selected to include these free products in discount calculations.
- Override Behavior: This field has two values:
- All: This allows reps to update all tiers.
- Current Tier: This allows reps to update only that specific line.
By default, the discount schedule is based on quantity fields, which can be changed to custom fields as per the business needs. After saving the discount schedule, you can define the tiers. Navigate to Discount Schedule Edit Tiers. In this example, we schedule a discount schedule for Cartridge, a sample product in the Salesforce org. This will open the Edit Tiers screen as shown here:
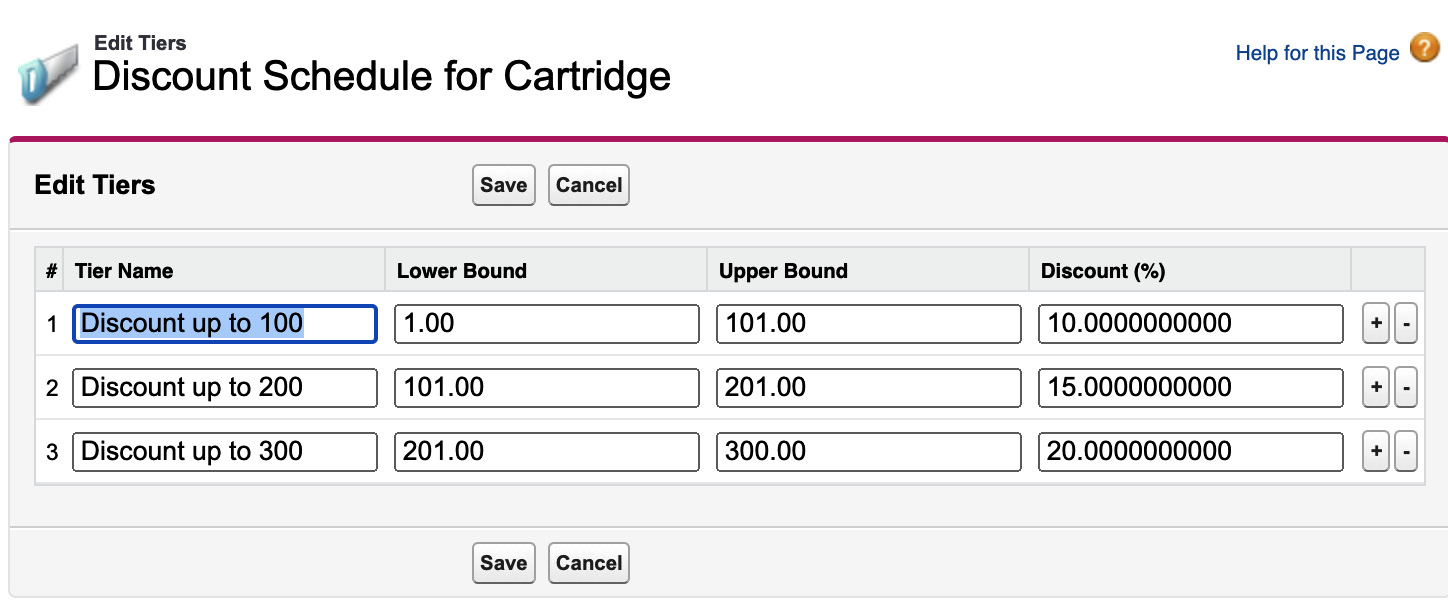
Figure 4.15 – Edit discount tiers
The admin has defined three sample tiers, as shown in the preceding figure. Since the admin selected Discount Unit as Percent, we see the Discount (%) column. If we select Discount Unit as Amount, then we see the corresponding field. Also, if we have multi-currency enabled at the Salesforce org level, additional fields will be displayed.
Associating the discount schedule with a product
Now that we have created the discount schedule, let's see how an admin can link this to a specific product. To do this, navigate to App Launcher Product. For this example, search and select Cartridge and then click Edit. This will open the screen shown here:

Figure 4.16 – Associate a discount schedule with a product
As shown in the preceding figure, the Discount Schedule field is used to apply the volume-based schedule to a product. It is applied based on the quantity. In this example, we linked it to the Printer Toner Cartridge product.
The Term Discount Schedule field is the discount schedule associated with the subscription term of the quote line. For the term discount, we can use only Range and not Slab.
Discount schedules can also be applied to a product feature or an option level (we discussed features and option levels in Chapter 3, Configuring CPQ Products). The one that is most specific takes precedence. For example, the discount schedule at the option level overrides the discount schedule at the feature level. The discount schedule hierarchy from highest to least priority is as follows:
- Contracted price
- Price dimension
- Product option
- Feature
- Product
Let's view the sample discount schedule in the QLE, shown in Figure 4.17. To demonstrate the discount, schedule calculations for two lines have been added. The first line has a quantity of 200 units, which is eligible for a 15% discount as per the discount tier set up. So, the net price is 15% of the list price ($125). For the second line, the quantity has been updated to 50 units, which is eligible for the 10% discount. The net price for line two is 10% of the list price ($125).
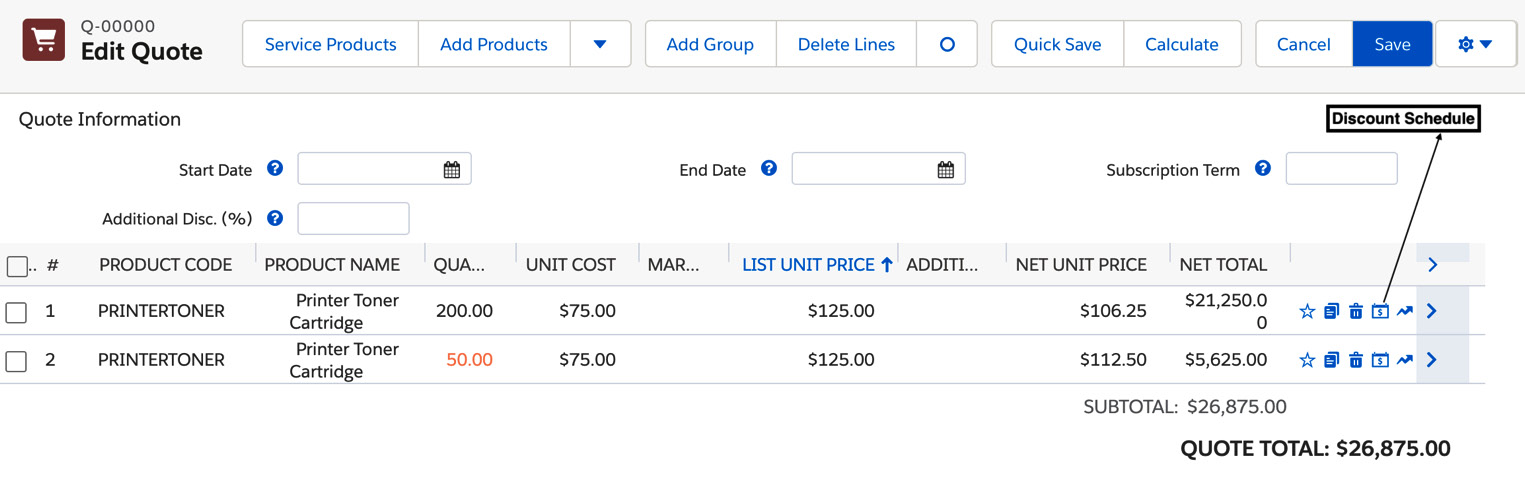
Figure 4.17 – Discount schedule in the QLE
In most business scenarios, a fixed price per unit will be adequate. In addition, pricing methods, discounting tools, and subscription pricing will suffice. For complex pricing requirements, Salesforce CPQ provides a powerful configuration – price rules, which can be customized. Let's learn about price rules in the next section.
Creating price rules
Price rules are used to update a product's price in quote lines and automate price calculations in CPQ. They are an extension of out-of-the-box CPQ functionality. These rules are helpful for your business when you have products that change in response to the presence of other products in a quote. Price rules allow admins to conditionally update the value of any field (not only the price) in the quote, quote line, or quote line group. Price rules are useful if you need product values to dynamically change based on other products in the quote. For example, if your rep wants to sell two ink cartridges and one printer paper whenever a printer is sold, then a price rule could be created to automatically add two cartridges and one printer paper when a printer is added to the quote. Price rules also can handle dynamically changing data for subscriptions by utilizing MDQ (multi-dimensional quoting). Price rules can also be used in quote templates, which we will learn about in Chapter 5, Generating and Configuring Quote Template.
Like product rules, price rules also follow the if/then structure. Price rules have a price condition, scope, and action. In the previous chapter, we saw that product rules mainly control the user interface of a QLE or a configurator. You can hide/show/enable/disable products. Product rules restrict the visibility of products based on conditions. They also provide alerts and validations to control product additions to a quote. Price rules are different and much more powerful, and they can replace standard Salesforce configurations such as Workflow, Flow, or Apex logic.
Important Note
Salesforce CPQ does not recommend that any of this logic should be used with quote lines or subscriptions.
Price rules inject value into a quote or quote line object field.
Enabling the advanced calculator
Price rules will not work with the CPQ Legacy Calculator. As a prerequisite, we need to enable the advanced calculator in the CPQ package settings. To do this, navigate to Setup Installed Packages CPQ Pricing and Calculation Use Legacy Calculator, uncheck the Legacy Calculator checkbox, and click Save. This action will display the message shown here:
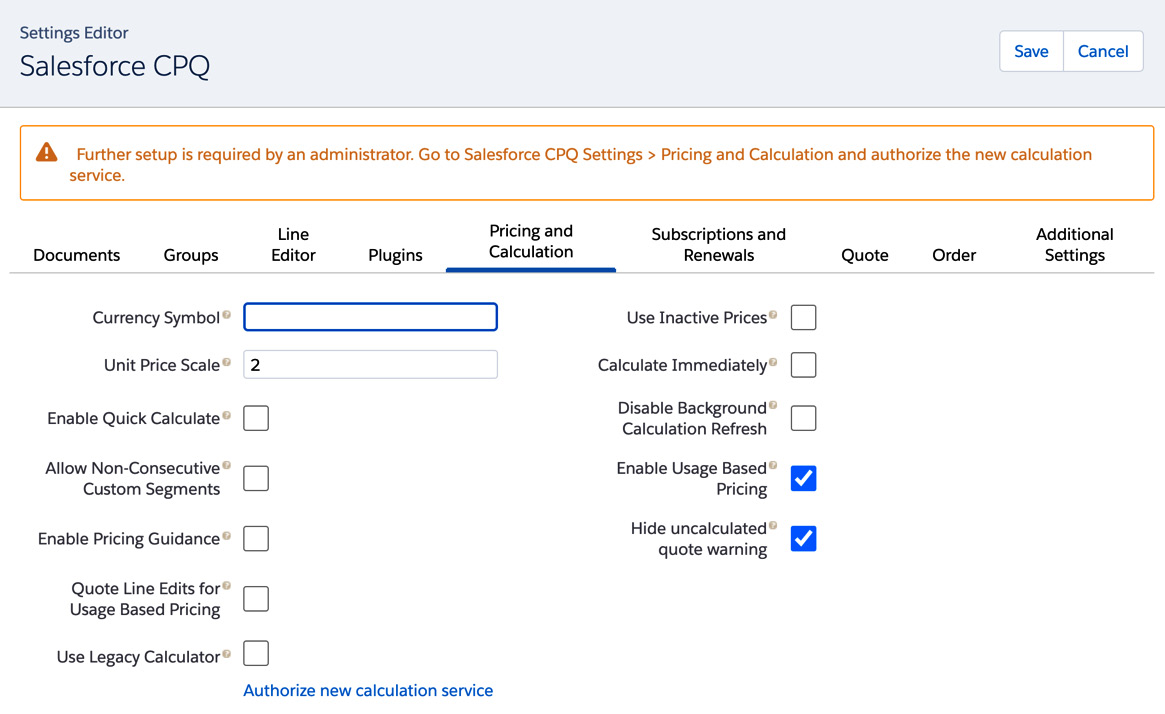
Figure 4.18 – Enable the advanced calculator
Click on Authorize new calculation service and then click Allow. Once you refresh the screen, the popup (warning) shown in the preceding figure will be disabled.
Creating a sample price rule
Let's create a price rule to understand the concept. This price rule can be extended to build complex rules with multiple conditions. For instance, Packt Corp is selling laptops to multiple customers. An account object has the field Account Type, which captures the type of the customer. There will be different types of customers in the Packt Salesforce org, including direct customers, channel partners, technology partners, and many more. For example, we want Salesforce CPQ to automatically calculate and apply discounts based on the account type. When a laptop is sold to a direct customer, we would like the discount to be 10%; for channel partners, 15%; and for technology partners, 25%. For accounts where the tier is blank, no discounts should be applied. We need to create the account type in the quote object with the same picklist values as we have in an account object.
Let's learn how admins can configure this scenario using price rules. To create a price rule, navigate to App Launcher Price Rules New. This will open the New Price Rule window as shown here:
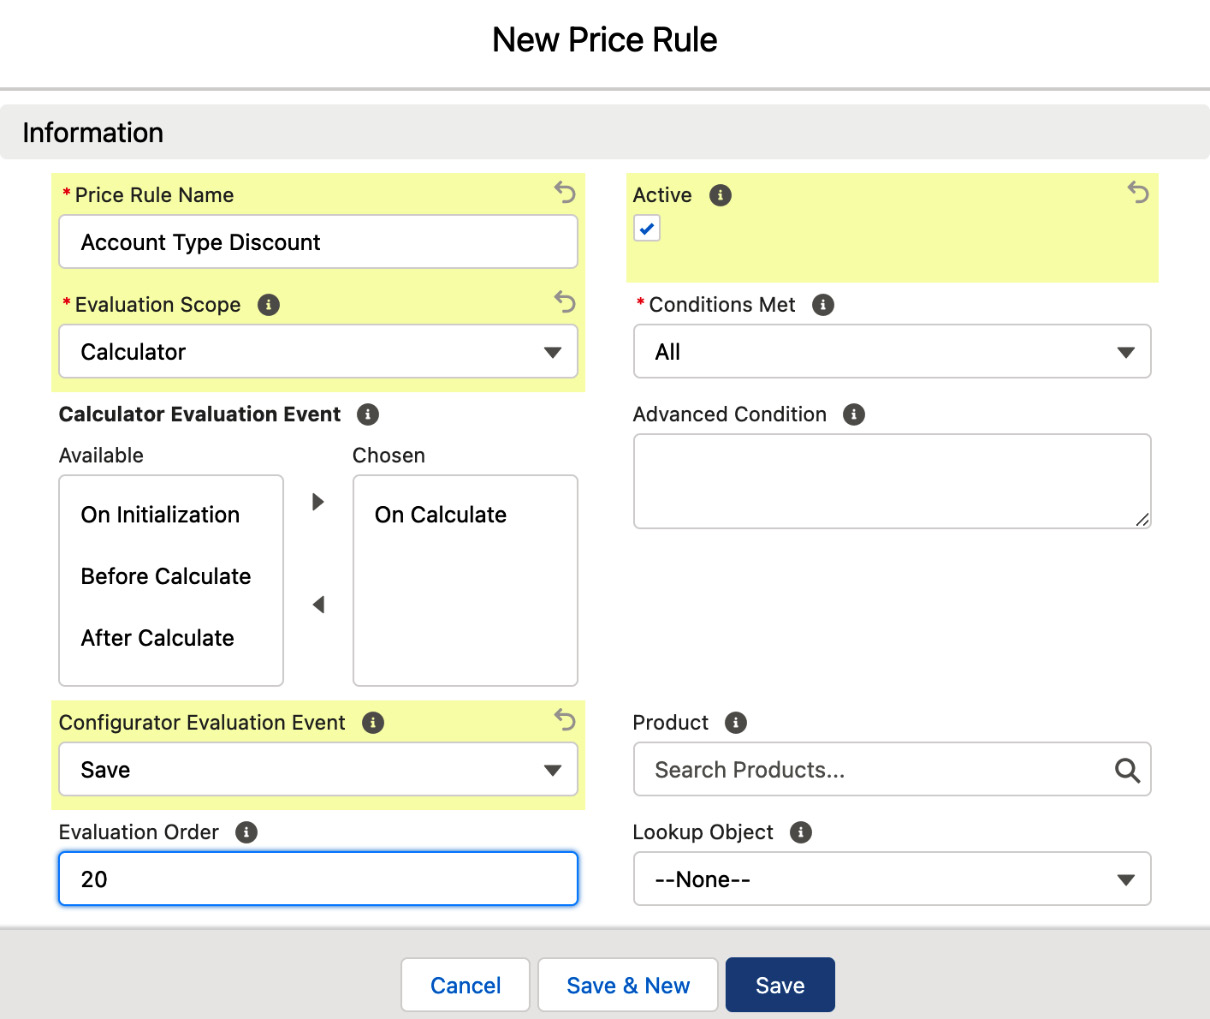
Figure 4.19 – Creating a price rule
Price rules can be created to target either the configurator or the calculator. In the preceding figure, we can view a few important fields involved in price rule creation, which include the following:
- Price Rule Name: This provides a descriptive name to identify the price rule.
- Active: This field indicates whether the price rule is active or not. This checkbox can be deselected in the process of testing and reselected for the implementation of Salesforce CPQ.
- Evaluation Scope: This defines where the price rule will be evaluated. Set this value to Configurator when you want the price rule to be triggered when your rep is configuring the products. If you want this rule to fire when a user is adjusting price in the QLE, select Calculator. For this example, let's select Calculator as we want the rule to fire in the QLE.
- Conditions Met: We will be adding one or more conditions to the price rule. We can select Any, All, or Custom, based on the criteria that trigger this price rule. For this example, let's select All for this field, as we want to fire the rule when all the conditions are met. When you select Custom, you can provide the logical conditions in the Advanced Condition field (for example, 1 AND (2 OR 3)).
- Calculator Evaluation Event: This field will have the following picklist values:
- On Initialization: In the loading and initialization process, the CPQ engine loads products and options first, followed by lookup relationships, and then the formula field metadata. The system then evaluates the price rules if this option is selected. On initialization is executed only once when you edit lines and enter CPQ Visualforce pages.
- On Calculate: When this value is chosen, then the price rules are evaluated while CPQ calculates the quote's price.
- Before Calculate: When this value is chosen, then price rules are evaluated before CPQ calculates the quote's price.
- After Calculate: Price rules are evaluated after CPQ calculates the quote's price.
For this example, let's choose On Calculate.
- Configurator Evaluation Event: This field can have two values, Save or Edit. Selecting Save will fire the rule when the record is being saved and Edit will fire the rule in real time. Unless you really need to see the calculations in real time, it is not advisable to select Edit as this will impact performance.
- Evaluation Order: When your Salesforce organization has multiple price rules, this field determines the order in which the price rules will be triggered. Higher-order rules are evaluated last. CPQ evaluates price rules in order from lowest to highest. For example, a price rule with Evaluation Order set to 10 is evaluated before a price rule with Evaluation Order set to 20. Therefore, if multiple price rules act on the same product, the price rule with the lowest evaluation order takes precedence. Numbering is within the evaluation event. While creating the rule, leave some gaps in the evaluation order numbering, so that when there is a new requirement, you can easily add that. Please refer to Salesforce help at https://help.salesforce.com/s/articleView?id=sf.cpq_price_rule_considerations.htm&type=5 to understand how price rules operate.
- Lookup Object: Let's learn about this in the Creating a price rule using a lookup object section. You can leave this field blank for this example.
Creating a price condition
Now let's create a price condition for an example product where we want to provide different discounts based on the account type. The price condition determines when the rule should trigger. To create a price condition, navigate to App Launcher Price rules. Select the example product account type discount for which you want to create the rule by navigating to Account Type Discount Price Conditions New. This will open the screen shown here:
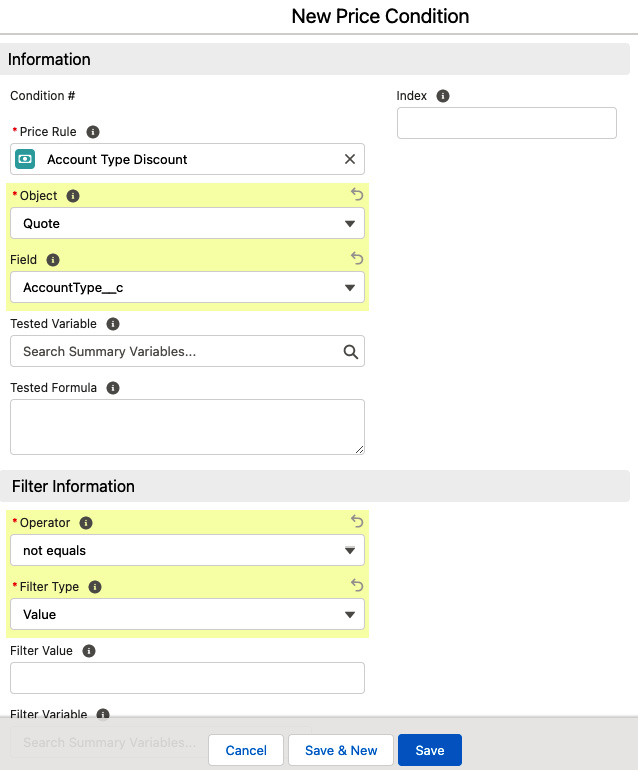
Figure 4.20 – Creating a price condition
Price conditions are like the product rule conditions that you learned about in the previous chapter. As shown in Figure 4.20, a few important fields in price conditions include the following:
- Price Rule: The name of the price rule for which you are creating this condition. A price condition is evaluated based on the fields Object and Field. In this example, we want to verify the Account Type field in the quote. When it is not blank, we want to assign different levels of discounts that we can configure in price actions.
- Tested Variable: A summary variable can be created and used in the tested variable to evaluate the price condition. For this example, we can leave this blank. We have already covered summary variable creation details in the previous chapter. You can use it if your requirements need this condition to be evaluated using a summary variable.
- Tested Formula: You can add any cross-object formula to evaluate the tested formula value. For this example, we can leave this blank.
- Filter Type: This field determines how the filter can be evaluated. It can have the following options:
- Value: When you choose this option, the filter condition will be evaluated based on this value.
- Variable: When you choose a variable for the type, you can use a summary variable to assess the filter condition.
- Formula: When you choose a formula for the type, you can create a cross-object formula to evaluate the filter condition.
For this example, we are setting Filter Type to Value.
Based on your business requirements, other configurations can also be used to define price conditions. For using formulas, the standard Salesforce formula syntax can be followed. A price condition record is unnecessary if you want your price action to execute irrespective of any condition.
Let's create a price action to update the field values – in this case, discount.
Creating a price action
A price action describes what the price rule should do, and which value it should update.
We have created a price rule and a price condition to apply the account type discount. In this section, we will define the price actions, which are the actions that the rule will perform once the conditions are met. First, navigate to App Launcher Price Rules. In this example, we select the price rule Account Type Discount. Then, create a price action by navigating to Price Action New. This will open the screen shown here:
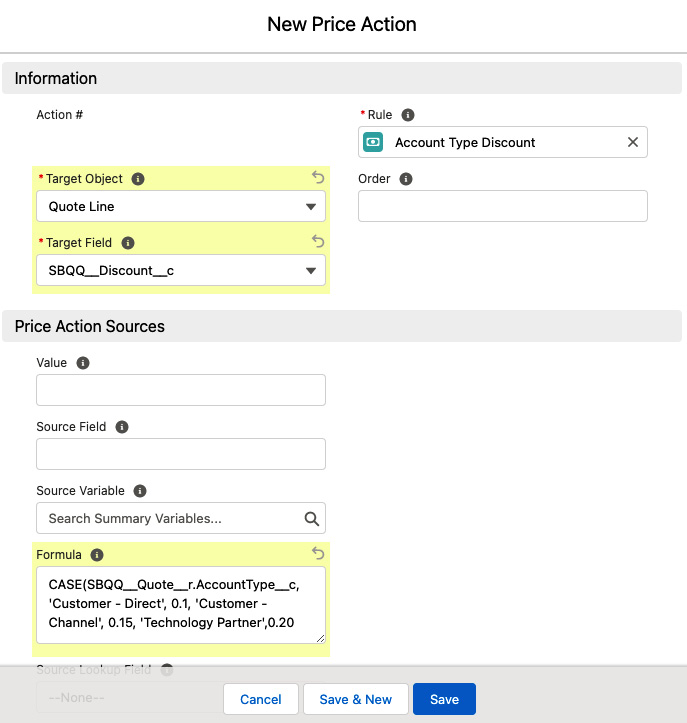
Figure 4.21 – Creating a price action
A few important fields while creating a price action include the following:
- Target Object and Target Field: They determine the field that needs to be updated for a specific object. The API name of the field should be added to the picklist Target Field. In this example, when the price conditions are met, we want to update the discount field (SBQQ__Discount__C) in the Quote Line object.
- Price Action Sources: This determines the source for the value to be updated in the target field. CPQ provides five different sources:
- Value: You can directly provide a value that you want to update the target field with. For this example, we are leaving it blank.
- Source Field: If you want to update this source from another quote line field, you can provide the field reference here.
- Source Variable: Use a summary variable as required. For this example, we are leaving this blank.
- Formula: Provide a formula if you want to use the formula result field to update the target field. For this example, we want direct customers to have 10%, channel customers to have 15%, and technology partners to have a 20% discount. We are using the formula using case statements, as shown in Figure 4.21 to calculate the discount value.
- Source Lookup Field: The API name of the field from the lookup object record that matches the price condition. Lookup queries are covered in the Creating a lookup query for the price rule section of this chapter.
Testing a price rule in the QLE
Let's verify the end user experience for this sample price rule. Verify that the account type related to a sample quote is set to one of the three values Customer - Direct, Customer - Channel, or Technology Partner (these are sample account types in our Salesforce instance). For this example, let's choose Technology Partner. To verify the discount price rule, navigate to Quote Edit Lines. Add any product and the corresponding discount will be applied automatically in the quote line Additional Discount field. This works for any product because the Product lookup was left blank in the initial rule configuration.
Creating a price rule using a lookup object
In the Creating a price action section, we saw that there are five sources where we can provide the source field to update the target field. One of the price action sources is the lookup object. In this section, we will see how a price rule can be created using a lookup object. In the previous example, we created a price rule to apply discounts based on the account type field. This use case may also have additional requirements such as applying these discounts only for hardware products. We need to verify the product family (this is a standard field for the product object) along with the customer type.
We can create multiple price rules for this scenario but as the attributes increase, the logic becomes complex. We can use a lookup object to store this custom data. Using this lookup object, we can define a single price rule that will automatically apply a discount.
As shown in Figure 4.22, a custom object is created where you list all the attributes that need to be stored and use the fields of that custom object in the price action source. To demonstrate this, we have created a custom object called Account Type Discounts Name and added test data.
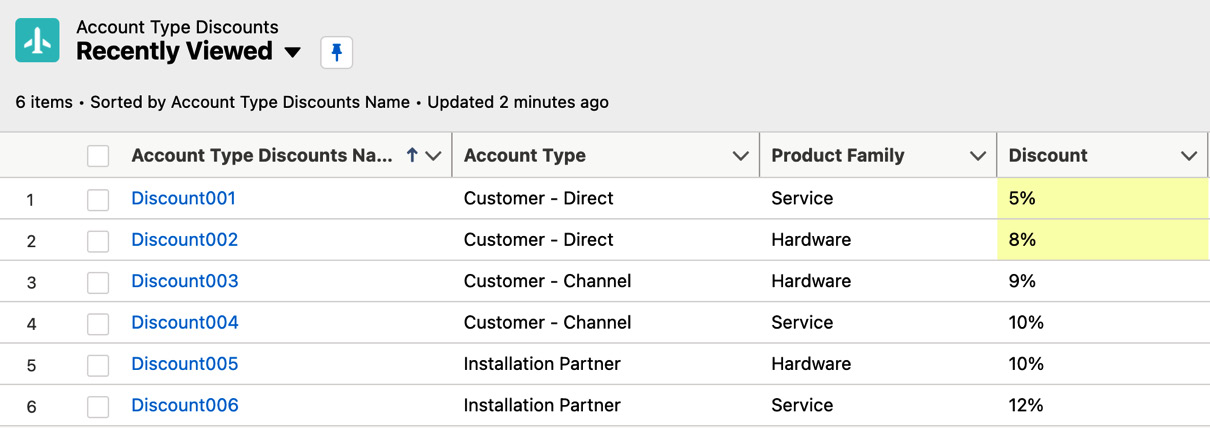
Figure 4.22 – Lookup object example
The preceding figure shows the sample data for applying discounts. When the rep selects an account, Customer - Channel, and adds a product belonging to the product family Service, then a 10% discount should be applied automatically. Additional attributes can be added to this custom object as required. Now, let's create a price rule using the lookup object. Navigate to App Launcher Price Rules New. This will open a New Price Rule window as shown here:
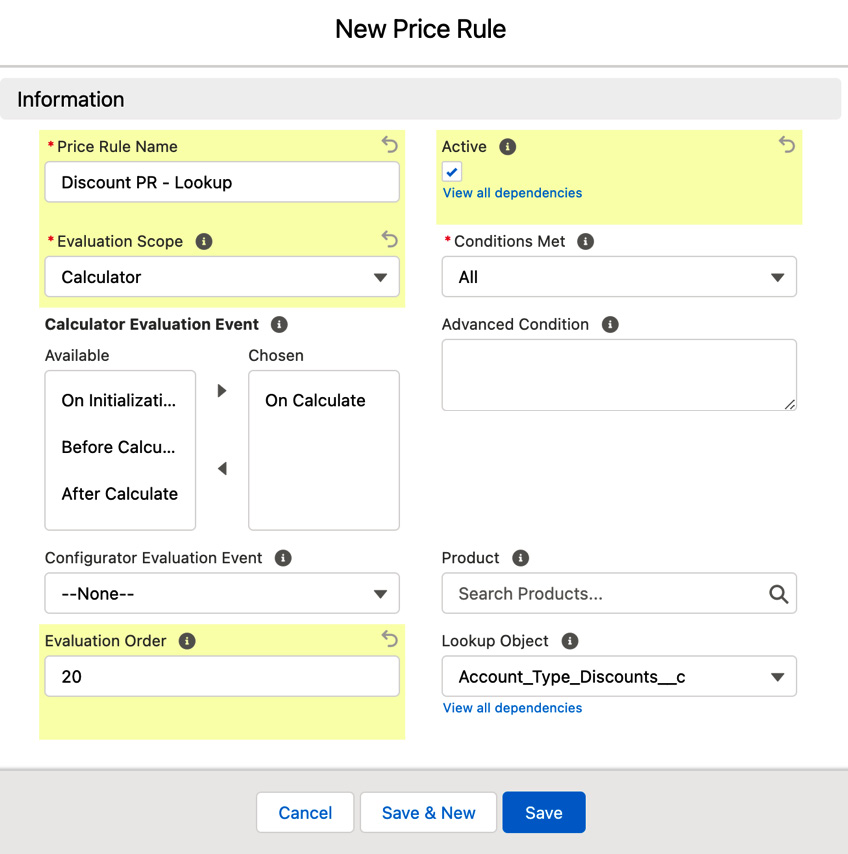
Figure 4.23 – Price rule with a lookup object
Compared to the previous price rule in Figure 4.19, where Lookup Object was blank, in this price rule, we update Lookup Object with the custom object value Account_Type_Discounts__c and then click Save. CPQ knows that this custom object holds the data to configure the price rule.
Creating a lookup query for the price rule
Now let's add price conditions as required. Refer to the previous price condition for the navigation path and syntax.
Next, create a lookup query associated with the price rule. The lookup query must return exactly one result. When the lookup query returns multiple records (rows), CPQ will display an error: Multiple results returned from the query. Please contact your Salesforce CPQ administrator while executing the price rule. Salesforce would prefer that you keep the number of lookup queries in your org at less than 10. Also, the same custom object can support multiple queries as long as the query returns a single result. Lookup queries will filter the data from the lookup object.
A user can select the attributes for the quote. In this example, the user selects a product family – Service, and account type – Customer - Direct. To create a lookup query, navigate to App Launcher Price Rules. In this instance, select the price rule Discount PR - Lookup Related Lookup Queries New. This will open the New Lookup Query screen as shown here:
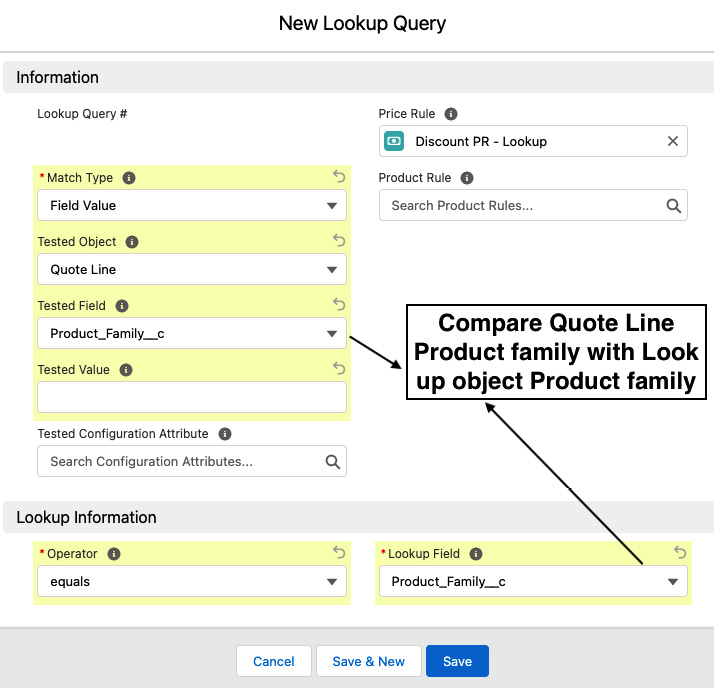
Figure 4.24 – New lookup query
Let's learn about some of the important fields for configuring the price rule lookup query:
- Match Type: Using this field, the target data for the lookup query will be evaluated. This can have three values:
- Field Value: When you choose this value, select an option from the Tested Object drop-down field and an option from the Tested Field dropdown.
- Static Value: If you select this picklist option, then enter the user-defined value in Tested Value.
- Configuration Attribute: If we choose this value, then we need to select the configuration attribute from the dropdown Tested Configuration Attribute.
- Tested Object and Tested Field names are compared against the lookup values. In this example, we are going to check the field value Service (Tested Field) in the Quote Line (Tested Object) object. Service is the picklist attribute of the Product Family field that we created. This picklist value will not be available in the lookup query object, and you need to add this picklist value (API value). You will be comparing this value against an Operator in the Lookup field. In this example, we are using the equals operator and the Lookup field product family (Service). Again, this lookup field's picklist value needs to be updated (API name). In the lookup query, we are only specifying the Lookup field name. The lookup object is linked at the time of creating the price rule header.
Multiple lookup queries can be created as required. To satisfy the use case of providing a discount based on product family and service, another lookup query is needed for this rule. Once the lookup queries are configured, we are ready to create a price action.
Creating a price action for the lookup query price rule
To create a price action, navigate to App Launcher Price Rules. In this instance, select the price rule Discount PR Lookup Price Action New. This will open the screen shown here:
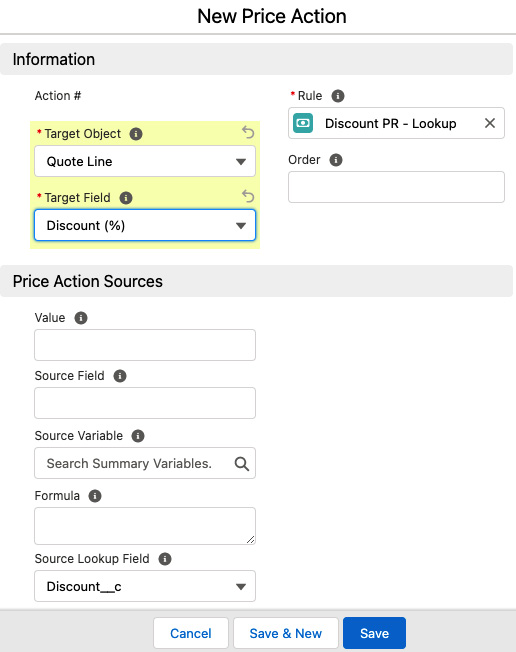
Figure 4.25 – Lookup query price rule – New Price Action
As shown in Figure 4.25, Target Field – in this example Discount (%) in the quote line – is updated by Source Lookup Field (the discount from the lookup object).
You can verify the end user experience by adding this sample product to the QLE. Based on the lookup object data, the corresponding discounts will be applied automatically. Salesforce debug log will create a log entry for the actual query and results (if any). This is quite useful during troubleshooting.
Summary
In this chapter, you learned how pricing and discounting can be automated using CPQ. We also discussed the creation of price rules, which help control quoting and optimize sales. These CPQ pricing concepts can help customize use cases as per company-specific business processes. In addition, we learned about out-of-the-box CPQ pricing methods: list prices sourced from price book entries, cost prices sourced from costs, block prices featuring tiered pricing, and PoT where the price can be calculated based on other line items.
We looked at MDQ basics, which helps break a long subscription into smaller pieces to treat each piece differently. We also covered how discount schedules can be used to create volume-based discounts considering the quantity or terms of quote lines. This pricing automation can help reps accurately create quotes for customers and close deals more quickly, which helps increase revenue. In the next chapter, we will learn how we can configure quote templates, generate quotes, and send them to customers using CPQ.