5
Argo CD Bootstrap K8s Cluster
In this chapter, we will see how we can bootstrap K8s clusters in a repeatable automated manner with the necessary services and utilities ready for usage, and for disaster recovery purposes. We will go through the creation of a K8s cluster in AWS using Infrastructure as Code (IaC) tools, and in the post-creation phase, we will set up a K8s cluster with the required services and utilities using Argo CD. Then, we will identify how we can tackle the problem of dependencies in a cluster and how we can control their creation order with sync waves, which we discussed in Chapter 2, Getting Started with Argo CD.
At the end of the chapter, we will identify the security challenges of deploying services and following GitOps practices with Argo CD and how we can tackle them securely.
The main topics we will cover are as follows:
- Amazon EKS with Terraform
- Bootstrapping EKS with Argo CD
- Using the app of apps pattern
- Bootstrapping in practice
- ApplicationSet – the evolution
Technical requirements
For this chapter, we assume that you have already installed the Helm CLI. Additionally, you will need the following:
- An AWS account: https://aws.amazon.com/free.
- Terraform: https://learn.hashicorp.com/collections/terraform/aws-get-started.
- The AWS CLI: https://docs.aws.amazon.com/cli/latest/userguide/getting-started-install.html.
- The AWS IAM authenticator: https://docs.aws.amazon.com/eks/latest/userguide/install-aws-iam-authenticator.html.
- A code editor with YAML and Terraform support. I am using Visual Studio Code: https://code.visualstudio.com.
We are going to use the free AWS account to deploy with Terraform a managed K8s cluster, which is called Amazon EKS: https://aws.amazon.com/eks/. We will bootstrap EKS with the necessary services using Argo CD.
The code for this chapter can be found at https://github.com/PacktPublishing/ArgoCD-in-Practice in the ch05 folder.
Amazon EKS with Terraform
In this section, we will create a managed K8s cluster in AWS so that we can use it in a real-time scenario to bootstrap ready-to-use K8s clusters in production environments. We will describe Amazon EKS, which is the managed K8s cluster of AWS, and how we can provision it with IaC and, more specifically, with Terraform.
Getting familiar with Amazon EKS
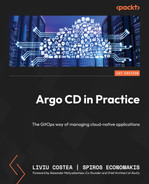
Most of the cloud providers have implemented managed K8s and they offer a fully managed control plane. AWS has Amazon EKS, which provides a fully managed and highly available control plane (K8s API server nodes and an etcd cluster).
Amazon EKS helps us to operate and maintain K8s clusters in AWS without a hassle. The API server, scheduler, and kube-controller-manager run in a VPC (https://aws.github.io/aws-eks-best-practices/reliability/docs/controlplane/#eks-architecture) managed by AWS in an auto-scaling group and different Availability Zones in an AWS Region. The following architecture diagram gives you a nice overview of Amazon EKS:
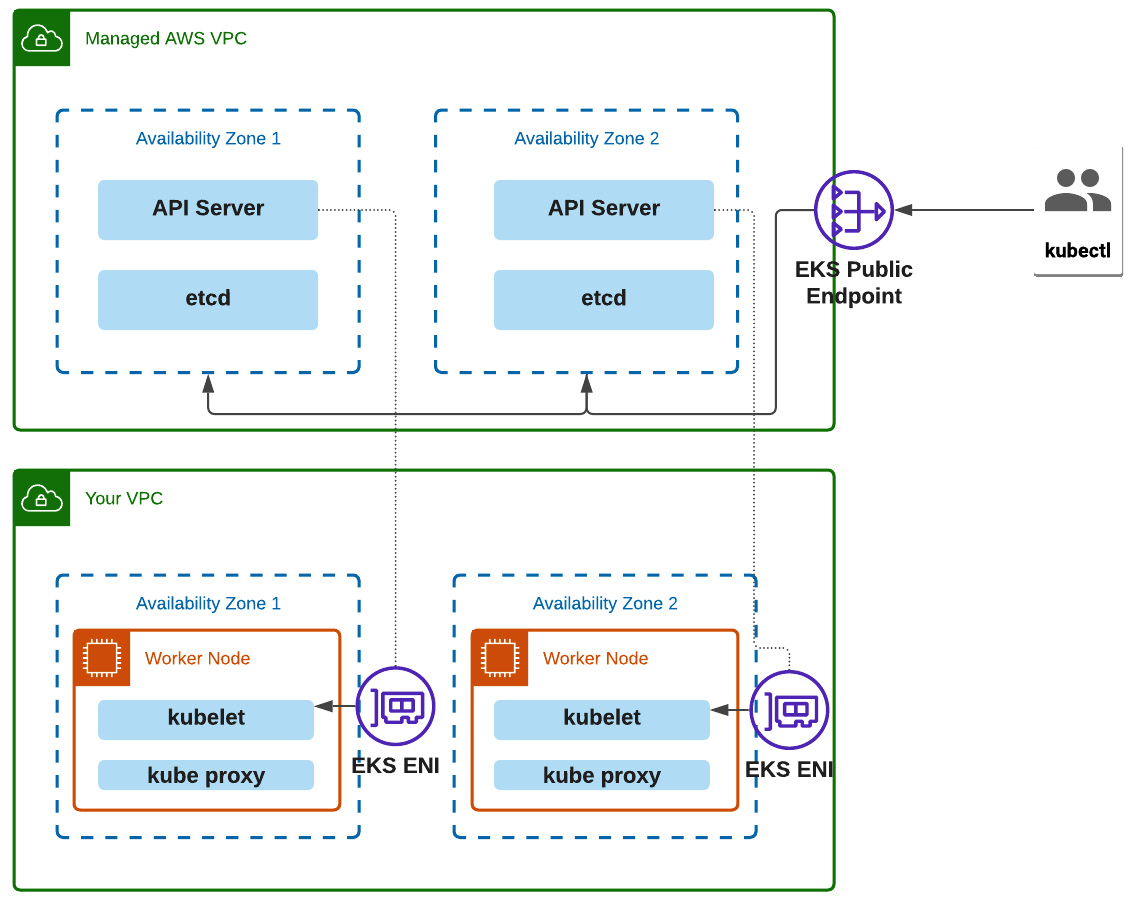
Figure 5.1 – Amazon EKS architecture
In practice, we only manage the worker node groups by ourselves, where we will deploy our services and which are included in our VPC, as described in Figure 5.1.
Let’s now write the Terraform scripts that we will use to provision an Amazon EKS cluster in practice.
Designing EKS infrastructure
The first thing we need to do is to sign up for a free account in AWS so that we can deploy our infrastructure. You can find more details about how to set up an AWS account at this link: https://docs.aws.amazon.com/cli/latest/userguide/getting-started-prereqs.html#getting-started-prereqs-signup.
In order to interact with AWS from our local machine instead of the web console, we need to create an IAM user with the required permissions and generate the AWS credentials to configure the local AWS CLI.
In order to create an IAM user, we need to visit the IAM page in the AWS menu. Type Iam in the top search bar; you can see where to find it in Figure 5.2:
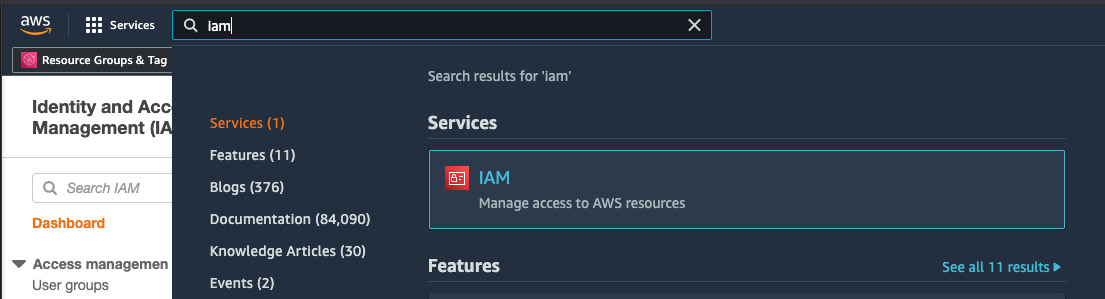
Figure 5.2 – IAM management in AWS
Then, you can click on IAM user to create a user other than the AWS root account we used to sign up for a free AWS account. Check the following options in Figure 5.3 to fill in and create an IAM user:
Figure 5.3 – Creating an IAM user
On the next screen, create a group for testing purposes with Administrator access by creating an admin policy name – in this case, TestGroup, as shown in Figure 5.4:
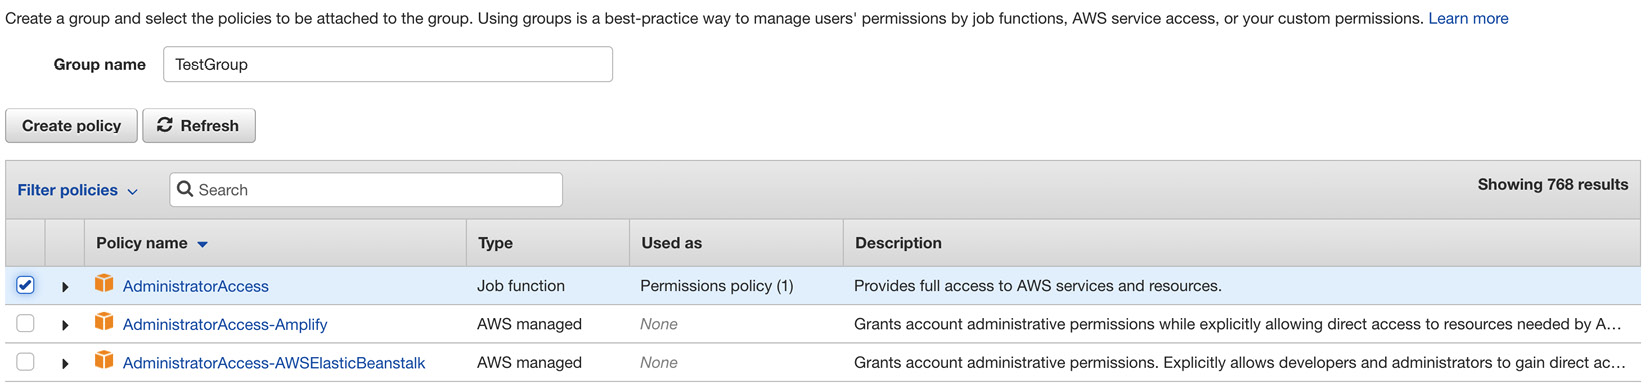
Figure 5.4 – Assigning an IAM group to an IAM user
Now, generate the AWS security credentials for programmatic access, as shown in the following screenshot:

Figure 5.5 – Assigning an IAM group to an IAM user
You need to download the CSV or copy the credentials to a secure place, such as a password manager. Now, it’s time to configure the local AWS CLI so that we can interact with the AWS APIs. To do that, we need to run the following commands:
$ aws configure
AWS Access Key ID [None]: YOUR_AWS_ACCESS_KEY_ID
AWS Secret Access Key [None]: YOUR_AWS_SECRET_ACCESS_KEY
Default region name [None]: YOUR_AWS_REGION
Default output format [None]: json
The key infrastructure resources we need to create to provision an Amazon EKS cluster in the AWS cloud are the following:
- VPC: A virtual network where we can deploy AWS infrastructure resources.
- Network Address Translation (NAT) gateway: A NAT service that allows the EKS nodes in a private subnet to connect to services outside our VPC but does not allow any other service to initiate a connection with those nodes.
- Security group: A set of rules or, even better, a virtual firewall to control inbound and outbound traffic to our worker node groups.
- Elastic Compute Cloud (EC2) instance: A virtual server in AWS EC2.
- Auto Scaling group: A group of EC2 instances conform to a logical group for autoscaling purposes – in our case, the K8s worker instance groups.
It’s a good practice to split our worker node into some logical grouping, which will help us later in Argo CD so that we can split and have separate groups for different purposes. The following figure describes this logical separation into two groups:
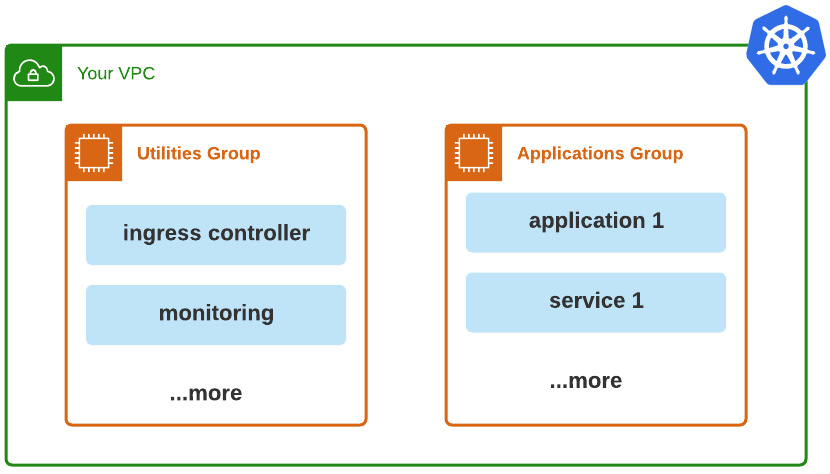
Figure 5.6 – Worker nodes’ logical grouping
Let’s define the purpose of each worker node group so that we can have a bit more clarity:
- Utilities: This group will be responsible for including utilities/tools to make the applications/services available to internal and external users.
- Application: This group will be responsible for deploying any applications and services available to internal and external users.
Next, we are going to use Terraform, which is an OSS IaC tool created by HashiCorp. It gives us the ability to describe with a declarative configuration the resources of the infrastructure of a data center.
Provisioning EKS with Terraform
As we mentioned earlier, we need to create some necessary resources before we create an EKS cluster. The structure we are going to follow will be divided into logical groups of resources:
- provider.tf: The provider in Terraform is an abstraction of the AWS API.
- network.tf: The network layer where the resources will be created.
- kubernetes.tf: The EKS infrastructure resources and worker node groups.
- variables.tf: The dynamic variables, which we pass to Terraform scripts so that they can be repeatable.
- outputs.tf: The output of different resources, which can be printed out in the system console.
First, let’s set up the related VPC where the EKS worker nodes groups will be created. Now, we need to define in Terraform the cloud provider we want to use in provider.tf:
provider "aws" {
  region = var.region
}
In Terraform, the community has built a couple of modules that abstract a set of resources that are used and created together. So, to create a new network layer (VPC) in our case, we will use a module provided by the AWS team in network.tf:
data "aws_availability_zones" "zones" {}
module "vpc" {
  source  = "Terraform-aws-modules/vpc/aws"
  version = "3.11.0"
  name                 = var.network_name
  cidr                 = var.cidr
  azs                  = data.aws_availability_zones.zones.names
  private_subnets      = var.private_subnets
  public_subnets       = var.public_subnets
  enable_nat_gateway   = true
  enable_dns_hostnames = true
  tags = {
    "kubernetes.io/cluster/${var.cluster_name}" = "shared"
  }
  public_subnet_tags = {
    "kubernetes.io/cluster/${var.cluster_name}" = "shared"
    "kubernetes.io/role/nlb"                      = "1"
  }
  private_subnet_tags = {
    "kubernetes.io/cluster/${var.cluster_name}" = "shared"
    "kubernetes.io/role/internal-nlb"             = "1"
  }
}
The reason we used a new VPC is that, in any case, if your AWS account is not new and you already had something deployed inside it, to not impact existing resources and create the new EKS cluster there. Let’s look at Figure 5.7 to understand the network topology:
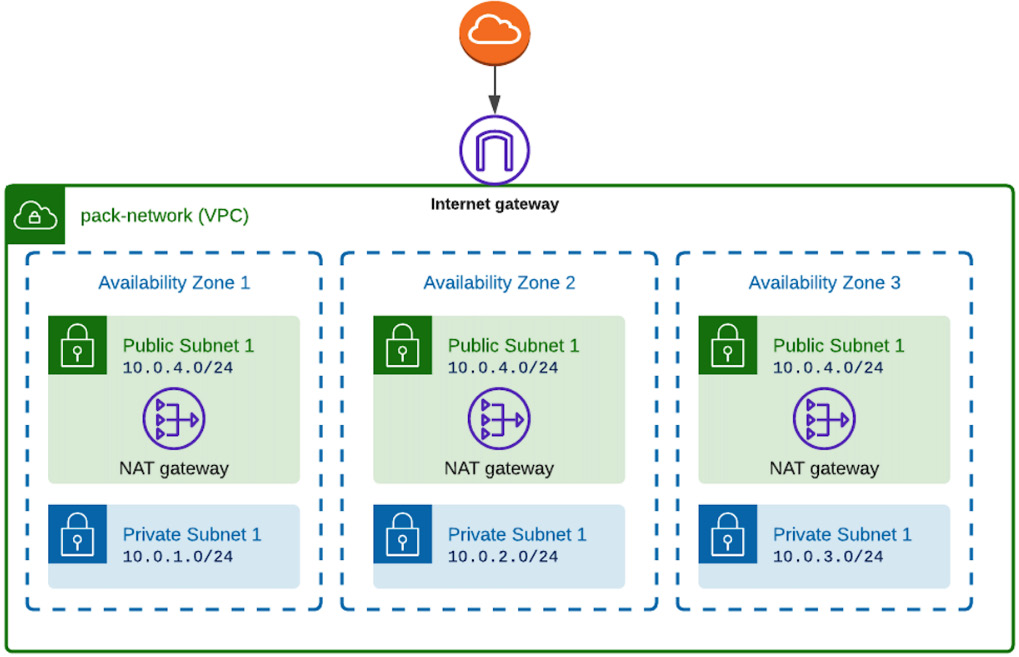
Figure 5.7 – Worker nodes’ logical grouping
As we can see in Figure 5.7, we have a public and a private subnet for each Availability Zone and a NAT gateway for each public subnet. Private subnets can download packages and have access to the outside world, as they have attached the NAT gateway in their route table as a target. In Figure 5.8, we can see an example of the route table of a private subnet:
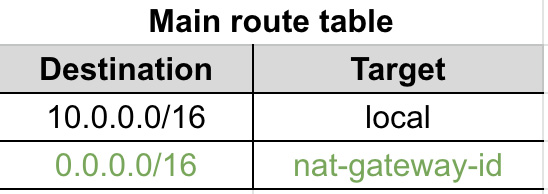
Figure 5.8 – Worker nodes’ logical grouping
Now, it’s time to define the EKS K8s cluster, as described in Figure 5.6, and attach the private subnets to the K8s nodes so that they are not directly accessible from the outside world of the network. So, if we evolve Figure 5.7 now with EKS K8s nodes, we will have the topology shown in Figure 5.9:
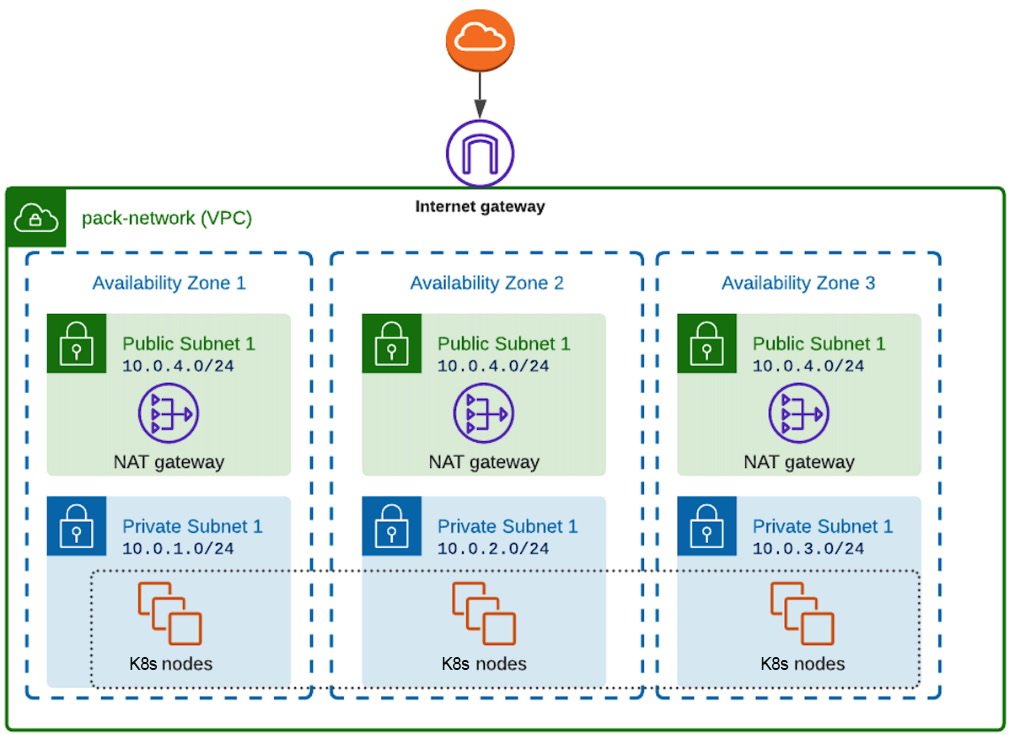
Figure 5.9 – Worker nodes’ logical grouping
It is a good practice to always set the version of the providers we use in order to avoid a break in compatibility if there is a major version upgrade. We have a specific file to define these versions, which is versions.tf:
terraform {
  required_providers {
    aws = {
      source  = "hashicorp/aws"
      version = ">= 3.66.0"
    }
    kubernetes = {
      source  = "hashicorp/kubernetes"
      version = ">= 2.6.1"
    }
  }
}
Now, we are ready to run the Terraform scripts and create the AWS infrastructure resources. First, we need to initialize the Terraform working directory:
$ terraform init
Initializing modules...
Terraform has been successfully initialized!
After the initialization, we create an execution plan that will give us a preview of the changes that Terraform will make:
terraform plan –out=plan.out -var=zone_id=<your-zone-id>
In plan.out is the generated Terraform plan, which can be applied with the following command and output if it’s successful:
$ terraform apply plan.out
Apply complete! Resources: 57 added, 0 changed, 0 destroyed.
In the same directory in which we did a run of Terraform scripts, there is a newly created file called kubeconfig_packt-cluster, which is the kubeconfig file we can use to access the new EKS K8s cluster in AWS through the kubectl commands. Now, it’s time to configure our terminal with this K8s configuration:
$ export KUBECONFIG=kubeconfig_packt-cluster
$ kubectl -n kube-system get po
The last command will return all the Pods that are under the kube-system namespace, and the output will be like that shown in Figure 5.10:
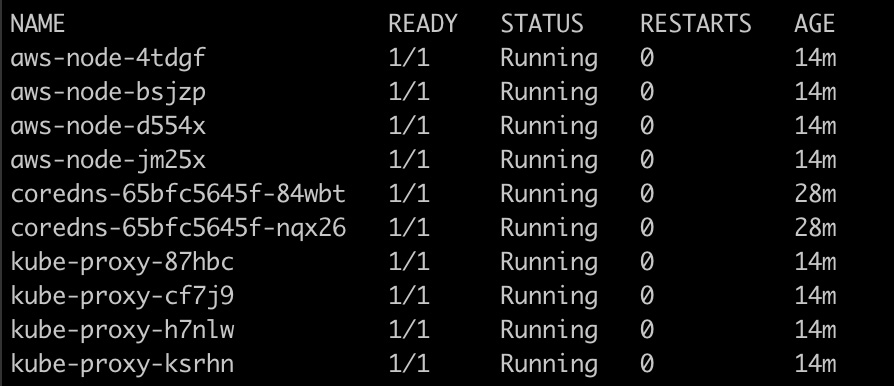
Figure 5.10 – Pods available in kube-system
We now have an EKS K8s cluster ready in AWS, and we can jump into the hands-on work to bootstrap the cluster for repeatability and disaster-recovery scenarios. In the next chapter, we will have a post-creation phase of the initial infrastructure, where we will set Argo CD in the cluster along with the required utilities and applications.
Bootstrapping EKS with Argo CD
Now that we have created the cluster, we need to evolve our Terraform scripts a bit more so that for every new cluster we create, we set it up to be ready with Argo CD and manage the configuration so that we can follow GitOps practices for Argo CD too. As we mentioned in Chapter 2, Getting Started with ArgoCD, Argo CD syncs and manages itself.
Preparing Argo CD Terraform
We will use the Terraform provider for kustomize and install Argo CD in the cluster. First, we will create kustomization.yaml, which will install Argo CD and, in parallel, create the K8s resources for Argo CD, such as the name and the related ConfigMap. Here is kustomization.yaml:
apiVersion: kustomize.config.k8s.io/v1beta1
kind: Kustomization
namespace: argocd
bases:
  - https://raw.githubusercontent.com/argoproj/argo-cd/v2.1.7/manifests/install.yaml
resources:
  - namespace.yaml
patchesStrategicMerge:
  - argocd-cm.yaml
With the preceding kustomization in practice, we will install Argo CD in a namespace resource, which is defined in a namespace.yaml file called argocd, and with a strategic merge (https://github.com/kubernetes/community/blob/master/contributors/devel/sig-api-machinery/strategic-merge-patch.md), we add the ConfigMap for Argo CD too. Now, it’s time to define in Terraform how to install Argo CD with kustomize in the new EKS cluster. First, we need to add an extra provider for kustomization and add the following in provider.tf:
provider "kustomization" {
  kubeconfig_path = "./${module.eks.kubeconfig_filename}"
}
Here is argocd.tf to bootstrap the cluster with Argo CD:
data "kustomization_build" "argocd" {
  path = "../k8s-bootstrap/bootstrap"
}
resource "kustomization_resource" "argocd" {
  for_each = data.kustomization_build.argocd.ids
  manifest = data.kustomization_build.argocd.manifests[each.value]
}
Now, it’s time to apply the Terraform script to install Argo CD.
Applying Argo CD Terraform
Similar to what we did when we created the EKS K8s cluster, we need to plan the changes in Terraform:
$ terraform plan –out=plan.out
This command will display that there are a couple of changes:
Plan: 41 to add, 0 to change, 0 to destroy.
Now is the time to apply and check that everything works as expected:
$ terraform apply plan.out
In the end, everything will be successful, and you will see this message:
Apply complete! Resources: 20 added, 0 changed, 0 destroyed.
But is Argo CD really installed and running? Let’s check it with the following command:
$ kubectl -n argocd get all
Everything worked, and you should be able to see something similar to Figure 5.11:
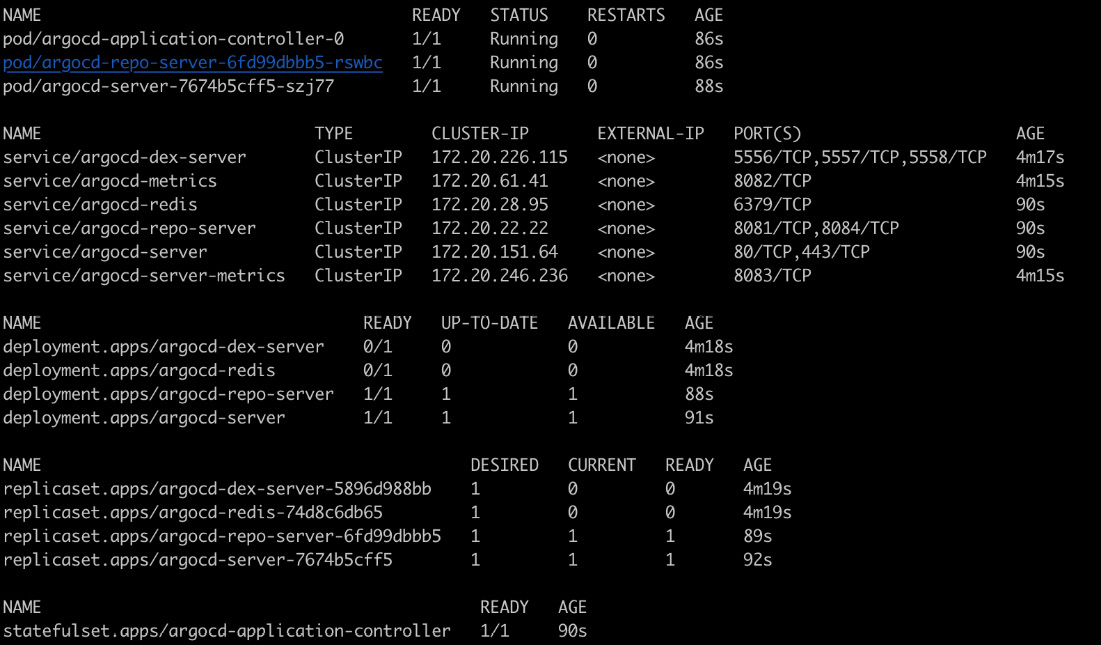
Figure 5.11 – Bootstrapping EKS with Argo CD
Let’s run a port-forward to the Argo CD K8s service and check whether the UI works, and we can see the argo-cd app managing itself as an Argo application. Let’s fetch the password for the UI login first:
$ kubectl -n argocd get secret argocd-initial-admin-secret -o jsonpath="{.data.password}" | base64 –d
It’s not a good practice to use the admin user, but for convenience, we will use it. So, the username is admin, and the admin password is fetched by the preceding command. Let’s now port-forward to access the UI with the following command:
$ kubectl -n argocd port-forward service/argocd-server 8080:80
We can see in Figure 5.12 that the argo-cd application has been created and is already synced:
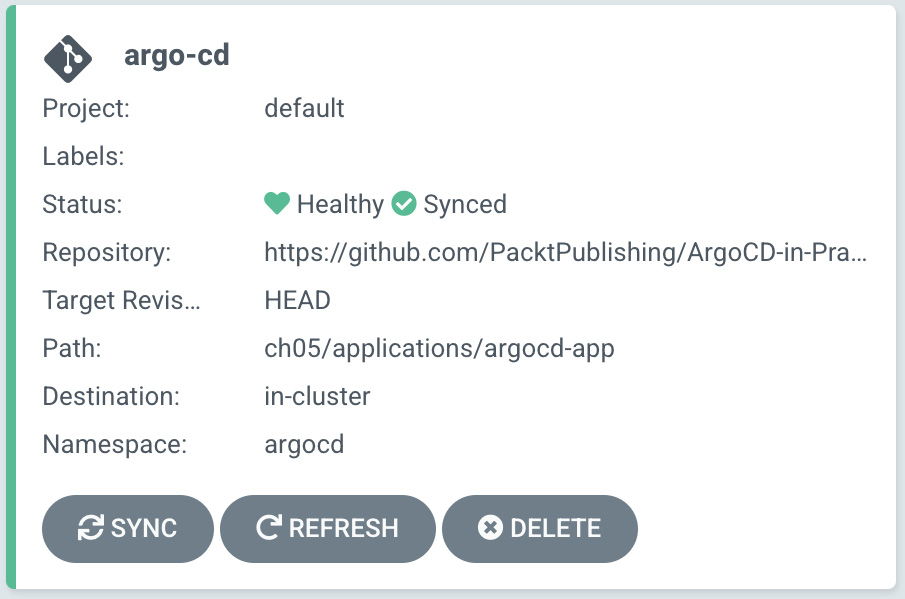
Figure 5.12 – Argo CD managing the application
If we check a bit further, we can see that argo-cm.yaml is already synced:
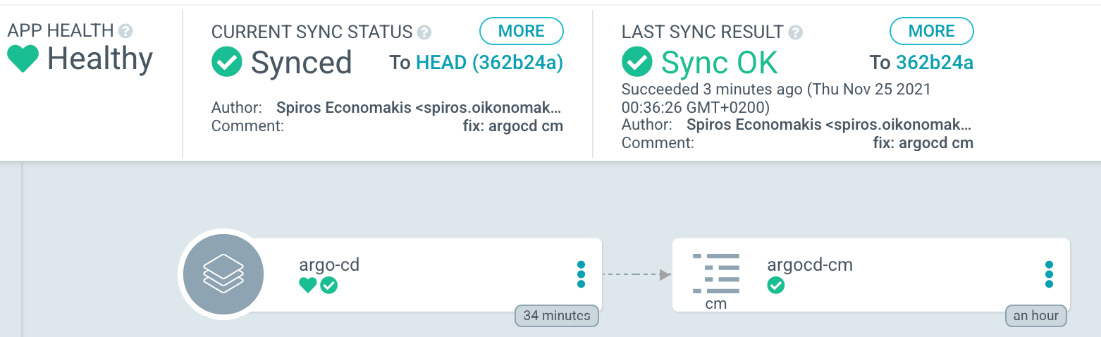
Figure 5.13 – Argo CD managing the application
In Figure 5.13, you can see that the app is healthy and synced without any issue. From this moment, we are able to change the configuration of Argo CD with GitOps, and in practice, as we mentioned earlier, Argo CD syncs and manages itself.
As a result, we have a new EKS cluster with Argo CD bootstrapped, and we have a repeatable manner with Terraform to create a new K8s cluster ready for use. In the next section, we will go a bit deeper into understanding the app of apps pattern and try to orchestrate the dependencies between the different utilities and applications we want to have bootstrapped in the cluster.
Using the app of apps pattern
In Chapter 2, Getting Started with Argo CD, we created a quick example of the app of apps pattern while we were using Argo CD Autopilot. It’s also important to talk about how we would use the app of apps pattern in real environments and why we need it. In the previous section, we followed one step of the pattern by bootstrapping the cluster with Argo CD, but in a real environment, we want to create a repeatable K8s cluster with the same services; this is especially critical in disaster-recovery scenarios.
Why the app of apps pattern?
The pattern in practice gives us the ability to have a master application and logical grouping of another set of applications. You can create a master app that creates other apps and allows you to declaratively manage a group of apps that can be deployed in concert.
The pattern is used for bootstrapping a cluster with all the applications, and this is the main thing we are trying to accomplish in this chapter. The first issue, although simple to tackle, is how we can deploy our services and applications with GitOps practices. Another issue that an Argo CD application may have is that it can have only one source type, which means you cannot have Helm, kustomization, or plain YAML manifests in parallel.
With the app of apps pattern, instead of deploying multiple Argo CD application CRDs, you can deploy only one – the master app, which will deploy the rest for you. In the real world, even at the company that I am working for right now, we do logical grouping, which gives you the ability to have a watcher application that ensures all applications in the group are deployed and healthy.
Let’s jump back into our bootstrapping of the EKS cluster and start adding the utilities and applications for our scenario.
Bootstrapping utilities
In the previous section, we created the Argo CD, and in order to access the UI, we ran a port-forward to the service of K8s, and then we were able to access it. In the real world, we have teams that need external access to utilities or services other than port-forward. The first thing we will try here is to create an Ingress and a way to give a DNS name so that we can access them accordingly when needed.
For the sake of the use case here, we will use just public access in AWS and the public hosted zones, although, in a real environment, we always maintain one public and one private hosted zone. The reason is to give access to private hosted zones only through a VPN for services that are not for public access.
We need two utilities in order to have an Ingress and a DNS name. Specifically, we are going to use the following:
- External DNS: This will help create AWS Route 53 records for the Istio Gateway ingresses.
- Istio operator: This will help install, upgrade, and uninstall Istio in an environment, and will also install Istio and a control plane.
- Istio control plane: This will help to manage and configure the ingress gateways to route traffic.
- Istio resources: This will help you to access the Argo CD UI without port-forwarding.
The important part is the order of deploying these utilities in order to have them up and running and the logical grouping of the app of apps pattern. The order we need to follow is the following:
- External DNS
- The Istio operator
- The Istio control plane
- Argo CD Istio ingress
I think you already know the answer after reading Chapter 2, Getting Started with Argo CD, to how we are going to achieve the ordering. Of course, the answer is sync-waves, so let’s now see them in practice. First, we need to define the External DNS in the master-utilities Argo application. Before we start with the YAML files, you need to know that we need a registered domain name so that we can use it as an AWS public hosted zone in Route 53 (https://aws.amazon.com/route53/). Then, the External DNS will use the public hosted zone to create the related records defined in Istio as the Gateway.
AWS offers the ability to register domain names and automatically create an AWS Route 53 hosted zone after registration has been approved. In this case, I am using the registered domain name and hosted zone at http://packtargocdbook.link/, as shown in Figure 5.14:

Figure 5.14 – Argo CD managing the application
Next, we need to create an IAM role with a specific IAM policy to list and change resource record sets in AWS Route 53. The following is the related Terraform script to create the necessary role in iam.tf with the following policy:
resource "aws_iam_policy" "external_dns" {
  name        = "external-dns-policy"
  path        = "/"
  description = "Allows access to resources needed to run external-dns."
  policy = <<JSON
{
  "Version": "2012-10-17",
  "Statement": [
    {
      "Effect": "Allow",
      "Action": [
        "route53:ChangeResourceRecordSets"
      ],
      "Resource": [
        "${data.aws_route53_zone.zone_selected.arn}"
      ]
    },
    {
      "Effect": "Allow",
      "Action": [
        "route53:ListHostedZones",
        "route53:ListResourceRecordSets"
      ],
      "Resource": [
        "*"
      ]
    }
  ]
}
JSON
}
The first application is the External DNS one and you can find it in the official Git repository: https://github.com/PacktPublishing/ArgoCD-in-Practice in the ch05/applications/master-utilities/templates/external-dns.yaml file.
Next in order is the Istio operator in applications/master-utilities/istio-operator.yaml:
apiVersion: argoproj.io/v1alpha1
kind: Application
metadata:
  name: istio-operator
  namespace: argocd
  annotations:
    argocd.argoproj.io/sync-wave: "-2"
  finalizers:
    - resources-finalizer.argocd.argoproj.io
spec:
  project: default
  source:
    repoURL: https://github.com/istio/istio.git
    targetRevision: "1.0.0"
    path: operator/manifests/charts/istio-operator
    helm:
      parameters:
        - name: "tag"
          value: "1.12.0"
  destination:
    namespace: istio-operator
    server: {{ .Values.spec.destination.server }}
  syncPolicy:
    automated:
      prune: true
Next is the Istio control plane, and here is the Argo app – applications/master-utilities/istio.yaml:
apiVersion: argoproj.io/v1alpha1
kind: Application
metadata:
  name: istio
  namespace: argocd
  annotations:
    argocd.argoproj.io/sync-wave: "-1"
  finalizers:
    - resources-finalizer.argocd.argoproj.io
spec:
  project: default
  source:
    repoURL: https://github.com/PacktPublishing/ArgoCD-in-Practice.git
    targetRevision: HEAD
    path: ch05/applications/istio-control-plane
  destination:
    namespace: istio-system
    server: {{ .Values.spec.destination.server }}
  syncPolicy:
    automated:
      prune: true
    syncOptions:
      - CreateNamespace=true
Last but not the least, we need the Argo application with the Istio resource for Argo CD UI access:
apiVersion: argoproj.io/v1alpha1
kind: Application
metadata:
  name: argocd-istio-app
  namespace: argocd
  finalizers:
    - resources-finalizer.argocd.argoproj.io
spec:
  project: default
  source:
    repoURL: https://github.com/PacktPublishing/ArgoCD-in-Practice.git
    targetRevision: HEAD
    path: ch05/applications/argocd-ui
  destination:
    namespace: argocd-ui
    server: {{ .Values.spec.destination.server }}
  syncPolicy:
    automated:
      prune: true
      selfHeal: true
    syncOptions:
      - CreateNamespace=true
    validate: true
However, let’s mention something important here. The order is defined by the sync waves that are set as Argo CD annotations. We will see in the Manifest file that the Istio operator chart has been assigned argocd.argoproj.io/sync-wave: "-2" and, conversely, the Istio control plane chart has argocd.argoproj.io/sync-wave: "-1". The end result is that the Istio operator will be installed first, as it has a lower value than the Istio control plane. Argo CD will wait to finish the deployment and be in a healthy state in order to proceed to the next wave.
There is a small problem though, which is that Argo CD doesn’t really know when the Istio control plane is healthy, meaning that it doesn’t know when the Istio resource has been created. The only thing that Argo CD knows is that it’s deployed and healthy when the chart is installed in the EKS cluster.
The preceding problem can be solved with the custom health checks by Argo CD, which you can write in a programming language called Lua. There are two ways we can define custom health checks:
- Use the argocd-cm.yaml ConfigMap so that we can leverage GitOps too
- Custom health checks scripts as part of an argo-cd build, which are not very flexible
We are going to use the first option, as it’s more flexible, and we need to add a custom health check with a Lua script. The easy part here is that the Istio operator provides a status attribute in the IstioOperator CRD, which will be updated once the Istio control plane resources have been created successfully. We will modify argocd-cm.yaml to the following:
apiVersion: v1
kind: ConfigMap
metadata:
  name: argocd-cm
  namespace: argocd
  labels:
    app.kubernetes.io/name: argocd-cm
    app.kubernetes.io/part-of: argocd
data:
  resource.customizations: |
    install.istio.io/IstioOperator:
      health.lua: |
        hs = {}
        if obj.status ~= nil then
          if obj.status.status == "HEALTHY" then
            hs.status = "Healthy"
            hs.message = "Istio-Operator Ready"
            return hs
          end
        end
        hs.status = "Progressing"
        hs.message = "Waiting for Istio-Operator"
        return hs
The Lua script added here will be used periodically by Argo CD to validate the health status of K8s objects of the install.istio.io/IstioOperator type. Now, after the modification, we can just commit and push the change because Argo CD manages itself, and if there is a drift of changes, it will apply them. Easy, right?
In the next section, we will start from the beginning, and we will first destroy everything completely so that we can see in practice the bootstrap of a new cluster ready for usage.
Bootstrapping in practice
In this section, the end goal is to create a fresh EKS cluster and validate all the actions we made in the previous sections. The validation criteria are the following:
- The EKS cluster created
- Two worker node groups, one for utilities and one for applications
- Accessing the UI of Argo CD (meaning the Istio operator and master-utilities are deployed already as they were part of previous sync-waves)
- Checking whether the Argo CD application to manage itself is there
Now, it’s time to destroy the infrastructure and recreate the infrastructure so that we can cross-validate what we have done so far is working, as described in the previous sections.
Destroying infrastructure
We have bootstrapped the EKS cluster with the necessary utilities in this chapter, and now it’s time to destroy the infrastructure completely and start afresh. Terraform gives us the ability to destroy infra with the following command to completely clean up the AWS account of all the resources:
$ terraform destroy –auto-approve
Starting fresh infrastructure
Once the infrastructure is destroyed, it’s time to recreate everything from the beginning. The first thing we need to do is to clean up the Terraform workspace:
$ rm -rf .terraform .terraform.lock.hcl *.tfstate*
We need to initialize Terraform so that we can redownload the providers we have set with the related versions:
$ terraform init
…......
Terraform has been successfully initialized!
Now, it is time to first plan the Terraform script and then apply it. After some time – it will take a couple of minutes – the apply will finish successfully, and here are the related commands:
$ terraform plan –out=plan.out
$ terraform apply plan.out -auto-approve
After everything is done, we are ready to validate whether the expected result and all the utilities have been installed and are in a healthy state in Argo CD.
In the previous section, we discussed and deployed an app of apps pattern for the sake of our example. The Argo team evolved the app of apps pattern and created a new Argo CD CRD called ApplicationSet. In the next section, we will try to understand some of the disadvantages of the app of apps pattern and how ApplicationSet tackled them.
App of apps disadvantages
The pattern solved a couple of the problems of bootstrapping a cluster easily and helped us to avoid deploying hundreds of Argo CD application objects, as you actually just need to deploy one that groups all the others. A big plus was that this pattern gave us the ability to have an observer Argo CD application that ensures that the rest of the applications are deployed and healthy.
However, we still have some challenges to solve, such as how to support monorepos or multi-repos, especially in a microservice world, how to give a team the ability to deploy applications using Argo CD in multi-tenant clusters without the need for privilege escalation, and, of course, how to avoid creating too many apps.
Enter the newest controller by the Argo team, ApplicationSet, which supplements the Argo CD application functionality. We will see how it works in the next section.
What is ApplicationSet?
The ApplicationSet controller is a typical K8s controller and works along with Argo CD to manage Argo CD applications, and we can think of it as an application factory. The great features that the ApplicationSet controller gives us are the following:
- One K8s manifest to deploy to multiple K8s clusters with Argo CD
- One K8s manifest to deploy multiple Argo applications by multiple sources/repositories
- Great support for “monorepos”, which in Argo CD means multiple Argo CD application resources in one repository
In Figure 5.15, we can see how the ApplicationSet controller interacts with Argo CD and that the only purpose it has is to create, update, and delete Argo application resources within the Argo CD namespace. The only goal is to ensure that Argo apps have the right state, which has been defined in the declarative ApplicationSet resource:
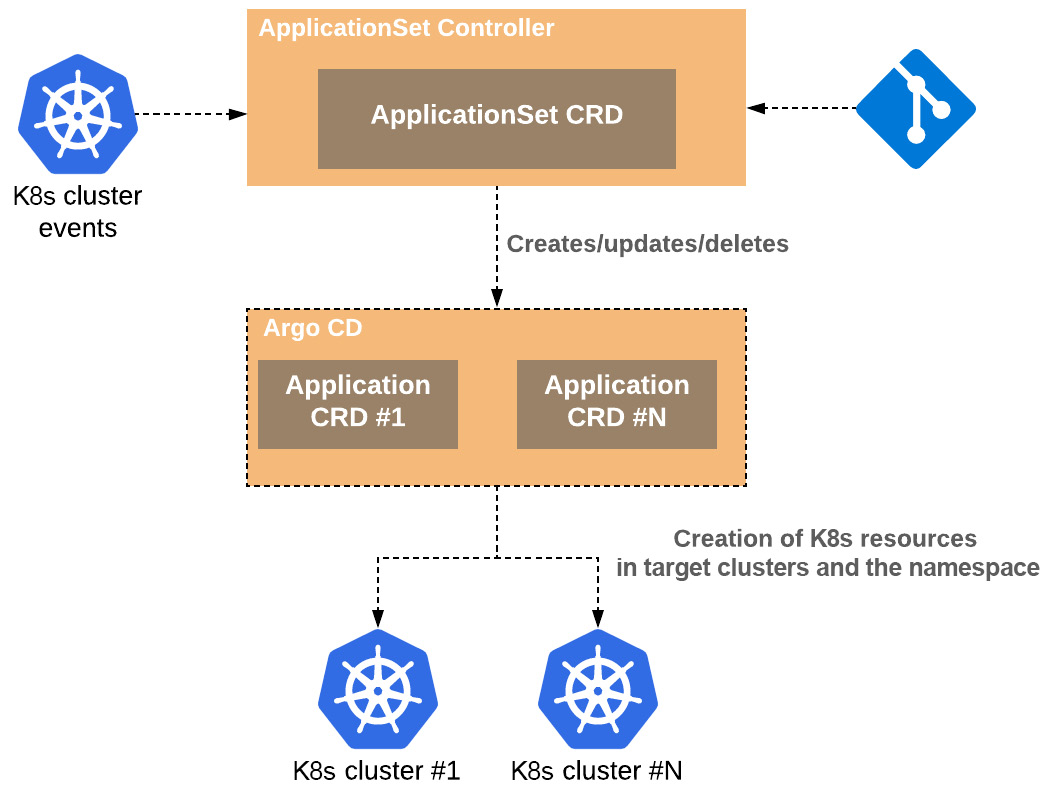
Figure 5.15 – The application’s controller interaction with Argo CD
ApplicationSet relies on generators to generate parameters for the different data source supports. We have the following generators:
- List: A fixed list of clusters to target Argo CD applications.
- Cluster: A dynamic list based on the clusters is already defined and managed by Argo CD.
- Git: The ability to create applications within a Git repository or ones based on the directory structure of a Git repository.
- Matrix: Combines parameters for two different generators.
- Merge: Merges parameters for two different generators.
- SCM provider: Automatically discovers the repositories in an Source Code Management (SCM) provider (for example, GitLab and GitHub).
- Pull request: Automatically discovers open pull requests in an SCM provider (for example, GitLab and GitHub).
- Cluster decision resource: Generates a list of clusters in Argo CD.
It’s time to evolve our current CI/CD a bit to a monorepo approach with multiple services and utilize the ApplicationSet controller.
Generators
The fundamental components of ApplicationSet are generators, which are responsible for generating parameters that are then used in the fields of ApplicationSet.
Let’s look at some of the available generator types. First, we will look at the List generator, which will allow us to target Argo applications to a fixed list of clusters. An example can be found here:
apiVersion: argoproj.io/v1alpha1
kind: ApplicationSet
metadata:
  name: chaos-engineering
spec:
  generators:
  - list:
      elements:
      - cluster: cloud-dev
        url: https://1.2.3.4
      - cluster: cloud-prod
        url: https://2.4.6.8
      - cluster: cloud-staging
        url: https://9.8.7.6
  template:
    metadata:
      name: '{{cluster}}- chaos-engineering
    spec:
      source:
        repoURL: https://github.com/infra-team/chaos-engineering.git
        targetRevision: HEAD
        path: chaos-engineering/{{cluster}}
      destination:
        server: '{{url}}'
        namespace: guestbook
Note that we have defined a list of clusters, such as cloud-dev, cloud-prod, and cloud-staging. We can make the preceding manifest a bit more flexible when we don’t want to have a fixed list, and we can use ClusterGenerator for this. With ClusterGenerator, we have two options:
- Target all the K8s clusters available in Argo CD
- Target the K8s cluster that matches a label selector
Let’s target all the clusters available in Argo CD first and see the difference with ListGenerator:
apiVersion: argoproj.io/v1alpha1
kind: ApplicationSet
metadata:
  name: chaos-engineering
spec:
  generators:
  - clusters: {}
  template:
    metadata:
      name: '{{cluster}}-chaos-engineering'
    spec:
      source:
        repoURL: https://github.com/infra-team/chaos-engineering.git
        targetRevision: HEAD
        path: chaos-engineering/{{cluster}}
      destination:
        server: '{{url}}'
Actually, the only difference is the property clusters in manifest: {}, which means that if we don’t define anything, we will do the application to every available cluster in Argo CD.
With a label selector, we need to have a metadata label in the Secret for the cluster, which we can use to select and deploy only to these clusters. An example is the following:
kind: Secret
data:
  # etc.
metadata:
  labels:
    argocd.argoproj.io/secret-type: cluster
    sre-only: "true"
Here is ApplicationSet, which selects the clusters by the matching label:
kind: ApplicationSet
metadata:
  name: chaos-engineering
spec:
  generators:
  - clusters:
      selector:
        matchLabels:
          sre-only: true
That’s it! Now, it’s clear that the app of apps pattern will soon be replaced by the powerful ApplicationSet, which can be very helpful when you have multiple utilities and services to deploy in concert.
Summary
In this chapter, we learned step by step how to create a new EKS cluster in AWS and bootstrapped it in an instrumented manner by covering Argo CD, learning how to use an Argo CD app to manage itself, External DNS, the Istio operator, the Istio control plane, and the Argo CD Istio ingress.
The full code can be found at https://github.com/PacktPublishing/ArgoCD-in-Practice in the ch05 folder. We gained a better understanding of sync waves in a real scenario that we can apply to our day-to-day work operations. In the end, we learned about the new custom health checks that, through a simple Lua programming script, can give us the power to validate when a resource is really ready.
In the next chapter, we will see how we can adopt Argo CD in a CI/CD workflow, tackle the security challenges with Secrets, and coordinate a real scenario of microservice deployments with Argo Rollouts.
Further reading
- Cluster bootstrapping: https://argo-cd.readthedocs.io/en/stable/operator-manual/cluster-bootstrapping/
- GitOps and K8s bootstrapping: https://medium.com/lensesio/gitops-and-k8s-bootstrapping-752a1d8d7085
- Sync waves: https://argo-cd.readthedocs.io/en/stable/user-guide/sync-waves/
- Custom health checks: https://argo-cd.readthedocs.io/en/stable/operator-manual/health/#custom-health-checks
- ApplicationSet: https://github.com/argoproj-labs/applicationset