5
OpenShift Deployment
In this chapter, we will navigate through a deployment process for Red Hat OpenShift. A successful implementation case will be only possible when you understand the needs of the architecture, understand the branding technology applied to the underlying infrastructure, and understand the workloads you are supposed to have on top of OpenShift.
As you have seen in Chapter 1, Hybrid Cloud Journey and Strategies, there are a lot of options in this multi-cluster universe. So, what are the best options for you? How can you choose? It can be very confusing if you start to prepare the requisites of the deployment without properly preparing yourself for it. That said, we must stress the importance of being aligned with the architecture chosen to ensure the expected deployment will succeed. Runtime changes and unplanned gaps can have unexpected results and create a platform full of flaws, causing the platform to malfunction. Making a comparison with the real world, it is like a ship that cannot be smoothly loaded with containers because it is always being repaired and, as such, is not ready to perform long trips or even depart.
Considering the explanation in the first part of this book, there are now several options for deploying OpenShift clusters. Next, we'll start with a checklist of questions that will help you make the right decision for your needs. Keep in mind, there are no right or wrong answers, but it will help you decide which is the best for you.
This chapter covers the following:
- Requirements
- OpenShift installation prerequisites
- Preparing for the installation
- Installation
- What's next?
Let's get started then!
Requirements
This is a practical chapter in which you will deploy an OpenShift cluster using what we consider to be the most complex deployment procedure: the User-Provisioned Installer (UPI)/agnostic installation.
The source code used in this chapter is available at https://github.com/PacktPublishing/OpenShift-Multi-Cluster-Management-Handbook/tree/main/chapter05.
As we already covered in this book, there are many different types of installations and supported providers, and it is almost impossible to cover every combination of them – neither is it our intention, as there is plenty of documentation, tutorials, and great references on the internet that will guide you through all types of installations.
That said, we understand that the most-added-value deployment procedure we can bring to you is the UPI/agnostic one; when you make it, you will be able to understand and easily execute the other types of installations. The reason for this is simple: with the UPI/agnostic installation, you are responsible for providing all the prerequisites that an OpenShift deployment requires, while with the Installer-Provisioned Infrastructure (IPI) deployment, the installer itself will provide the prerequisites for you automatically within the underlying provider.
OpenShift checklist opt-in
Have you seen the checklist we gave to you in Chapter 2, Architecture Overview and Definitions, and Chapter 3, Multi-Tenant Considerations. If you are reading this chapter to implement an OpenShift cluster in an enterprise and you haven't read those chapters yet, we strongly recommend you go back and read them, as they contain important aspects you need to think about and consider first, before deploying a cluster.
Lab requisites
To follow the labs in this chapter, you will need the following:
- A hypervisor or cloud provider in which you can spin up the instances. You can also use bare metal servers if you have them available.
- This is the minimum requirement for the VMs:
- One temporary server for the Bootstrap node
- Three servers for master nodes, with 2 vCPU, 8 GB RAM, and 50 GB of disk (minimum)
- Two servers for worker nodes, with 2 vCPU, 8 GB RAM, and 50 GB of disk (minimum)
- One server for the bastion node, with 2 vCPU, 4 GB RAM, and 20 GB of disk (minimum)
If you don't have enough resources available in your environment, you can also use a three-node cluster, in which masters and workers are co-located in the same nodes.
Important Note
The requirements listed are valid only for a lab. Refer to Chapter 2, Architecture Overview and Definitions, to get a reliable sizing for an enterprise installation.
OpenShift installation prerequisites
Before starting your journey through OpenShift deployment, you must observe several prerequisites. First, we will explore the options according to the decision that you previously made in the opt-in form.
As explained in Chapter 1, Hybrid Cloud Journey and Strategies, OpenShift has three installation modes: Installer-Provisioned Infrastructure (IPI), User-Provisioned Infrastructure (UPI), and agnostic (that is, a bare metal installer). It is very important to remember that no option will work well for every case, although the best option is the one that best fits into the architecture designed for you previously.
This chapter is very focused on deployment and all things related to spawning up a cluster by yourself, so keep that in mind when making your own lab and enjoy the tips and materials on our GitHub repository, which will be a real Swiss Army knife for you.
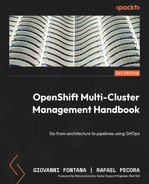
The following table shows you which installation methods you have available, according to the provider chosen (at the time this book was written):
Regarding the terms in the previous table, we classified some of the available options for each infrastructure provider to give you an overview of the current possibilities (at the time of writing this book). When we say Recommended, we are not only giving our perspective, but we are trying to say this is a common and best choice for that scenario. Possible indicates a valid option, but you will have some penalties, such as losing some great automation features the product brings out of the box. For that reason, we classified them as Possible, but not as the best choice. Not Available is self-explanatory.
As the prerequisites will be different according to the installation method, we prepared a matrix that helps you start the preparation of the underlying infrastructure to begin the cluster deployment:

UPI/agnostic installer
Any OpenShift installation must have a valid Red Hat subscription, the OpenShift installer binaries, a pull secret file, a public Secure Shell (SSH) key, and the resources available according to each provider.
In this section, we will guide you through a feasible and reliable cluster installation, whatever provider you have chosen. We will also set up the prerequisites needed using practical examples – feel free to use those configurations as many times as you need.
Note that the files used in this chapter are also available in our GitHub repository: https://github.com/PacktPublishing/OpenShift-Multi-Cluster-Management-Handbook/tree/main/chapter05
So, let's start with the prerequisite systems that are not part of OpenShift itself, but are indispensable to ensure that everything will work fine during the deployment process.
DNS
In this section, we will discuss the Domain Name System (DNS) requirements to provision an OpenShift cluster. For demonstrations purposes, we will give the minimum configuration to make everything work; for in-depth settings, check the references we have provided in the last chapter of this book.
For our lab, we will use the BIND tool running in a Red Hat Enterprise Linux 8 VM; however, you can use any other DNS server on top of Windows or your preferred Linux distribution. We will refer to this Linux VM from now on by the name bastion, which is a kind of convention with Red Hat architectures. If you want to strictly follow the instructions in this chapter, we recommend you use a fresh installation of Red Hat Enterprise Linux 8, using the minimum install.
An OpenShift cluster requires a dedicated subdomain. To facilitate your understanding, we will use a hypothetical hybrid cloud company that uses hybridmycloud.com as its main public domain. The complete subdomain for the OpenShift cluster will be ocp.hybridmycloud.com.
To install BIND, run the following commands on your bastion VM:
$ sudo yum install bind bind-utils -y
$ sudo systemctl enable --now named
$ sudo firewall-cmd --permanent --add-port=53/tcp
$ sudo firewall-cmd --permanent --add-port=53/udp
$ sudo firewall-cmd --reload
Now, we are going to configure the DNS server to be used with the OpenShift installation and applications. Perform the following steps to accomplish this:
- Create a subdomain zone by adding the following code in your named.conf file. You can alternatively download a file ready to be used in our GitHub repository at chapter05/named.conf:
$ sudo cat << EOF >> /etc/named.conf
zone "ocp.hybridmycloud.com" IN {type master;
file "/var/named/ocp.hybridmycloud.com.db";
allow-query { any; };allow-transfer { none; };allow-update { none; };};
zone "1.168.192.in-addr.arpa" IN {type master;
file "/var/named/1.168.192.in-addr.arpa";
allow-update { none; };};
EOF
- Create a forward zone file at /var/named/ocp.hybridmycloud.com.db:
$ sudo cat <<EOF > /var/named/ocp.hybridmycloud.com.db
;[1] Begin Common Header Definition
$TTL 86400
@ IN SOA bastion.ocp.hybridmycloud.com. root.ocp.hybridmycloud.com. (
202201010001 ;Serial
21600 ;Refresh
3600 ;Retry
604800 ;Expire
86400 ;Minimum TTL
)
;End Common Header Definition
;Name Server Information [2]
IN NS bastion.ocp.hybridmycloud.com.
;IP address of Name Server [3]
bastion IN A 192.168.1.200
;api internal and external purposes [4]
api IN A 192.168.1.200
api-int IN A 192.168.1.200
;wildcard application [5]
*.apps IN A 192.168.1.200
;bootstrap node to start cluster install only [6]
bootstrap IN A 192.168.1.90
;master nodes [7]
master1 IN A 192.168.1.91
master2 IN A 192.168.1.92
master3 IN A 192.168.1.93
;worker nodes [8]
worker1 IN A 192.168.1.101
worker2 IN A 192.168.1.102
EOF
Let's look at this code in more detail:
[1]: Common DNS zone header.
[2]: The nameserver will be its own Bastion server.
[3]: The IP address from the nameserver (Bastion IP).
[4]: These records are mandatory and need to point to the VIP that will be used for the OpenShift API functions. In our case, we are using the bastion server as the VIP (suitable only for lab environments).
[5]: Wildcard VIP record used for the applications that run on OpenShift. In our case, we are using the bastion server as the VIP (suitable only for lab environments).
[6]: Bootstrap node IP record, used only for the cluster installation and can be removed after it.
[7]: Master node IP records, where the control plane objects will be hosted.
[8]: Worker node IP records, where the workloads will run. If you go for a three-node cluster, disregard the worker hosts.
- Create a reverse zone file at /var/named/1.168.192.in-addr.arpa:
$ sudo cat <<EOF > /var/named/1.168.192.in-addr.arpa
$TTL 1W @ IN SOA bastion.ocp.hybridmycloud.com.root (
2019070700 ; serial
3H ; refresh (3 hours)
30M ; retry (30 minutes)
2W ; expiry (2 weeks)
1W ) ; minimum (1 week)
5.1.168.192.in-addr.arpa. IN PTR
api.ocp.hybridmycloud.com.;
5.1.168.192.in-addr.arpa. IN PTR
api-int.ocp.hybridmycloud.com.;
90.1.168.192.in-addr.arpa. IN PTR
bootstrap.ocp.hybridmycloud.com.;
91.1.168.192.in-addr.arpa. IN PTR
master1.ocp.hybridmycloud.com.;
92.1.168.192.in-addr.arpa. IN PTR
master2.ocp.hybridmycloud.com.;
93.1.168.192.in-addr.arpa. IN PTR
master3.ocp.hybridmycloud.com.;
101.1.168.192.in-addr.arpa. IN PTR
worker1.ocp. hybridmycloud.com.;
102.1.168.192.in-addr.arpa. IN PTR
worker2.ocp. hybridmycloud.com.;
EOF
Important Notes
Do not create a reverse zone record for the application's wildcard VIP, as that will lead to the wrong DNS resolution.
If you created it for a three-node cluster, disregard the worker A and PTR records.
- Restart the named service:
sudo systemctl restart named
- Validate the DNS to ensure that all DNS records are set up appropriately using the following dig commands (replace 192.168.1.200 with your bastion IP):
- Validate the OpenShift API using the following:
dig +short @192.168.1.200 api.ocp.hybridmycloud.com
dig +short @192.168.1.200 api-int.ocp.hybridmycloud.com
- For the BIND samples we described in this section, the output must be as follows:
192.168.1.5
192.168.1.5
- Validate the application's wildcard using the following:
dig +short @192.168.1.200 joedoe.apps.ocp.hybridmycloud.com
dig +short @192.168.1.200 whatever.apps.ocp.hybridmycloud.com
- All results must point to the ingress application's wildcard VIP, as follows:
192.168.1.6
192.168.1.6
- Validate the nodes, as follows:
dig +short @192.168.1.200 boostrap.ocp.hybridmycloud.com
dig +short @192.168.1.200 master1.ocp.hybridmycloud.com
dig +short @192.168.1.200 master2.ocp.hybridmycloud.com
dig +short @192.168.1.200 master3.ocp.hybridmycloud.com
dig +short @192.168.1.200 worker1.ocp.hybridmycloud.com
dig +short @192.168.1.200 worker2.ocp.hybridmycloud.com
The answer must be the following:
192.168.1.90
192.168.1.91
192.168.1.92
192.168.1.93
192.168.1.101
192.168.1.102
dig +short @192.168.1.200 -x 192.168.1.90
dig +short @192.168.1.200 -x 192.168.1.91
dig +short @192.168.1.200 -x 192.168.1.92
dig +short @192.168.1.200 -x 192.168.1.93
dig +short @192.168.1.200 -x 192.168.1.101
dig +short @192.168.1.200 -x 192.168.1.102
The results look similar to the following:
bootstrap.ocp.hybridmycloud.com.
master1.ocp.hybridmycloud.com.
master2.ocp.hybridmycloud.com.
master3.ocp.hybridmycloud.com.
worker1.ocp.hybridmycloud.com.
worker2.ocp.hybridmycloud.com.
Well done! If your DNS server is properly resolving names, you took a big step in preparing the prerequisites. Now, let's move on to another important piece of an OpenShift installation using the UPI method: the Dynamic Host Configuration Protocol (DHCP).
DHCP
DHCP is used to provide IP addresses to the OpenShift nodes. In UPI or agnostic installation nodes, the IP address needs to be set using static configuration on DHCP (the fixed-address parameter).
Make sure that the IP address and hostname for the nodes in the DNS and DHCP match – each IP address and hostname in the DNS and DHCP need to be the same. In this subsection of prerequisites, we are focusing on creating a simple DHCP setup for later study and laboratory use. As previously stated, DHCP will be configured to provide static IP addresses, under the 192.168.1.x subnet, so, this configuration uses the media access control (MAC) address of each node's Ethernet interfaces:
- Install DHCP on your bastion VM:
$ sudo yum install dhcp-server -y
- Configure the dhcpd.conf file according to the hostnames and IP addresses used with the DNS:
cat <<EOF > /etc/dhcp/dhcpd.conf
# DHCP Server Configuration file.
#[1]
ddns-update-style interim;
ignore client-updates;
authoritative;
allow booting;
allow bootp;
allow unknown-clients;
default-lease-time 3600;
default-lease-time 900;
max-lease-time 7200;
#[2]
subnet 192.168.1.0 netmask 255.255.255.0 {option routers 192.168.1.254;
option domain-name-servers 192.168.1.200;
option ntp-servers 192.168.1.200;
next-server 192.168.1.200; #[2.1]
#filename "pxelinux.0";#[2.2]
#[3]
group {host bootstrap {hardware ethernet 50:6b:8d:aa:aa:aa;
fixed-address 192.168.1.90;
option host-name "bootstrap.ocp.hybridmycloud.com";
allow booting;
}
host master1 {hardware ethernet 50:6b:8d:bb:bb:bb;
fixed-address 192.168.1.91;
option host-name "master1.ocp.hybridmycloud.com";
allow booting;
}
host master2 {hardware ethernet 50:6b:8d:cc:cc:cc;
fixed-address 192.168.1.92 ;
option host-name "master2.ocp.hybridmycloud.com";
allow booting;
}
host master3 {hardware ethernet 50:6b:8d:dd:dd:dd;
fixed-address 192.168.1.93 ;
option host-name "master3.ocp.hybridmycloud.com";
allow booting;
}
host worker1 {hardware ethernet 50:6b:8d:11:11:11;
fixed-address 192.168.1.101;
option host-name "worker1.ocp.hybridmycloud.com";
allow booting;
}
host worker2 {hardware ethernet 50:6b:8d:22:22:22;
fixed-address 192.168.1.102;
option host-name "worker2.ocp.hybridmycloud.com";
allow booting;
}
}
}
EOF
$ sudo systemctl enable --now dhcpd
$ sudo firewall-cmd --add-service=dhcp --permanent
$ sudo firewall-cmd --reload
Let's look at this code in more detail:
[1]: Common settings to define DHCP as authoritative in that subnet and times of IP lease.
[2]: Scope subnet definition:
- [2.1] and [2.2]: Must be defined when using a PXE server, helpful for bare metal installations. In this lab, we are going to use VMs and, as such, that will not be used; therefore, leave it commented (using the # character at the beginning of the line).
[3]: A group with all nodes to lease IP addresses. If you go for a three-node cluster, disregard the worker hosts.
Important Note
After you create the VMs in your hypervisor, update dhcpd.conf accordingly with the MAC addresses you get from the network interfaces; otherwise, no IP address will be given to this subnet.
Web servers
A web server is used to serve the OS image to install nodes, and also to provide the Ignition files (Ignition files are manifest files encoded on base64). In our scenario, we will install and configure an Apache web server, which is a very simple way to provide all the necessary tools for the cluster installation to run adequately.
Follow this short list of steps to accomplish this task:
- Install an httpd server:
$ sudo yum install httpd policycoreutils-python-utils –y
- Configure /etc/httpd/conf/httpd.conf to change the Listen directive:
$ sudo sed –i 's/80/81/g' /etc/httpd/conf/httpd.conf
- Apply SELinux to change the default httpd port:
$ sudo semanage port -a -t http_port_t -p tcp 81
- Create a rule on firewalld to allow port 81:
$ sudo firewall-cmd --add-port 81/tcp --permanent
$ sudo firewall-cmd --reload
- Create a directory for OS image and Ignition files, and a file to test the connectivity:
$ sudo mkdir –p /var/www/html/images
$ sudo mkdir –p /var/www/html/ignition
$ sudo touch /var/www/html/images/imageFileToTest.txt
$ sudo touch /var/www/html/ignition/ignitionFileToTest.txt
- Set permission and owner to the files:
$ sudo chown –R apache. /var/www/html/
$ sudo chmod 744 –R /var/www/html/
- Start and enable the Apache web server:
$ sudo systemctl enable --now httpd
- Test connectivity using the curl command:
$ curl –O http://192.168.1.200:81/images/imageFileToTest.txt
$ curl –O http://192.168.1.200:81/ignition/ignitionFileToTest.txt
If you can see the file downloaded to your current folder, it means you have the Apache web server properly configured to serve the OpenShift installation.
Load balancer
A load balancer is another important element in an OpenShift cluster architecture. It is responsible for balancing the connection to the pool member in a set of nodes. For performance and resilience reasons, it is recommended that you use dedicated load balancing appliance hardware for production environments.
For our lab, we will be using HAProxy in our bastion VM to perform the load balancing function, which is a powerful, lightweight, and easy-to-use software load balancer.
That being said, before we start to configure it, it is important that you understand the basics of load balancing methods and the best practices that fit with the OpenShift platform.
I suppose the load balancer is like drops of water evenly distributed between a few cups, and each drop must fall into one glass, then the next drop must land in the next glass, and so on. Nonetheless, the cups are periodically dumped to avoid waste or overload.
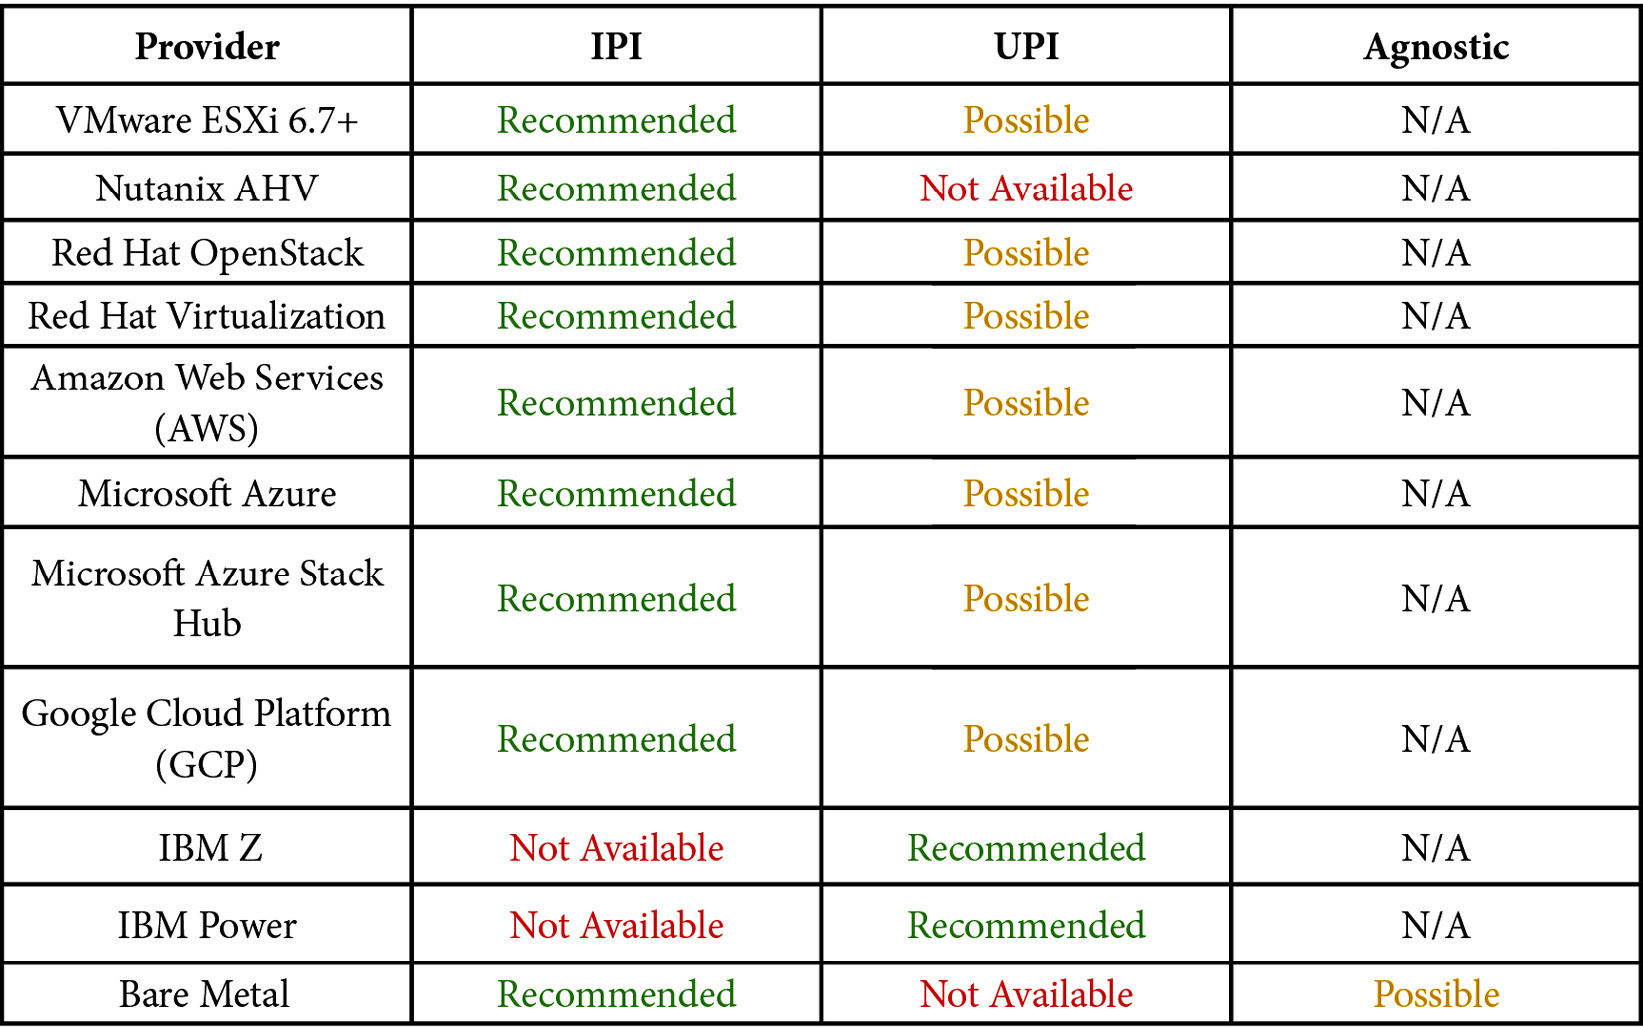
So, there are some ways to perform the task; these ways are known as balancing methods. The following table explains the scenarios that OpenShift will make use of:
A typical load balancer configuration is composed of four pairs of frontend and backend configurations that will balance the different types of requests and give a reliable fault tolerance to the platform.
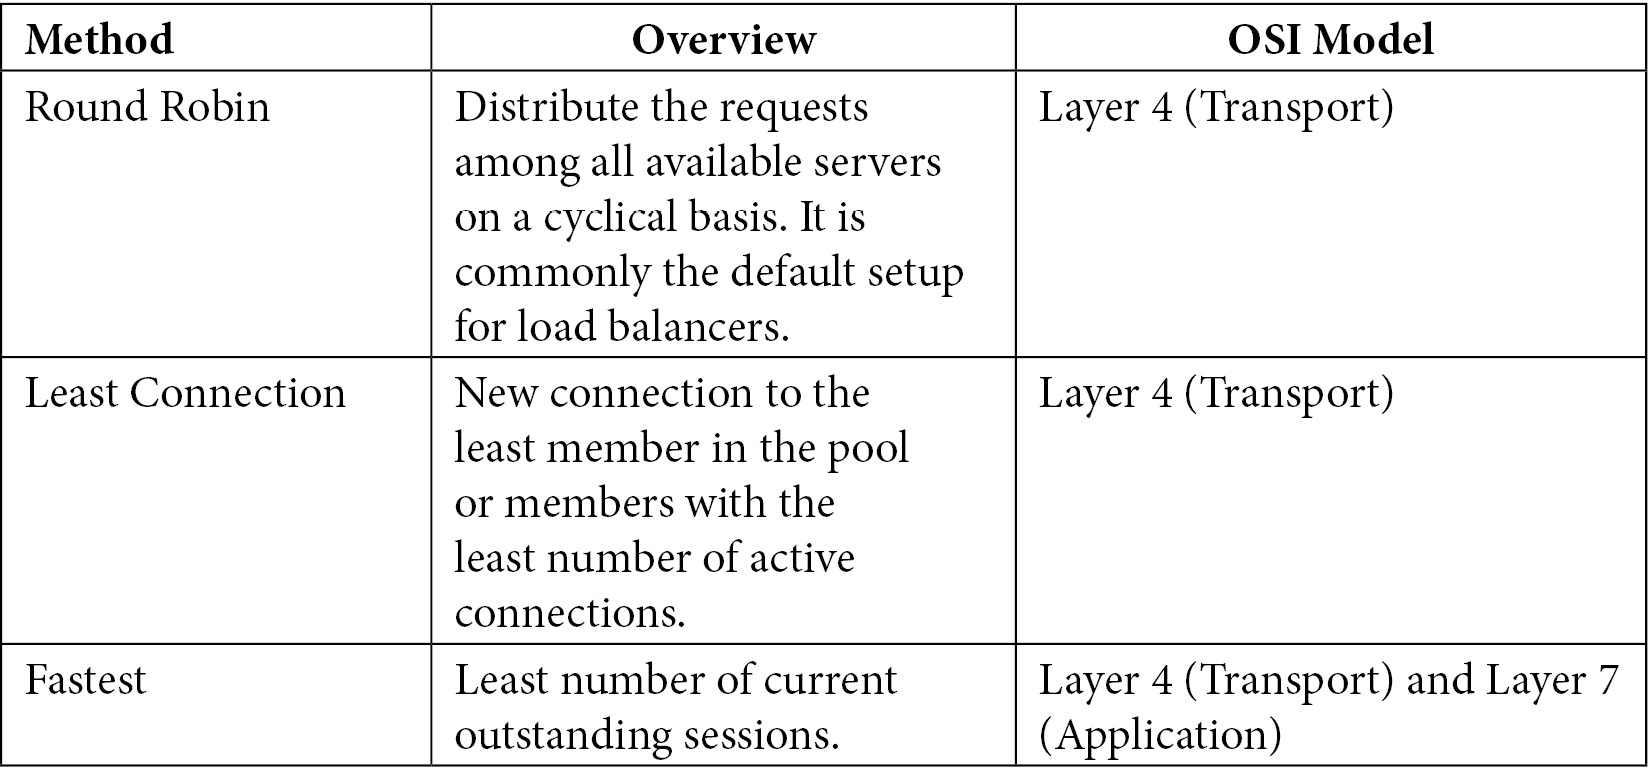
The first pool members are the master nodes; these are a group of three members and should work with the Least Connection method with a sourced address setup. This setting ensures that, during internal API calls to the load balancer, the request will be handled from the same node that started the call requisition and, as such, gives the proper callback and asynchronous functioning.
You can find the HAProxy frontend and backend configurations in the sample here: (frontend openshift-api-server and backend openshift-api-server).
Figure 5.1 – Master node load balancer
The second group of load balancer configurations is also used with the master nodes for the OpenShift machine-config-server API. See the HAProxy configuration for the machine-config-server API in the frontend machine-config-server and backend machine-config-server.
The third and fourth groups of load balancers should be a pool of at least two nodes (worker nodes) that will be responsible for the traffic routing from the outside to the application distributed on the worker nodes of the cluster (one for HTTP and another for HTTPS).
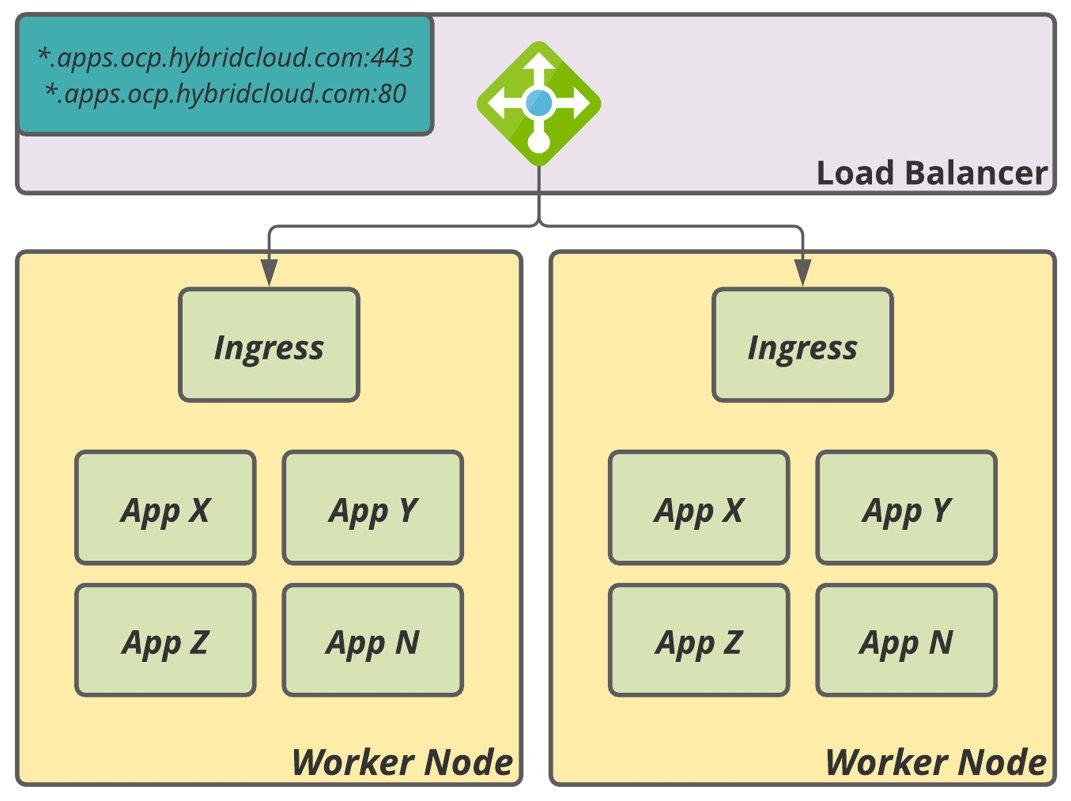
Figure 5.2 – Ingress load balancer
OpenShift often recommends the least connections with source addresses running on the transport layer (Layer 4,) which gives good performance to routing applications. However, when using certificates signed by a public Certificate Authority (CA) in the load balancer, instead of the OpenShift Ingress Controller, you must eventually set up this pool to work on the application layer (Layer 7).
Important Note
We strongly recommend disabling the SSL inspection on the load balancer/firewall layers to avoid digital certificate issues and the malfunctioning of the OpenShift cluster. This occurs because the enterprise load balancer/firewall solution, when used with SSL inspection mode enabled, decrypts every TCP payload and re-encapsulates them with a new SSL header. OpenShift interprets it as a certificate error, causing incorrect source/destiny TCP packets, and hanging up to TLS termination.
In a nutshell, the complete haproxy.cfg will be similar to the following:
$ sudo yum install haproxy -y
$ sudo cat <<EOF > /etc/haproxy/haproxy.cfg
# Global settings
global
  maxconn 20000
  log /dev/log local0 info
  chroot /var/lib/haproxy
  pidfile /var/run/haproxy.pid
  user haproxy
  group haproxy
  daemon
  # turn on stats unix socket
  stats socket /var/lib/haproxy/stats
defaults
  mode http
  log global
  option httplog
  option dontlognull
  option forwardfor except 127.0.0.0/8
  option redispatch
  retries 3
  timeout http-request 10s
  timeout queue 1m
  timeout connect 10s
  timeout client 300s
  timeout server 300s
  timeout http-keep-alive 10s
  timeout check 10s
  maxconn 20000
# Enable haproxy status endpoint
listen stats
  bind :9000
  mode http
  stats enable
  stats uri /
# OpenShift API (port 6443)
frontend openshift-api-server
  bind *:6443
  default_backend openshift-api-server
  mode tcp
  option tcplog
backend openshift-api-server
  balance source
  mode tcp
# bootstrap line below can be removed after the cluster is deployed
  server bootstrap 192.168.1.90:6443 check
  server master1 192.168.1.91:6443 check
  server master2 192.168.1.92:6443 check
  server master3 192.168.1.93:6443 check
# machine-config-server API (port 22623)
frontend machine-config-server
  bind *:22623
  default_backend machine-config-server
  mode tcp
  option tcplog
backend machine-config-server
  balance source
  mode tcp
# bootstrap line below can be removed after the cluster is deployed
  server bootstrap 192.168.1.90:22623 check
  server master1 192.168.1.91:22623 check
  server master2 192.168.1.92:22623 check
  server master3 192.168.1.93:22623 check
# Applications HTTP (port 80)
frontend ingress-http
  bind *:80
  default_backend ingress-http
  mode tcp
  option tcplog
backend ingress-http
  balance source
  mode tcp
  server worker1 192.168.1.101:80 check # [1]
  server worker2 192.168.1.102:80 check # [1]
# Applications HTTPS (port 443)
frontend ingress-https
  bind *:443
  default_backend ingress-https
  mode tcp
  option tcplog
backend ingress-https
  balance source
  mode tcp
  server worker0 192.168.1.101:443 check # [1]
  server worker1 192.168.1.102:443 check # [1]
EOF
Let's look at this code in more detail:
[1]: If you go for a three-node cluster, you should also point to the master nodes here.
After that, apply the HAProxy configuration by starting and enabling the service, as follows:
$ sudo setsebool -P haproxy_connect_any=1
$ sudo systemctl enable --now haproxy
$ sudo firewall-cmd --add-service=http --permanent
$ sudo firewall-cmd --add-service=https --permanent
$ sudo firewall-cmd --add-port=6443/tcp --permanent
$ sudo firewall-cmd --add-port=22623/tcp --permanent
$ sudo firewall-cmd --reload
After it starts, your load balancer can receive incoming connections and give the redirect to one member of the pool.
Note
As soon as the installation of the OpenShift control plane is finished, you will receive a message saying that it is safe to remove Bootstrap from load balancing; then, you can open the haproxy.cfg file and comment, or remove the lines that are referencing the Bootstrap server and restart the HAProxy server to apply the configuration.
Firewall
As the cluster has a lot of components involved, it is important to think about the security between Red Hat OpenShift and all other systems it integrates with. Unless you are working with a disconnected environment (refer to the Further reading section of this chapter for more details), you will need to grant access to ports 80 and 443 from certain URLs. These URLs are needed to download the required container images and others. Therefore, whitelist the following URLs in your network firewall:
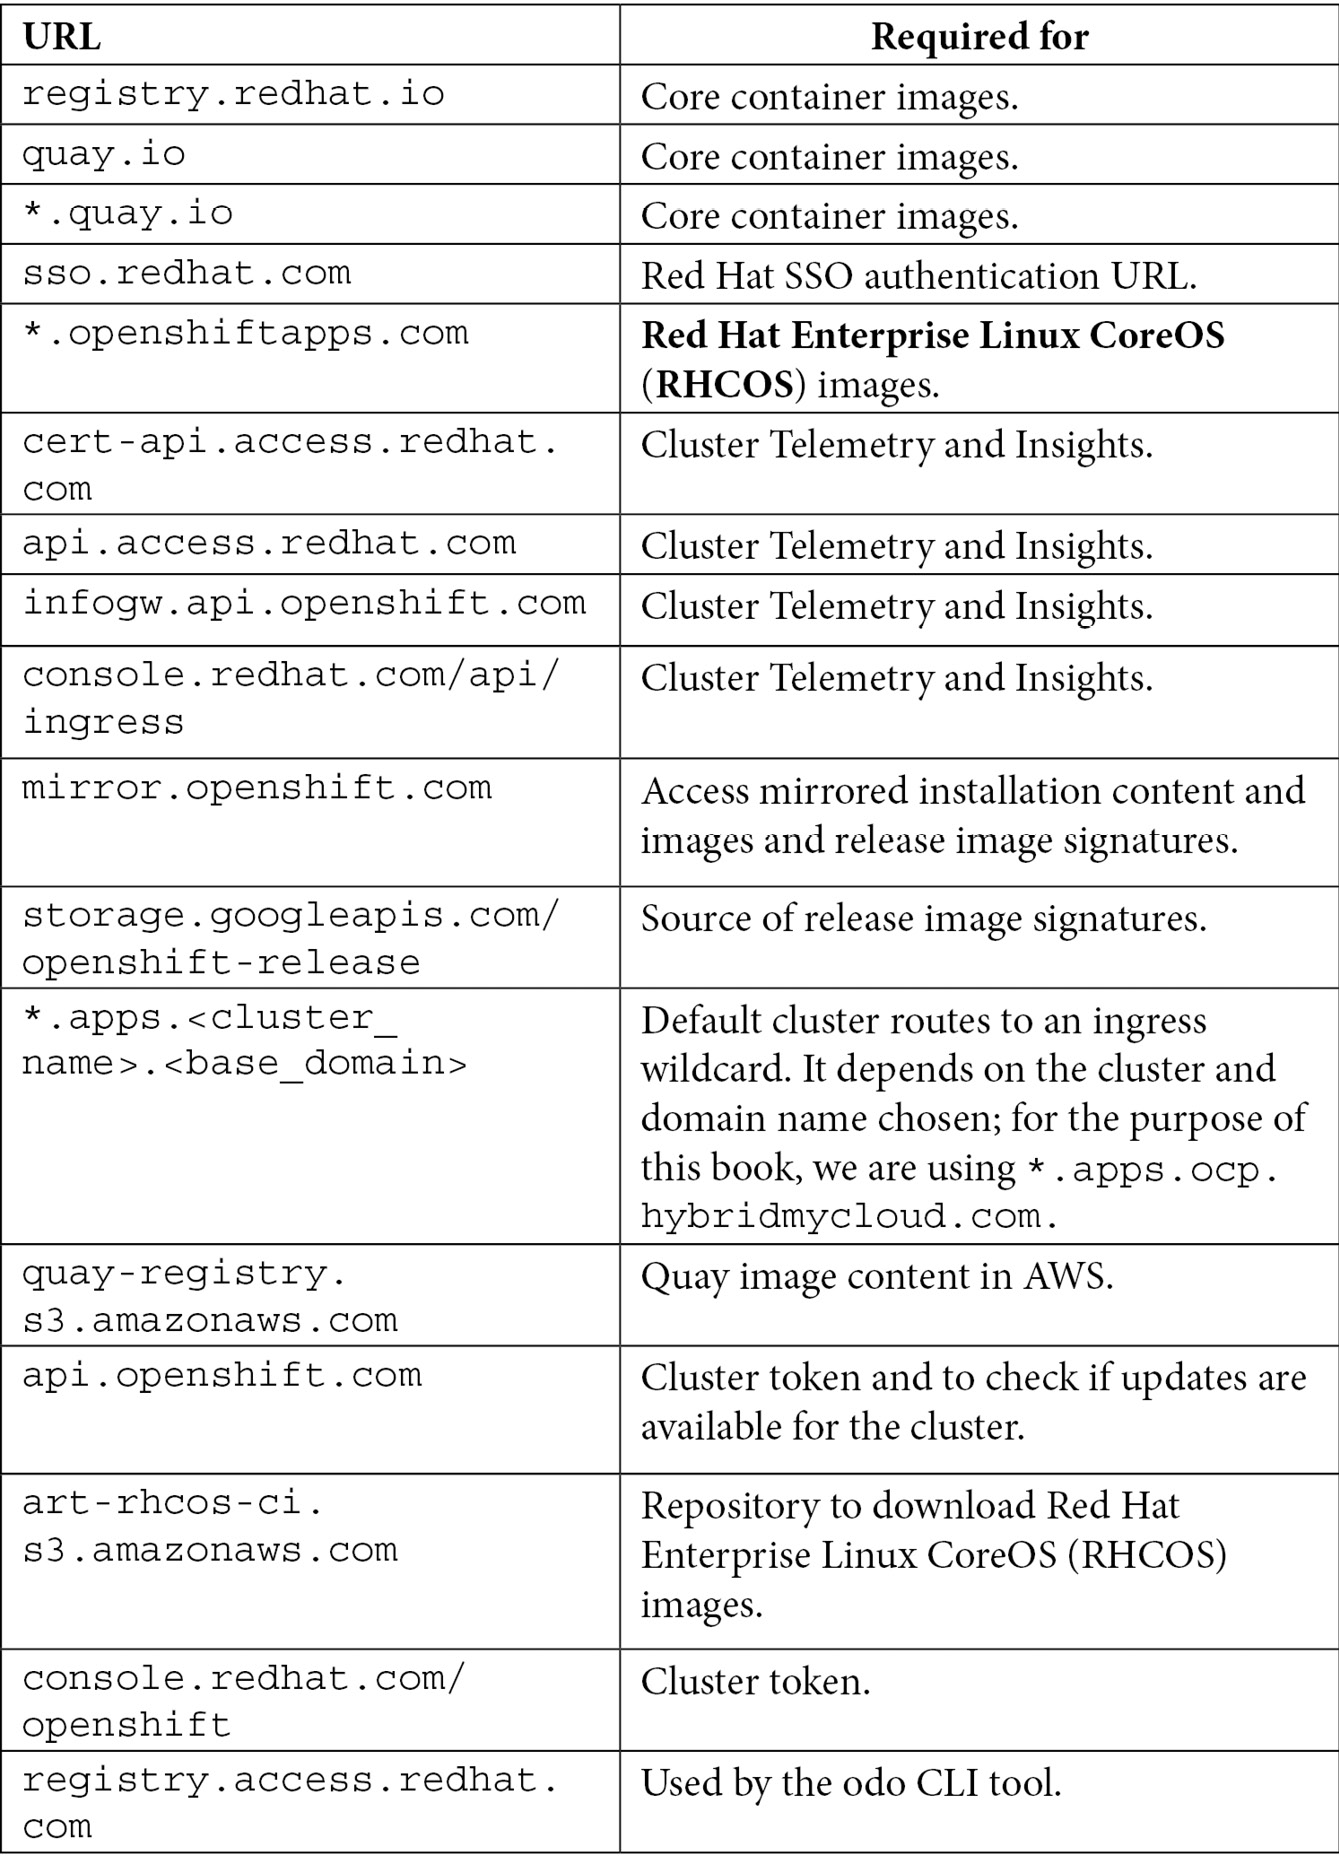
Reference
Refer to this link for the latest set of URLs: https://docs.openshift.com/container-platform/4.9/installing/install_config/configuring-firewall.html.
PXE server
A PXE server is a component that easily allows the boot process to look for installation files. During PXE configuration, you can create a simple Grand Unified Bootloader (GRUB) menu that works exactly like an OS installer, with all the kernel parameters you need.
We will deploy some packages to install the PXE server, create directories to store the configuration files, and develop a simple and useful bootstart menu. Now, SSH to your bastion server and do the following:
- Install these syslinux packages:
$ sudo yum install –y syslinux-tftpboot syslinux-nonlinux syslinux tftp-server
$ firewall-cmd --add-service=tftp --permanent
$ firewall-cmd --reload
$ sudo systemctl enable --now tftp
- Create the following directories:
$ mkdir -p /var/lib/tftpboot/networkboot/coreOS
$ mkdir -p /var/lib/tftpboot/pxelinux.cfg
- Copy the required PXE server files, as follows:
$ cp /usr/share/syslinux/* /var/lib/tftpboot
- Copy the Red Hat CoreOS image files, as shown here (files are available for download at this link: https://console.redhat.com/openshift/install/platform-agnostic/user-provisioned):
├── networkboot
│ └── coreOS
│ ├── rhcos-live-initramfs.x86_64.img
│ ├── rhcos-live-kernel-x86_64
│ └── rhcos-live-rootfs.x86_64.img
- Finally, create the bootloader menu to assist you in the installation:
$ sudo cat <<EOF > /var/lib/tftpboot/pxelinux.cfg/default
UI vesamenu.c32
MENU COLOR sel 4 #ffffff std
MENU COLOR title 0 #ffffff
TIMEOUT 120
PROMPT 0
MENU TITLE OPENSHIFT 4.X AGNOSTIC PXE MENU
LABEL BOOTSTRAP NODE
KERNEL networkboot/coreOS/rhcos-live-kernel-x86_64
APPEND initrd=networkboot/coreOS/rhcos-live-initramfs.x86_64.img,networkboot/coreOS/rhcos-live-rootfs.x86_64.img coreos.inst.install_dev=/dev/sda coreos.inst.ignition_url=http://192.168.1.200:81/ignition/bootstrap.ign
LABEL MASTER NODE
KERNEL networkboot/coreOS/rhcos-live-kernel-x86_64
APPEND initrd=networkboot/coreOS/rhcos-live-initramfs.x86_64.img,networkboot/coreOS/rhcos-live-rootfs.x86_64.img coreos.inst.install_dev=/dev/sdacoreos.inst.ignition_url=http://192.168.1.200:81/ignition/master.ign
LABEL WORKER NODE
KERNEL networkboot/coreOS/rhcos-live-kernel-x86_64
APPEND initrd=networkboot/coreOS/rhcos-live-initramfs.x86_64.img,networkboot/coreOS/rhcos-live-rootfs.x86_64.img coreos.inst.install_dev=/dev/sdacoreos.inst.ignition_url=http://192.168.1.200:81/ignition/worker.ign
EOF
Now that we have all the prerequisite components correctly set, we can start the installation using the UPI or agnostic installation method! So, go ahead and start your engines!
IPI
Even though we tried to give you a smooth demonstration of how to create all the prerequisite systems and servers, it might still look like an exhausting process. It is important to emphasize that it can be tiring when preparing on your own, but, in large enterprises, those infrastructures are often already working and need only some small setting tweaks to reach the necessary state.
You must be worn out after going through all the previous steps for the UPI installer. The good news is that the IPI installer is much easier to follow! You probably compared all the things needed on the table Preparation Stuff Table. To accomplish the task using the IPI, you should have only your cloud credentials, ensure the object limit of your cloud provider is enough for the minimum required in OpenShift, choose the size of cloud instances that best fit your needs, create the install-config.yaml file, and run the OpenShift install binary to spawn your cluster.
This process is simple due to the high level of automation that OpenShift has under the hood, which uses cloud APIs to create all the prerequisites for you, according to the parameters you set in install-config.yaml. Obviously, there are some changes from cloud to cloud. In the following code, we show two excerpts that change in install-config.yaml when preparing your file for AWS, Azure, and GCP:
Here's an AWS install-config sample file:
apiVersion: v1
baseDomain: hybridmycloud.com
credentialsMode: Mint
controlPlane:
  hyperthreading: Enabled
  name: master
  platform:
    aws:
      zones:
      - us-west-2a
      - us-west-2b
      rootVolume:
        iops: 4000
        size: 500
        type: io1
        type: m5.xlarge
    replicas: 3
compute:
  - hyperthreading: Enabled
  name: worker
  platform:
    aws:
      rootVolume:
        iops: 2000
        size: 500
        type: io1
      type: c5.4xlarge
      zones:
      - us-west-2c
    replicas: 3
metadata:
  name: test-cluster
  networking:
    clusterNetwork:
    - cidr: 10.128.0.0/14
    hostPrefix: 23
    machineNetwork:
    - cidr: 10.0.0.0/16
    networkType: OpenShiftSDN
    serviceNetwork:
    - 172.30.0.0/16
  platform:
    aws:
      region: us-west-2
      userTags:
      adminContact: jdoe
    costCenter: 7536
    amiID: ami-96c6f8f7
    serviceEndpoints:
      - name: ec2
        url: https://vpce-id.ec2.us-west-2.vpce.amazonaws.com
fips: false
sshKey: ssh-ed25519 AAAA...
pullSecret: '{"auths": ...}'
Next, let's look at a sample Azure install-config file:
apiVersion: v1
baseDomain: hybridmycloud.com
controlPlane:
  hyperthreading: Enabled
  name: master
  platform:
    azure:
      osDisk:
        diskSizeGB: 1024
        type: Standard_D8s_v3
        replicas: 3
    compute:
  - hyperthreading: Enabled
  name: worker
  platform:
    azure:
      type: Standard_D2s_v3
      osDisk: diskSizeGB: 512
      zones:
      - "1"
      - "2"
      - "3"
  replicas: 5
metadata:
  name: test-cluster
  networking:
  clusterNetwork:
  - cidr: 10.128.0.0/14
  hostPrefix: 23
  machineNetwork:
  - cidr: 10.0.0.0/16
  networkType: OpenShiftSDN
  serviceNetwork:
  - 172.30.0.0/16
platform:
  azure:
    BaseDomainResourceGroupName: resource_group
    region: centralus
    resourceGroupName: existing_resource_group
    outboundType: Loadbalancer
    cloudName: AzurePublicCloud
pullSecret: '{"auths": ...}'
Here, we have a GCP install-config sample:
apiVersion: v1
baseDomain: hybridmycloud.com
controlPlane:
  hyperthreading: Enabled
  name: master
  platform:
  gcp:
    type: n2-standard-4
    zones:
    - us-central1-a
    - us-central1-c
  osDisk:
    diskType: pd-ssd
    diskSizeGB: 1024
    encryptionKey:
      kmsKey:
      name: worker-key
      keyRing: test-machine-keys
      location: global
      projectID: project-id
  replicas: 3
compute:
- hyperthreading: Enabled
  name: worker
  platform:
  gcp:
    type: n2-standard-4
    zones:
    - us-central1-a
    - us-central1-c
    osDisk:
    diskType: pd-standard
    diskSizeGB: 128
    encryptionKey:
    kmsKey:
      name: worker-key
      keyRing: test-machine-keys
      location: global
      projectID: project-id
  replicas: 3
metadata:
name: test-cluster
networking:
  clusterNetwork:
  - cidr: 10.128.0.0/14
    hostPrefix: 23
  machineNetwork:
  - cidr: 10.0.0.0/16
  networkType: OpenShiftSDN
  serviceNetwork:
  - 172.30.0.0/16
platform:
gcp:
  projectID: openshift-production
  region: us-central1
pullSecret: '{"auths": ...}'
fips: false
sshKey: ssh-ed25519 AAAA...
Well done! Now you have the correct install-config.yaml files to use with your cloud provider. Continue with the installation to start OpenShift using your preferred installation method.
Preparing for the installation
As you have seen in the previous sections, the prerequisites are very important, and any mistake could be an Achilles' heel for the OpenShift cluster installation and functioning. Failure to prepare the prerequisites correctly will cause errors during the cluster deployment that are not always easy to troubleshoot to find the root cause. That said, we would like to stress the importance of preparing and validating the pre-requisites correctly before starting the cluster deployment.
To start the installation using the UPI method, you will need the following:
- An SSH key pair
- A pull secret for the cluster, which you can generate by accessing https://console.redhat.com/openshift/install, with a valid user subscription
- OpenShift installer binary
- OpenShift command-line tools
- Installation configuration file (install-config.yaml)
In the following sections, we will detail all of those steps.
An SSH key pair
Starting from OpenShift version 4, Red Hat begins to use Red Hat CoreOS as the main OS due to the container and immutable nature. Red Hat CoreOS needs some Ignition files to provision the OS based on that configuration. This process leads to a secure and reliable way of provisioning OpenShift nodes, allowing a standard zero-touch provisioning (ZTP) process.
SSH is used to access the nodes directly and only through a pair of keys assigned to the username coreos (it is not possible to access the nodes using a simple username/password combination). It is vital to keep a copy of the SSH key pair used during the cluster deployment in case of a problem with your cluster, as this is the only way to directly access the nodes to collect logs and try to troubleshoot them. Also, the SSH key pair will become part of the Ignition files and the public key pair is distributed across all nodes of the cluster.
We are going to use our bastion VM to create an SSH key pair, by using the following command:
$ ssh-keygen -t ecdsa -N '' -f ~/.ssh/clusterOCP_key
We will use a public key in the next steps, for example, clusterOCP_key.pub.
Important Note
Never expose or share the SSH private key; any malicious person with the private key could get root access to the nodes and, with some knowledge, escalate privileges as an OpenShift cluster-admin user.
Pull secret
A pull secret is a file that contains a collection of usernames and passwords encoded in Base64 used for authentication in image registries, such as quay.io and registry.redhat.io. You need to have a valid username at console.redhat.com to download or copy the pull secret.
To do so, complete the following two steps:
- Access https://console.redhat.com/openshift/create and access Downloads in the side menu, as shown in the following figure:
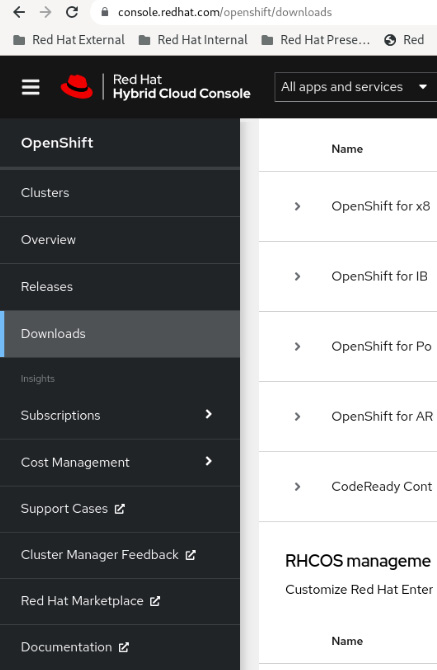
Figure 5.3 – Pull secret, Downloads menu
- Scroll down to the Tokens section and click on the Copy or Download buttons to get the pull secret, as shown here:

Figure 5.4 – Download or copy the pull secret
On this page, you will also find the command line, developer tools, and the installer binaries to download.
OpenShift installer binary
To install the cluster, you should download the installer binary, which can be downloaded from the Red Hat Hybrid Cloud Console, as shown in Figure 5.3, or you can browse the public repository found here: https://mirror.openshift.com/pub/openshift-v4/x86_64/clients/ocp/latest/.
OpenShift command-line tools
Like the installer binary, you can download the command-line tools under the same public repository mentioned previously, or through the Red Hat Hybrid Cloud Console from where you downloaded the pull secret.
OpenShift command-line tools consist of the oc and kubectl CLIs, which you will use to manage and run commands on the cluster as soon as it has been spawned.
Installation configuration file (install-config.yaml)
The last step before starting the installation is to create a manifest file called install-config.yaml. Essentially, this file consists of the control plane, workers, and network definitions, along with some metadata, such as the pull secret and the public SSH key.
Based on our previous configuration, the following is a sample of the install-config file that can be used with the installation. You can find this file in our GitHub repository at chapter05/none-install-config.yaml:
$ mkdir ~/ocp
$ cat <<EOF > ~/ocp/install-config.yaml
apiVersion: v1
baseDomain: hybridmycloud.com # [1]
compute:
- hyperthreading: Enabled
  name: worker
  replicas: 2 # [2]
controlPlane:
  hyperthreading: Enabled
  name: master
  replicas: 3 # [3]
metadata:
  name: ocp # [4]
networking:
  clusterNetwork:
  - cidr: 10.148.0.0/14 # [5]
    hostPrefix: 23
  networkType: OpenShiftSDN # [6]
  serviceNetwork:
  - 10.153.0.0/16 # [7]
platform:
  none: {} # [8]
fips: false
pullSecret: '<YOUR-PULL-SECRET>' # [9]
sshKey: '<YOUR-SSH-KEY>' # [10]
EOF
Let's look at this code in more detail:
[1]: The base domain for your cluster. Needs to match with the one you configured in your DNS in the previous section.
[2]: The initial number of worker nodes you will be deploying with the cluster. If you go for a three-node cluster, this value must be zero.
[3]: The initial number of master nodes you will be deploying with the cluster. For a highly available cluster, always use three replicas.
[4]: The cluster name. This also needs to match with what you specified in your DNS.
[5]: A block of IP addresses that will be used internally for pods within OpenShift SDN. We explored this concept in Chapter 2, Architecture Overview and Definitions.
[6]: The type of SDN used. Valid values are OpenShiftSDN or OVNKubernetes.
[7]: A block of IP addresses that will be used internally for network services within OpenShift SDN. We explored this concept in Chapter 2, Architecture Overview and Definitions.
[8]: Specific data about the underlying platform. This will be different depending on the platform on which your cluster will be hosted (such as AWS, Azure, GCP, and VMware). For agnostic installation, use none.
Note
You can use also the openshift-installer binary to generate a sample install-config.yaml file for the provider you are going to work with. Use the following command for that: ./openshift-install create install-config.
After this file is created, you can proceed to the installation steps in the following section.
Installation
Now, some further steps should be performed before deploying the cluster. The first step in the installation is to create the manifest files. We strongly recommend you create a backup of the install-config.yaml file before running the following command, as this command removes the original file and you will need to create it again from scratch if you need to retry the installation:
$ ./openshift-install create manifests --dir=home/user/ocp/
Open the ~/ocp/manifests/cluster-scheduler-02-config.yml file in your preferred editor. Change the mastersSchedulable parameter to false if you go for a regular cluster, or true if you decided to provision a three-node cluster.
You should now generate the Ignition files by running the following command:
$ ./openshift-install create ignition-configs --dir=home/user/ocp/
After the previous command, you should have three new Ignition files: bootstrap.ign, master.ign, and worker.ign.
Copy these three files to the HTTP server you prepared in the previous section:
$ sudo cp ~/ocp/*.ign /var/www/html/ignition
$ sudo chown -R apache. /var/www/html
$ sudo chmod 744 /var/www/html
Finally, you can proceed with provisioning the nodes.
Phase 1 – Provisioning servers
First, you need to provision the servers. This will vary depending on the underlying infrastructure but, in general, the process for virtualized environments (for example, VMware, vSphere, and RHV) is as follows:
- Import the Red Hat CoreOS template to the hypervisor.
- Clone it and configure the VM parameters according to the provider.
On the other hand, the process for bare metal or agnostic installation is performed either by booting using the Red Hat CoreOS ISO or using a PXE.
In our lab, we are going to boot using the Red Hat CoreOS ISO. Follow these steps to do it:
- Download the ISO file from console.redhat.com, as mentioned previously, or directly through this link: https://mirror.openshift.com/pub/openshift-v4/dependencies/rhcos/latest/rhcos-live.x86_64.iso.
- In the bastion VM, run the following command to get the SHA512 digest of the Ignition files (this will be used after booting from the ISO to validate the authenticity of the file):
$ sha512sum ~/ocp/bootstrap.ign
$ sha512sum ~/ocp/master.ign
$ sha512sum ~/ocp/worker.ign
An example of the output is shown here:
a5a2d43879223273c9b60af66b44202a1d1248fc01cf156c46d4a79f552b6bad47bc8cc78ddf0116e80c59d2ea9e32ba53bc807afbca581aa059311def2c3e3b installation_directory/bootstrap.ign
- Boot using the ISO image, but don't specify any options until you see a shell prompt.
- Run the following coreos-installer command to start the ignition process and, consequently, the OS provisioning:
$ sudo coreos-installer install --ignition-url= http://192.168.1.200:81/ignition/bootstrap.ign /dev/sda --ignition-hash=SHA512-
a5a2d43879223273c9b60af66b44202a1d1248fc01cf156c46d4a79f552b6bad47bc8cc78ddf0116e80c59d2ea9e32ba53bc807afbca581aa059311def2c3e3b
- Repeat the same process for each server, always respecting the following format for the coreos-intaller command:
$ sudo coreos-installer install --ignition-url=http://192.168.1.200:81/<node_type>.ign <device> --ignition-hash=SHA512-<digest>
Where <node_type> will be bootstrap.ign, master.ign, or worker.ign, <device> is the disk to be used to install the OS (such as /dev/sda), and <digest> is the result of the sha512sum command mentioned previously.
After booting the bootstrap and master nodes using this procedure, you can go to the next step to monitor the progress of the installation.
Phase 2 – Bootstrap and control plane
In this phase, Bootstrap will download the container images to provision the control plane components. As soon as the containers in each master node are running, the control plane components will start configuring themselves until the etcd cluster, API, and controllers from OpenShift are synchronized.
Run the following command from the Bastion VM to monitor the progress of the Bootstrap and control plane deployment:
./openshift-install wait-for bootstrap-complete --dir= /home/user/ocp/ --log-level=debug
Immediately after the command is triggered, you will see some log messages on the console, similar to this sample:
INFO Waiting up to 30m0s for the Kubernetes API at https://api.ocp.hybridmycloud.com:6443... INFO API v1.22.1 up INFO Waiting up to 30m0s for bootstrapping to complete... INFO It is now safe to remove the bootstrap resources
After that, you must remove Bootstrap from the load balancer and restart the haproxy service.
Note
Remember, the Bootstrap server is a one-shot use only; therefore, you can destroy the Bootstrap server completely from the infrastructure provider because it will not be used anymore, even if something goes wrong during the cluster installation.
Phase 3 – Check for certificates to sign – For UPI and agnostic installations only
When Bootstrap finishes its process, the Red Hat OpenShift Container Platform creates a series of certificate signing requests (CSRs) for each of the nodes. During our planning, we attempted to provision two worker nodes, so we must accept the certificates to join the worker nodes to the cluster.
We need to use the oc client to approve the certificates. To do so, run the following command to export the kubeadmin credentials and get access to the cluster:
$ export KUBECONFIG=~/ocp/auth/kubeconfig
A simple command can list the pending certificates and approve them until no pending certificates are showing:
$ oc get csr | grep –i Pending
NAME      AGE   REQUESTOR                             CONDITION
csr-bfd72 5m26s system:node:worker0.ocp.hybridmycloud.com   Pending
csr-c57lv 5m26s system:node:worker1.ocp.hybridmycloud.com   Pending
...
Then, to approve the certificates, run the following command:
$ oc get csr -o name | xargs oc adm certificate approve
certificatesigningrequest.certificates.k8s.io/csr-bfd72 approved
certificatesigningrequest.certificates.k8s.io/csr-c57lv approved
To confirm that everything worked fine, run the following commands until all nodes remain Ready:
$ oc get nodes
NAME                        STATUS   ROLES    AGE   VERSION
ocp-7m9wx-master-0       Ready    master   77d   v1.21.1+9807387
ocp-7m9wx-master-1       Ready    master   77d   v1.21.1+9807387
ocp-7m9wx-master-2       Ready    master   77d   v1.21.1+9807387
ocp-7m9wx-worker-jds5s   Ready    worker   77d   v1.21.1+9807387
ocp-7m9wx-worker-kfr4d   Ready    worker   77d   v1.21.1+9807387
Phase 4 – Finishing the installation
We are almost at the end of our UPI/agnostic installation! Now, we must check the cluster operators to ensure that all of them are available.
Using the following command, you will be able to monitor the cluster operators' deployment progress:
./openshift-install wait-for install-complete --dir= /home/user/ocp/ --log-level=debug
INFO Waiting up to 30m0s for the cluster to initialize...
When it finishes, you will receive the kubeadmin password to finally get access to your OpenShift cluster.
Important Note
kubeadmin is a temporary user with the cluster-admin privileges. It is highly recommended that you remove the kubeadmin user as soon as you set up a new identity provider, and give proper cluster-admin privileges to the cluster administrators.
Now, you can access the OpenShift Console GUI using your preferred browser. To do so, browse to https://console-openshift-console.apps.ocp.hybridmycloud.com and insert the kubeadmin credentials:
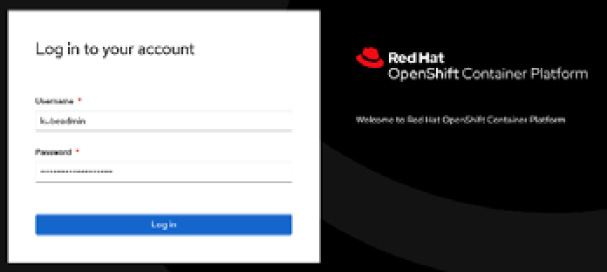
Figure 5.5 – Accessing the Console UI
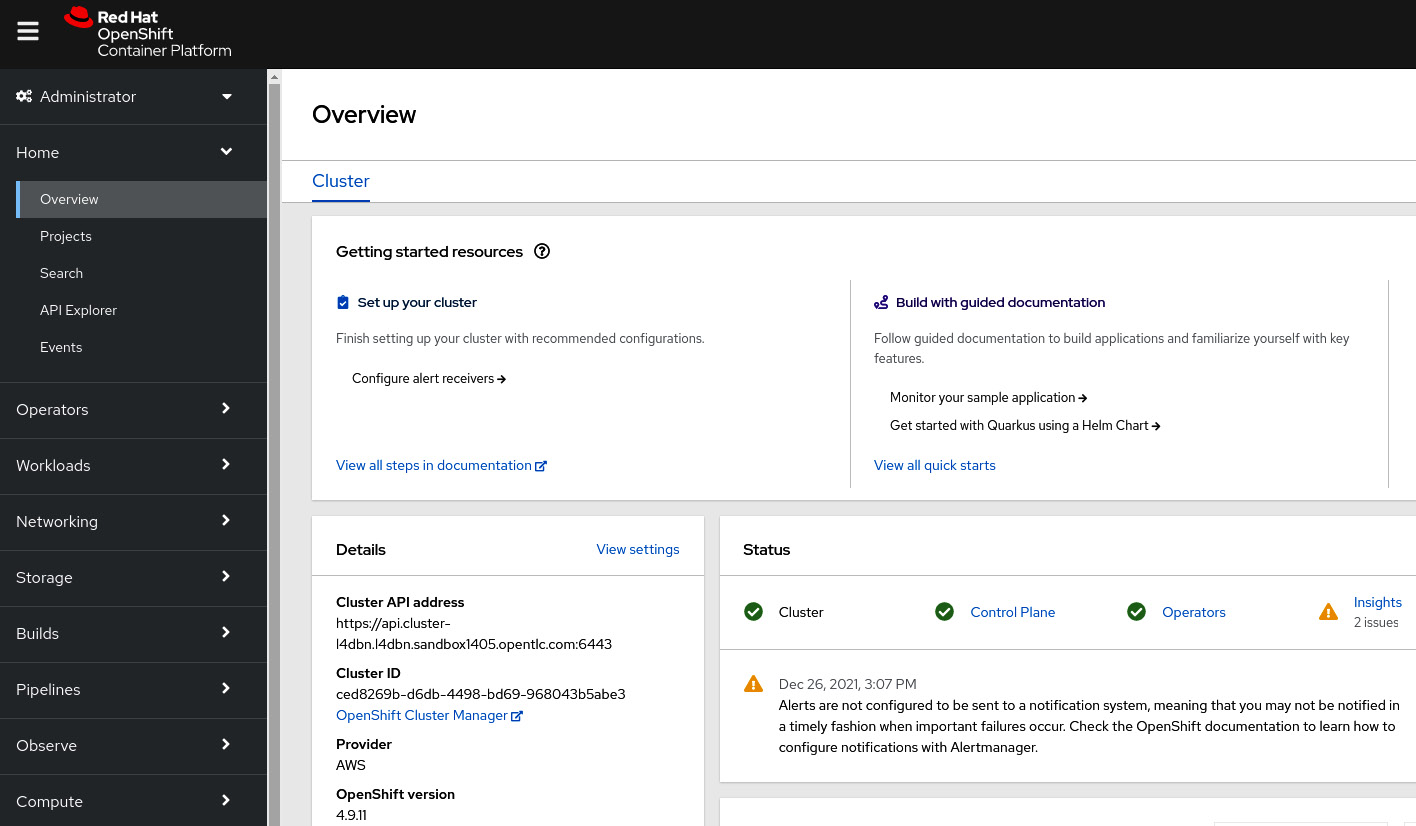
Figure 5.6 – The Console UI
Congratulations! You successfully deployed an OpenShift cluster! Celebrate your great success, but remember that your journey is just starting!
What's next?
Now, OpenShift is minimally functional, meaning that you have a control plane that can schedule pods, handle API calls and controllers, and an etcd cluster, which offers key/value storage for objects in the cluster. You also have some worker nodes fully functional that can already host some workloads.
But that's not all! Now, the activities that demand configuration begin (also known as Day 2, or post-installation activities). In the next few chapters, we will look at Ingress configurations, networks, registry configurations, views for local volumes, and persistent volumes.
We will also talk about taints and tolerations, security, and best practices – everything it takes for you to go from zero to hero and start acting on more complex implementations.
FAQs
While in the deployment phase, whatever kind of installation you do, it is common for things to not work as expected. We will look at some error cases you could face during deployment.
Why did the openshift-install execution stick waiting for the API?
The following message will be displayed:
Message: "INFO Waiting up to 20m0s for the Kubernetes API at https://api.ocp.hybridmycloud.com:6443..."
Sometimes, the INFO message can be big trouble. At this point, you do not have much output to investigate, even if you increase the debug level of the messages. In this case, you should look at some of these options:
- Look up the API URL and check the DNS resolution; the query must result in the API IP in install-config.yaml.
- Try to ping all three master nodes individually to assure it is already up.
- UPI installation: Check on the hypervisor VM terminal if all masters are up and running and at the login prompt screen. Master nodes on the bootloader menu or whatever different situation of the login prompt screen could result in an API waiting message.
- IPI installation: Check the cloud credentials and permissions related to prerequisites. Your credentials might not have all the necessary permissions to create objects in general. Don't give admin permission to the role attributed by the cluster service user because installation searches for a specific permission name. You can check roles and permission tables at https://docs.openshift.com/container-platform/4.9/installing/installing_vsphere/installing-vsphere-installer-provisioned.html, according to the cloud provider (for example, VMware vCenter).
Timeout installation waiting for Bootstrap to complete
The following message will be displayed:
Message: "INFO Waiting up to 30m0s for bootstrapping to complete..."
When the openshift-install binary freezes while waiting for a Bootstrap process to complete, it means that it is waiting for some cluster operators to become available. In this case, do the following:
- Check whether you have enough worker nodes (at least two) to make the Ingress operator available.
- SSH to a worker node and check that the crictl process is still creating pods.
- SSH to a worker node and search for errors related to kube-apiserver, kubelet, podman, or crictl using the journalctl daemon.
X509 messages during cluster deployment
The following message will be displayed:
Message: "x509 certificate signed by unknown authority.."
When creating Ignition files, OpenShift automatically creates a self-signed certificate that will be verified with every API call within the cluster. However, even if you have done all the prerequisite processes properly, sometimes you may get similar x509 messages that will result in the installation process failing and not achieving the expected result. Try checking the following options:
- VSphere IPI installation: Make sure you have imported the VMware CA certificate from the cluster that will extend OpenShift to the machine and will start the cluster installation.
- Bare metal installation: master.ign does not have the same CA certificate configured on the load balancer that must respond in api-int. Also, verify that the external load balancer has been configured to use Layer 4/TCP/Passthrough.
Certificates created by openshift-install residing in master.ign have an expiration date of 24 hours and cannot be updated. If you tried to install the day before, and it was not successful, delete the installation directory and start creating manifests and Ignition files again.
Summary
In this chapter, we have examined some options to install and configure your OpenShift Container Platform solution. From public clouds to on-premises, we have navigated through UPI, IPI, and agnostic implementation methods.
You now know about the public clouds offering fully supported implementations and documentation to start your cluster.
You are invited to look deeper into making your OpenShift cluster stronger, more reliable, and as secure as possible. We encourage you to continue to the next chapter and learn even more with us.
Further reading
If you want to look at more information related to the concepts we covered in this chapter, check the following references:
- The installation process for disconnected installations: https://docs.openshift.com/container-platform/latest/installing/installing-mirroring-installation-images.html
- OpenShift Container Platform 4.x: Tested integrations by Red Hat and partners: https://access.redhat.com/articles/4128421
- OpenShift Container Platform IPI: x509 certificate signed by an unknown authority: https://access.redhat.com/solutions/5203431
- OpenShift Container Platform bare metal: x509 certificate signed by an unknown authority: https://access.redhat.com/solutions/4271572