
Chapter 7: Migrating Your Windows Applications to the Windows App SDK and WinUI
In the previous chapters, we learned about the main features of the Windows App SDK and WinUI and how they are differentiated from the existing features of other popular Windows development platforms, such as Windows Forms, WPF, and Universal Windows Platform (UWP). We have learned a lot of concepts that are important when it comes to building a real-world application: binding, adopting the MVVM pattern, building a responsive UI, and more.
Now, it's time to put the knowledge we have acquired so far into practice. We can do this by using it to migrate real applications to the Windows App SDK and WinUI so that we achieve our modernization goal: building an enterprise application that can leverage all the capabilities of the Windows platform and that delivers a modern user experience, which can support new devices, new interaction modes, and accessibility.
In this chapter, we'll take a few sample applications that we've built with different technologies, and we'll migrate them to the Windows App SDK and WinUI, guiding you through all the required steps.
In this chapter, we'll cover the following topics:
- Getting an understanding of general migration guidance
- Updating your applications to .NET 6
- Migrating a Windows Forms application
- Migrating a WPF application
- Migrating a UWP application
Let's get started!
Technical requirements
The samples related to this chapter are available at the following URL:
Getting an understanding of general migration guidance
Line-of-Business (LoB) applications are often developed in a three-tier architecture and, therefore, consist of three logical components:
- A user interface
- Business logic
- Data access
During the modernization of the application, you will need to touch upon all components, but not to the same extent.
If your application is still based on the .NET 4.x Framework, all the components will need to be lifted to the .NET 6 runtime. We'll cover this topic in the next section. It is not recommended that you move to .NET Standard 2.x anymore unless you plan to share your code with .NET Core 3.1 or Xamarin. This is because .NET Standard 2.1 has been superseded by .NET 6. You can find more information about how to build a class library in Chapter 1, Getting Started with the Windows App SDK and WinUI.
In general, the migration of the data access and business logic layers is relatively straightforward. You start by moving the entire project to the new framework and upgrading the dependencies to the latest version. There will likely be some API changes in the dependencies that need to be addressed. The tools we're going to cover in the next section will help you to identify those changes.
If your current project targets .NET Core, there is no need to worry right now; .NET Standard will still be around for a while – but active development is happening on the succeeding frameworks, for example, .NET 6. If you're already using the new .NET runtime to build your application, just remember to change the TargetFramework property in the .csproj file, as follows:
<TargetFramework>net6.0-windows10.0.19041.0</TargetFramework>
This target framework enables the usage of the Windows-specific APIs, which are required to support the Windows App SDK and WinUI.
The complexity of migration varies a lot based on the complexity of the original project. However, at a high level, the best approach is to create a new Windows App SDK project and to migrate the code with the least dependencies first. For example, if your solution is made by a project with the main application and multiple class libraries, you should start from the libraries and, only at the end, move to the application's project. Usually, these are the models, followed by the business logic (data transformation) classes and the data access layer classes. This helps you to focus on a single class at a time without needing to jump back and forth on each dependency. Assets can simply be copied over. Unless you're coming from a UWP application, UI elements such as pages, apps, and windows need to be recreated. This is because the source UI definition is either incompatible (Windows Forms) or subtly different (WPF). For UWP, it's a good start to simply copy over the entire file and adapt its namespaces.
We'll learn more about these best practices in the upcoming sections. However, first, let's see more details regarding the sample application we're going to migrate.
Exploring the sample application
Our sample application is a typical, data-driven application to manage employee records. Applications such as this can be found in many enterprises as part of their digital heritage. They have reached an almost feature-complete state and are only maintained on-demand.
The application covers the most widely used requirements, such as implementing Create-Read-Update-Delete (CRUD) operations, navigation, and validation. Additionally, users can interact with the application to display and select employee records in a table to display, edit, or delete them on a different page. The following screenshot shows the UWP version in action:
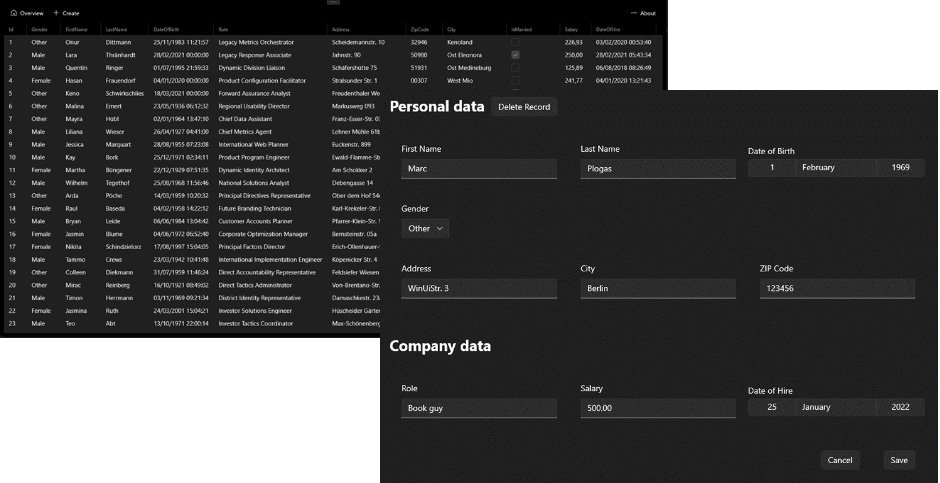
Figure 7.1 – Two views of the sample application: a list of all the records and a form to create a new one
We'll start from the same application that is built with different technologies (that is, Windows Forms, WPF, and UWP), and we'll migrate it to the Windows App SDK and WinUI, using technologies such as Entity Framework (EF) Core 6 for the data layer, .NET 6, and the Windows Community Toolkit. Also, we will apply the recommendations from the previous chapter, including the MVMM architecture and Inversion of Control (IoC).
All services and dependencies are registered in the code-behind file of the App object. We have added NavigationService (which is a stripped-down version of the Template Studio implementation we discussed in Chapter 6, Building a Future-Proof Architecture) to allow commands that are registered to view models to initiate navigation events. Also, we have added a DialogService class, as the delete command should issue a dialog box to confirm the deletion of an entry. The ContentDialog control that is used to display the dialog requires a reference to XamlRoot. We'll highlight that when migrating from UWP.
From a UI perspective, we're going to mostly use built-in WinUI controls, except for the DataGrid one, which is included in the Windows Community Toolkit. We're going to use many of the features we have learned about in previous chapters, such as converters, templates, and styles.
However, before we start migrating the application, we need to be sure that our code is fully supported by .NET 6. As such, let's see what the steps are to migrate a solution from .NET Framework to .NET 6.
Updating your applications to .NET 6
Upgrading your .NET Framework applications to .NET 6 is the best way to ensure you have a path forward to keep adding new features, integrating more and more with the Windows ecosystem, and leveraging the latest enhancements in the language and the tooling.
Migrating an application based on the full .NET Framework to .NET 6 can have a very different outcome based on many factors. There isn't a golden rule, but it depends on scenarios such as the following:
- The complexity of the solution
- The usage of libraries or third-party controls that haven't been migrated to the new ecosystem
- The usage of APIs or features that are considered deprecated and, as such, haven't been ported to the new .NET ecosystem, such as Application Domains, Windows Communication Foundation (WCF) servers, and Windows Workflow Foundation (WF)
Let's see what strategies we can adopt to migrate our .NET Framework projects.
The .NET Portability Analyzer
An effective way to understand the potential complexity of the migration process is to use a tool, created by Microsoft, called the .NET Portability Analyzer. It comes as a Visual Studio extension that can scan your code and prepare a detailed report of which APIs you are using that aren't supported in .NET 6.
Note
At the time of writing, the .NET Portability Analyzer hasn't been updated to support Visual Studio 2022 and .NET 6. The steps ahead will require Visual Studio 2019 and .NET 5 until the tool is updated. However, since .NET 6 doesn't include many breaking changes compared to .NET 5, running an analysis with the current version of the tool is still a good starting point to understand the complexity of the porting.
To use it, first, you have to download and install the extension from the Visual Studio Marketplace at https://marketplace.visualstudio.com/items?itemName=ConnieYau.NETPortabilityAnalyzer.
Once you have installed it, with Visual Studio, you can open the solution based on the full .NET Framework that you want to migrate. The first step is to right-click on it, and choose Portability Analyzer Settings to configure it:

Figure 7.2 – The Portability Analyzer configuration window
From here, you can pick the platforms of the .NET ecosystem that you would like to target. The most important ones for our migration scenario are listed as follows:
- .NET 5.0.
- .NET 5.0 + Platform Extensions (which includes the Windows Compatibility Pack; this is a special package we're going to explore later that expands the surface of supported APIs).
- .NET Standard 2.0 (in case you need to continue sharing one of the libraries that is part of your solution with projects that are still based on the full .NET Framework).
The tool supports generating reports in multiple formats. The default one is Excel. However, if you prefer, you can also switch to HTML, JSON, or DGML.
Once you have completed the configuration, you can right-click on the solution in Visual Studio again and choose Analyze Assembly Portability. The tool will build your solution and then create the report using the format you have configured in the settings. Once the scan has been completed, the Portability Analyzer Results window will appear, allowing you to interact with the newly generated report along with the older ones.
This is what the report looks like (in this case, using the Excel format):
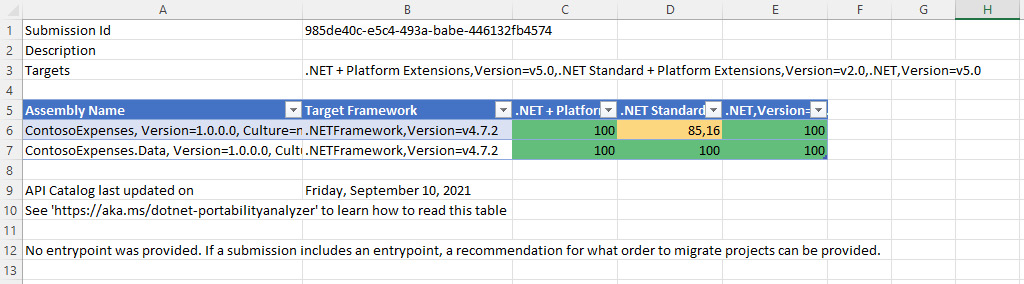
Figure 7.3 – The Portability Analyzer report
In the previous example, we achieved a successful result. All the APIs that we are using in our .NET Framework 4.7.2 project are supported by .NET 5. This means that we shouldn't expect any trouble during the migration. However, if we need to migrate the project to support .NET Standard 2.0, we can see that we might expect some challenges since approximately 15% of the APIs we're using aren't compatible.
If you hit a similar scenario, the Excel file includes a second sheet named Details, which will give you an overview of the APIs that are failing along with a potential workaround:

Figure 7.4 – The Details section of the Portability Analyzer report
For example, in this screenshot, we can see that the application is using APIs related to the Application Domain feature, which has been removed from .NET 5.
Now that we have an idea of how easy (or complex) the migration will be, we can start the process.
Upgrading your solution
Typically, upgrading a solution to .NET 6 involves the following steps:
- Upgrade the projects included in the solution to use the new SDK-style format.
- Migrate the packages.config file. In .NET Framework applications, NuGet packages were declared inside a file called packages.config. With .NET 6, they have instead been moved directly inside the project's file using a new property, called PackageReference, as shown in the following snippet:
<Project Sdk="Microsoft.NET.Sdk">
<PropertyGroup>
<TargetFramework>net6.0-windows</TargetFramework>
<OutputType>WinExe</OutputType>
<UseWPF>true</UseWPF>
</PropertyGroup>
<ItemGroup>
<PackageReference Include="CommunityToolkit.Mvvm"
Version="7.0.3" />
</ItemGroup>
</Project>
- Upgrade the NuGet packages used in the solution to the latest version, since it's more likely they include support for .NET Standard or .NET 6.
To automate these tasks, and give you a better starting point for your migration, Microsoft has released a tool called .NET Upgrade Assistant. This is a global .NET tool. To install it, you just have to open Command Prompt and, assuming you have installed the latest .NET SDK, run the following command:
dotnet tool install -g upgrade-assistant
Once it's installed, you can launch it using the following command:
upgrade-assistant upgrade .ContosoExpenses.sln
The preceding sample command assumes that we want to migrate a solution called ContosoExpenses.sln, which is stored in the current folder. Of course, you can replace the last parameter with the path of any project or solution on your machine that is based on .NET Framework.
The tool will guide you through the process by proposing different actions to take to migrate your solution, which you can either apply or skip based on your scenario and requirements. The tool is command-line based, as you can see in the following screenshot:
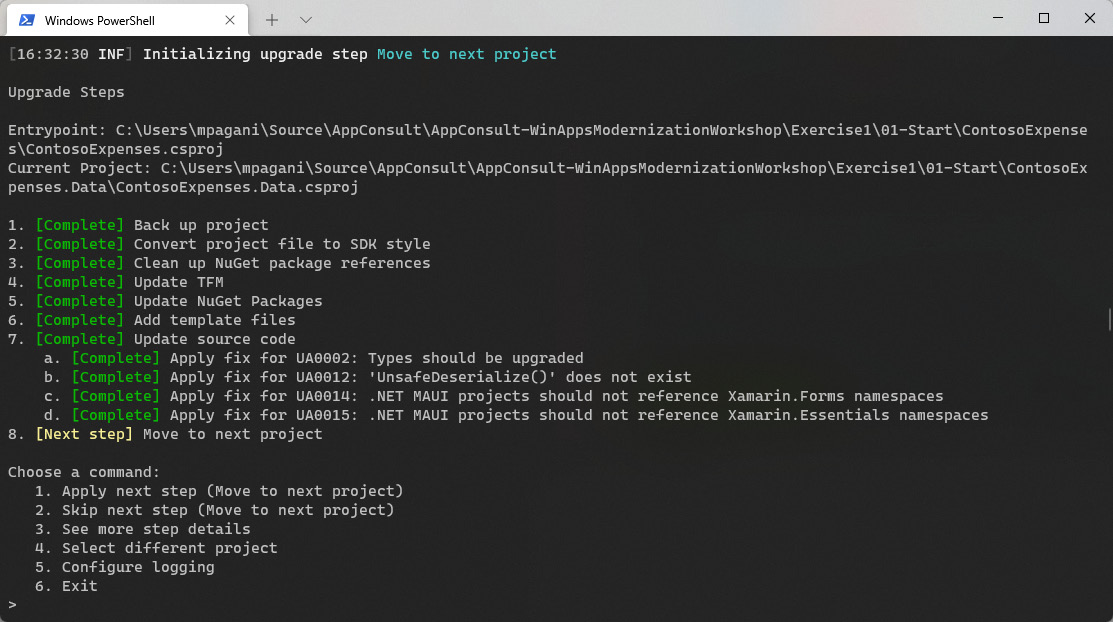
Figure 7.5 – The .NET Upgrade Assistant tool in action
Once you have launched the tool, before using it, first you will have to configure it:
- In the first step, the tool will ask you for the entry point of your solution (typically, it's the project that contains the main application).
- In the second step, based on the previous choice, the tool will suggest a migration order. For example, if your solution is made by two projects, the main app and a class library, the tool will suggest first migrating the class library and then the main app. As we mentioned at the beginning of the chapter, the fewer dependencies a project has, the higher the chances that the conversion will be successful. The suggested approach is to just press Enter so that the tool can follow the suggested order; otherwise, if for any reason you prefer to start from another project, you can just select which one you want to use.
After the first configuration, the tool will start a step-by-step process that will take care – for each project that is part of the solution – of the following:
- Performing a backup
- Converting it from the old .csproj format into the new SDK style one
- Moving all the NuGet packages references from the packages.config file to the project's file
- Updating the TargetFramework property in the project's file to use the most appropriate one
- Updating the NuGet packages to the latest version
- Applying a series of fixes in the source code for known blockers
Additionally, the tool will install a special library called Windows Compatibility Pack (which is represented by the Microsoft.Windows.Compatibility NuGet package). Its goal is to give you access to a broader set of Windows APIs in a .NET 6 or .NET Standard library. The package supports features such as the following:
- Interacting with the Windows Registry
- Using the Windows event log
- Setting Windows Access Control Lists (ACLs)
- Working with Windows services
It's important to highlight that these features will result in your libraries only being supported by Windows. As such, if you're planning to also use them on another platform (for example, you want to reuse a class library with a web or mobile application), you will need to adopt platform checking techniques to make sure that you don't use specific Windows APIs on another operating system. For example, consider the following code:
public bool IsFirstTimeLaunch()
{
if (RuntimeInformation.IsOSPlatform(OSPlatform.Windows))
{
var regKey =
Registry.CurrentUser.OpenSubKey(
@"SOFTWAREContosoContosoExpenses", true);
if (regKey != null)
{
string isFirstRun =
regKey.GetValue("FirstRun").ToString();
return isFirstRun == "true";
}
}
else
{
//use an alternative approach
}
}
The preceding snippet returns the information if the application has been launched for the first time. By using the RuntimeInformation.IsOSPlatform() method provided by .NET, we can tailor this code based on the platform where the application is running. If it's running on Windows, we can use the registry to store and retrieve this information; if we're running on another platform, we can use an alternative approach instead (for example, using a local file).
To make the developer's life easier in finding all the places in code where you need to pay attention, .NET 6 integrates an analyzer that will give you warnings every time it finds one or more APIs that are platform-specific. For example, consider the earlier snippet of code. If you try to compile it with Visual Studio, the build will be successful, but you will see the following warnings:
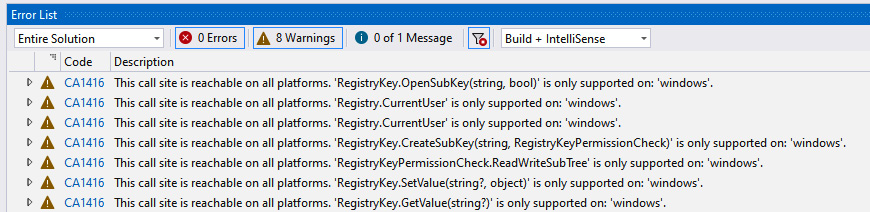
Figure 7.6 – The warnings generated by the .NET analyzer
Visual Studio is warning us that the APIs that work with the registry are only supported on Windows. So, if we're planning to reuse the same library on a web project running on Linux, we need to pay attention and make sure this code isn't hit.
Once the work of the .NET Upgrade Assistant tool has been completed, you're ready to start the next phase of the migration. As mentioned earlier, migrating an application from the full .NET Framework to .NET 6 can vary from being an easy task to a very challenging process. The .NET Upgrade Assistant tool is a great way to automate some of these tasks and give you a better starting point, but it cannot take care of the entire process. It will be up to you to confirm the quality of the migration, by running unit tests, integration tests, UI tests, and making sure that the application still behaves in the same way.
Now that you know how to migrate your applications to .NET 6, we're ready to explore how to migrate a Windows Forms application.
Migrating a Windows Forms application
Before we get started, let's take a brief inventory of the Windows Forms application. The data access layer is provided by the DBContext class of EF6.
Note
EF is a modern object-database mapper (ORM) for .NET, which simplifies working with databases. Thanks to EF, you can map all the database concepts (such as tables, rows, and columns) to the equivalent C# concepts (such as classes, properties, and collections). We won't cover EF in detail, since it's beyond the scope of this book. You can learn more at https://docs.microsoft.com/en-us/ef/.
To keep the sample focused and concise, we are not using additional patterns to decouple the context. The main window hosts two tabs, one containing the Overview view and the other with the detailed Item view:
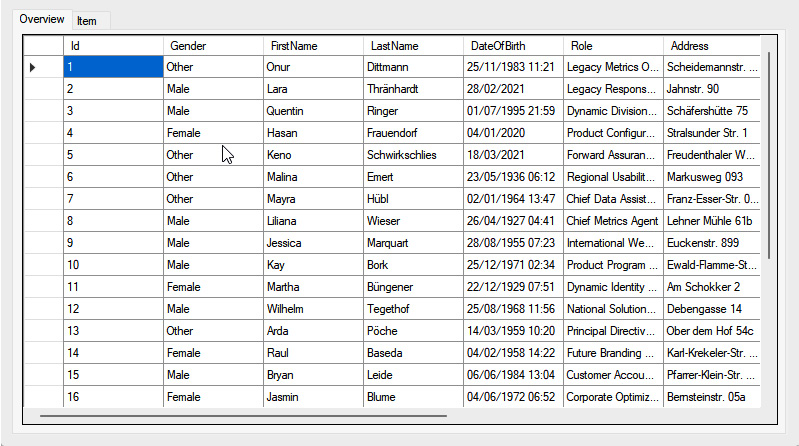
Figure 7.7 – The data displayed in the Windows Forms application
The Overview tab displays a DataGrid control, which is used for displaying and sorting the data. When you select an entry, the application will load all the information about the employee into the second tab. Clicking on the column header will sort the entries by this column, which is a convenient built-in functionality of the DataGrid control. Other features such as in-line editing and saving have been deactivated on purpose.
In comparison, the Item details tab consists of a few TextBox, Label, Button, and ComboBox controls: these are all basic controls that are available in the Windows Forms framework. The ComboBox control is used for selecting the gender. The list of supported values is hardcoded and matches the Gender model class:
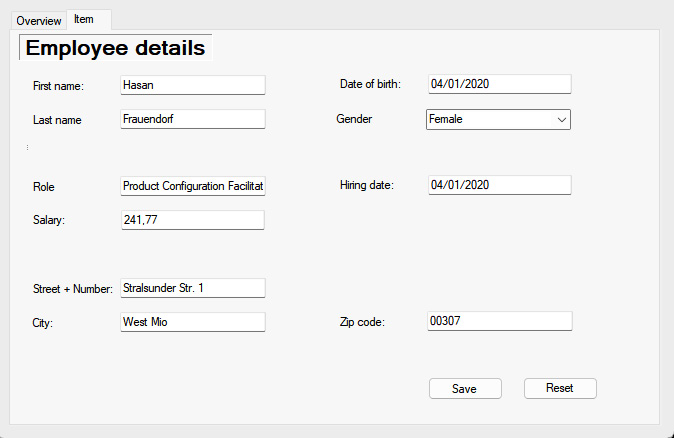
Figure 7.8 – The tab that displays the list of selected employees
We're now aware of the UI components of our existing application, and the first step is to find a suitable replacement in the Windows App SDK control library. Unless you already have some experience with the WinUI controls, the best and easiest way to become familiar with the available controls is via the XAML Controls Gallery application, which is available in the Microsoft Store or on GitHub. We have mentioned this application in Chapter 5, Designing Your Application. The application lists all the controls that are available in WinUI along with the ones included in the Windows Community Toolkit. This is especially helpful in our case, as the WinUI 3 DataGrid control is only available through the CommunityToolkit.WinUI.UI.Controls namespace. All the remaining controls are part of the official control library, but we are changing the masked TextBox control to the date into a DatePicker control.
Now that we have a list of all the required controls, we can take a look at the project structure:
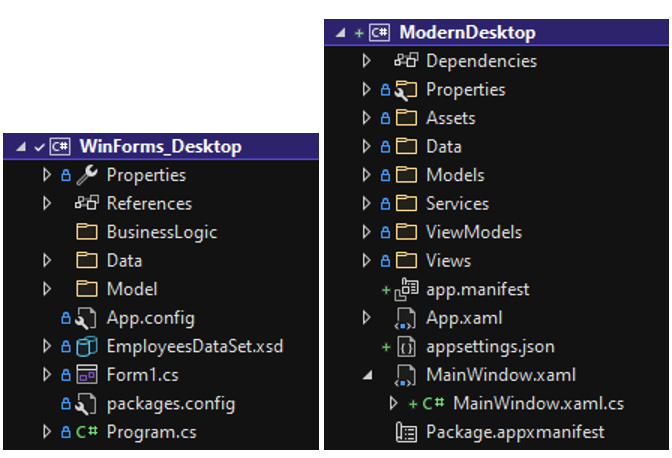
Figure 7.9 – The differences between the Windows Forms and WinUI projects
In the Windows Forms application, we have a static Program class that acts as an entry point for the application. The singleton application object is being used to enable visual styles, register handles, and set the form that was initially called upon. In the Windows App SDK project, we don't have a Program class but a singleton Application object class. By default, the App class is a partial class – where some parts are described in XAML and others are described in C#. Usually, global resources are described in ResourceDictionaries in XAML, while more complex configurations, such as the IoC container setup, are implemented in code.
A noteworthy difference is the App object life cycle. In Windows Forms, the commonly used life cycle events are provided through the forms – the Application object itself does not expose any life cycle events nor does the Program class. This approach has changed with the introduction of the App object (which was first added in WPF), which now exposes its own set of life cycle events such as OnLaunched or UnhandledException.
As discussed in Chapter 5, Designing Your Application, WinUI 3 uses a Frame object inside a Window container object to display content. If you are using a single-page application, you will use a single window that is initialized in the OnLaunched event of the App object. Any subpage content will be rendered on the Frame object within this window.
This approach is being used in our sample application. You can find the call to the window in the App class, as follows:
private Window;
protected override void OnLaunched(Microsoft.UI.Xaml.
LaunchActivatedEventArgs args)
{
this.window = new MainWindow();
this.window.Activate();
}
In comparison, this is the frame definition in the MainWindow.xaml file:
<Frame x:Name="ContentFrame"/>
The Windows App SDK windowing APIs introduce new integrations with the Windows user experience, enabling interesting scenarios. The new set of APIs can be found in the Windows.UI.WindowManagement.AppWindow class, abstracting the container in which the content is hosted – making it comparable to an abstraction of the window's handle (HWND). This is particularly interesting for scenarios where you want to interact with other native windows, such as the FileOpenPicker class or the MessageDialog class. You just need to expose a handle in your app class and pass the reference to the initialization of the interoperability to parent the dialog handle, as shown in the following snippet:
public App()
{
this.InitializeComponent();
WindowHandle =
WinRT.Interop.WindowNative.GetWindowHandle(this);
}
public static IntPtr WindowHandle { get; private set; }
private async Task ShowParentDialog()
{
var dialog = new Windows.UI.Popups.MessageDialog(
"Message here");
WinRT.Interop.InitializeWithWindow.Initialize(dialog,
App.WindowHandle);
await dialog.ShowAsync();
}
We'll look at other examples of this approach in Chapter 8, Integrating Your Application with the Windows Ecosystem.
Now that we have defined the basic building blocks of the user interface, let's see how to properly implement the navigation.
Supporting navigation
We start the actual migration by selecting the right navigation pattern. The NavigationView control we learned to use in Chapter 5, Designing Your Application, is the best choice and can be configured in two modes through PaneDisplayMode: Top and Left. Left can be further customized with a much smaller footprint. Displaying the navigation on top of your content makes sense when your application only has a few fixed top-level navigation items that are of equal importance. Additionally, less important items can be hidden in overflow menus. The look will be very similar to the = TabControl menu from the starting Windows Forms application sample.
Another display option for NavigationView is the Left display mode. Here, the pane is expanded on the left-hand side of the screen, pushing the content further right. Using the left-aligned navigation is useful when you have more than a few (that is, more than five) navigation items or you want to divide the navigation items into distinct categories.
While the top alignment works well without the use of icons, it becomes very important to provide suitable icons to the navigation items when using the left-hand alignment. As this mode uses a considerable portion of the screen, it often provides an option to resize the navigation into a small bar. In this LeftCompact mode, the icons are displayed. If no icons are defined, the first character from the menu description is used, resulting in a less-than-great navigation experience. You can go one step further and hide the navigation entirely by setting the PanelDisplayMode control to LeftMinimal. This will only show the menu button (the one called hamburger) until the pane is opened. Once it opens, the navigation pane overlays the content, similar to the LeftCompact mode.
Before we go into the details of navigation using the NavigationView control, we have to understand how the content is being displayed. The content is hosted by pages, which inherit from the Page class. Page itself is UserControl, so it can be used as the root for all our content elements. Additionally, it brings its own life cycle events that allow us to bind to view models, load data from external sources, and more. The Page object is assigned to the Content property of the Frame object, which is part of our main window and defined next to the NavigationView control. The Content property of the Frame object is null upon initialization of the object in XAML, hence we are assigning the Overview page directly in the OnLoaded event of the menu. In all subsequent navigation actions, we can rely on the Navigate() method of the Frame object. The implementation details of all these patterns have been addressed in Chapter 5, Designing Your Application.
Following the open-closed principle of good software engineering, we don't want to hardcode the navigation targets into the ItemInvoked navigation event, as this would require us to modify the method every time a change in the navigation occurs, for example, a new item is added or removed. Instead, it's helpful to deliver the navigation target within the definition of the navigation item itself. This is where the Tag property comes to the rescue: it's a property that can get or set any arbitrary object, even complex ones. Additionally, it can be used to store additional information about the element. If you are familiar with Android development, a similar concept has been available for many years.
We are leveraging the Tag property to store our navigation in a fully qualified notion, as shown in the following snippet:
Tag="ModernDesktop.Views.OverviewPage"
Thanks to Tag, we can use reflection to find the type of the page we want to redirect the user to. This is provided to the Navigate() method, together with the content of NavigationItem to initiate the navigation to the content:
ContentFrame.Navigate(Type.GetType(item.Tag.ToString()),
item.Content);
As you can see, there's a big leap between the Windows Forms navigation concept and the Windows App SDK navigation concept.
Based on what we have learned so far, this is the definition of the NavigationView control we have included in the XAML of our main page:
<NavigationView x:Name="MainMenu"
PaneDisplayMode="Top"
IsBackButtonVisible="Collapsed"
Loaded="MainMenu_OnLoaded"
ItemInvoked="MainMenu_OnItemInvoked"
Background="Transparent"
IsSettingsVisible="False"
Margin="10" >
<NavigationView.MenuItems>
<NavigationViewItem x:Name="Overview"
Icon="Home"
Content="Overview"
Tag="ModernDesktop.Views.O
verviewPage" />
<NavigationViewItem x:Name="Create"
Icon="Add"
Content="Create"
Tag="ModernDesktop.Views
.UpsertPage" />
</NavigationView.MenuItems>
<NavigationView.FooterMenuItems>
<NavigationViewItem x:Name="About"
Icon="More"
Content="About"
Tag="ModernDesktop.Views
.AboutPage" />
</NavigationView.FooterMenuItems>
<NavigationView.Content>
<Frame x:Name="ContentFrame"/>
</NavigationView.Content>
</NavigationView>
In comparison, the following code shows the code behind implementation, which includes the handling of the OnLoaded event (which sets the Content property of the Frame object with a new instance of the OverviewPage page) and the ItemInvoked event (which handles the selection of the item):
private void MainMenu_OnLoaded(object sender,
RoutedEventArgs e)
{
ContentFrame.Content = new OverviewPage();
}
private NavigationViewItem lastItem;
private void MainMenu_OnItemInvoked(NavigationView
sender, NavigationViewItemInvokedEventArgs args)
{
var item = args.InvokedItemContainer as
NavigationViewItem;
if (item == null)
{
ContentFrame.Content = null;
return;
}
else if (item == this.lastItem)
{
return;
}
ContentFrame.Navigate(Type.GetType(
item.Tag.ToString()), item.Content);
this.lastItem = item;
}
Now that the navigation has been set up, it's time to migrate the business logic. Since we want to build a future-proof application, we're going to move it to the ViewModel.
Migrating from the code-behind approach to the MVVM pattern
If we look at our sample Windows Forms application, we can see we have used the traditional code-behind approach. The Form1 class contains all the code to load the data, handle user interactions, and more. However, as we learned in Chapter 6, Building a Future-Proof Architecture, this isn't the right approach to build an application that must be easy to maintain and evolve. The MVVM pattern is the best approach to use since it helps to separate the business logic from the UI layer.
As such, we must follow the guidance we learned in Chapter 6, Building a Future-Proof Architecture, to create a ViewModel class that will take care of retrieving the data from the data layer, preparing it for being displayed, and connecting it to the UI layer using binding. The ViewModel classes are created using the helpers provided by the MVVM Toolkit library, which is part of the Windows Community Toolkit.
ViewModel is then connected to the UI layer by exposing it as a property on the code-behind class, which enables us to use the x:Bind markup expression:
public sealed partial class OverviewPage : Page
{
public OverviewViewModel ViewModel { get; }
public OverviewPage()
{
this.InitializeComponent();
ViewModel =
Ioc.Default.GetService<OverviewViewModel>();
}
}
As part of the migration to a ViewModel class, we're going to do the following:
- Convert the data we must display in the UI (such as the collection of employees) into properties that implement the INotifyPropertyChanged interface to dispatch notifications to the binding channel.
- Convert event handlers into commands. Since they are exposed as a property, they can be connected to the UI layer using binding as well, which helps to keep the UI layer completely separate from the logic.
Let's see an example of both scenarios.
Migrating the data
In the Form1 class of the Windows Forms application, we can see that we are using the LoadEmployee() method exposed by the Form class to retrieve a collection of all the employees using the APIs offered by EF:
protected override void OnLoad(EventArgs e)
{
base.OnLoad(e);
context = new EmployeeContext();
employeeBindingSource.DataSource =
context.Employees.Local.ToBindingList();
employeeDataGridView.Refresh();
}
Since we're using a code-behind approach, we set the collection directly to the DataSource property of the DataGrid control using its name. When we move to MVVM, the collection must be connected to the DataGrid control using binding. As such, we need to expose it as a property of our ViewModel class, as shown in the following example:
private ObservableCollection<Employee> _employees;
public ObservableCollection<Employee> Employees
{
get => _employees;
set { SetProperty(ref _employees, value); }
}
This way, we'll be able to connect it to the View using the x:Bind markup expression.
In this section, we looked at one data migration example. In the final version of the application on GitHub, you will find that all the data has been migrated using the same approach.
Migrating the event handlers
Event handlers are used in the code-behind approach to define the logic you want to execute when a control raises an event. They're very powerful, but they also create a tight dependency between the logic and the UI layer: in fact, event handlers can only be defined in code-behind. The proper way to support handlers in the MVVM patterns is by using commands. As we learned in Chapter 6, Building a Future-Proof Architecture, commands are defined using ViewModel properties. This is so that they can be connected to the UI layer using the Command property available in the XAML and the binding.
For example, take a look at our Windows Forms application with the following handler, which is connected to the CellClick event of the DataGrid control. It's used to handle the selection of an employee from the grid:
private async void employeeDataGridView_CellClick(object
sender, DataGridViewCellEventArgs e)
{
if (e.RowIndex >= 0) // sorting returns -1
{
var value = employeeDataGridView.Rows[
e.RowIndex].Cells[0].Value;
selectedEmployee = await
context.Employees.FindAsync(value);
LoadEmployee();
}
}
In comparison, in our ViewModel class, it will be defined as a command. This is thanks to the RelayCommand class offered by the Windows Community Toolkit:
public class OverviewViewModel : ObservableObject,
INavigationAware
{
public IRelayCommand<Employee> SelectCommand { get;
private set; }
public OverviewViewModel()
{
LoadEmployees();
}
private void InitializeCommands()
{
SelectCommand = new
RelayCommand<Employee>(SelectEmployee);
}
private void SelectEmployee(Employee item)
{
var selectedEmployee = new
ObservableEmployee(item);
this.navigationService.NavigateTo(typeof(
DetailsPage), selectedEmployee);
}
}
Now we can connect the SelectCommand object to the View using the x:Bind markup expression, as we did with the data. Also, in this case, we repeat this process for every other event handler in our application.
As part of the migration from the code-behind approach, we also need to ensure that the business logic and the UI are clearly separated. In this section, you have seen an example that goes against this approach: the code to access the database using EF is directly called in code-behind, which creates a tight dependency between the data layer and the UI layer. As such, as part of the migration, you must move all the code that involves the data layer into separate classes, which will be used by the various ViewModel classes. The code to interact with the database is a good example: in the final version of the application that is available on GitHub, you can see that neither the code-behind nor the ViewModel contains any reference to the EF classes. Instead, all the operations with the database are centralized in a dedicated class, called SqlDataService, which is described by the IDataService interface.
Thanks to this approach, other than building a cleaner architecture, we can also set the fundaments to adopt the IoC pattern, which we're going to detail next.
Supporting the IoC pattern and dependency injection
Another thing we learned in Chapter 6, Building a Future-Proof Architecture, is the adoption of the IoC pattern to make the application easier to test and evolve. Instead of manually creating all of the dependencies that are required by a ViewModel (such as the SqlDataService class we learned about earlier) class at compile time, we register all of them inside a container, and we inject them into the ViewModel classes at runtime. This enables us to easily swap the implementation of a service (for example, if we want to move from SQL Server to a cloud service) or to mock them so that we can write unit tests for ViewModel (so that we don't need access to a real database to perform tests).
The migrated version of the application, which you can find on GitHub, follows the guidance we learned in Chapter 6, Building a Future-Proof Architecture, to support this feature. The following list details the required changes:
- In the App class, we use the Ioc helper provided by the toolkit to register all our ViewModel classes and services. The following code shows an excerpt of the full implementation, with the registration of the SqlDataService class:
public App()
{
var serviceProvider = ConfigureServices();
Ioc.Default.ConfigureServices(serviceProvider);
this.InitializeComponent();
}
private static IServiceProvider ConfigureServices()
{
var services = new ServiceCollection();
. . .
services.AddSingleton<INavigationService,
NavigationService>();
services.AddSingleton<IDataService,
SqlDataService>();
. . .
return services.BuildServiceProvider();
}
- In the code-behind of every page, instead of manually creating a new instance of the corresponding ViewModel, we retrieve it from the container using the Ioc helper again, as shown in the following sample:
public sealed partial class OverviewPage : Page
{
public OverviewViewModel ViewModel { get; }
public OverviewPage()
{
this.InitializeComponent();
ViewModel =
Ioc.Default.GetService<OverviewViewModel>();
}
}
- We add a dependency to all the required services in the constructor of each ViewModel. This way, the Ioc helper will give us an instance of ViewModel already populated with everything we need. For example, this is how we define that the OverViewModel class requires an IDataService object to interact with the database:
public OverviewViewModel(IDataService dataService,
INavigationService navigationService)
{
this.dataService = dataService;
this.navigationService = navigationService;
}
Now we're all set with the architecture of the application. We can start working on the UI and migrate our DataGrid control.
Migrating the DataGrid control
Now that we have all the building blocks in place, let's migrate the DataGrid control. For Windows Forms, Visual Studio provides a tool called DataSetGenerator to define the TableAdapter types, entities, and properties connected to the DataGrid control via DataSet. While this is very convenient and straightforward, many settings are hidden from the wizards, making it quite a challenge to tweak or modify the binding. Using MVVM, we can now precisely control what data is bound to the DataGrid control. There is no wizard available, so migrating the MVVM architecture and exposing the data for the DataGrid control requires some plumbing work on our side.
The DataGrid control expects an IEnumerable collection as a data source, and in order to be able to track changes, an ObservableCollection type is exposed and bound to the ItemSource property. We learned about the ObservableCollection type in Chapter 2, The Windows App SDK for a Windows Forms Developer. It's a special type of collection that can dispatch notifications to the UI whenever something changes, such as a new item being added or removed. It's a perfect match for our binding purposes, which is achieved using the x:Bind markup expression we learned about in Chapter 3, The Windows App SDK for a WPF Developer. In the previous section, we learned how we can expose the list of employees from ViewModel.
However, unlike in Windows Forms, the WinUI DataGrid control isn't built into the framework, but comes with the Windows Community Toolkit. As such, before adding it to our page, we need to declare its namespace in the Page control, following the guidelines we learned about in Chapter 4, The Windows App SDK for a UWP Developer:
xmlns:controls="using:CommunityToolkit.WinUI.UI.Controls"
Connecting the DataGrid control with our collection of employees is a straightforward operation: thanks to what we learned in the previous section, we already have the collection declared as a property of the OverviewViewModel class, which is already exposed to the View through the ViewModel property that was declared in the code-behind:
<controls:DataGrid x:Name="dataGrid"
ItemsSource="{x:Bind
ViewModel.Employees, Mode=OneWay}"
IsReadOnly="True"
SelectionMode="Single"
Sorting="DataGrid_OnSorting" />
But what about handling the selection of an employee from the DataGrid control? We have already defined a command in ViewModel to support this scenario, called SelectCommand. However, there's a challenge: the DataGrid control doesn't expose a Command property, so how can we connect it using binding?
We must introduce the concept of behaviors, which is a XAML feature that enables you to attach complex logic to XAML controls directly in XAML. To use it, we must install a package from NuGet called Microsoft.Xaml.Behaviors.WinUI.Managed, which provides the Interaction.Behaviors collection and the EventTriggerBehavior and InvokeCommand classes. The former is used to define the event we want to manage, through the EventName property (in our case, this is SelectionChanged). The latter is used to bind a command to the event –we can bind it to our ViewModel command and even provide parameters. In our scenario, the selected entry can then be passed as a payload to the NavigationService to be used on the details page. Thanks to this feature, we can connect a command to virtually any event exposed by a control, enabling us to keep following the MVVM pattern even when we have to handle secondary events that are supported by the Command property.
This is what the full DataGrid implementation looks like:
<Page
xmlns:controls="using:CommunityToolkit.WinUI.UI
.Controls"
xmlns:interactivity="using:Microsoft.Xaml
.Interactivity"
xmlns:core="using:Microsoft.Xaml.Interactions.Core">
<Grid>
<controls:DataGrid x:Name="dataGrid"
ItemsSource="{x:Bind
ViewModel.Employees,
Mode=OneWay}"
IsReadOnly="True"
SelectionMode="Single"
Sorting="DataGrid_OnSorting">
<interactivity:Interaction.Behaviors>
<core:EventTriggerBehavior
EventName="SelectionChanged">
<core:InvokeCommandAction
Command="{x:Bind
ViewModel.SelectCommand}"
CommandParameter="{x:Bind
dataGrid.SelectedItem,
Mode=OneWay}" />
</core:EventTriggerBehavior>
</interactivity:Interaction.Behaviors>
</controls:DataGrid>
</Grid>
</Page>
When the user selects an employee from the GridView control, we must trigger a navigation to the Details page, where we expect an entry as a parameter. In our Windows Forms app, we weren't switching between pages and could, therefore, rely on a backing field – now this information needs to be passed as a parameter instead.
We can achieve this goal by using the NavigationService approach we learned about in Chapter 6, Building a Future-Proof Architecture. This exposes methods that we can use in our ViewModel instances to navigate from one page to another with a parameter. The NavigationService class is injected inside the ViewModel using the IoC pattern, so we can simply perform the navigation using the following code:
private void SelectEmployee(Employee item)
{
var selectedEmployee = new ObservableEmployee(item);
this.navigationService.NavigateTo(typeof(DetailsPage),
selectedEmployee);
}
We have completed the migration of the Overview page. Next, let's see how we can migrate the Details page.
Migrating the Details page
Migrating the Details page is an easy operation thanks to the knowledge we have acquired so far. This page displays all the properties of an employee, using input controls such as TextBox and DatePicker so that the user can also update them. As such, the operations to perform are the same as for the Overview page:
- We migrate the data using properties that implement the INotifyPropertyChanged interface. In this case, we have a property called Employee, where we store a reference for the selected employee.
- We migrate the event handlers to commands to support all the user interactions. For example, the UpsertCommand object is connected to the Save button, and it takes care of saving the changes made on the employee to the database.
Note that we still need to take extra steps to bind a TextBox control to a decimal property – however, the solution is more elegant with a converter, which we learned to use in Chapter 2, The Windows App SDK for a Windows Forms Developer. A DigitalToStringConverter object is used during binding, and it converts both, a string to decimal and a decimal to string whenever the source or target changes. The converter is registered in global ResourceDictionary of the application, in the App class.
This is an example of the syntax used to apply the converter to the binding channel:
<TextBox Text="{x:Bind ViewModel.SelectedEmployee.
Salary, Mode=TwoWay, Converter={StaticResource
DecimalToStringConverter}}" Header="Salary" />
Another difference to bear in mind, compared to the Overview page, is that most of the properties are connected to the UI using the TwoWay mode for binding. Since TextBox is an input control, TwoWay binding enables you to not only display the value of the property in the control but also set it.
And what about the Employee property? We can populate it using another helper that we saw in Chapter 6, Building a Future-Proof Architecture, where we talked about navigation: the INavigationAware interface. We can implement this in our ViewModel. Thanks to this, we can subscribe to the OnNavigatedTo event directly in ViewModel. This is so that, when the Details page is loaded, we can retrieve the selected employee from the NavigationService class, as shown in the following example:
public class DetailsViewModel : ObservableObject,
INavigationAware
{
public void OnNavigatedTo(object parameter)
{
if (parameter is ObservableEmployee employee)
{
SelectedEmployee = employee;
IsExisting = true;
}
else
{
SelectedEmployee = new ObservableEmployee(new
Employee());
IsExisting = false;
}
}
}
That's it! We have completed an overview of the steps required to move our Windows Forms application to a modern WinUI application based on the MVVM pattern.
Now, let's explore the migration effort when the starting application is built, using WPF.
Migrating a WPF application
Migrating from a WPF application usually requires a lot less effort than for Windows Forms. This is due to at least two reasons:
- WPF applications already leverage XAML as the UI description language. While the actual XAML syntax might be different, it can easily be transformed into the WinUI XAML syntax. Concepts such as converters or resources are usually well understood.
- Given the effectiveness of XAML binding, many WPF applications are already built upon the MVVM architecture. While there were many MVVM frameworks for WPF available, such as MVVM Light, Prism, or lightweight DIY frameworks, they all follow the same principle. Not only that, MVVM is (almost) always accompanied by the use of IoC. This means that you might need to rework the XAML pages a bit, but you will be able to reuse almost all of your data layers and ViewModel classes without changes.
We are going to start by taking a quick inventory of the WPF application again. Our WPF application (which you can find in the GitHub repository at https://github.com/PacktPublishing/Modernizing-Your-Windows-Applications-with-the-Windows-Apps-SDK-and-WinUI/tree/main/Chapter07/WPF) is built upon the MVVM pattern just like the Windows App SDK app. It uses solutions and libraries that are extremely popular in the WPF ecosystem. For example, the IoC pattern is provided by the Unity library, which is a bit different from the modern IoC implementation. Back in the day, property injection was more common than constructor injection. Injected dependencies were exposed as properties and marked with an attribute, as shown in the following sample:
[Dependency]
public IConcurrencyService ConcurrencyService { get; set; }
The implementation of the MVVM pattern is self-built and does not rely on any framework. All the advanced features, such as navigation and showing dialogs, are implemented manually. The same applies to base classes, which manually implement the INotifyPropertyChanged interface, as shown in the following sample:
public abstract class NotifyPropertyChangedBase :
INotifyPropertyChanged
Self-rolled MVVM frameworks require more manual plumbing, as you will explore in our WPF sample. There is abstract DelegateCommandBase that implements ICommand, while the NavigationService class is more than just a simple service and relies on manual context and parameter implementation.
Data access is still provided through EF6 but wrapped in a repository pattern. Repository and Unit of Work (UoW) patterns are a common sight in legacy .NET 4.x WPF applications, hence we have included them.
The UI is similar to the Windows Forms sample app in concept, but it's more powerful since it uses many of the advanced features that WPF brings to the table: themes, styles, validators, and busy indicators.
As you can see, the basic concepts are already in place, but migration still requires touching on many pieces. First of all, let's migrate from Unity to a modern IoC container. As we have seen in the Windows Forms migration, the new .NET runtime provides a built-in implementation of the IoC pattern, thanks to the IServiceProvider interface. Therefore, the registration of dependencies in the bootstrapper class needs to be moved to a ServiceProvider registration.
Other framework dependencies, such as EF, are easier to migrate to and just require updating and adapting to the new API. You can learn more about migrating from EF to EF Core in the official documentation at https://docs.microsoft.com/en-us/ef/efcore-and-ef6/porting/. UoW and repository patterns should be disposed of, as the DBContext class already provides us with repositories and UoW under the hood. Unless you're using a generic, detached UoW pattern with transactions, using specific UoW and repository implementations will actually increase the load on your database, as SaveChanges will be called multiple times, making rolling back impossible to achieve. A detached, generic UoW pattern does bring its own set of challenges, so it's recommended that you stay clear from these patterns in modern applications. Dispose of them entirely, and move the custom queries to the service classes.
Also, WPF applications based on Unity to implement the IoC pattern often adopted Managed Extensibility Framework (MEF), which is a library introduced with .NET Framework 4 to simplify the creation of lightweight and extensible applications. You can learn more about it at https://docs.microsoft.com/en-us/dotnet/framework/mef/.
In this scenario, unfortunately, migrating a Unity and MEF-based WPF application requires almost complete refactoring since there is no simple upgrade path. MEF features have moved to the System.Composition and System.ComponentModel.Composition namespaces. While the general idea remains the same, not all features have been ported, so consider moving carefully.
Migrating the ViewModel instances is far easier. In the WPF sample application, we implemented many of the MVVM features, such as INotifyPropertyChanged or other commands, manually. This is still supported, and it will continue to work with the Windows App SDK and WinUI. However, thanks to the lightweight and open source nature of the Windows Community Toolkit, we recommend you move to it rather than relying on a self-developed MVVM implementation. For example, in our migrated application, the DelegateCommand class has been replaced by the RelayCommand (or AsyncRelayCommand for an asynchronous operation) class. Or the INotifyPropertyChangedBase class has been replaced by the ObservableObject class.
The task of migrating XAML user controls and pages mainly involves finding and replacing potential namespace changes and bindings. When you move to WinUI, it's a good idea to switch to the new x:Bind markup expression, which is more powerful and delivers better performances. However, the binding syntax is slightly different, so you will have to make a few changes. For example, a key difference between traditional binding and x:Bind is the context lookup. In the WPF sample, we can see that, through the ViewBase class (which is used as a base class for all the pages), the binding context is provided by the DataContext class, which is exposed by every XAML control. This means that to connect the OverviewPage view with its corresponding ViewModel class, we must create a new instance of the OverviewViewModel class and assign it to the DataContext property. When we use x:Bind, the XAML framework will look for the context in code-behind instead, as we learned in Chapter 3, The Windows App SDK for a WPF Developer. As such, instead of setting the DataContext property, we must expose a property in code-behind to hold a reference to the corresponding ViewModel. For example, the following is what the code-behind approach of the OverviewPage page looks like in the final WinUI version:
public sealed partial class OverviewPage : Page
{
public OverviewViewModel ViewModel { get; }
public OverviewPage()
{
this.InitializeComponent();
ViewModel =
Ioc.Default.GetService<OverviewViewModel>();
}
}
Now we can use the ViewModel property to access all the properties and commands exposed by the ViewModel class using the binding channel, as shown in the following example:
<TextBox Text="{x:Bind ViewModel.SelectedEmployee.Role,
Mode=TwoWay}" />
Finally, many of the controls have been improved over time, so it's helpful to check out the XAML Controls Gallery application we learned about in Chapter 5, Designing Your Application, for new features of the existing controls.
Now, let's take a look at how to migrate one of the most frequently used WPF features: themes.
Themes
WinUI theming is different from WPF theming. In WinUI, you can leverage three different base themes: Light, Dark, and HighContrast. A theme is now defined by a ThemeDictionary type and applied using its x:Key attribute, as follows:
<ResourceDictionary.ThemeDictionaries>
<ResourceDictionary x:Key="Default">
<SolidColorBrush
x:Key="TargetBackground" Color="Red"/>
...
</ResourceDictionary>
<ResourceDictionary x:Key="HighContrast">
<SolidColorBrush
x:Key="TargetBackground"
Color="Black"/>
...
</ResourceDictionary>
</ResourceDictionary.ThemeDictionaries>
ThemeDictionaries aren't meant to provide an entire app theme anymore. Instead, the system themes should be preferred, and specific theme resources should only be used in a few cases to override system values.
Now that we have learned how to migrate our WPF sample, let's see the last technology covered in this chapter: the UWP app.
Migrating a UWP app
The Windows App SDK and WinUI can be considered the direct successors of UWP. In fact, its goal is to detach many of the UWP APIs and features from the operating system so that they can be consumed also by Win32 applications.
Consequently, among the technologies we have seen in this chapter, UWP is, for sure, the easiest one to start a migration from.
The high-level migration approach is similar to the one we have adopted to migrate our WPF sample application: as the main architecture pattern is already in place, it's mostly a matter of updating to the latest version of the Windows Runtime APIs and adapting to changes in the API. The documentation often provides a suggested migration path. In fact, moving from UWP could even be an easier task than moving from a .NET 4.x-based WPF application, as IoC and MVVM are likely provided by the same frameworks and packages as their Windows App SDK counterpart.
Most Windows Runtime APIs can be used in Windows App SDK applications, but there are some noteworthy exceptions. They are listed as follows:
- APIs that have a dependency on features and are only available in the UWP UI layer can't be used. There is the Windows UI Library (that is, WinUI 3) for that now.
- APIs that require a package identity (a globally unique identifier for a package) are only supported in MSIX packaged apps. If you're planning to integrate deeper with the operating system (such as managing firewall rules), MSIX is the preferred deployment technology. This is because it makes it easier to control the integration through the manifest file.
Another significant difference is that splash screens aren't supported out of the box for the Windows App SDK and need to be substituted with a window transition. This is in the case that your application requires some time to be initialized.
One of the key differences between UWP and WPF is how the dispatcher works. Let's see how we can migrate it.
Migrating the dispatcher
In our UWP application, we are using the Microsoft.UI.Xaml.Window.Dispatcher class to dispatch tasks to the UI thread. This is required when you are performing some operations in the background, but at some point, you have to update the user interface. However, as we learned in Chapter 4, The Windows App SDK for a UWP Developer, this class is no longer available due to the different implementation of the Window container between UWP and Win32.
As such, we must leverage the DispatcherQueue property exposed by the Window, Page, or Control objects. To run a task on the UI thread using the dispatcher, enqueuing it to the DispatcherQueue property will ensure it's executed on the thread associated with the dispatcher queue. Refer to the following code:
If (this.DispatcherQueue.HasThreadAccess)
{
textBlock.Text = msg;
}
else
{
var result = this.DispatcherQueue.TryEnqueue(
Microsoft.UI.Dispatching
.DispatcherQueuePriority.Normal,() =>
textBlock.Text = msg);
}
You can refer to Chapter 4, The Windows App SDK for a WPF Developer, to see more details regarding how to use the new dispatcher and how you can optimize it with helpers from the Windows Community Toolkit.
Now, let's see another key difference between UWP and WinUI: the activation logic.
Activation
Let's take a look at the App class of our UWP sample application. In UWP, the activation logic can be implemented by overwriting specific activation methods of the Application object, such as OnFileActivated or OnBackgroundActivated, or by using the ActivationKind property of the IActivatedEventArgs parameter of the OnActivated override. Casting this parameter to a specific implementation (for example, FileActivatedEventArgs) gives access to the activation parameters.
These events are made available thanks to the peculiar life cycle of the UWP: applications can be suspended when they are idle; terminated when Windows needs to release memory to let other applications run; or even activated in the background, without showing any user interface.
In comparison, Windows App SDK applications are based on the Win32 model, and as such, they have a simpler life cycle. There are no overridable activation-related methods available in the Application model except for OnLaunched. The entire activation is now simplified and handled entirely in OnLaunched. For packaged applications, all 44 activation kinds known from UWP are available with the UWPLaunchActivatedEventArgs.Kind property of the LaunchActivatedEventArgs parameter. Unpackaged apps only support four activation kinds:
- Launch: This is for command-line activation, used when a user clicks the app icon.
- File: This is for registered file type activation, used when the user opens a file of the registered type.
- Protocol: This is for protocol-based activation, used when a user opens the app via a URI.
- StartupTask: This is for user login-based activation, used when the app is started on user login.
For example, our UWP application can handle file type association, so we have the following code in the App class:
protected override void OnFileActivated(FileActivatedEventArgs
args)
{
var file = args.Files[0];
//open a dedicated page to display the selected file
}
Through the activation arguments, we retrieve a reference to the file the user is trying to open, which is stored in the Files collection.
In our Windows App SDK application, we must move this code directly inside the OnLaunched event and use the AppInstance class to retrieve a reference to the selected file, as shown in the following sample:
protected override void OnLaunched(Microsoft.UI.Xaml.
LaunchActivatedEventArgs args)
{
var eventArgs =
AppInstance.GetCurrent().GetActivatedEventArgs();
if (eventArgs.Kind == ExtendedActivationKind.File)
{
var fileActivationArguments = eventArgs.Data as
FileActivatedEventArgs;
var file = fileActivationArguments.Files[0];
// open a dedicated page to display the selected
// file
}
var shellFrame = new Frame
{
Content = new MainPage()
};
MainWindow.Content = shellFrame;
MainWindow.Activate();
}
Since we have mentioned how activation is impacted by the life cycle of the application, let's look at a little bit more information regarding the differences between UWP and the Windows App SDK.
Managing the life cycle
As we mentioned earlier, the life cycle of a UWP application is very different from the Win32 one. UWP applications are born to run on multiple devices, with potentially limited resources, and, as such, they have a conservative life cycle. For example, when the application is minimized, it gets suspended, and it can't perform any background operations so that it doesn't consume the CPU. In comparison, a Win32 application doesn't have this limitation and can continue to run as long as the process is in execution.
In our UWP sample application on GitHub, you can see an example of this behavior in the code-behind of the OverviewPage class:
public OverviewPage(OverviewViewModel viewModel)
{
InitializeComponent();
ViewModel = viewModel;
Application.Current.Suspending += Current_Suspending;
}
private void Current_Suspending(object sender, Windows.
ApplicationModel.SuspendingEventArgs e)
{
ApplicationData.Current.LocalSettings.Values[
"OverviewViewModel"] = ViewModel;
}
Here, we subscribe to the Application.Current.Suspending event, which is triggered when the UWP application is about to be suspended. This is so that we can save important data that should survive if Windows terminates the application because it's running out of resources.
In terms of migrating the application to the Windows App SDK and WinUI, we don't have to do this anymore since Windows will no longer try to suspend or terminate our application (unless we do something wrong, such as not catching an exception that leads to a crash). However, there might still be scenarios where we want to optimize the execution based on the workload. We can do this thanks to the Power Management APIs that we learned about in Chapter 4, The Windows App SDK for a UWP Developer.
Instead of overriding methods of the Application object, we can now subscribe to events on the PowerManager object, which is included in the Microsoft.Windows.System.Power namespace, using an event handler. This allows you to register to these events in headless apps or background apps but is usually implemented in MainWindow:
private void SetupPowerManagerHandler()
{
PowerManager.DisplayStatusChanged +=
PowerManager_DisplayStatusChanged;
PowerManager.SystemSuspendStatusChanged +=
PowerManager_SystemSuspendStatusChanged;
}
private void PowerManager_DisplayStatusChanged(
object sender, object e)
{
if (PowerManager.DisplayStatus == DisplayStatus.On)
{ /*do things*/ }
else if (PowerManager.DisplayStatus ==
DisplayStatus.Off) { /*stop things*/ }
}
private void PowerManager_SystemSuspendStatusChanged(
object sender, object e)
{
if (PowerManager.SystemSuspendStatus ==
SystemSuspendStatus.Entering) { /* stop things*/ }
}
In this sample, we are suspending the execution of operations in the case that the screen goes off, meaning that the user is no longer actively using their device.
With this, we have completed our journey of migrating our UWP app to the Windows App SDK and WinUI.
Summary
In this chapter, we put what we have learned so far in this book into practice. By using the knowledge acquired around the XAML framework, binding, the application's life cycle, navigation, and the MVVM pattern, we have migrated real applications built with different technologies to .NET 6, the Windows App SDK, and WinUI.
However, this is only the beginning. Now we have an application that is reliable, more pleasant to use, and based on modern runtimes. But we haven't added any new features yet. This is the goal of the next chapters: we're starting on a journey to integrate our applications with many exciting features that are available in Windows 10 and Windows 11. We will start with technologies such as localization and Windows Hello, which will be covered in the next chapter.
Questions
- When we migrate from WPF to WinUI, we can reuse the same UI layer since both technologies are based on XAML. Is this true or false?
- When we move to WinUI and the x:Bind markup expression, we can keep using the DataContext property to connect the Views with the ViewModels. Is this true or false?
- If your UWP application supports multiple activation points, you have to change their implementation when you move to the Windows App SDK and WinUI. Is this true or false?