
Chapter 2: Enforcing Policy as Code on CloudFormation and Terraform
This chapter will walk you through the concept of policy-as-code and how it can be helpful in terms of security and compliance. You will also learn the stage of CI/CD at which infrastructure policies (which is not only limited to infrastructure resources but also network access control) can be checked. After that, we will learn how to apply some policies to an AWS CloudFormation template using CloudFormation Guard. We will also learn how to use AWS Service Catalog across multiple development teams to spin up compliant resources. Then, we will learn how to integrate Terraform Cloud with GitHub. Finally, we will write some HashiCorp Sentinel policies to apply to Terraform templates to enforce the rules before Terraform spins up any cloud resources.
In this chapter, we are going to cover the following main topics:
- Implementing policy and governance as code on infrastructure code
- Using CloudFormation Guard to enforce compliance rules on CloudFormation templates
- Using AWS Service Catalog across teams with access controls and constraints
- Integrating Terraform Cloud with GitHub
- Running Terraform templates in Terraform Cloud
- Writing Sentinel policies to enforce rules on Terraform templates
Technical requirements
To get started, you will need an AWS account and a Terraform Cloud account (there is a 30-day free trial). The code examples can be found in this book's GitHub repository chapter-02:
https://github.com/PacktPublishing/Accelerating-DevSecOps-on-AWS/tree/main/chapter-02
Implementing policy and governance as code on infrastructure code
In this section, we will learn what policy as code is and how it helps an organization to govern and enforce best practices when we spin up resources in a secure and compliant way. We will also learn where to place policy checks in the CI/CD pipeline.
Policy as code
A policy is a set of rules or a plan related to particular situations. It is a way to enforce certain rules and constraints that restrict unauthorized access to resources such as services and environments. There are three different types of policies:
- Compliance policies: These policies make sure the system or resources are compliant with standards such as PCI-DSS, GDPR, or HIPAA.
- Security policies: These are organizational policies for the security of infrastructure resources.
- Operational excellence policies: These are policies that make sure all the services or resources contain objects that make operation easy. For instance, tagging all the resources.
Policy as code basically means expressing these rules or plans in a high-level language to automate and manage the policies. It is a similar concept to infrastructure as code (IaC), where we write infrastructure resources as code. Some of the well-known policy-as-code tools available in the market are HashiCorp Sentinel, Open Policy Agent (OPA), and CloudFormation Guard.
Why use policy as code?
Policy as code is a extension of DevSecOps, which embraces the shift-left culture. DevSecOps is basically the practice of implementing security into each DevOps stage and activity. If we implement security at every stage, then we can identify and fix issues earlier, which helps save time, effort, and money. It's called shift-left because we discover issues earlier (to the left) in the timeline.
The benefits of policy as code
Policy as code provides the following benefits:
- Codification: When we write policy logic as code, the information and logic about the policy is directly written in code and can be commented on to add further explanation. This makes it easier to understand than relying on verbal explanations of policies.
- Version control: The major advantage of writing policy as code is that we can easily use and manage it in a version control system (VCS). This lets you take advantage of all the modern VCS features, such as pull requests, multiple versions, multiple commits, and more.
- Integration with automation: With policy as code in a text file, we can use it in our automation tools. For example, before provisioning your infrastructure, you can setup a pipeline stage that runs before to check whether the infrastructure resources meet all the conditions mentioned in the policy file.
An important use case for policy as code is to integrate it in your CI/CD plan. There are multiple ways to include it, which we will discuss in the next section.
Policy as code in CI/CD
There are multiple ways to strategize policy as code as part of your CI/CD plan. Let's look at some of these in the following figures:
Example 1:
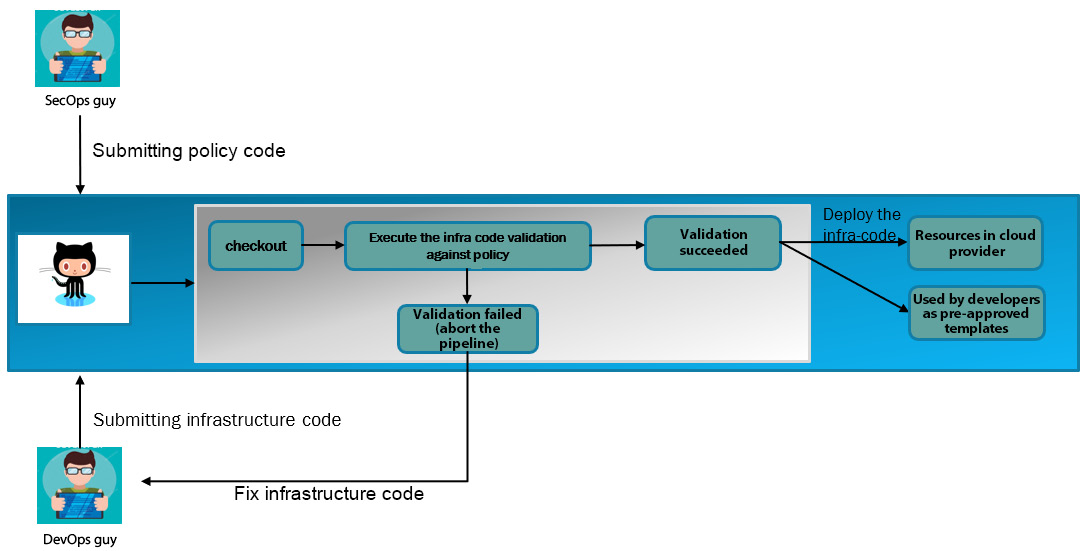
Figure 2.1 – An example of policy as code in CI/CD
In the preceding figure, the following steps are illustrated:
- The DevOps engineer is submitting the infrastructure code in the VCS. Similarly, the SecOps engineer is submitting the policy code.
- Then, the build system checks out the code from the VCS.
- The build executor will run the validation command on the infrastructure code against the policy code.
- If the validation fails, the pipeline will be aborted, and the DevOps engineer needs to fix the infrastructure code so that it will comply with the policy.
- If the validation succeeds, then the infrastructure code will be deployed to the cloud provider.
- This infrastructure code will also be kept as catalog/template code so that the developer can directly use it in their application CI/CD and deploy the infrastructure dynamically along with the application.
This is one way of using policy as code in CI/CD, but there is one gotcha, and you must be wondering what that is? It is that the pre-approved catalog code will be locked and you won't be able to change the variables in the template. For example, if the developers want to use the template but want to change a configuration slightly (such as instance type), then it won't be permitted. Otherwise, the developers can use any higher VM instance type, which might not be allowed in the organization because of high cost. But it also restricts developers, with an organizational policy, to modify configurations based on their needs. To allow the developers to modify the configuration, we can implement the CI/CD plan in the following way.
Example 2:
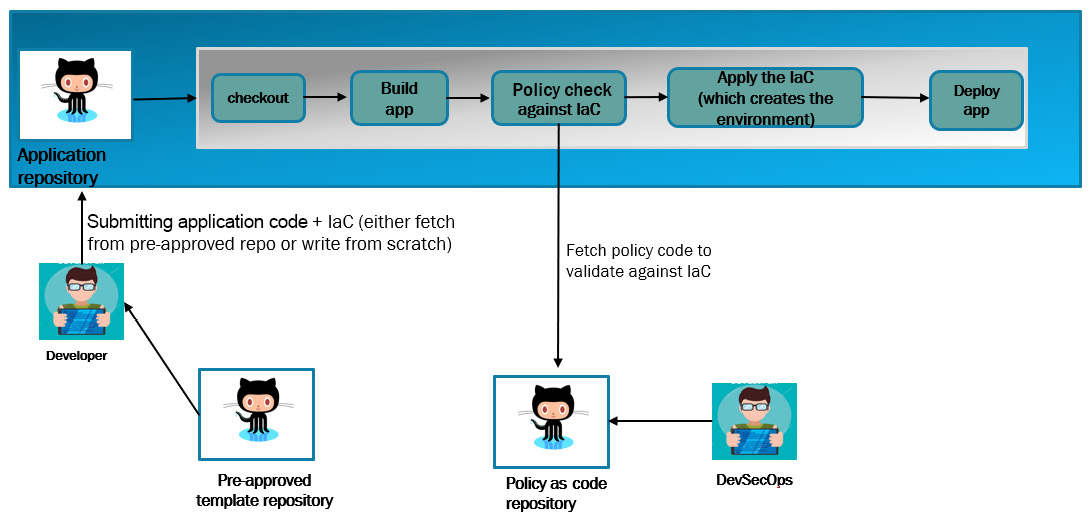
Figure 2.2 – An example of policy as code in application CI/CD
In the preceding image, we are trying to give the developers the power to spin up infrastructure resources, which saves time by cutting out the ticketing process of infrastructure provisioning, for the operation stream. But the aforementioned CI/CD pipeline also makes sure that if developers pass any value in the infrastructure code that violates the policy, then the pipeline will fail. In the preceding diagram, the following steps are illustrated:
- The developer submits the application code along with the infrastructure code for the resources they want to create. They either write this infrastructure code from scratch or use the pre-approved template of the organization. These pre-approved templates are generally written by the DevOps team and can be used by developers.
- The build system checks out both the application and infrastructure code.
- The build system builds the application code.
- The build system checks out the policy code from the policy code repository. This policy code is written by the DevSecOps team. The build system validates the policy against the infrastructure code.
- Upon successful validation, the build system will apply the infrastructure code, which will create the environment for the application. If the validation fails, then the pipeline will fail too.
- Once the environment is created, the application will be deployed to the environment
The policy as code not only applies to the infrastructure code, but it could also apply to Kubernetes definition or access control. There are some amazing policy engine tools available that support multiple platforms (such as AWS, Terraform, and Kubernetes) such as OPA, Checkov, and CloudFormation Guard. In the next section, we will explore CloudFormation Guard 2.0, which supports CloudFormation templates, Terraform, and Kubernetes.
Using CloudFormation Guard to enforce compliance rules on CloudFormation templates
In this section, we will learn about CloudFormation Guard, including how to install it, how to write rules for it, and how to validate it against CloudFormation templates.
CloudFormation Guard
CloudFormation Guard is an open source policy-as-code validation tool. It supports infrastructure configuration tools such as CloudFormation templates and Terraform JSON configuration files. It also has additional support to write rules for Kubernetes configurations. It enables developers to use a simple yet powerful domain-specific language (DSL) to write rules and validate JSON- or YAML-formatted structured data.
Installation
To install CloudFormation Guard 2.0 (the latest major version), please follow these steps:
- Go to Terminal and enter the following command:
$ curl --proto '=https' --tlsv1.2 -sSf https://raw.githubusercontent.com/aws-cloudformation/cloudformation-guard/main/install-guard.sh | sh
$ sudo cp ~/.guard/bin/cfn-guard /usr/local/bin
- Validate the installation:
$ cfn-guard help
If you get a description of cfn-guard 2.0 and usage subcommands, that means you have installed cfn-guard.
Template validation
To validate your CloudFormation template with Guard rulesets, you use the following command:
$ cfn-guard validate –d your-cloudformation-template –r guard-rule-file
The -d (or ––data) is for the CloudFormation template and the –r (or ––rules) is for the CloudFormation Guard rules.
Writing CloudFormation Guard rules
Guard rules are used to check if resources' configurations comply with organizational policies or expectations. Guard rules are written in a DSL, and it's easy to understand. You don't need programming experience to understand or write the rules. The basic format of a Guard rule is illustrated as follows:
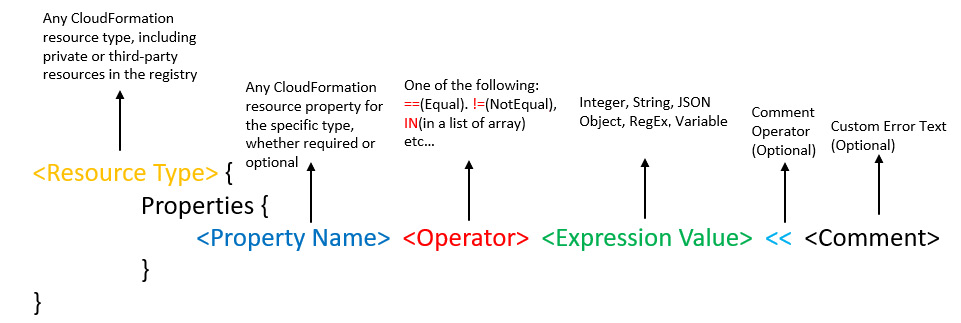
Figure 2.3 – The format of a CloudFormation Guard 2.0 rule
Let's explore this with an example. We have a CFT file, cfntemp.yaml, for an Amazon EBS volume, which can be seen as follows:
---
AWSTemplateFormatVersion: '2010-09-09'
Description: Sample template
Resources:
SampleVolume:
Type: AWS::EC2::Volume
Properties:
AvailabilityZone: us-west-2b
Size: 10
VolumeType: gp2
Now, suppose we want to validate that the EBS volume resources in the preceding template meet the following criteria: the encryption property is set to true; the size of the volume is 50 or above; the AvailabilityZone property's value is ap-southeast-1a. To do this, you will create a ruleset, shown as follows in the cfntestpolicy file:
AWS::EC2::Volume {
Properties {
Encrypted == true
Size >= 50
VolumeType == 'gp2'
AvailabilityZone == 'ap-southeast-1a'
}
}
To check whether the CFT file for the EBS volume is compliant with the policy, we need to run this command:
$ #cfn-guard validate –d <CloudFormationTemplate> -r <cfn-guard-rulesetfile>
$ cfn-guard validate –d cfntemp.yaml -r cfntestpolicy
cfntest.yaml Status = FAIL
FAILED rules
cfntestrule/default FAIL
---
Evaluation of rules cfntestrule against data cfntest.yaml
--
Property traversed until [/Resources/SampleVolume/Properties] in data [cfntest.yaml] is not compliant with [cfntestrule/default] due to retrieval error. Error Message [Attempting to retrieve array index or key from map at path = /Resources/SampleVolume/Properties , Type was not an array/object map, Remaining Query = Encrypted]
Property [/Resources/SampleVolume/Properties/Size] in data [cfntest.yaml] is not compliant with [cfntestrule/default] because provided value [10] did not match expected value [50]. Error Message []
Property [/Resources/SampleVolume/Properties/AvailabilityZone] in data [cfntest.yaml] is not compliant with [cfntestrule/default] because provided value ["us-west-2b"] did not match expected value ["ap-southeast-1a"]. Error Message []
So, the result we can see in the preceding code block is FAIL, and the reason is also mentioned in the preceding code block. If the result is FAIL, that means the infrastructure code is not compliant. Now, to make it compliant, we need to fix the preceding CloudFormation template. We will enable the encryption, increase the volume size, and also change the availability zone. The changes are as follows:
---
AWSTemplateFormatVersion: '2010-09-09'
Description: Sample template
Resources:
SampleVolume:
Type: AWS::EC2::Volume
Properties:
Encrypted: true
AvailabilityZone: ap-southeast-1a
Size: 50
VolumeType: gp2
Now, to check whether the preceding CFT file is compliant with the Guard rule, we again need to run the cfn-guard validate command:
$ cfn-guard validate -d cfntest.yaml -r cfntestrule
cfntest.yaml Status = PASS
PASS rules
cfntestrule/default PASS
---
Evaluation of rules cfntestrule against data cfntest.yaml
--
Rule [cfntestrule/default] is compliant for template [cfntest.yaml]
--
We can see the result is PASS, and that means the CFT file is compliant with the Guard rule. This one was a simple example. Let's see another example with a different scenario that covers additional rule formats. We will use a sample template comex.yaml file that describes an Amazon S3 bucket with server-side encryption and versioning enabled. It also describes an EBS volume with encryption set to true and AvailabilityZone set to ap-southeast-1, which is as follows:
---
AWSTemplateFormatVersion: '2010-09-09'
Description: Sample template
Resources:
SampleBucket:
Type: AWS::S3::Bucket
Properties:
BucketEncryption:
ServerSideEncryptionConfiguration:
- ServerSideEncryptionByDefault:
SSEAlgorithm: AES256
BucketName: !Sub 'sample-bucket-${AWS::Region}-${AWS::AccountId}'
VersioningConfiguration:
Status: Enabled
SampleVolume:
Type: AWS::EC2::Volume
Properties:
AvailabilityZone: ap-southeast-1a
Encrypted: true
Size: 10
VolumeType: gp2
Now, let's try to create a Guard rule file, comexrule.guard, for the preceding template:
let volumes = Resources.*[ Type == 'AWS::EC2::Volume' ] 1
rule sample_volume_check when %volumes !empty { 2
%volumes.Properties.Encrypted == true 3
%volumes.Properties.AvailabilityZone in ['ap-southeast-1a', 'ap-southeast-1b'] 4
}
let buckets = Resources.*[ Type == 'AWS::S3::Bucket' ]
rule sample_bucket_encryption when %buckets !empty {
%buckets.Properties {
BucketEncryption.ServerSideEncryptionConfiguration[*] {
ServerSideEncryptionByDefault.SSEAlgorithm == 'AES256'
}
}
}
You must be wondering why the rules written for this example are more complex than the first example. Let's try to understand this rule file based on the highlighted numbers in the preceding code example:
- Here, when we are using Resources.*[ Type == 'AWS::EC2::Volume' ], it means we are using a query expression to traverse hierarchical data. Inside query expressions, we can use a filter to target a subset of values. If we use Resources.*, then the query output will be as follows:
Resources:
SampleBucket:
Type: AWS::S3::Bucket
Properties:
BucketEncryption:
ServerSideEncryptionConfiguration:
- ServerSideEncryptionByDefault:
SSEAlgorithm: AES256
BucketName: !Sub 'sample-bucket-1'
VersioningConfiguration:
Status: Enabled
SampleVolume:
Type: AWS::EC2::Volume
Properties:
AvailabilityZone: ap-southeast-1a
Encrypted: true
Size: 10
VolumeType: gp2
But, in our case, we are using the Resources.*[ Type == 'AWS::EC2::Volume' ] filter, so the query output will be as follows:
Type: AWS::EC2::Volume
Properties:
AvailabilityZone: ap-southeast-1a
Encrypted: true
Size: 10
VolumeType: gp2
Now, this output value will be assigned to a variable when we are using let volumes =. So, in this case, volumes is a variable that includes the properties of AWS::EC2::Volume.
- Here, we are creating a rule block with a name. So, the format looks like the following:
rule <rule name> [when <condition>] {
Guard_rule_1
Guard_rule_2
...
}
We have created a rule named sample_volume_check, and this rule block will be executed only when the condition is met, meaning, when %volumes (the way to call the assigned variable) is !empty (NOT operator). In this case, the condition is met, because the value of volumes is not empty.
- The Guard rule that we are using with (.) to traverse the data, just like in JQ utility. %volumes.Properties.Encrypted, will query the value of the Encrypted property mentioned in the CFT file and compare this with the value mentioned in the rule using the equal to (==) binary operator.
- The Guard rule that uses the IN operator will return true if the value retrieved from the CFT file matches the value mentioned in the rule array.
If we validate the CFT file against the Guard rule, we will get the status that it is compliant with the Guard rule:
$ cfn-guard validate -d comex.yaml -r comexrule
comex.yaml Status = PASS
PASS rules
comex/sample_volume_check PASS
comex/sample_bucket_encryption PASS
---
Evaluation of rules comex against data comex.yaml
--
Rule [comex/sample_bucket_encryption] is compliant for template [comex.yaml]
Rule [comex/sample_volume_check] is compliant for template [comex.yaml]
--
The previous two examples give you an overview of how to write a Guard rule. Now, let's try to write a Guard rule for another scenario.
We need to write a Guard rule for a CFT file, which enforces the following conditions in an Amazon EC2 instance:
- If the EC2 instance is tagged with key Environment and value Dev, then the instance type must be t2.micro.
- If the EC2 instance is tagged with key Environment and value Prod, then the instance type must be t2.xlarge.
- The EBS volume attached to the EC2 instance must be encrypted, its volume type must be gp2, and its size must be either 100 or 200 GB.
- The EBS volume and EC2 instance must be in the availability zone ap-southeast-1a.
- The security group ports should not be open for 0.0.0.0/0.
The ruleset that covers all of the preceding conditions is as follows:
let volumes = Resources.*[ Type == 'AWS::EC2::Volume' ]
rule VOLUME_CHECK when %volumes !empty {
%volumes.Properties {
Encrypted == true
Size in [50,100,120]
VolumeType == 'gp2'
AvailabilityZone in ['ap-southeast-1a']
}
}
let sg = Resources.*[ Type == 'AWS::EC2::SecurityGroup' ]
rule SECURITYGROUP_CHECK when %sg !empty {
%sg.Properties {
SecurityGroupIngress[*]{
CidrIp != '0.0.0.0/0'
}
}
}
let ec2_instance = Resources.*[ Type == 'AWS::EC2::Instance' ]
let ec2_instance_dev = %ec2_instance [ Properties.Tags[1].Value == 'Dev' ]
let ec2_instance_prod = %ec2_instance [ Properties.Tags[1].Value == 'Prod' ]
rule EC2INSTANCE_DEV_CHECK {
when %ec2_instance_dev !empty {
%ec2_instance.Properties.InstanceType == 't2.micro'
%ec2_instance.Properties.AvailabilityZone == 'ap-southeast-1a'
}
}
rule EC2INSTANCE_PROD_CHECK {
when %ec2_instance_prod !empty {
%ec2_instance.Properties.InstanceType == 't2.xlarge'
%ec2_instance.Properties.AvailabilityZone == 'ap-southeast-1a'
}
}
Now, we will test this rule on the CFT file. The commands to validate the CFT file against the Guard rule are as follows:
$ git clone https://github.com/PacktPublishing/Modern-CI-CD-on-AWS.git
$ cd chapter-02
$ cfn-guard validate -d CFT-ec2instance.yaml -r cfn-ruleset
CFT-ec2instance.yaml Status = FAIL
SKIP rules
cfn-ruleset/EC2INSTANCE_DEV_CHECK SKIP
PASS rules
cfn-ruleset/VOLUME_CHECK PASS
cfn-ruleset/EC2INSTANCE_PROD_CHECK PASS
FAILED rules
cfn-ruleset/SECURITYGROUP_CHECK FAIL
---
Evaluation of rules cfn-ruleset against data CFT-ec2instance.yaml
--
Property [/Resources/InstanceSecurityGroup/Properties/SecurityGroupIngress/0/CidrIp] in data [CFT-ec2instance.yaml] is not compliant with [cfn-ruleset/SECURITYGROUP_CHECK] because provided value ["0.0.0.0/0"] did match expected value ["0.0.0.0/0"]. Error Message []
--
Rule [cfn-ruleset/EC2INSTANCE_PROD_CHECK] is compliant for template [CFT-ec2instance.yaml]
Rule [cfn-ruleset/VOLUME_CHECK] is compliant for template [CFT-ec2instance.yaml]
--
Rule [cfn-ruleset/EC2INSTANCE_DEV_CHECK] is not applicable for template [CFT-ec2instance.yaml]
We can see that EC2INSTANCE_DEV_CHECK has been skipped because the EC2 instance is tagged with Prod. Also, SECURITYGROYP_CHECK has failed, because inside the CFT template, the security group port 22 is open to 0.0.0.0/0.
The next question you might ask yourself is how will we use the cloudformation guard checkin automation? The answer is the exit status. If the Guard rule execution result is PASS, then the exit status is 0, and if it is FAIL, then the exit status is 5.
Note
You can read the blog at https://aws.amazon.com/blogs/devops/integrating-aws-cloudformation-guard/ to learn how to use Guard rules in the AWS Developers tools. Keep one thing in mind: the blog or the repository link mentioned in the blog is using CloudFormation Guard 1.0 instead of 2.0. You need to change the Guard rule from v1.0 to v2.0, as well as the Buildspec.yaml file used in CodeBuild.
So, in this section, we learned how to check a CloudFormation template compliance status using CloudFormation Guard rules. We can imbed this process in an automation pipeline very easily. If you want to provide a compliant CloudFormation template via user interface to developers for their own use, we can do that using AWS Service Catalog, which we will cover in the next section.
Using AWS Service Catalog across teams with access controls and constraints
In this section, we will explore how to use AWS Service Catalog to give different teams access to resources. We will learn how to enforce rules using constraints, and we will find out how to manage access with access controls.
AWS Service Catalog
AWS Service Catalog is a service managed by AWS that allows organizations to provision and manage pre-approved catalogs of IT services. IT services include any AWS resources, such as servers, databases, software, and more. This service allows IT administrators/DevOps teams to create a service catalog and allow other teams to access it from a central portal. This way, IT administrators or DevOps teams ensure that other teams are provisioning compliant infrastructure resources. Some of the terminology used in Service Catalog is explained in the following subsections.
Users
AWS Service Catalog supports two types of users:
- Catalog administrators: Catalog administrators can be your IT administrator or DevOps engineers, whose responsibilities include the preparation of CloudFormation templates, configuring constraints, and configuring access management for sharing the catalog.
- End users: End users could be your developers or sales team, or any team member who wants to use the catalog to provision the resources. End users receive the details of catalogs from catalog administrators.
Products
A product is an IT service that is a set of AWS resources, such as Amazon EC2 instances, Amazon RDS instances, monitoring configurations, or networking components. For example, a CloudFormation template of LAMP stack can be considered a product.
Portfolios
A portfolio is a collection of products that contains configuration information. Portfolios help manage who can use specific products and how they can use them. With Service Catalog, you can create a customized portfolio for each type of user in your organization and selectively grant them access to the appropriate portfolio.
Constraints
Constraints control the way the user deploys the product. They allow governance over the products. For example, if the user's environment is set to Dev, then the EC2 instance type must be t2.medium.
The workflow for a catalog administrator is illustrated in the following figure:
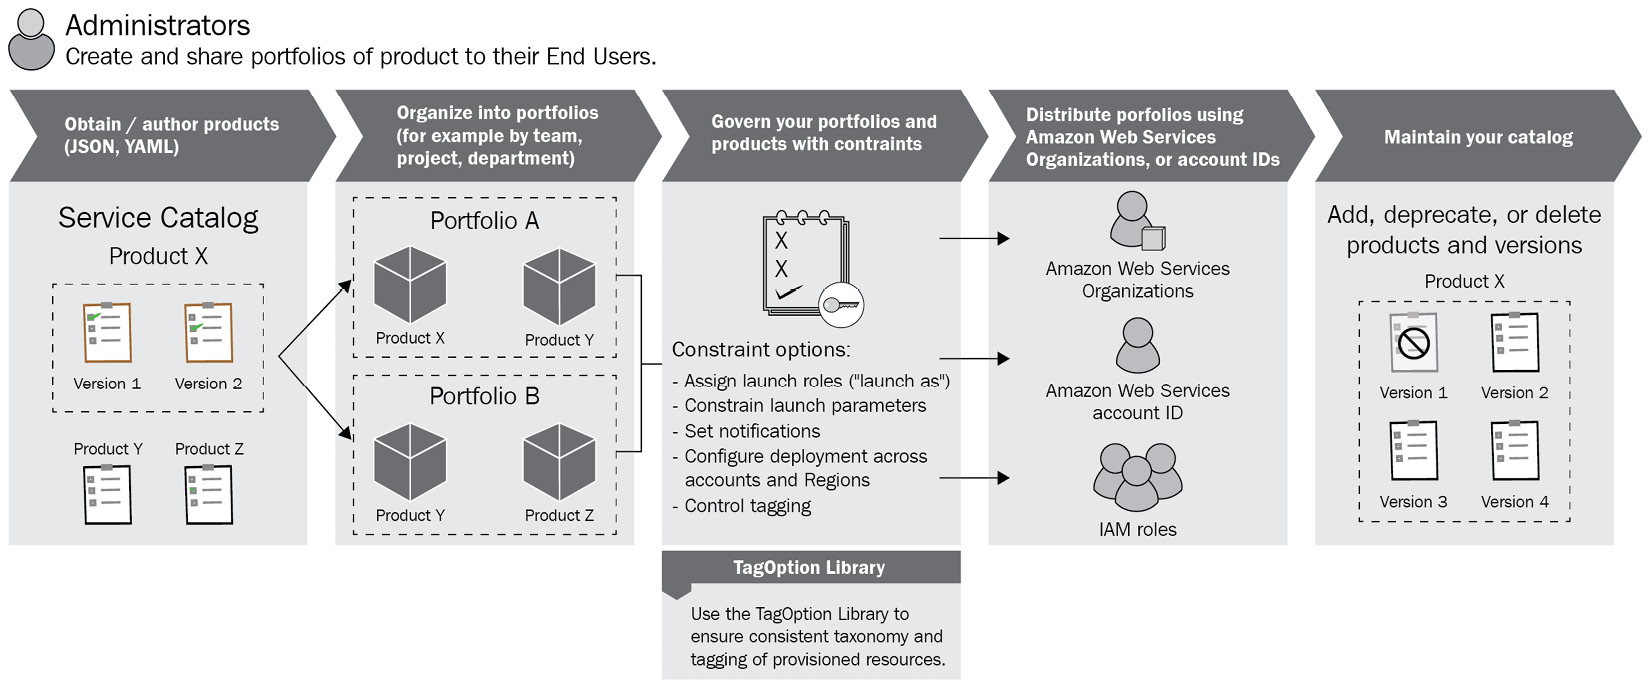
Figure 2.4 – The AWS Service Catalog administrator workflow
The workflow for an end user is illustrated in the following figure:
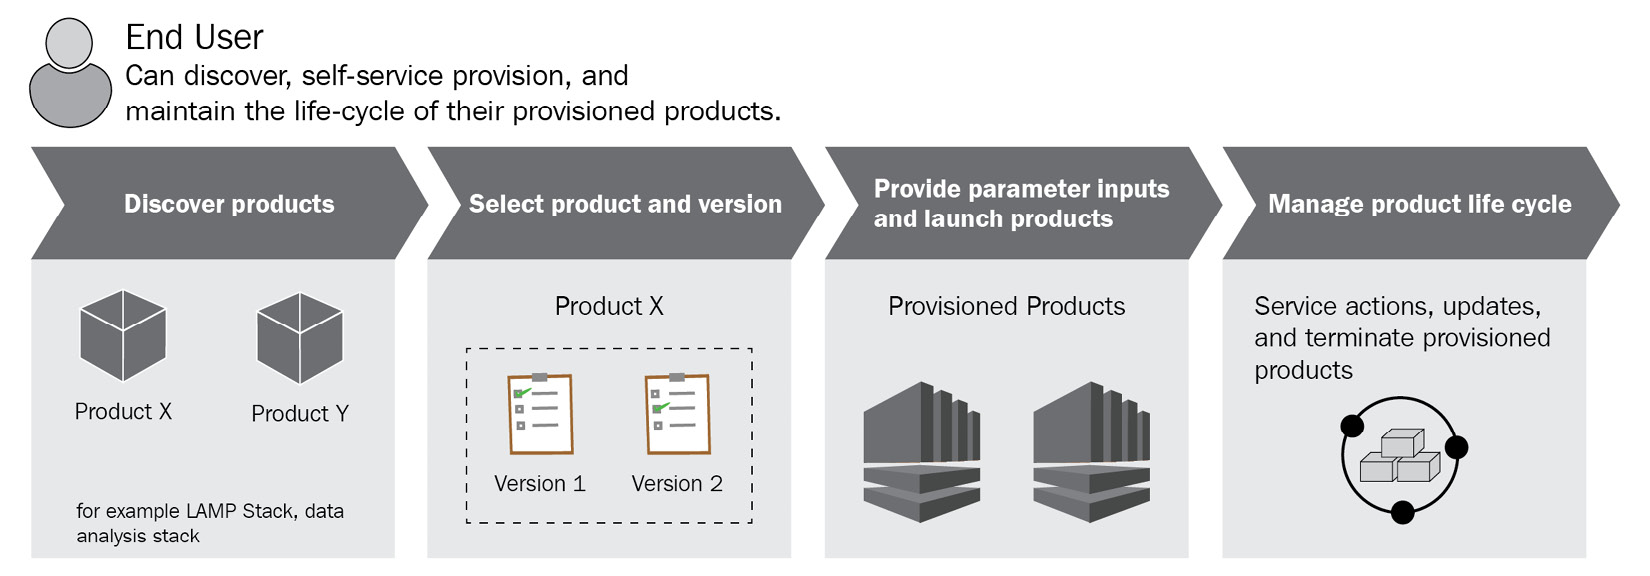
Figure 2.5 – The AWS Service Catalog end user workflow
This is a basic overview of AWS Service Catalog. Now, we will explore a scenario to understand the AWS Service Catalog in action:
We will act as a catalog administrator, create a product and organize it in a portfolio, and then apply some constraints and access controls. After that, we will log in as an end user and try to access the product. We will enter noncompliant parameters in the service catalog page and check whether it stops us from provisioning the product. The steps to implement the scenario are as follows:
- Log in to the AWS Management Console and navigate to AWS service catalog service. You will see the home page of AWS Service Catalog. In the left-hand section, you will see the Administration settings menu:
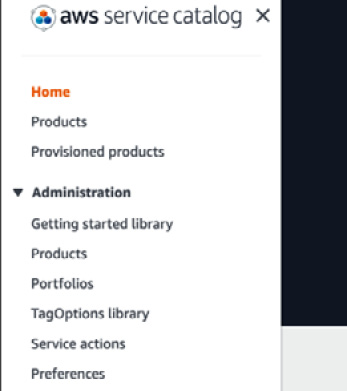
Figure 2.6 – The AWS Service Catalog Administration settings menu
- Click on Portfolios, create a portfolio named Application Team, enter your details in the Description and Owner fields, then click on Create:
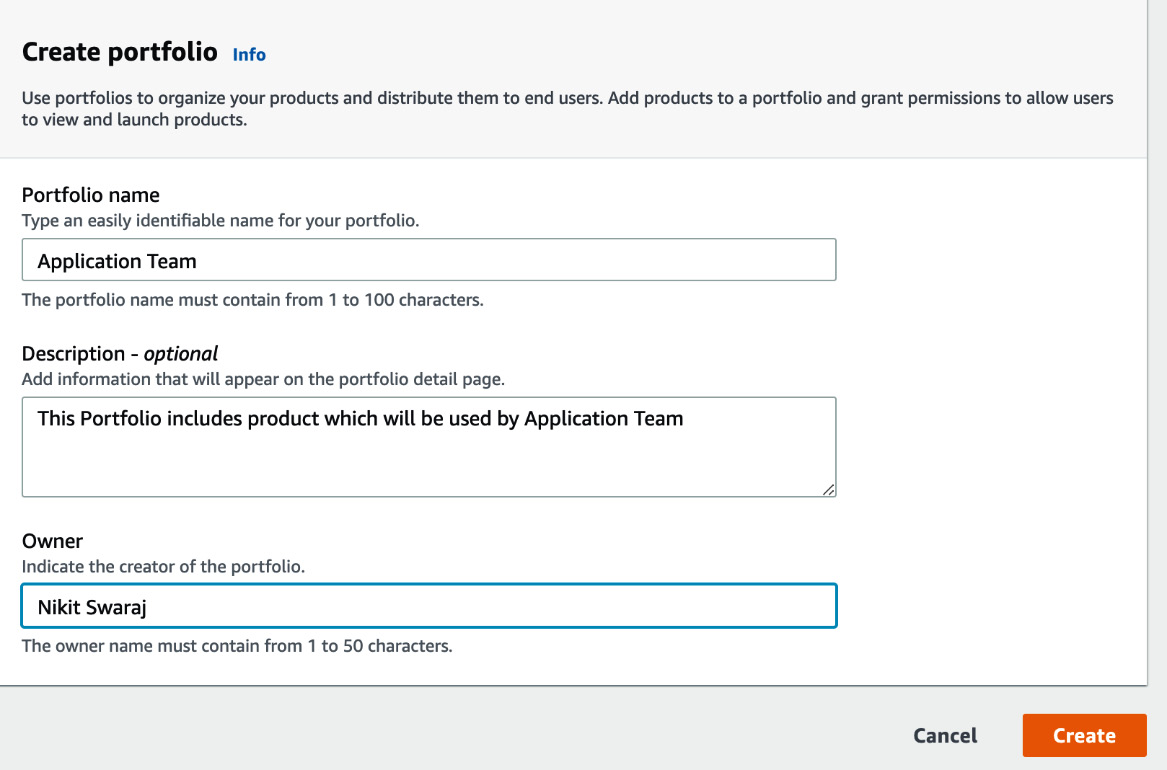
Figure 2.7 – Creating a portfolio

Figure 2.8 – Local portfolios page
- Click on Upload new product to upload a CloudFormation template. We will use the same CFT file from the repository that we cloned for CloudFormation Guard.
- Enter SVC-CAT-CFT-EC2 in the Product name field. Under Version details, we need to choose a method to provide the CFT File. Select the Use a template file radio button. Click on Choose file to upload the CFT file from your local machine. Enter a version name, v0.1, then click on Review:
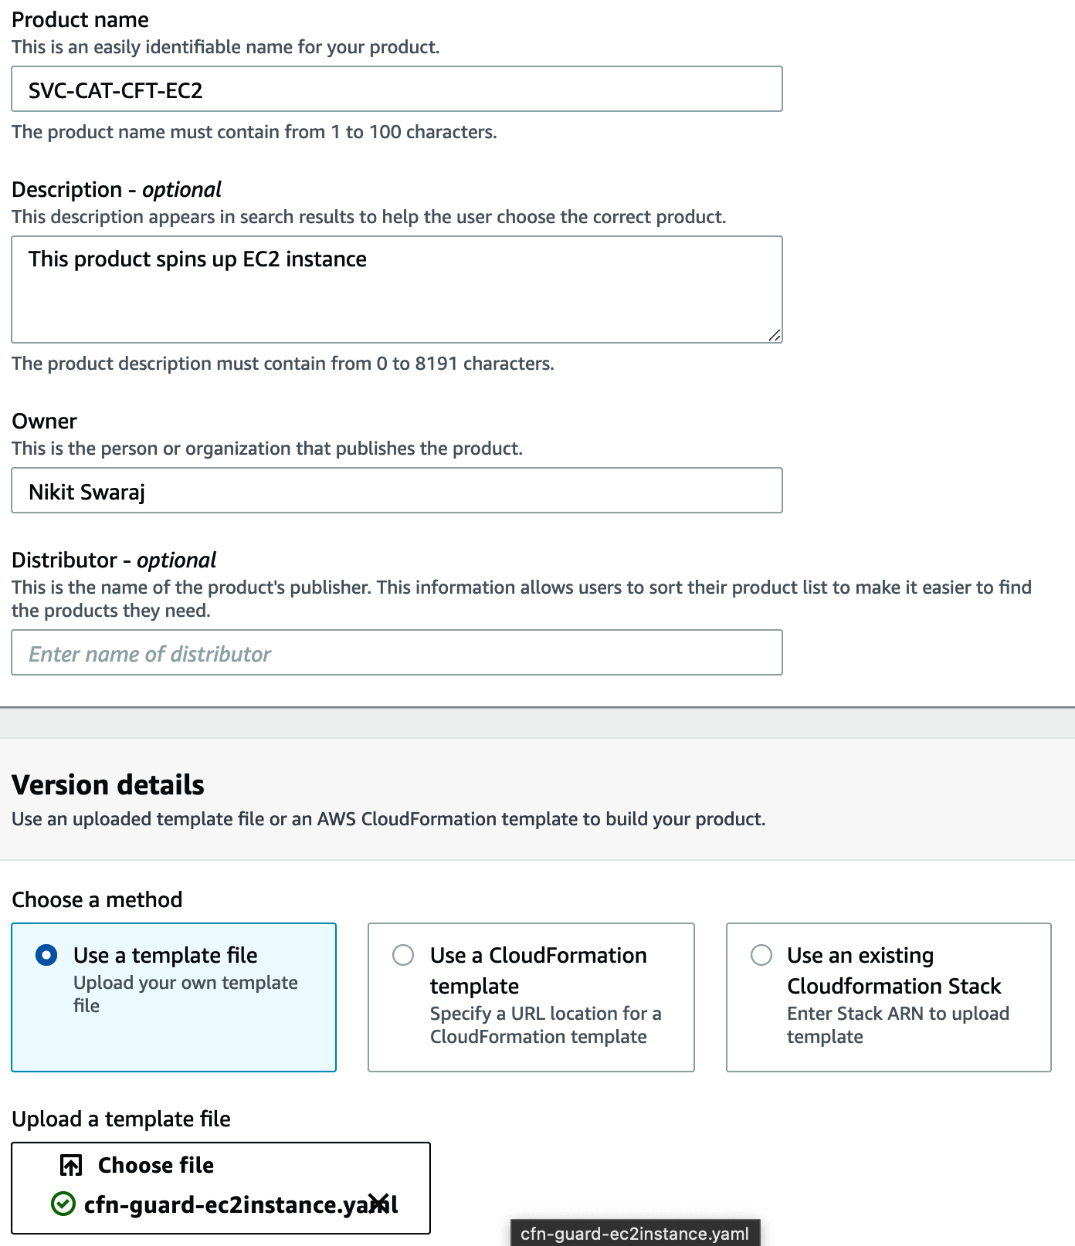
Figure 2.9 – Filling in product details
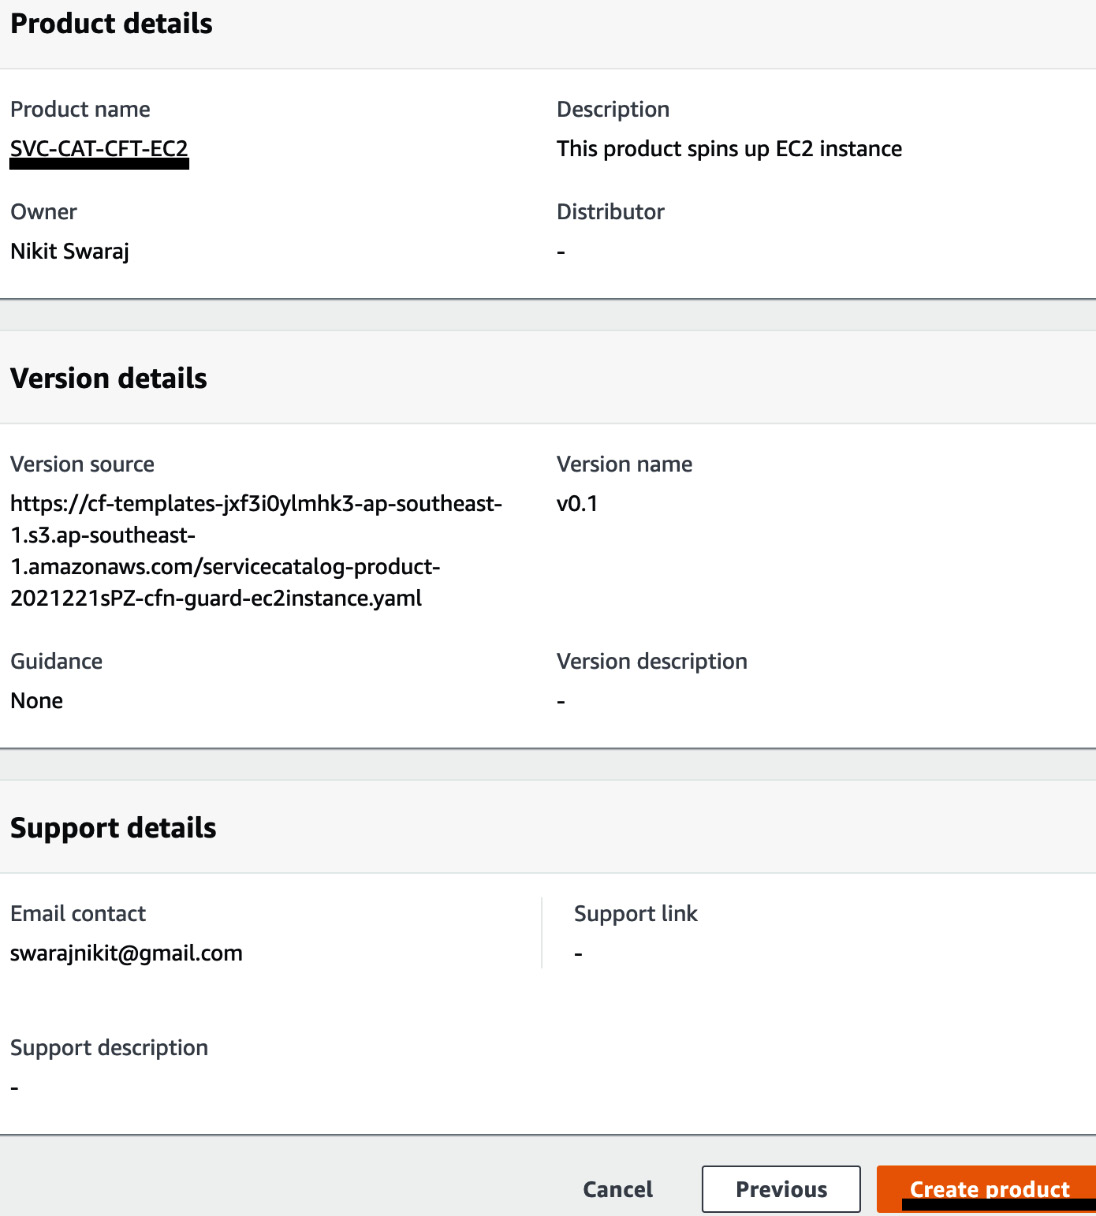
Figure 2.10 – Creating a product
- At this point, we will be able to see the product in the Application Team portfolio. Click on the Constraints tab and then on Create constraint:

Figure 2.11 – The Constraints tab
- In the Create constraint page, select the product that we just created. In the constraint type, select Template. In the template constraint method, select Text editor, where you can write the constraint rule. Copy the following JSON content and paste it into your text editor for the template constraint. Click on Create to create the constraint. The following rule restricts the end user to create a product with EC2 instance type of t2.medium or m3.medium:
{
"Rules": {
"Rule1": {
"Assertions": [
{
"Assert": {
"Fn::Contains": [
[
"t2.medium",
"m3.medium"
],
{
"Ref": "InstanceType"
}
]
},
"AssertDescription": "Instance type should be either t2.micro or m3.medium"
}
]
}
}
}
- To allow end users to access this product, we need to configure the Identity and Access Management (IAM) settings. To do this, click on the Groups, Roles, and Users tabs. Click on Add groups, roles, and users. You will be able to see all the groups, roles, and users in the groups, roles and users list. Select the identity that you will use to log in to access the product, and click on Add access:

Figure 2.12 – Granting users access to the portfolio
- We can also share this product with another AWS account by clicking on the Share tab and entering the details in the AWS Account Id field. But we are not covering that here.
- Now, try to log in as the user you have given access to, navigate to AWS Service Catalog, and click on Products. In this case, I had given access to a role. I switched to the role, navigated to the product, and was able to see it:
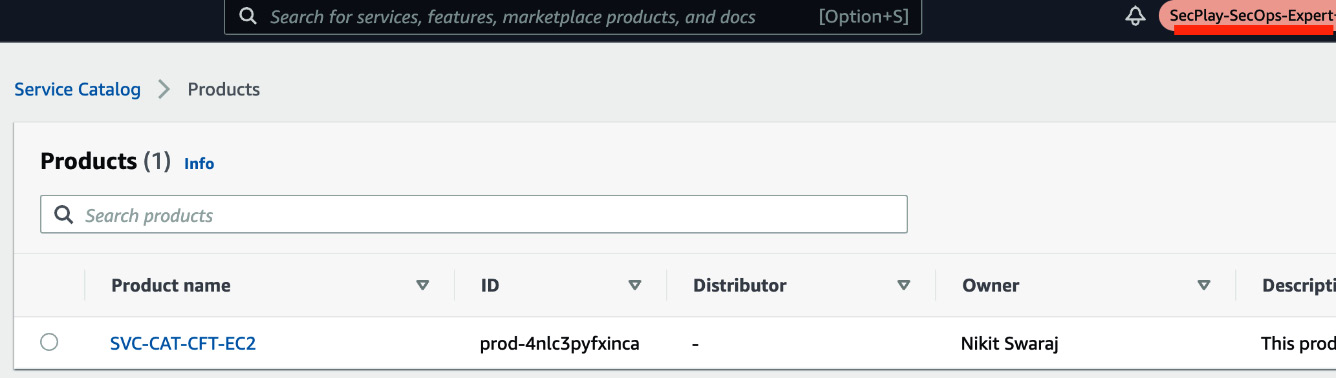
Figure 2.13 – Product page view by end user
- Select the SVC-CAT-CFT-EC2 product and click on Launch Product. You will be redirected to a Launch page. Enter App-starfish into the Provisioned product name field. Select the version. Enter t2.xlarge in the Instance Type field. Here, you will get a prompt that says Instance type should be either t2.medium or m3.medium. This is because of constraints rule:
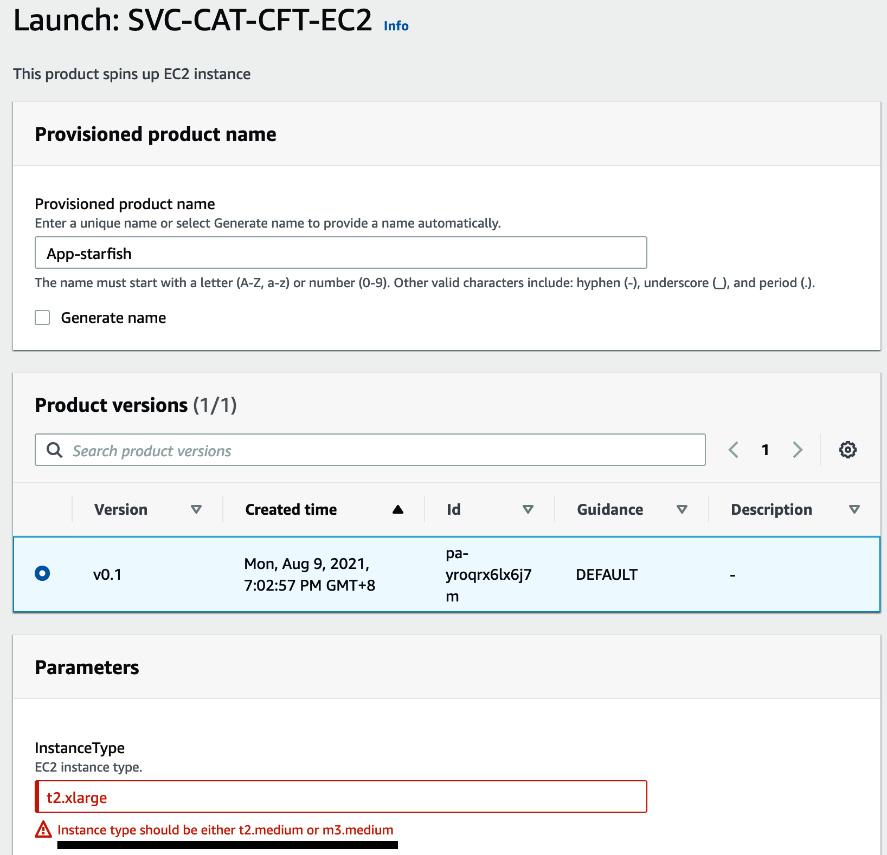
Figure 2.14 – Product Launch page
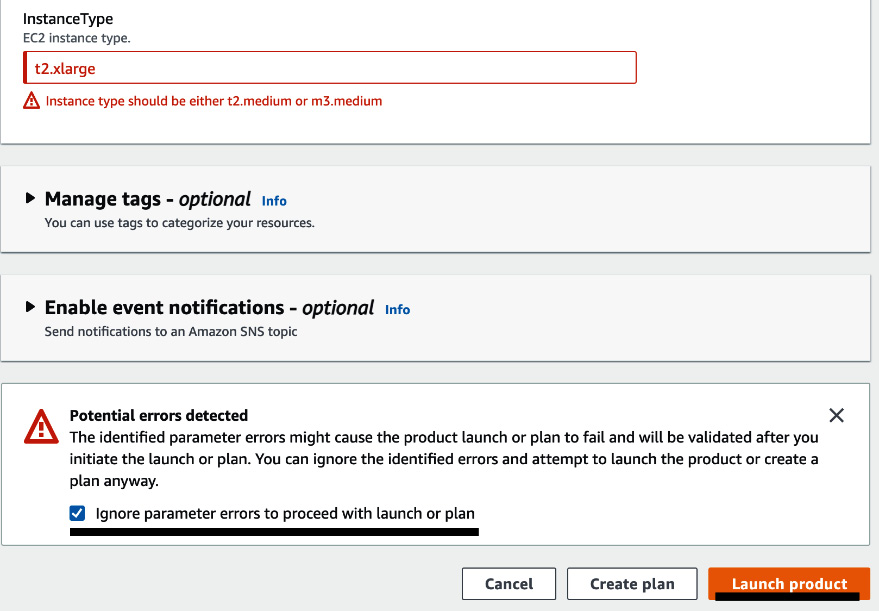
Figure 2.15 – Launching the product
- You will be redirected to the provisioned products page, from where you can navigate to the CloudFormation page to see the actual resource that is getting provisioned.
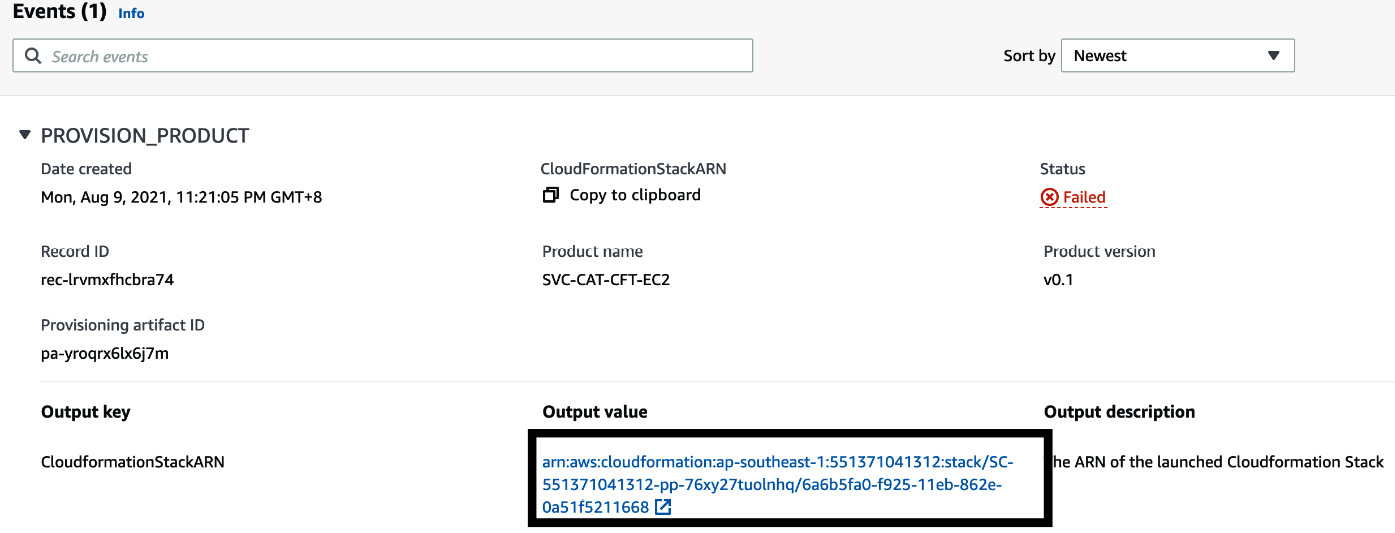
Figure 2.16 – Status page of the product
- But from Figure 2.16, we can also see that the status of provisioned product is Failed. We can retrieve the reason for the status by clicking on the CloudFormationStackArn value. In this case, the reason is because of the EC2 instance type. The EC2 instance type that we provided above was t2.xlarge, but the allowed values are only t2.medium or m3.medium.

Figure 2.17 – CloudFormation Event page
This way, we can enforce the end user to only provision the compliant resources..
In the next section, we will learn about Terraform Cloud and HashiCorp Sentinel. There is no doubt that Terraform is heavily used by developers and DevOps. So, policy as code in Terraform will be covered in the next section.
Integrating Terraform Cloud with GitHub
In this section, we will dive deep into Terraform Cloud and how we can integrate it with GitHub.
Terraform Cloud
Terraform is an IaC tool available from HashiCorp. Terraform lets you define infrastructure resources as human-readable and declarative configuration files. Terraform supports multiple cloud platforms and comes with lots of provider plugins. It also maintains a state file to track resource changes. Terraform comes in three different editions – Terraform OSS, Terraform Cloud, and Terraform Enterprise. Terraform OSS is free and comes with basic features. Terraform Cloud has free and paid versions. And Terraform Enterprise is a paid service with additional features.
A chart showing the differences between the Terraform versions can be seen in Table 2.1:
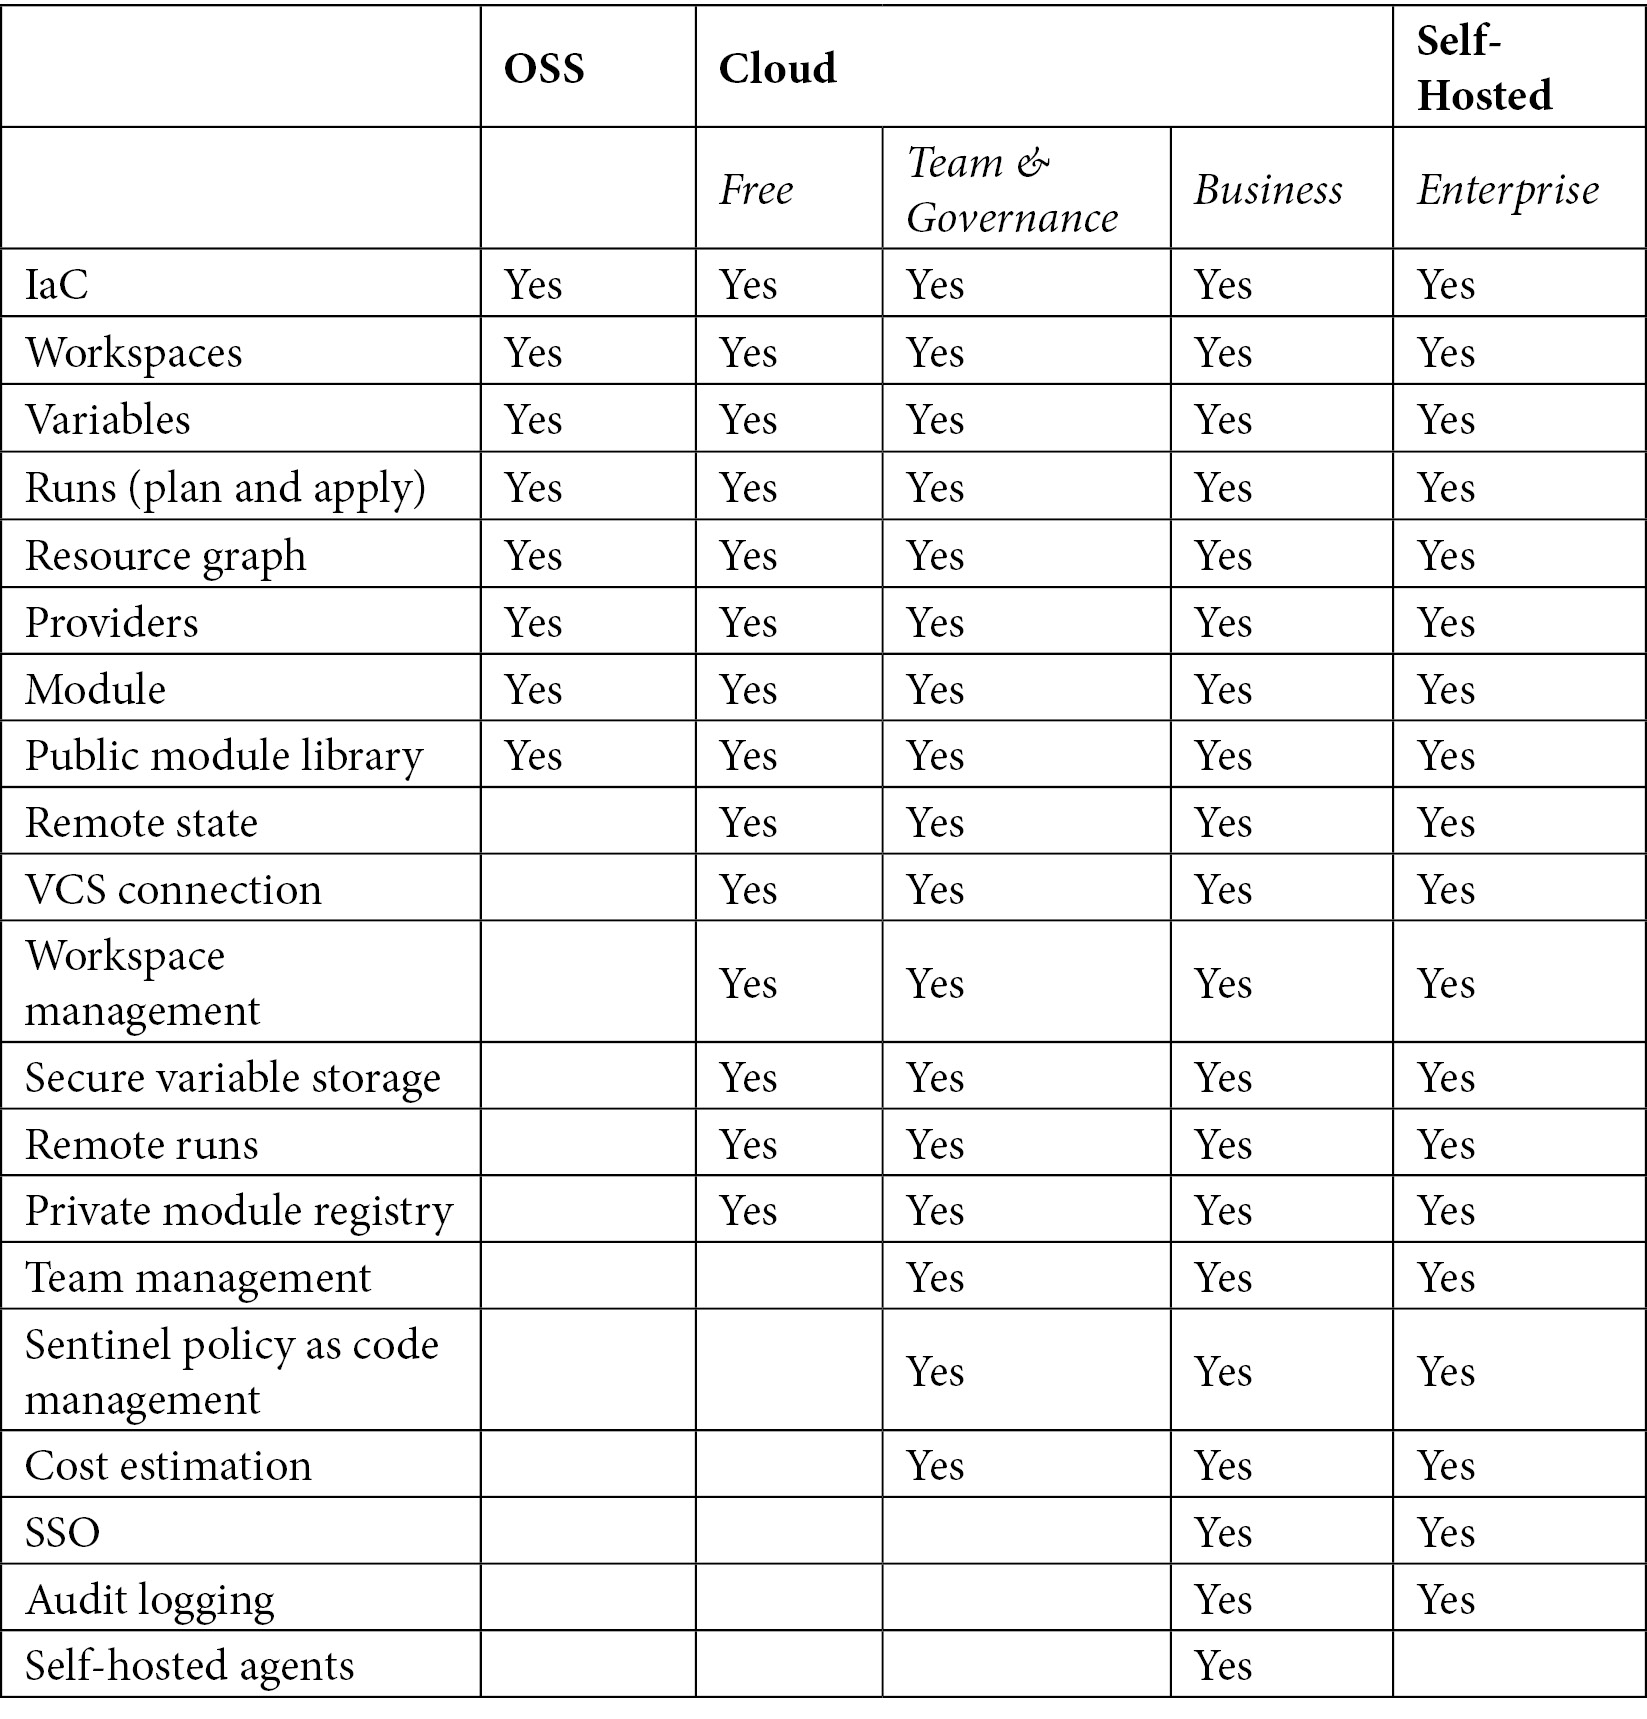
Table 2.1 – Terraform version features
Terraform Cloud is a SaaS platform that manages Terraform executions in a reliable environment instead of a local machine. It basically stores all necessary information (such as secrets and shared state files) and connects to a VCS so that a team can collaborate. Terraform executions in Terraform Cloud can take place in the following three ways:
- Local CLI: For this method, we need to install the Terraform command-line interface (CLI) on our local machine, and we need to log in to Terraform Cloud with a Terraform login command, where we will authenticate and generate a token. After that, we need to provide backend remote configurations in a backend.tf file, which will allow you to run the command locally but make the Terraform execution take place in Terraform Cloud.
- UI/VCS: For this method, the branch from the VCS is integrated with the workspace of Terraform Cloud by a webhook, so whenever there is a commit, it will automatically trigger Terraform Cloud for execution.
- API: For this method, Terraform Cloud is dependent on one of your organization tools like any build server. An organization tool oversees the change in the Terraform configurations, and based on that, it makes a series of calls to Terraform Cloud's Runs and configuration versions.
VCS-driven workflow (GitHub)
The steps to integrate Terraform Cloud with GitHub are as follows:
- Create two repositories in GitHub, one for a Terraform config file and the other for a Sentinel policy, which will be used in the next section. Make sure the repositories have a READ.Me file.
- Log in to Terraform Cloud (you need to create an account first) by clicking on this link https://app.terraform.io/.
- If your account is new, then you will see the Choose your setup workflow page. We will go with Start from scratch because we need to integrate the VCS and get to know file that triggers a remote execution in Terraform Cloud:
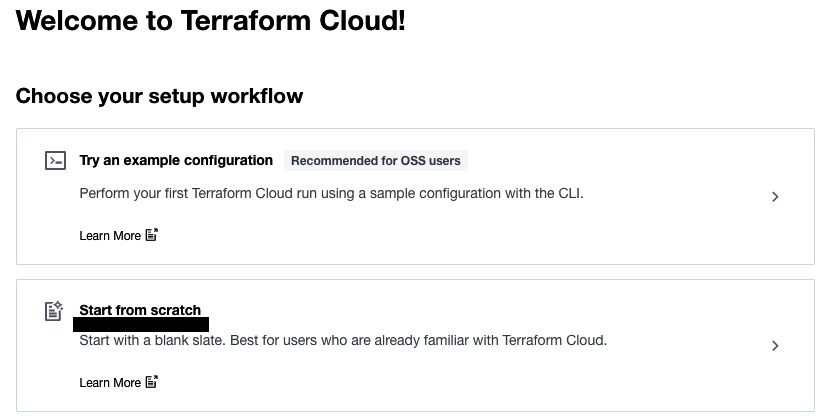
Figure 2.18 – Terraform workflow setup page
- Enter the organization name as stella and click on Create organization. Organization names in Terraform Cloud are a unique name. Organizations are private shared spaces for teams to collaborate on infrastructure configuration:
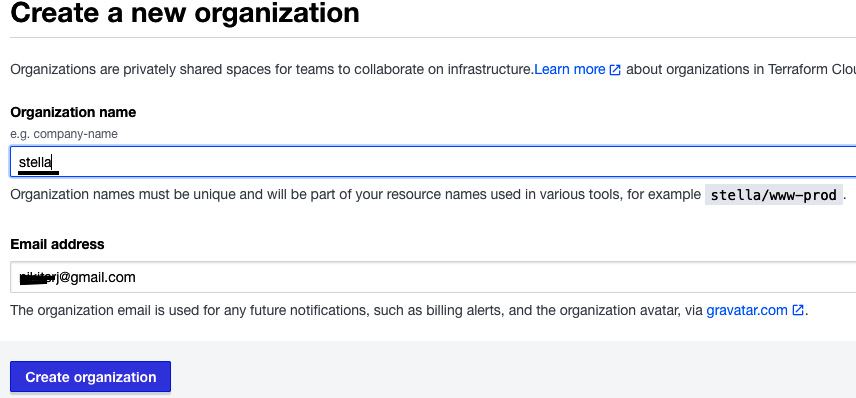
Figure 2.19 – Creating an organization in Terraform Cloud
- Once you create your organization, you will be asked to create a workspace. A workspace in Terraform contains all the Terraform configuration files. Select Version Control Workflow to integrate Terraform Cloud with your VCS.
- Now, you need to choose your VCS. In our case, we are proceeding with GitHub. You need to authorize Terraform Cloud to access GitHub:
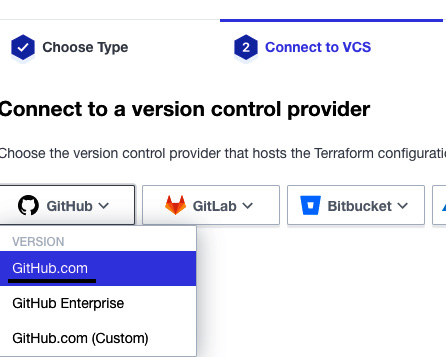
Figure 2.20 – Connecting a VCS with Terraform Cloud
- After that, select your code repository (that is, the one we created in Step 1 for Terraform configurations, as illustrated in following screenshot, I created policy-as-code-CFT-TF repository which will contain terraform template):
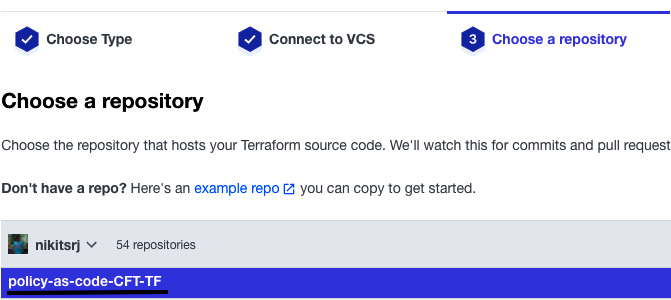
Figure 2.21 – Selecting the repository for Terraform configurations
- After that, in Configure settings, you can click on Advanced options to set the branch on which Terraform Cloud listens to trigger runs. In our case, we are keeping the default branch. Then, click on Create workspace.
- You will be able to see that Terraform Cloud is now integrated with GitHub:
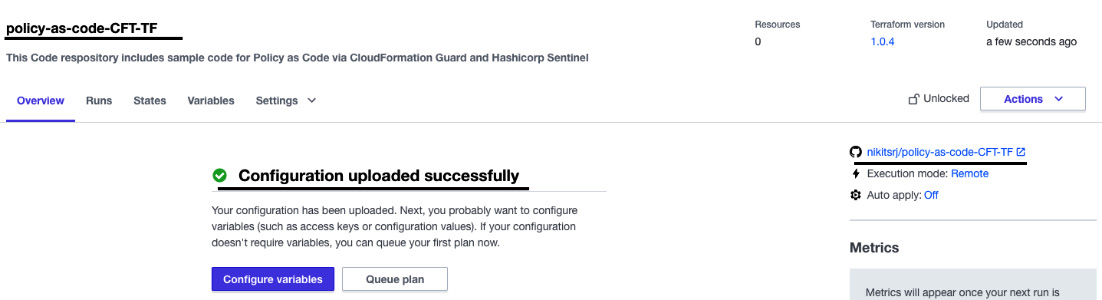
Figure 2.22 – The VCS integration status
In this section, we saw how to integrate a VCS (GitHub) with Terraform Cloud. In the next section, we will write some Terraform configurations for an AWS EC2 instance and run the configuration via Terraform Cloud.
Running a Terraform template in Terraform Cloud
In this section, we will write a Terraform configuration to spin up an EC2 instance in AWS and push that configuration to the repository that we configured in the previous section. We will also learn how to store AWS credentials Terraform Cloud. Follow the next steps to get started:
- Go to the new GitHub repository that you integrated with Terraform Cloud and commit the content of the ec2-instance.tf file from folder chapter-02.
- Now, we need to add an authentication token (access key and secret key) of AWS to Terraform Cloud. Go to the Variables tab of your workspace and select Add environment variables, as shown in the following figure:
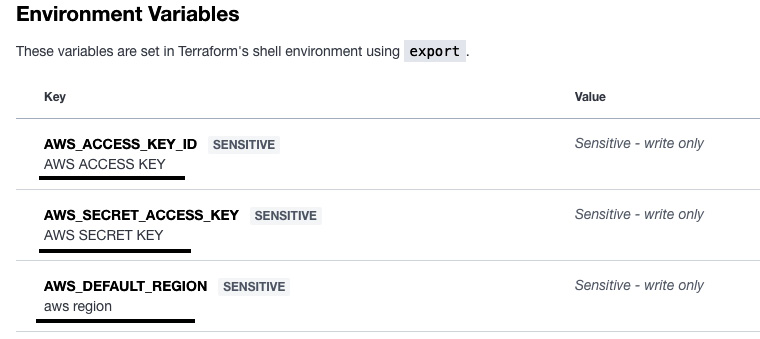
Figure 2.23 – Adding AWS environment variables
- During the first commit to the GitHub repository, Terraform Cloud will not run the plan. We need to start the plan manually by clicking on Actions, then selecting Start new plan:

Figure 2.24 – A Terraform plan action via the UI
- Since we triggered the plan via the UI, in the Runs tab, you can see that the Terraform plan executed and after that, it will ask you to confirm to apply the changes. You need to enter a meaningful comment for the record and click on Confirm & Apply to create an EC2 instance in AWS:
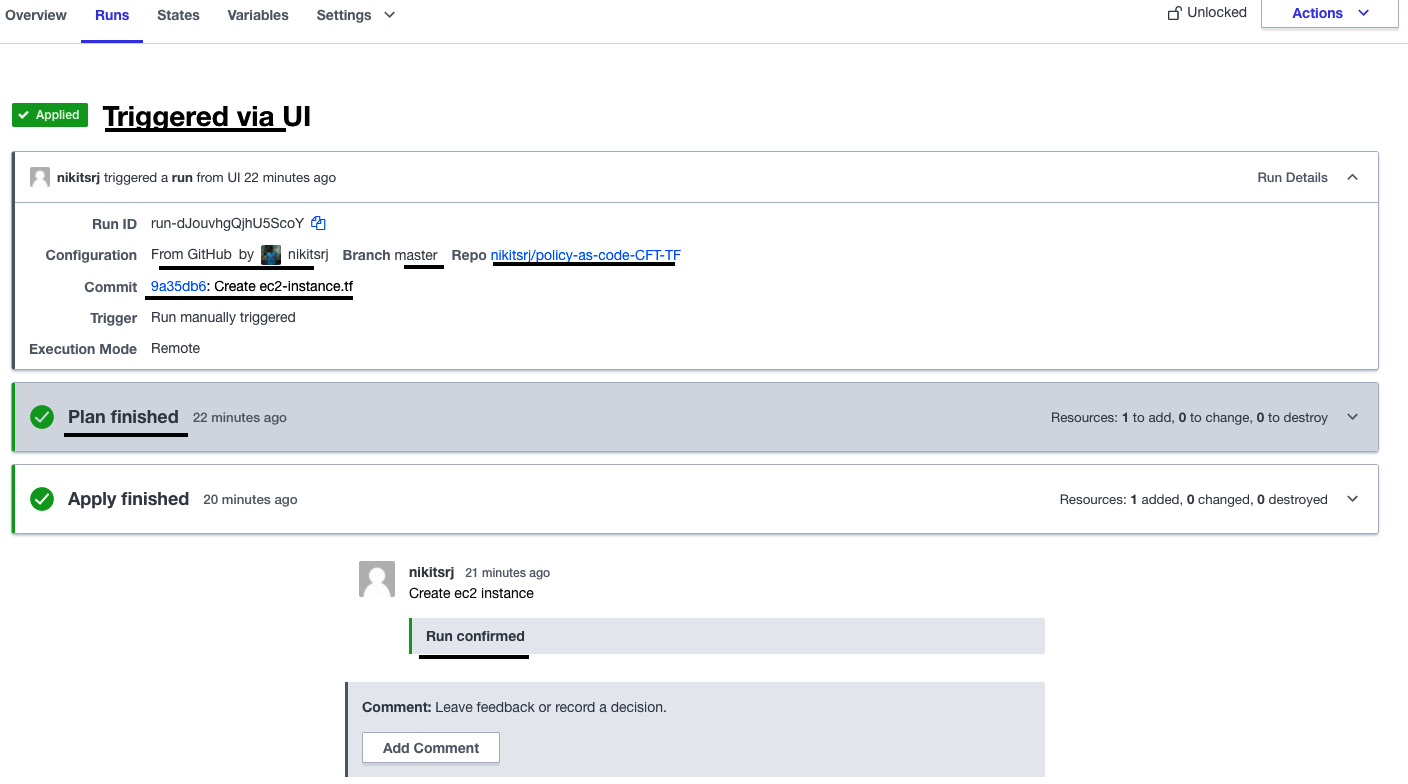
Figure 2.25 – Terraform execution status
- You can verify the EC2 instance in your AWS account.
- Now, let's make the changes in the Terraform code of ec2-instance.tf in GitHub. Replace the tag name value from Hashicorp_Sentinel to Hello<your name>. In my case, I changed it to HelloNikit. Commit the changes by entering a commit message of changing the tag, and then go to Terraform Cloud. Now, you will see that the Terraform plan has been started automatically. Since this time the trigger takes place on a git commit hook, we will see the commit message (changing the tag) as a run:
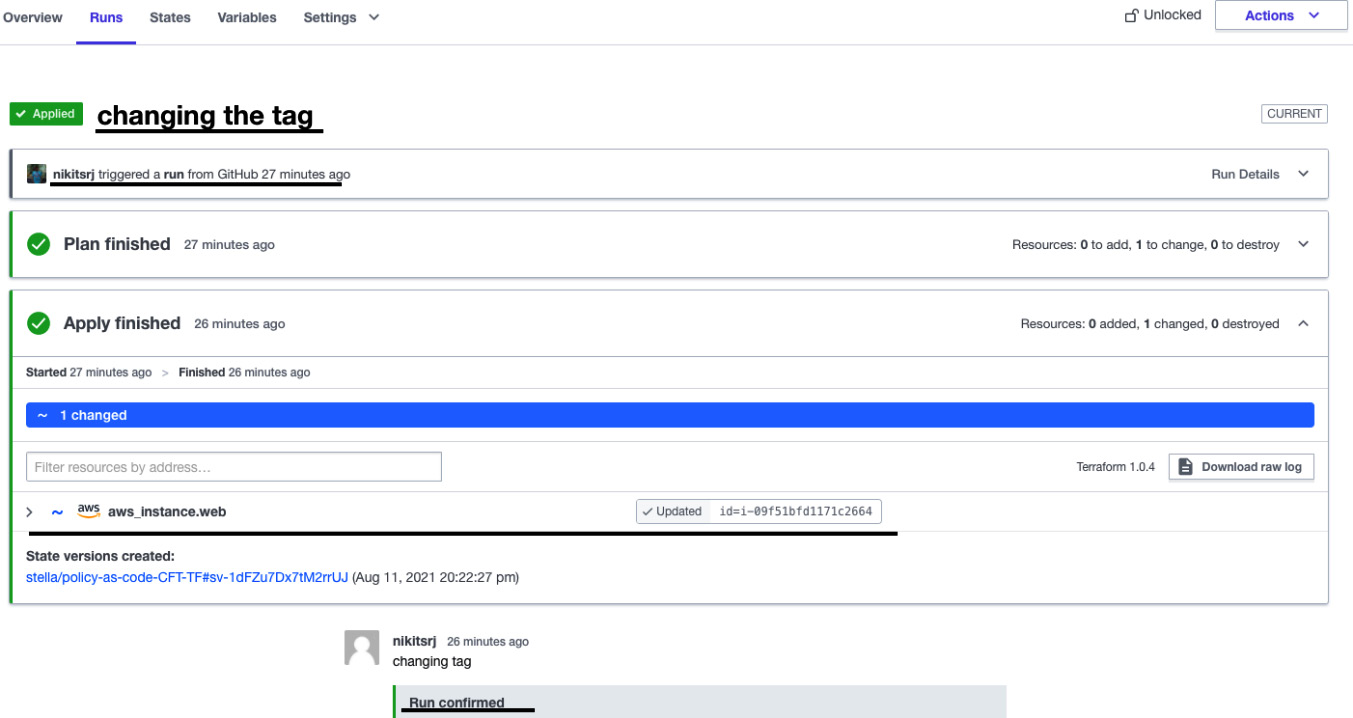
Figure 2.26 – The Terraform Cloud runs page
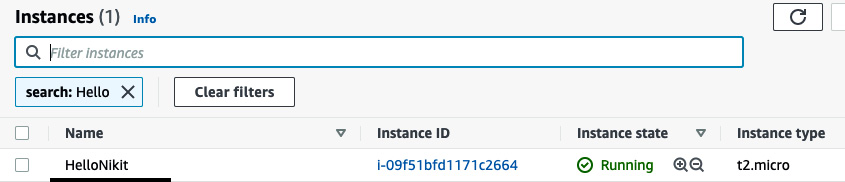
Figure 2.27 – EC2 Instance name change
Up until now, we have seen how to run Terraform configurations in Terraform Cloud via a VCS. In the next section, we will learn how to enforce policies on Terraform template using Sentinel.
Writing Sentinel policies to enforce rules on Terraform templates
In this section, we will learn about HashiCorp Sentinel and how we can enable it in Terraform Cloud. After that, we will write a Sentinel policy to enforce rules on Terraform templates.
HashiCorp Sentinel
Sentinel is a framework for policy and language, built in software to enforce fine-grained, logic-based policy decisions. It is an enterprise feature of Terraform, Vault, Nomad, and Consul. Sentinel is easy to learn and needs minimal programming experience. Sentinel policies are written in a text file using the Sentinel language with the .sentinel file extension. The Sentinel language has a main function, whose value decides whether a policy passes or fails. Here's an example:
main = 9 > 3
When you execute this policy using a Sentinel command, the result will be true. Sentinel handles the result of the execution in levels known as an enforcement level. Sentinel has three enforcement levels:
- Advisory: At this level, if policies are failed, still the execution of terraform apply will take place. Execution will give a warning and it will be logged into the system.
- Soft mandatory: At this level, if policies are failed, then the rest of the execution will stop. However, it can be resumed with a comment.
- Hard mandatory: At this level, policies must be passed.
Enforcement levels are defined in the sentinel.hcl file. Enforcement levels are also tied to the name of the policy file. For example, if a policy file is named restrict-ec2-tag.sentinel, then the content of the sentinel.hcl file will be like the following JSON example:
policy "restrict-ec2-tag" {
enforcement_level = "hard-mandatory"
}
By default, Sentinel is not enabled in Terraform Cloud, as it is only available in the Team and Governance package. To enable Sentinel in Terraform Cloud, follow these steps:
- Go to Settings tab of organization(at the top), then click Plan & billing, then click here to get started, then click Trial plan, and then click Start your free trial:
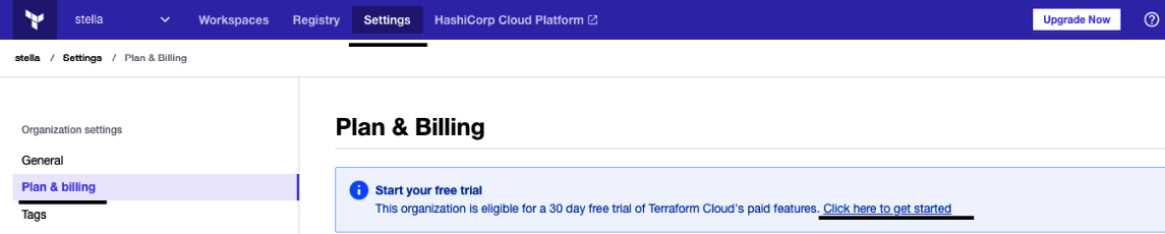
Figure 2.28 – Terraform Cloud Plan & Billing page
- After that, Terraform Cloud will enable the paid features (including Sentinel policies) for a free trial period (30 days):
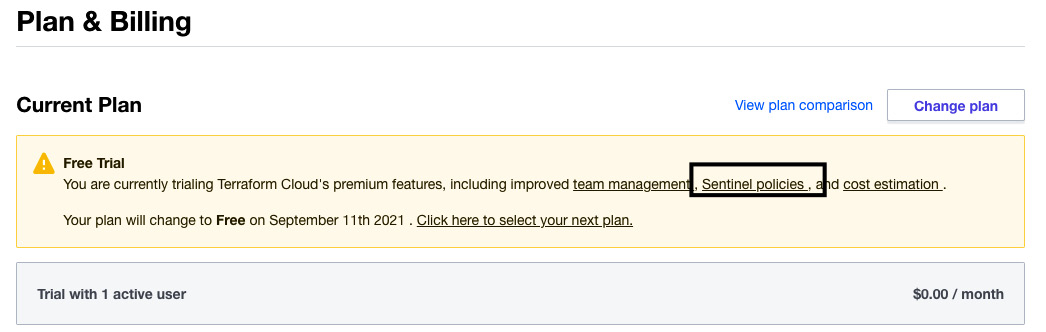
Figure 2.29 – Enabling paid features in Terraform Cloud
- Now, we will use the second repository to store the Sentinel policies. It is not advisable to put Terraform configurations and policies in the same repository, as policy repositories are handled by the security team. Copy the content from the enforce-mandatory-tag.sentinel and sentinel.hcl from chapter-02 folder and paste it into your repository. The policy contains a rule for the configuration to have three tags (Name, Owner, and Environment). The enforcement level of the policy is soft-mandatory.
- After that, you need to create a policy set and attach it to the workspace where our Terraform runs are taking place. Go to Settings of the organization and click on Policy sets. Click on Connect a new policy set. Click on the GitHub button and then select your policy repository.

Figure 2.30 – Connecting a policy repository to Terraform Cloud
- In the Configure settings tab, change the Scope of Policies option to Policies enforced on selected workspaces, then select the workspace that you want to run the policy on. Then click on Connect policy set.
- Now, go to the repository where the Terraform configuration file (to create the EC2 instance) is located and change the value of the EC2 instance type to c3.xLarge, remove one of the tags, and commit the changes in GitHub so that the Terraform run executes automatically. Go to the Runs section of Terraform Cloud, and there you will see that the policy check has failed:
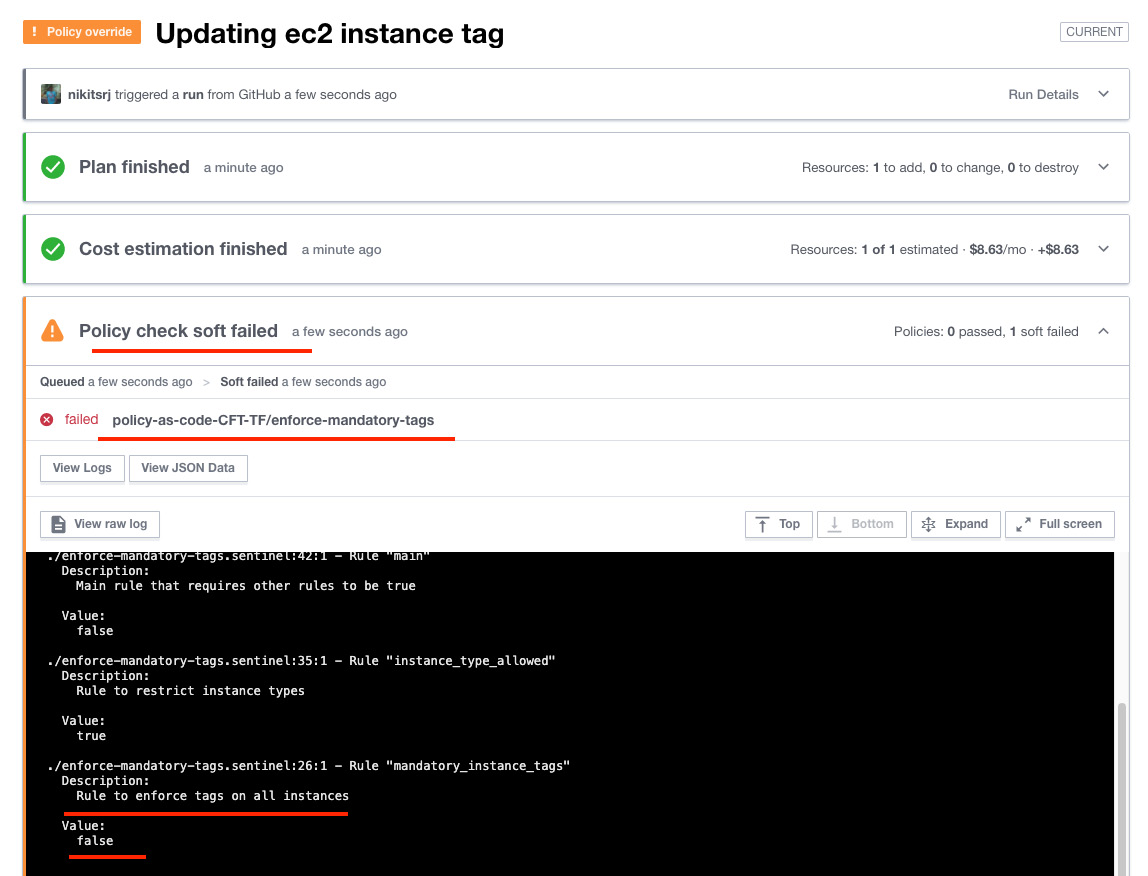
Figure 2.31 – A Sentinel policy check failure
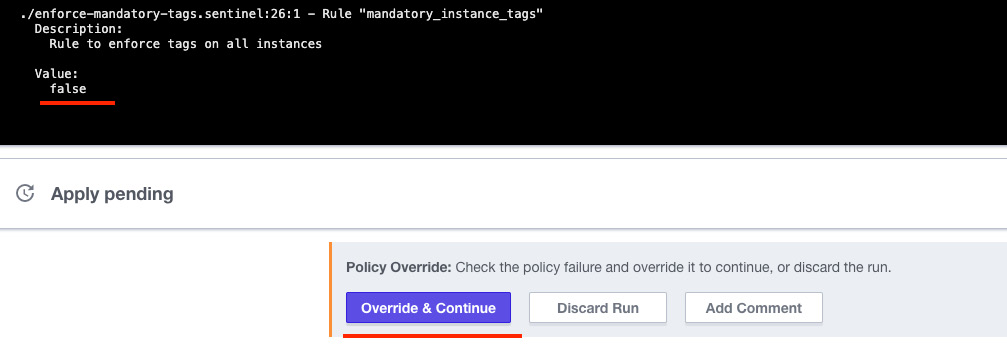
Figure 2.32 – The Override & Continue option to continue the execution
- The policy check didn't pass because the Terraform configuration has only one tag. Let's add the additional mandatory tags and commit the code in GitHub to pass the policy check:
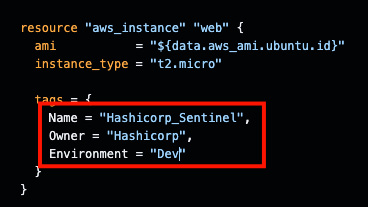
Figure 2.33 – Adding new tags to the ec2-instance.tf file
- Once you commit the changes in the Terraform configuration file, Terraform Cloud executes the run, which will give you the status of the policy check, which is now passed.
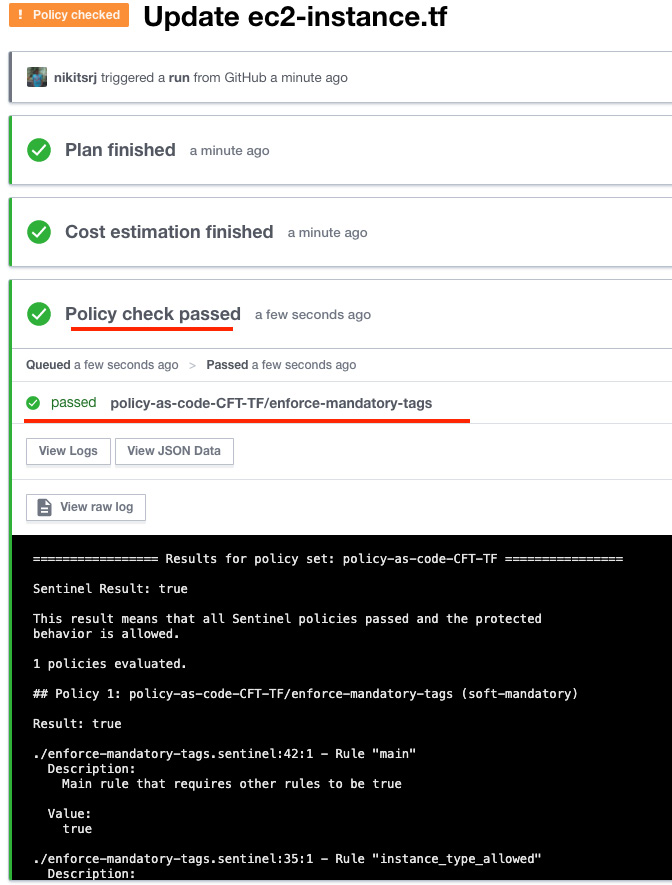
Figure 2.34 – Passed Sentinel policy check
We can also integrate Sentinel policy checks into our CI/CD toolchain, but in that case, you would need to execute the Terraform commands using a remote backend. You can read more about integrating Sentinel with Jenkins at the following link: https://www.hashicorp.com/resources/securing-infrastructure-in-application-pipelines.
Summary
In this chapter, we learned how we can implement policy and governance as code. We showed where we can fit our policy-as-code checks in the CI/CD pipeline. We also learned how to write AWS CloudFormation Guard rules. We implemented access controls in AWS Service Catalog to share Service Catalog products with constraints. We also subscribed to Terraform Cloud to execute Terraform configuration and we applied policies using HashiCorp Sentinel. Now, you can integrate policy checks in your CI/CD stages. In the next chapter, we will learn how to spin up application containers smoothly with the AWS Proton service, and we'll use AWS Code Guru to review the application code.