
Chapter 3: Dynamic Analysis – Techniques and Tooling
Now that we have covered static analysis – the art of obtaining intelligence from a piece of malware without execution – it's time to study the antithesis of this approach.
We will utilize the most powerful tool in our arsenal as malware analysts; executing the malware and watching for the behaviors that the software exhibits, as well as what techniques the adversary is utilizing to achieve their goals. Knowing and understanding this may allow our counterparts in security operations to build better defense mechanisms to prevent further incidents, making this an incredibly important technique.
Additionally, we'll take a look at how we may automate some of these tasks in order to make the most use of our time and react more quickly to threats in our environment.
In this chapter, we are going to cover the following main topics:
- Detonating your malware
- Action on objective – enumeration by the enemy
- Case study: Dharma
- Discovering persistence mechanisms
- Using PowerShell for Triage
- Persistence identification
- Checking for corresponding logons
- Locating secondary stages
- Examining NTFS (NT File System) alternate data streams
Technical requirements
The following are the technical requirements for this chapter:
- FLARE VM setup, which we covered in the first chapter
- An internet connection
- A malware sample pack from https://github.com/PacktPublishing/Malware-Analysis-Techniques
Detonating your malware
In malware analysis, some of the most useful information we can gain as analysts comes from simply executing malware and observing the behavior of the sample in question.
While static analysis is invaluable in the sense that it can provide the equivalent of OSINT (Open-Source Intelligence) regarding a sample, it becomes a bit harder for the adversary to hide their intentions when taking action on objective – when their software is executed.
Basic dynamic analysis techniques and tooling will allow us to identify the actions taken by the adversarial software on the machine as well as on the network and allow us to ascertain more about how the malware works – and perhaps what the author's goals are.
Monitoring for processes
In executing malware, it's important to realize that the binary file or scripted malware dropper that we are presented with as an initial vector of infection is rarely all there is to see. Often, the malware will create additional processes or executables that are not necessarily immediately apparent to the end user. Malware, as a rule, often performs many tasks that are invisible to the targeted user unless you are actively looking for these actions. To this end, there are several tools that are conducive to discovering these actions. The first tool we will examine is ProcWatch, a tool included in FLARE.
Analysis tip
Always run ProcWatch as administrator. Malware often utilizes a UAC (user account control) bypass or other privilege escalation techniques to run as NT AUTHORITYSYSTEM or similarly privileged accounts, meaning you will not see these processes in ProcMon unless you're at a similar level of access.
As you can see, ProcWatch has a simple and intuitive interface:
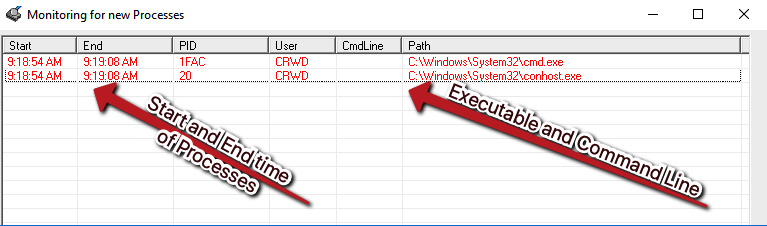
Figure 3.1 – The ProcWatch interface
ProcWatch will monitor for new processes as they execute on the system, and will inform us of their command-line arguments, as well as the user that ran them, and the start and end time of the processes. It's important to note that it will monitor for all new processes, not just ones related to malware, and as such, is prone to collecting noise from Windows' normal background processes.
Let's take a look at a sample piece of malware – an Emotet malicious document:
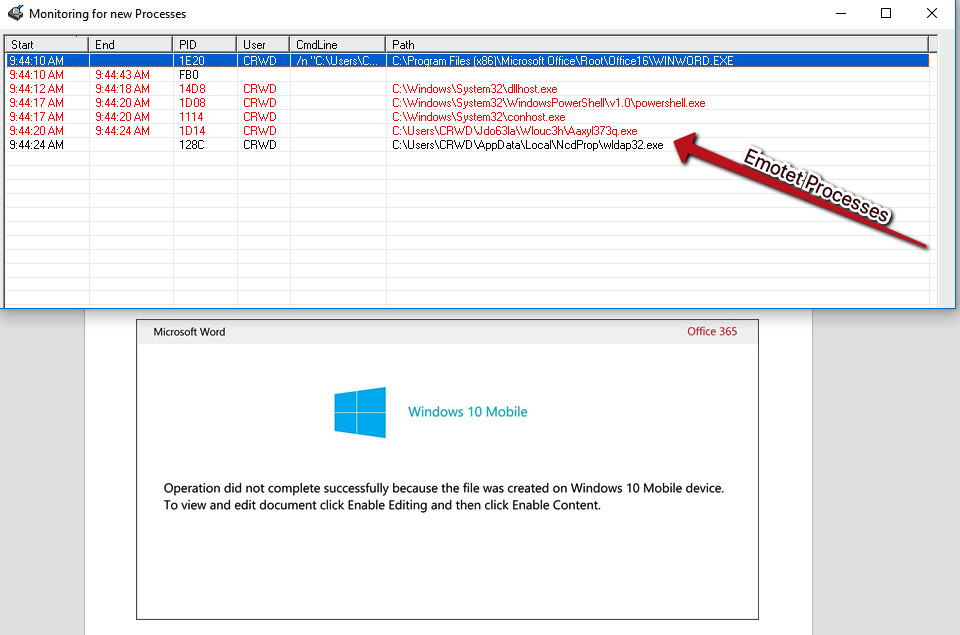
Figure 3.2 – Emotet processes running from %LOCALAPPDATA%
After enabling macros, we can see several processes running that appear quite suspicious when compared to local Windows processes. If we navigate to the folder shown, %LOCALAPPDATANcdProp, we can take an SHA256 of the binary by right-clicking and utilizing the HashMyFiles menu option:
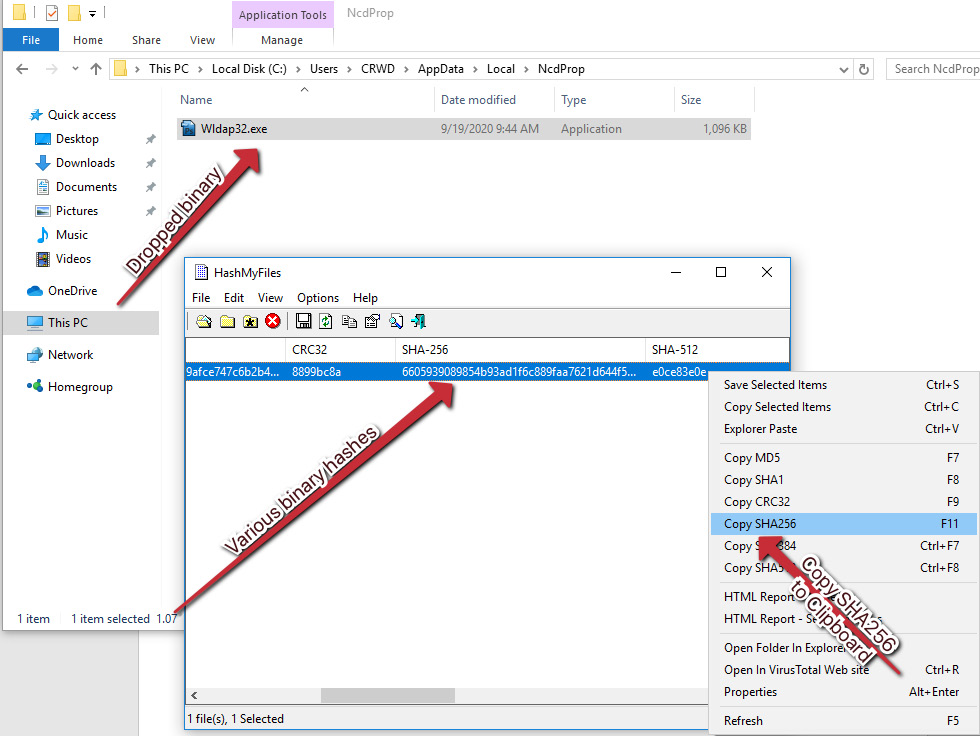
Figure 3.3 – The HashMyFiles interface and SHA256 of our dropped binary process
Utilizing VirusTotal static analysis and intelligence techniques uncovered in the previous chapter, in conjunction with the discovered binary dropped via ProcWatch, we can assess with confidence that the threat is Emotet, as shown in the following screenshot:
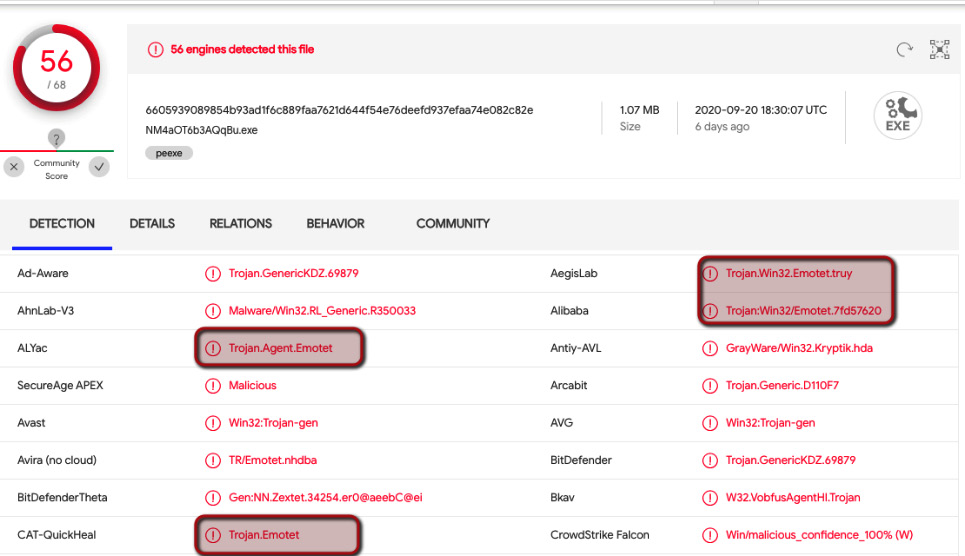
Figure 3.4 – Emotet attribution for our SHA256 hash
Now that we have gained attribution by finding dynamically created processes and dropped files, we can move on to attempt to collect further information and indicators of compromise arising from the threat.
Network IOC collection
In addition to monitoring for processes spawned by malware, we can also monitor for outbound network connections via WireShark, which may reveal valuable additional information about the attacker's command and control servers:
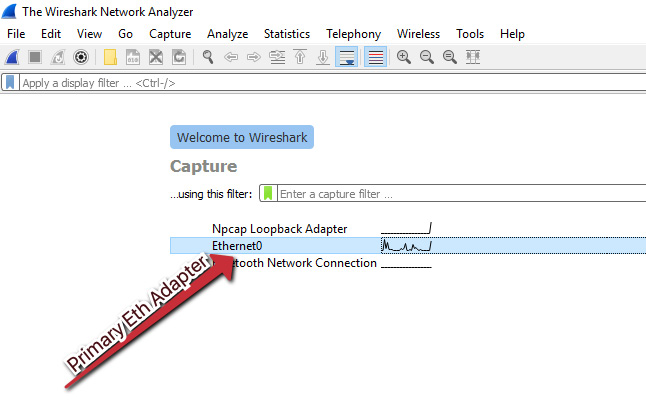
Figure 3.5 – The start up screen for Wireshark showing our primary network interface
Once Wireshark is open, we can begin a packet capture by simply double-clicking our primary network interface, in this case, Ethernet0. After doing so, we'll once again execute our Emotet document sample and begin parsing our captured network traffic for IOCs.
Analysis tip
When beginning a capture in Wireshark, you may be presented with an administrative prompt in your host or guest OS asking you to approve a network capture on the device. Be sure to approve this to accurately capture traffic.
Once we have stopped our traffic capture, we can begin parsing the capture for suspicious traffic. A good starting place is often HTTP traffic, as threat actors will often use this for command and control in an attempt to sneak past the firewall in the existing, normal web traffic noise:
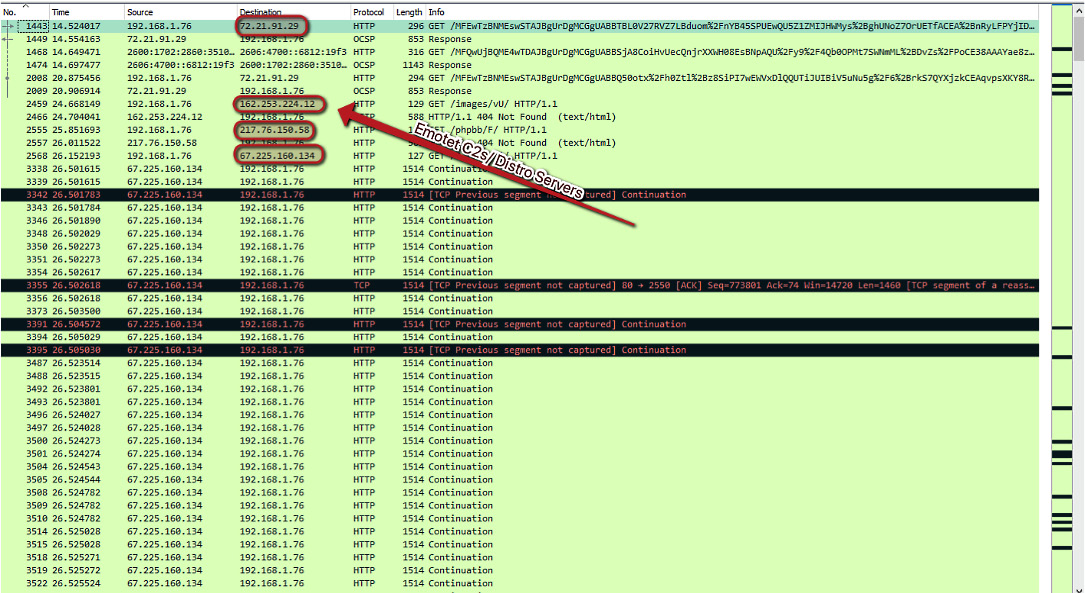
Figure 3.6 – Emotet C2 and distribution server IPs in Wireshark
As you can see, we have several IP addresses that are responsible for command and control of the Emotet threat, as well as servers that appear to be responsible for distribution of the malware. Not only can we utilize these IP addresses to monitor and block outbound connections, but we can also utilize reverse DNS to obtain the associated domains and block those in case they are multihomed:
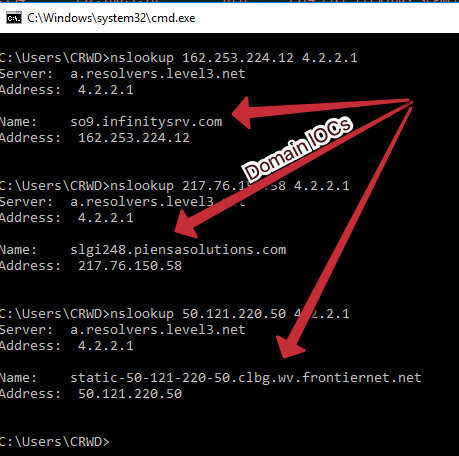
Figure 3.7 – The domains associated with the Emotet IP addresses
Analysis tip
In networking nomenclature, multihoming refers to having a singular domain point to several IP addresses, sometimes in a round-robin or conditional fashion. For this reason, it's often necessary to collect domains in conjunction with IP IOCs to ensure complete coverage.
Discovering enumeration by the enemy
While not strictly part of dynamic analysis, sometimes in malware analysis, an infection will be accompanied by active enumeration and interactivity by an adversary.
This is done primarily through reconnaissance tools downloaded to the host and executed. Different threat actors have different tools they prefer, but the idea is always the same: discover more hosts, with more vulnerabilities or users, and exploit those to gain a larger foothold within the network.
Domain checks
Some actors will utilize enumeration to decide whether a target is worth attacking at all – for instance, in some Emotet binary executions, the binary will issue commands to check for a domain such as net user /domain to see what domain, if any, exists. If this check fails, it's likely not worth their time to interact with, and the execution may halt.
In the instance that a domain is found, the threat actor will probably attempt to enumerate the users who have logged on to the system, in the hope that certain misconfigurations are in place and that a domain administrator has logged on to the system.
System enumeration
In these instances, it may be that the attacker uses Task Manager to dump the local security authority subsystem process – LSASS.exe – and obtain administrative credentials in the form of an NTLM hash. Other methodologies exist, but living off the land in this way is popular among adversaries, as it raises fewer alarms than Mimikatz:
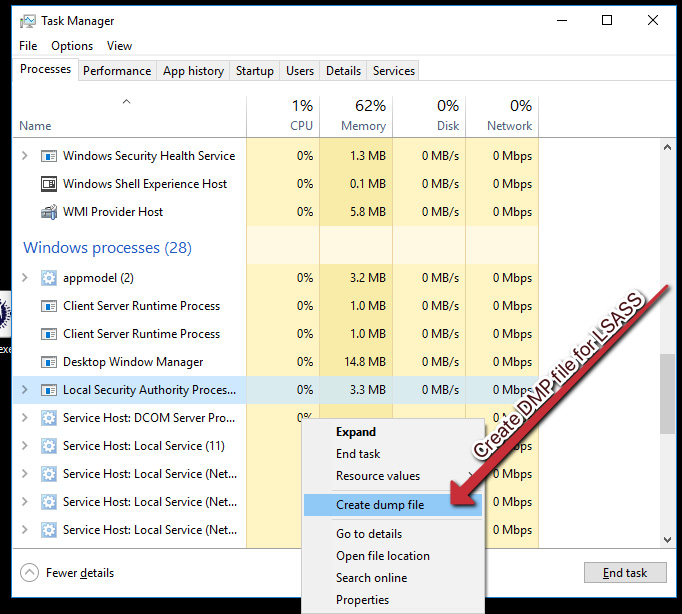
Figure 3.8 – Dumping LSASS to obtain a file that can be parsed for credentials
Additional methodologies also exist to obtain credentials from Windows via the registry via commands such as those shown in the following screenshot, although this has somewhat fallen out of favor with threat actors due to newly implemented security in most Windows installations:
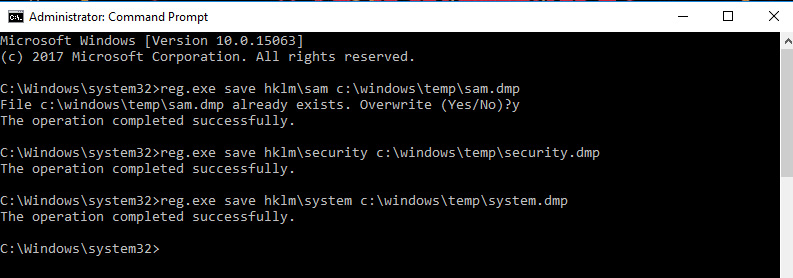
Figure 3.9 – Utilizing reg.exe to dump registry hives for secrets
Unfortunately, these single-system enumeration techniques also have corollaries on domain controllers. Should an attacker be lucky enough to compromise a domain controller quickly, the NTDS.dit file will be the first target, as this stores all the credentials for every user in the domain:

Figure 3.10 – Obtaining a patch level via systeminfo.exe
These are the primary ways in which an attacker will enumerate a system, but they may also perform recursive searches on the system for keywords such as password with built-in tools such as find. Attackers may also use tools such as systeminfo to obtain the patch level of the system and ascertain known vulnerabilities that may be exploitable on secondary machines.
Network enumeration
Once the adversary has obtained credentials that may facilitate lateral movement, they will likely begin attempting to discover other targets on the network that may be conducive to furthering their attack.
A number of methodologies exist for this, but it usually involves a secondary (often legitimate) tool being written to the system, such as Advanced IP Scanner, or a similar tool that allows for quick and accurate enumeration of the other hosts on the network, as shown in the following screenshot:

Figure 3.11 – An example of advanced IP scanner results
The key indicators here will likely be massive amounts of TCP SYN traffic originating from a single host, combined with previous indicators – malicious hashes, known C2 traffic, and previous enumeration commands.
An additional indicator may be large quantities of certain types of traffic, including the following:
- TCP 3389 – Remote Desktop Protocol
- TCP 5985/5986 – HTTP for WinRM
- TCP 445 – Server Message Block
- TCP 135 and 49152-65535 – WMIC
Large amounts of these types of traffic originating from a single host may indicate that an attacker is trying to utilize credentials to execute commands on laterally available systems.
Case study – Dharma
In recent years, ransomware has been very popular, and frequently offered as a service. Among these actors, there have been relatively low-skilled threat actors utilizing a ransomware suite named Dharma, as well as variants thereof:

Figure 3.12 – The Dharma ransom note
In this case study, we'll walk through some of the techniques and tools utilized by the threat actor.
In the vast majority of Dharma cases, the initial vector has been to brute-force weak RDP credentials via a freely available tool called NLBrute. In scenarios such as this, hundreds of passwords and usernames would be tried until a successful RDP session was created.
After gaining access via the remote desktop protocol, hackers would often utilize Advanced IP Scanner to ascertain what other hosts on the network could be infected, and dump passwords from the system or attempt to use the cracked RDP password to authenticate elsewhere.
Once a list of internal hosts has been created, it would be exported. The threat actors would then use one of two methodologies – further RDP sessions to spread the ransom software, or it would be pushed via WMIC, and downloaded via PowerShell from a staging server, and then executed using previously stolen credentials.
When the ransomware binary is run, it would enumerate files on the system, and append them with an extension chosen by the actor, after encrypting the files in-place with AES-256, and then create persistence mechanisms in the start up folder (more on this shortly).
Assuming we are a malware analyst performing retroactive analysis, we have a treasure trove of IOCs to utilize in order to prevent another incident. Ask yourself: what actionable IOCs were provided by the threat actor in this incident that may prove useful in the future for preventing further incidents?
Discovering persistence mechanisms
So far, we've discussed attacker methodologies, and have been watching for processes and dropped files created by our malware. While writing a malicious payload to disk and executing it is a great first step for an actor, it does not guarantee continued control of the host. For this, actors need a persistence mechanism – or a way to guarantee that the malware will execute each time the target is restarted.
Run keys
In Windows, one of the most common techniques for maintaining persistence is a built-in feature of the Windows Registry. The Windows Registry houses per-user and per-machine keys that can store file path values of binaries to run upon login or startup. The keys are as follows:
- HKEY_LOCAL_MACHINESoftwareMicrosoftWindowsCurrentVersionRun
- HKEY_CURRENT_USERSoftwareMicrosoftWindowsCurrentVersionRun
- HKEY_LOCAL_MACHINESoftwareMicrosoftWindowsCurrentVersionRunOnce
- HKEY_CURRENT_USERSoftwareMicrosoftWindowsCurrentVersionRunOnce
Due to the desire to maintain persistence, the Run keys are preferred over the RunOnce keys. RunOnce key values are deleted by default prior to the command line being run on the system:
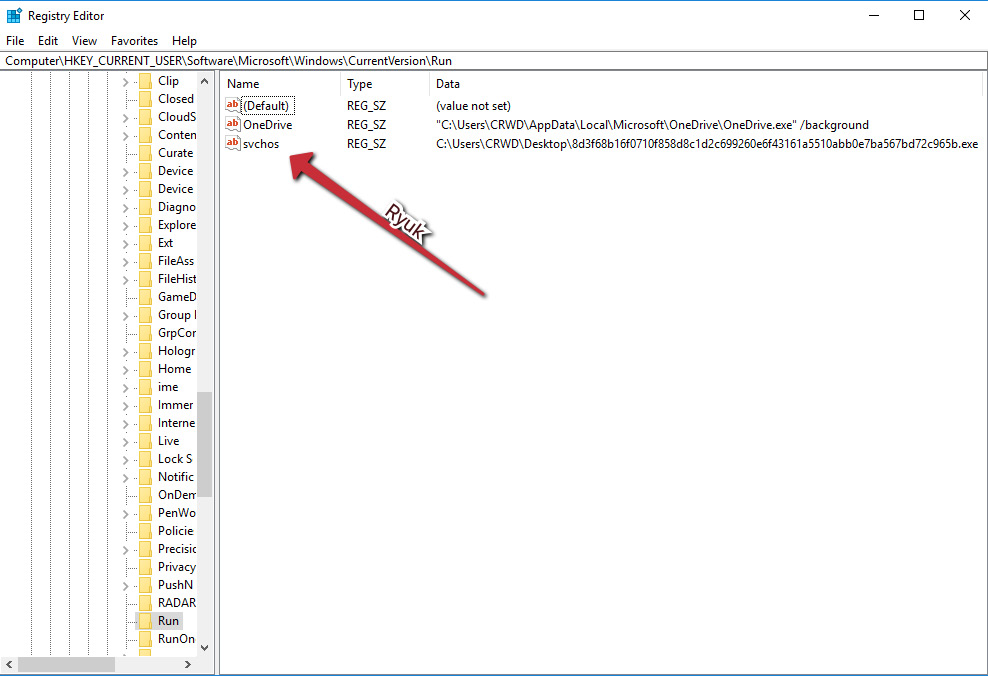
Figure 3.13 – Persistence key created by Ryuk ransomware
Analysis tip
If you are not logged in as the affected user, HKCU keys will not be accessible via this pathing. However, they will be accessible via the HKEY_USERS hive. This can be accessed via HKU<USER SID>SoftwareMicrosoftWindowsCurrentVersionRun.
Keys under HKEY_LOCAL_MACHINE (HKLM) are system-level keys and are run for every user on the system. The opposite is true of HKEY_CURRENT_USER (HKCU) keys – they are user-level keys that are run for a single user. These are more common among malware, as they require fewer permissions to be created.
Scheduled tasks
In addition to Run keys, Windows also offers task scheduling by default, which is also a common method of persistence for adversaries. Executables and command-line invocations can be set to run on an arbitrary schedule with the schtasks.exe binary.
Many adversaries utilize scheduled task registration in order to ensure that the software not only starts on boot or login, but remains running or restarts at a given interval in case of a crash.
As malware analysts, we can query scheduled tasks with the following command line:
schtasks /query /fo list /v
This will return a full list of scheduled tasks and their corresponding binary. You should particularly always be suspicious of scheduled tasks with a UUID-style or high-entropy name.
Malicious shortcuts and start up folders
Another incredibly common persistence mechanism that can befuddle malware analysts is the placement of malicious LNK files, or shortcuts, on Windows systems. These will either rely on the user to double-click the shortcut, while posing as a symbolic link to a legitimate file, or will be placed in a directory where they will run automatically, such as C:Users$usernameAppDataRoamingMicrosoftWindowsStart MenuProgramsStartup.
In instances where this directory is used, the file need not be a shortcut, and the malicious binary itself may also simply be placed in this directory and will execute upon startup.
Service installation
Perhaps one of the more obvious techniques is the installation of a Windows service that points to a malicious binary. Services can be set to automatically start and are a very reliable way of ensuring the persistence of adversarial software:
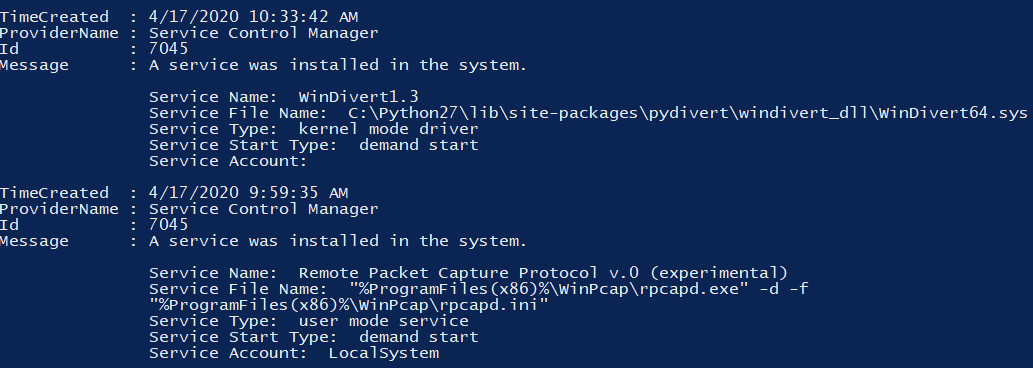
Figure 3.14 – Example output from Get-WinEvent
We can easily check services via PowerShell to ascertain names and execution paths with a command such as the following:
Get-WmiObject win32_service | select Name, DisplayName, @{Name='Path'; Expression={$_.PathName.split('"')[1]}} | Format-List
This will return a list of all services on the system, allowing an analyst to inspect each one. Furthermore, a service installation will generate event log entries with ID 7045, which can be located with the following PowerShell:
Get-WinEvent -FilterHashtable @{logname='system'; id=7045} | format-list
Uncovering common techniques
We've listed several ways to ascertain the techniques utilized by threat actors to maintain persistence on the system. However, there are also tools in FlareVM that allow us to uncover these persistence mechanisms. AutoRuns from SysInternals is one such tool:

Figure 3.15 – The AutoRuns GUI
AutoRuns is a powerful tool that covers not only the basic persistence techniques we have learned about in this chapter, but also less common and more advanced techniques, which we'll discuss later in Chapter 7, Advanced Dynamic Analysis Part 2 – Refusing to Take the Blue Pill.
In AutoRuns, you can quickly disable or enable tasks that have been created via registry keys, scheduled tasks, and more via the checkbox on the left. Additionally, a color-coding scheme exists to show whether the file is signed – and there's even a column for VirusTotal detections, should you choose to enable this feature, making triage a breeze.
Final word on persistence
A lot of information has been disseminated in this chapter regarding these techniques, and you may be wondering how you can possibly know which methodology is in use or which one the malware author has chosen.
Frequently, the simplest way is to know what parent process spawned the malicious binary. For instance, If Explorer.exe is the parent process, it's likely that the execution is related to a malicious shortcut. If RunOnce.exe is the parent, it's likely a registry key, and so on. Much of this will come with experience, and much of it is also dependent on having a good logging or EDR solution that will assist with presenting this information in a quickly parseable manner.
Now, let's take a look at some ways in which we can make the process of analyzing the actions that malware takes a bit simpler and more automated.
Using PowerShell for triage
The most important aspect of responding to a malware incident is triage. During this step of the process, we ascertain the impact the malware running on our hosts has had, and answer a few questions:
- What files were written to the system?
- What persistence mechanisms exist, if any?
- What was the initial vector responsible for infection?
- What are the roles of the artifacts we've identified as a result of answering the other questions?
Triage can be a time-consuming process, and if multiple incidents exist within the same timeframe, it may be difficult to adequately assess each incident in a timely manner – and time is often of the essence in a security incident.
Thankfully, PowerShell is here to help, and is installed out of the box on all Windows environments since Windows 7. Because of the ubiquity of this powerful scripting engine (and the ubiquity of Windows malware), it makes an obvious choice for scripting initial analysis and triage.
In this chapter, we will slowly build a script that will perform initial triage for us and spit out a nicely formatted report via standard out. Within PowerShell, it's also possible to export to CSV, and a myriad other formats as well, which can simplify report building for C-Levels.
Analysis tip
PowerShell certainly isn't the only language that lends itself to quickly scripting IOC collection. While this chapter is focused mostly on PowerShell automation of common triage tasks, it can also be achieved in Python, C# binaries, shell scripting, and many other methods. Choose the one you feel most comfortable with.
Let's take a look at some of the ways in which PowerShell can be utilized to collect indicators of compromise from a malware incident, beginning with the identification of persistence created by malicious software.
Persistence identification
We'll begin our script by making the assumption that you have received an alert within your EDR (Endpoint detection and response) platform of choice and are aware of a malicious binary that has been executed on an endpoint. From here, as we've learned in past chapters, it will be key to identifying persistence mechanisms (methodologies that malware utilizes to run on the system each time the system reboots, or a user logs in) that have been established by the malware, meaning it may continue to run regardless of user action.
Let's now move on to a few code examples that will help to triage the most common persistence methodologies.
Registry keys
As previously discussed in the preceding section, there are four primary Run Keys within the Windows operating system. Other methods of persistence within the Windows registry exist as well, but for now, we'll focus on the four primary ones:
- HKEY_LOCAL_MACHINESoftwareMicrosoftWindowsCurrentVersionRun
- HKEY_CURRENT_USERSoftwareMicrosoftWindowsCurrentVersionRun
- HKEY_LOCAL_MACHINESoftwareMicrosoftWindowsCurrentVersionRunOnce
- HKEY_CURRENT_USERSoftwareMicrosoftWindowsCurrentVersionRunOnce
As you can see, we have four keys to check – two system-bound keys, which are readable by any user of the machine, and two user-bound keys, which are assigned to HKEY_CURRENT_USER, a per-user registry variable.
First, let's take care of our first two keys. We'll fire up PowerShell ISE and begin coding. As we're going to be looping over variables somewhat frequently, let's create an array first.
We can define an array such as the following to store our two system keys:

Figure 3.16 – Defining an array with machine-based keys
Now, we have a variable assignment that will allow us to iterate over the keys we have defined. In PowerShell, we can utilize Get-ItemProperty to return the value of registry keys. All we need do is define a simple for ForEeach loop to do so:
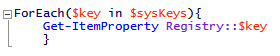
Figure 3.17 – A ForEach loop to iterate over each machine-based key
This will return the values stored in each key and allow the analyst to review each key for any suspicious values. This is much quicker than utilizing regedit.exe!
Now, we have the slightly trickier task of dealing with user-based registry keys. We'll want to enumerate keys for every user on the system – not just the one we're currently logged in as, so we aren't able to make use of the HKEY_CURRENT_USER variable.
In Windows, each user is assigned an SID, or Security Identifier, within the registry. We'll have to utilize these in order to load each SID's registry hive and iterate through it. There are some rules with SID assignment within Windows, and we can be certain that they won't start with S-1-5-18-20, as these are reserved for specific system or service accounts, such as NT AUTHORITYSYSTEM or IIS.
Armed with this information, we'll need to create an array of user profiles and their corresponding user directories and SIDs. We can utilize the powerful WMI (Windows Management Instrumentation) framework within PowerShell to accomplish this via Get-WMIObject:
Figure 3.18 – Utilizing Get-WMIObject to obtain a list of non-built-in profiles
In this code snippet, we get each user profile that doesn't match the previously outlined reserved SIDs and load it into a user array. Then, we load each user's path in and SID into the userPaths and userSIDs arrays, respectively. The only thing left for us to do is iterate over each user in a loop and load their registry hives, and then read their keys:
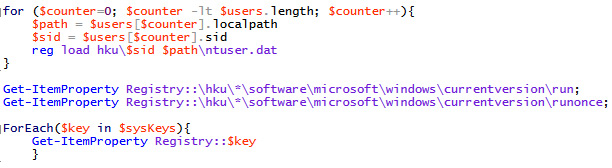
Figure 3.19 – The loop responsible for loading information into arrays and querying the corresponding keys
This code snippet is a bit more complex, though not much. The logic of the loop is as follows:
The counter begins at zero and continues while the counter's value is less than the number of objects in the user array and increments by one each time the loop completes.
For each time the loop completes, we load the object (be it path or SID) into the corresponding variable based on the value of the counter. That is to say that when the counter is zero, we load the first user in the users array, user[0], path, and SID into their corresponding variables. From there, we load their registry hive by utilizing reg load.
Once loaded, we query each user's registry keys, utilizing the same method we utilized before for the system bound keys and have now obtained a full picture of the most common registry keys utilized for persistence.
Service installation
Unfortunate as it may be for those of us assigned the task of responding to incidents, registry keys are not the only persistence mechanism available to threat actors.
A semi-common methodology of achieving persistence is the installation of a Windows service. This method is leveraged by several threat actors – most notably TrickBot, which sometimes installs upward of 10 services to achieve persistence.
Checking for services within PowerShell is fairly simple and can be achieved utilizing the same Get-WMIObject command we've already made use of:
Figure 3.20 – Using GetWMIObject to query installed services
Utilizing this simple one-liner will quickly return all services installed on the system and their display name. This allows the analyst to quickly inspect the services for anything that stands out, usually (though not always) a service with a high-entropy name.
Scheduled tasks
Another common persistence methodology that is fairly simple to check via PowerShell are scheduled tasks. These tasks run on a standard schedule set at task creation time, and can perform any number of actions, including simply executing a binary.
Created tasks are also stored as simple XML files in C:WindowsSystem32Tasks. It's easier to list each one of these files and then pull out the relevant information to be printed to standard out. Let's build a function that does this.
We'll begin by loading each XML file into an array utilizing Get-ChildItem, and ensuring that we recurse to check subfolders as well:
Figure 3.21 – Building an array of installed tasks via XML files
Now that we have the items loaded into an array, we can iterate over each task, and pull out the relevant information. In this case, the information we'd like is going to be the specific binary called by each task. Syntactically, this is surrounded by <Command></Command> tags, which we can utilize to our advantage:

Figure 3.22 – Returning the name of our tasks, and the relevant command in the XML file
Here, we're utilizing PowerShell's Select-String capability – the equivalent of grep on *nix systems – to select any string containing <Command>, as shown in the following screenshot:

Figure 3.23 – The output of our loop!
Combined with some simple text formatting and new line `r`n characters, we're presented with a fairly cleanly formatted list of tasks and their corresponding binaries.
Less common persistence mechanisms
We've covered the most common mechanisms that malware utilizes for persistence and have added them to the script. Let's take a look at some less-common persistence mechanisms that may still be worth looking at, and how we can automate checking for these.
WMI subscriptions
WMI subscriptions are fairly simple ways of achieving persistence that can execute arbitrary binaries via the same WMI framework we've previously made use of to check other persistence mechanisms:

Figure 3.24 – Checking WMI namespaces for subscriptions via GetWMIObject
Thankfully, there is a simple PowerShell one-liner we can utilize to check for these, as shown in the screenshot.
Start up folders
Once common, the Start Menu startup folder persistence methodology has become less common as time has worn on, although it can still be found being used on a semi-frequent basis.
The folders for all users live in a single location, so we can utilize a wildcard to check for these, being sure to exclude the common desktop.ini file. If results are found, they'll likely be in the form of a shortcut – an lnk file, referencing a binary or command elsewhere on the system:

Figure 3.25 – Checking each user's start up folder directory using wildcards
By no means has this been an exhaustive list of persistence mechanisms utilized by malware – as there are nearly as many as there are vulnerabilities to exploit, but it will cover most instances of malware in the wild today.
Checking user logons
Sometimes, we are semi-lucky as an analyst and can find a user logon event that corresponds to the malicious activity, as we have observed in our EDR platform of choice or SIEM event.
Frequently with threat actors, malicious code will be immediately preceded by an RDP (Remote Desktop Protocol) logon via brute-force or dumped credentials, or even via PSExec or WMI lateral movement. These methods all have one thing in common: they will create a Type 3 or Type 10 logon event in the Windows Security log. Being able to quickly ascertain which user credentials are compromised, or may have been compromised, is key to quickly containing an incident.
PowerShell makes parsing event logs very easy with the Get-WinEvent cmdlet. Here, we can filter by day, utilizing the $Before and $After variables, and return the corresponding events, to be correlated with the malicious activity observed in our SIEM or EDR:

Figure 3.26 – Checking terminal services logins via the Get-WinEvent cmdlet
Now, let's take a look at further IOCs, including secondary stages that may be dropped or written by our sample.
Locating secondary stages
As we alluded to in the previous sections, often, the obvious malware or the initial binary we receive an alert for is not the only malicious binary on disk. Frequently, secondary executables are written that may not be immediately apparent.
In cases such as this, we can utilize PowerShell to gain a list of every file that has been written in the past day (or other period) to determine whether anything appears out of place or malicious:

Figure 3.27 – A PowerShell scriptlet for checking files written in the past 24 hours
You may have noted that we've both selected the full name of the files in question and loaded them into an array before printing them to screen. This is because we can utilize this for further processing.
Although, computationally speaking, it may be intensive, we can elect to bulk-compute SHA256 hashes with this list by piping the array to Get-FileHash, although this is not necessarily recommended for quick triage.
Next, we'll take a look at ways in which adversaries may hide payloads within Windows, and how we can determine what they are attempting to hide.
Examining NTFS (NT File System) alternate data streams
Sometimes, an attacker will write a file containing malicious code of a non-zero size, but when you examine the contents of the file, it will either be gibberish padding, or entirely blank.
Many junior analysts have fallen victim to this methodology, which hides data in plain sight by assuming that the data they view in the primary data stream is entirely meaningless.
We can utilize our previously collected array of recently written files to check for NTFS alternate data streams and return the contents of any that are outside the normal $:DATA data stream, where the data is stored by default in normal files. Any file with an alternate data stream should be regarded as highly suspect and examined closely by an analyst:

Figure 3.28 – A loop that will return all files that have NTFS ADS
Analysis tip
NTFS also utilizes alternate data streams to store some file metadata – the "Mark of the Web." Though it may not often come in handy, sometimes, you can utilize this data stream to ascertain the origin of a file, if you are absent other telemetry for that use.
Now that we have covered several methodologies of collecting IOCs via scripted means, let's put what you have learned to the test with the help of a real-world sample.
Challenge
By this point in the chapter, we've built quite the script for collecting the most common IOCs that may be utilized by commodity malware. Now it is time to put your knowledge to the test! I encourage you to do this exercise manually first – timing yourself, and then complete it using the script we have created to see the difference.
Utilizing the malware sample link included at the beginning of this chapter, attempt to answer the following questions, courtesy of the WIZARD SPIDER adversarial group:
- What persistence mechanisms were utilized by this sample?
- How many files did the sample write? Where, and what, are their SHA256 hashes?
- Is there any hidden data?
- How could you alter your script to not only return the malware and persistence, but remove it?
Summary
In this chapter, we've really taken a dive into what true malware analysis is about. We've learned the basics of watching processes and network connections, learned what adversarial behavior looks like, and begun to understand persistence mechanisms and why they are important.
We'll continue to build on this understanding of malicious behavior in the chapters to come and put some of this to practice in the form of challenges to both sharpen our skills and gain a deeper understanding of the behavior of adversarial software. In the next chapter, we'll discuss automating what we've learned so far, and how this may be beneficial in reducing triage time.