We will remain in the same Step action as the preceding subsection. Let's now fill in the customer information:
- Add a new Recorder Capture action.
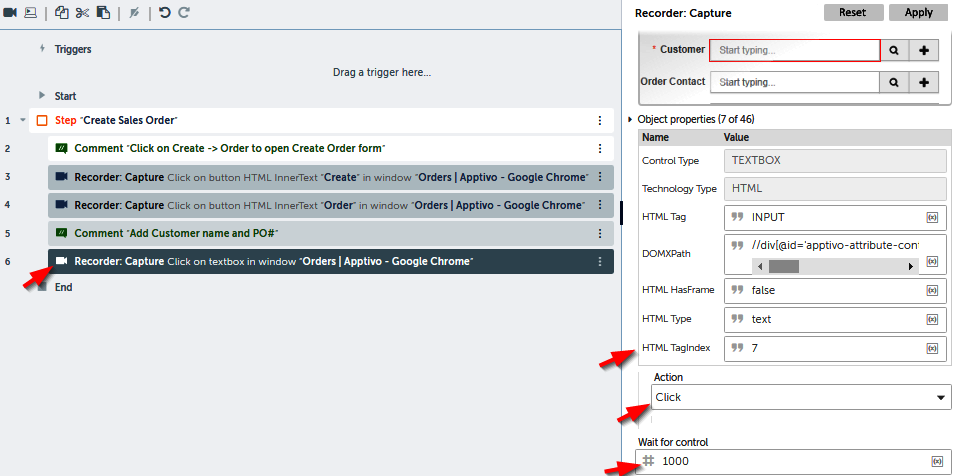
- After choosing the same Orders | Apptivo - Google Chrome window, click on Capture Object and point to the Customer input box on Apptivo. Ensure that the object properties (especially HTML Tag and HTML TagIndex are provided) and Action are as shown here:

- Just below the Recorder Capture, let's add a Delay Action with Delay as 500 milliseconds. This to enable the select box to show up before we enter the value.
We are assuming that the customer names and item names exist in Apptivo. The sample data in our SO Excel has the same customer and item names as the ones we added in Chapter 5, Purchase Order Processing with UiPath ReFramework. If you do not have these customers or items, please add them to Apptivo before proceeding.
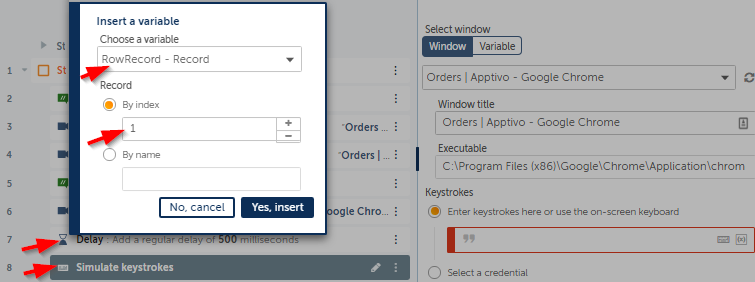
- Let's now enter the value for the customer name. For that, we will add the Simulate Keystrokes Action. In the properties, choose the same Orders | Apptivo - Google Chrome window. For Keystrokes, click on Insert a variable in the input box and then choose the variable RowRecord with By index set to 1, as shown here:

This is because the customer name is recorded index number 1 in the record data that was read from the Excel sheet (the count starts at 0, so PO# is at position 0 and the customer name is at position 1).
- Add another Delay Action with Delay as 500 milliseconds. This is to enable the value to be entered fully before we press the Enter key.
You can copy similar actions to speed up the bot configuration process. For example, to add a Delay, you can copy the previous Delay action and paste it. You can use either Ctrl + C or you can click on the options for the action (three dots) and click copy. You can then paste the action where you would like the new action to be.
- To press Enter, add another Simulate Keystrokes action. Choose the same Orders | Apptivo - Google Chrome window. For Keystrokes, click on the keyboard icon in the input box and choose Enter, as shown here:

- Let's now add the PO number within the customer information. Add a new Recorder Capture action for the same Orders | Apptivo - Google Chrome window.
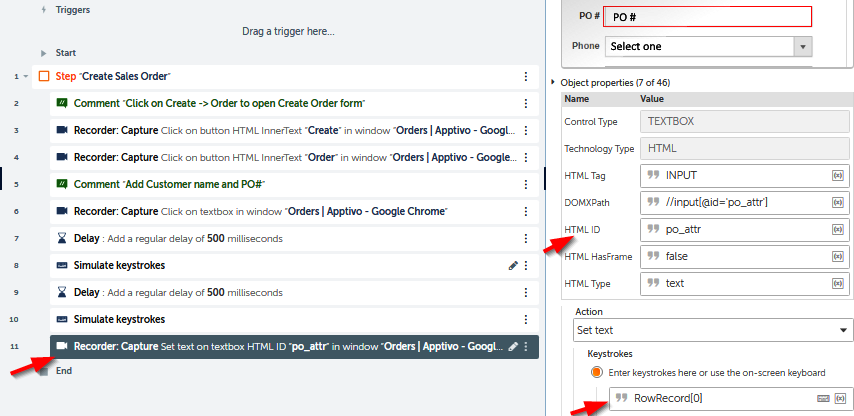
- Click on Capture Object and point to the PO# input box on Apptivo. Make sure that the Object properties are as shown in the following screenshot. Choose Set text for Action and set Keystrokes to RowRecord[0] (to extract PO#).
- Ensure you also add a Delay of 500 milliseconds in the properties (below Keystrokes – not shown):

Next, you can optionally fill in the customer address information as well. You can add the billing address, city, state, and zip data similar to the preceding PO# by adding four capture actions and setting the respective keystrokes with the correct RowRecord index.
We will now proceed to add the item details on the order form.
