
The trainer’s toolbox: tips and tricks for making training successful
Abstract:
This chapter provides helpful tips and tricks for trainers designed to aid both the novice and seasoned trainer alike. The topics discussed include the merits of team training, to the preparation needed to take your ‘show on the road’, to training in your home location. Special emphasis is given to the importance of having detailed backup plans and equipment at the ready.
Co-teaching
One of the best parts of planning and delivering your own custom training and instruction sessions is that in addition to catering to the specific needs of your audience, there is also ample opportunity to cater to yourself as a trainer. Training gives you the opportunity to showcase your individual talents and expertise, and it also gives you the opportunity to collaborate with other trainers and instructors. Co-training can be an effective way to train, and it can alleviate some of the pressure that can accompany the implementation of a training session.
Cook and Friend (2004) describe co-teaching as an instruction or training scenario in which two or more people agree ‘to share instructional responsibility, for a single group of students, primarily in a single classroom or workspace, for specific content, with mutual ownership, pooled resources, and joint accountability’ (Villa et al., 2008: 5). Co-teaching, or co-training, is a ‘cooperative process’ (ibid.: 4) that provides you with a partner with whom you can split the planning and teaching responsibilities of your session or sessions. You and your co-trainer are joint contributors to the training session, from the beginning stages of analyzing your community to creating and structuring the content, up through the evaluation and retooling of the lesson. Co-training can require a bit more work and scheduling when preparing a session, but that work is rewarded during the actual delivery of the session when you have someone in the front of the room with you leading the training event.
Co-training can be especially useful and helpful for novice trainers as it provides an automatic backup and a sense of security, facilitates diversity in the delivery of training content (with regard to voice and perspective), and having a partner can aid in keeping you on time and on task, and aid in answering participant questions. Co-training is equally useful for veteran trainers as well; the authors of this book have been co-trainers for many years and have developed a great working relationship, one that allows us to play off each others’ strengths and expertise, and enjoy a great level of comfort when delivering multi-day, multi-lesson training sessions.
Taking your show on the road!
At some point in your career, you may be asked to ‘take your show on the road’ and train staff in another location. Now this might mean traveling to a facility across town or across the state or across the country, but in each case there are certain preparations you can make to assure that your training will go smoothly.
The first step in your planning would be to determine what you will need to produce the training. The first pass at this list should be completely exhaustive, meaning it should include everything you would need from the participant handouts to the flipcharts and/or projection equipment; even the preferred seating arrangements for the participants. If you have presented this particular training session before, this list should be easy to compile, but for a new session this will take some work. One method that works well for this (and can also be used to determine a rough timing for the session) is to write some quick notes into the margins of the lesson plans or handouts for the session. Notes would include things like flipchart participants’ answers to the question, pass out case studies, show a certain website, etc. In this manner you will soon have a list of things that you will need for the session and can divide them into what is going to be provided for you at the training location and what you will need to bring with you.
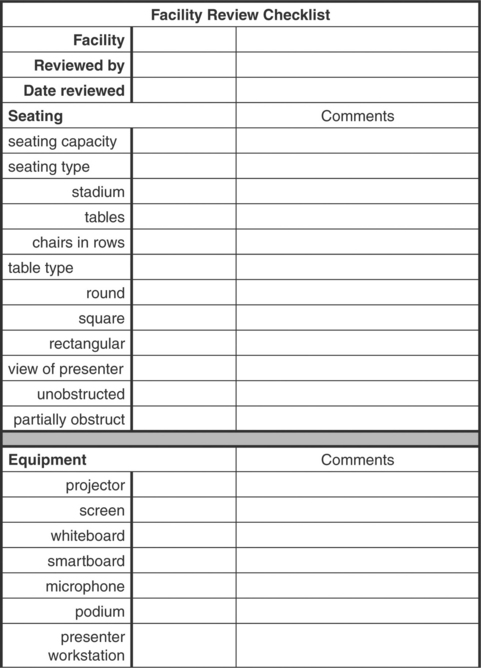
If at all possible, you should visit the training location to test equipment and to determine if the facility can handle the program. Things to look at/determine would include: seating/room arrangement, lighting, equipment, parking, ease of access, and internet access. A handy checklist for keeping track of everything is provided in Figure 8.1. This is quite similar to the checklist used to compare and contrast facilities when you are shopping for conference facilities. Saving these checklists and sharing them with other trainers is helpful as sometimes it is not possible to make a trip to visit a facility. Making some notes regarding your thoughts on each of the main categories – seating, lighting, parking and transportation, equipment, and handicap accessibility that are specific to your particular workshop and your needs – will be helpful as the workshop date approaches and you are in contact with the facility staff. You want to be sure to speak with the staff member who is in charge of scheduling the rooms when you visit to discuss how other trainers have used the room in the past. Asking their opinion on the best arrangement of the room for your workshop will save you time in considering possible arrangements, and also show deference to their knowledge of the facility.

At this time it is also prudent to discuss with the facility staff what other events are or may be occurring at the same time as your event. In this manner you may avoid possible conflicts with another program. This is mentioned because in our experience we have seen rooms get switched or downsized because the facility decided to, or needed to, host another program at the same time. This is much more likely to happen in a library or similar facility where you are not paying room rental fees, but the same problems can also occur in a facility where you are paying usage fees. Here you do have some recourse (if you have specified rooms named in your contract), but this is certainly not something you need to deal with the day of a training session.
An ounce of prevention – a trainer’s toolbox
So you’ve followed all the steps discussed thus far and created a wonderful and effective training session, and you’re now ready to deliver your training. All that’s left to do is show up at your session, right? Almost. Before you turn off your computer, let’s talk about backing up your equipment and files. Like a Scout, a good trainer is always prepared. Not unlike a Swiss Army knife full of different tools, you, as a trainer, can readily assemble a tookbox full of ideas and things that you can use to get yourself out of any jams. In taking your show on the road, or presenting in your home location, this preparedness can be crucial to the success of the program. To get a job done right, a professional carries with them their tools of choice, and a trainer is no different. In addition to your Power Point and handouts, you need to bring a few other things with you.
The first thing to ‘pack’ is extras – be sure to have extra supplies on hand: extra pens, pencils, markers, flipchart pads, name tags, scratch paper, tape, index cards, duct tape, etc. Whatever supplies you plan to use during the course of your training session, be sure to have a toolbox or container stocked with extras. If you are having handouts during the program, whether they are outlines of the entire program or exercises to be completed, bring at least five extra sets of each of the handouts. Sometimes the copier smears a page or someone wants an extra copy of this for their boss, co-worker, etc., so carry a few extra for these times. And a first aid kit won’t hurt; you never know when you’ll need a Band Aid. For that matter, a small but powerful flashlight can be a life- saver in a power outage in a strange location.
On the high-tech side, you want to bring a long heavy- duty extension cord and either masking or duct tape to tack it down (so you or the participants don’t trip!). If you are travelling with your own digital projector, bring extra bulbs, and if you are using the projection equipment in the facility, consider bringing your own as a backup. Projectors are getting smaller and less expensive, so having your own projector to use for presentations is no longer something that is out of reach. The same would hold true for the computer running the presentation software – bring your own laptop as a backup. You should have multiple copies of your presentation saved by different methods such as a memory stick, on your laptop, in your email, and/or saved to an online storage website. You should always have at least two backups of all of your files, just in case. There are several online storage sites available for use after a free registration and they are listed in the resources section at the end of the chapter.
Your presentation may also involve using the internet for showing different websites and you do need to have a backup plan for this also – but have you ever tried to copy or backup the internet? That would take a VERY large memory stick! However, using various screen recording programs you can record the actions on the websites you need to access or demo during the presentation, and if the internet connection or the website is down during your presentation, you can still show the participants what you intended. There are numerous screen recording programs available at little or no cost that are quite easy to use and easy to learn. A few names and websites are included in the resource list at the end of the chapter.
The key thing to remember with the screen recording is that you are not recording this in hopes of winning an Academy Award; it is an emergency backup plan, so if it is not perfect, that’s okay. If you happen to click on the wrong spot and need to go back or mistype the URL, that’s acceptable. If you need to use this backup plan, chances are that the tension in the room (and your own personal tension level) is running quite high. Making a joke out of a mistake will rapidly diffuse the tension, both for the participants and you. Most times participants are aware of problems as they are occurring and they will tend to root for the problem to be solved, so if there is a solution that works but is less than perfect, they will be accepting.
If you are planning to employ video conferencing, have a backup plan (i.e. a speaker phone and phone connection) in the event the technology doesn’t arrive intact or on time, fails at the last minute, or you experience issues with electrical sources. And on a more practical note, check all of your equipment (projectors, DVD player, voice recorders, laptops, stereos, remote controls, etc.) making sure that they work compatibly with one another, are up to date with any upgrades and updates, and that you have plenty of batteries or additional sources of power, and the necessary cords, adapters, power strips and other accoutrements to successfully connect all the pieces of your training plan. If you are travelling, check in with the local tech folks to determine the versions of software the facility is using. Asking them how often they run updates of software is a way to determine how up to date the facility software will be without having to ask directly and possibly offend the staff.
While we have given you ideas on how to handle problems with equipment and the facility, there is still one other area where there might be a problem. What would you do if you are ill the day of the training or if you are travelling and have transportation problems that preclude you from getting to the training session? If you have a co-trainer for the sessions, your co-trainer is your backup and you are your co-trainer’s backup. The concept of co-training was discussed earlier in this chapter, so you are aware that you need to be completely familiar with your co-trainer’s content and be ready to step in at a moment’s notice. If you are not fortunate enough to have a co-trainer, then the session would need to be postponed. If this is the case, try to remember that this is not the end of the world; there are a few reasons that a session might need to be postponed, such as dangerous weather conditions, illness, or something as simple as a power or utility (heat or A/C) outage. The session only needs to be postponed, not cancelled; it can be presented at a later date.
We hope that the tips and tricks presented in this chapter help to ease your mind prior to your training sessions. Being able to relax prior to training is important. If you are very nervous and uptight, this will translate to your participants and thus set the mood for your training session. A small amount of trainer nerves are the norm for any trainer, so try and relax prior to the training. Look over your notes, take some deep cleansing breaths, take a short walk down the hall – anything that burns off some excess energy and makes you feel more relaxed. At this point – you are prepared and ready to present a great training session – relax, enjoy it, and have fun. The participants will definitely follow your lead on this attitude and have a great time also.
CamStudio – http://camstudio.org/
Jing – http://www.techsmith.com/jing/
Capture Fox – https://addons.mozilla.org/en-US/firefox/addon/capture-fox/
SlideShare – http://www.slideshare.net/
SlideRocket – http://www.sliderocket.com/
Dropbox – https://www.dropbox.com/
Cook, L., Friend, M., Co-teaching: Principles, Practices, and Pragmatics. In the Quarterly Special Education Meeting April 29, 2004. Symposium conducted at the New Mexico Public Education Department, Albuquerque, NM, 2004.
Villa, R., Thousand, J., Nevin, A. A Guide to Co-teaching: Practical Tips for Facilitating Student Learning. Thousand Oaks, CA: Corwin Press; 2008.