
In the previous chapter, we looked at Struts 2 actions and some of the functionality provided by the ActionSupport class. In this chapter, we will look at the other end of action processing—results. Results determine the type of response sent back to the browser after a request. The result configuration is what maps an action's return value (a simple string) to a JSP page, a redirect, another action, and so on.
We've already seen dispatcher, the default result type used to dispatch to JSP pages. We'll examine it along with some of the more common result types such as the redirect and FreeMarker results. We'll also create our own custom result type and see how we can integrate it into our application.
The dispatcher result type is the default type, and is used if no other result type is specified. It's used to forward to a servlet, JSP, HTML page, and so on, on the server. It uses the RequestDispatcher.forward() method.
We saw the "shorthand" version in our earlier examples, where we provided a JSP path as the body of the result tag.
<result name="success" type="dispatcher">
/WEB-INF/jsps/recipe/thanks.jsp
</result>
We can also specify the JSP file using a<param name="location"> tag within the<result...> element, in case we don't feel we've typed enough.
<result name="success" type="dispatcher">
<param name="location">
/WEB-INF/jsps/recipe/thanks.jsp
</param> </result>
We can also supply a parse parameter, which is true by default. The parse parameter determines whether or not the location parameter will be parsed for OGNL expressions. We'll discuss this functionality later in the chapter. However, if you immediately suspect that it could be very useful, you are right.
Configuring results using annotations in Struts 2.1.6 is significantly different from that in Struts 2.0. In Struts 2.0, there was an @Result annotation in the Struts 2 configuration package. In Struts 2.1.6, we'd use the @Result annotation of the Convention Plug-in.
Convention-based action results only need to be configured manually if we're not using the default, "conventional" result. As an example, consider the following (least-exciting-ever nominee) action:
package com.packt.s2wad.ch04.actions.examples;
import com.opensymphony.xwork2.ActionSupport;
public class DispatchResultExampleAction
extends ActionSupport {
}
Assuming the default location for the Convention result pages (JSP in our case), we'd have a JSP located in /WEB-INF/content/examples/dispatch-result-example.jsp. To configure a different result location, we can annotate either the entire class or an individual action method.
@Results({
@Result(name = "success",
location = "/WEB-INF/content/examples/dre.jsp")
})
public class DispatchResultExampleAction
extends ActionSupport {
}
When we visit /examples/dispatch-result-example, we'll get the contents in the dre.jsp file. Note that the name annotation parameter is required even for the default success value. Also note that as with XML, we could supply the type of the result—in this case "dispatcher", with the "type" annotation parameter. This is an additional change from Struts 2.0, where the type parameter was a Class.
The Convention Plug-in does not have a similar parse parameter.
The redirect result type does exactly what we'd expect. It calls the standard response.sendRedirect() method, causing the browser to create a new request to the given location. As it's a redirect, request parameters will be lost. Struts 2 provides some mechanisms for handling this, which we'll see later.
As with the dispatcher result type, we can provide the location either in the body of the<result...> element or as a<param name="location"> element. Redirect also supports the parse parameter. Here's an example configured using XML:
<action name="redirect-result-example">
<result type="redirect">
/sanity.action
</result>
</action>
@Result(name = "success", type = "redirect",
location = "/examples/dispatch-result-example")
public class RedirectResultExample extends ActionSupport {
}
We'll often want to redirect to another action. While we could do that using a redirect result type, we'd need to append the .action (by default) suffix, preceded by a namespace if necessary. A redirectAction result type is quite common, and allows the use of only the action's name without the extension.
<result type="redirectAction">home</result>
We can provide the action name as the result tag's contents, as shown in the previous section, or by using a<param name="actionName"> element. Providing a namespace value is only possible using a<param name="namespace"> element.
<result type="redirectAction">
<param name="namespace">/</param>
<param name="actionName">home</param>
</result>
Using Convention's @Result annotation to do the same task looks like the following code snippet.
@Result(name = "success", type = "redirectAction",
location = "dispatch-result-example")
public class RedirectActionResultExample
extends ActionSupport {
}
Supporting a redirect to an action in a different namespace involves using the params annotation parameter. The params parameter accepts an array of parameter name and value pairs. Some sort of map might be more useful, but Java annotations impose some limitations.
As a further example of the Convention Plug-in, we'll use its @Action annotation to create an additional mapping inside the action class.
@Results({
@Result(name = "success", type = "redirectAction",
location = "dispatch-result-example"),
@Result(name = "ns", type = "redirectAction",
location = "home",
params = {"namespace", "/"})
})
public class RedirectActionResultExample
extends ActionSupport {
@Action("nsresult")
public String useNamespacedResult() {
return "ns";
}
}
This action class creates the standard Convention-based mapping for ActionSupport.execute() and creates an additional mapping for an nsresult action in the same namespace. The nsresult action method returns ns, which names an additional result definition. Note the use of the params parameter, where we set the namespace parameter to a home action.
The @Action annotation is a way to map a URL to a specific action method, similar to using the method attribute inside an XML-based<action> configuration element.
The chain result type allows us to execute another action as a result of the current action. This means that the output shown to the browser is ultimately controlled by the action being chained to.
It's similar to a forward, but includes the chained action's interceptor stack, results, and so on. In addition, the request parameters will be copied from the original request. The action being chained from is left on the value stack for access by the chained action.
The use of action chaining is controversial at best, and is actively discouraged. There are few valid use cases for it. It can lead to confusing application flow, surprise us with unexpected interactions with various interceptors (validation, for one, can become irritating), and so on. When we find ourselves thinking that action chaining would be a good idea, it's better to take a step back, and examine both our code and our assumptions. We should also see if a functionality can be moved from an action into a service layer, a prepare() method, or some other option.
So no example! And if we decide to use it, we get what we deserve. Note that there are examples provided on the Struts 2 documentation wiki. However, there is almost always a better way to provide whatever functionality we think we need from chaining actions.
Earlier, it was hinted that the parse parameter controlled parsing of OGNL expressions in the location parameter. In our JSP pages, we access action properties using OGNL. It turns out that we have the same capability in our result configuration (including annotations). This is a big win when used appropriately.
As a simple example, we'll use this functionality to implement a somewhat contrived use case (think administrative functionality).
A user can enter a recipe ID and view the recipe with that ID.
To keep the JSP size down, we'll use some tags, which we haven't yet introduced—they were hinted at in the previous chapter. Struts 2 has several custom form tags that make the creation of low-fidelity (but functional and reasonable-looking) forms, quick and easy. We'll also start to look at some coding practices. These will ultimately lead us to practices we can put to use to keep our applications agile, changeable, and easier to maintain.
Our form for entering a recipe ID will contain a single text field, the recipe ID, and a submit button. We'll use some I18N functionality already introduced for the page title and the text field label. Setting the key attribute of the form field tags automagically looks up the form element label, sets the form element name, and retrieves the appropriate value from the action when necessary. We'll learn a lot more about form tags in an upcoming chapter. However, sometimes a little teaser can be entertaining.
We'll use the Convention plug-in again. Our action will have only a few responsibilities, including displaying the form, validating the form, and directing us to the action that will actually display the recipe. We don't have to write anything beyond the action definition to display the form:
package com.packt.s2wad.ch04.actions.recipes;
import com.opensymphony.xwork2.ActionSupport;
public class ViewByIdAction extends ActionSupport { }
We'll create a package.properties file containing a title and form element label entry. The important bits of our JSPs are reduced to the following:
<s:form action="view-by-id-process">
<s:textfield key="recipe.id"/>
<s:submit/>
</s:form>
Don't worry! It will all be explained later on. However, much of it is obvious. Also, as you've probably read some of the Struts 2 tag documentation, you've already run across these.
Again, following convention, this will be located in /WEB-INF/content/recipes/view-by-id.jsp.
If we view the generated source, we'll see output nearly identical to the table-based HTML that we created in the previous chapter. The logic for displaying form validation error messages is included as well. Hooray, custom tags. Notice that our<s:form> tag's action attribute points to an action we haven't defined yet.
We'll submit our form to another Convention-based action, as seen previously. We'll define this action using Convention's @Action annotation that we saw earlier, and create another method in our existing ViewByIdAction:
@Action(value = "view-by-id-process",
results = {
@Result(name = INPUT,
location =
"/WEB-INF/content/recipes/view-by-id.jsp")
})
public String process() {
return SUCCESS;
}
Notice our @Result annotation. We've configured an "input" result manually, and determined that it will use the conventionally located JSP page containing our form. We'll learn more about the validation process in a later chapter. However, we can conclude that if there are any validation errors, Struts 2 will return us to the "input" result, our form in this case.

Validating the form will add the following code to our action:
public void validate() {
if (recipe == null || recipe.getId() == null) {
addFieldError("recipe.id", "Recipe ID is required.");
}
}
If we submit the form without entering a recipe ID, we should see something similar to the following screenshot. The custom tag checks for and displays error messages on a per-field basis—all for free.

Remember when I said you'd wonder why we went through all the trouble of doing it on our own?
The next step is to configure a success result, that is, what is to be done when validation passes. To demonstrate dynamic results (using OGNL in our results configuration), we'll create a result that redirects to a view action, used to view a recipe, potentially from various other pages (like a list of recipes).
We'll add another @Result annotation to our @Action annotation's results parameter:
@Result(name = SUCCESS,
type = "redirectAction",
location = "show",
params = {"recipe.id", "%{recipe.id}"})
This @Result uses the redirectAction result, sending us to an action named show. The annotation also includes a parameter. Here, we're sending a parameter named recipe.id, and its value is ${recipe.id}.
The %{recipe.id} parameter value is an OGNL expression—the same as we'd use in a Struts 2 custom tag—wrapped in %{} characters. We can also wrap OGNL expressions in %{} when we use Struts 2 custom tags. This is compulsory in some cases.
We can use the same OGNL expressions in our Struts 2 XML configuration files as well, also wrapped in %{} characters. It's important to note that in much of the existing documentation, we'll see OGNL expressions in both XML and annotations using the ${} notation. This is still supported, but changed to include the use of %{} to better match how we use OGNL in our JSP pages.
The bottom line is that we're sending a parameter named recipe.id to the show action (which we haven't written yet), and giving it a value of our recipe's ID, which is entered using our form.
The complete action method, along with its annotations, will look like this:
@Action(value = "view-by-id-process",
results = {
@Result(name = SUCCESS,
type = "redirectAction",
location = "show",
params = {"recipe.id", "%{recipe.id}"}),
@Result(name = INPUT,
location =
"/WEB-INF/content/recipes/view-by-id.jsp")
})
public String process() {
log.debug(String.format("Enter: recipe.id=%d.",
recipe.getId()));
return SUCCESS;
}
Note that we've put a logging statement in our process() method (logging will be discussed in more detail in a later chapter). The reason for this is about to become apparent.
If we run the code at this point and submit the form with a reasonable integer value in the form field, we'll notice something rather interesting. When we submit the form, we'll see a log statement that displays the ID we entered.
No big deal, right? The Recipe class's id property is defined as a java.lang.Integer. As we all know, forms can submit only strings. However, it's working.
Note
In case you didn't know, forms submit strings. This is a source of much confusion. For example, if you looked at the network traffic for a form submission, you'd see only strings. There won't be any type information, no strange binary formats, just strings (file uploads are a bit special). Every form field is submitted as a string, no matter what.
XWork has type conversions built right in for many common types. This means that simple conversions, such as the string-to-Integer seen above, are generally handled transparently by the framework. This saves a fair amount of time and headache during coding. You might not have even noticed. It just seems so natural, and it is. Converting form values to Java objects on our own was tedious, error-prone, and it cluttered up the code that did the real work. We'll cover more about type conversion in Chapter 6.
Something else is happening as well. Even though we have no code that creates a Recipe object, we're logging (to the console) a bit of the recipe property. The framework is creating a Recipe instance as well. Remember instantiating everything on our own? Remember pulling request parameters out on our own, converting them, and copying them into our model object? In many cases, particularly the most common ones, we don't have to do that anymore. This is very helpful in many ways. It saves code, cognitive overhead, and duplication of effort.
Our view action receives the recipe.id parameter, again into a Recipe object, instantiated and filled by the framework without any intervention from us. Now that's quite handy. For now, as we're not using a database, we're going to look up some fake, hard-coded data—but from where?
One very important principle of agile software development is to decouple our application as much as possible. This means that our individual code chunks should strive to do only one thing, and do it well.
In the past, we would load up our servlets (or framework classes) with all the code to do everything. In Struts 2 terms, we would code a database lookup into our action, handle database exceptions in our action code, marshal (say) a JDBC result set into a business model, and who knows what else.
This is a horrible idea.
However, as we progress through the book, we'll see many reasons why (and how) doing it differently is a really good idea. One of the easiest reasons to highlight is that it makes our code much longer. This increases the cognitive overhead necessary to understand how a particular section of code works, what its purpose is, and so on.
One of the easiest chunks to move out of the mainline code is database access and data marshaling. We'll return to this topic in force in later chapters, especially when we cover testability, Spring, and the mysterious-sounding Inversion of Control (IoC) (also known as Dependency Injection).
Until then, we'll write a class that pretends it's retrieving recipes from a database—but it's really just a map of hard-coded recipes. We will, however, create a parallel interface that our recipe service will implement. This allows us to write other recipe services that implement the same interface. The code in the action shouldn't have to change once we're retrieving recipes from the database.
For now, it's enough to know that there is an interface, RecipeService, which we can use to retrieve a single recipe by ID.
Note
Notice that it's not called IRecipeService. Interfaces can be thought of as classes with multiple implementations. Each implementation is a RecipeService for all intents and purposes. Prefixing an interface name with an "I" isn't necessary. The distinction should come on the implementation side, not the interface definition.
For now, the interface defines only what we need—the ability to find a recipe by its ID.
package com.packt.s2wad.ch04.services;
public interface RecipeService {
Recipe findById(Integer id);
}
Our implementation is called (somewhat accusingly) FakeRecipeService, and is really simple. Some of the code is elided here to make the snippet shorter. The key point to remember is that there's a map of recipes, and we can retrieve them through the findById() method.
public class FakeRecipeService implements RecipeService {
private static Map<Integer, Recipe> recipes =
new LinkedHashMap<Integer, Recipe>() {{
put(1, new Recipe(1, "Spicy Lentil Pot", ...));
put(2, new Recipe(2, "Bread and Water", ...));
...
}};
public Recipe findById(Integer id) {
return recipes.get(id);
}
}
Note
For simplicity, our low-fidelity prototype recipe service returns a null if no recipe is found (whether or not to return a null value is a long-running discussion). Personally, I think it causes problems later on—I'd return a statically-defined notfound recipe with a known ID and check for a valid recipe, rather than a null. Null values cause code to blow up, whereas a non-null, but possibly invalid value, may lead to puzzling behavior. However, nothing actually explodes.
Finally, we code our view action, which for now, simply instantiates an instance of the FakeRecipeService and uses it to look up our ID (getters and setters not shown). We'll see better ways to handle getting our recipe service later in the book.
public class ShowAction extends ActionSupport {
private Recipe recipe;
private RecipeService recipeService =
new FakeRecipeService();
public String execute() throws Exception {
recipe = recipeService.findById(recipe.getId());
return recipe != null ? SUCCESS : "notfound";
}
}
Note that we're returning notfound when we don't find a recipe. The Convention plug-in will look for /WEB-INF/content/recipes/show-notfound.jsp, and will build the JSP file name using the action name and the action's return value.
Our recipe show-success.jsp page just displays the recipe's title, description, and so on. Here's a fragment:
<h1><s:text name="recipe.show-recipe.header"/></h1>
<h2><s:text name="ingredients"/></h2>
<p>${recipe.ingredients}</p>
<p>${recipe.description}</p>
...
Note that we're using the I18N features in several more places. During our prototyping / low-fidelity phase, we probably don't care if we do that or not. However, it gives us a chance to again see how we can use action properties in our messages. The recipe.show-recipe.header message is defined in package.properties as follows:
recipe.show-recipe.header=Recipe: ${recipe.name}
This gives us a localized "Recipe" header along with our recipe's name. Of course, this works only if we don't have localized recipe names… but think low-fidelity!
JSP may be the most common JEE view technology in use. However, it has its detractors due to its verbosity and inability to render outside a server container (in general). Two other popular view technologies are FreeMarker and Velocity—both Java templating engines with simplified markup (compared to JSP).
FreeMarker is used within Struts 2 to create its custom tags (as opposed to using standard Java- or JSP-based tags), so I'll focus on the FreeMarker results (a Velocity discussion would look very similar). FreeMarker will also be covered a bit more when we look at custom themes and templates. FreeMarker does have a few advantages over Velocity. It includes the ability to use custom tags (only Java-based at the time of writing this book, JSP 2.0 tag files aren't yet supported), capture template output into a variable, use built-in conversion and formatting capabilities, and so on. It is a capable replacement for JSP in the view layer.
The FreeMarker support in Struts 2 is built-in. Hence, configuring a FreeMarker result looks like the other results types we've seen. Only the FreeMarker library (already a dependency of Struts 2) is required—no additional libraries or plug-ins are necessary. In addition to the location and parse parameters, FreeMarker results may also specify the contentType parameter (which defaults to "text/html") to allow writing other content types. (This is surprisingly handy, for example, when producing XML, CSV, and so on.) The writeIfCompleted (false by default) may also be specified, which will write the output to the stream only if there were no errors while processing the template.
As a simple example of using a FreeMarker result, we'll create another show recipe method in our existing action. However, we will use FreeMarker instead of JSP to view the results. Our new method just returns the value of our existing execute() method. However, as we're using Convention's @Action annotation, it will search for files named after our action name. This means Convention will look for fmshow-success.ftl and fmshow-notfound.ftl. (It will actually look for the same files, but with a JSP extension. If it doesn't find those, it will look for FreeMarker files next).
@Action(value = "fmshow")
public String fmshow() throws Exception {
return execute();
}
Note
Remember, this is a low-fidelity prototype at this point. We only have guesses for what the final functionality and data structures will look like. However, we can make semi-intelligent guesses along the way. The more we can show a potential client without coding ourselves into a corner, the better off we are. Our guesses will usually be close, and will help to better identify what the client really wants.
Our FreeMarker template looks much like you'd expect it to (assuming you expected FreeMarker and not JSP). The portion that displays the recipe header and title looks very similar to that of our JSP file:
<h1><@s.text name="recipe.show-recipe.header"/></h1>
<h2>
<@s.text name="recipe.show-recipe.description.header"/>
</h2>
<div id="description">
${recipe.description}
</div>
The Struts 2 custom tags are used, but with the<@s.tagname...> syntax. We can also use FreeMarker's EL notation inside the ${} characters, just like in JSP, to access the value stack.
The FreeMarker result type may also be used to create various text-based result types very easily because of its contentType parameter. For example, by using one of the comma-separated value content types, such as "text/csv", you could create a page that could then be imported into a spreadsheet application. The default dispatcher result type for JSP pages does not have a similar contentType parameter, meaning that we must define the content type in the JSP page itself.
With its ability to use Struts 2 custom tags and its concise syntax, FreeMarker can be a compelling replacement for JSP views. There are a few potential gotchas when using FreeMarker results. They are discussed in the Struts 2 documentation wiki in the Tag Developers Guide.
Perhaps the most glaring gotcha is FreeMarker's requirement that tags be declared as "inline" or "block" tags with an inability to switch between the two. For the sake of convenience, some Struts 2 tags are defined as "inline" tags, that is, tags that accept no inner content. For example, the<s:action> tag is defined as an inline tag.
As we'll see in the next chapter, the<s:action> tag may be used with nested<s:param> tags. This use case is currently not possible using FreeMarker.
The XSLT result type allows us to transform an action using a specified XSLT file. We don't have to output XML, which is then styled. We simply access our action's properties in our XSLT file, as if we were transforming XML. If we're already invested heavily in XSLT, this result type can be very helpful.
During development, it's handy to turn off Struts 2's built-in stylesheet caching using a "constant" element in our Struts 2 configuration file, or in our web.xml. We'll add an initialization parameter to our web.xml entry for our Struts 2 filter dispatcher.
<init-param>
<param-name>struts.xslt.nocache</param-name>
<param-value>true</param-value>
</init-param>
To test the XSLT result, we'll create a simple test action, configured using XML. Why aren't we using the Convention plug-in for this example? It turns out that we must play some games with how the Convention plug-in is configured—the default implementations support only a few result types. It's neither impossible nor difficult to extend Convention to handle XSLT results.
public class XsltExample extends ActionSupport {
private String headerText;
private String testString =
"really awesome property inserted";
private List<String> listProperty =
new ArrayList<String>() {{
add("Item number one");
add("The second item");
add("Yet another item: the third");
}};
@Override
public String execute() throws Exception {
headerText = getText("header.key");
return SUCCESS;
}
One significant difference with XSLT results is that we do not have access to the Struts 2 tags in our result. Any value we need in our XSLT page must be an exposed action property. This means that our action code must include getters for localized text messages and so on.
The XSLT result assumes our Struts 2 action is exposed with a root element result. This is mandatory. The transformation just displays the header text and iterates over the exposed list.
<?xml version="1.0" encoding="ISO-8859-1"?>
<xsl:stylesheet version="1.0"
xmlns:xsl="http://www.w3.org/1999/XSL/Transform">
<xsl:output method="html" version="4.0"
encoding="iso-8859-1" indent="yes"/>
<xsl:template match="result">
<html>
<head>
<title>
<xsl:value-of select="headerText"/>
</title>
</head>
<body>
<h1><xsl:value-of select="headerText"/></h1>
<table>
<tr><th>String from list</th></tr>
<xsl:for-each select="listProperty/*">
<tr>
<td><xsl:value-of select="."/></td>
</tr>
</xsl:for-each>
</table>
</body>
</html>
</xsl:template>
</xsl:stylesheet>
The XSLT result type takes two optional parameters for including (matchingPattern) and excluding (excludingPattern) action properties.
The plain text result type escapes the text sent to the browser, allowing you to see a raw view of a JSP, for example. The plain text is sent back without any interpretation: JSP pages won't execute any custom tags, FreeMarker pages won't execute their directives, and so on. No example is necessary, it's just plain text.
The stream result type allows straightforward file downloading from an InputStream. We can set various parameters such as contentType and contentDisposition, which do what we would expect them to.
The only requirement for this result type is that our action must either implement InputStream getInputStream() or a getter for the property specified in the inputName parameter. However, I suspect the default of inputStream is perfectly adequate. This getter will be called the source of the stream sent to the browser.
Note
The showcase example shows the results of a resourceAsStream(...) call being returned directly in the getInputStream() method. In general, we'll probably attempt resource stream creation in an action's execute() method (or whichever method we're executing) to allow for the possibility of throwing an exception for a missing file and acting on it, and so on.
As this example consists of opening a FileInputStream (just like the showcase example, we can open a file as a resource stream, as long as it is on the application classpath), we won't examine it further—let it be an exercise to the reader...
The HTTP header result type allows the status, error code and message, as well as arbitrary headers, to be set. It also accepts the parse parameter, allowing the use of action properties in the results. This could allow, for example, the error message to come from an S2 property file. We'll skip an example of this as well since that's all we can do with it, and it should be self-explanatory.
These result types are beyond the scope of this book, as each requires knowledge of its respective technology.
Tiles allows the definition of page fragments, which are then composited into complete pages. Tiles results allow tile definitions to be used as the end result of an action execution. Those familiar with Tiles from Struts 1 will recognize the Tiles 2 configuration and tags, although they have changed somewhat.
JasperReports is a reporting engine that can produce reports in several output formats including PDF. The Jasper result tag allows an easy mechanism for rendering the results of an action as a report of any supported output format.
Even though Struts 2 ships with most of the results we'll need (and a few we probably won't), there are times when only creating our own results will do. We'll look at a contrived example where having a custom result type saves us some development time upfront.
Let's assume for a moment that our client already has a large number of recipes stored on their file system in a custom format that is neither JSP nor FreeMarker. These recipes, over a thousand of them, are kept in Markdown format. To avoid the overhead of converting the recipes to the site's database format, it's decided that they will be served directly by the application.
Note
Markdown is a lightweight markup used to create HTML. Several blogging engines use it as their default markup because it's very simple and reads well as plain text. It is of limited use in a web application as it has no concept of variables (at least for now). However, it makes for a short, convenient, and contrived example.
The Markdown recipe files are very simple (as is our sample recipe).
Items prefaced with a
*character are put into an unordered listItems prefaced with a
1. are put into a numbered list# Macaroni and Cheese A simple baked macaroni and cheese. ## Ingredients * Macaroni * Cheese * Whole milk ## Directions 1. Cook the macaroni. 1. Mix it with the cheese and milk. 1. Bake at 325F for 35 minutes or until bubbly.
By creating a MarkdownResult result type, we can serve these files directly using an action. It will act like a normal dispatcher result that can serve a JSP page, but it serves a converted Markdown file instead.
Again, keeping things simple, we'll ignore things like caching and efficiency, and focus only on the small amount of code necessary to create our own custom result. This task is made easier by subclassing Struts 2's StrutsResultSupport, a class implementing Result that provides some typical functionality, such as the parse and location parameters, which we've seen in other result types.
We'll be using the "markdownj" library, available on SourceForge.
We'll work a bit backwards, starting with our result configuration. This is a sort of built-in test-driven development step. Our application will fail unless we finish writing our custom result type. We add the following to the top of our struts.xml file in our default package element:
<package name="default" namespace="/"
extends="struts-default">
<result-types>
<result-type name="markdown"
class="com.packt.s2wad.ch04.examples.MarkdownResult"/>
</result-types>
...
This tells Struts 2 that we can now use a result type markdown, and that it is implemented by the MarkdownResult class.
Our action is simple, because we're making assumptions in the interests of brevity (as usual).
package com.packt.s2wad.ch04.examples;
import com.opensymphony.xwork2.ActionSupport;
public class MarkdownAction extends ActionSupport {
private String mdid;
public String getMdid() { return mdid; }
public void setMdid(String mdid) { mdid = mdid; }
}
The XML action configuration is similarly simple:
<action name="viewmd"
class="com.packt.s2wad.ch04.examples.MarkdownAction">
<result type="markdown">
/WEB-INF/mdrecipes/${mdid}.md
</result>
</action>
The biggest assumptions are:
All of our Markdown-based recipe files live in
/WEB-INF/mdrecipes.The filenames are all valid URL parameters.
In our case, they're just named 1.md, 2.md, and so on. This is not, of course, production-ready code.
We see again how useful accessing action properties in our result configuration can be. Struts 2 handles what essentially is a miniature templating mechanism, saving us the trouble of building up strings ourselves.
We need only three simple steps to implement our custom result type:
Read the Markdown file.
Process the Markdown file.
Write the Markdown file.
In real life, we'd pay more attention to error handling.
Our Markdown result looks like this (imports, getters, and setters not shown):
package com.packt.s2wad.ch04.examples;
public class MarkdownResult extends StrutsResultSupport {
private String defaultEncoding = "ISO-8859-1";
public void doExecute(final String finalLocation,
final ActionInvocation invocation)
throws Exception {
String markdownInput =
readFromContextPath(invocation, finalLocation);
if ((markdownInput == null)
|| (markdownInput.length() == 0)) {
// FIXME Like our error handling?
}
MarkdownProcessor p = new MarkdownProcessor();
String markdown = p.markdown(markdownInput);
ActionContext actionContext =
invocation.getInvocationContext();
HttpServletResponse response =
(HttpServletResponse)
actionContext.get(StrutsStatics.HTTP_RESPONSE);
byte[] markdownBytes =
markdown.getBytes(defaultEncoding);
response.setContentLength(markdownBytes.length);
response.setContentType("text/html;charset="
+ this.defaultEncoding);
PrintWriter out = response.getWriter();
out.print(markdown);
}
private String
readFromContextPath(ActionInvocation invocation,
String finalLocation) {
ServletContext servletContext =
ServletActionContext.getServletContext();
File inFile =
new File(servletContext.getRealPath(finalLocation));
if (!inFile.exists()) {
// FIXME More awesome error handling.
return "";
}
try {
return FileUtils.readFileToString(inFile,
defaultEncoding);
} catch (IOException e) {
e.printStackTrace();
}
return "";
}
}
The entry point into StrutsResultSupport classes is the doExecute() method. It receives the current action invocation and the location of the result, which is parsed for OGNL expressions if necessary. In our case, we're passing the Markdown recipe ID from the action into the location using OGNL. Therefore, the finalLocation parameter would be 1.md if we passed an mdid value of 1.
We read the Markdown file in the readFromContextPath() method. Reading a file into a String is boring, so we've used Apache Commons IO's FileUtils class. (Commons IO is required for the default Struts 2 file uploading process; so we shouldn't feel too bad about adding another dependency.) What is (slightly) less boring is how we access things like the ServletContext from within our custom result. This highlights a simple way to get access to the servlet context on the rare occasions we need to tie ourselves to the servlet API (we also saw this in the chapter covering Struts 2 actions).
ServletActionContext.getServletContext()
I won't talk about it much because using this method ties us to the servlet specification, and we try to avoid that whenever possible. In this case, it was unavoidable as I've packaged the Markdown-based recipe files into our web application for easy deployment, but not on the classpath. Typically, they would live outside the application.
Other than that, it's just a matter of using the MarkdownJ package to transform the Markdown markup into HTML and returning it to the browser with the appropriate headers set. The rest of the doExecute() method uses a MarkdownJ processor to convert the Markdown file contents and write it directly to the response.
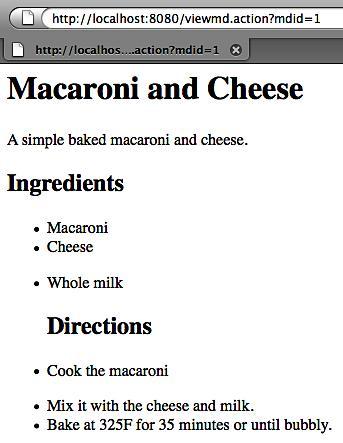
When we make a request to /viewmd.action?mdid=1, our result gets the location, /WEB-INF/mdrecipes/1.md, thanks to our result configuration. The file contents are run through the Markdown conversion process and get transformed into HTML which, without any styling, will present us with something resembling this:
The chapter covers most of the standard result types, leaving a few of the more complicated, and a few of the most simple for self-study. The chapter also takes a quick look at the process for creating new result types, should our application need custom functionality.
The chapter also tells how action properties can be interpolated in our result configuration, which can be a very useful technique.
The use case scenario gives us a teasing look at some of the Struts 2 form tags, which help eliminate the bulk of the JSP we wrote on our own in the previous chapter. It would also help us start on the path to agile action coding, which will eventually lead to keeping our code more easily testable (coming up a bit later).
Next on our list are Struts 2's non-form-oriented custom tags, some of which we've already seen (such as<s:property>, <s:if>). We'll also dive into OGNL, everybody's favorite expression language, and the value stack, from which OGNL gets its data.
References
A reader can refer to the following:
The
struts-default.xmldefines standard result types (and much more of interest!):The standard result types:
Struts 2 Type Conversion:
FreeMarker:
XSLT:
Tiles:
SiteMesh:
JasperReports:
http://jasperforge.org/plugins/project/project_home.php?group_id=102
Markdown:
MarkdownJ: