
In the previous chapter, we had a crash course in some of JavaScript's more esoteric, but useful features, particularly those related to how JavaScript implements Object-Oriented Programming (OOP).
JavaScript is only one aspect of the browser we need to be conversant with when developing a modern web application. We also need to be conversant in the Document Object Model (DOM). It is the internal representation of our rendered HTML and CSS, and does more than simply providing a means to design and style our pages.
There are approximately eighteen hundred million JavaScript frameworks. At the time of writing this book, Struts 2 ships Dojo 0.4.3. This is significantly different from Dojo's current 1.0 release, and relatively heavy for the type of programming we'll be doing in this chapter. For our JavaScript explorations, we'll actually use jQuery—an elegant, minimal JavaScript library that embraces JavaScript's approach to OOP. Any other JavaScript framework is likely to have similar functionality. The techniques used here are generally applicable.
In this chapter, we'll start applying our new-found JavaScript-Fu to our application, by adding an expandable list of ingredients in our recipe entry form. Rather than limit users to a fixed number, we'll allow the addition of an arbitrary number of ingredients by dynamically adding form fields.
We'll also add some minor styling elements to help our form look a little better. A full discussion of CSS's styling abilities is beyond the scope of this book, but there are a few tricks we can use to help make our low-fidelity prototype look better than unadorned HTML. We'll also begin looking at Struts 2's internal stylesheets and discover some limitations of the default Struts 2 themes.
Markup refers to both general markup languages and annotations used within the language. HTML is considered a markup language. We apply annotations to text to control how it is rendered. Markup can also refer to individual annotations within our HTML, such as putting headline tags around a headline, and so on.
It can also include markup not necessarily intended to control appearance. For example, we might surround the name of an ingredient with a span tag, giving it an "ingredient" class. This markup, which falls under the "semantic markup" definition, can often be used in unexpected ways.
It's hard to overstate the importance of comprehensive markup in our HTML. It is only by giving DOM elements an ID or CSS styles that we can refer (easily) to the elements later, whether for styling (appearance) or for the construction of semantic information. Elements without an ID or a named style are difficult to reference and may lead to fragile, order-dependent DOM manipulations.
What does this imply from a practical standpoint? We should mark up our JSP and HTML as much as is practical, paying particular attention to elements we're likely to refer to later, or that others might be interested in referring to (screen-scraping is much more enjoyable when there's known elements to scrape).
The id attribute of DOM elements is meant to be unique per webpage. This means that an ID should be used only once on any page. Therefore, IDs are specifically for elements we know will be unique.
On the other hand, styles may appear multiple times on a page and can be used to identify elements for both styling and reference purposes. We can also apply multiple styles to a DOM element, allowing us to build up the styles and/or references we need.
Recall that the default "xhtml" theme puts our form inside a table, one row per form element, with labels for the form elements. However, our ingredient form felds needed to be handled differently, so that our quantity fields would be on the same line as the ingredient name fields. Those fields were handled manually, using the simple theme.
The<s:head> tag includes a CSS stylesheet on our page. The styles defined in it include:
|
Styles |
Usage |
|---|---|
|
|
The class of the table our form is contained in |
|
|
|
|
|
|
|
|
|
|
|
Not used in our current form, but self-explanatory |
|
|
Not used in our current form, but self-explanatory |
|
|
|
|
|
|
With just a few text fields, a text area, and a submit button, our form is easy to dress up. One of the easiest form element dress-ups is creating a solid, one pixel border around form fields. This alone can take a drab, 1990's form into at least the current century. We'll load our own stylesheet after the Struts 2 head tag, in order for our styles to take precedence.
<%@ taglib prefix="s" uri="/struts-tags" %>
<html>
<head>
<title><s:text name="new.title"/></title>
<s:head/>
<link rel="stylesheet" type="text/css"
href="<s:url value="/styles/main.css"/>" />
</head>
...
In order to get the web app context, we're using Struts 2's<s:url> tag to create the full pathname of our CSS file. We're assuming a separate directory for our stylesheets, which we're placing in /styles.
We'll use this style for all our input elements and the text area. However, we would like to restrict its use to elements found inside our form's table to ensure that we don't mess up any other styling (maybe our own or of any third party) on the page. We can apply the style across the entire page, but that's not as much fun.
While we're at it, we'll add a border around the entire form. We create our own stylesheet with an entry for the wwFormTable class. CSS classes are indicated by putting a period (.) before the class name as shown here:
.wwFormTable {
border: 1px solid #669;
padding: 1em;
}
This defines a solid, one pixel, dark-bluish border. It also adds some padding to the table border, so that the border isn't too close to the text. To style input fields contained within the table, we'll style both the input elements created by the text field tags, along with the text area (although it isn't an "input" element technically like most other elements). In this case, we can style them both at the same time as shown here:
.wwFormTable input, .wwFormTable textarea {
border: 1px solid #bbb;
background: #fef;
}
Now, all input and text area elements within an element with the wwFormTable class will be styled as we've defined—a light blue-grey background and a grey, one-pixel border. There are two important things to be noted in this example.
The first is that we can define the style for multiple CSS selectors by separating the selectors with commas. The second is that we're using CSS selectors. CSS selectors are the official names for the way we select which elements to style (the stuff outside the brackets) with our style definitions (the stuff inside the brackets).
CSS selectors can be annoyingly complex and deserve more attention than we'll give them here. However, as we are striving towards rapid prototyping, for the most part, we would keep these CSS selectors mercifully simple.
Here, we use the "class" selector. The "." prefix means that we're defining a CSS class. If we used the "#" character, we'd be defining a style for a specific DOM element by ID.
We'll also create some styles for input errors and modify our form JSP to include the cssErrorClass attribute. For example, the recipe name text field tag will look like this:
<s:textfield key="recipe.name" cssErrorClass="inputError"/>
Our inputError class, defined for both input and text area elements, changes the input element color a bit and puts a dotted red line around it (not shown). Along with some other minor style changes, we'll remove most of the ingredient fields in anticipation of adding them. When we submit the form without a recipe name, we'll see something similar to the screenshot here:
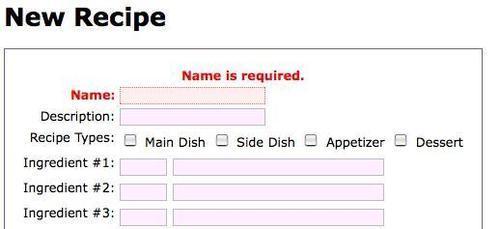
It's still not the world's most attractive form. However, for less than 40 lines of CSS, it's not that bad. If we focus on the error message for a moment, we'll start to understand how the default "xhtml" theme can make some things difficult.
For example, if we want the text left aligned, we find the undertaking nontrivial. This is because even though the text itself is inside a span element with the class errorMessage, the span is inside of a table row with no ID or class. Subtle gotchas like this is one reason why it pays to be aware when creating DOM elements. Elements with no ID or classes are difficult (not impossible) to access and modify.
Before we get to that, we're going to drop back into the land of JavaScript for a moment.
We ended our last chapter by looking at a simple way to hide our JavaScript, in order to protect it from being overwritten by a conflicting library. We're going to return to that conversation for a moment and show one way that particular module methodology might break down.
We'll also take a first look at jQuery, as we build an example page that adds onclick handlers to a group of links. It's another contrived example. However, the techniques used here will be utilized regularly in JavaScript-driven applications, even if we're not using jQuery.
First, we make sure that jQuery is loaded. We'll then put the reference into our HTML head section, using Struts 2's URL tag, to generate the preamble to our jQuery location.
<head>
<script type="text/javascript"
src="<s:url value="/jquery/jquery-1.2.6.js"/>" >
</script>
</head>
Note that we use a<script ...></script> element rather than a single<script/>. Some browsers require the use of the first form, else our JavaScript won't work.
Our JSP will just create three links using the iterator tag. We don't really care about the content of the links, but we do care that we're adding a CSS class to each one. We'll also create another link (we'll see why in a moment) that also goes nowhere.
<ul>
<s:iterator value="{'Link 1', 'Link 2', 'Link 3'}"
var="linkText" status="stat">
<li>
<a href="#" class="notify">${linkText}</a>
</li>
</s:iterator>
<li><a href="#">We don't care about this link.</a></li>
</ul>
To add onclick handlers to our links, we'll use a combination of CSS selectors, jQuery, and JavaScript. We'll build up the JavaScript one bit at a time. The following will wrap up all of our JavaScript:
<script type="text/javascript">
$(function () {
...
});
</script>
This is jQuery-speak for "run the defined function when the page's DOM is ready". The "$" is actually the name of a jQuery function, $(). It takes several types of arguments, and behaves differently based on the type of argument passed in. When the argument is a function, the function will be run when the DOM is ready. It's convenient shorthand, despite its mysterious appearance.
Inside that block we'll use $() again, but this time we'll pass in a string. More specifically, a CSS selector designed to return all the links on the page with a class including "notifier". When we pass a string to the $() function, it interprets it as a CSS selector and will query the DOM, returning an object containing the selected elements.
<script type="text/javascript">
$(function () {
$("a.notify").each(
...
);
});
</script>
The each() function expects another function as its argument, which takes the index of the object and the object itself as its arguments. Also, supplied as an argument inside the function, the this keyword refers to the current element of iteration. However, we'll use the function argument for now. Our onclick handler then just pops up an accusatory alert box and returns false, so the link won't be followed. Here's the final first iteration of our code:
<script type="text/javascript">
$(function () {
$("a.notify").each(function (i, theLink) {
theLink.onclick = function () {
alert("You clicked me.");
return false;
};
});
});
</script>
If you're not used to seeing the function keyword so much, this can be somewhat disturbing. Just to rehash:
Our next requirement is that the onclick handler shows the link number. We get the index in the each() method. We have easy access to it in the function we define as our onclick handler. A slight modification to the code gives us the following:
$("a.notify").each(function (i, el) {
el.onclick = function () {
alert("You clicked link " + (i+1));
return false;
};
});
Remember our discussion about closures? We're using one here, even if we didn't know it. In our onclick handler function, the value of i is retained by each of our handler functions. The handler function is created in the context of the function being called by jQuery's each() function.
However, we would like our onclick handler function to be part of a JavaScript module. (In this usage, it's not as important. However, if the handler is significantly longer, we'd probably want to abstract it away from the code that attached the handler to the links.)
Our first attempt at the modularized version looks like this:
var MOD = {
linkClickHandler: function () {
alert("You clicked link...");
}
};
However, we are missing our link number. We can't just pass it to the onclick handler and attach it with jQuery. Consider the following code to add our handler:
el.onclick = MOD.linkClickHandler(i);
It would call the function when the DOM is ready, and not when the link is clicked! We need another layer, a layer that builds our click handler. We'll then change the code in our module to this:
var MOD = {
buildClickHandler: function (i) {
return function () {
alert("You clicked link #" + (i+1));
};
}
};
Again, we're utilizing our new favorite term—closure. The function we're returning is enclosed by the buildClickHandler() function, and will retain the value of "i" we passed to buildClickHandler(). Now, the code that sets onclick handlers for our links will look like this:
$(function () {
$("a.notify").each(function (i, el) {
el.onclick = MOD.buildClickHandler(i);
});
});
Each link's onclick handler is set to the function returned by the MOD.buildClickHandler() function, which receives the link index. The value of the link index is preserved in the onclick handler because of closures.
You're probably thinking to yourself: "Man, couldn't we have just added the onclick handler to the link tag?! Why did we go through all this?" That's certainly a valid question, and in this particular case, it might have been better to do it that way.
Remember when we used to add style attributes to our elements? Remember how CSS meant we didn't have to do that anymore? The idea of removing JavaScript from our markup is very similar. In the same way, we can mark up our elements to control how they're rendered. We can also mark them up to control their behavior.
It's another layer of abstraction, but now we're making behavioral abstractions instead of rendering abstractions. By separating our behavior, we have three levels of abstraction:
Our content (the links)
Style (how the link is rendered)
Behavior (what happens when we do things to the link, such as clicking it)
Although not readily apparent in this example, if we had a lot of links to add handlers to (or whatever else we’re doing), we would be doing it all in one place. If our code was embedded in our HTML, changes would have to be made in many places. This way it’s a matter of only a few lines of code, isolated in a single location.
Also, consider a case where the link needing a particular onclick handler is decided at render time—for example, when each link had a dynamically specified style attribute. By adding our behavior later in the game, we can save lot of noisy JSP needed to determine the onclick handler.
We'll now add some actual functionality. Let's say our JavaScript module includes some data such as a module name, a lookup table, or something similar. It's defined in our module as we'd expect.
var MOD = {
title: "Module MOD",
...
We'd like our handler to access the title property. Our first attempt (which I predict may fail) looks like this:
buildClickHandler: function (i) {
return function () {
alert("You clicked link #" + (i+1) + " from "+title);
};
}
This won't work because title isn't defined in the context of the click handler function. Instead, we get a JavaScript error complaining about an undefined variable. Our second attempt (also doomed) uses the this keyword.
buildClickHandler: function (i) {
return function () {
alert("You clicked link #" + (i+1)
+ " from " + this.title);
};
}
This doesn't give us an error, but it also doesn't give us the title in our alert box. Puzzled, we add the following:
buildClickHandler: function (i) {
alert(this.title);
return function () {
alert("You clicked link #" + (i+1)
+ " from " + this.title);
};
}
Interestingly this works, and displays the module title during the page loading process, every time buildClickHandler() is called. As we've seen, this means different things that we'd often prefer. Here, we'll use the that trick again:
buildClickHandler: function (i) {
var that = this;
return function () {
alert("You clicked link #" + (i+1)
+ " from " + that.title);
};
}
That gives us the result we want. The data from our module is correctly displayed when we click the links with a notify CSS style. Remember, in JavaScript, this won't always work the way we expect it to be!
The final trick is something we'll see in the wild, although we may never use it ourselves. It's possible for us to bury our module data even further, so that it can't be accidentally overwritten and isn't visible to any other JavaScript. It's another technique for creating modules and relies on immediate function execution.
First, we'll take a quick look at what this actually means, before we start muddying the waters by making it do something. See the following JavaScript:
var temp = function () {
return function (s) {
alert(s);
}();
What could be the result of the execution of this JavaScript? Notice the final () characters. We already know that's how we invoke a function. Here, we're defining a function, and then we are invoking it. And the function we're invoking returns a function. The temp variable is set to the return value of our outer function, which is a function that calls alert.
temp("Wow.");
Now, what will this code do? It will pop up an alert box that says"Wow."
We can translate our existing example to this module pattern:
var MOD = function () {
var title = "Module MOD";
return {
buildClickHandler: function (i) {
return function () {
alert("You clicked link #" + (i+1)
+ " from " + title);
};
}
};
}();
One thing to notice is that we no longer need to refer to the module title using the that trick. We can refer to it directly (hooray, closure). Another difference is that nothing else has access to the title, except the code inside our module. In this case, that's not a particularly useful feature. However, consider a case where a user of our module would need to be restricted to only the functionality or the data we exposed.
We could, of course, add a getTitle() method to our return object that returns the value, title. However, the title could not be set unless we also provided a setTitle() function. And they said JavaScript wasn't a real programming language!
Many applications have a requirement to be able to add rows to a form at runtime. Doing so in a conventional web application requires a combination of JavaScript and DOM manipulation.
Our example will use a simple link as the trigger for adding a new recipe ingredient row. Each new row will appear above the Add Ingredient link, and the input focus will be set to the quantity field of the new row. This allows a smooth input flow when using the keyboard. To enter a quantity, the user must hit Tab, enter a name, and hit Tab again. If a new ingredient row is to be entered, the user must hit RETURN on the Add Ingredient link.
Our requirements imply several things. We must know where to add the row on the page (hence in the DOM). We must keep track of the number of ingredient rows in order to maintain the array notation used by each row's form input fields. We must be able to reference the last row added in order to set the focus on the new form field. We should also try to keep the JavaScript as small and isolated as possible.
The first requirement is pretty easy as we already know that the standard Struts 2 form tags will create a row for each element in the form (by default, our form currently mixes the default "xhtml" theme with the simple theme, as we need two form elements on each row). We'll simply create a new table row with an ID. Each new ingredient row will be added immediately before the table row with the link in it.
Note
NOTE: We're abandoning our "unobtrusive JavaScript" for brevity. An accessible, robust site would have a real link in the href attribute that would re-render the page with an addition ingredient row, and we'd add the onclick handler after the DOM is ready. This allows the site to degrade gracefully under browsers with no JavaScript, and aids meeting accessibility requirements.
<tr id="addRow"> <td> </td> <td> <a href="#" onclick="return Recipe.addRow()"> Add Ingredient </a> </td> </tr>
We haven't written our JavaScript yet, but we'll assume a Recipe JavaScript module with an addRow() function. We'll keep our JavaScript in an external file, so we won't have access to the ingredient label defined in our property file. It's obvious when we think about it. However, with so many layers involved, we sometimes forget when we can do what.
We'll also assume that our Recipe module has a prepare() function that takes the label argument and the index of the first new ingredient row. The code for loading the JavaScript and preparing our Recipe module for use is a boring JavaScript as seen here:
<script src="<s:url value="/js/recipe/recipe.js"/>"
type="text/javascript"></script>
<script type="text/javascript">
Recipe.prepare('<s:text name="recipe.ingredient"/>', 3);
</script>
Here comes a bunch of JavaScript. As usual, we'll work through it bit-by-bit, at least the bits that need explaining. In reality, only a few aspects of it are particularly interesting and/or problematic. Much of it is actually refactored functions that concatenate strings.
var Recipe = function () {
var ingredientLabel;
var ingredientCount;
function getNamePrefix() {
return "recipe.ingredients[" + ingredientCount + "]";
};
function createIngredientLabel() {
return ingredientLabel+' #' + (ingredientCount+1)+':';
};
function createInputTag(name, size, id) {
var s = '<input type="text" size="' + size
+ '" name="' + name + '"';
if (id) { s += ' id="' + id + '"'; }
return s + '/>';
}
function createQuantityInput() {
return createInputTag(getNamePrefix() + ".quantity",
5, "count_" + ingredientCount);
};
function createNameInput() {
return createInputTag(getNamePrefix() + ".name", 30);
};
function createIngredientRow() {
return [
'<tr>',
' <td class="tdLabel">',
' <label class="label">',
' ' + createIngredientLabel(),
' </label>',
' </td>',
' <td>',
' ' + createQuantityInput(),
' ' + createNameInput(),
' </td>',
'</tr>'
].join("
");
}
return {
prepare: function (label, count) {
ingredientLabel = label;
ingredientCount = count;
},
addRow: function (label) {
$("#addRow").before(createIngredientRow());
$("#count_" + ingredientCount).focus();
ingredientCount++;
return false;
}
};
}();
Working backwards, once again we see the trailing () characters (we know this trick). This means the Recipe variable, along with our module, will be set to the results of the execution of our function—the two functions we return.
The first function, prepare(), is an initialization function. It sets the module's ingredientLabel and ingrediantCount. We pass the results of a Struts 2 text tag. And since we manually created three ingredient rows, the next index (not count) is three.
This function, and all the rest that use the ingredient's label and count, is relying on closures. Even though we've returned the functions, they're being evaluated in the context of the Recipe module. As we've seen, this means that the returned methods retain their access to the ingredient's label and count. It's like magic.
The addRow() function is the onclick handler for our Add Ingredient link. It uses jQuery's $() function and a CSS selector, as we've already seen. Recall when we first discussed selectors, we defined a style for a particular ID with the "#" character. The CSS selectors work identically when accessing elements with jQuery. $("#addRow") will return a collection of all the DOM elements with an ID, addRow.
In this case, it will only return one object in the collection. However, we don't need to worry about it being in a collection because jQuery's functions are designed to work with $(). JQuery's before() function adds DOM objects immediately before (clever!) the selected DOM objects. In our case, it's a single object, our row with the add link.
The next statement sets the focus on the newly-created ingredient row's quantity input element. Here, we've built the CSS selector from a constant string and the current index value. We increment the ingredient count and return false, so the link won't be followed.
The remaining functions are "private", that is, they're accessible only from the two methods we return when we evaluate the module function. If we add a function to the Recipe module outside of our initial function execution, it won't have access to the private functions.
The createIngredientRow() function returns a string containing all the HTML for an ingredient row. JQuery's before() function can take an HTML string and turn it into DOM elements. Some people prefer direct DOM manipulation, for both performance and technical reasons. However, in this example, we're aiming strictly for convenience.
The createIngrediantRow() function, in turn, calls the remaining functions to build up the more complicated strings. None of them are particularly interesting, although createInputTag() does use JavaScript's ability to accept fewer (or more) parameters than the function is declared with. Here, we use it to optionally provide an id attribute, so that can refer to the quantity field during the addRow() function and set the input focus (as described earlier).
Now, when we click on the Add Ingredient link, we'll generate a new ingredient row, and the focus is set to its quantity field. Our JavaScript is encapsulated. It's relatively easier to modify the generated HTML if our requirements should change, and we can confuse our co-workers with our mad JavaScript skills. What more could one ask for?
The next question of how to dynamically delete a row is left as an exercise for the reader. Oh, snap! Kidding aside, deleting a row adds a considerable amount of irritation to the process. The order of ingredients is usually significant in a recipe, so we would need to either re-compute the indices or remove empty list items on the server side.
With a few minor CSS changes, we end up with the following page, showing one extra ingredient row. It won't win any beauty contests, but we're getting the basic idea.
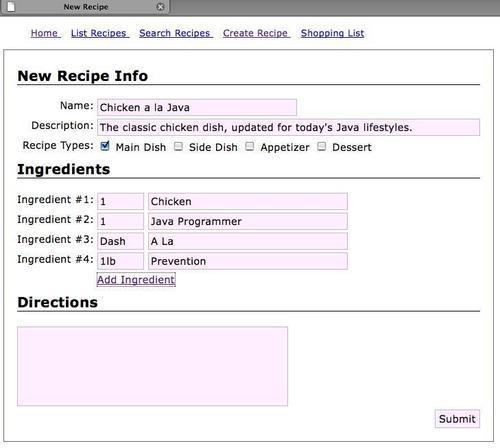
The idea is to communicate how the application behaves to determine if it's on the right track. Obviously, there's a lot more to be done, but we nearly have enough to get the basic idea of how our application will work.
This chapter looks at CSS, which is used for both styling and adding behavior to a page. With only a very minimal amount of CSS, some clean JavaScript, and effective use of the framework, we learn to produce a partially-functional prototype quickly and easily. Bear in mind that as it stands, we're right around a thousand lines of code. For Java, that isn't all that bad.
In the next chapter, we'll look at themes and templates of Struts 2. We will focus on modifying one of the default themes to allow some currently missing functionality, focusing on enhancements that will allow us to have more fun with CSS, and exercise our mad JavaScript skills. We'll also look at FreeMarker, the template language used by Struts 2, which can also be used in place of JSP.
References
A reader can refer to the following: