
In the previous chapter, we looked at the aspects of Struts 2 related to Rich Internet Application (RIA) development. We'll now move into testing, a key component of robust deliverables.
"Testing is for the weak! We are strong!", "QA does our testing", "It's so simple, it doesn't need testing", or "It takes too long to write tests!", and so on. There are plenty of excuses. However, having a comprehensive suite of application tests of various types, frees our minds so that we can worry about more important things such as application functionality and resilience to change.
Instead of worrying if our latest refactoring broke the application, or wondering if the junior (or senior!) developer's awesome new functor library she/he found on the Internet broke the entire application or a rarely-used (but critical) portion of it, we can make changes both small and large with (relative) impunity. It's difficult to oversell the beauty and comfort of never having to say: "I don't want to touch that because I'm not sure what will happen."
Tests can also be used as a part of the acceptance process. By creating tests that follow user stories, it's easier to know when we're done, easier to prove to our clients we're done, easier to understand how the application should behave under various circumstances, and so on.
In this chapter, we'll take a look at the various ways we can test our application, ways that Struts 2 aids in our testing endeavors, and how tests can be used as a part of our application's documentation and deliverables.
In simple words, Test-driven development (TDD) means that we first write the tests and then the code that makes them pass. Pure TDD states that we write code only to fix a failing test, meaning we must first verify that our test has failed. It sounds obvious, but without knowing when we fail, we can't know if we've done something right.
In a very real sense, by writing the tests first, we are designing our application as we go. Rather than using Big Design Up Front (BDUF)—a waterfall-style method—we use our tests as a way to refine our system even as we code. It provides us with live feedback on our API, as well as a way to verify that it works as intended. Think of it as another use case of our API besides the application itself. The more usage data points we have, the happier we are!
Writing tests does take time—like any investment, the returns may not be seen immediately (although sometimes there are immediate benefits, particularly when writing tests expose use cases we hadn't thought of, flaws in design, and so on). As we go into the details of testing, we'll see some reasons why the initial investment is worth the effort, and generally ends up saving time and aggravation down the road.
Unit testing is probably the most familiar aspect of TDD. Even if we're not using pure TDD, it's easy to add unit tests to new codebases. Simply put, unit testing is supposed to exercise and validate a small area (a unit) of code functionality. Unit tests provide a repeatable way to prove our code works (or doesn't work). Adding unit tests to existing code is more difficult, particularly if the code was not written with testability in mind.
In addition to providing executable documentation of our code, which in itself is probably worth the initial test-writing overhead, unit testing can help focus the intent of our code. As unit tests are, according to definition, focused on testing small bits of functionality, it helps remind us to keep our code small and contained. Rather than writing a large, monolithic method that scatters its focus across concerns, we're more likely to divide that method into smaller, more focused, and more easily testable units of work.
As unit tests are targeted at small, focused units of work, most should run quite quickly. Tests that take too long to run, won't be run, thus negating any benefit. However, sometimes long-running tests are required. When this occurs, it's reasonable to break long-running tests into a separate test suite. The tests should still be run. However, both the application and its tests can be segmented in such a way that the small and fast tests can be run frequently, while the long-running tests would be required to run only after major changes.
An example of long-running tests that may be required to run only under specific circumstances are tests that access an actual database. Because of the communication overhead, possible initialization delays, and query performance, some groups of tests might take several minutes, or even hours, to run, rather than the desired several seconds.
In this case, we can break the database tests into a separate suite and run them only when the database access code changes, as a part of acceptance testing on code checking, as part of a continuous integration process, and so on.
In Test Driven, Lasse Koskela refers to the process of test, code, and refactor as the "heartbeat" of TDD. The sequence becomes automatic after consistent implementation. Write failing tests. Write the code that makes them pass. Refactor, lather, rinse, repeat as necessary. It's an iterative process—the stronger the heartbeat, the stronger the code.
JUnit was one of the first comprehensive Java unit testing frameworks. There are resources available by way of its website, books, articles, and so on. It is supported by Ant, Maven, and essentially every common Java IDE.
We'll now take a quick look at using JUnit as a part of TDD, by specifying some functionality, writing the initial tests, and then implementing the functionality itself. We'll create the tests using JUnit and then TestNG (another unit testing framework). We will again use JUnit to create tests for a Struts 2 action. Finally, we'll return to TestNG to show how we can test a Struts 2 interceptor.
Let's take another look at our iterator filter from Chapter 5, where our (gleefully contrived) requirement was to create an iterator filter that removed strings without vowels when using a view-side iterator tag. It's actually a pretty simple requirement, and complete testing might involve the interaction of the iterator itself. However, some testing can be done in isolation.
The code for our SubsetIteratorFilter.Decider consisted of the implementation of the decide() method defined by the Decider interface. Let's pretend we didn't already write the code and that we're creating it using the TDD mindset—write tests that fail, and then create the code that makes them pass.
Our requirements for the decider are the following:
Allow only strings to be compared. Throw an exception if we get a non string.
If a string has a vowel, return true, otherwise, return false.
Pretty simple! We may argue that something this simple doesn't require testing. TDD states that nothing is so simple it doesn't require testing. Note that our original version of the filter was for a single-character string. Now we're assuming that the string can be of any length.
There are several ways to create and run our tests. Full coverage is beyond the scope of this book. We can run our tests from the command line, using a build process, through an IDE, as part of a continuous integration process, and so on.
For the example in the following section, we'll use the Eclipse JUnit test creation for JUnit 4.x and not delve into the intricacies of all the possibilities. There are several books, along with a multitude of articles and tutorials available, that discuss various ways of integrating tests into the development process. The following test will be runnable with a few clicks in nearly any IDE.
Eclipse will create an initial test stub for testing our decide() method. By default, it simply fails—recall that when following the pure TDD paradigm, we always want to start with failing tests. If we run the following stub class as a JUnit test, it fails. Mission accomplished!
package com.packt.s2wad.ch14.examples;
import static org.junit.Assert.*;
import org.junit.Test;
public class TestVowelDecider {
@Test public void testDecide() {
fail("Not yet implemented");
}
}
As seems common with the phrase "Mission accomplished!", we're not finished just yet.
First, we'll create a test to make sure we get back the right Boolean value for various string values. Recall that we want a true for strings with vowels and false otherwise. Again, we write the test first.
Our test is simple—we pass in some strings and make sure we get the right value back.
@Test public void testVowelRecognition() throws Exception {
VowelDecider vd = new VowelDecider();
assertTrue("Has vowels", vd.decide("has vowels"));
assertFalse("Has no vowels", vd.decide("hsnvwls"));
}
The string arguments to assertTrue/False() are human-readable strings that describe the test being run. The second argument is expected to return a boolean. In this case, the decide() method returns a boolean, so no antics are required to manipulate the results of the class under test.
When writing our test, as it is focused very tightly on vowel recognition, we immediately see a hole in our specification. We haven't explicitly specified what happens if there's an empty string. Of course, empty strings don't contain vowels, so technically it should fail the test. However, our use case might demand otherwise. This is a specification ambiguity that should be cleared up and stated explicitly, either in the specification or in the test. In this case, we'll assume that an empty string should return false and should add the appropriate assertion (seen below), as it has no vowels. (We'll handle a null check in the next test case, don't panic.)
assertFalse("Empty string has no vowels", vd.decide(""));
We'll also assume that we created a default implementation of VowelDecider.decide() using Eclipse. Normally, boolean methods will return false by default, which is just fine for now.Our primary goal is to ensure that our tests can fail—we'll make them pass soon enough.
When we run our test against our new default implementation, we should get an immediate failure. Our first test checks for vowels, and the stub implementation returns false. For example, using the Eclipse JUnit integration, we'll see something similar to the following when we attempt the test:
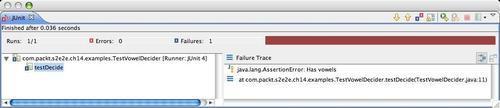
We add our first stab at implementation using the String's matches() method, which should work for us.
public boolean decide(Object o) throws Exception {
String s = (String) o;
return s.matches(".*[aeiouy]+.*");
}
The regular expression says to accept any number of occurrences (including none) of any character, followed by at least one vowel, followed again by any number of occurrences (including none) of any character. We'll also add some sanity check tests to make sure single-character strings work for both a vowel and a non-vowel (which could help identify a broken regular expression).
We probably would have written this test in parallel, or in the same method as our first test. We've broken it out to keep things simple. Moreover, this test checks for a very different error.
Now we'll check that we get an exception if we pass decide() a null or non-String parameter. Again, our goal is to write failing tests first, before implementing the code that makes the test pass. If we can't verify that our tests can fail, we can't trust the test when it passes.
The desired behavior is to throw an IllegalArgumentException for both null and non-String parameters. JUnit 4's @Test annotation optionally accepts a Throwable, with the exception expected to be thrown. In order to test both nulls and non-strings, it's easier to just write two tests, although we could forgo the convenience of the annotations and wrap the separate tests in try/catch blocks.
It's a matter of taste, but the annotation method is more concise and arguably expresses our intent more clearly. In addition, the annotation allows documentation generation tools to pull out more information programmatically.
Our illegal argument tests now look like the following. Remember that we haven't yet implemented the argument-checking functionality in our class under test—we must have failing tests.
@Test(expected=IllegalArgumentException.class)
public void testNonStringArgument() throws Exception {
VowelDecider vd = new VowelDecider();
vd.decide(1);
}
@Test(expected=IllegalArgumentException.class)
public void testNullArgument() throws Exception {
VowelDecider vd = new VowelDecider();
vd.decide(null);
}
Now, when we run our test, it fails because we have no code implementing the parameter type checking shown below. To get our test to pass, we add the highlighted code to our filter implementation. It's as simple as you would expect:
public boolean decide(Object o) throws Exception {
if ((null == o) || !(o instanceof String)) {
throw new
IllegalArgumentException(
"Expects non-null String");
}

String s = (String) o;
return s.matches(".*[aeiouy]+.*");
}
Now our tests pass and, in theory, we have specification-compliant code. Any changes to the code earn a run of the unit tests to make sure we didn't accidentally break something. The tests are run before the code is checked into our source control system.
It's important to note that this method of checking exceptions only ensures we're throwing the appropriate class. It can't be used to check for things such as custom exception values. If we need to test the returned exception for anything other than the type, we need to wrap our class under test in a try/catch block and perform our asserts manually.
One consequence of how we structured our tests is that the first test failure in a test method will stop the test execution immediately. This may not be the desired behavior. We might want to run each test individually and have more granularity over our test successes and failures.
We can also posit that we may not want to construct a new test object (VowelDecider, in this case) for every test. In this case, it doesn't matter. However, if the test setup is particularly time consuming (as we'll see a bit later when we fire up a browser to run client-based tests via Selenium), we'll want to initialize our test harness only once per set of tests.
We first create a test method for each of our asserts (and exception checking) from above, giving us the following collection of methods (code not shown to save space, you're welcome)
@Test public void testSingleVowel() throws Exception {...}
@Test public void testWordsWithVowels() throws Exception {...}
@Test public void testSingleConsonant() throws Exception {...}
@Test public void testNoVowels() throws Exception {...}
@Test public void testEmptyString() throws Exception {...}
{...}
If we want to use the same instance of the VowelDecider for each test, we can create a test class property to hold the filter and instantiate it in a setup method. In JUnit, we annotate a test setup method with the @BeforeClass annotation. This method will be run when the test class is instantiated.
private VowelDecider vd;
@BeforeClass public static void setup() {
vd = new TddVowelDecider();
}
As we would expect, there is a corresponding @AfterClass annotation we can use when we need to perform cleanup on anything used in our test fixture.
JUnit also provides @Before and @After annotations—methods annotated with these will be run before (or after) every test in the class. For example, if the class under test held some internal state that needed to be cleared before every test, the code could be put in a @Before method.
TestNG is a JUnit alternative that may suit some people. It was created to address some of the perceived shortcomings in JUnit, particularly before JUnit 4.x was released. The underlying basics are very similar and it shares support similar to that of JUnit. However, I'd guess it's not as popular due to the name recognition JUnit enjoys.
A TestNG conversion of our TestVowelDecider, NgTestVowelDecider, looks nearly identical, and by statically importing TestNG's JUnit assertion methods, it looks even more identical.
TestNG also provides @BeforeClass and @AfterClass annotations. The basic @Test annotation is the same. Tests can use a Java assert for the actual test, or with the JUnit-compatibility static imports, use JUnit-like assertTrue, assertFalse, and so on. Testing for exceptions is also similar, but we can use an array of expected exception types. An equivalent TestNG test class would look similar to our JUnit test:
package com.packt.s2wad.ch14.examples;
import static org.testng.AssertJUnit.assertFalse;
import static org.testng.AssertJUnit.assertTrue;
import org.testng.annotations.BeforeClass;
import org.testng.annotations.Test;
public class NgTestVowelDecider {
private VowelDecider vd;
@BeforeClass public void setup() {
vd = new VowelDecider();
}
@Test public void testDecide() throws Exception {
assertTrue("Has vowels", vd.decide("has vowels"));
assertFalse("Has no vowels", vd.decide("hsnvwls"));
assertFalse("Empty string has no vowels",
vd.decide(""));
}
@Test(expectedExceptions=IllegalArgumentException.class)
public void testNonStringArgument() throws Exception {
vd.decide(1);
}
@Test(expectedExceptions=IllegalArgumentException.class)
public void testNullArgument() throws Exception {
vd.decide(null);
}
}
TestNG's capabilities go far beyond this limited example. One of my favorite features is the ability to group tests using a simple string name. Rather than grouping tests by package or creating suites manually, we can tag tests with a string and run just those tests. A canonical example is to group tests on the basis of their execution speed. In our current example, they're all pretty fast. So, I'll create an exception-handling group by annotating the two tests that check the exception handling.
@Test(groups="exceptions",
expectedExceptions=IllegalArgumentException.class)
public void testNullArgument() throws Exception {
vd.decide(null);
}
@Test(groups="exceptions",
expectedExceptions=IllegalArgumentException.class)
public void testNonStringArgument() throws Exception {
vd.decide(1);
}
No matter how we're running the tests, we can choose to run only those tests belonging to the exceptions group. For example, the Eclipse TestNG plug-in integrates with the Run dialog allowing us to define a configuration to include only specific test groups. It can often be more convenient to run some tests from our IDE than using an Ant or Maven process. Test groups are cool and can help avoid manual test grouping.
However, when we try to run the exceptions group, it fails. This is because our @BeforeClass setup method is not assigned to a group. We must either assign it to the exceptions group (this is a bad idea, because we need to for all the groups) or add a alwaysRun parameter to the @BeforeClass annotation. Now, our setup method looks like this:
@BeforeClass(alwaysRun=true)

public void setup() {
vd = new VowelDecider();
}
We can also specify that an entire test class belongs to a given group (while still allowing individual methods to belong to additional groups).
There is a lot more we can do with TestNG's annotations—we can specify test ordering dependencies using @Test's dependsOnGroups or dependsOnMethods parameters. We can supply data to test methods using the @DataProvider or @Parameters annotations, or we can supply parameters to the @Test annotation (these are very powerful and allow a variety of ways to parameterize test data). We can specify the number of times to invoke the test method. There's a lot more—spending some time with the TestNG documentation will most likely get us at least a little bit more excited about unit testing.
TestNG is a powerful testing framework that deserves a look if we're not already tied to JUnit. Either framework provides a tremendous amount of functionality and peace of mind when used as part of a comprehensive testing practice.
Adding unit tests to legacy code provides several benefits. For poorly-documented codebases, it is a method of documentation. It increases a developer's understanding of the existing code. It provides a basis against which to refactor and prove the correctness of the refactoring.
Retroactive unit testing might not be as easy as doing it up-front, but can provide a way to reduce existing design debt, and adds value beyond the cost of writing and verifying the tests.
Struts 2's actions can also be unit tested. Some testing requires a fair amount of setup. We won't cover that here, saving it for an advanced Struts 2 book. However, we can easily test a large amount of action functionality using techniques we've seen so far.
Remember when we hinted that we would look at Dependency Injection, otherwise known as Inversion of Control (IoC), again? We're here!
Dependency Injection (DI) is a common technique for deciding which implementation of an interface is used. In order to use DI effectively, we think in terms of using interfaces rather than implementations—this is a good idea anyway. For example, when we use an ArrayList, we almost always declare the type of the variable as List, rather than ArrayList as shown here:
List aList = new ArrayList();
We're doing the same thing in our action used to view recipes. Our FakeRecipeService implements the RecipeService interface:
public class View extends ActionSupport {
private RecipeService recipeService =
 new FakeRecipeService();

public String execute() throws Exception {
recipe = recipeService.findById(recipe.getId());

return SUCCESS;
}
...
One implication is that when we use our recipe service we care only about its RecipeService-ness, not that we're using the FakeRecipeService implementation.
Another implication is that if we create another RecipeService implementation, HibernateRecipeService (that uses Hibernate), the code in the execute() method doesn't need to change. We only need to change recipeService's initialization.
In this code, the View class chooses the RecipeService implementation to use. DI turns this on its head by letting something else determine the implementation we'll use for our recipeService. There are several options for defining which implementation to use. Most options depend on some combination of configuration files, publicly-accessible setter methods, or annotations. We'll look at using Spring and a configuration file in a moment.
public class View extends ActionSupport {
private Recipe recipe;
private RecipeService recipeService;
public String execute() throws Exception {
recipe = recipeService.findById(recipe.getId());
return SUCCESS;
}
public void setRecipeService(RecipeService
recipeService) {
this.recipeService = recipeService;
}
public void setRecipe(Recipe recipe) {
this.recipe = recipe;
}
}
Note that our above code could still choose the RecipeService implementation, but we also allow external forces to set the RecipeService implementation for the class. In fact, we could just instantiate this class, set all the appropriate values, and call execute():
View view = new View();
view.setRecipeService(new FakeRecipeService());
Recipe recipe = new Recipe();
recipe.setId(1);
view.setRecipe(recipe);
String result = view.execute();
Assuming no exception is thrown, we should get the string success in result.
For now, just remember that DI means that the implementation of an interface can be set outside of the class that uses the implementation.
Our current recipe view action returns success no matter what. It might be better if we return a different result depending on whether or not the recipe in question was found. We'll add a requirement (only partially contrived!) that if the service doesn't find a recipe for the supplied recipe ID, we'll return a notFound message. This would allow us to create a result for our action that might show an error page, a page with a search box, and so on.
Then our mini-user story for this is as follows:
Users may search for a recipe by recipe ID
With the following mini stories by way of clarification:
Show an error page if no recipe is found
Otherwise, show the recipe
We can test part of this functionality by making sure our view action returns the appropriate value, notFound or success, under the appropriate conditions.
We already have a FakeRecipeService containing a known set of recipes. It's easy to write a test that will exercise our action (recalling that we must first write a failing test). Our test class is very straightforward and utilizes our new-found love of DI.
package com.packt.s2wad.ch14.test.actions;
...
public class TestRecipeViewAction {
private View view;
private Recipe recipe;
@BeforeClass public void setup() {
view = new View();
view.setRecipeService(new FakeRecipeService());
}
@Test(groups="actions")
void testRecipeFoundResult() throws Exception {
recipe = new Recipe(1, null);
view.setRecipe(recipe);
assertTrue(view.execute().equals("success"),
"Recipe found returns 'success'");
}
@Test(groups="actions")
void testRecipeNotFoundResult() throws Exception {
recipe = new Recipe(42, null);
view.setRecipe(recipe);
assertTrue(view.execute().equals("notFound"),
"Recipe found returns 'success'");
}
}
As we can set the RecipeService implementation used by our recipe viewing action, we can tell it to use our FakeRecipeService. We know the FakeRecipeService has a recipe with ID == 1, and doesn't have one for ID == 42, we'll use those as our tests. (In a real system, we might define known IDs in the fake recipe service.)
The testRecipeFoundResult() test passes, as our action always returns success at the moment. Our other test fails, so that we've at least partially satisfied our "tests must fail" requirement. We then tweak our action slightly:
public String execute() throws Exception {
recipe = recipeService.findById(recipe.getId());
if (recipe.notFound()) {
return "notFound";
}
return SUCCESS;
}
Note
The Recipe's notFound() method is a convenient method to check if the recipe instance is equal to a static Recipe instance we used to indicate a recipe wasn't found. This helps us get rid of the process of null checking of recipes returned by our services, eliminating one class of possible application errors. It's a matter of some debate as to which method is best—scattering null-checks throughout an entire codebase, or creating "empty" objects to represent non existence.
Our tests now pass. We've exercised one portion of our recipe view tests.
This is nice, but how can we configure our Struts 2 application to use a particular implementation of RecipeService across the entire application—not just in test fixtures?
Spring, among a great many other things, is a Dependency Injection container. This means that we can use Spring to manage our DI. For example, we can configure our application to always use our FakeRecipeService implementation via a configuration file.
Struts 2 integrates with Spring with the Struts 2 Spring plug-in. We still need the Spring library—the plug-in provides only the Spring integration, not Spring itself. We'll take a quick look at how to configure our application to use our FakeRecipeService for its RecipeService needs.
We use Spring's ContextLoaderListener to load our Spring configuration files. This is configured in our web.xml file. We will also define a context parameter to tell Spring where to find our Spring configuration files. Here, we'll define them to lie anywhere on our classpath and be named applicationContext*.xml, giving us the option of breaking up our Spring configuration in whatever way seems reasonable.
<context-param>
<param-name>contextConfigLocation</param-name>
<param-value>
classpath*:applicationContext*.xml
</param-value>
</context-param>
<listener>
<listener-class>
org.springframework.web.context.ContextLoaderListener
</listener-class>
</listener>
At the time of writing this book, it was also necessary to set a Struts 2 configuration variable relating to Spring autowiring (it may not be necessary by the time you're reading this). We add the following<init-param> element to our Struts 2 filter definition:
<init-param>
<param-name>
struts.objectFactory.spring.autoWire.alwaysRespect
</param-name>
<param-value>true</param-value>
</init-param>
We'll put an applicationContext.xml file at the root of our classpath, using the XSD-based configuration introduced in Spring 2.0. The outline looks like this:
<?xml version="1.0" encoding="UTF-8"?>
<beans xmlns="http://www.springframework.org/schema/beans"
xmlns:xsi="http://www.w3.org/2001/XMLSchema-instance"
xsi:schemaLocation="
http://www.springframework.org/schema/beans
http://www.springframework.org/schema/beans/ spring-beans-2.5.xsd">
...
</beans>
We can define a recipe service bean in our Spring context file with the following short XML fragment:
<bean name="recipeService"
class="com.packt.s2wad.ch14.recipe.FakeRecipeService"/>
Now, something scary happens: if we visit our view-by-id action, even though we don't define a recipe service in the action, we get a recipe back on a valid ID. The magic here is "autowiring by name". The default behavior is that when a class managed by Spring (as our actions are under the Spring plug-in) contains a public property with the same name as a bean defined in a Spring configuration file, that bean will be injected into the class.
In this case, our recipe view action has a public setter method setRecipeService(), and our FakeRecipeService Spring bean is named recipeService. This means when the action class is instantiated, the action's setRecipeService() method will be called and will be given a new instance of FakeRecipeService.
If we need to use a different RecipeService implementation, we just update our Spring configuration file, and any Spring-managed objects (like our actions) that have a setRecipeService() method will get an instance of the recipeService's type. Rather than changing all the classes that need a RecipeService implementation, we can change the behavior of the entire application through Spring. This is handy (and I am the King of Understatements).
However, we shouldn't forget that when we rely on magic, particularly name-based magic, it can turn around and bite us in uncomfortable places. If our bean names happen to match a property expected elsewhere, it can lead to spectacular stack traces, mysterious class cast exceptions, and much cursing. Actions can also be configured explicitly. Some people prefer this methodology, and it can often eliminate mysterious problems.
Earlier, we tested a Struts 2 action by calling its execute() method. This is helpful, and may be sufficient in many cases. However, it would be more robust to call action methods in the context of things such as a particular interceptor stack configuration.
It's the same with interceptors. We might be able to abstract the bulk of an interceptor's code and test it independently. However, ideally we'd like to call the interceptor's intercept() method (or doIntercept(), and so on, depending on the interceptor's superclass) with an action invocation. This is particularly true if the interceptor is supposed to act only on actions implementing a specific marker interface.
Here, we'll test our trim interceptor with an action invocation. For the most part, things look like a regular unit test. The main difference is that we need to set up some framework objects in order to create a mock action invocation.
We'll use TestNG's @BeforeClass annotation to create a TrimInterceptor instance and set its excluded parameters list. We'll also set up some XWork configuration objects which we can use to generate action invocations. The test class's imports and setup method looks like this:
package com.packt.s2wad.ch14.test.interceptors;
import static org.testng.Assert.assertFalse;
import static org.testng.Assert.assertTrue;
import java.util.HashMap;
import java.util.Map;
import org.testng.annotations.BeforeClass;
import org.testng.annotations.Test;
import com.opensymphony.xwork2.ActionContext;
import com.opensymphony.xwork2.ActionProxyFactory;
import com.opensymphony.xwork2.config.Configuration;
import com.opensymphony.xwork2.config.ConfigurationManager;
import com.opensymphony.xwork2.inject.Container;
import com.opensymphony.xwork2.mock.MockActionInvocation;
import com.opensymphony.xwork2.util.XWorkTestCaseHelper;
import com.packt.s2wad.ch14.interceptors.TrimInterceptor;
public class TestTrimInterceptor {
private TrimInterceptor trim;
protected ConfigurationManager configurationManager;
protected Configuration configuration;
protected Container container;
protected ActionProxyFactory actionProxyFactory;
@BeforeClass
public void setup() throws Exception {
trim = new TrimInterceptor();
trim.setExcludedParams(
"simple, nested.simple, indexed, complex.foo");
configurationManager = XWorkTestCaseHelper.setUp();
configuration =
configurationManager.getConfiguration();
container = configuration.getContainer();
actionProxyFactory =
container.getInstance(ActionProxyFactory.class);
}
...
}
Our test is simple since all the work is done in the helper method. The testTrimming() method takes three arguments—the name of the request parameter, its value, and the value we expect after running through the interceptor.
The request parameter would be the name of the parameter found in a form submission. The trim interceptor uses its excludedParams property to determine whether a particular request parameter should be trimmed.
@Test(groups="interceptors")
public void testTrimming() {
testTrimming("foo", " hello ", "hello");
testTrimming("complex.nar", " hello ", "hello");
testTrimming("simple", " hello ", " hello ");
testTrimming("complex.foo[1]", " hello ", " hello ");
}
For example, based on the excludedParams we set in the setup() method, we would expect a request parameter named foo to be trimmed. Therefore, our first test passes our test helper the untrimmed form submission value, along with the trimmed value we expect the interceptor to pass on to our actions. (There are better ways to consolidate the excludedParams value and the parameter/expected value pairs than what we're using here.)
The testTrimming() method creates the action invocation, runs the interceptor's doIntercept() method, and makes sure we're getting the value we want back.
private void testTrimming(final String param,
final String val,
final String expected) {
MockActionInvocation i = setupInvocation(param, val);
try {
trim.doIntercept(i);
Map<String, Object> params =
i.getInvocationContext().getParameters();
assertTrue(params.containsKey(param),
"Parameters contains param key");
String newVal = ((String[]) params.get(param))[0];
assertTrue(newVal.equals(expected),
"Trim operation correct.");
} catch (Exception e) {
assertTrue(false, "Should not have gotten exception");
}
}
Note
For simplicity, this test assumes that each request parameter name contains a single value, and it's true in our tests. A comprehensive test would also test multiple values.
The setupInvocation() method accepts a parameter name and value, and sets the request parameter. It then creates a mock action invocation, to which we attach the action context containing the request parameters.
private MockActionInvocation setupInvocation(
final String param,
final String val) {
Map<String, Object> params =
new HashMap<String, Object>() {{
put(param, new String[] { val });
}};
MockActionInvocation i = new MockActionInvocation();
ActionContext c = ActionContext.getContext();
c.setParameters(params);
i.setInvocationContext(c);
return i;
}
Note
If we were testing an interceptor that required a specific action (for example, to test an interceptor that acted only on actions that implemented a specific interface), we could provide the action invocation with an instance of the action being invoked.
These techniques allow us to test an interceptor in the context of an action invocation.
Testing our Java code is obviously very important, but it's equally (or maybe even more) important to test the application in its native habitat, that is, in the browser. In some ways, this is among the most important means of testing our application, as the application itself (which lives in the browser) is the deliverable seen by the application's user.
Selenium allows us to test web applications by running a browser. We can use it to click links, check for DOM elements and their contents, submit forms, and so on. Basically, anything that a user can do with our web application can be done using Selenium.
Selenium can drive several browsers, including Internet Explorer, Firefox, and Safari. These examples were tested using Firefox, but they're simple and should work across browsers. Note that as of IE 6 there were, as seems typical, the occasional gotcha. When possible, it's often easier to test using Firefox.
In order to integrate our Selenium tests into our unit testing, we'll use Selenium RC (Remove Control) and the Java client driver. In a nutshell, our tests use the client driver to communicate with the Selenium RC server, which in turn drives the browser.
For our purposes, we're just going to run the server from the command line, which is as easy as starting up the server jar:
$ java -jar selenium-server.jar
For our tests, we'll look at a quick iteration of a login screen and make sure that what we expect to see on the screen actually shows up under various scenarios. The login screen is a typical login, containing both email and password fields. There's a message for failed logins, and we're taken to a welcome page on a successful login.
For this example, we'll keep things simple and contained to a single class. Not all of the source will be presented here. It's quite likely you'll find your own set of convenience classes, methods, suites, and so on. This is just an overview of the process.
The first sanity check is to make sure the appropriate form fields are displayed in the browser. We can use Selenium to check for DOM elements with given IDs, so this is not a problem. Following the TDD methodology, we write our test first, before creating the page. In this case, we actually created the page stub first. In pure TDD, we'd first test for the presence of the page, and it would probably be a valuable test to add.
Our test class needs to perform some Selenium housekeeping. We'll use TestNG's @BeforeClass and @AfterClass annotations to do this for us. We're simply starting up a browser at the beginning of all the tests in the class and closing it afterwards. If we had a lot more test classes, we'd probably want to create the browser before all the tests ran. This will help avoid the additional overhead of browser startups.
Remember that tests must be as fast as is practically possible, but shouldn't be much faster. The functional tests we're showing here might live in their own TestNG group, giving us the ability to run them separately from other groups:
private static String LOGIN_INPUT_URL =
"http://localhost:8080/user/login!input.action";
private Selenium selenium;
@BeforeClass public void setup() {
selenium = new DefaultSelenium(
"localhost", 4444, "*firefox", LOGIN_INPUT_URL);
selenium.start();
}
@AfterClass public void tearDown() {
selenium.stop();
}
We'll add a convenience method to test for the presence of an element in the DOM, taking an explanatory message and a Selenium selector. (See the Selenium documentation for a complete explanation of querying the DOM. There are many ways we can query elements, including CSS selectors.)
public void assertElementPresent(final String msg,
final String selector) {
assertTrue(msg + ": '" + selector + "'",
selenium.isElementPresent(selector));
}
We'll then write our first simple test (designed to fail) that tests the presence of the form, the two form text inputs, and a login button with the text Login.
@Test(groups="functional")
public void testLoginFormFields() {
selenium.open(LOGIN_INPUT_URL);
assertElementPresent("login form", "id=loginForm");
assertElementPresent("userName field", "id=email");
assertElementPresent("password field", "id=password");
assertElementPresent("Login button",
"//input[@value='Login']");
}
The test will fail because the form doesn't exist. We create the login form as a normal Struts 2 form, nothing terribly exciting here:
<s:form id="loginForm" action="login" method="post">
<s:textfield id="email" name="email" label="Email"/>
<s:password id="password" name="password" label="Password"/>
<s:submit value="Login"/>
</s:form>
Running the test again confirms that the form fields we expect to exist are now present. We continue writing our tests to verify proper validation behavior. If either field is missing, we should get an error message to that effect. Shown below is the email validation test. Password validation is essentially identical. (The typeOrClear() method is a helper that enters text into text fields.)
@Test public void testEmailValidation() {
testLoginFormFields();
typeOrClear("email", null);
typeOrClear("password", "ohai");
selenium.click("//input[@value='Login']");
selenium.waitForPageToLoad("10000");
// Should not have moved to /welcome.action.
assertUrlEndsWith("/login.action");
assertElementPresent("An error message span",
"css=span[class~='errorMessage']");
String text =
selenium.getText("css=span[class~='errorMessage']");
assertTrue(text.equals("Email is required."));
}
Note that if both fields are omitted, there will be two errorMessage spans. It becomes more difficult to get the text in that case. However, as any CSS selector may be used, it's simple enough to build up the appropriate selector. At the same time, we probably don't want to do that. It's much cleaner to appropriately assign an ID to the span, table row, or similar objects. This is another great opportunity to further customize our FreeMarker tag templates to mark up our HTML in order to make testing easier (and hopefully, much more likely to be done).
Our next test is to make sure a failed login puts an action error in the JSP. We'll specify that action errors will appear in a<div> with an id of flash and a class of error. The important consideration is that we're specifying how we'll identify page elements much earlier. As we've seen, the more we can mark things up, the better off we are.
The relevant portion of the test looks like following:
assertUrlEndsWith("/login.action");
assertElementPresent("The flash span",
"css=div[id=flash][class~='error']");
String text =
selenium.getText("css=div[id=flash][class~='error']");
assertTrue(text.indexOf("Login failed") > -1);
Our initial run will fail. Our action doesn't set an action error, and our JSP doesn't do anything with action errors that don't exist. Remember, TDD says write failing tests first. Tests that cannot fail are useless.
In our JSP, we test for the presence of action errors. If there are any, we render a<div> with our expected ID and class, using the standard Struts 2<s:actionerror/> tag inside, at least for now.
The last test we'll look at is the results of a successful login. This is little more than checking the subsequent URL, although in the actual system we might check to make sure that user-specific information was on the page, and so on. We've configured a "welcome" action in our default package, and we know its URL.
assertUrlEndsWith("/welcome.action");
A real test system might process any Struts 2 configuration files to avoid needing to know the actual URL. We could also check for the URL. However, we prefer using configuration information to determine the action suffix, and so on.
The tests might also be prototyped using the Selenium IDE. This is a Firefox plug-in that can record browser sessions. This tool can be used by the developer, or with a good testing or QA department. These tests may be manipulated by a developer to create the unit tests (it can output Java code directly, but it usually needs work), or used to test from within the browser.
Client-side testing can become very complex, particularly with the addition of AJAX and other rich client behavior. With today's heavy use of JavaScript and DOM manipulation, the ability to mechanically verify behavior is very important, even if it's not practical to verify every bit of HTML or behavior on a page.
There are many other forms of testing and development methodologies, and ways of integrating them into the process. We'll take a very brief look at other test tools in our arsenal. There are essentially an unlimited number of ways any of these methods fit into our development process. It is often dependent on the type of application, the nature of the client relationship, and so on.
It's possible to develop every application with some level of the following practices in place. The peace of mind they can provide is generally worth the additional effort, and when automated, they provide free benefits for the rest of the life of the project.
The client-focused Selenium testing discussed earlier may be used as a part of an acceptance testing process. Acceptance testing can be used to verify the correct operation of our user stories (remember those?)
When we unit-tested our Struts 2 action for listing recipes, we had a couple of "mini stories" accompanying it. They wouldn't necessarily belong in a user story, but might belong in an acceptance test.
Acceptance testing is a mechanism for determining the correct application behavior. It provides a metric for knowing the system is as the client requires. Therefore, acceptance tests are best-owned by our client, as they're the ones to whom the tests will be delivered and they should be most interested in knowing when the application is done.
Acceptance tests should preferably be written by the client with us (the developer), in a non-technical language (the language should match the domain of the application). The tests should be focused, precise, and clear. They should focus on underlying functionality and not bring in too much detail of how that functionality is being implemented.
By focusing on "what" and not "how", we get a verifiable snapshot of the system's behavior. For web applications, this looks a lot like the client-side testing we've already discussed. Indeed, a subset of the client-side tests may very well be used as a part of an acceptance test suite. By driving a browser, we're testing our deliverable from the standpoint of a user.
Acceptance testing might also include various database processes such as batch jobs, complicated queries, actions across systems, and similarly complex tasks. My admittedly simplistic take on this is that they're a subset of unit and client-side tests. However, they may exist as a separate documentation (or however they're being expressed), and hence are different, even if only in intent.
Load testing the system should be done fairly early in the process, and not as an afterthought. Integrating an automated load test into a continuous build system can provide much needed input towards identifying problems early in the process—it's easier to confront issues immediately upon noticing them. Load testing can help point out configuration errors, database bottlenecks, scalability issues, shared data abuse, and more. Even a small amount of load testing can be valuable.
JMeter is a Java-based desktop application that performs functional load testing. It can simulate any number of users making variably-timed requests, including ramping up usage over time. JMeter is designed primarily as a load tester and not as a functional tester (for which we've used Selenium). Its main purpose is to make requests, rather than examining the results of those requests, and to time the requests.
JMeter includes a GUI for creating and running the test plans. Test plans are saved in an easy-to-understand XML format, allowing simple and automated test plan generation through any language that can manipulate XML.
JMeter provides many ways to vary the requests being made, including timing differences, request parameter variation, normal and Ajax requests, GET and POST requests, request interleaving, and more (see the JMeter documentation for further details).
As a simple example, we'll configure a load test of an ingredient list page, simulating 25 users, ramping up over a period of 30 seconds, each requesting the ingredient list page, in HTML format, four times, with a delay of 0.5-1.5 seconds between each request. This sounds complicated, but it only scratches the surface of what JMeter and similar tools are capable of.
It might sound like JMeter provides more than what is necessary, but understanding how our application works under various types of loads can be critically important. Not all applications are used constantly throughout the day. Some might experience a heavy load early in the morning, or during end-of-the-week reporting, and so on.
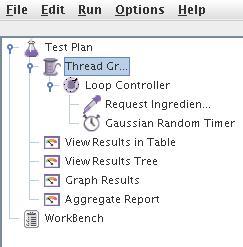
The JMeter GUI screenshot shown above shows a tree on the left, which represents the test plan and its nested elements. Each thread group (represented by a spool of thread) represents a certain number of users. Here, we see a single thread group, each containing a simple loop controller that repeats itself a specified number of times. We'll request our ingredient list, wait a variable amount of time, and repeat. We've also specified various views of our requests, which we'll cover in a moment.
The thread group contains 25 users, ramping up their requests over 30 seconds, which will loop twice (we won't show a picture of this here, but we'll see it when we look at the XML test plan). The request is simply a GET request to our HTML ingredient list page. The Gaussian Random Timer element allows us to choose a constant offset, which specifies the minimum time delay, and a random component.
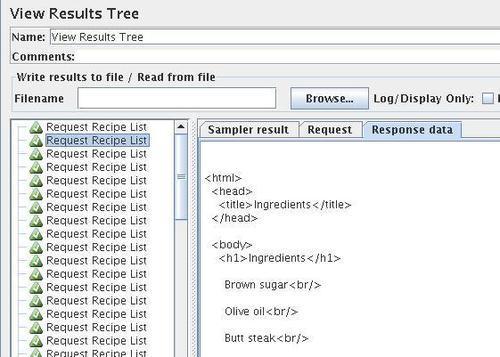
When we run this test plan, we can examine the results in several ways. The View Results Tree element provides a view of each request, including the response data. On the previous screen, we see the basic HTML returned by our test ingredient listing.
We can also get an aggregate report of our test plan, which will return the number of samples, the average time-per-request, the minimum and maximum times, and so on. This provides a high-level view of the load test results.
Our test plans are saved in an XML format. The test plan shown above creates around 200 lines of XML code. We'd never create these XML test plans by hand—we'd either use the GUI or generate them programmatically. One feature not discussed here allows our test plans to use data sets to generate requests, form parameters, and so on. These data sets could also be generated automatically from actual system data.
Recovery testing is not so much an issue of application testing, but of process testing, on several levels. It includes making sure that the source control system is set up properly. It includes ensuring the build processes is repeatable, including across build machines, along with deployment and configuration scripts, and so on—basically anything that is involved throughout the entire life of application development.
How much recoverability testing is required is closely related to the deliverables. If we're just delivering a WAR file, we may not feel the need to test our local backup system (but we have a working one, right?) or other well-known processes. If the deliverable includes a turn-key, source- and design-included application along with training, then a higher standard needs to be followed and be integrated into the client's preferred mechanisms if possible.
Testing provides a huge amount of freedom. It can reduce the amount of written documentation and provide an executable specification. Testing covers a wide range of topics, from the smallest unit of code to the behavior of the system as a whole, under various scenarios.
In the next chapter, we'll continue looking at application documentation (remember, tests are documentations!), but from a more traditional standpoint, that is, documenting our code the old-fashioned way. We will also discover some tools and methodologies that go beyond simple Javadocs.
References
A reader can refer to the following:
http://en.wikipedia.org/wiki/Test-driven_development http://c2.com/cgi/wiki?TestDrivenDevelopment
TestNG