
In this chapter we are going to provide a hands on introduction to the core components of the Oracle SOA Suite, namely the Oracle BPEL Process Manager (or BPEL PM) and the Oracle Service Bus (or OSB). We will do this by implementing an Echo service, a trivial service, which takes a single string as input and then returns the same string as its output.
We will first use JDeveloper to implement and deploy this as a BPEL process. During which, we will take the opportunity to give a high level tour of JDeveloper in order to familiarize you with its overall layout.
Once we have successfully deployed our first BPEL process, we will use the BPEL Console to execute a test instance of our process and examine its audit trail.
Next we will introduce the Service Bus, and look at how we can use its web based console to build and deploy a proxy service on top of our BPEL process. Once deployed, we will use the tooling provided by the Service Bus Console to test our end-to-end service.
Before creating and running your first service, you will need to download and install the SOA Suite. As of the time of writing, the Oracle SOA Suite 10.1.3.4 deploys on Oracle Application Server 10.1.3.4 (and WebLogic 9.2), apart from the Oracle Service Bus 10gR3 which deploys on WebLogic 10gR3.
This is likely to change in the near future, with all components being certified to deploy on WebLogic 10gR3. Rather than document an installation process which is likely to be out of date almost as soon as the book is published, we have decided to make this available separately from the book.
To download the installation guide, go to the support page of Packt Publishing (www.packtpub.com/support ); from here follow the instructions to download a ZIP file containing the code for the book. Included in the ZIP will be a PDF Document named SoaSuiteInstallation.pdf.
This document details the quickest and easiest way to get the SOA Suite up and running. It covers the following:
Ensure that the Oracle SOA Suite has started (as described in the above mentioned installation guide) and start JDeveloper. When you start JDeveloper for the first time, it will be pretty empty as shown in the following screenshot:
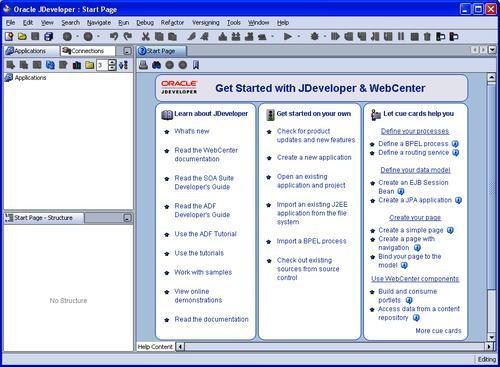
The top left hand window is the Applications navigator, which lists all the applications that we are working on (which is currently empty as we have not yet defined any). With JDeveloper an application is a grouping of one or more related projects. A project is a collection of related components that make up a deployable resource (for example a BPEL process, Java Application, web service, and so on).
Within the context of the SOA Suite, each BPEL process is defined within its own project, with an application being a collection of related BPEL Processes.
Next to the Applications navigator tab is the Connections tab. If we click on this, it will list the types of connections we can define to JDeveloper. A connection allows us to define and manage links to external resources, such as databases, application servers, and rules engines.
Once defined, we can expand a connection to inspect the content of an external resource, which can then be used to create or edit components which utilize the resource. For example, you can use a database connection to create and configure a database adapter to expose a database table as a web service.
Connections also allow us to deploy projects from JDeveloper to the external resource. If you haven't done so already, you will need to define a connection to the integration server (as described in the installation guide); we will need this to deploy our BPEL processes from within JDeveloper.
The main window within JDeveloper is used to edit the artifact we are currently working on (for example BPEL process, Extensible Stylesheet Language Transformations (XSLT), Process, XSLT Transformation, Java code, and so on). The top of this window contains a tab for each resource we have open, allowing you to quickly switch between them.
At the moment, the only artifact that we have opened is the Start Page, which provides links to various documents on JDeveloper, and so on.
The bottom left hand corner contains the Structure window; the content of this depends on the resource we are currently working on.
Within JDeveloper, an application is the main container for our work; it consists of a directory where all our application projects will be created.
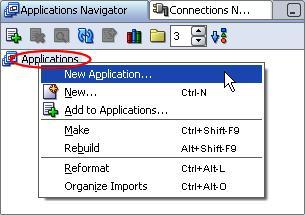
So, before we can create our Echo BPEL process we must create the application to which it will belong. Within the Applications Navigator tab in JDeveloper right-click on the Applications element (circled in the following screenshot) and select New Application.
This will launch the Create Application dialogue as shown in the following screenshot:
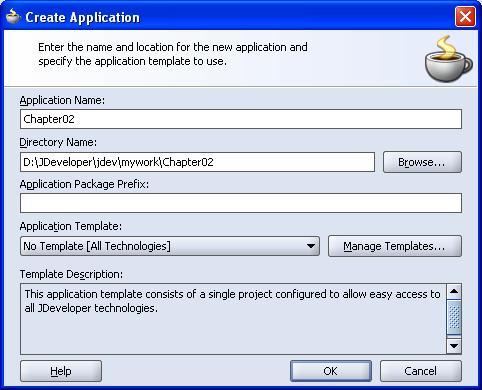
Give the application an appropriate name, such as Chapter02.
We can specify the top level directory in which we want to create our applications; by default JDeveloper will set it to:
<JDEVELOPER_HOME>jdevmywork<Application Name>
Normally, we would specify a directory that's not under JDEVELOPER_HOME, as this makes it simpler to upgrade to future releases of JDeveloper.
In addition you can specify an Application Template. This is only applicable if creating a Web or Java Application. For our purposes, always keep the default No Template [All Technologies] and click OK.
Next JDeveloper will prompt us with the option to create a new empty project; as we don't need this, select Cancel.
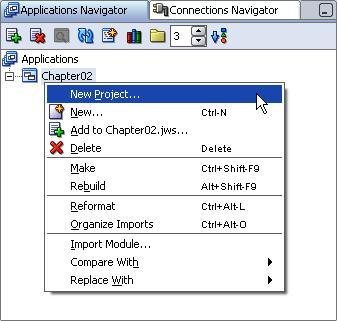
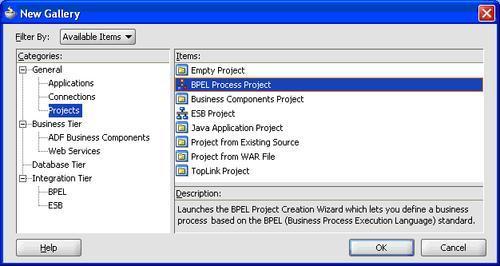
The next step is to add a BPEL project to our newly created application. Right-click on the application name and select New Project, as shown in the following screenshot:
This will launch the project gallery window, where we can specify the type of project we want to create. Select BPEL Process Project as shown in the following screenshot:
This will launch the BPEL Project Creation Wizard as shown in the following screenshot:

Give the process a name, that is Echo, and select a template of type Synchronous BPEL Process and click Finish. JDeveloper will create a skeleton BPEL process and a corresponding WSDL that describes the web service implemented by our process.
If we look at the process that JDeveloper has created (shown in the following screenshot), we can see in the center is the process itself, which contains the activities to be carried out. At the moment it just contains an initial activity for receiving a request and a corresponding activity for sending a response.
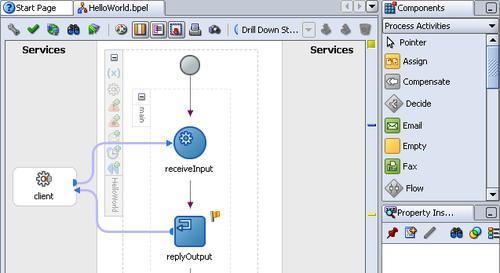
Either side of the process we have a swim lane which contains PartnerLinks that represent either the caller of our process, as is the case with the client PartnerLink, or services that our BPEL process calls out to. This at the moment is empty as we haven't defined any.
The Components window (to the right of our process window in the previous screenshot) lists all the Process Activities that we can use within our process. To use any of these, simply drag-and-drop them onto the appropriate place within our process.
If you click on the Process Activities drop down, you also have the option of selecting Services, which we use whenever we need to call out to an external system.
Getting back to our skeleton process, we can see it consists of two activities: receiveInput and replyOutput. In addition it has two variables: inputVariable and outputVariable which were created as part of our skeleton process.
The first activity is used to receive the initial request from the client invoking our BPEL process; on receipt of this request it will populate the variable inputVariable with the content of the request.
The last activity is used to send a response back to the client, the content of this response will contain the content of outputVariable.
For the purpose of our simple Echo process, we just need to copy the content of the input variable to the output variable.
In BPEL the <assign> activity is used to update the values of variables with new data. The assign activity typically consists of one or more copy operations. Each copy consists of a target variable, that is the variable that you wish to assign a value to and a source; this can either be another variable or an XPath expression.
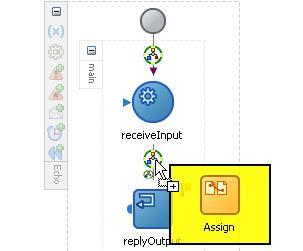
To insert an Assign activity, drag one from the Component pallet on to our BPEL process at the point just after the receiveInput activity, as shown in the following screenshot:
To configure the Assign activity, double-click on it to open up its configuration window. Click on the Create menu and select Copy Operation... as shown in the following screenshot:
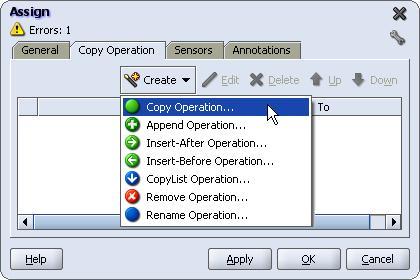
This will present us with the Create Copy Operation window as shown:
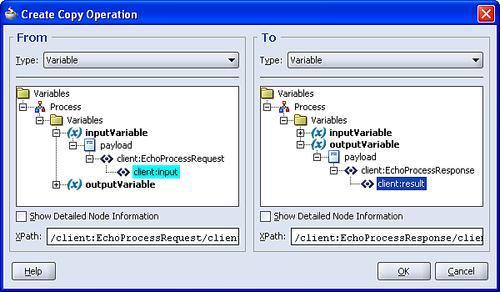
On the left-hand side we specify the From variable, that is where we want to copy from. For our process we want to copy the content of our input variable to our output variable. So expand inputVariable and select / client:EchoProcessRequest/client:input as shown in the previous screenshot.
On the righthand side we specify the To variable, that is where we want to copy to. So expand outputVariable and select /client:EchoProcessResponse/client:result.
Once you've done this click OK, and then OK again to close the Assign window.
This completes our process, so click on the Save All icon (the fourth icon along, in the top left-hand corner of JDeveloper) to save our work.
Note
As a BPEL project is made up of multiple files, we typically use Save All to ensure all modifications are updated at the same time.
Our process is now ready to be deployed. Before doing this make sure the SOA Suite is running and that within JDeveloper we have defined an Integration Server connection (as described in the installation guide).
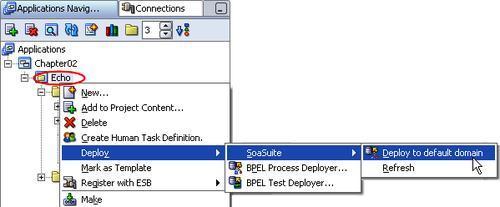
To deploy the process, right click on our Echo project (circled in the next screenshot) and then select: Deploy | SoaSuite | Deploy to default domain.
This will start the process of building our process, JDeveloper will open up a window below our process containing three tabs: Messages, BPEL Messages, and Apache Ant to which it outputs the status of the deployment process.
On completion of the build process the Message tab will state Please check Ant log to determine whether the project deployed successfully. If you click on the Apache Ant tab it should show the message BUILD SUCCESSFUL, as shown in the following screenshot:.
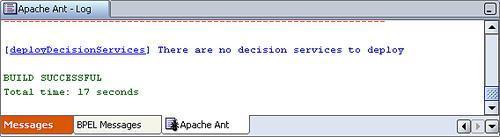
If you don't get this message, check the build log for details of the error and fix it accordingly.
Now that our process has been deployed, the next step is to run it. A simple way to do this is to initiate a test instance using BPEL Control: the web-based management console for BPEL PM.
To launch BPEL Control, from the programs menu in Windows, select:
All Programs | Oracle - Oracle_Home | Oracle BPEL Process Manager | BPEL Control.
Or alternatively, open up a browser and enter the URL:
http://<hostname>:<port>/BPELConsole
This will bring up the login screen for BPEL Control; log in as bpeladmin (default password welcome1). This will take us to the BPEL Control Dashboard as shown in the following screenshot:
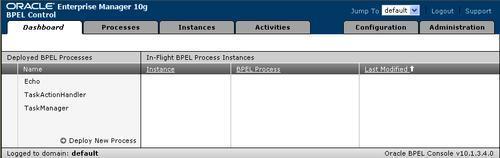
The Dashboard provides us with a summary report on a BPEL domain. On the left hand side we have a list of deployed processes, which includes the two default processes created by BPEL as well as the Echo process that we have just deployed.
On the right hand-side it lists BPEL processes that are currently executing and the most recently completed processes. At the moment this is empty as we haven't run any yet.
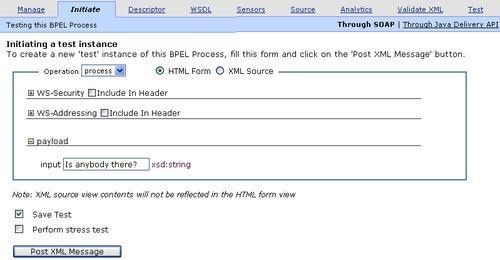
From here click on the process name, that is Echo; this will take us to the Initiate screen for running a test instance of our process, as we can see in the following screenshot:
When we created our process, JDeveloper automatically created a WSDL file which contained the single operation (that is process). However, it's quite common to define processes that have multiple operations, as we will see later in this book.
The Operation drop-down allows us to specify which operation we want to invoke; in our case, it's automatically defaulted to process.
When you select the operation to invoke, the console will generate an HTML Form, with a field for each element in the message payload of the operation (as defined by the WSDL for the process). Here we can enter into each field the value that we want to submit.
For operations with large message payloads, it can be simpler to just enter the XML source. If you select the XML Source radio button, the console will replace the form with a free text area, with a skeleton XML fragment into which we can insert the required values.
You may have noticed that in the previous screenshot we have checked the box Save Test; this will cause BPEL PM to save our test values. So next time we initiate a test process, those values will be pre-populated in the form, which we can then modify if required. This can be quite useful if we have several fields as it can save us the hassle of rekeying them every time.
To execute a test instance of our process, enter some text in the input field and click Post XML Message. This will cause the Console to generate a SOAP message and use it to invoke our Echo process.
Upon successful execution of the process, our test page will be updated to show the response returned by our process. Here we can see that the result element contains our original initial input string as shown in the following screenshot:
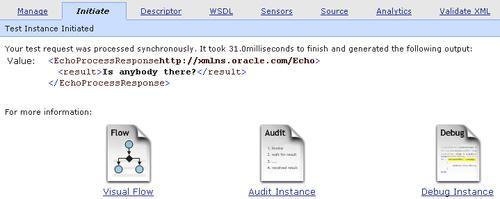
If we click on the Visual Flow link, this will display details of the process instance, along with a graphic audit trail showing the activities that have been executed, as shown in the following screenshot:
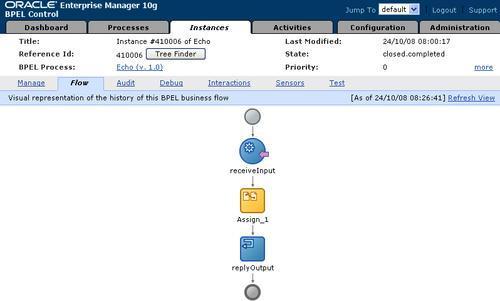
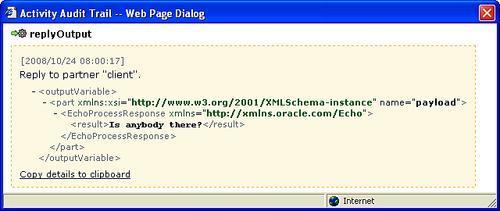
Clicking on any of the activities in the audit trail will pop up a window displaying details of the actions performed by that activity. In the following figure we can see details of the message sent by the replyOutput activity.
If you close this and return to the Dashboard tab in BPEL Control, you will see that our process is listed under the Recently Completed BPEL Process Instances section. If you click on the instance ID it will take you back to the process audit trail.
This completes development of our first BPEL process; the next step is to call it via the service bus. In preparation for this, we will need the URL for the WSDL of our process. To obtain this, from the BPEL Dashboard click on the Echo process, and then the WSDL tab; this will display a link for the WSDL location and Endpoint as shown in the following screenshot:
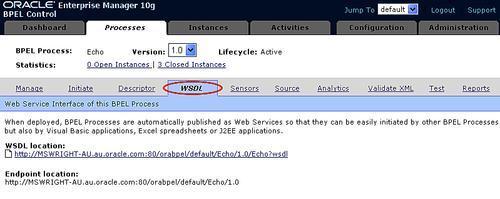
If you click on this link, the BPEL Console will open a window showing details of the WSDL. Make a note of the WSDL location as we will need this in a moment.
Rather than allow clients to directly invoke our Echo process, best practice dictates that we provide access to this service via an intermediary or proxy, whose role is to route the request to the actual endpoint. This results in a far more loosely coupled solution, which is key if we are to realize many of the benefits of SOA.
In this section, we are going to use the Oracle Service Bus to implement a proxy Echo service, which sits between the Client and our Echo BPEL Process as illustrated in the following figure:

It is useful to examine the above scenario to understand how messages are processed by OSB. The Service Bus defines two types of services:
A proxy service
A business service
The proxy service is an intermediary service that sits between the client and the actual end service being invoked (that is our BPEL process in the previous example).
On receipt of a request, the proxy service may perform a number of actions on the request, such as validating, transforming, or enriching it before routing it to the appropriate business service.
Within the Oracle Service Bus, a business service is a definition of an external service for which OSB is a client. This defines to OSB how to invoke the external service and includes details such as the service interface, transport, security, and so on.
In the above example we have defined an Echo Proxy Service, which routes messages to the Echo Business Service, which then invokes our Echo BPEL Process. The response from the Echo BPEL Process follows the reverse path, with the proxy service returning the final response to the original client.
Ensure that the Oracle Service Bus has started and then open up the Service Bus Console. Either do this from the programs menu in Windows, using the following path:
Oracle Weblogic | User Projects | OSB | Oracle Service Bus Admin Console
Or alternatively, open up a browser and enter the URL:
http://<hostname>:<port>/sbconsole
Hostname represents the name of the machine on which OSB is running and port represents the port number. So if OSB is running on your local machine using the default port, enter the following URL in your browser:
http://localhost:7001/sbconsole
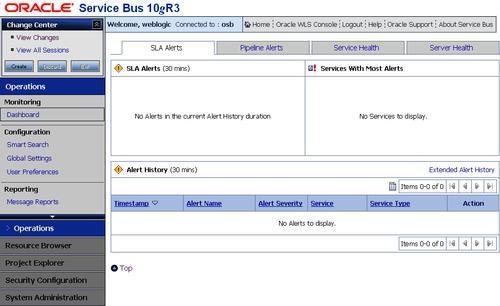
This will bring up the login screen for the Service Bus Console; log in as weblogic (default password weblogic). By default the OSB Console will display the Dashboard view which provides a summary of the overall health of the system.
Looking at the console we can see it divides into three distinct areas. In the top left-hand corner is the, the Change Center, which we will cover in a moment. Also on the left, below the Change Center is the navigation bar which we use to navigate our way round the console.
The navigation bar is divided into the following sections: Operations, Resource Browser, Project Explorer, Security Configuration, and System Administration. Clicking on the appropriate section will expand that part of the navigation bar, and allow you to access any of its sub-sections and their corresponding menu items.
Clicking on any of the menu items will display the appropriate page within the main window of the console. In the previous screenshot, we are looking at the Dashboard view, under Monitoring which is part of the Operations section.
Before we can create a new project, or make any configuration changes through the console, we must create a new change session. A change session allows us to specify a series of changes as a single unit of work; these changes won't come into effect until we activate a session. At any point we can discard our changes, which will cause OSB to roll back those changes and exit our session.
While making changes through a session, other users can also be making changes under separate sessions. If users create changes that conflict with changes in other sessions then the Service Bus will flag that as a conflict in the Change Center and neither user will be able to commit their changes until those conflicts have been resolved.
To create a new change session, click on Create in the Change Center; this will update the Change Center to indicate a session and the user who owns that session. As we are logged in as weblogic, it will be updated to show weblogic session as shown in the following screenshot:

In addition you will see that the options available to us in the Change Center have changed to Activate, Discard, and Exit.
Before we can create our Echo proxy service we must create an OSB project in which to place our resources. Typical resources include WSDL, XSD schemas, XSLT, and XQuery as well as Proxy and business services.
Resources can be created directly within our top level project folder, or we can define a folder structure within our project into which we can place our resources.
Note that from within the same OSB domain you can reference any resource regardless of which project it is included in.
The Project Explorer is where we create and manage all these artifacts. Click on the Project Explorer section within the navigation bar. This will bring up the Projects view as shown in the following screenshot:
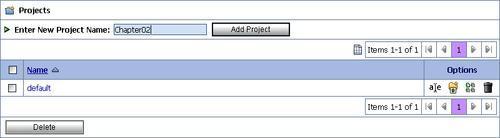
Here we can see a list of all projects defined in OSB, which at this stage just includes the default project. From here we can also create a new project; enter a project name, for example Chapter02 as shown in the screenshot, and then click Add Project. This will create a new project and update our list of projects to reflect this.
Click on the project name; this will take us to the Project View as shown in the following screenshot.
We can see that this splits into three sections. The first section provides some basic details about the project including any references to or from artifacts in other projects as well as an optional description.
The second section lists any folders within the current project folder, and provides the option to create additional folders within the project.
The final section lists any resource contained within this folder, and provides the option to create additional resource.
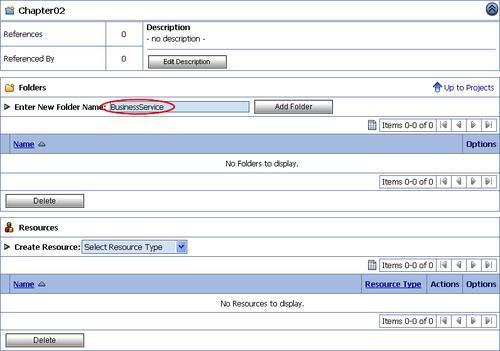
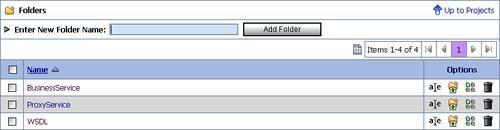
We are going to create the project folders BusinessService, ProxyService, and WSDL, into which we will place our various resources. To create the first of these, in the Folders section enter BusinessService as the folder name (circled in the previous screenshot) and click Add Folder. This will create a new folder and update the list of folders to reflect this.
Once created, follow the same process to create the remaining folders; your list of folders will now look as follows:
Before we can create either our proxy or business service we need to define the WSDL on which the service will be based. For this we are going to use the WSDL of our Echo BPEL process that we created earlier in this chapter.
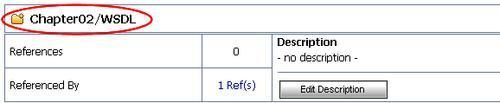
Before importing the WSDL, we need to ensure that we are in the right folder within our project; to do this click on the WSDL folder in our Folders list. On doing this the project view will be updated to show us the content of this folder, which is currently empty. In addition the project summary section of our project view will be updated to show that we are now within the WSDL folder, as circled in the following screenshot:
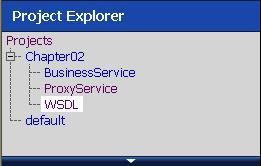
If we look at the Project Explorer in the navigation bar, we can see it has been updated to show our location within the projects structure. By clicking on any project or folder in here the console will take us to the project view for that location.
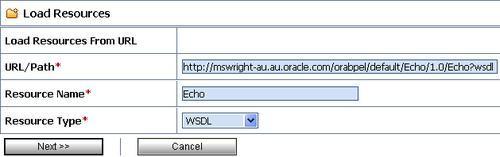
To import the Echo WSDL into our project, click on the drop down next to Create Resource in the Resources section and select Resources from URL as shown in the following screenshot:
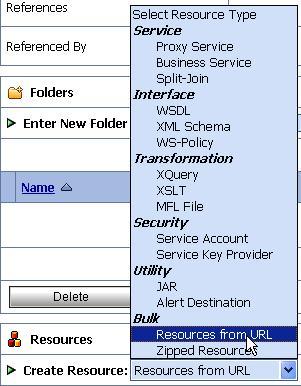
This will bring up the page for loading resources from a URL as shown in the following screenshot:
Note
A WSDL can also be imported from the file system by selecting the WSDL option from the Create Resource drop down.
In the URL/Path enter the URL for our Echo WSDL. This is the WSDL Location we made a note of earlier (in the WSDL tab for the Echo process in the BPEL Console) and should look like the following:
http://<hostname>:<port>/orabpel/default/Echo/1.0/Echo?wsdl
Enter an appropriate value for the Resource Name (for example Echo), select a Resource Type of WSDL and click Next.
This will bring up the Load Resources window, which will list the resources that OSB is ready to import.
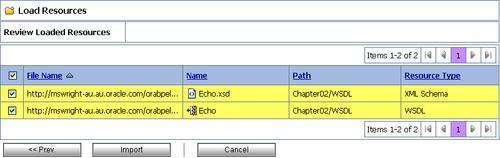
You will notice that in addition to the actual WSDL file, it will also list the Echo.xsd. This is because the Echo.wsdl contains the following import statement:
<types>
<schema xmlns="http://www.w3.org/2001/XMLSchema">
 <import namespace="http://xmlns.oracle.com/Echo"
schemaLocation="Echo.xsd"/>

</schema>
</types>
This imports the Echo XML Schema, which defines the input and output message of our Echo service. This schema was automatically generated by JDeveloper when we created our Echo process; in order to use our WSDL we will need to import this schema as well.
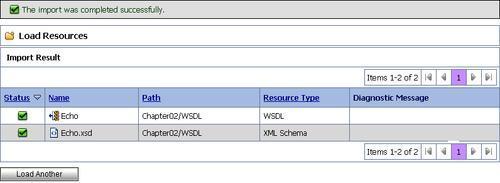
Click Import; the OSB Console will confirm that the resources have been successfully imported, and provide the option to Load Another resource, as shown in the following screenshot:
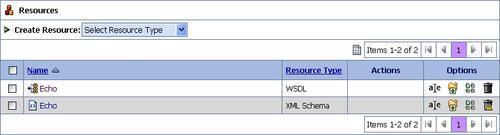
Click on the WSDL folder within the Project Explorer to return to its project view. This will be updated to include our imported resources, as shown:
We are now ready to create our Echo business service. Click on the Business Service folder within the Project Explorer to go to the project view for this folder.
In the Resources section click on the drop down next to Create Resource and select Business Service. This will bring up the General Configuration page for creating a business service as shown in the following screenshot:
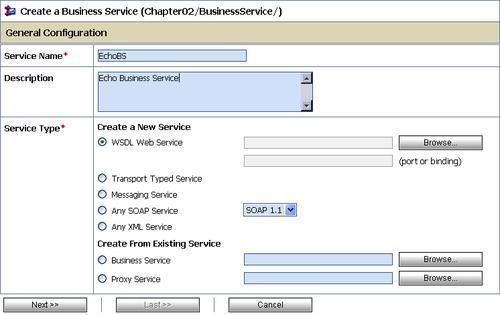
Here we specify the name of our business service (i.e. EchoBS) and an optional description. Next we need to specify the Service Type. As we are creating our service based on a WSDL select WSDL Web Service.
Next click the Browse button; this will launch a window from where we can select the WSDL for the business service, as shown in the following screenshot:
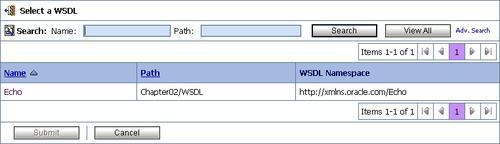
By default, this window will list all WSDL resources defined to the service bus, though you can restrict the list by defining search criteria.
In our case, we have just the Echo WSDL, so click on this. We will now be prompted to select a WSDL definition as shown in the following screenshot:
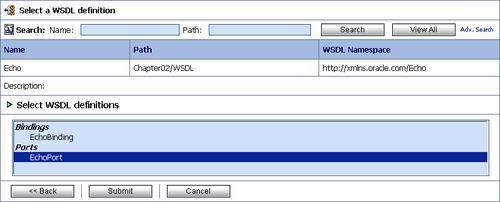
Here we need to select which binding or port definition we wish to use for our Business Service; select EchoPort and click Submit.
This will return us to the General Configuration screen, with the Service Type updated to show the details of the selected WSDL and port as shown in the following screenshot:
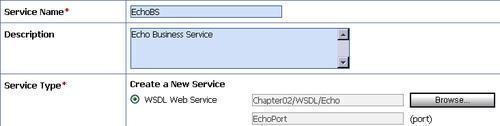
Click Next; this will take us to the Transport Configuration page shown in the following screenshot. Here we need to specify how the business service is to invoke the external service.
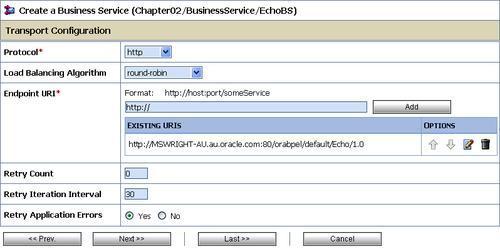
As we based our business service on the EchoPort definition, the transport settings are already pre-configured based on the content of our WSDL file.
Note
If we had based our business service on the EchoBinding definition, the transport configuration would still have been pre-populated except for the Endpoint URI, which we would need to add manually.
From here click Last, this will take us to a summary page of our business service. Click Save to create our business service.
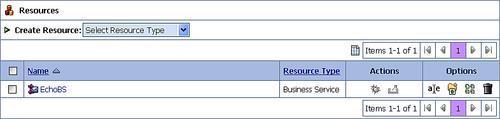
This will return us to the project view on the Business Service folder, and display the message The Service EchoBS was created successfully. If we examine the resources section we should see it now contains our newly created business service.
We are now ready to create our Echo proxy service. Click on the Proxy Service folder within the Project Explorer to go to the project view for this folder.
In the Resources section click on the drop down next to Create Resource and select Proxy Service. This will bring up the General Configuration page for creating a proxy service, as shown in the following screenshot:
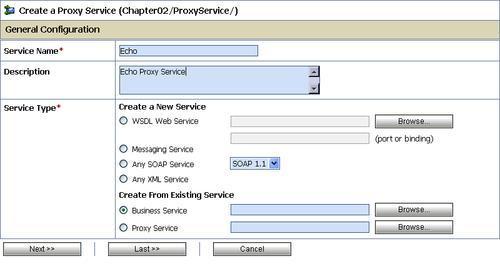
You will notice this looks very similar to the general configuration screen for a business service. So, as before, enter the name of our service (i.e. Echo) and an optional description.
Next we need to specify the Service Type; we could do this in exactly the same way that we did for our business service and base it on the Echo WSDL. However, this time we are going to base it on our EchoBS business service, we will see why in a moment.
For the Service Type, select Business Service as shown in the previous screenshot and click Browse. This will launch the Select Business Service window from where we can search for and select the business service that we want to base our proxy service on.
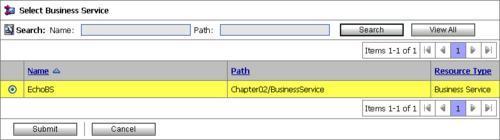
By default, this window will list all business services defined to the Service Bus, though you can restrict the list by defining search criteria.
In our case, we have just the EchoBS, so select this and click on Submit. This will return us to the General Configuration screen, with Service Type updated as shown in the following screenshot:

From here click Last; this will take us to a summary page of our proxy service. Click Save to create out proxy service.
This will return us to the project view on the Proxy Service folder, and display the message The Service Echo was created successfully.
If we examine the resources section of our project view, we should see it now contains our newly created proxy service.
Once we have created our proxy service, the next step is to specify how it should handle requests; this is defined in the message flow of the proxy service.
The message flow defines the actions that the proxy service should perform on receipt of a request, such as validating the payload, transforming or enriching it before routing it to the appropriate business service.
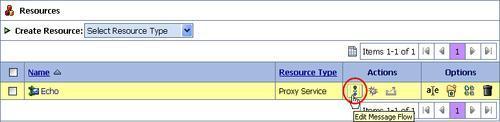
Within the resource section of our project view, click on the Edit Message Flow icon as circled in the previous screenshot. This will take us to the Edit Message Flow window, where we can view and edit the message flow of our proxy service, as shown in the following screenshot:
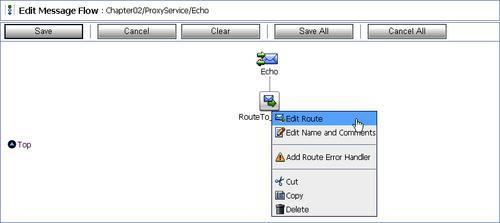
Looking at this, we can see Echo already invokes the route node RouteTo_EchoBS.
Click on this and select Edit Route (as shown in the previous screenshot). This will take us to the Edit Stage Configuration window as shown:
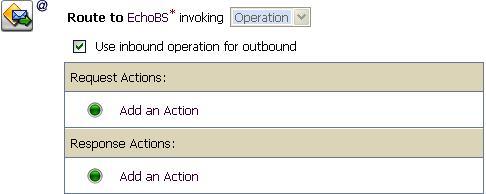
Here we can see it's already configured to route requests to the EchoBS business service.
Normally, when we create a proxy service, we have to specify the message flow from scratch. However, when we created our Echo proxy service we based it on the EchoBS business service (as opposed to a WSDL). Because of this, the service bus has automatically configured the message flow to route requests to EchoBS.
As a result, our message flow is already predefined for us, so click Cancel, and then Cancel again to return to our project view.
We now have a completed proxy service; all that remains is to commit our work. Within the Change Center click Activate.
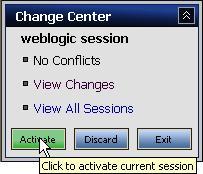
This will bring up the Activate Session as shown in the following screenshot:
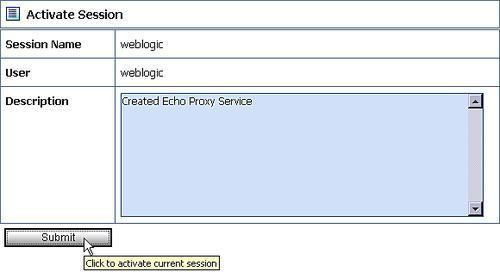
Before activating a session, it's good practice to give a description of the changes that we've made, just in case we need to roll them back later. So enter an appropriate description and then click on Submit as shown in the previous screenshot.
Assuming everything is okay, this will activate our changes, and the console will be updated to list our configuration changes as shown in the following screenshot:

If you make a mistake and want to undo the changes you have activated, you can click on the undo icon (circled in the previous screenshot), and if you change your mind you can undo the undo.
OSB allows you to undo any of your previous sessions as long as it doesn't result in an error in the run time configuration of the Service Bus.
All that's left is to test our proxy service; a simple way to do this is to initiate a test instance using the Service Bus Test Console.
To do this, we need to navigate back to the definition of our proxy service. Rather than do this via the Project Explorer, we will use the Resource Browser. This provides a way to view all resources based on their type.
Click on the Resource Browser section within the navigation bar, by default it will list all proxy services defined to the Service Bus, as shown in the following screenshot:
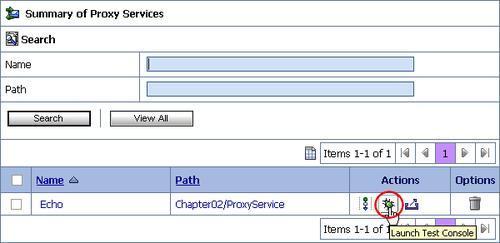
We can then filter this list further by specifying the appropriate search criteria.
Click on the Launch Test Console icon for the Echo proxy service (circled in the previous screenshot). This will launch the test console, shown in the following screenshot.
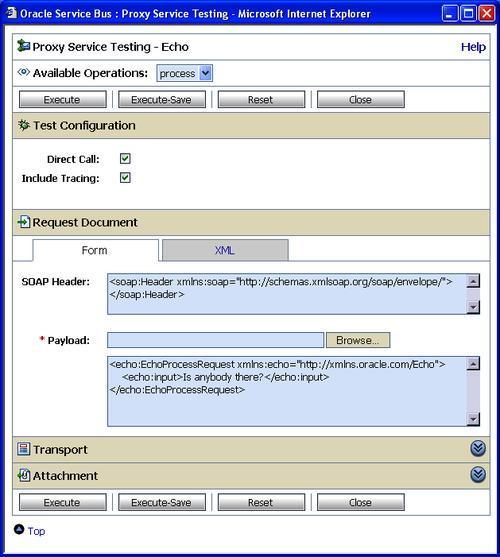
The Available Operations drop down allows us to specify which operation we want to invoke; in our case it's automatically defaulted to process.
By default, the options Direct Call and Include Tracking are selected within the Test Configuration section; keep these selected as they enable us to trace the state of a message as it passes through the proxy service.
The Request Document section allows us to specify the SOAP Header and the Payload for our service. By default these will contain a skeleton XML fragment based on the WSDL definition of the selected operation, with default values for each field.
To execute a test instance of our service, modify the text in the <echo:input> element as we have below and click Execute. This will cause the console to generate a request message and use it to invoke our Echo proxy service.
Upon successful execution of the proxy, the test console will be updated to show the response returned. Here we can see that the result element contains our original initial input string as shown in the following screenshot:
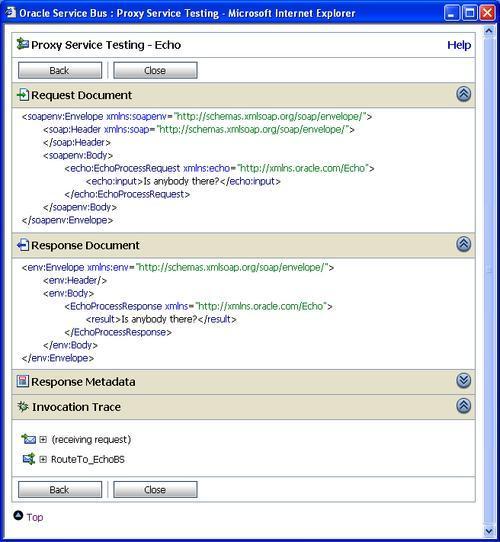
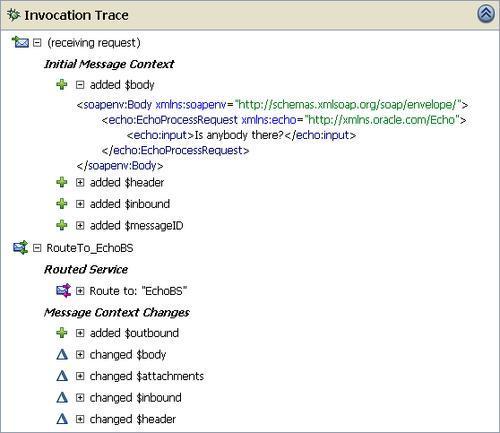
We can examine the state of our message as it passed through the proxy service by expanding the Invocation Trace, as we have in the following screenshot.
In addition, if you log back into BPEL Control, you should be able to see the process instance that was invoked by the service bus.
In this section we have implemented our first BPEL process and then built our first proxy service on top of it. While this example is about as trivial as you can get, it has provided us with an initial introduction to both the design time and run time components of Oracle BPEL PM and Oracle Service Bus.
In the next few chapters we will go into more detail on each of these components as well as looking at how we can use adapters to service enable existing systems.