
The heart of service-oriented architecture is the creation of processes and applications from existing services. The question arises, where do these services come from? Within a SOA solution some services will need to be written from scratch, but most of the functions required should already exist in some form within the IT assets of the organization. Existing applications within the enterprise already provide many services that simply require exposing to an SOA infrastructure. In this chapter we will examine some ways to create services from existing applications. We refer to this process as service enabling existing systems. After a discussion of some of the different types of systems we will look at the specific functionality provided in the Oracle SOA Suite that makes it easy to convert file and database interfaces into services.
IT systems come in all sorts of shapes and forms, some have existing web service interfaces which can be consumed directly by an SOA infrastructure, others have completely proprietary interfaces and others expose functionality through some well understood but non-web service based interface. In terms of service enabling a system it is useful to classify it by the type of interface it exposes.
Within the SOA Suite, components called adapters provide a mapping between non-web service interfaces and the rest of the SOA Suite. These adapters allow the SOA Suite to treat non-web service interfaces as though they had a web service interface.
If an application exposes a web service interface, meaning a SOAP service described by a Web Service Description Language (WSDL) document, it may be consumed directly. Such web services can directly be included as part of a composite application or business process.
The latest versions of many applications expose web services, for example Siebel, Peoplesoft, and E-Business Suite applications provide access to at least some of their functionality through web services.
Many applications, such as SAP and Oracle E-Business Suite, currently expose only part of their functionality, or no functionality, through web service interfaces, but they can still participate in service-oriented architecture. Many applications have adopted an interface that is to some extent based on a standard technology.
Examples of standard technology interfaces include:
Files
Database Tables and Stored Procedures
Message Queues
While these interfaces may be based on a standard technology they do not provide a standard data model and generally there must be a mapping between the raw technology interface and the more structured web service style interface that we would like.
The following table shows how these interfaces are supported through technology adapters provided with the SOA Suite.
|
Technology |
Adapter |
Notes |
|---|---|---|
|
Files |
File |
Reads and writes files mounted directly on the machine. This can be physically attached disks or network mounted devices (Windows shared drives or NFS drives for example). |
|
FTP |
Reads and writes files mounted on an FTP server. | |
|
Database |
Database |
Reads and writes database tables and invokes stored procedures. |
|
Message Queues |
JMS |
Reads and posts messages to Java Messaging Service (JMS) queues and topics. |
|
AQ |
Reads and posts messages to Oracle AQ (Advanced Queuing) queues. | |
|
MQ |
Reads and posts messages to IBM MQ (Message Queue) Series queues. |
In addition to the six technology adapters listed above there are other technology adapters available, such as a CICS adapter to connect to IBM mainframes, and an adapter to connect to systems running Oracle's Tuxedo transaction processing system. There are many other technology adapters that may be purchased to work with the SOA Suite.
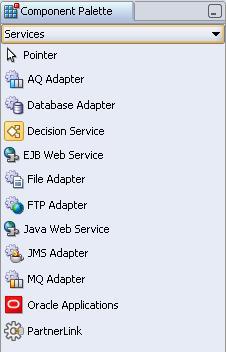
Installed adapters are shown in the component palette of JDeveloper when Services are selected.
The technology adapters leave the task of mapping the data structures into XML in the hands of the service enabler. This mapping of data structures is already done when using application adapters such as those for the Oracle E-Business Suite or SAP. These application adapters make life easier for the service enabler by hiding underlying data formats and transport protocols.
Unfortunately the topic of application adapters is too large an area to delve into in this book, but you should always check if an application specific adapter already exists for the system that you want to service enable. This is because application adapters will be easier to use than the technology adapters.
There are hundreds of third party adapters that may be purchased to provide SOA Suite with access to functionality within packaged applications.
Within the SOA Suite adapters are implemented and accessed using a Java technology known as Java Connector Architecture (JCA). JCA provides a standard packaging and discovery methods for adapter functionality. Most of the time SOA Suite developers will be unaware of JCA because JDeveloper wraps the JCA interfaces in WSDL and automatically deploys them with the appropriate component that is using them, such as a BPEL process. In the current release JCA adapters must be deployed separately to a WebLogic server for use by the service bus.
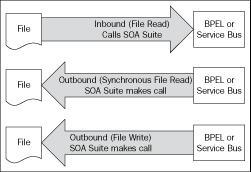
A common mechanism for communicating with an existing application is through a file. File communication is either inbound meaning a file must be read, or outbound meaning a file must be written.
Consider a company that has a payroll application that produces a file detailing payments. This file must be transformed into a file format accepted by the company's bank and then delivered to the bank through FTP. The company wants to use SOA technologies to perform this transfer because it allows them to perform additional validations or enrichment of the data before sending it to the bank. In addition they want to store the details of what was sent in a database for audit purposes. In this scenario a file adapter could be used to take the data from the file, an FTP adapter to deliver it to the bank and a database adapter could post it into the tables required for audit purposes.
Let's look at how we would read from a payroll file. Normally we will poll to check for the arrival of a file, although it is also possible to read a file without polling. Key points to consider beforehand are:
How often should we poll for the file?
Do we need to read the contents of the file?
Do we need to move it to a different location?
What do we do with the file when we have read or moved it?
Should we delete it?
Should we move it to an archive directory?
How large is the file and its records?
Does the file have one record or many?
We will consider all these factors as we interact with the File Adapter Wizard.
We begin by dragging the file adapter from the component palette in JDeveloper onto either a BPEL process (see Chapter 15) or an ESB interaction (not covered in this book as we use the Oracle Service Bus). We could also create a new adapter by clicking File and New... in JDeveloper to bring up the New Gallery and navigating in the tree to the Business Tier, Web Services leaf to display the same list from which we could select the File Adapter and click OK. We would use this latter route when creating adapters for use with the Oracle Service Bus.
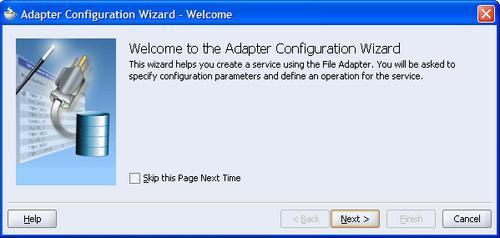
This causes the File Adapter Configuration Wizard to start.
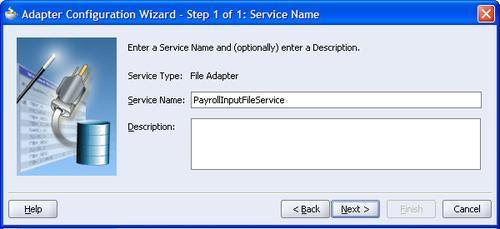
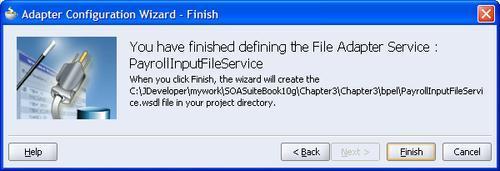
Clicking Next allows us to choose a name for the service that we are creating and optionally a description. We will use the service name PayrollInputFileService. Any name can be used as long as it has some meaning for the developers.
Clicking Next allows us to start specifying how we map the files onto a service. It is here that we decide whether we are reading or writing the file. When reading a file we decide if we wish to generate an event when it is available (a normal Read File operation that requires an inbound operation to receive the message) or if we want to read it only when requested (a Synchronous Read File operation requires an outbound operation).
Note
Who calls who?
We usually think of services as something that we call and then get a result. However, in reality services in a service-oriented architecture will often initiate events. These events may be delivered to a BPEL process which is waiting for an event, or routed to another service through the service bus or may even initiate a whole new BPEL process. Under the covers an adapter might need to poll to detect an event, but the service will always be able to generate an event. With a service we either call it to get a result or it generates an event that calls some other service or process.
The file adapter has three types of operation as outlined in the following table. We will explore the read operation to generate events as a file is created.
|
Operation Type |
Direction |
Description |
|---|---|---|
|
Read File |
Outbound event from service. |
Reads the file and generates one or more events into BPEL or Service Bus when a file appears. |
|
Write File |
Inbound call to service with no response. |
Writes a file, with one or more calls from BPEL or the Service Bus, causing records to be written to a file. |
|
Synchronous Read File |
Inbound call to service returning file contents. |
BPEL or Service Bus requests a file to be read, returning nothing if the file doesn't exist. |
Note
Why ignore the contents of the file?
The file adapter has an option to not read the file contents. This is used when the file is just a signal for some event. Do not use this feature for the scenario where a file is written and then marked as available by another file being written. This is explicitly handled elsewhere in the file adapter. Instead the feature can be used as a signal of some event that has no relevant data other than the fact that something has happened.

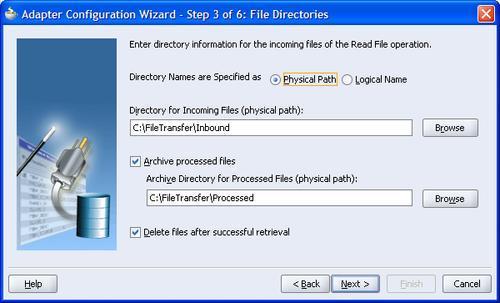
Clicking Next takes us to the screen that allows us to configure the location of the file. Locations can be specified as either physical (mapped directly onto the file system) or logical (an indirection to the real location). The directory for incoming files specifies where the adapter should look to find new files.
A key question is now what to do with the file when it appears. One option is to keep a copy of the file in an archive directory. This is achieved by checking the Archive processed files attribute and providing a location for the file archive. In addition to archiving the file we need to decide if we want to delete the original file. This is indicated by the Delete files after successful retrieval check box.
Note
Logical versus physical locations
The file adapter allows us to have logical ( Logical Name) or physical locations ( Physical Path) for files. Physical locations are easier for developers as we embed the exact file location into the assembly with no more work required. However, this only works if the file locations are the same in the development, test, and production environments, particularly unlikely if development is done on Windows but production is on Linux. Hence for production systems it is best to use logical locations that must be mapped onto physical locations when deployed. Chapter 18 shows how this mapping may be different for each environment.
The screenshot shows a physical file mapping that is really only appropriate in development.
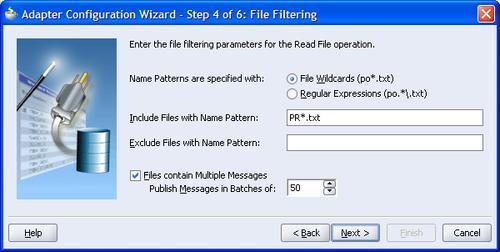
Having defined the location where files are found, we can now advance to the next step in the wizard. Here we describe what the filenames look like. We can describe filenames using either wildcards (using '*' to represent a sequence of 0 or more characters) or using Java regular expressions as described in the documentation for the java.util.regex.Pattern class. Usually wildcards will be good enough. For example if we want to select all files that start with PR and end with .txt then we would use the wildcard string PR*.txt or the regular expression PR.*.txt. As can be seen it is generally easier to use wildcards rather than regular expressions.
The final part of this screen in the adapter wizard asks if the file contains a single message or many messages. This is confusing because when the screen refers to messages it really means records.
Note
XML files
It is worth remembering that a well formed XML document can only have a single root element, and hence an XML input file will normally only ever have a single input record. In the case of very large XML files it is possible to have the file adapter batch the file up into multiple messages, in which case the root element is replicated in each message, and the 2nd level elements are treated as records. Note that this behavior cannot currently be set using the wizard.
By default a message will contain a single record from the file. Records will be defined in the next step of the wizard. If the file causes a BPEL process to be started then a 1000 record file would result in 1000 BPEL processes being initiated. To improve efficiency, records can be batched and the Publish Messages in Batches of attribute controls the maximum number of records in a message.
The next step in the wizard allows us to configure the frequency of polling for the inbound file. There are two parameters that can be configured here the Polling Frequency and the Minimum File Age.
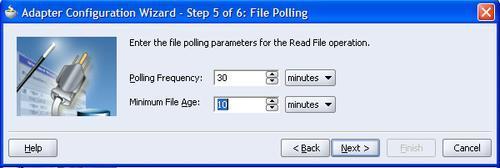
The Polling Frequency just means the time delay between checking to see if a file is available for processing. The adapter will check once per interval to see if the file exists. Setting this too low can consume needless CPU resources, setting it too high can make the system appear unresponsive. Too high and too low are very subjective and will depend on your individual requirements. For example the polling interval for a file that is expected to be written twice a day may be set to 3 hours, while the interval for a file that is expected to be written every hour may be set to 15 minutes.
Minimum File Age specifies how old a file must be before it is processed by the adapter. This setting allows a file to be completely written before it is read. For example a large file may take 5 minutes to write out from the original application. If the file is read 3 minutes after it has been created then it is possible for the adapter to run out of records to read and assume the file has been processed when in reality the application is still writing to the file. Setting a minimum age to 10 minutes would avoid this problem by giving the application at least 10 minutes to write the file.
The penultimate step in the file adapter is to set up the format of records or messages in the file. This is one of the most critical steps as this defines the format of messages generated by a file.
Messages may be opaque, meaning that they are passed around as black boxes. This may be appropriate with a Microsoft Word file for example that must merely be transported from point A to point B without being examined. This is indicated by the Native format translation is not required check box.
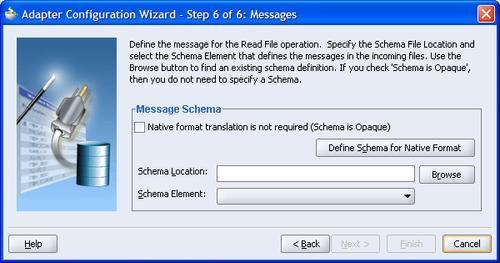
If the document is already in XML format then we can just specify a schema and an expected root element and the job is done. Normally the file is some non-XML format that must be mapped onto an XML Schema generated through the native format builder wizard invoked through the Define Schema for Native Format button.
Invoking the Native Format Builder wizard brings up an initial start screen that leads on to the first step in the wizard, choosing the type of format as shown in the following screenshot:
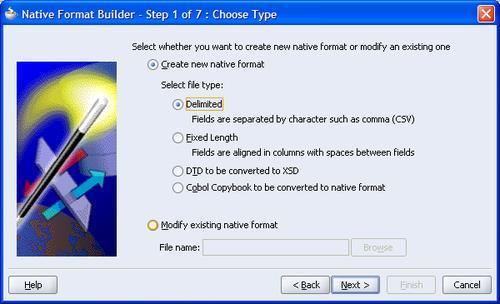
This allows us to identify the overall record structure. If we have an existing schema document that describes the record structure then we can point to that. More usually we will need to determine the type of structure of the file ourselves. The choices available are:
Delimited: Such as CSV files (Comma Separated Values) or records with spaces or '+' signs for separators.
Fixed Length: Files whose records consist of fixed length fields. Be careful not to confuse these with space separated files as if a value does not fill the entire field then it will usually be padded with spaces.
DTD: XML Data Type Definition XML files that will be mapped onto an XML Schema description of the file content.
Cobol Copybook: Files that have usually been produced by a COBOL system, often originating from a mainframe.
We will look at a delimited file as it is one of the most common formats.
Although, we are using the separator file type the steps involved are basically the same for most file types including the fixed length field format, which is also extremely common.
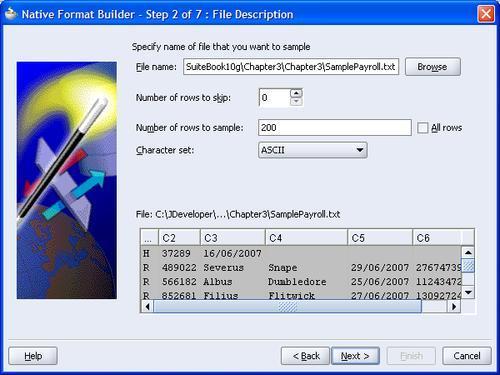
To make it easier to describe the format of the incoming file the wizard asks us to specify a file to use a sample. If necessary we can skip rows in the file and determine the number of records to read. Obviously reading a very large number of records may take a while and if all the variability on the file is in the first 10 records then there is no point in wasting time reading any more sample records.
Setting the character needs to be done carefully, particularly in international environments where non-ASCII character sets may be common.
After selecting a sample file the wizard will display an initial view of the file with a guess at the field separators.
The next step of the wizard allows us to describe how the records appear in the file.
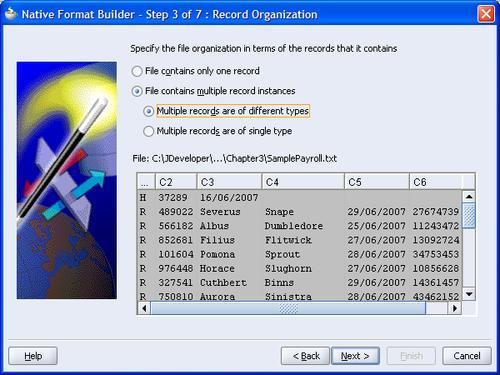
The first option of File contains only one record allows us to process the file as a single message. This can be useful when the file has multiple records, all the same format, that we want to read in as single message. Use of this option disables batching.
The next option of File contains multiple records instances allows batching to take place. Records are either of the same type or of different types. They can only be marked of different types if they can be distinguished based on the first field in the record. In other words to choose the Multiple records of different types the first field in all the records must be a record type identifier. In the example shown the first field is either an H for Header records or an R for Records.
The next step allows us to define the target namespace and root element of the schema that we are generating.
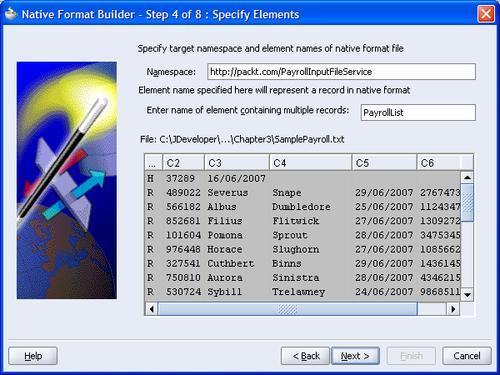
Note
Don't forget that when using the Native Format Builder wizard we are just creating an XML Schema document that describes the native (non-XML) format data. Most of the time this schema is transparent to us, but at times the XML constructs have to emerge, such as identifying a name for a root element. The file is described using an XML Schema extension known as NXSD.
As we can see the root element is mandatory. This root element acts as a wrapper for the records in a message. If message batching is set to 1 then each wrapper will have a single sub-element, the record. If message is set to greater than 1 then each wrapper will have at least one and possibly more sub-elements, each sub-element being a record. There can never be more sub-elements than the batch size.
Having described the overall structure of the file we can now drill down into the individual fields. To do this we first specify the message delimiters.
In addition to field delimiters we can also specify a record delimiter. Usually record delimiters are new lines. If fields may also be wrapped in quotation marks then these can be stripped off by specifying the Optionally enclosed by character.
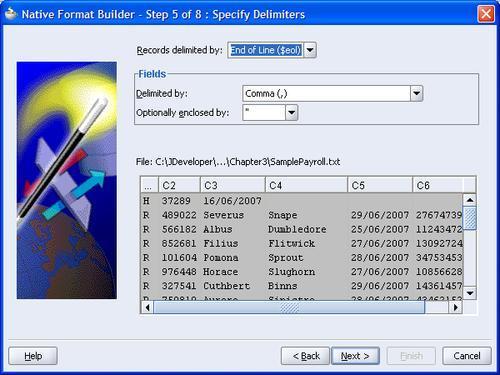
The wizard will identify the types of record based on the first field in each record as shown. It is possible to ignore record types by selecting them and clicking Delete. If this is done in error then it is possible to add them back by using the Add button. Only fields that exist in the sample data can be added in the wizard.
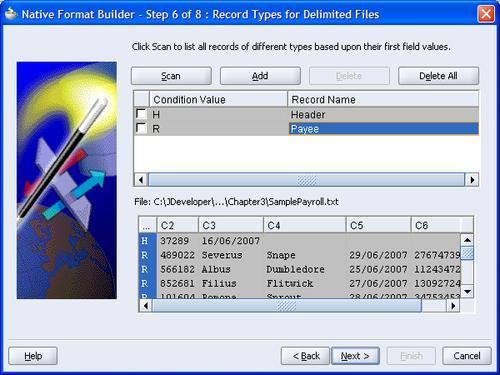
Note that if we want to reset the record types screen then the Scan button will re-scan the sample file and look for all the different record types it contains.
The Record Name field can be set by double-clicking it and providing a suitable record name. This record name is the XML element name that encapsulates the record content.
Now that we have identified record and field boundaries we can drill down into the records and define the data types and names of individual fields. This is done for each record type in turn. We can select which records to define by selecting them from the Record Name drop-down box or by clicking the Next Record Type button.
It is important to be as liberal as possible when defining field data types because any mismatches will cause errors that will need to be handled. Being liberal in our record definitions will allow us to validate the messages, as described in Chapter 12, without raising system errors.
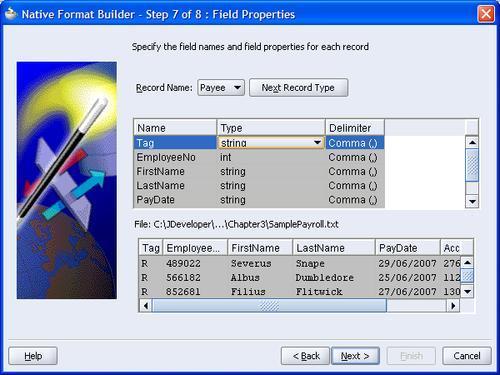
The Name column represents the element name of this field. The wizard will attempt to guess the type of the field but it is important to always check this because the sample data you are using may not include all possibilities. A common error is for identification numbers to be tagged as integers when they should really be strings accept integer types only when they are likely to have arithmetic operations performed on them.
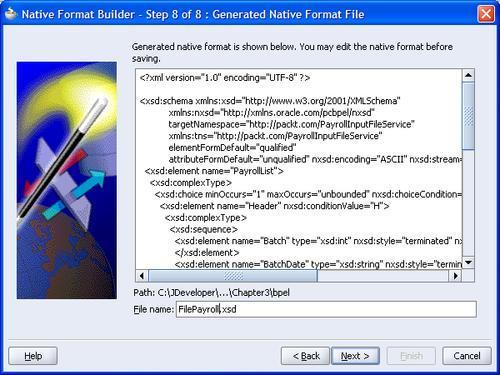
We have now completed our mapping and can verify what has been done by looking at the generated XML Schema file. Note that the generated schema uses some Oracle extensions to enable a non-XML formatted file to be represented as XML. In particular the nxsd namespace prefix is used to identify field separators and record terminators.
Note
The XML Schema generated can be edited by hand. This is useful to support nested records (records inside other records), such as may be found in a file containing order records with nested detail records (an order record contains multiple line item detail records). In this case it is useful to use the wizard to generate a schema, with order records and detail records at the same level. The schema can then be modified by hand to make the detail records children of the order records.
Clicking Next and then Finish will cause the generated schema file to be saved.
Up to this point no work has been saved except for the XML Schema mapping the file content onto an XML structure. The rest of the adapter settings are not saved and the endpoint is not set up until the Finish button is clicked on the completion screen as shown in the following screenshot. Note that the file generated is a Web Service Description Language (WSDL) file.
The file and FTP adapters can consume a lot of resources when processing large files (thousands of records) because they keep sending messages with batches of records until the file is processed, not waiting for the records to be processed. This behavior can be altered by forcing them to wait until a message is processed before sending another message. This is done by making the following changes to the WSDL generated by the wizard. This changes the one-way read operation into a two-way read operation that will not complete until a reply is generated by our code in BPEL or the Service Bus.
Add a new message definition to the WSDL such as the one shown:
<message name="Dummy_msg">
<part xmlns:xsd="http://www.w3.org/2001/XMLSchema"
name="Dummy" type="xsd:string"/>
</message>
In the <portType> add an <output> element to the read <operation> element.
<portType name="Read_ptt">
<operation name="Read">
<input message="tns:PayrollList_msg"/>
</operation>
</portType>
In the <jca:operation> element add an empty <output/> element.
The adapter will now have a two-way interface and will need to receive a reply to a message before it sends the next batch of records, thus throttling the throughput. Note that no data needs to be sent in the reply message. This will limit the number of active operations to the number of threads assigned to the file adapter.
We can now use the FTP adapter to write the payroll file to a remote file system. This requires us to create another adapter within our BPEL process or service bus. Setting up the FTP adapter to write to a remote file system is very similar to reading files with the file adapter.
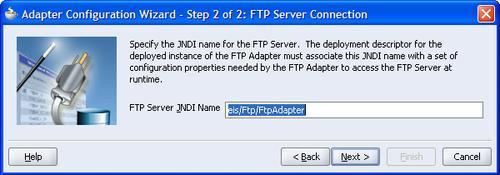
The first difference is that when using the FTP adapter instead of the File adapter we have to specify an FTP connection to use in the underlying application server. This connection is set up in the application server running the adapter. For example, when running SOA Suite on top of Oracle Application Server, this can be done through Application Server Control, or when using WebLogic Application Server then the WebLogic Console can be used. The JNDI location of the connection factory is the location that must be provided to the wizard. The JNDI location must be configured in the application server using the administrative tools provided by the application server, refer to your application server documentation for how to do this as it varies between application servers.
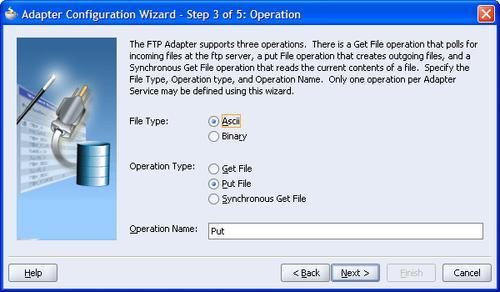
When we come to choose the type of operation we again notice that the screen is different to the file adapter, having an additional File Type category. This relates to the ASCII and binary settings of an FTP session. ASCII causes the FTP transfer to adapt to changes in character encoding between the two systems. For example converting between EBCDIC and ASCII or altering line feeds between systems. When using text files it is generally a good idea to select the ASCII format. When sending binary files it is vital that the binary file type is used to avoid any unfortunate and unwanted transformations.
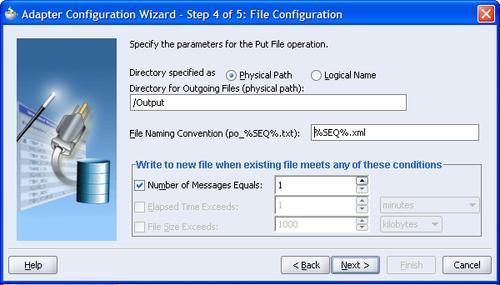
Choosing where the file is created is the same for both the FTP and the File Adapter. Again there is a choice of physical or logical paths. The file naming convention allows us some control over the name of the output file. In addition to the %SEQ% symbol that inserts a unique sequence number it is also possible to insert a date or date time string into the filename. Note that in the current release you cannot have both a date time string and a sequence string in the file naming convention.
Note
Note that when using a date time string as part of the filename, files with the same date time string will overwrite each other, if this is the case then consider using a sequence number instead.
When producing an output file we can either keep appending to a single file, which will keep growing without limit, or we can create new files dependant on attributes of the data being written. This is the normal way of working for non-XML files and a new output file will be generated when one or more records are written to the adapter.
The criteria for deciding to write to a new file are as follows:
Number of Messages Equals forces the file to be written when the given number of messages is reached. This can be thought of as batching the output so that we reduce the number of files created.
Elapsed Time Exceeds puts a time limit on how long the adapter will keep the file open. This places an upper time limit on creating an output file.
File Size Exceeds allows us to limit the size of files. As soon as a message causes the file to exceed the given size then no more messages will be appended to this file.
These criteria can all be applied together and as soon as one of them is satisfied a new file will be created.
The next step in the wizard is to define the actual record formats. This is exactly the same as when creating an input file. If we don't have an existing XML Schema for the output file then we can use the wizard to create one if we have a sample file to use.
Finally, again remember to run through the wizard to the end and click finish rather than cancel or our entire configuration will be lost.
Sometimes we will just want an adapter to move, copy, or delete a file without reading the file. We will use the ability of the file adapter to move a file in Chapter 14 Message Interaction Patterns, to set up a scheduler service within the SOA suite.
The following steps will configure an outbound file or FTP adapter to move, copy, or delete a file without reading it.
Use the file or FTP adapter wizard to generate an outbound adapter, file write or FTP put operation. The data content should be marked as opaque, so that there is no need to understand the content of the file. Once this has been done we will modify the WSDL generated to add additional operations.
Modify the port type of the adapter to include the additional operations required as shown below. Use the same message type as the Put or Write operations generated by the wizard.
<portType name="Write_ptt">
<operation name="Write">
<input message="tns:Write_msg"/>
</operation>

<operation name="Move">
<input message="tns:Write_msg"/>
</operation>

</portType>
Note that the following operation names are supported:
Bindings describe how the service description maps onto the physical service implementation. They are covered in more detail in Chapter 17 — The Importance of Bindings. For now we will just modify the binding to add the additional operations needed and map them to the appropriate implementation as shown below:
<binding name="Write_binding" type="tns:Write_ptt">
<jca:binding />
<operation name="Write">
<jca:operation PhysicalDirectory="C:FileTransferOutbound"
InteractionSpec="oracle.tip.adapter.file.outbound. FileInteractionSpec"
FileNamingConvention="fred_%SEQ%.txt"
NumberMessages="1"
OpaqueSchema="true" >
</jca:operation>
<input>
<jca:header message="hdr:OutboundHeader_msg"
part="outboundHeader"/>
</input>
</operation>

<operation name="Move">
<jca:operation InteractionSpec="oracle.tip.adapter.file.outbound. FileIoInteractionSpec"
SourcePhysicalDirectory="C:FileTransferInbound"
SourceFileName="test.txt"
TargetPhysicalDirectory="C:FileTransferOutbound"
TargetFileName="test.txt"
Type="MOVE">
</jca:operation>
<input>
<jca:header message="hdr:OutboundHeader_msg"
part="outboundHeader"/>
</input>
</operation> </binding>
Note that the following types are supported for use with the equivalent operation names; observe that operation names are mixed case and types are uppercase:
MOVECOPYDELETE
For the FTP adapter the InteractionSpec property is oracle.tip.adapter.ftp.outbound.FTPIoInteractionSpec.
In order to allow run time configuration of the source and destination locations it is necessary to modify the adapter header file that is provided by the wizard, ftpAdapterOutboundheader.wsdl or fileAdapterOutboundHeader.wsdl.
We need to add the source destination locations as properties in the header as shown below:
<element name="OutboundFileHeaderType">
<complexType>
<sequence> <element name="fileName" type="string"/>
 <element name="sourceDirectory" type="string"/>
<element name="sourceFileName" type="string"/>
<element name="targetDirectory" type="string"/>
<element name="targetFileName" type="string"/>

</sequence>
</complexType>
</element>
These elements in the adapter header can be used to dynamically select at run time the locations to be used for the move, copy or delete operation.
With the above modifications the move, copy, or delete operations will appear as additional operations on the service that can be invoked from the service bus or within BPEL.
In addition to the data associated with the service being provided by the adapter, sometimes referred to as the payload of the service, it is also possible to configure or obtain information about the operation of an adapter through header messages. Adapter header files are generated by the adapter wizard and may be modified to alter the operation of the adapter as was shown in the previous section on moving and copying files with the file adapter.
To use an adapter from within BPEL we first need to create a message variable of the correct type by selecting it from the Project WSDL files in the type chooser. See Chapter 15 for details on creating BPEL variables and using the invoke statement.
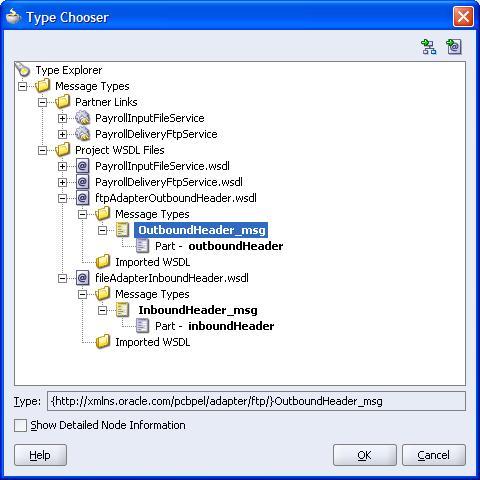
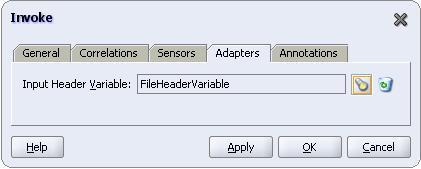
We can then use the header by assigning appropriate values to the fields within the header, such as the filename, before adding it to an invoke statement in BPEL. In JDeveloper the invoke statement property dialog has an Adapters tab that can be used to specify the header variable to be used in the invocation.
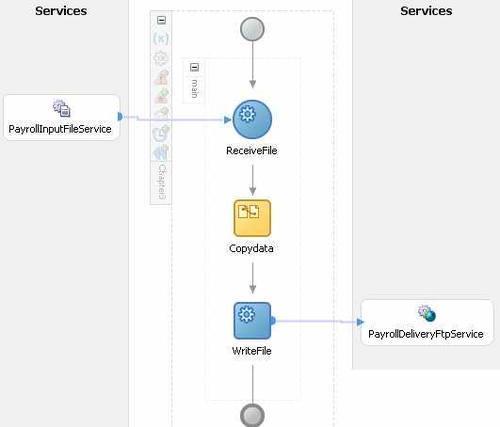
We can test the adapters by using them within a BPEL process such as the one shown in the following screenshot. Building a BPEL process is covered in Chapter 15. This uses the two services we have just described and links them with a copy operation that transforms data from one format to the other.
In the following sections, we will have a look at how to create services from databases.
Along with files, databases are one of the most common ways of interfacing with existing applications and providing them with a service interface. Before we configure a database adapter we first need to create a new database connection within JDeveloper. This is done by creating a Database Connection from the New Gallery.
Choosing a database connection brings up the database connection wizard which allows us to enter the connection details of our database.
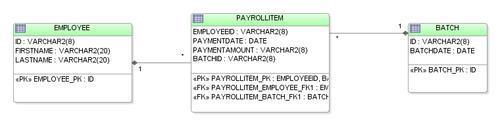
With an established database connection we can now create a service based on a database table. We will create a service that updates the database with the payroll details. The model for the database tables is shown in the following screenshot:
Now we have our database connection. We can run the Database Adapter Wizard by dragging the database adapter icon from the tool palette onto a BPEL process or ESB. This starts the database adapter wizard and after giving the service a name we come to the Service Connection screen as shown:
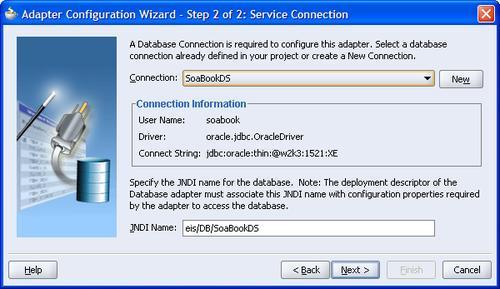
This allows us to choose a local connection in JDeveloper to use and also to select the JNDI location in the run time environment of the database connection. Note that this JNDI connection must be configured as part of the database adapter in the default application in a similar way to configuration of the FTP adapter.
Note
How connections are resolved by the database adapter
When the adapter tries to connect to the database it first tries to use the JNDI name provided, which should map to a JCA connection factory in the application server. If this name does not exist then the adapter will use the database connection details from the JDeveloper database connection that was used in the wizard. This behavior is very convenient for development environments because it means that you can deploy and test the adapters in development without having to configure the JCA connection factories.
The database adapter has many ways in which it can interact with the database to provide a service interface.
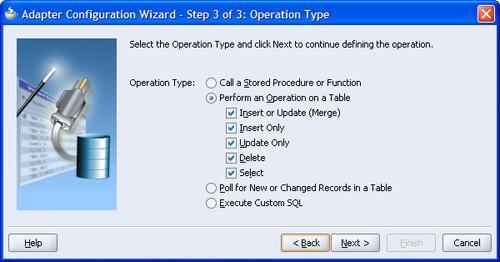
The operation types split into two groups: calls into the database and events generated from the database. Calls into the database cover the following operations:
Stored procedure or function call to execute a specific piece of code in the database. This could either update the database or retrieve information but in either case it is a synchronous call into the database.
Perform an
insert, update, delete, orselectoperation on the database. Again this is done synchronously as a call into the database.Execute custom SQL, this again runs the SQL synchronously against the database.
Poling for new or changed records is the only way for the database adapter to generate messages to be consumed in a BPEL process or the service bus. For this exercise we will select insert/update for the operation.
The next step in the wizard asks which table is the root table, or beginning of the query. To select this, we first click the Import Tables... button to bring up the Import Tables dialog.
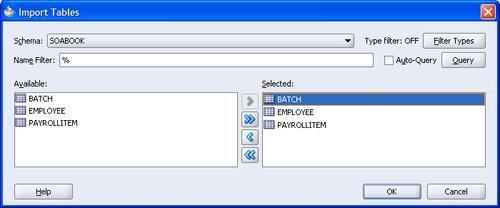
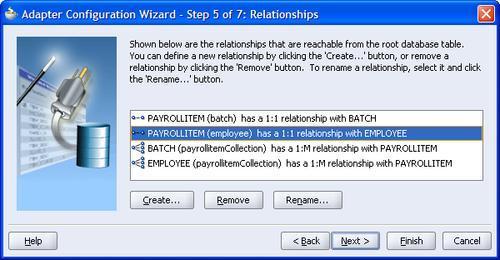
Once we have imported the tables we need, we then select the PAYROLLITEM table as the root table. We do this because each record will create a new PAYROLLITEM entry. All operations through the database adapter must be done with a root table; any other tables must be referencable from this root table.
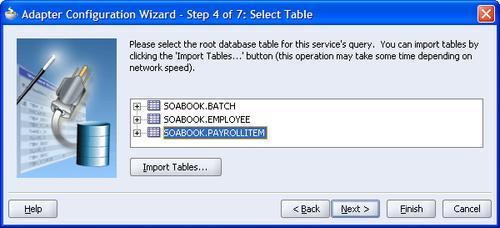
Because we have more than one table involved in this operation, we need to decide which table relationship we want to use. In this case we want to tie a payroll item back to a single employee so we select the one-to-one relation.
We can now finish the creation of the database adapter and hook it up with the file adapter we created earlier to allow us to read records from a file and place them in a database.
Under the covers a lot has happened. An offline copy of the relevant database schema has been created so that the design time is not reliant on being permanently connected to a database. The actual mapping of a database onto an XML document has also occurred. This is done using Oracle TopLink to create the mapping and a lot of the function of the wizard is implemented using TopLink. The mapping can be further refined using the features of TopLink.
Note
Using keys
Always identify the primary key for any table used by the database adapter. This can be done by applying a primary key constraint in the database; if no such key has been created then TopLink will prompt you to create one. If you have to create one in TopLink, then make sure it is really a primary key. TopLink optimizes its use of the database by maintaining an identity for each row in a table with a primary key. It only reads the primary key on select statements and then checks to see which records it needs to read in from the database. This reduces the amount of work mapping fields that have already been mapped because a record appears multiple times in the selection. If you don't correctly identify a primary key then TopLink may incorrectly identify different records as being the same record and only load the data for the first such record encountered. So if you seem to be getting a lot of identical records in response to a query that should have separate records then check your primary key definitions.
In this chapter we have looked at how to use the file and database adapters to turn file and database interfaces into services that can be consumed by the rest of the SOA Suite. Note that when using the adapters, the schemas are automatically generated, and changing the way the adapter works may mean a change in the schema. In the next chapter we will look at how to isolate our applications from the actual adapter service details.