
One of the most important aspects of application development is testing. In order to ensure that applications work correctly when deployed to your user base, you need to ensure that you have performed full testing. The Seam Framework provides excellent support for testing Seam applications at both component and integration levels.
The Seam Framework includes the TestNG (http://www.testng.org) library for performing the testing of Seam components and applications. When used in conjunction with the SeamGen application generator, Seam removes many of the complexities of application testing. This results in tests that are easier to write, to maintain, and are hopefully more prevalent.
TestNG is a unit-testing framework for Java that uses Java annotations, allowing complex test libraries to be built up. TestNG test suites can be developed entirely separately from your application's source code, and therefore do not have to be deployed with applications.
TestNG test suites are built up from classes that are adorned with different annotations. Let's take a look at a basic test class:
package mytests;
import org.testng.annotations.*
public class ATest {
@Test (groups= {"examples"})
public void runATest() {
assert getString().equals("some value");
}
}
This simple test class (ATest) defines a test class that has one test method (runATest). The method we wish to run as a test is adorned with the @Test annotation.
@Test (groups= {"examples"})
This annotation takes an array of the different groups that the test is defined as belonging to. In this example, the test belongs to the examples group. The groups parameter is optional, but can be used to differentiate different groups of tests so that groups of tests can be run separately, or can be identified for reporting purposes.
So, how does TestNG know if a test has succeeded or not? If a test completes without throwing an exception, it is considered to have succeeded. Typically, the assert statement is used, as this throws an AssertionError exception if the expression being asserted evaluates to false. If you are unfamiliar with the assert statement, check out the Sun Microsystems guide Programming with Assertions at:
http://java.sun.com/j2se/1.4.2/docs/guide/lang/assert.html
TestNG allows pre and post conditions to be defined within a test class. These can be used for setting an object's state or initializing data before a test is executed. Methods can be configured to run before and/or after a suite, a test, a test group, a class, or a method is executed. To define a method that is run in these conditions, the following annotations are used:
@AfterSuite/@BeforeSuite@AfterGroups/@BeforeGroups@AfterTest/@BeforeTest@AfterClass/@BeforeClass@AfterMethod/@BeforeMethod
For example, the following setup() method would be executed before the first test method in the class is executed.
@BeforeClass
public void setUp() {
// Setup initialization data.
this.intVal=17;
}
To run TestNG tests, a control XML file is required, which details different test suite parameters such as the name of tests to be run, whether they should be run in parallel, and so on. A test suite is a collection of related tests. If you are using TestNG then this control file is typically called testng.xml. However, SeamGen-generated projects expect the control files to be called *Test.xml (for example, AllTests.xml or UITests.xml). Typically, this file is placed within the default package for your application, or inside the package that contains the tests. A typical control file to run a set of tests would look like this:
<!DOCTYPE suite SYSTEM "http://testng.org/testng-1.0.dtd" >
<suite name="MySuite" verbose="2" parallel="false">
<test name="MyTest">
<classes>
<class name="myPackage.MyTest" />
</classes>
</test>
</suite>
In this control file we can see that a test suite called MySuite has been defined. This test suite does not run tests in parallel—all of the tests are run in sequence. Within this test, there is one test class defined (myPackage.MyTest).
If you have a large number of tests, all within the same package, listing out all of the test classes in this way can become cumbersome. TestNG allows a <packages /> element to be defined instead of the <classes /> element, which details the packages that are to be executed as tests.
<!DOCTYPE suite SYSTEM "http://testng.org/testng-1.0.dtd" >
<suite name="MySuite" verbose="2" parallel="false">
<test name="MyTest">
<packages>
<package name="myTestPackage" />
</packages>
</test>
</suite>
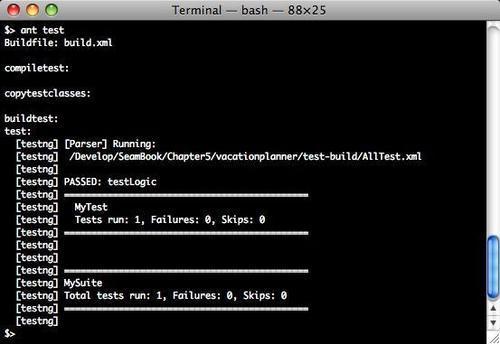
Executing a set of test suites is performed using the ant test target. This is achieved by opening a command prompt within the project directory and running ant test, as shown in the following screenshot. You can see from the output following the command line that the project is built if necessary (the compiletest and buildtest ant targets are executed). The tests are then executed by TestNG and the number of tests run, failed, and skipped are output once all of the tests have been executed.
Note
One of the benefits of using SeamGen to generate application skeletons is that the infrastructure for testing applications is preconfigured for you. You don't need to worry which JAR files go into which directory, and you don't need to build the ant script to execute tests.
TestNG provides many more features than we have discussed so far, and it's outside the scope of this book to describe them all. We suggest that you check out the TestNG web site (http://www.testng.org) for further details.
Now that we've had an overview of what TestNG can do, we can add a test to our sample Vacation Planner application. At present, there aren't many components within the application to be tested. However, as we progress throughout the book, we'll keep coming back to the tests, and show how new components that we develop can be tested.
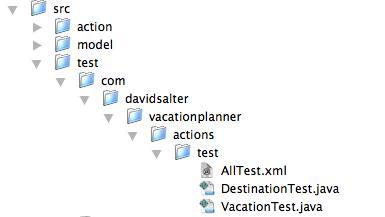
To start testing our application we need to have a TestNG control file. We'll create a file called AllTests.xml and place it in the src/test/com/davidsalter/vacationplanner/actions/test folder of our sample application.
Because all of our tests are in the same package, we can specify the tests by using the <package /> element within the AllTests.xml file. For our sample application, the AllTests.xml file is as follows.
<!DOCTYPE suite SYSTEM "http://testng.org/testng-1.0.dtd" >
<suite name="VacationPlanner" verbose="2" parallel="false">
<test name="VacationTest">
<packages>
<package name="com.davidsalter.vacationplanner. actions.test"/>
</packages>
</test>
</suite>
We can then write a test for our Destination.java class as follows:
package com.davidsalter.vacationplanner.actions.test;
import org.testng.annotations.BeforeClass;
import org.testng.annotations.Configuration;
import org.testng.annotations.Test;
import com.davidsalter.vacationplanner.model.Destination;
public class DestinationTest {
Destination destination = null;
private static double TOLERANCE = 0.001;
@BeforeClass
public void setUp() {
destination = new Destination();
destination.setMinimumBudget(200.0);
}
@Test (groups= {"component"})
public void testDestination() {
assert destination.getMinimumBudget() - 200.0 < TOLERANCE;
}
}
This class declares one test and adds it to the component group. We can see that the @BeforeClass annotation is used on the setUp() method to instantiate an instance of the Destination class and perform some initialization. The testDestination() method is annotated with the @Test annotation, indicating that this is the method that runs to perform the test.
Unit testing allows us to perform discrete tests on classes and groups of classes to see how they all work in isolation from the application as a whole. Unit testing provides an excellent way to test our classes in isolation, but doesn't allow us to test any interaction between classes, components, or user interfaces. It is useful, therefore, to be able to run integration tests on components and on the user interface, showing the interaction of the classes when events such as buttons on forms are clicked. Traditionally, this type of testing is performed within the container.
To perform this testing, the application needs to be built, deployed, and then tested. However, Seam makes this process easy by allowing us to perform integration tests of this type, outside of the container. Seam is supplied with an embedded version of JBoss, which can be found within the bootstrap directory of SeamGen generated projects. When you run integration tests with Seam, the tests are deployed to the embedded version of JBoss and are run outside of the container, although, the tests still use the TestNG framework. This provides a much quicker turnaround, and can easily be integrated into your IDE as all of the major IDEs support TestNG testing.
Note
By now, you should be able to see the benefits of a SeamGen generated project. I would recommend that you always use SeamGen to create Seam projects as doing so can save you an awful lot of time and effort.
To create an integration test to validate user interface interactions, we need to derive our test class from the org.jboss.seam.mock.SeamTest class. Within this class, we create an anonymous class that extends org.jboss.seam.mock.FacesRequest, to allow us to emulate different phases of the JSF life cycle (we discussed the JSF lifecycle in the previous chapter). The FacesRequest class provides several methods that we can override in order to test different stages within the JSF life cycle of our user interface.
|
Method |
Description |
|---|---|
|
|
This method is called during the apply request value phase of the JSF life cycle. |
|
|
This method is called during the invoke application phase of the JSF life cycle. |
|
|
This method is called during the process validations phase of the JSF life cycle. |
|
|
This method is called during the render response phase of the JSF life cycle. |
Therefore, the basic structure of a class that can test user interface interactions is as follows:
import org.jboss.seam.mock.SeamTest;
import org.testng.annotations.Test;
public class MyTest extends SeamTest {
@Test(groups={"ui"})
public void testMe() throws Exception {
new FacesRequest() {
@Override
protected void processValidations() throws Exception {
// Perform Tests
}
@Override
protected void updateModelValues() throws Exception {
// Perform Tests
}
@Override
protected void invokeApplication() throws Exception {
// Perform Tests
}
@Override
protected void renderResponse() throws Exception {
// Perform Tests
}
}.run();
}
Within these methods of the FacesRequest anonymous class, we can get, set, and validate Seam component properties and invoke Seam component methods.
|
Method |
Description |
|---|---|
|
|
Gets a value from a JSF expression such as |
|
|
Sets the value of a JSF expression. |
|
|
Validates an expression based upon the JSF validations present. |
|
|
Invokes a JSF method binding such as |
If we put all of this together, we can create user interface tests that allow us to emulate user input, follow the JSF life cycle, and then verify the correctness of any output parameters of our page flow.
We can write a test for our sample Vacation Planner application to test the interaction that is performed when we select a vacation type.
package com.davidsalter.vacationplanner.actions.test;
import org.jboss.seam.mock.SeamTest;
import org.testng.annotations.Test;
import com.davidsalter.vacationplanner.model.Destination;
public class VacationTest extends SeamTest {
@Test(groups={"ui"})
public void testCityVacation() throws Exception {
new FacesRequest() {
@Override
protected void processValidations() throws Exception {
validateValue("#{destination.destinationType}", Destination.DestinationType.CITY);
validateValue("#{destination.minimumBudget}", 200.0);
assert !isValidationFailure();
}
@Override
protected void updateModelValues() throws Exception {
setValue("#{destination.destinationType}", Destination.DestinationType.CITY);
setValue("#{destination.minimumBudget}", 200.0);
}
@Override
protected void invokeApplication() {
assert invokeMethod("#{vacationManagerAction. selectVacationType}").equals("/city.xhtml");
assert invokeMethod("#{vacationManagerAction. selectVacationType}").equals("/city.xhtml");
}
@Override
protected void renderResponse() {
assert getValue("#{destination.minimumBudget}"). toString().equals("200.0");
}
}.run();
}
In this code, we can see that we have declared a user interface integration test and added it to our user interface group of tests (denoted by the group name ui). We've then overridden each of the four different phases of the JSF life cycle (process validations, update model, invoke application, and render response) and performed validation at each stage.
Sometimes, we may want to test the interaction of Seam components, but don't want to emulate the JSF life cycle. Seam allows us to do that, again by extending our test class from org.jboss.seam.mock.SeamTest, but this time creating an instance of an anonymous org.jboss.seam.mock.ComponentTest class. Within this class, we can still use the getValue(), setValue(), and invokeMethod() methods that we used in the FacesRequest class. However, we must also declare the testComponents()method into which we can put code to test the interaction of components.
protected abstract void testComponents()
A typical Seam component test would look similar to the following:
import org.jboss.seam.mock.SeamTest;
import org.testng.annotations.Test;
public class MyTest extends SeamTest {
@Test(groups={"component"})
public void testMe() throws Exception {
new ComponentTest() {
@Override
protected void testComponents() throws Exception {
// Perform tests.
}
}.run();
}
To test our VacationPlanner application—specifically how the VacationManagerAction class works at a component level—we could write a test that follows the preceding structure by defining a new ComponentTest.
package com.davidsalter.vacationplanner.actions.test;
import org.jboss.seam.mock.SeamTest;
import org.testng.annotations.Test;
import com.davidsalter.vacationplanner.model.Destination;
public class VacationManagerActionTest extends SeamTest {
@Test
public void testSelectVacationType() throws Exception {
new ComponentTest() {
@Override
protected void testComponents() throws Exception {
setValue("#{destination.destinationType}", Destination.DestinationType.ACTION);
assert invokeMethod("#{vacationManagerAction. selectVacationType}").equals("danger");
}
}.run();
}
}
In this code, we have written a test, testSelectVacationType, which sets up the destination type and then invokes the selectVacation method. The test finally asserts that the correct result is obtained, by executing the selectVacationType method.
Sometimes, when we are performing components testing, we may not want to test the full interaction between components and may want to use a mock implementation for specific components. A mock object is the one that provides the same API as the object that it is mocking, but does not necessarily include the full functionality of the object. A mock object will have a well-defined set of input and output data, which makes it ideal to test against.
Mock objects are useful when it is difficult to simulate a real object in a unit test. This may be, for example, a database operation or invoking external functionality. For a database operation, we may not have access to a full production database to do the testing against. So we may want to make a mock datasource that we can perform queries against. Again, when we are invoking external functionality, this may not be fully available within our test environment. So we may want, to provide mock implementations of our external services.
Seam provides an easy way to allow mock components to be written. In Seam, we can define a component as a mock component by setting its install precedence to be higher than that of the standard component. When Seam looks up a component to inject or outject into another Seam component, it will find the component with the highest precedence and use that.
When we define a component in Seam, it is typically created with the APPLICATION precedence (this is the third-lowest component precedence—just above that of the Seam Framework components). If we create a component with the same name as an already-existing component within the Seam Framework, the default operation will use the one provided by us, the developer, rather than the one provided by the framework. A precedence can be defined for each Seam component, and when Seam instantiates a component, it always instantiates the one with the highest precedence. Therefore, we can see that if we wish to mock a component, we need to provide it with the highest precedence, and Seam will ensure that the mock implementation is used.
Within Seam, the following component precedences are defined as follows (ranging from the lowest precedence to the highest precedence)
These precedences are defined within the Seam org.jboss.seam.annotations.Install interface. To set the precedence of a component to Install.MOCK, and therefore define a Seam component as a mock component, we need to annotate the component with the @Install(precedence=Install.MOCK) annotation.
A simple definition of a mock for our vacationManagerAction could therefore be developed, as shown in the following code.
package com.davidsalter.vacationplanner.actions;
import org.jboss.seam.annotations.Install;
import org.jboss.seam.annotations.Name;
@Name("vacationManagerAction")
@Install(precedence=Install.MOCK)
public class MockVacationManagerAction {
public String selectVacationType() throws Exception {
return "danger";
}
}
From this simple class, we can note several things.
The class has been defined within the same package as the "full"
vacationManagerActionThe class has been defined with the same
@NameThe precedence of the class has been defined as the highest that is allowed by Seam, by using the
@Install(precedence=Install.MOCK)annotationThe code has a well-defined (albeit rather simplified) set of outputs
In this chapter, we've looked at TestNG, and seen how it can be used to build sets of test suites. We saw that TestNG provides annotations that can be applied to Java classes in order to turn them into test classes.
After introducing TestNG, we looked at how it can be applied to our sample application to test any POJO classes that we may have developed, effectively using TestNG as a component-testing framework.
Next, we looked at how the Seam testing framework leverages TestNG to provide testing facilities for JSF pages. We saw how it is possible to test JSF pages outside of the application server, enabling integration tests to be run in a simple straightforward manner that is not immediately available for other web frameworks.
Finally, we saw how it is possible to test Seam components directly, by using a similar mechanism to how we performed user interface testing, creating mock components where necessary.
We've seen in this chapter how Seam provides excellent facilities for allowing us to perform testing of our applications, at the class, Seam component, and user interface levels.