
So far, we have looked at the Seam Framework and seen many of the features that make Seam an attractive framework for developing conversational web applications. In this final chapter, we're going to take a look at some of the more advanced features of Seam, and see how these can be used within our web applications.
In this chapter, we are going to discuss:
Internationalization
URL rewriting
Seam events
PDF document generation
Email
Internationalizing an application can be an important stage of application development if you plan to release your application into a multilingual territory.
Internationalizing an application involves three key stages, all of which are fully supported by Seam and JSF/Facelets.
Defining which languages your application is available in.
Writing application-specific strings in different languages.
Displaying the appropriate language strings in a web page.
Note
It is usually a lot easier to internationalize your application from the start rather than having to retrospectively fit internationalized strings at a later date.
The languages that we wish to have our application deployed into must be defined within the <locale-config /> section of the WEB-INF/faces-config.xml file.
Within the WEB-INF/faces-config.xml file, we can specify which languages the application is available in by using the <supported-locale/> element.
<supported-locale>en</supported-locale>
The default language for the application is also defined within the WEB-INF/faces-config.xml, in the <default-locale/> element.
<default-locale>en</default-locale>
If we want to support English, German, and French in our application, with English being the default language, the faces-config.xml file would look similar to the following.
<?xml version='1.0' encoding='UTF-8'?>

<faces-config version="1.2"
xmlns="http://java.sun.com/xml/ns/javaee"
xmlns:xsi="http://www.w3.org/2001/XMLSchema-instance"
xsi:schemaLocation="http://java.sun.com/xml/ns/javaee
http://java.sun.com/xml/ns/javaee/web-facesconfig_1_2.xsd">
<application>
<locale-config>
<default-locale>en</default-locale>
<supported-locale>de</supported-locale>
<supported-locale>en</supported-locale>
<supported-locale>fr</supported-locale>
</locale-config>
</application>
</faces-config>
The locale specified within the <supported-locale/> and <default-locale/> elements takes the language[_country][_variant] format, where the [_country] and [_variant] values are optional. So, for example, British English would be defined as en_gb whereas American English would be defined as en_us.
The list of two-letter codes that are applicable for locales are defined by ISO 639, and can be obtained from http://www.loc.gov/standards/iso639-2/php/ code_list.php.
Some of the more common two-letter country codes are shown in the following table:
|
Language |
Locale Code |
|---|---|
|
German |
De |
|
English |
En |
|
French |
Fr |
|
Italian |
It |
|
Japanese |
Ja |
|
Spanish |
Es |
After deciding which languages an application needs to be developed for, we need to write the localized strings and group these into separate text bundles. When the application is running, the relevant bundle will be loaded by the application and the localized strings will be available for display within web pages.
Within a Seam, JSF, or a Facelets application, the localized strings for an application are stored within properties files, which are usually stored within the WEB-INF/classes folder. The localization bundles take the name messages_locale.properties where the locale is as defined within the faces-config.xml file (for example, en, fr, de, and so on).
To localize an application into French, English, and German, the following files would be required:
messages_fr.propertiesmessages_en.propertiesmessages_de.properties
Within a localization properties file, each string that we wish to display within our user interface should be defined using a lookup key. This language independent lookup key is used within the web page to display the correct localized string.
For example, if we had an application that asked for customer details, we may want to localize the word "customer". Our English, German, and French properties files would have the following entries for "customer":
English:
customer=CustomerFrench:
customer=ClientGerman:
customer=Kunde
After defining the languages available for your application and defining (and translating) the localized strings for the user interface, the final stage is to specify the localization strings within the Facelets pages. This can be achieved by using the JSF messages element.
We can directly access the JSF messages bundle and output text by using the JSF <h:outputText /> tag. For example, to output the word "customer" in any of our supported languages, we would use the following JSF code.
<h:outputText value="#{messages['customer']}"/>
When this code is rendered, the appropriate text from the message bundle will be loaded and rendered on the web page. On selecting the English language, we get the following screenshot:

On selecting Deutsch as our language, we get the following screenshot:
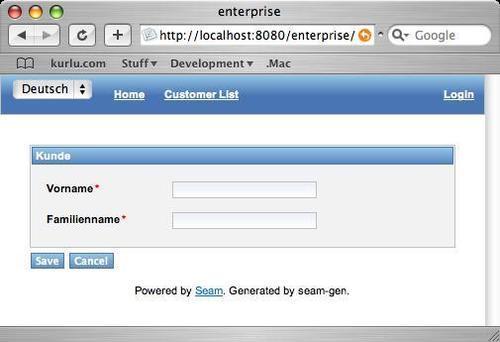
We can access internationalized strings from a Facelets page. It is also possible to access internationalized messages from within a Seam component. The internationalization messages are stored in the org.jboss.seam.international.Messages Seam component. To access the internationalized messages, they must first be injected into a Seam component.
@In
private Map<String, String> messages;
The messages are injected as a java.util.Map type, so we can therefore extract localized messages from the map by using the map's get() method.
String localizedCustomer = messages.get("customer");
Within an application, it can sometimes be useful to change the localization dynamically by using a drop down box on a web page.
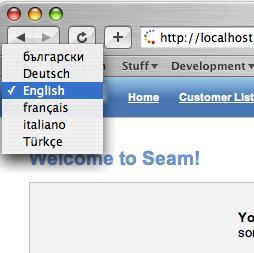
Seam provides support for dynamically changing an application's locale via the org.jboss.seam.international.localeSelector component.
The localeSelector component can be used within a Facelets page to show a list of all of the supported locales for an application (obtained from the information stored in faces-config.xml), and can be used to change the locale of an application.
To display a locale selector drop-down box like the one shown in the preceding screenshot, we need to create a JSF <h:selectOneMenu /> component. The drop-down items are populated via the supportedLocales property of the localeSelector component—#{localeSelector.selectedLocales}. The following Facelets fragment shows how the drop-down locale selector in the previous example is written.
<rich:toolBar
xmlns="http://www.w3.org/1999/xhtml"
xmlns:ui="http://java.sun.com/jsf/facelets"
xmlns:h="http://java.sun.com/jsf/html"
xmlns:f="http://java.sun.com/jsf/core"
xmlns:s="http://jboss.com/products/seam/taglib"
xmlns:rich="http://richfaces.org/rich">
<rich:toolBarGroup>
<h:form id="selectLanguage" action="#{localeSelector.select}">
<h:selectOneMenu value="#{localeSelector.localeString}" onchange="submit()">
<f:selectItems
value="#{localeSelector.supportedLocales}"/>
</h:selectOneMenu>
</h:form>
</rich:toolBar>
In this Facelets fragment, you can see that we cause the form action to be invoked in a JavaScript onChange() event. We could have used an AJAX4JSF style event here, instead of having to write JavaScript (even though we have only written one line of JavaScript!), but when changing the locale, we really want all of the screen to change, as all of our labels will potentially need to be rendered in a different language. This is one instance where we don't want small parts of the page to be refreshed, but instead we want the whole page to be refreshed.
Persisting the localization settings can easily be achieved by setting the cookie-enabled attribute of the <international:locale-selector /> element to true within the components.xml file.
To access this element, we need to make sure that we have defined the international namespace in the components.xml file.
<?xml version="1.0" encoding="UTF-8"?>
<components
xmlns:international =
"http://jboss.com/products/seam/international"
http://jboss.com/products/seam/international
http://jboss.com/products/seam/international-2.1.xsd>
… Other namespace definitions omitted for brevity.
<international:locale-selector cookie-enabled="true"/>
</components>
As you would expect, if you use SeamGen to generate your application, several internationalization features are provided automatically for you.
SeamGen automatically sets up the faces-config.xml file to support the following languages:
bg (Bulgarian)
de (German)
en (English)
fr (French)
it (Italian)
tr (Turkish)
Localized resource properties files contain localized strings for many Seam and JSF events also created for these languages. Check out the appropriate localization files for full details of the default localized strings.
You will remember that back in Chapter 2, we introduced Hibernate Validators and showed how we could write a simple calculator application that could add two numbers together. When we wrote this application, we showed that if you entered non-numeric values, the Hibernate Validator would cause a rather lengthy and unintelligible error message to be displayed, as shown in the following screenshot:

In Chapter 2, we said it was easy to fix this error and said that we would show how to fix it later in the book. Well, now it's time, and we can see how easy it is to change this error message into something more intelligible, as shown in the following screenshot.

Using the techniques that we have just covered for localization also allows us to change the messages that are generated from the Hibernate Validators. When messages are generated for errors from the Hibernate Validator annotations, the messages are looked up from a message bundle file. If we don't like the message that is generated (clearly the one generated in this case is not a very helpful error message!), we can "override" the default messages by adding our own message to the applications messages_locale.properties file(s). We can completely localize this message and write it in whatever languages our application supports, giving us completely localized Hibernate Validator error messages.
Note
This technique is not only applicable to Hibernate Validator error messages, but to all of the messages that are generated via JSF message bundles.
To override the default messages generated from Hibernate Validator, we need to know the message ID, and then need to create a corresponding entry for the message in the messages.properties file. For the Hibernate Validator double validation rules, the following keys define the messages that we want to override:
javax.faces.converter.DoubleConverter.DOUBLEjavax.faces.converter.DoubleConverter.DOUBLE_detail
These messages define both a basic error message and a detailed message for a double converter. To change these messages to be something more meaningful in an English version of our application (as shown in the previous screenshot), we would add the following to our messages_en.properties file:
javax.faces.converter.DoubleConverter.DOUBLE_detail=Please ensure you enter a numeric value
javax.faces.converter.DoubleConverter.DOUBLE=Please ensure you enter a numeric value
Remember that in order to ensure that our application is localized completely, we would also need to enter the relevant error messages into the other messages_locale.properties files.
Within web applications, it can be useful to perform URL rewriting in order to provide URLs in a more user-friendly and often shorter format. Typically, URLs are re-written to remove GET parameters, which can help us in making URLs more search engine friendly and ultimately resulting in a higher page ranking within search engines.
As we saw earlier in the book, the default file extension for a Seam web page is .seam. We can use URL rewriting to remove this extension. For example, using Seam's default configuration, the URL for a customer details page may be:
http://localhost:8080/enterprise/customer.seam
With URL rewriting, we can change this to:
http://localhost:8080/enterprise/customer
There's not really that much benefit in simply removing the .seam suffix from a URL. The major benefit occurs when we have HTTP GET parameters in the URL. URL rewriting allows us to remove these parameters and make them part of the URL.
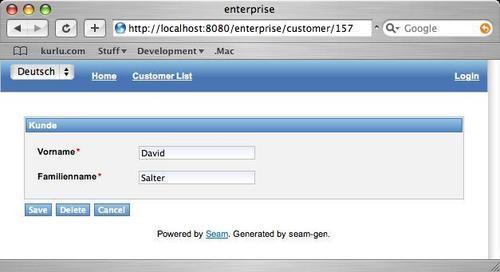
Consider again our URL to access a customer's details. To access details for customer number 157, the URL may be written as:
http://localhost:8080/enterprise/customer.seam?customerId=157
By using URL rewriting, we can make this URL much simpler by removing the parameter name.
http://localhost:8080/enterprise/customer/157
To enable URL rewriting, we first need to indicate the pattern of web pages that we wish to apply the rewrite filter to. This is achieved within the components.xml file.
To enable rewriting for all of the URLs ending in .seam, we create an instance of the <web:rewrite-filter /> element and set the view-mapping attribute to the URL pattern that we wish to rewrite.
<web:rewrite-filter view-mapping="*.seam" />
Now that we have specified which URL pattern the rewrite filter will be applied to, we need to specify the rewritten pattern for any parameters that we wish to remove, for example replacing ?customerId=157 with /157. This is done within the pages.xml file.
Within the pages.xml file, we need to add a <rewrite /> element to the appropriate <page /> element, specifying the new URL pattern that we wish to use within the pattern attribute.
To rewrite the customer page as discussed, we would need to specify the rewrite as follows:
<page view-id="/customer.xhtml">
<rewrite pattern="/customer/{customerId}"/>
</page>
This XML configuration specifies that we wish to rewrite the /customer.xhtml page as /customer/{customerId}. The customerId parameter, which was originally available as a HTTP GET parameter must be defined within the braces - {} - within the <rewrite /> element.
The Seam Framework provides a comprehensive set of components that allow us, as developers, to build comprehensive web applications.
In addition to invoking methods on components and classes, Seam provides an event-based framework that allows us to both raise and observe events. Events can be raised both synchronously and asynchronously, the latter being particularly useful if we want to implement background functionality without impacting user interface response times.
One common use for events is to provide auditing facilities. Whenever an action is performed within an application, for example, logging on or creating a customer, an event can be raised. When the event is observed, a log entry could be created in a database showing the action performed, who performed it, and when.
Seam provides two ways of raising events. They can be raised using the @RaiseEvent annotation or can be raised via the org.jboss.seam.core.Events class.
The @RaiseEvent annotation is the easiest way to raise events, so let's take a look at it, first.
The @RaiseEvent annotation can be applied to component methods in order to raise an event "after" the method has completed executing.
The annotation takes one parameter, which is the name of the event being raised. If this parameter is not specified, then an event with the same name as the method is raised.
@RaiseEvent("customerCreated")
// Event "customerCreated" is raised after
// the method completes
public String persist() {}
@RaiseEvent
// Event "persist" is raised after
// the method completes
public String persist() {}
The org.jboss.seam.core.Events class allows events to be raised either synchronously or asynchronously.
To raise an event using this class, we must get an instance of the Events() class and then invoke either the raiseEvent() method or the raiseAsynchronousEvent() methods.
Both of these methods take a mandatory first parameter, which is the name of the event to be raised. A variable number of object parameters can then be passed to these methods, which are in turn passed through to the event observer. Depending on the scope of your objects, you probably won't need to pass parameters to these methods, because your event observer can be injected with any necessary structured data.
public String persist() {
// Raise the event "customerCreated" immediately
// Passing no parameters.
Events.instance().raiseEvent("customerCreated")
…
}
public String persist() {
// Raise the event "customerCreatedParams" asynchronously
// passing the customers second name.
Events.instance().raiseEvent("customerCreatedParams", this.instance.getSecondName());
…
}
To create an event observer, we need to create a Seam component and annotate event listener methods with the @Observer annotation.
The @Observer annotation takes a single parameter, which is the name of the event being observed.
Any optional parameters that are being passed with the event must also be declared in the event observer method.
@Name("eventListener")
public class EventListener {
@Logger
private Log log;
@Observer("customerCreated")
// Observe the "customerCreated" event.
public void customerCreated() {
log.info("New customer created.");
}
@Observer("customerCreatedParams")
// Observer the "customerCreatdParams" event.
public void customerCreatedParams(String secondName) {
log.info("New customer created: "+secondName);
}
}
The Seam Framework utilizes the iText library to allow PDF documents to be generated directly from the Facelets pages. iText is a pure Java library that provides an API for generating and manipulating Adobe PDF files.
Note
For more information on iText, visit http://www.lowagie.com/iText/
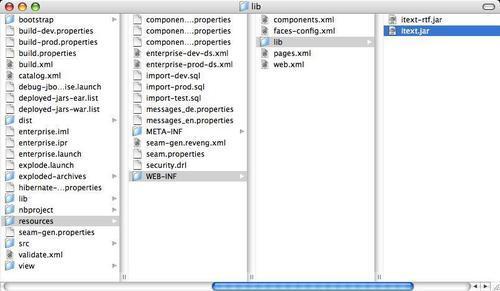
In order to use iText for PDF generation within Seam, we first need to copy the iText JAR files into our web application's class path and enable the document servlet. This is one of the instances where SeamGen doesn't currently configure an application completely for us.
To use Seam's PDF generation tools, we need to ensure that the itext.jar and itext-rtf.jar (that is, the iText JAR files) are within the web application's classpath. It's important to note that the web application's classpath is different to the EAR's classpath if you are deploying an application as an EAR file. To place these files within the web application's classpath, we can either place them in the server/default/lib directory on the JBoss Application Server (if you are using a different application server to the JBoss AS, consult your application server documentation to find the classpath), or we can modify the build process to ensure that these files are built into the WEB-INF/lib directory of the web application. The use of any of these techniques will depend on whether you have a one-off application that needs to use the JAR files, or whether you wish to share the JAR files over multiple applications.
To modify a SeamGen project to use Seam's PDF facilities, you simply need to copy the itext.jar and itext-rtf.jar files from the <seam_home>/lib folder into your application's resources/WEB-INF/lib/ folder.
To generate PDFs from within a Seam application, we write a Facelets page, but use the <document /> element as the root of the page. This allows Seam to know that the page is to be generated as a PDF rather than being rendered as HTML.
The <document/> element is defined within the http://jboss.com/products/seam/pdf namespace, p. A Facelets page that renders as a PDF document must therefore take the following form:
<p:document xmlns:ui="http://java.sun.com/jsf/facelets"
xmlns:p="http://jboss.com/products/seam/pdf"
...
</p:document>
The <p:document /> element has several attributes, the most common of which are shown in the following table:
|
Attribute |
Description |
|---|---|
|
author |
The author of the generated PDF document. |
|
creator |
The creator of the generated PDF document. The creator may be the same as the author of a document, but this is not necessarily the case. |
|
keywords |
Keywords associated with the generated PDF document. |
|
orientation |
The orientation of the generated PDF document. Valid values are |
|
pageSize |
The page size of the generated PDF document. Valid values are |
|
title |
The title of the generated PDF document. |
|
subject |
The subject of the generated PDF document. |
|
type |
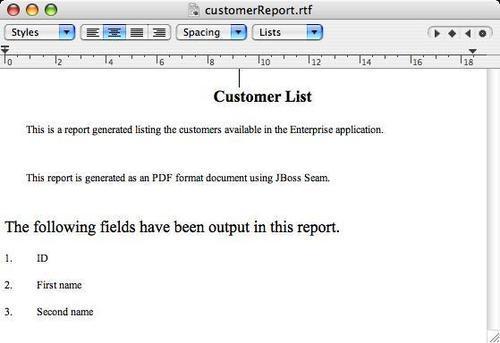
The type of the document to be created. Documents can be created as |
Within the <p:document/>, we can write paragraphs of text. Each paragraph is denoted by the <p:paragraph> element.
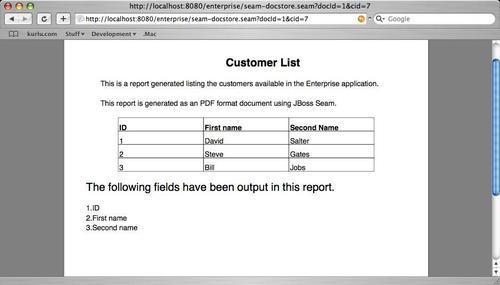
<p:paragraph>
This is a report listing the customers
available in the Enterprise application.
</p:paragraph>
<p:paragraph spacingAfter="20">
This report is generated as a PDF format document
using JBoss Seam.
</p:paragraph>
The <p:paragraph /> element has several attributes, the most common of which are shown in the following table.
|
Attribute |
Description |
|---|---|
|
alignment |
The paragraph alignment. Valid values are |
|
indentationLeft |
The left-hand indentation of the paragraph, defined in points (pt). |
|
indentationRight |
The right-hand indentation of the paragraph, defined in points (pt). |
|
keepTogether |
Flag indicating whether paragraphs are to be kept together on one page. Valid values are |
|
spacingAfter |
The spacing after the paragraph, defined in points (pt). |
|
spacingBefore |
The spacing before the paragraph, defined in points (pt). |
Within a paragraph, we can access any of our Seam components by using EL to output either single entries or tables of entries.
To output individual strings from Seam components, we use the <p:text/> element. This takes one parameter, value, which must be bound to a value EL expression.
<p:paragraph>Report generated by:
<p:text value="#{identity.username}"></p:text>
</p:paragraph>
The font of the text that is created in the generated PDF file can also be changed. The name, size, and style of the font can all be changed by using the <p:font> element.
<p:font style="bold" size="18">
<p:paragraph alignment="center">
Customer List
</p:paragraph>
</p:font>
The <p:font /> element has several attributes, which are shown in the following table.
|
Attribute |
Description |
|---|---|
|
name |
The name of the font family to be used. Valid values are |
|
size |
The size of the font in points (pt). |
|
style |
The style of the font. Valid values are |
In addition to paragraphs, we can generate tables of data that are backed by lists held within a Seam component. To output a table, we use the <p:table /> element. Within a <p:table />, each cell is defined as a <p:cell />. We can use the Facelets <ui:repeat /> element to iterate over lists and insert data elements into cells.
<p:table columns="3" headerRows="1" widths="1 3 3">
<p:cell><p:font style="bold">ID</p:font></p:cell>
<p:cell><p:font style="bold">First name</p:font></p:cell>
<p:cell><p:font style="bold">Second Name</p:font></p:cell>
<ui:repeat value="#{customerList.resultList}" var="customer">
<p:cell>#{customer.id}</p:cell>
<p:cell>#{customer.foreName}</p:cell>
<p:cell>#{customer.secondName}</p:cell>
</ui:repeat>
</p:table>
The <p:table /> element has several attributes, the most common of which are shown in the following table:
|
Attribute |
Description |
|---|---|
|
columns |
The number of columns in the table. |
|
footerRows |
The number of footer rows in the table. |
|
headerRows |
The number of header rows in the table. |
|
widths |
The widths of each of the columns, relative to each other. For example, a value of " |
The <p:cell /> element has several attributes, the most common of which are shown in the following table:
|
Attribute |
Description |
|---|---|
|
colspan |
The number of columns for the cell to span. |
|
horizontalAlignment |
The horizontal alignment of the cell. Valid values are |
|
verticalAlignment |
The vertical alignment of the cell. Valid values are |
In addition to creating text using paragraphs, fonts, and tables, we can also define plain HTML tags and have these rendered in the PDF document. To output HTML, we must surround the HTML with the <p:html/> tag.
<p:html>
<h2>The following fields have been output in this report.</h2>
<ol>
<li>ID</li>
<li>First name</li>
<li>Second name</li>
</ol>
</p:html>
The Seam Framework provides support for sending emails via SMTP. To send emails, we need to perform the following three basic steps.
Configure the SMTP settings
Write the email template
Send the email
When using an application server such as the JBoss Application Server, I'm a big proponent of using the facilities provided by the application server. The JBoss Application Server provides a JNDI lookup to allow emails to be sent from within Java EE applications. Usually, you need to perform JNDI lookups to access this resource, but fortunately Seam provides a transparent way of sending emails without having to perform any JNDI lookups. We therefore have two configurations that we need to make before we can send emails with Seam applications. First we need to configure email within the application server itself, and second we need to configure our Seam application to use the application server's mail settings.
With the JBoss Application Server, configuring the email is simply a matter of editing the server/<instance>/deploy/mail-service.xml file. Within this file, we need to configure the address and port of our SMTP server, along with the user credentials to use if authentication is necessary. To configure these details, edit the following properties in the mail-service.xml file.
|
Property |
Description |
|---|---|
|
|
The JNDI name to look up the mail resource. The default value of |
|
|
The address of the SMTP server that you want to use to send emails, for example, |
|
|
The SMTP port to use to connect to when sending emails. The default port of 25 will probably be correct. |
|
|
The default email address that emails sent would appear as having come from. |
After editing the mail-service.xml file, it will look similar to the following:
<?xml version="1.0" encoding="UTF-8"?>
<server>
<mbean code="org.jboss.mail.MailService" name="jboss:service=Mail">
<attribute name="JNDIName">java:/Mail</attribute>
<attribute name="User">nobody</attribute>
<attribute name="Password">password</attribute>
<attribute name="Configuration">
<configuration>
<!-- Change to the SMTP gateway server -->
<property name="mail.smtp.host" value="smtp.hostingprovider.com"/>
<!-- The mail server port -->
<property name="mail.smtp.port" value="25"/>
<!-- Change to the address mail will be from -->
<property name="mail.from" value="[email protected]"/>
<!- Other properties omitted for brevity -->
</configuration>
</attribute>
<depends>jboss:service=Naming</depends>
</mbean>
</server>
One of the main benefits of using the email services provided by the application server is that if any of our configuration changes, for example, we change hosting provider, we don't need to recompile our application—all that is required is a simple reconfiguration of the mail service on the application server.
Note
If you are using an application server other than JBoss, please consult your application server documentation for details of how to configure email support for this type of application server.
After configuring the application server, we need to configure our Seam application with the name of the JNDI lookup to use. As it is standard with Seam applications, this type of configuration is made within the components.xml file. Within this file, we need to create an element of the <mail:mail-session /> type and set its session-jndi-name to the JNDI address just configured within the application server. The <mail:mail-session /> element is defined within the xmlns:mail="http://jboss.com/products/seam/mail" Seam mail namespace.
<mail:mail-session session-jndi-name="java:/Mail" />
Writing an email template within Seam is as simple as writing a Facelets page. Within an email template, we can use any of the Facelets facilities to provide templating, access to Seam components, iterating through lists, and so on.
A Seam email template must have the <m:message /> element at its root. This element is defined within the xmlns:m="http://jboss.com/products/seam/mail" namespace.
<m:message xmlns="http://www.w3.org/1999/xhtml"
xmlns:m="http://jboss.com/products/seam/mail">
…
</m:message>
Within a <m:message /> tag, we need to define the standard data used with an email.
Who the email is to (both email address and name)
Who the email is from (both email address and name)
The subject of the email
The body of the email
Any attachments to be included in the email
The <m:from /> element is used to specify who the email is from. This element has two attributes: name and address. The name attribute holds the displayed name of the person or organization that the email is from, whereas the address attribute shows the actual email address that the email is received from. These fields can be bound to a Seam component by using EL.
<m:from name="#{emailManager.emailDetails.fromName}"
address="#{emailManager.emailDetails.from}" />
The <m:to /> element is used to specify the address that the email is to be sent to. Again, this element has two attributes: name and address. The name attribute holds the displayed name of the person or organization that the email is to be sent to, whereas the address attribute holds the actual email address that the email is to be sent to. These fields can be bound to a Seam component by using EL.
<m:to name="#{emailManager.emailDetails.toName}">
#{emailManager.emailDetails.to}
</m:to>
The <m:subject /> field holds the subject of the email.
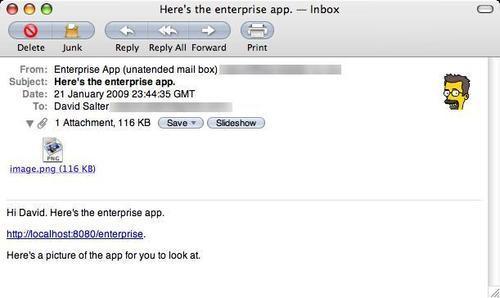
<m:subject>Here's the enterprise app.</m:subject>
The <m:body> field holds the body of the email. This body can contain any valid Facelets code or HTML markup.
<m:body>
<p>Hi. Here's the enterprise app.</p>
<p><a href="http://loclhost:8080/enterprise"> http://localhost:8080/enterprise</a>.
</p>
</m:body>
Files can be attached to emails by using the <m:attachment /> element. This element should be enclosed within a <m:body /> element.
<m:body>
<p>Here's a picture of the app for you to look at.</p>
<m:attachment value="/image.png" />
</m:body>
The previous example shows how to attach a static attachment into an email. Dynamic data can also be attached into an email. This is achieved by setting the value attribute to a Seam component's method that returns a byte[], by using EL. When attaching the file in this way, it is best to set the contentType attribute so that the email can be viewed correctly on the recipient's computer.
@Name("pictureData")
public class PictureData {
private byte[]theData;
public byte[] getTheData(); {
return theData;
}
public void setTheData(byte[] theData) {
this.theData = theData;
}
// … Rest of class omitted for brevity
}
<m:attachment value="#{pictureData.theData}" contentType= "image/gif" />
Once we have configured the email properties and defined an email template, an email can be sent by using the org.jboss.seam.faces.Renderer component. This component can be injected into a Seam action component by using the @In annotation.
@In
private Renderer renderer;
To send an email, we need to invoke the render() method of the renderer component, as shown in the following example action component.
package com.davidsalter.enterprise.action;
import com.davidsalter.enterprise.entity.EmailDetails;
import javax.ejb.Stateless;
import org.jboss.seam.ScopeType;
import org.jboss.seam.annotations.In;
import org.jboss.seam.annotations.Name;
import org.jboss.seam.annotations.Out;
import org.jboss.seam.annotations.Scope;
import org.jboss.seam.faces.Renderer;
@Stateless
@Name("emailManager")
@Scope(ScopeType.SESSION)
public class EmailManagerAction implements EmailManager {
@In
private Renderer renderer;
@Out
private EmailDetails emailDetails;
public EmailDetails getEmailDetails() {
return emailDetails;
}
public void setEmailDetails(EmailDetails emailDetails) {
this.emailDetails = emailDetails;
}
public String sendEmail() {
try {
emailDetails = new EmailDetails();
// Set up the email details here
// Send the email
renderer.render("/email.xhtml");
} catch (Exception e) {
return "/emailFailure.xhtml";
}
return "/emailSent.xhtml";
}
}
In this book, we've focused on learning about Seam and what benefits it can provide to web application developers. We've looked at many different features of Seam and seen the benefits that these features provide.
So, what's the future of Seam, what will be in the next version, and what is the Seam team working on now?
The Seam team has been working on the Web Beans specification, as defined by JSR 299 (http://jcp.org/en/jsr/detail?id=299). Web Beans defines Dependency Injection and Contextual Lifecycle management for applications. To quote the JCP:
The purpose of this specification (JSR 299) is to unify the JSF managed bean component model with the EJB component model, resulting in a significantly simplified programming model for web-based applications.
This description sounds very much like the core of the Seam Framework, and is indeed described as such by the Seam Team (http://seamframework.org/WebBeans). The Seam team describes Seam as a "superset" of Web Beans, with Web Beans being at the core of future releases of the Seam Framework. Further, the Seam team adds:
Seam will continue to be the vehicle which delivers BPM integration, Seam Security, PDF, and email rendering, etc.
It certainly sounds like Seam has a solid future ahead of it, with Web Beans being heavily influenced by Seam and possibly being a part of future releases.
Whatever the future may bring, if you've enjoyed learning about Seam, I encourage you to keep learning more.
In this chapter we've taken a look at some of the enterprise features that are available within the Seam Framework.
We've looked at internationalizing an application and seen how we can easily develop resource bundles and dynamically change them whilst our application is running. Whilst looking at localization we also saw how we can easily change the error messages generated by Hibernate Validator annotations, as introduced in Chapter 2.
We've looked at URL rewriting and seen how it can be used to make URLs easier for people to remember and to make our applications more search engine friendly.
Next, we took a look at Seam events and saw how we can program against an event driven architecture, both raising and observing events.
Finally, we looked at both PDF and email generation and saw how both types of content are generated based upon Facelets templates.
Hopefully, you've now got a good understanding of the features provided by Seam and should be able to start developing your own Seam-based applications. In the Appendix, we'll see how developing Seam applications can be even more productive when used in conjunction with the Seam Tools for Eclipse.