
In Magento, you can add a Simple Product, a Grouped Product, or a Configurable Product. Until you have added several Simple Products, the other two choices don't make much sense.
The following is the procedure for adding a simple product, which is divided into seven parts.
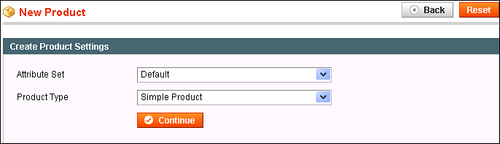
In this part of the process, you will create the blank Product and select an Attribute Set for the Product. The Attribute Set will determine which Attributes are available for the Product.
Note
Once you have assigned an Attribute Set to a Product, you cannot remove that Set and apply a different one.
The Product now permanently uses that Attribute Set. You can edit the Set under Catalog | Attributes. This will change the Attributes in the Set and, therefore, the Attributes that the Product has. However, you cannot remove the Set from the Product.
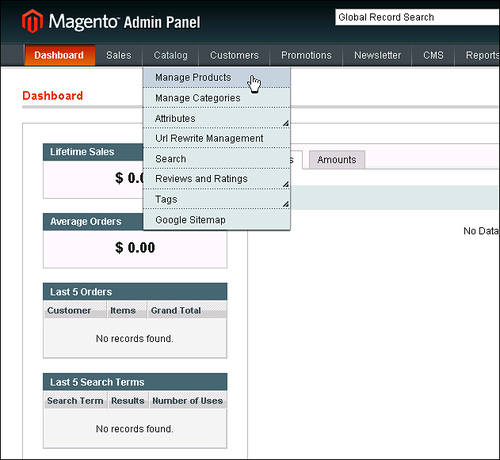
Log in to your site's backend, which we call the Administrative Panel.
Select Catalog | Manage Products as shown:
The Manage Products page is displayed. Because you haven't added any products yet, the list of products is blank as shown in the following screenshot:
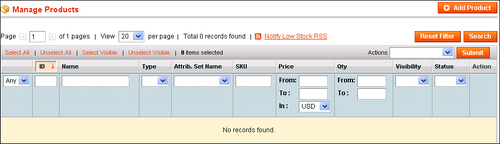
Click on Add Product. The Create Product Settings page is displayed.
Note
If you don't know what an Attribute Set is, stop here and read Chapter 3 before proceeding.
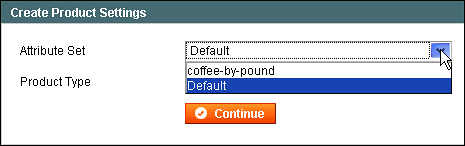
In our demo store, we will use the Attribute Set coffee-by-pound, which we created in the previous chapter.
Note
Once you assign an Attribute Set to a Product and select its Product Type, these cannot be changed. Therefore, make sure that before you create a Product, you have chosen the correct Product Type, and you have created the Attribute Set that you want to use.
Leave Product Type set to Simple Product. Until you have added several Simple Products, the other two choices (Grouped Product and Configurable Product) don't make much sense.
Click on Continue. The Product Information page is displayed as shown in the following screenshot:

This page is divided into tabs, which you see listed on the left side. We won't discuss all of the fields in all of the tabs. Instead, we'll cover the fields and tabs that you are most likely to use when you are first creating your store.
The General tab is selected for you. Let's begin there.
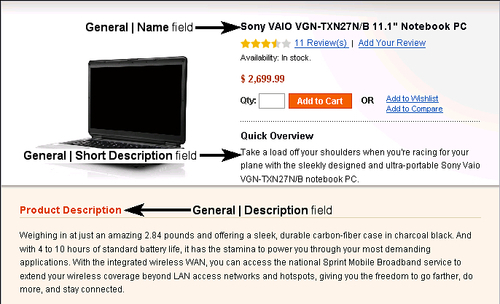
When Magento displays a product in your store, that product appears on its own page. Most of the information that your shoppers see on that page is entered in the General tab:

Notice that several fields on this page are marked with red asterisks. These fields are required, so you must fill them. There is also a required field under the Prices tab.
Each of the fields in the General tab is described next. Fill in the fields for your Product.
Name, Description, and Short Description
Your customers will see the product Name at the top of the product's page. A Short Description appears below it, and a Description below it.
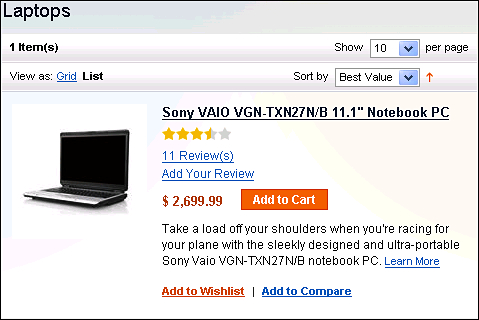
When shoppers List the products in a Category, they also see the Name and Short Description as shown in the following screenshot:
SKU
SKU stands for Stock Keeping Unit. This is a standard term in the retail industry. Each item in your store must have a unique SKU. For more about SKUs, see the Wikipedia article at http://es.wikipedia.org/wiki/Stock_Keeping_Unit.
Weight
This field is the product's weight. Usually, this field holds the shipping weight, and not the actual weight of the product. You usually put the actual weight of the product in the product's description. You usually use this field for calculating the cost of shipping.
For example, the Product Description for the laptop states that it weighs 2.84 pounds. However, the shipping weight would be much higher because it includes the box, accessories, packaging, and manuals.
Our coffee store is an exception because we sell products by weight. So, we will take the unusual step of using the Weight field for the product's actual weight.
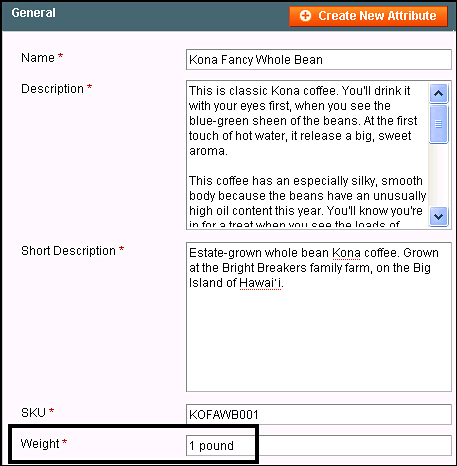
Most of our coffee will be sold in one-pound bags. However, if we want to offer a half-pound or two-pound bag, we'll need to create separate products for each of them.
Set Product as New from Date and Set Product as New to Date
The default layout for Magento's home page shows blocks that display the shopper's recently viewed products, and products that the shopper chooses to compare. You can also add some code to your store's home page that will display new products. The new products will appear at the bottom of the page. Magento can also put new products into an RSS feed and send email announcements of new products, for customers who subscribe.
A new product can be included in the new product display, RSS feed, and/or email announcement.
Setting dates in the fields for Set Product as New from/to Date makes the product "new" to Magento. If you use any of the above features, you will need to fill in these date fields. However, if you don't highlight "new" products in your store, you can safely leave these fields blank.
Status
Enabled makes this product active and displays it in your store. Disabled makes this product inactive and hides it from shoppers. I prefer to keep a product Disabled until I've filled out all the tabs, and double-checked my work.
URL key
Some features can cause a web page to rank higher in search engines. Designing a page to appear as high as possible in search engines is called search engine optimization, or SEO. It is part science and part art. A full discussion is beyond the scope of this chapter.
One feature that helps a page's search engine rank is a URL that has relevant search terms in it. For example,
brew-me-a-cup.com/product/1234is not a search engine friendly URL. However,brew-me-a-cup.com/kona-fancy-wholebeangives a search engine more information to index.The URL key field creates a search engine friendly URL. Because a URL cannot have spaces or special characters; you cannot use them in this field. If you leave this field blank, Magento will generate a search engine friendly URL for you. It will base this URL on the product's Name.
Visibility
This field determines whether the product will not display at all in your site (Nowhere), display on the pages of your site (Catalog), show up in search results (Search), or both (Catalog, Search). Note that even if a product's Status is set to Enabled, you must have its Visibility set to Catalog or Search, or your shoppers won't be able to see or find it. If you have the Status set to Disabled, then the Product won't show up in the Catalog no matter what you've set the Visibility to. However, you can set Visibility to Search for a Disabled product.
Allow Gift Message
This field determines if customers can add a gift message to this product during checkout. Yes and No are self-explanatory. Use config means that for this product, Magento will use the sitewide setting for gift messages. You will find that setting under System | Sales | Sales | Gift Messages.
Save and Continue to Pricing
In the upper right corner of the New Product page, there are two buttons:

Save will save what you have entered into this tab, and advance you to the next tab.
Save and Continue Edit will save the information that you entered and keep you on the same tab. Because there is a required field on the next tab, you will want to Save this tab and proceed to the Prices tab. This is because you must fill in all required fields before the system will allow you to save the product.
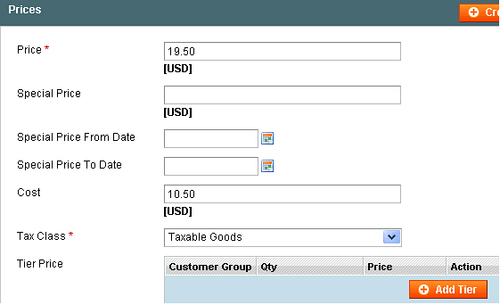
Each of the fields under the Prices tab is described in the following subsections—fill in the required fields plus any optional fields that you want to use:
Special Price
If you enter a Special Price, the original Price will be displayed with a red line through it, and the Special Price will be displayed. If you do not enter any dates, the Special Price will be in effect until you remove it. If you do enter dates, the Special Price will be in effect during the dates specified.
This is not the only place where you can determine the price of a product. You can also use an advanced feature called a Shopping Cart Price Rule. This rule can change the price of a product based on what other products are in the Shopping Cart. A Shopping Cart Price Rule takes effect in the Shopping Cart during the checkout process so that customers don't see them until they've added the Product to their carts. A Special Price is displayed on the catalog page so customers see it before they add the Product to their carts.
Tax Class
The Tax Class that you select here determines how the product gets taxed.
Note
If you don't know what a Tax Class and a Tax Rule are, stop here and read Chapter 4 before proceeding.
In our demo store, we will give this Product a Tax Class of Food.
Tier Pricing
Tier Pricing enables you to give different prices for different quantities. Usually, you use this to give a discount for buying in bulk. You can apply tiered pricing to all, or to certain groups of customers.
There is more about Tiered Pricing in Chapter 7.
The Meta Keywords and Meta Description appear under meta tags, in the page's HTML code. Enter information about this Product that you think will help search engines to properly categorize this page.
A meta tag contains information not normally displayed to the user. The word meta means about this subject and the meta tags contain information about the page. Webmasters use meta tags to tell search engines about a page, and to help search engines better categorize that page.
You can see the meta tags in a page if you view the pages' source code.
For Meta Title, enter the title for this Product page. The keywords should be search terms that customers will use when searching for this kind of a product.
For Meta Keywords, enter keywords that describe this Product. The keywords should be search terms that customers will use when searching for this kind of product.
For Meta Description, enter a single sentence, or phrase, that describes the Product. If a potential customer found this Product on a search site such as Google or Teoma, what description would you like the customer to see? That is what you should enter here.
By default, Magento uses three images for each Product: base, small, and thumbnail. The base image is displayed on the Product's home page. The small image is displayed when a Product appears in a list of other Products, such as when you are viewing a Category landing page. The thumbnail image appears in the Shopping Cart, and in blocks that show recently added items and other items that the customer may be interested in.
The default stylesheet in Magento usually displays thumbnail images at 50-by-50 or 75-by-75 pixels. Small images are usually displayed at 125-by-125 or 135-by-135 pixels. Base images are usually displayed at 265-by-265 pixels. You can upload any size image, and Magento will resize it when displaying the image. However, there are some advantages to sizing the images yourself.
First, while Magento does a good job of resizing the images, it is not a graphic editing application. Some images will look better if you resize them with a specialized graphic editing software such as PhotoShop or GIMP. If you want to be sure of the resized image's quality, do it yourself instead of depending upon Magento.
Second, resizing an image yourself enables you to preview the image at the final display size. For example, suppose you upload the following image for one of your Products:

The size of this image is 400-by-267 pixels. On a computer monitor that displays 96 dots per inch, the image would be about 4.2-by-2.8 inches. At this size, you can see that it is a pile of grounded coffee. However, if you let Magento resize this image to 75-by-75 pixels, it becomes unrecognizable.

Instead of depending upon Magento to resize the image, let's crop and resize it ourselves. It now looks as follows:

Remember that the base image is displayed on the Product's home page. If the base image that you upload is larger than 265-by-265 pixels, shoppers will be able to zoom in and see more detail.
To summarize, before uploading images for your Product, you should at least crop the images to fill the space with as much Product as possible. For a thumbnail image, crop the image so that the subject will be recognizable at 75-by-75 pixels, or about three quarters of an inch square. Magento will resize images for you. However, if you want to be sure about how they will look at various sizes, resize the images in a graphics program before you upload them.
After you have created your Product images, it is time to upload them. The following are the steps to upload your images:
On the Product Information page, select the Images tab.
Click on Browse Files...; a dialog box appears, where you select one file for uploading.
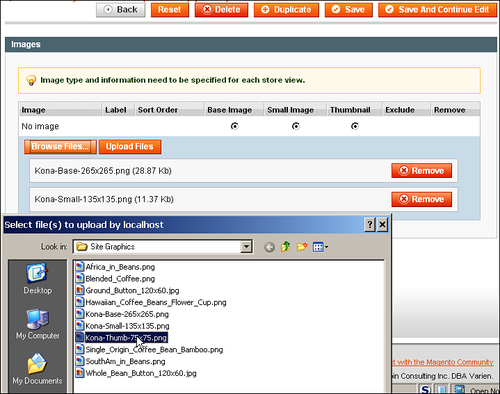
Select an image to upload, and then click on the Open or OK button in the dialog box.
If you want the same image to be used for the base, small, and thumbnail images, you can move to the next step. If you want to use separate images for all the three images, then click on Browse Files... and select more images.
After you select all the images that you want for this Product, click on Upload Files. The files will be uploaded to the images page as shown in the following screenshot:
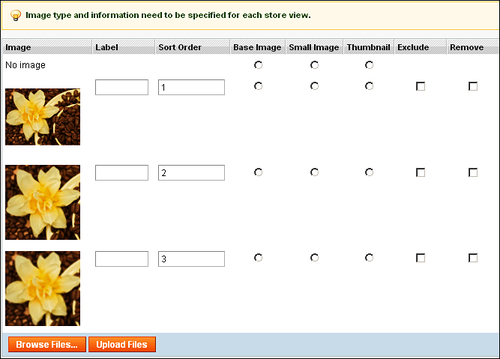
Select the image that you want for Base Image, Small Image, and Thumbnail by clicking the radio buttons, which can be seen in the following screenshot:

To exclude an image type, click on the radio button in the top row for No Image. This means that wherever Magento would have used that image size, no image will be displayed. For example, the thumbnail image appears in the Shopping Cart. If you select No Image for the Thumbnail image, then no image will be added when this is placed in the Shopping Cart. You might use No Image when you are selling something for which an image doesn't make sense. For example, if you're selling a repair service you might not need an image.
Enter a Label for each image. This will be used as the "alt text" for that image.
Click on Save And Continue Edit.
You should now have at least one image, and possibly several more, for your Product. Each image should be optimized for the size at which it will display. You have also entered the alt text for each image.
The Design tab is next on the menu. We will skip that tab because it is beyond the scope of a beginner's guide. Instead, let's proceed to the Inventory tab.
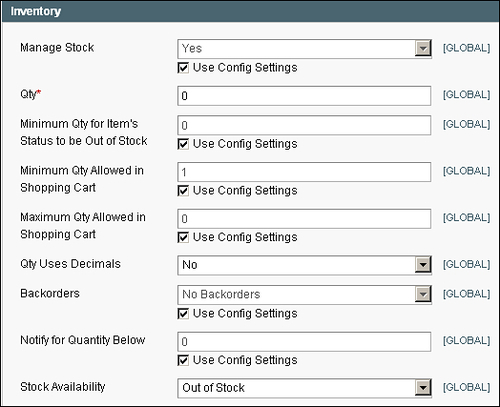
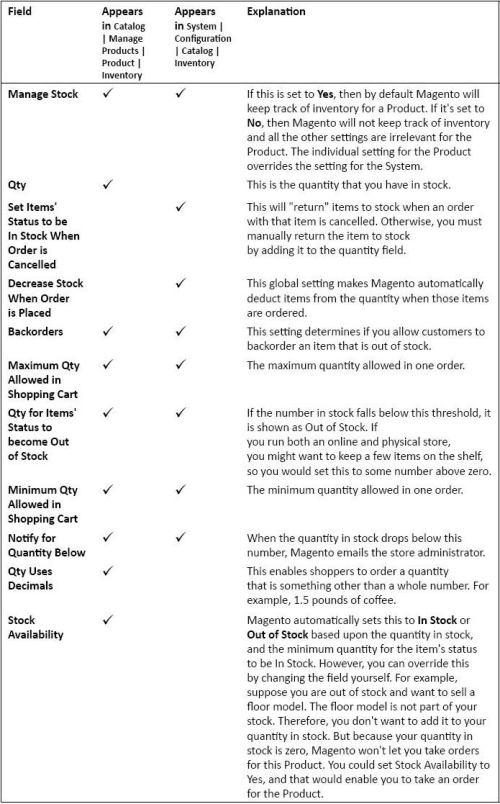
Notice that all of the settings on the Inventory tab, except for Qty and Stock Availability, use the global configuration as shown:
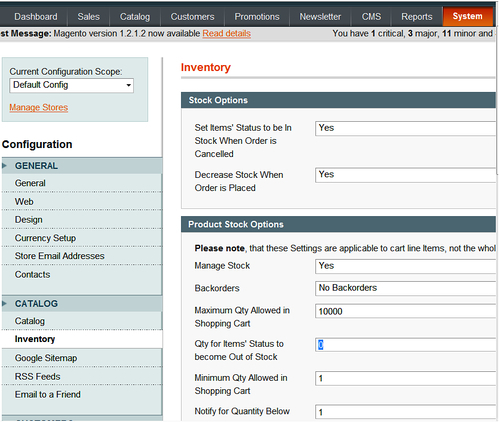
You will find these global inventory settings under System | Configuration | Catalog | Inventory. Look at the following screenshot:
Let's return to the Product's Inventory tab and examine each of these fields. Remember that except for Qty and Stock Availability, each of these fields is found on both the Product and system configuration pages. Choose the one you want to edit (the Product or the Global settings) and navigate to that page. Next, select a setting for each of the following fields. The following table shows the settings that we used for our demo store:
If this is the first Product that you have added, navigate to System | Configuration | Catalog | Inventory and set the global default values. If you open the system configuration page in a new tab, you can keep the Product's Inventory tab open while you do this.
Under the Product's Inventory tab, either select the default value for each field or enter a value to override the default.
At this point, you have set global inventory options for your Products. You also have set the inventory options for at least one individual Product. These settings will determine whether a Product is marked as In Stock. At this point you will be reminded to re-order, how much a customer can order, and other related functions.
The remaining tabs are optional. These tabs are used to promote this and related Products. They are covered in Chapter 7.
So far, we have:
Created Categories.
Created Attributes.
Created an Attribute Set.
Created a Tax Rule.
Added a Product.
As you can see from the list, the largest part of adding a Product is the work that comes before you actually add it. It is more efficient to create all the Categories, Attributes, and Tax Rules that you will need before you start adding Products. However, that rarely happens in the real world. When adding a Product, you should be prepared to create Categories, Attributes, and Tax Rules as needed.
Which of the following cannot be changed once you've created a Product?
a. The Product Name.
b. The Product Type (simple, compound, and so on).
c. The Category to which you've assigned the Product.
Which two tabs must be filled in, at a minimum, before a Product can be saved?
a. General
b. Images
c. Inventory
d. Meta Information
e. Pricing
For a Product to be available for purchase, its Status must be set to:
a. In Stock
b. Available
c. Enabled
For a Product to show up in your catalog and in search results, you must set its:
a. Status
b. Availability
c. Visibility
In this chapter, we saw how to add a Product and the Product Information. In the next chapter, we will see what parts of the standard store layout need to be modified, and what parts can be left untouched. Remember that the purpose of this quick-start guide is to get you selling as soon as possible. So, we will not cover extensive customizing of your Magento store. Instead, we will cover only the customizing that is needed.