
Magento enables you to accept many different kinds of online payments. This chapter will cover the Checkout and Sales configuration, and the various payment types supported by Magento. A look at the System | Configuration | Payment Methods page will show a list of the online payment types that Magento supports.
The page looks as follows:

Not shown in this screenshot is Google Checkout, another option for accepting payment. That is on a separate page. There is also a separate page where you enter your PayPal accounts.
In this chapter, we will look at the details of setting up the different payment types.
Before we cover the topic of accepting payment, we need to perform some configuration. This is the subject of the next section. Then, we will move on to configuring the payment methods shown in the previous screenshot.
Various configuration options are scattered around the System | Configuration menu, which must be set before you can accept payments. After you set these miscellaneous options, you can proceed to configure Magento to accept credit cards, checks, money orders, and PayPal.
The System | Configuration | Tax page contains some configuration options, which you should set before going online with your store. Not all of the options on this page need to be set. We will cover the ones that you must review and/or set.
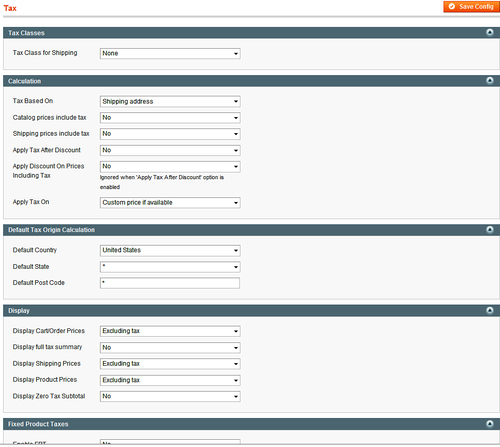
In Chapter 4, we created Tax Classes for our Products. Under Tax Class for Shipping, you should set the Tax Class for shipping charges. If you ship to locations that require you to select a sales tax for shipping, then you will probably want to configure the Tax Class labeled Shipping, which is built into Magento.
The fields under the Calculation section determine when the sales tax is applied. For example, in Chapter 7 we covered Tiered pricing, where you give a discount for buying certain quantities. The field Apply Tax After Discount determines whether you apply sales tax before or after this discount is applied.
Default Tax Origin Calculation should be set to your business location. If your business is located in one taxing jurisdiction and your products are being shipped from a different jurisdiction, consult a tax adviser about how this affects your tax liability.
Display determines how taxes are displayed in the Shopping Cart. By default, taxes are displayed separately from prices. You can choose to display prices including tax.
Fixed Product Tax always adds the same amount of tax to a product, no matter what price the product is. After enabling the fixed tax, you can add an Attribute to the Product to record the fixed tax. This is useful for items where the jurisdiction charges a flat tax per item. For example, many states charge a flat tax on each automobile tire, to help pay for the disposal of used tires.
Logged-in users can use a feature called One Page Checkout, which you can enable or disable. One Page Checkout is enabled by default.
The One Page Checkout feature puts all of the checkout items on a single page, in separate tabs. The customer proceeds from tab to tab, but never leaves that page. A sidebar on the right shows the customer's progress, as shown in the following screenshot:
Go to System | Configuration | Sales | Checkout.
Enable or disable the Allow Guest Checkout option. This field determines whether someone who has not created an account on your site can complete a purchase. If you set this to No, then buyers must create an account while completing their purchases. You should weigh the benefits of making customers create accounts against the chance of losing customers during the checkout, because they may not want to create accounts. By default, this is set to Yes so that customers are not required to create accounts to complete a purchase.
Set the amount of time for which a shopper can keep an item in his/her Shopping Cart.
The field Quote Lifetime (days) determines how long a Product can site in a customer's saved Shopping Cart before the price expires. If your prices change every few days, you should set this such that a customer won't have the old price if (s)he returns to a saved Shopping Cart.
Determine if a Grouped Product has its own image in the Shopping Cart.
Recall that a Grouped Product consists of a group of Simple Products. Also, recall that when a Grouped Product is added to the Shopping Cart, each of the Simple Products is added individually. The field Grouped product image determines if the thumbnail image for those individual Products will be the one for the Group, or different for each individual Product.
Determine if a Configurable Product has its own image in the Shopping Cart.
Recall that a Configurable Product also consists of a group of Simple Products, each one being slightly different. The Configurable product image field determines if the thumbnail image for a Configurable Product will be the one for the Configurable Product, or for the individual Simple Product that was chosen.
In the previous procedure, you set some basic options for how your checkout process will work. The most important was whether you will force shoppers to create an account to check out, or allow guests to check out.
Follow these steps to set the Sales configuration:
At a minimum, set these options—Checkout totals sort order, Allow Reorder, Address, and Allow Gift Messages.
The section Checkout totals sort order is used to sort out the calculated items that appear in the Shopping Cart. Their normal order is:
Subtotal
Discount
Shipping
Fixed Product Tax
Grand Total
Notice that Tax is displayed after Discount. This makes sense if you're applying the discount first. However, if you set Apply Tax After Discount to No, that means you're applying the Tax first and then the Discount. In that case, you might want to use this page to display the Tax before the Discount.
Notice also that Tax is displayed after Shipping. If you know that you will never charge tax on shipping, you could rearrange these and put Shipping after Tax. That would make it clear to the customer that you are calculating Tax before Shipping. Therefore, there is no tax on shipping.
Allow Reorder saves a copy of the past orders in a customer's account. The customer can then just click on the saved copy to duplicate that order.
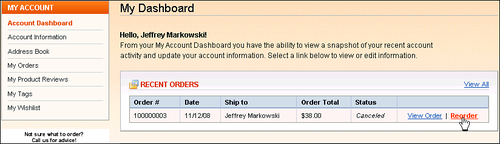
If your inventory changes often, you might want to disable this. You don't want customers to try to Reorder items that are no longer available, or imply that they can do this when they can't.
Under Invoice and Packing Slip Design, remember to enter your business address. While this is not required by Magento, imagine receiving a gift that someone else sent from a store with a packing slip that has no contact information for the business that sent it. You can also enter your business phone number and email here, so that the recipient of an item from your store has all of your contact information.
The Gift Messages section determines if a customer can add a gift message for the order, and/or for individual items in the order.
Save your settings.
The settings configured in the previous section will affect the look and function of the checkout process for your customers.
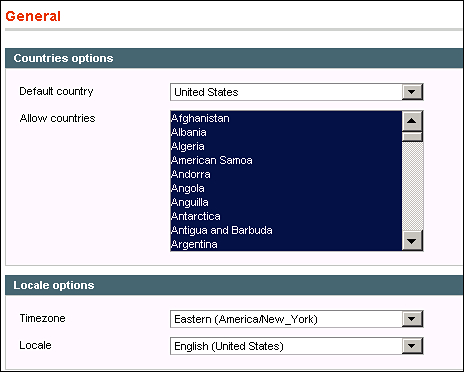
Go to System | Configuration | General and configure Magento for your location.
Go to System | Configuration | Currency Setup.
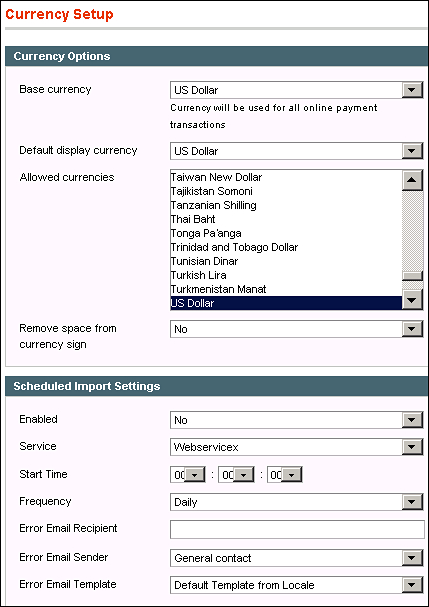
The Base currency is the currency that will be used for the backend of your store. The Default display currency is the currency that the customers will see in your catalog. For example, if you are in the UK and you are selling to customers in the US, your Base currency would be British Pound Sterling and your display currency would be US Dollar.
Allowed currencies determines which currency or currencies your customers can choose.
If you allow only one currency, then the drop-down menu that enables customers to choose currencies will be hidden.
If you allow customers to select different currencies, or if you have a different Base currency and Default display currency, you should set up currency exchange rates under Scheduled Import Settings. This will update the exchange rates daily, enabling Magento to convert between currencies.
If you want to use a currency that is not shown in this list, it is probably because that currency is not installed. Go to Advanced | System and select the Currency section. You will see a list of the Installed Currencies. If the currency you want to use is not selected, then select it and save the configuration.
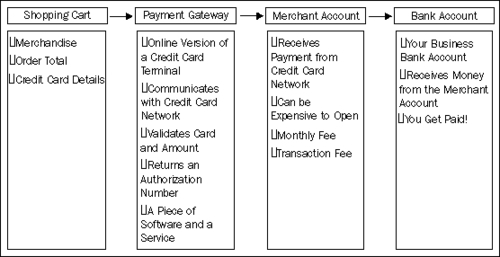
To process credit cards online, the following four components need to work together:
Shopping Cart.
Payment Gateway.
Merchant Account.
Bank Account.
Each of these components does a specific job in the order presented here. In the following subsections, we will discuss each component.
Like most e-commerce systems, Magento uses a Shopping Cart to hold the customer's items. In addition to the items that the customer is buying, the Shopping Cart also holds the amount that the customer owes.
Magento's Shopping Cart is built-in; you don't need to use a separate piece of software to create a Shopping Cart.
When a customer proceeds to the checkout screen, (s)he chooses the payment method. If a customer chooses to pay by credit card, (s)he must then enter the credit card details. When the customer clicks on the Submit button and sends the credit card information, a piece of software called the Payment Gateway takes over. The Payment Gateway is the equivalent of the physical credit card terminal located in most retail outlets.
The Payment Gateway securely transmits the credit card information to the credit card network, such Visa or MasterCard. The network validates the credit card information and amount. That is, Visa, MasterCard, or some other network determines that the credit card is valid and has the funds available. The network gives the transaction an authorization number, which the Gateway returns to Magento. Thus, the payment is authorized.
You should keep in mind that the Payment Gateway is both a piece of software and a service. The software communicates between your Shopping Cart and the credit card network. The service performs the card validation. The software part of the Payment Gateway is built into Magento; the service isn't. You will need to open an account with one of the Payment Gateways that Magento supports.
After the credit card payment is authorized, the money must be transferred from the credit card account to your business's checking account. This is done by the Merchant Account.
A Merchant Account is more than just another bank account. It is an account, a contract with the credit card network(s) from which you will accept payment, and also a line of credit. All of these features together form a Merchant Account.
The credit card network transfers money from the credit card account to the Merchant Account. If you have a Merchant Account, it is the end of the process. You can then choose to keep the money in your Merchant Account, or transfer it to another Bank Account.
Opening a Merchant Account can be expensive. It requires a credit check, and in some cases, collateral. Also, there is a monthly maintenance fee that is higher than a normal bank account. However, there is a way for you to accept credit card payments without a Merchant Account. We will deal with that in the next section. The following image shows the complete process:
The previous section explained the following four components of the credit card process:
Shopping Cart.
Payment Gateway.
Merchant Account.
Bank Account.
In Magento, the Shopping Cart is a built-in feature, you only need to configure it, and the Bank Account is yours. That means you still need a Payment Gateway and Merchant Account. PayPal, Authorize.net, and Payflow can perform these functions.
Payflow Pro is a Payment Gateway. If you have your own Merchant Account, you can use Payflow Pro to validate credit card payments.
To use Payflow Pro, you must open a Payflow Pro account. As of this writing, Payflow is owned by PayPal. So, you would need to go to the PayPal web site, www.PayPal.com, to open a Payflow account.
If you use Payflow Pro, the process looks as follows:

Notice that a Bank Account is optional because you own the Merchant Account. Since the funds are transferred from the credit card network into your Merchant Account, you now have the money. It is your decision to keep it in your Merchant Account or transfer it to a Bank Account.
If you do not have or do not want a Merchant Account, you can still use PayPal and Authorize.net to process credit card transactions. When these companies process a credit card transaction for you, they act as both the Payment Gateway and the Merchant Account. This means that you don't need to open a separate Merchant Account. Instead, PayPal and Authorize.net will:
Validate the credit card transaction.
Accept funds from the credit card network.
Transfer those funds to your Bank Account.
If you use PayPal or Authorize.net, the process looks as follows:
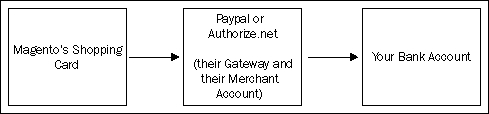
Notice that a Bank Account is required. That is because PayPal or Authorize.net must transfer the funds from their Merchant Account to your Bank Account.
So far, we looked at three options for credit card processing: PayPal, Authorize.net, and Payflow Pro. Now you need to decide which is the best for your business.
If your store has two hundred or more transactions a month, consider using Payflow Pro. You will need to open and maintain your own Merchant Account, which is an added expense. However, the fee for each transaction is usually smaller than PayPal and Authorize.net (because Payflow does less, as it's only a Gateway). Also, Payflow has better reporting tools.
If you have a physical store and are adding an online store, you probably already have a Merchant Account. In that case, Payflow Pro will probably be your best option for processing credit cards.
If you want to accept both credit cards and regular PayPal payments, then PayPal is the obvious choice. Magento can be configured to accept both credit card and email-based payments from PayPal.
If you have a low volume of sales, or don't have the fee, or a good enough credit rating to open a Merchant Account, consider either PayPal or Authorize.net.
The following sections describe each of the payment methods available in Magento. These methods are available on the System | Configuration | Payment Methods page, and also on Google Checkout. The payment methods in Magento can be seen in the following screenshot:
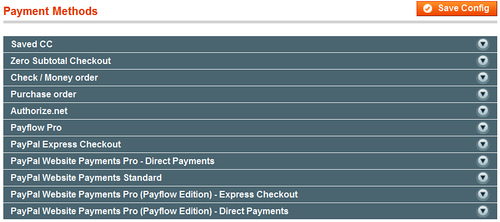
Remember that to use any of the PayPal methods, you must enrol in PayPal and enter your PayPal account information under System | Configuration | PayPal Accounts.
The following subsections give you details about each of the payment methods available in Magento. However, no step-by-step directions of how to set up each payment method are given. This is for two reasons. First, the official Magento site contains thorough directions for configuring each of these payment methods. Second, some of these configuration options are likely to change while this book is in print.
Note
Instead of telling you how to configure each payment method, the following sections focus on a more difficult task. They give you the information you need to decide which payment methods are best for your store, and what effect each method might have on your business.
Use this information to select the payment methods that are best for your business. Then, head to the official Magento site for directions on how to configure them.
When you enable this payment method, Magento will save the customer's credit card information along with the order. Offline, you can verify the credit card payment.
If you have a physical store where you already accept credit cards, you could use this method. You could use Magento to capture and save the credit card information, and process the payment information later. This would require you to manually process each order.
If you already have a Merchant Account for your physical store, and you expect your online sales volume to be low, then this is a quick and free way to accept credit card payments online.
To use this method, you need a Merchant Account and a credit card terminal.
If you enable this method, when a customer places an order and the product total is equal to zero, the customer will not be asked to enter any payment information. You might use this if you offer free samples from your store.
When you enable this payment method, and the customer selects it during checkout, the customer is given your payment address and the Make Check payable to information, as shown in the following screenshot:
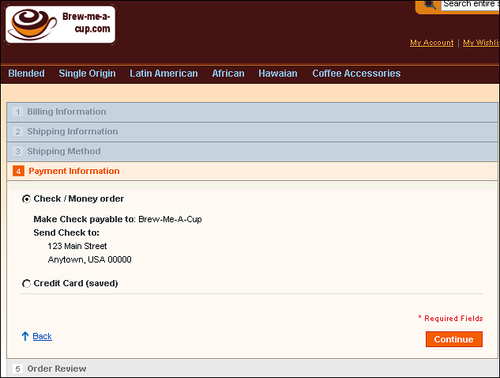
To use this method, you only need a bank account where you can deposit checks and money orders.
When you enable this payment method, and the customer selects it during checkout, Magento prompts the customer to enter the purchase order number. This purchase order number will appear on the order that is submitted to your store.
This is an offline payment method, like Check/Money Order and Saved Credit Card. You must manually check the purchase order number that the customer entered against your records. This means that you are maintaining purchase order numbers in a system outside of Magento.
To use this method, you need a system for tracking purchase orders and a bank account.
If you enable this method, customers can enter their credit card information just as they do on any e-commerce site. There is no indication that Authorize.net is processing the credit card. The customer remains on your site while Authorize.net processes the credit card.
To use this method, you need to enrol in www.authorize.net, and should have a bank account.
If this method is enabled, customers can enter their credit card information just as they do on any e-commerce site. There is no indication that Payflow is processing the credit card. The customer remains on your site while Payflow processes the credit card.
To use this method, you need to enrol in Payflow Pro and should have a Merchant Account.
This is the traditional PayPal method, where no credit card is needed. Instead, money is transferred from the buyer's PayPal account to the seller's PayPal account.
If a customer is shipping an order to multiple addresses, (s)he cannot select this payment method.
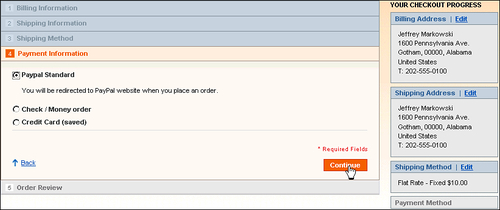
When the customer selects this method, (s)he will be redirected to the PayPal web site.

After selecting PayPal Express or PayPal Standard as the payment method, the customer continues to the Order Review step, where (s)he confirms the order.
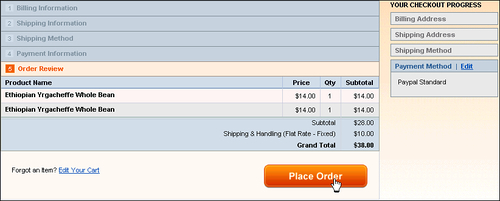
After clicking on the Place Order button, the customer is taken to the PayPal site shown in the following screenshot:
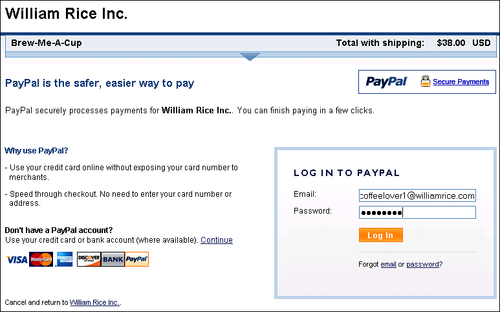
Then, the customer sees your store as the payee, and the amount to be paid. The customer also chooses a shipping address.
The customer then authorizes the payment. Money is transferred from the buyer's PayPal account to your PayPal account.
After the payment is done, the buyer is taken back to your store. The merchandise is shipped to the address that the buyer has on file at PayPal. The shipping address that the buyer entered into Magento is ignored.
The completed order displays the shipping address that Magento received from PayPal. The billing address section is empty.
The processing flow for PayPal Standard is almost identical to PayPal Express. That is, the customer will be temporarily taken off your site and to the PayPal site to submit their payment.
The only differences are that the shipping address from Magento is used instead of the shipping address from the customer's PayPal account, and PayPal Standard allows credit cards.
To use PayPal Express or Standard, you just need a PayPal account and a bank account. PayPal Standard is probably the easiest way to accept credit card payments on your site. The only disadvantage is that customers leave your site during the checkout process, which might result in a greater number of abandoned transactions.
If you enable this method, customers can enter their credit card information just as they do on any e-commerce site. There is no indication that PayPal is processing the credit card. The customer remains on your site while PayPal processes the credit card.
To use this method, you just need a PayPal account and a bank account. As of this writing, if you select this method, PayPal requires that you also offer your customers PayPal Express checkout. That is, if you have PayPal process your credit cards, you must also offer your customers the option of using their PayPal account.
This is probably the most professional-looking option for processing credit cards, because customers don't leave your site to submit payment. However, you might want to reassure customers that their credit cards are safe by putting a notice on your payment page like, "Your credit card is processed by PayPal, an established leader in e-commerce safety and security!"
With the previous four PayPal methods, PayPal is both our payment gateway and your merchant account. That is, PayPal processes the credit card, and, accepts the money from the credit card company and transfers it into your account. If you use the Payflow method, then PayPal becomes only your payment gateway. That is, PayPal will only process the credit card payments. They will not act as your merchant account. You will need to establish a merchant account elsewhere, and link PayPal Payflow to that account. This might be a good option for you if you have a physical store that accepts credit cards, and you are happy with your merchant account. Payflow will enable you to accept credit cards online while using the same merchant account that you have been using for your physical store.
Google Checkout is configured under System | Configuration | Sales | Google API. First, let's look at the customer experience when you use this payment method. Then, let's discuss how to decide if it's right for your store.
When you enable Google Checkout, Magento will display a Google Checkout button in the customer's Shopping Cart as shown in the following screenshot:
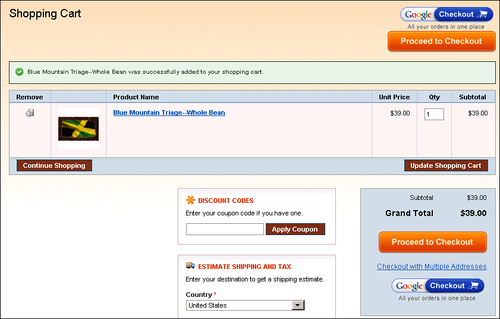
When a customer clicks on the Google Checkout button, (s)he is taken to Google's checkout interface. This is completely separate from Magento's checkout process. At this point, the customer must either log into his or her Google account, or create a Google account.

After your customer logs into or creates his/her Google account, Google Checkout displays its own version of a Checkout Page as shown in the following screenshot:
Notice that customers can select the shipping method. The choices on this drop-down menu are carried over from Magento. They are configured in the Google API tab.
Also notice that Google Checkout calculates the sales tax. The tax rules are also carried over from Magento.
The credit card is entered in Google Checkout, not Magento.
You can see that the items in this Shopping Cart were also carried over from Magento. Customers cannot change these items from this screen. To change the items, customers must close this page, return to Magento, and start over.
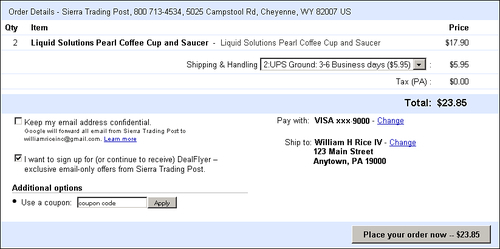
When a customer clicks the Place your order now button, the order is placed. The customer will be returned to Magento.
Unseen by the customer, Google keeps a record of the order in your Google Seller's Account. Google also sends the order information to Magento. Magento will create the order under Sales | Orders, where it will be stored with all of the orders that were processed in Magento.
Knowing the advantages and disadvantages of Google Checkout will help you decide if you want to offer it to your customers.
As you can see from the previous subsection, when your customer uses Google Checkout, (s)he is taken from your site to the Google's Checkout site. If the customer doesn't have a Google account, (s)he must create one. This is an extra step for your customer. You might lose some customers during checkout because of the time they must take to create Google accounts.
Another disadvantage of Google Checkout is that it is not as easy to set up in Magento as the other payment methods. The official Magento site has step-by-step directions. However, it is more complicated than the setup for other payment methods.
Google Checkout is available only to customers in the United States.
The last disadvantage to using Google Checkout is that the customer can choose to not give you a telephone number, and can mask his or her email address. This makes it more difficult for you to contact the customer if there's a problem with the order. While Google will forward your email to the customer, you will not know for sure if your message reached the customer and you cannot call the customer to check.
There are several advantages to using Google Checkout. One is that the Google brand might reassure your shoppers that you are legitimate and that their transaction is secure.
Another advantage is that, as of this writing, the transaction fee for Google Checkout is usually lower than that for PayPal or Authorize.net.
Finally, as of this writing, for every $10 that you process through Google Checkout you get a $1 credit with Google Adwords.
Select a payment method and configure it in your store. The easiest payment method to set up is Check/Money Order. Once you have a payment method, you can go through the complete checkout process as a customer.
You should go through the descriptions of the payment methods that we saw, and select the one that best fits the needs of your customers and your business. Select the methods that you want, and then go the official Magento site and search for directions on how to configure them.
In this chapter, you performed some miscellaneous configuration needed to enable you to accept payments. Then, we discussed the details of various payment methods. By now, you should have a good idea of which payment methods are best for your business. We end the chapter with an assignment: select and configure the payment methods that best meet your needs.