
Prior to Oracle's acquisition of BEA, the underlying application server for Oracle SOA Suite and many Oracle applications such as E-Business Suite, JD Edwards was Oracle Internet Application Server (aka OC4J).
As a result, it is a common requirement for Oracle Service Bus to consume messages that have been published to OC4J. In this recipe, we will configure a proxy service on Oracle Service Bus to consume messages published to a JMS provider running on OC4J.
The core of this recipe requires us to configure Oracle Service Bus and its Java Naming and Directory Interface (JNDI) provider in the WebLogic server to access a remote JNDI provider (on OC4J). Once configured, we can then implement a proxy service to consume JMS messages as if it was on a local queue.
For this recipe, we have assumed you have a working knowledge of the OC4J JMS provider, WebLogic server, and JMS itself.
To prepare for this recipe, make sure you have access to the OSB server's console and the console of your JMS provider, as you'll need access to the required Java libraries.
To configure OSB to connect to OC4J, you will need to have the JNDI details of a connection factory and queue (or topic) on OC4J.
You need to ensure that Oracle Service Bus has access to the same Java client libraries as any normal JMS client would. For OC4J, you will need the following JAR files:
oc4j-internal.jaroptic.jar
These are located in the [OC4JHOME]/j2ee/home/lib directory.
- Copy the library files listed in the Getting ready section of this recipe to the
libdirectory of your OSB domain; this should be located at the following location:[ORACLE_HOME]/user_projects/domains/[OSB DOMAIN]/lib
- You must update your classpath for the OSB Admin server and your OSB server (if you've split them out during your domain's creation). To do this, you must edit your
setDomainEnv.sh(or.cmdfor Windows) file in the following location:[ORACLE_HOME]/user_projects/domains/[OSB DOMAIN]/bin
- Add a line, like the following, to the end of your
setDomainEnv.shorsetDomainEnv.cmdfile (all in one line):export CLASSPATH=$CLASSPATH${CLASSPATHSEP}${DOMAIN_HOME}/lib/optic.jar${CLASSPATHSEP}${DOMAIN_HOME}/lib/oc4j-internal.jar - For Windows, edit
setDomainEnv.cmdwith a line like the following:set CLASSPATH=%CLASSPATH%%CLASSPATHSEP%%DOMAIN_HOME%/lib/optic.jar%CLASSPATHSEP%%DOMAIN_HOME%/lib/oc4j-internal.jar
- If your OSB domain is currently up, now would be a good time to restart; otherwise start the domain up before continuing.
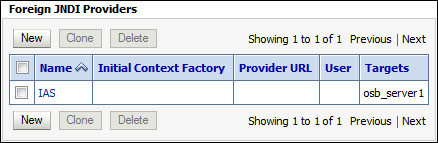
- From the domain structure in the WLS console, expand the Services menu and select Foreign JNDI Providers from the Administration console of your OSB domain.
Click on New and give it a descriptive name (IAS in the following example), click on Next where you should target this to the OSB server or cluster, and click on Finish.
- Next we need to configure our foreign JNDI provider to point it at the JMS queue on OC4J. To do this, click on the provider you just created.
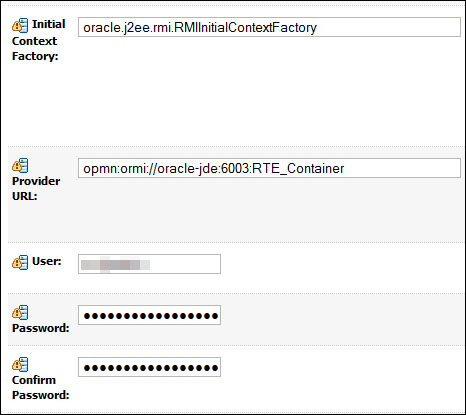
This will take you to the JNDI configuration window; here we need to specify the JNDI client details of our OC4J JMS provider, as shown in the following table:
Property
Value
Initial Context Factory
oracle.j2ee.rmi.RMIInitialContextFactoryProvider URL
opmn:ormi://[HOSTNAME]:[PORT]:[Container Name]User
Username of an account with privileges to access these JMS resources on your OC4J server
Password/Confirm Password
The password for the user
Your foreign JNDI provider should look somewhat like the following screenshot:
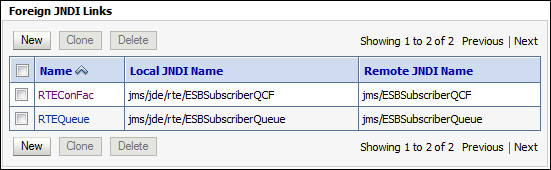
- Next we need to configure local JNDI links for the OC4J queue or topic that we wish to consume messages from.
Click on the Links tab of the foreign JNDI provider you created previously, and click on New. Give the link a descriptive name for the queue or topic that you're going to link into your OSB's JNDI tree.
For Local JNDI Name, enter a JNDI name for which this resource will appear in OSB's JNDI tree.
For Remote JNDI Name, enter the JNDI name of the resource in your JMS provider's JNDI tree. Once this is done, click on OK.
Repeat this process to create a link for the connection factory of the queue or topic. Once completed, our Foreign JNDI Links window should look somewhat like the screenshot, shown as follows:
- Create a proxy service in the OSB console or Eclipse, as you usually would, but at the Transport Configuration screen in the wizard, select jms as your Protocol and EndPoint URI should be something like jms://[OSBHOST]:[PORT]/[LINKCF]/[LINKQUEUE].
Where
LINKCFandLINKQUEUEare the local JNDI names of the connection factory and queue respectively, which you have defined in the previous step.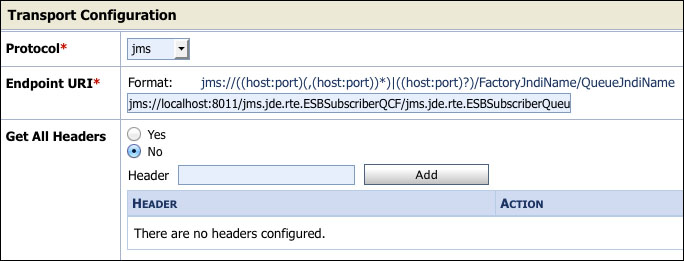
Ensure the correct Destination Type is selected in the next screen and continue with the wizard as usual. For testing purposes, add a simple log or report action step to the pipeline to write out the content of the JMS message.
You an now deploy and test your OSB proxy service; once you have validated that the proxy service is successfully consuming a message from the OC4J JMQ queue, you can then implement the remainder of your proxy service as required.
The foreign JNDI provider and the links work by linking the local names in our JNDI tree to the remote ones we've configured. The important thing to note is that you need to include the classes normally required by this remote JNDI provider to Oracle Service Bus because, even though it's locating the JNDI reference locally, it is still acting as a remote client to the JMS provider. It will make JMS server connections directly to the providing server via the connection factory.
Once configured, the OSB proxy service thinks it's accessing the JMS destination as a local resource.
For those readers more experienced with the WebLogic server, you might note that we had to add the classes to the classpath and not just drop them into the domain's lib folder; this is because of the WebLogic server's (and Java's) class loading hierarchy. When the WebLogic server loads the JARs in the lib directory, it loads them as a child to the system class loader for all J2EE applications. We need these classes loaded in the system class loader to be available for the server itself, and so we had to adjust the classpath.
For those readers who have used Oracle's JD Edwards (JDE) product and are not on the WebLogic server yet, this solution would give your OSB installation access to JDE Realtime Events (RTE) and provide a gateway to SOA Suite for performing business logic based on the events in JDE.