
It is getting increasingly common to require messages published to a WebLogic domain on which OSB is not running to trigger an OSB proxy service.
Store-and-Forward (SAF) allows you to get messages from a remote WebLogic domain to the OSB domain for processing, without the publisher being aware of OSB. Normally, without SAF you would have to configure the publisher to publish to a different location, which could cause problems if the network is slow or goes down, or it might not even be possible to configure your publisher.
This recipe shows how to use SAF to push JMS messages from a remote WebLogic domain to your OSB domain for consumption by an OSB proxy service.
For this recipe, you'll need access to your OSB domain, as well as another WebLogic Server domain (WebLogic 9.x or higher is required to use the Store-and-Forward feature).
You'll need to create a queue in your OSB domain to receive forwarded JMS messages. For this recipe, we'll assume a default JNDI name of /jms/remote.
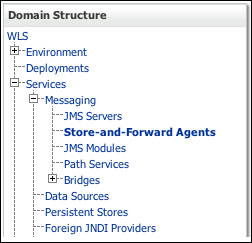
- First, we need to create the SAF sending agent on the WebLogic domain. Log in to the WebLogic console, then within the Domain Structure navigate to Services | Messaging and select Store-and-Forward Agents, as shown in the following screenshot:
This will take you to the Store-and-Forward Agents window; click on New and give the agent an appropriate name (
CookbookSAFAgentin our example), and set Agent Type to Sending-only. Click on Next and target the agent to an appropriate server or cluster in your WebLogic domain, and then click on Finish.
- Next, we need to create a JMS module to collect together the configuration for the SAF sending agent. Within Domain Structure, navigate to Services | Messaging and select JMS Modules.
This will take you to the JMS Modules window; click on the New button to launch the Create JMS System Module wizard. Give the module a name (we've assumed you use
SAFAgent), and target it to the same WebLogic server or cluster as the SAF sending agent.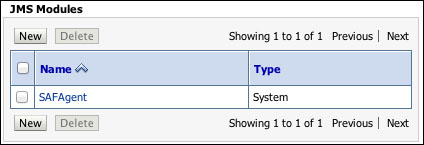
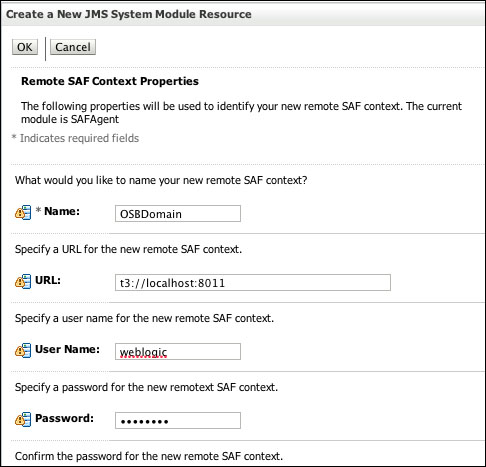
- Next we need to create SAF Remote Context, which tells our WebLogic server how to connect to our remote OSB domain. Click on JMS Module, which we created in the previous step.
Click on the New button and select the type of resource as Remote SAF Context, and configure as detailed in the following table:
Property
Value
Name
OSBDomain.URL
The URL of the remote OSB server is in the format
t3://[osbserver]:[port]. For example,t3://localhost:8011.User Name
The username of an account with privileges to access the JMS queue you created before starting this recipe (
/jms/remote). This could beweblogic, but do not use this for production.Password
The password for the user.
The following screenshot shows the properties and their values:
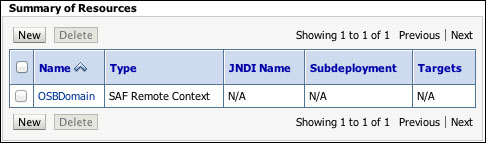
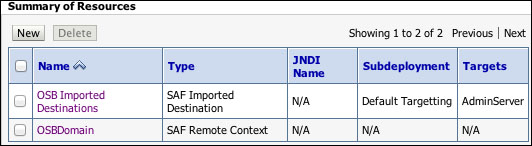
Once you have clicked on OK, you will see the newly created SAF Remote Context in Summary of Resources of your JMS Module.
- We now need to tell our WebLogic server how we're going to import our remote destination from our OSB server. From within the JMS module, click on New and select the type of resource as SAF Imported Destination, and click on Next and configure it, as detailed in the following table:
Property
Value
Name
OSB Imported DestinationsRemote SAF Context
OSBDomain (as created in the previous step)
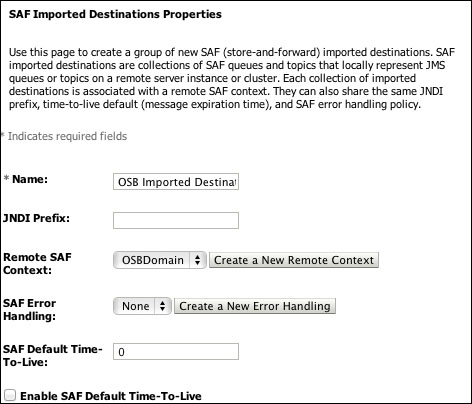
Click on Finish. You will now see your SAF Imported Destination in Summary of Resources of your JMS module.
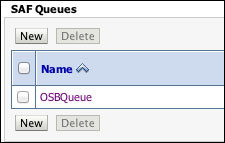
- We now need to import the remote destination from the OSB domain to our WebLogic domain. To do this, click on SAF Imported Destination that you created in the previous step, and click on the Queues tab.
- Click on New to create a link to a queue on your OSB domain. Configure it, as detailed in the following table:
Property
Value
Name
Local name for the OSB queue that we wish to forward messages to
Remote JNDI Name
JNDI name for the JMS queue on the OSB server that we wish to forward messages to (/
jms/remotein this example)The following screenshot shows the properties and their values:

When you have clicked on OK, you will be presented with your imported queue in the SAF Queues summary.
- Create a proxy service in the OSB console or Eclipse, as you usually would, but from the Transport Configuration screen in the wizard, select JMS as your Protocol, and EndPoint URI should be something like:
jms://[HOST]:[PORT]/weblogic.jms.ConnectionFactory/[QUEUE]
Where
QUEUEis the JNDI name of the local queue that SAF is forwarding messages to, in our examples,/jms/remoteis the queue.Ensure the correct Destination Type is selected in the next screen and continue with the wizard as usual. For testing purposes, add a simple log or report action step to the pipeline to write out the content of the JMS message.
You can now deploy and test your OSB proxy service. Once you have validated that the proxy service is successfully consuming a message from the WebLogic domain, you can then implement the remainder of your proxy service, as required.
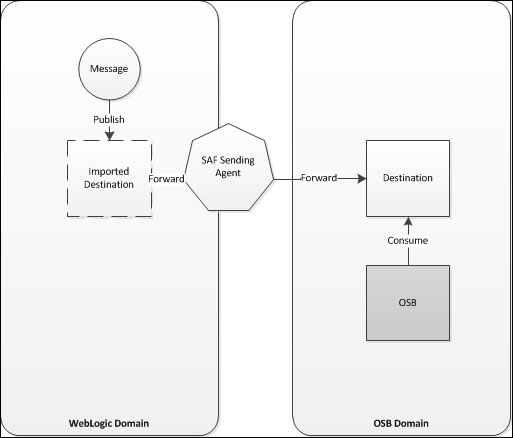
The SAF Sending Agent on your remote WebLogic Domain forwards messages published to Imported Destinations to the OSB Domain . The OSB proxy then consumes these messages from the local queue as though they were published locally.
This method could be used to forward messages from a remote domain, perhaps running an ERP, which publishes the messages you need to process. The advantage of the Store-and-Forward option is that it allows a JMS producer to produce to a remote destination without knowing it is a remote destination. This keeps the producer's configuration simple, or it might be required because the produce doesn't support remote JMS destinations.
You could also use this method to publish from OSB to a remote WebLogic server; you can do this by configuring the Store-and-Forward on the OSB server and the queue on the remote WebLogic server.
In step 4 of this recipe, we glossed over the error handling to simplify our configuration. Error handling is an important aspect of any JMS configuration and SAF is no different. The SAF error handling configuration allows you to specify an error handling policy to apply to all imported destinations, or a separate policy for each separate destination. It is common for such a policy to log and forward failed messages to an error-handling queue.