Another type of subscription is the data-driven subscription. This is a powerful way of creating subscriptions since you can use the database to set most of the properties of the subscription. The data-driven subscription is generated through a wizard. There are three different methods of delivery: e-mail, file share, and null. The null delivery does not generate a report. It is used to preload the cache for a report that is set up for using cached data.
Let's create a subscription to be sent out on the first of each month for each of the sales people:
Step 1 – specify the type of data-driven subscription
Select the toolbar item called New Data-driven Subscription.
Set the Description property to Last Month's Commissions for Each Sales Person.
Set the Specify how recipients are notified property to E-mail.
Select the Specify a shared data source option button.
Click on the Next button.
Step 2 – select the location of the shared data source
Set the Locationproperty to /Data Source/DS_SSRS2012Blueprints.
Click on the Next button.
Step 3 – set up the SQL statement or stored procedure that will return the data-driven property data.
Set the query to the following code: exec dbo.uspSalesCommissionsSubscription.
Click on the Validate button to verify if the query works.
Click on the Next button.
Note
This page has some handy information. It tells you exactly what fields you can have the query return for the data-driven subscription.
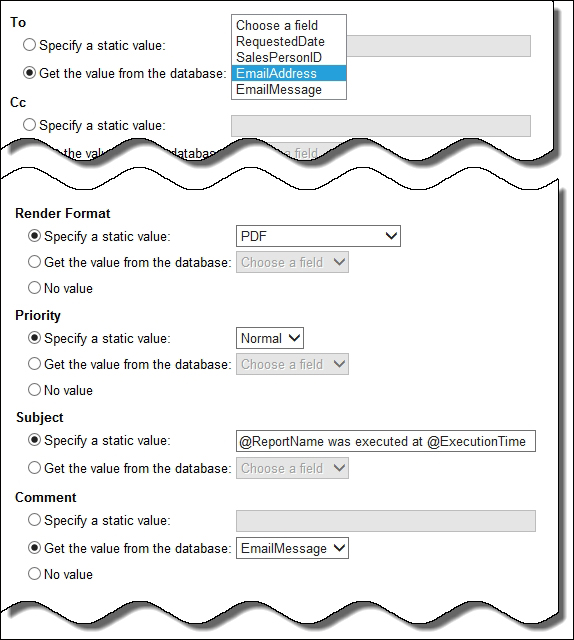
Step 4 – set up the delivery properties
Select the Get the value from the database option button for the To property.
Select EmailAddress from the drop-down list.
Select PDF from the drop-down list for the Render Format property.
Select the Get the value from the database option button for the Comment property.
Select EmailMessage from the drop-down list.
Click on the Next button:
Step 5 – set up the parameter values
Select the Get the value from the database option button for the Requested Date property.
Select RequestedDate from the drop-down list.
Select the Get the value from the database option button for the SalesPersonID property.
Select SalesPersonID from the drop-down list.
Click on the Next button.
Step 6 – set up the schedule for the subscription
Select the On a shared schedule option.
Select First of the Month as 2 am from the drop-down list.
Click on the Finish button.
Note
Subscriptions should be tested just like reports to make sure the parameters work correctly, and that the e-mail settings were accurately created. One way to test is to have the report sent to you a few minutes into the future. This will allow you to test the subscription without having to wait days or even months.