
John Kirkland is an awesome "accidental" SQL Server DBA for Red Speed Bicycle LLC—a growing bicycle startup based in the United States. The company distributes bikes, bicycle parts, and accessories to various distribution points around the world.
To say that they are performing well financially is an understatement. They are booming! They've been expanding their business to Canada, Australia, France, and the United Kingdom in the last three years.
The company has upgraded their SQL Server 2000 database recently to the latest version of SQL Server 2012. Linda, from the Finance Group, asked John if they can migrate their Microsoft Access Reports into the SQL Server 2012 Reporting Services.
John installed SSRS 2012 in a native mode. He decided to build the reports from the ground up so that the report development process would not interrupt the operation in the Finance Group.
There is only one caveat; John has never authored any reports in SQL Server Reporting Services (SSRS) before.
Let's give John a hand and help him build his reports from the ground up. Then, we'll see more of his SSRS adventures as we follow his journey throughout this book.
In this chapter, we will learn the following:
- Creating a report from scratch
- Using stored procedure in a report
- Defining data sources and datasets
- Using dataset as a parameter source
- Creating a parameterized report
- Creating multivalued parameters
- Creating cascading parameters
- Creating cascading multivalued parameters
Here's the first report requirement for John: a simple table that shows all the sales transactions in their database. Linda wants to see a report with the following data:
- Date
- Sales Order ID
- Category
- Subcategory
- Product Name
- Unit Price
- Quantity
- Line Total
We will build our report, and all succeeding reports in this book, using the SQL Server Data Tools (SSDT). SSDT is Visual Studio shell which is an integrated environment used to build SQL Server database objects. You can install SSDT from the SQL Server installation media.
In June 2013, Microsoft released SQL Server Data Tools-Business Intelligence (SSDTBI). SSDTBI is a component that contains templates for SQL Server Analysis Services (SSAS), SQL Server Integration Services (SSIS), and SQL Server Reporting Services (SSRS) for Visual Studio 2012.
SSDTBI replaced Business Intelligence Development Studio (BIDS) from the previous versions of SQL Server.
You have two options in creating your SSRS reports: SSDT or Visual Studio 2012. If you use Visual Studio, you have to install the SSDTBI templates.
Let's create a new solution and name it SSRS2012Blueprints.
Note
For the following exercises, we're using SSRS 2012 in native mode. Also, make a note that we're using the AdventureWorks2012 Sample database all throughout this book unless otherwise indicated. You can download the sample database from
CodePlex. Here's the link: http://msftdbprodsamples.codeplex.com/releases/view/55330.
Now, let's define a shared data source and shared dataset for the first report. A shared dataset and data source can be shared among the reports within the project:
- Right-click on the
Shared Data Sourcesfolder under the SSRS2012Bueprints solution in the Solution Explorer window, as shown in the following illustration.If the Solution Explorer window is not visible, access it by navigating to Menu | View | Solution Explorer, or press Ctrl + Alt + L:

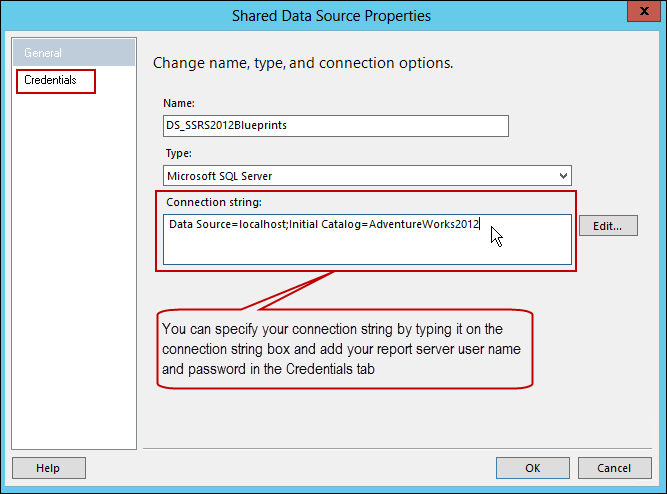
- Select Add New Data Source which displays the Shared Data Source Properties window. Let's name our data source
DS_SSRS2012Blueprint.For this demonstration, let's use the wizard to create the connection string. As a good practice, I use the wizard for setting up connection strings for my data connections. Aside from convenience, I'm quite confident that I'm getting the right connections that I want.
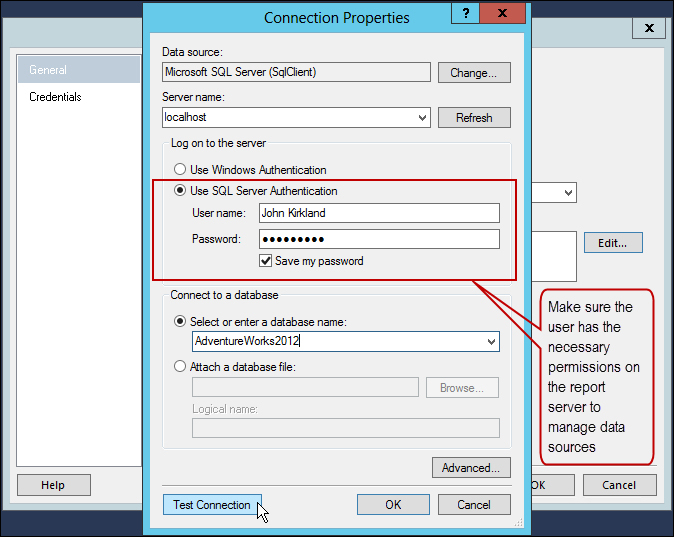
- Another option for setting the connection is through the Connection Properties dialog box, as shown in the next screenshot.
Clicking on the Edit button next to the connection string box displays the Connection Properties dialog box:
For the connection, one option is to manually specify the connection string as shown:
Data Source=localhost;Initial Catalog=AdventureWorks2012
We may find this option as a convenient way of creating our data connections. But if you're new to the report environment you're currently working on, you may find setting up the connection string manually more cumbersome than setting it up through the wizard.
Always test the connection before saving your data source. After testing, click on the OK buttons on both dialog boxes.