
John Kirkland just came out of another meeting with the Finance Manager, Linda. She has been thrilled with his work and has asked him if he is up for another challenge. He plans to accomplish her requests by setting up some subscriptions and snapshots for the reports.
She has asked that on the first of the month each sales person should receive a PDF document containing their commission for the previous month. She was very concerned with security for this report, because each sales person should not see anyone else's commission. This won't be a problem for John because he can limit access to the report by setting up security for the report. He can also create the report so that only a single sales person's commission shows in each PDF document. John thinks this is a great opportunity for using caching. He plans to cache the report data so that the SQL Server will only be asked once for the data. Then, he can deliver each individual report to each sales person from the cached data.
Linda has also asked that the same report be saved once a month with everyone's commissions so that it can be helpful for any future auditing needs, and that a copy be sent to her e-mail as well. John knows that this request can be accomplished by creating snapshots of the report and placing them in the Report History folder where the Finance Manager can reference them.
On his way back to his desk, John found out some good news from his manager. He has been doing such a great job of creating reports, so his manager wants him to train someone from the operations team on how to deploy the reports to production.
Let's follow John while he accomplishes his latest set of tasks.
In this chapter, you will learn how to:
- Deploy reports from within SQL Server Data Tools
- Deploy reports manually
- Set up user security
- Set up a shared schedule
- Set cache settings on a report
- Set up snapshots
- Set up an e-mail subscription and a data-driven subscription
First, find the T-SQL files named uspSalesCommissions.sql and uspSalesCommissionsSubscription.sql (included with this book) and execute them in the Adventureworks2012 database. uspSalesCommissions.sql is used for the sales commission report and uspSalesCommissionsSubscription.sql will be used for the data-driven subscription later on.
Let's take a look at uspSalesCommisison.sql. In Chapter 3, Getting Some Actions, we learned about using parameterized queries. For this report, we will need two parameters. One to pass in today's date to calculate last month's beginning and end date, and one to narrow the data to just one sales person. Since we are going to use caching for this report, we don't want to pass the stored procedure, the sales person's SalesPersonID. We want to make that parameter an internal parameter, which we will do in a minute.
For calculating the beginning and ending dates of last month, we are going to leverage a new function that SQL Server 2012 has called EOMONTH. This function has two parameters. The first parameter is the date that will be used to find the last day of the month. The second parameter is used to move to a different month. EOMONTH can be used in combination with the DATEADD function to calculate the first day of a specific month.
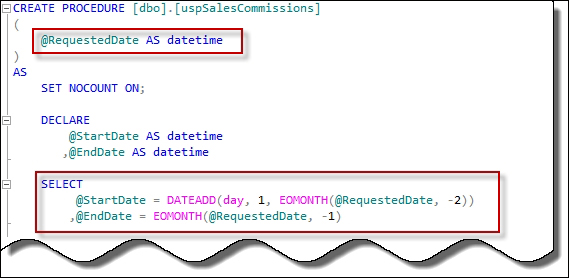
We need the first day and the last day of the month prior to the @RequestedDate parameter. For the first day, we can go back two months then add one day. This pushes the date to the first of the previous month. The end of the previous month is calculated by using -1 for the second parameter of the function.
Find the report file called Sales Commissions.rdl (included with this book) and add it to your project. It uses the same data source as the previous chapters.
Let's open up the Sales Commissions.rdl report and make a few adjustments to it so that it will satisfy all of Linda's requirements.
First, let's add the internal parameter, SalesPersonID, which we mentioned previously. It will have a default value of -1. This value will tell the report that it should generate a report with all the sales people's IDs. We will also make the parameter hidden so that no one will see it. This parameter will also be hidden to the users when they run the report, but we'll be able to leverage this parameter in the subscriptions which we will create later in the chapter. Let's perform the following steps:
- Right-click on Parameters in the Report Data window, and select Add Parameter.
- Name the parameter
SalesPersonID. - Set the Prompt property to
Sales Person ID. - Set the Data Type property to Integer.
- Set the Parameter Visibility property to Hidden.
- Click on the Default Values menu item on the left-hand side.
- Click on the Specify Values option button.
- Click on the Add button.
- Set the Value property to
-1. - Click on the OK button.
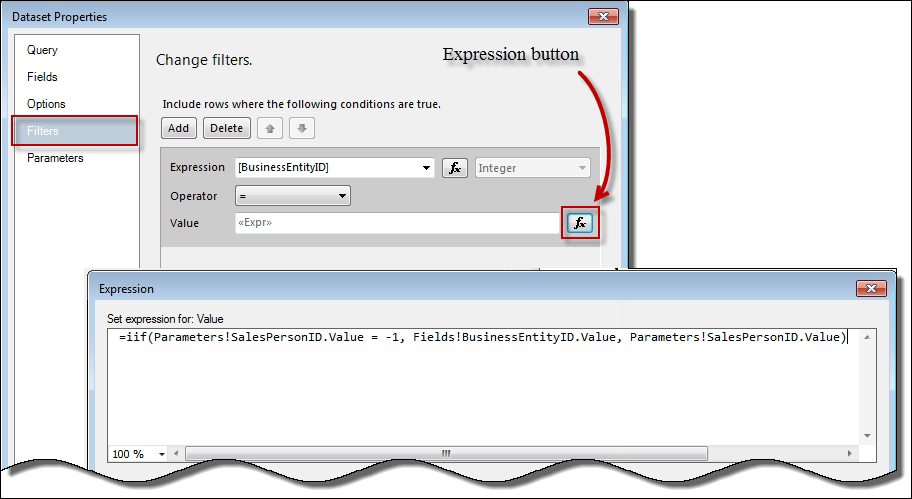
Now, let's set up a filter using the SalesPersonID parameter we just created. Since the data for the entire report will be filtered, we are going to set up the filter on the dataset. This filter will be leveraged when we set up the Data Driven Subscription later on.
- Right-click on the dataset
uspSalescommissionsin the Report Data window, and select Dataset Properties. - Click on the Filters menu item on the left-hand side.
- Click on the Add button.
- Set the Expression property to [BusinessEntityID].
- Click on the Expression button for the Value property.
- Create the following expression.
- Click on OK on the Expression window and the Dataset Properties window.
=iif(Parameters!SalesPersonID.Value = -1, Fields!BusinessEntityID.Value, Parameters!SalesPersonID.Value)
When the SalesPersonID parameter is -1, the report will show all the sales people. Otherwise, it will only show a single sales person based on the ID in SalesPersonID.
There are some settings that can be set in the project so that the reports, data sources, and shared datasets can be deployed from the project. Multiple configurations can be set up, so that a project can be deployed to multiple environments easily.
Now that the sales commissions report is set up, let's set some properties to make deploying easier:
- Right-click on the Project menu.
- Select the Properties menu item.

The Properties page for the project includes settings for deploying the project. These settings are related to a particular configuration. A configuration is a group of settings that are used together. Multiple configurations can be set up to represent multiple deployment locations. The default configuration is Debug and is always shown in the standard toolbar.
You can choose to have the datasets and data sources always overwritten when the entire project is deployed. If you choose to not use the overwritten option, then they will only be deployed when they do not exist on the Report server.
The following properties allow you to specify where on the Report server the various objects will be deployed to.
Let's set some of the properties for the default configuration, then we can deploy our report. We will be deploying to a subfolder called Finance in a folder called Sample on our local Report server.
- Set
TargetReportFolderto/Sample/Finance. - Set
TargertServerURLtohttp://localhost/ReportServer. - Click on the OK button.
- Right-click on the project name,
SSRS2012Blueprintsin the Solution Explorer. - Select Deploy in the menu.
All the reports, data sources, and datasets in the project will be deployed to the Report server. If the data sources and datasets existed already in the specified folders, then they will not be redeployed. Also, all the reports will now be in a folder called Finance. The output window will give us a report of what was deployed and what was not deployed. Any errors will be noted in the output window as well.
