
In order to explore Java Persistence, we need to install and configure a database server, and MySQL is a logical choice, being widely adopted and lightweight.
The software is available to several operating systems: Microsoft Windows, Debian, SUSE Linux Enterprise Server, Red Hat, Solaris, Mac OS X, and so on.
If you are using a Linux distribution such as Ubuntu or Red Hat, most likely you already have the software available, you just need to install it with a command like this (you may want to update your repositories and packages to be sure that your system is up-to-date):
sudo apt-get install mysql-server mysql-client
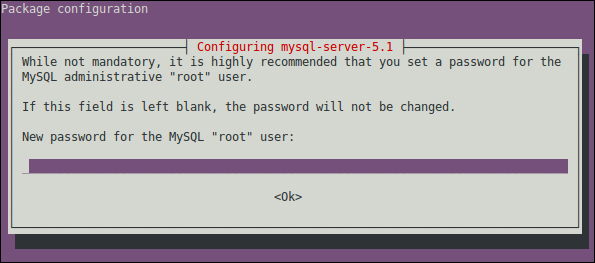
The system is going to suggest a lot of other packages, but we don't need them. Just press Y to start the procedure. When applying the changes, the installation procedure will ask you to enter a password for user root (MySQL's administration user):
If your system doesn't provide a package manager, perform the following steps to manually download and install the product:
- Access MySQL's download page at http://dev.mysql.com/downloads/mysql/.
- At the Generally Available (GA) Releases tab, select your platform. The list of available downloads will be updated automatically.
- Find the package that best fits your needs and click on Download.
- A login page is presented. If you don't have or don't want to create an account, click on the No thanks, just start my download. link.
- The detailed installation procedure for every platform can be found at http://dev.mysql.com/doc/refman/5.5/en/installing.html; just follow the instructions.
If you are using a UNIX or Linux distribution, most likely the filesystem you're using differentiates between lower case and upper case in filenames.
As MySQL databases and tables persist as folders and files, respectively, we must instruct MySQL to ignore these differences when handling table names by editing the engine's configuration file—/etc/mysql/my.cnf is default—and adding the following line inside the mysqld group:
lower_case_table_names=1
Restart the server with the appropriate command for your environment, and we're good to go:
sudo service mysql restart
If you are using Microsoft Windows, here are the points to note when running its installer:
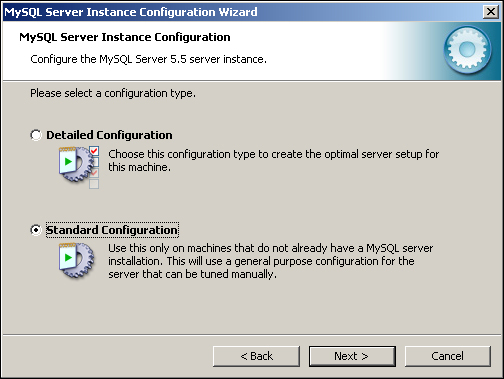
- We will not use any special feature of the product, so selecting Standard Configuration is good enough:
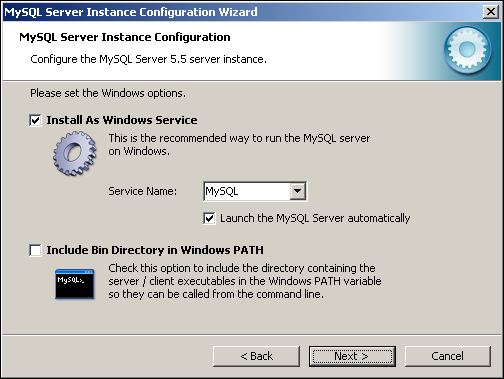
- You can set it to start at system startup by leaving both Install as Windows Service and Launch the MySQL Server automatically flags enabled:
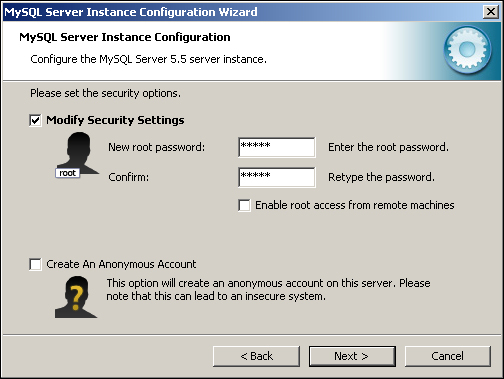
- Finally, set a password for root access (MySQL's administrator user) and write it down to use in the next section:
- Click on Next, then Execute, and the installation process will begin. Close the wizard by clicking on Finish.
If you chose to set it up as a service, or if this is the nature of your platform, then MySQL is already running upon completion of the installation procedure. To check this, open a terminal and enter the following command to start MySQL Monitor:
mysql -u root -p
If a message resembling ERROR 2002 (HY000): Can't connect to local MySQL server through socket '/var/run/mysqld/mysqld.sock' (2) shows up, you must start the server by issuing the proper command for your platform:
sudo service mysql start
Then, run the first command again. Enter the password you typed when installing MySQL, and you should be connected to the server.
Tip
By default, MySQL listener is bound to the loopback interface, so only local access is allowed. If you want to access the database from another machine, edit the configuration file (/etc/mysql/my.cnf or equivalent) and change the line:
bind-address = 127.0.0.1
To point to the desired network address:
bind-address = 192.168.0.5
Save the file and restart MySQL.
We're going to simulate two different business entities (which is explained in detail at the beginning of Chapter 3, Java EE Basics – Persistence, Query, and Presentation), so we need to create two separate databases and users on MySQL by running the following commands from MySQL Monitor:
create database store_db;
create database theater_db;
grant all on store_db.* to store_user@localhost identified by'store';
grant all on theater_db.* to theater_user@localhost identified by'theater';
flush privileges;
quit;
We've just created the users, the databases, and granted the corresponding access.
Now, to create and populate the data structures, we're going to use the same command, but pass a script as the parameter for each database. From the command prompt run:
mysql -D store_db -u store_user -p < store_db.sql
mysql -D theater_db -u theater_user -p < theater_db.sql
Tip
Files store_db.sql and theater_db.sql are located in the code bundle, available for download at the Packt Publishing website www.packtpub.com.
You should not see any error messages while the script is running. When the scripts end, the databases are configured and loaded with data.