Now that the authentication provider is set, we have to modify the deployment descriptors of the application to set the security properties and create a login page to let users authenticate themselves.
We first need to set the security constraints by editing web.xml:
- Open the
WEB-INF/web.xmlfile of the Store web application. - Paste the following lines right after the
servlet-mappingtag:<security-constraint> <web-resource-collection> <web-resource-name>protected</web-resource-name> <url-pattern>/reservation.jsf</url-pattern> </web-resource-collection> <auth-constraint> <role-name>User</role-name> </auth-constraint> </security-constraint> <login-config> <auth-method>FORM</auth-method> <form-login-config> <form-login-page>/login.jsf</form-login-page> <form-error-page>/login.jsf</form-error-page> </form-login-config> </login-config> <security-role> <role-name>User</role-name> </security-role>
Here's the explanation of each block of the preceding code snippet:
- The
security-constrainttag defines where security will be applied. You need to declare a combination of HTTP methods, URL patterns, and role constraints. In our use case, we're protecting a specific URL pattern,/reservation.jsf, and telling that only users with an abstract role namedUsercan proceed as per theauth-constrainttag. We say abstract because these roles don't actually have to match the roles at WebLogic Server. This match will be done later with another deployment descriptor,weblogic.xml.Tip
By default, all HTTP methods will be blocked since we're not explicitly specifying which ones must be secured. Here is how the same security constraint would look like protecting only
POSTandGETrequests:<url-pattern>/reservation.jsf</url-pattern> <http-method>POST</http-method> <http-method>GET</http-method> - The
login-configtag plays a very important role in the security process: it defines the authentication method, which in our case isFORM, and then points to where the the login and error pages will be available. These are the pages that users will be redirected to, to perform a login or in case any error occurs. It can also enforce SSL access by specifying thetransport-guaranteetag, which can beNONE,CONFIDENTIAL, orINTEGRAL.Note
A brief description of the available authentication methods is as follows:
BASIC: HTTP 1.0/1.1 basic authentication; a browser-controlled pop up will be displayed to input username/password.
FORM: A custom web page will be used to perform the authentication through an HTML
<form>. JSF or JSP pages are valid examples.CLIENT-CERT: Uses digital certificates to authenticate.
DIGEST: An advanced version of the HTTP basic authentication that leverages MD5 hashing.
- The
security-roletag is used to declare all abstract roles available for the web application. If we have some specific resources (constraints) for administrators and customers (groups) of the application, these rules must be declared here. Remember that you can name it anything you want, but later the value will be used in theweblogic.xmldescriptor to match the abstract role and a real group in the LDAP server.
After setting web.xml, we need to tie the roles declared there and the principals in the WebLogic server, or, to be more precise, on the OpenLDAP server.
- Open the
WEB-INF/weblogic.xmlfile of the Store web application. - Add the following lines right after the
</wls:library-ref>tag:<wls:security-role-assignment> <wls:role-name>User</wls:role-name> <wls:externally-defined /> </wls:security-role-assignment> - Save the file.
Simple, isn't it? Now let's see the explanation in detail.
The security-role-assignment tag can be used to define the match of abstract roles of a web application and the actual roles of WebLogic authentication providers. So a valid example could be as follows:
<wls:security-role-assignment>
    <wls:role-name>User</wls:role-name>
    <wls:principal-name>weblogic</wls:principal-name>
</wls:security-role-assignment
This would actually let only the WebLogic user (yes, the WebLogic administrator user; not recommended but vastly used) be a valid one for the application. Alternatively, you could point to any group available to the WebLogic security realm. Instead, with the externally defined element, we are pointing to a role that we need to set up from the WebLogic console. This extra step will provide a lot of flexibility since any group, users, or conditions that this role may map are defined from the WebLogic console, allowing us to modify the mapping without having to redeploy the application.
In order to accomplish this step, follow these instructions:
- Log in to the WebLogic console and click on Security Realms and then myrealm.
- Click on the Roles and Policies tab.
- On the Roles table, expand the Global Roles tree and click on Roles.
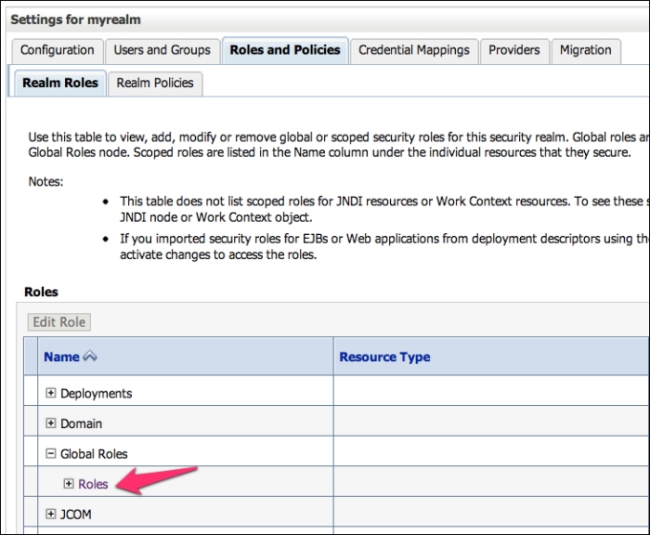
- On the Global Roles page, click on New.
- Use the following information:
- Name:
User - Provider Name:
XACMLRoleMapper
When done, click on OK.
- Name:
- Then, back on the Global Roles page, click on the User role we just created.
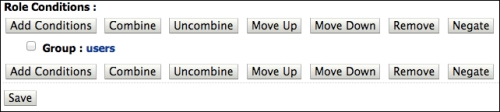
- At the Edit Global Role page, you will see a couple of buttons that can let you compose a set of rules that defines what this role actually maps. Click on Add Conditions.

- On the predicate list, select Group and click on Next.
- In the Group Argument Name textbox, type in
users. This is the name of the group from the OpenLDAP server that holds all common users of our application. Click on Add and then on Finish. - The Role Conditions section should look as shown in the following screenshot. If everything looks good, click on Save.
The only missing part now is the login form. In the web.xml file, we've specified a login and an error page that will be used by the web container to perform the authentication process or redirect in case of errors. A managed bean will be created to perform the actual authentication using the HttpServlet API and the login() method, available in Java EE 6. Let's get started.
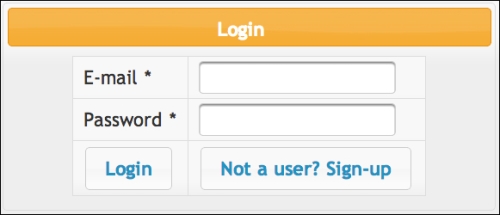
- In the Store project, create a new JSF file named
login.xhtml. The page will contain a web form with username and password fields with the proper binding to the managed bean. - Replace the body content of the page with the following code:
<ui:define name="content"> <center> <p:panel header="Login" style="width: 450px;" > <h:form> <p:growl id="messages" autoUpdate="true" closable="true" /> <p:panelGrid columns="2" rendered="#{request.userPrincipal == null}" style="border:0"> <p:outputLabel value="E-mail" for="email" /> <p:inputText id="email" required="true" value="#{login.customer.email}" label="E-mail" /> <p:outputLabel value="Password" for="password" /> <p:password id="password" required="true" value="#{login.customer.password}" label="Password" /> <p:commandButton value="Login" action="#{login.login}" /> </p:panelGrid> <h:panelGrid rendered="#{request.userPrincipal != null}"> <h:outputLabel value="#{request.userPrincipal}" /> <p:commandButton value="Logout" action="#{login.logout}" /> </h:panelGrid> </h:form> </p:panel> </center> </ui:define> - Create a new package named
com.packt.store.security. - Still in the security package, create a class and name it
LoginBean. - Copy and paste the following code. The code defines the
login()andlogout()methods referenced by thelogin.xhtmlpage that will be used to process the authentication.@Named @RequestScoped public class LoginBean implements Serializable { private static final long serialVersionUID = 1L; private Customer customer = new Customer(); private FacesContext context = FacesContext.getCurrentInstance(); private HttpServletRequest request = (HttpServletRequest) context.getExternalContext().getRequest(); public String login() { try { request.login(customer.getEmail(), customer.getPassword()); addSuccessMessage(String.format("Welcome back, %s!", customer.getEmail())); return "index?faces-redirect=true"; } catch (ServletException ex) { ex.printStackTrace(); addErrorMessage("Wrong username or password,please try again."); return "login?faces-redirect=true"; } } public String logout() throws ServletException { request.logout(); addSuccessMessage("You have logged out."); return "login?faces-redirect=true"; } ... // getters and setters - Save and close your open files and deploy the application. Your login form should look similar to the following screenshot:
As we have explicitly protected only the reservation.jsf page in web.xml, to test you just need to hit the URL http://localhost:7001/store/reservation.jsf. You will be redirected to the Login page and requested to input credentials of a valid user from LDAP. If any error occurs, you will be kept at the Login page and an error message will be displayed. On a successful login, the application will load the main page and you should see the principal name on the page header.
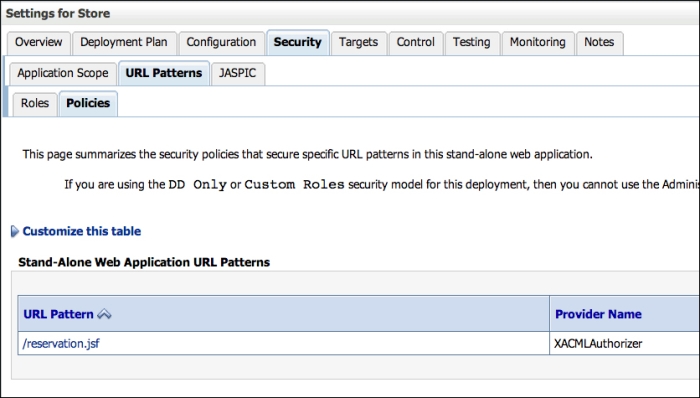
In order to check the security details of your web application using the WebLogic console, follow these steps:
- In the left-hand side menu, click on Deployments and then select the Store application from the deployment list.
- The Settings section for the Store application page will be displayed. Click on the Security tab. This tab shows various security settings but some of them are not available because this application is using the DD Only security model. So only the Roles, Policies, and Security settings declared by the
web.xmlandweblogic.xmldeployment descriptors are valid, but this page is a good place to check if what has been set in the descriptors looks good.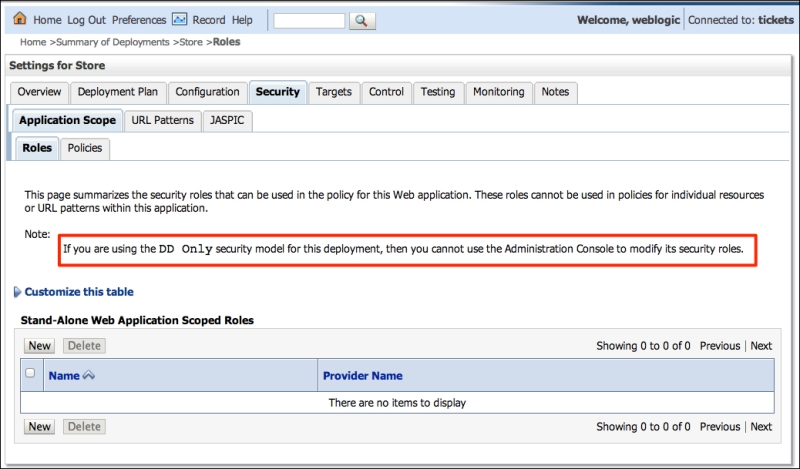
- To see a list of protected URLs in the web application, click on the URL Patterns tab and then Policies. But remember that you can't modify it from the console; that can be done only through deployment descriptors.