
For those who don't have English as their mother language, it can be surprising to discover that the word 'cluster' is actually a noun and a verb; it means a group of similar objects growing closely together (noun) and, also, congregating or being part of a group (verb). Of course, nowadays, the term is popular as computer clusters have become widespread.
Based on that, WebLogic Server cluster or clusters basically means that a group of servers will work together, running at the same time, toward some predefined architectural goals. Clusters can be created to cater to different needs of users, such as scalability, reliability, performance, load balancing, failover, and management. Note that WebLogic clusters can be defined by multiple machines and servers (Managed Servers) but they may also be seen as one single WebLogic Server for applications and clients.
Clustering is a key concept in application scalability and needs to be used in order to scale out (horizontally) by adding more machines to a system or scale up (vertically) by adding more servers or resources to the system. Today, with cloud computing, preparing your application to be scalable in both ways is mandatory and can be a successful factor in determining the number of users or requests your application can handle.
Thanks to the Java EE application server model, clustering is native to most of the Java EE and WebLogic components, for example:
- Servlets (JSF and JSP pages)
- Enterprise JavaBeans (Stateless and Stateful beans)
- Java Message Service (JMS) objects (queues, connection factories)
- Java Management Extensions (JMX) and Remote Method Invocation (RMI) objects
- Java Database Connectivity (JDBC) data sources and connections
Note
Application developers must be aware that clustering will modify the behavior of the application at runtime and should design the application taking this into consideration. For example, accessing a file when you have only one server and one machine is something easy and simple to do with a Java EE application, but doing this on a clustered environment in a consistent manner may incur different techniques considering that you may need to access the same file or different files from different physical machines.
Also, it's a common mistake to think that by simply clustering an application, you may end up with higher performance. There are cases when applications can run slower on clustered environments due to the heavy exchange of data between nodes; this is an indication that a session is being used without proper considerations such as the size of the objects in the session, and its replication is causing a performance bottleneck.
Clustering an environment or an application requires a detailed analysis of multiple technologies, such as network topologies, sizing, security, application architecture, and so on. Take these into consideration for any real or production system. In this book, we're creating a development environment according to the demo application's needs, for example.
Now, assuming that the machine and Node Manager configurations are in place, follow these steps to create the cluster:
- Access the WebLogic console at
http://localhost:7001/console. - In the left menu, expand the Environment section and then click on Clusters.
- In the
Clusterstable, click on New, and then select Cluster from the pop-up menu. - On the Create a New Cluster screen, enter
ticketsClusterin the Name field and leave all other values unchanged.
- Click on OK to create the cluster.
- Click the cluster name and navigate to the Servers tab.
- Under the Servers tab click on the Add button.
- In the Add a Server to Cluster window, click on Create a new server and add it to this cluster and then click on Next.
- Enter the following values and then click on Finish:
- Server name:
ticketMS_A - Server Listen Address:
localhost - Server Listen Port:
8001
- Server name:
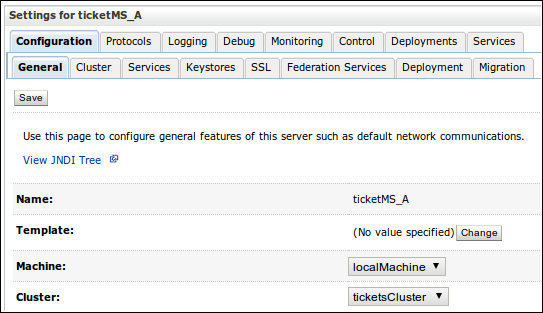
- Click on server name under the Servers tab and set the Machine drop-down to localMachine; notice that the Cluster drop-down is already set to ticketsCluster. Click on Save to conclude this step.
- Using the breadcrumbs at the top of WebLogic console, get back to the Servers tab and repeat the process from steps 6 through 8 using the following values:
- Server name:
ticketMS_B - Server Listen Address:
localhost - Server Listen Port:
9001
- Server name:
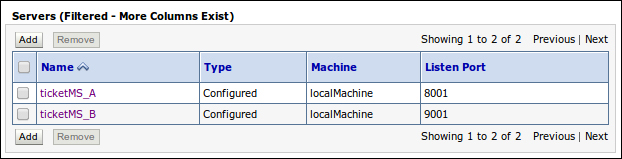
After the last step, you should have the configuration shown in the following screenshot:
This concludes the cluster configuration. Now, let's start the servers.
- On the Cluster Settings page, click on the Control tab.
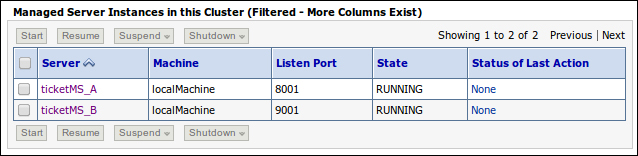
- In the Managed Server Instances in this Cluster (Filtered - More Columns Exist) table, select both the servers and notice that buttons will become available. Click on Start.
- The State column of the table will change from SHUTDOWN to STARTING. Wait a few seconds and refresh the page; the state should now be RUNNING.
- Under the Domain Structure menu on the left, expand Environment and click on Servers. You should see all two servers with the state RUNNING.
Congratulations, you have successfully set up and started a WebLogic cluster. To accomplish the steps performed here, WebLogic's administration instance sends instructions to the Node Manager asking it to start the Managed Server instances and, among other details, to exchange some metadata stating that they belong to a specific cluster, ticketsCluster.
Another way to accomplish the same outcome as in the previous section is by creating a dynamic cluster and two dynamic servers. This is a concept introduced in Version 12.1.2 of the product and is closely aligned to the Cloud Application Foundation (CAF) initiative. In a nutshell, it gives us a more flexible and quick way to create a WebLogic cluster by just defining the number of servers available. The servers can follow a server template and all other settings, such as listen addresses, ports, and machines are associated properly. This cluster can then shrink or increase the number of servers by just adjusting the maximum number of servers.
To illustrate how this works, let's see how to create and configure the components necessary to set up a dynamic cluster.
Note
The steps described here are not necessary to configure the remaining components of this chapter; they're just to show how easy it is to create a dynamic cluster and servers.
Of course, if you didn't create the cluster and Managed Servers as outlined in the previous section, you can use the following sequence that is way simpler—just remember to adjust the port values accordingly.
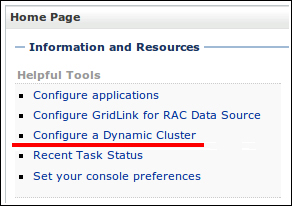
- At the administration console's home page, click on Configure a Dynamic Cluster, located in the Helpful Tools list.
- In the Clusters table, click on New, and then select Dynamic Cluster from the pop-up menu.
- Enter
ticketsClusterin the Name field and then click on Next. - The parameters in this page are specific to this kind of cluster; you must enter the number of Managed Servers you want available and the name prefix you want to use. Set the number to
2, entertickets-as the prefix, and then click on Next. - Now we must tell WebLogic which machines will be part of this dynamic cluster; as we just have one machine available, leave the first option selected and then click on Next.
- We're now asked to inform the initial list of port numbers that must be used by the dynamic servers of this cluster; again, leave the default values and then click on Next.
- A summary screen is shown, with all the information we entered as shown in the following screenshot:
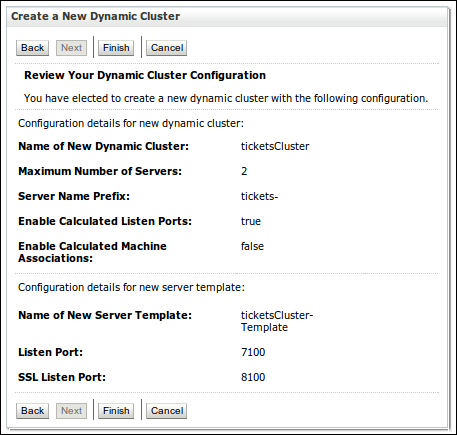
- Click on Finish to create the dynamic cluster.
We covered three concepts associated with this feature by completing the dynamic cluster creation wizard:
- Server templates: They hold the common information necessary to configure a dynamic server and are attached to only one dynamic cluster definition.
- Dynamic servers: These are Managed Servers created based on a server template and participating on a dynamic cluster. Some of its states aren't directly accessible to the administrator; for instance, we cannot create or delete a dynamic server by selecting it from the Servers table and clicking on Delete as we would with a regular server.
- Dynamic cluster: Putting it simply, a dynamic cluster is one that aggregates dynamic servers based on the same server template. So, it has the features of a regular cluster and also a little more information about how to configure and distribute dynamic servers over the machines bound to it.
Here are a few comments related to these concepts and the dynamic cluster wizard we just executed:
- WebLogic dynamic servers aren't started and stopped automatically by the server itself—the elasticity of the solution goes as far as helping us to create and remove nodes easily, but someone must decide how many instances must be started or stopped to cope with request peaks.
- When the cluster is created, the instances aren't started right away, so you could have entered
100in the Number of Dynamic Servers field; they will be created, but nothing else will be done, so you can go back later and change this value to a more realistic one. - The instances are distributed among the machines you selected previously, automatically, at the end of the cluster creation process and every time you change the number of dynamic servers of the cluster. If you need to create or retire a machine, go to the Cluster Configuration tab, then click on the subtab Servers, and change the Machine Name Match Expression field accordingly.
- We created both dynamic servers and a server template at the end of the dynamic cluster wizard. You can create templates by accessing the Server Templates entry under Cluster from the Domain Structure tree and, after that, create a dynamic cluster and instruct the wizard to use an existing template.
- Finally, if you want to shrink or expand the cluster by removing or adding dynamic servers, you must change the values in the Number of Dynamic Servers field at the cluster's Servers configuration page.
Here's the list of servers, showing static and dynamic ones together:
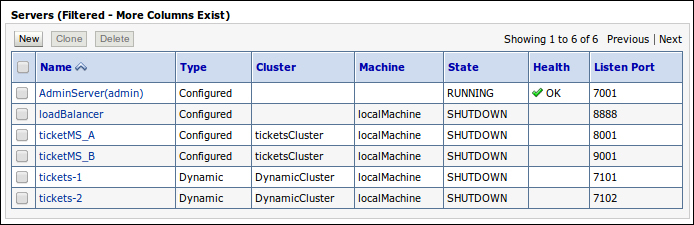
If you start one of the dynamic servers and click on its name after it starts running, you will see that there are only two tabs available, Monitoring and Control, both closely related to the current state of the server; neither of them has configuration parameters, only informational values.
All configuration parameters that we can tweak on a standard server are attached to the server template used to create the dynamic cluster; the server doesn't have any proprietary values (other than name, port number, and such, which are controlled by the cluster, not the server itself). So, if you want to change anything, such as logging, debugging, protocols, keystores, and so on, you are supposed to do that on the server template. And this is great because all dynamic servers will be using the same values, making administration a breeze.