
Although WebLogic Server is an application server used mostly for dynamic content and Java EE applications, it is also a fully-featured web server that's capable of serving static files as HTML and images. A WebLogic instance can even be used as a load balancer to distribute requests between clustered servers and do the necessary failover routing when a server becomes unavailable. In order to leverage such built-in functionalities, you must set up weblogic.servlet.proxy.HttpClusterServlet to act as your default web application for the domain. Here are the steps:
- Create a new dynamic web application in Eclipse named
HttpClusterServlet. - Open or create a
web.xmldeployment descriptor under theWEB-INFfolder. - Copy and paste the following content inside
web.xml:... <servlet> <servlet-name>HttpClusterServlet</servlet-name> <servlet-class> weblogic.servlet.proxy.HttpClusterServlet </servlet-class> <init-param> <param-name>WebLogicCluster</param-name> <param-value>localhost:8001|localhost:9001</param-value> </init-param> <init-param> <param-name>verbose</param-name> <param-value>true</param-value> </init-param> <init-param> <param-name>DebugConfigInfo</param-name> <param-value>ON</param-value> </init-param> </servlet> <servlet-mapping> <servlet-name>HttpClusterServlet</servlet-name> <url-pattern>/</url-pattern> </servlet-mapping> <servlet-mapping> <servlet-name>HttpClusterServlet</servlet-name> <url-pattern>*.jsf</url-pattern> </servlet-mapping> <servlet-mapping> <servlet-name>HttpClusterServlet</servlet-name> <url-pattern>*.html</url-pattern> </servlet-mapping> - Now, edit
weblogic.xmlunderWEB-INFand change thecontext-rootvalue to/:<?xml version="1.0" encoding="UTF-8"?> <wls:weblogic-web-app... > <wls:weblogic-version>12.1.2</wls:weblogic-version> <wls:context-root>/</wls:context-root> </wls:weblogic-web-app>
- Save both files.
- Export the application as a war file named
HttpClusterServlet.war.
Let's focus on explaining the set of parameters required by the HttpClusterServlet that we added in step 3 previously:
WebLogicCluster: It is the most important parameter because it's where the servers that will be part of the cluster are defined. For example,localhost:8001|localhost:9001.DebugConfigInfo: If it's set toONyou will be able to query information about the cluster by adding a special URL parameter,?__WebLogicBridgeConfig. The use of this parameter is discouraged for production systems.servlet-mapping: Notice that we're explicitly mapping the servlet to match specific URL patterns. Only requests made with these extensions will be load balanced throughHttpClusterServlet.
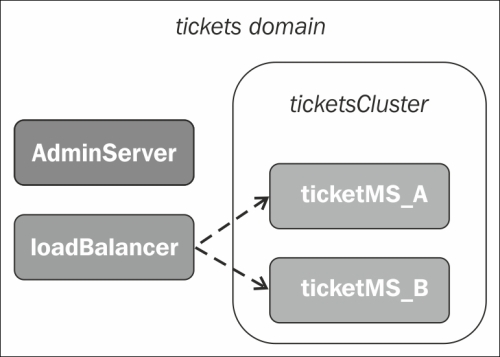
In this section, we propose the creation of a new Managed Server that will be responsible exclusively for load balancing and will host the HttpServerCluster application. Also note that this server will not be part of the cluster and doesn't need to have the same memory sizing as other managed nodes since it will not handle application objects and it only hosts one servlet.
Here's a diagram of the proposed topology:
To create this new WebLogic Server instance, follow these steps:
- Open the WebLogic console at
http://localhost:7001. - Under the domain structure (left menu) expand Environment and click on Servers.
- Click on New and then enter the following values:
- Server Name:
loadBalancer - Server Listen Port:
8888
- Server Name:
- Make sure the server is marked as a standalone server and then click on Finish.
- Back on the Servers table, check the loadBalancer checkbox under the Servers heading.
- Set the Machine drop-down to localMachine.
- Save the changes and start the server using the button under the Control tab.
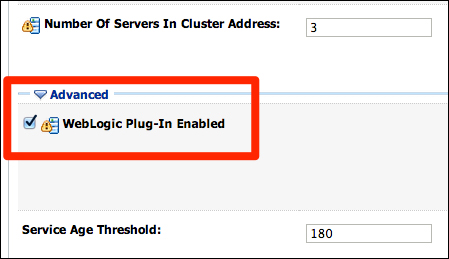
Next, you must enable the WebLogic Plug-In Enabled property under the Advanced tab in the cluster configuration section; this action will allow WebLogic to use its own proprietary header to balance requests received through a WebLogic Proxy Plug-In.
Now deploy the HttpServletCluster.war application and use the loadBalancer server as target. To check that the configuration is right, access the URL http://localhost:8888/?__WebLogicBridgeConfig and check that an output like the one shown in the following screenshot is generated:
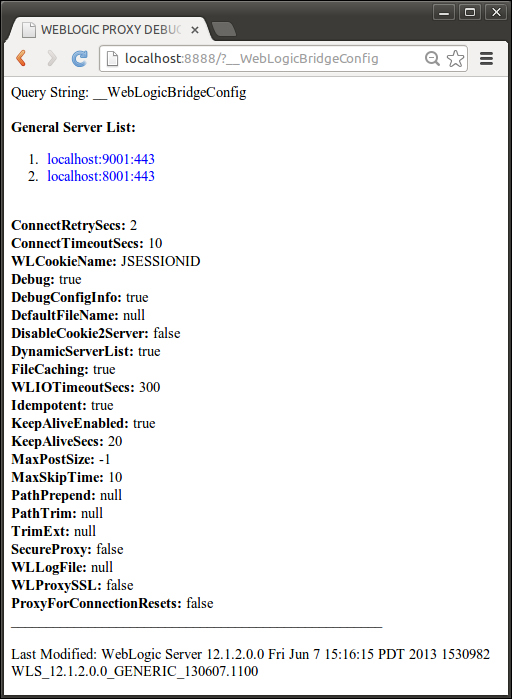
In the next section, we're going to update the application in order to enable the necessary settings for deployment on the cluster.
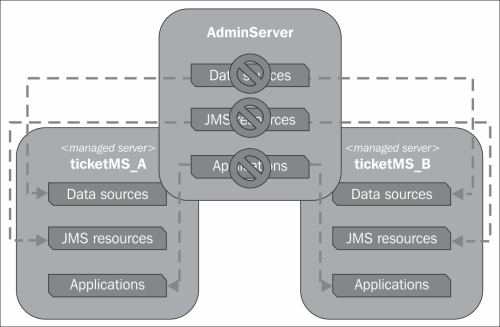
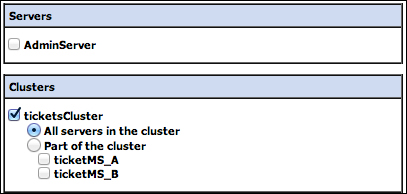
Although we have the cluster and servers up and running, our applications and resources are still deployed only on the Admin server and that's not acceptable anymore. In WebLogic, these resources can be targeted to a specific server, a whole cluster, or even part of the cluster.
Here's what the configuration should look like:
There are a couple of options to achieve these changes and we're going to explore some of the available ones.
One of the key features of Java EE web applications running on a cluster is HTTP Session replication. This functionality can be briefly described as the mechanism of sharing applications' state (HTTP session) between multiple servers and machines, having the application server responsible for decisions regarding where (in which server) the HTTP session will be stored; this usually means defining two servers that will be responsible for a session—the primary one, which will get the incoming requests of that specific session, and a backup server, which will receive the requests in case of the primary server failing.
In order to enable HTTP session replication, WebLogic does not follow the Java EE deployment descriptor web.xml. It instead uses its own runtime deployment descriptor, weblogic.xml, to enable HTTP session replication. Let's enable the standard mechanism of session replication on our web applications, performing the following steps:
- On Eclipse, in the Store web project, open the
weblogic.xmlfile underWEB-INFfolder. - Go to the Design tab of
weblogic.xml. - Expand the Session section on the left and then click on Persistent Store.
- From Store type select Replicated if clustered.
- On the left, click on Session Disposal and change the Session Timeout value according to your specific needs. We are going to set it to
300seconds.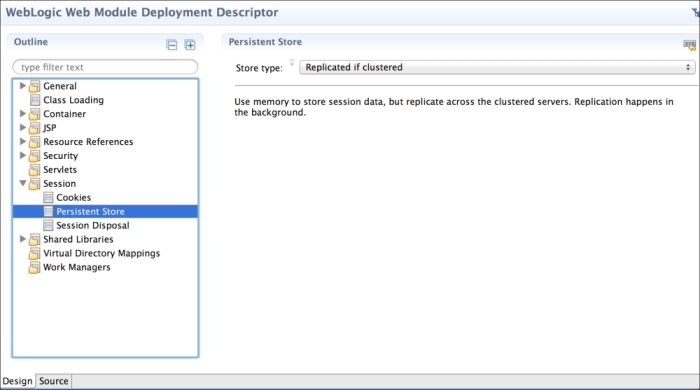
- Save the file and check the Source tab. The steps performed here will add the following lines to the
weblogic.xmlcontent:<wls:session-descriptor> <wls:timeout-secs>300</wls:timeout-secs> <wls:persistent-store-type> replicated_if_clustered </wls:persistent-store-type> </wls:session-descriptor> - Repeat the complete process for the Theater web application.
Also, edit web.xml and add a context-param tag in order to enable the JSF application state to be stored on the client. This will prevent some issues with Ajax processing and will decrease the server memory usage with a slight increase in the network bandwidth usage. Add the following parameter:
<context-param>
  <param-name>javax.faces.STATE_SAVING_METHOD</param-name>
  <param-value>client</param-value>
</context-param>
Do not attempt to deploy the application now since we still have to update the target of other resources such as JDBC data sources and JMS queues, which will be performed in the next sections.
Note
Note that WebLogic has five different session persistence mechanisms: Memory (non-replicated), File system, JDBC-based, Cookie-based, and In-memory (across a cluster). For clustered environments, In-memory and JDBC-based persistence are the best options since they offer effective replication mechanisms.
Let's retarget the data sources to the cluster so that we can later do this with the applications that use them:
- Access the WebLogic console at
http://localhost:7001/console. - On the left menu, expand Services and then click on Data Sources.
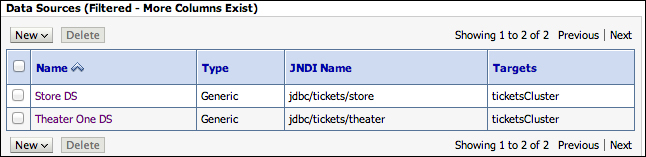
- Select Store DS and then click on the Targets tab.
- Un-check the AdminServer checkbox and then check ticketsCluster.
- Click on Save.
Repeat the process for the other data source, Theater One DS.
After this procedure, WebLogic Server will destroy the data source created on AdminServer and create a new connection pool and JDBC data source on each Managed Server of ticketsCluster.
Now, let's adjust the shared libraries and optional packages. In order to do so, follow these steps:
- In Eclipse, under the Servers tab, right-click on the server and click on Add and Remove.
- Click on Remove All and then click on Finish. This will remove the Theater and Store applications from the Admin server, which is required since they reference the shared libraries storeBO and theaterBO.
- Open the WebLogic console and, on the left menu, click on Deployments.
- In the
Deploymentstable, click on storeBO and then click on the tab Targets. - You should see a list of servers and clusters available on the domain. Un-check AdminServer and check ticketsCluster.
- Click on Save.
Now, go back to the deployments page and repeat steps 4 through 6 for components TheaterBO and primefaces.
In this section, we've performed the steps to change the target for all shared libraries we created. Now, we just need to adjust the targeting of the web applications.
Until now, the application has been deployed only to a single server, although some features such as HTTPSession were used, the session was not being distributed to different servers. Since the session serialization process is triggered only during the distribution, a common mistake is when a developer leaves non-serializable items on a session-scoped bean, where the application will behave fine without distributed sessions, but issues will arise when the application is used on a clustered environment with distributed sessions.
Other situations related to concurrency can also appear, such as how to serialize database access or distributed transactions. In order to prevent some of these issues, some measures are necessary to be taken while using this application and most of them are pretty easy to apply. For example:
- Open
SearchManager.javaand remove theEntityManagerinjection. By default,EntityManageris not serializable and at this point we actually don't need it here since we already have dedicated beans, such asTheaterManagerandMovieManagerthat are request-scoped and can be safely injected here.... // at SearchManager.java @Inject private TheaterManager theaterManager; @Inject private MovieManager movieManager; ...
- Edit the
search.xhtmlpage in order to useTheaterManagerandMovieManagerin the box components. - Make sure every attribute used in a session-scoped bean is serializable. For example,
TheaterClientneeds to implement theSerializableinterface and use the@Dependentscope to make sure that every instance of this bean is bound to the lifecycle of the parent object. - And the last step is to replace all host entries in the
web.xmlfile fortheaterServiceEndpointandreservationServiceEndpointwithlocalhost:8888, which is our software load-balancer address.
To retarget the applications, we could perform the same procedure used to adjust the shared libraries, but, for didactic reasons, we're going to illustrate how to change a deployment target from Eclipse in the following steps:
- Under the Servers tab, right-click on the tickets server and then click on Properties.
- In the Properties window, expand the WebLogic entry and then expand Publishing.
- Under Publishing, select Advanced. You should see the ticketsCluster and loadBalancer entries on the left side and AdminServer on the right.
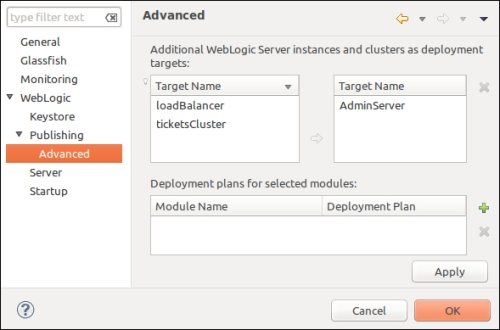
- Select AdminServer (on the right) and click on the red X icon.
- Select ticketsCluster (on the left) and click on the yellow arrow.
- Click on Ok to close the window and save the changes.
- Right-click on the server again and click on Add and Remove….
- Select the Store and Theater applications and click on Add. Then click on Finish.
- Wait a few seconds and both applications will be available on both Managed Servers. In order to test them, access the following URLs:
http://localhost:8001/store/http://localhost:9001/store/
Finally, to test the load balancer, open the URL http://localhost:8888/store/, which will distribute the requests to the Managed Servers present at its configuration.