
Execute the following steps to start a database instance on the standby server and make it ready for the RMAN duplicate operation.
- Create a service in Windows.
If you are creating a Data Guard configuration in Windows, you must create a service using the
oradimutility as follows:oradim -NEW -SID <sid> -STARTMODE manual -PFILE C:apporacleproduct11.2.0admin<sid>pfileinit.oraYou can skip this step if the environment is not Windows.
- Set the standby database initialization parameters:
Copy the
PFILEfrom the primary system to the standby system under the$ORACLE_HOME/dbsdirectory with the proper name (initINDIA.orain our example). Make changes as needed if the control file locations will be different on the standby database and then change locations. The diagnostic destination and memory must be checked. You also need to set the standby-related parameters we've just covered. Use the following example to compare parameters of the primary and standby databases.We haven't set Data-Guard-related parameters on the primary database yet. We'll set them after the RMAN duplicate operation finishes successfully. The following primary initialization parameters will be the final status.
The following are the primary database parameters:
control_files='/u01/app/oracle/oradata/orcl/control01.ctl','/u01/app/oracle/flash_recovery_area/orcl/control02.ctl'
db_name='orcl'
db_file_name_convert='/u02/app/oracle/oradata/orcl','/u01/app/oracle/oradata/orcl'  # for switchover purpose
db_recovery_file_dest='/u01/app/oracle/flash_recovery_area'
db_recovery_file_dest_size=4070572032
db_unique_name='turkey_un'
diagnostic_dest='/u01/app/oracle'
fal_server='INDIA'  # for switchover purpose
instance_name='TURKEY'
local_listener='LISTENER'
log_archive_dest_1='LOCATION=USE_DB_RECOVERY_FILE_DEST VALID_FOR=(ALL_LOGFILES,ALL_ROLES)'
log_archive_dest_2='SERVICE=INDIA LGWR ASYNC VALID_FOR=(ONLINE_LOGFILES,PRIMARY_ROLE) DB_UNIQUE_NAME=INDIA_UN'
log_archive_config='DG_CONFIG=(turkey_un,india_un)'
log_archive_max_processes=8
log_file_name_convert='/u02/app/oracle/oradata/orcl','/u01/app/oracle/oradata/orcl'  # for switchover purpose
memory_target=822083584
remote_login_passwordfile='EXCLUSIVE'
standby_file_management='AUTO' # for switchover purpose
The following are the standby database parameters:
control_files='/u02/app/oracle/oradata/orcl/control01.ctl','/u02/app/oracle/flash_recovery_area/orcl/control02.ctl'
db_name='orcl'
db_file_name_convert='/u01/app/oracle/oradata/orcl','/u02/app/oracle/oradata/orcl'
db_recovery_file_dest='/u02/app/oracle/flash_recovery_area'
db_recovery_file_dest_size=4070572032
db_unique_name='india_un'
diagnostic_dest='/u02/app/oracle'
fal_server='TURKEY'
instance_name='INDIA'
local_listener='LISTENER'
log_archive_dest_1='LOCATION=USE_DB_RECOVERY_FILE_DEST VALID_FOR=(ALL_LOGFILES,ALL_ROLES)'
log_archive_dest_2='SERVICE=TURKEY LGWR ASYNC VALID_FOR= (ONLINE_LOGFILES,PRIMARY_ROLE) DB_UNIQUE_NAME=turkey_un' # for switchover purpose
log_archive_config='DG_CONFIG=(turkey_un,india_un)'
log_archive_max_processes=8
log_file_name_convert='/u01/app/oracle/oradata/orcl','/u02/app/oracle/oradata/orcl'
memory_target=822083584
remote_login_passwordfile='EXCLUSIVE'
standby_file_management='AUTO'
- After preparing the standby instance parameter file, set the Oracle user environment variables and start the standby instance in the
No Mountstatus.[oracle@oracle-stby ~]$ export ORACLE_HOME= /u01/app/oracle/product/11.2.0/db_1 [oracle@oracle-stby ~]$ export ORACLE_SID=INDIA [oracle@oracle-stby ~]$ sqlplus / as sysdba SQL*Plus: Release 11.2.0.1.0 Production on Sun Aug 12 12:17:01 2012 Copyright (c) 1982, 2009, Oracle. All rights reserved. Connected to an idle instance. SQL>startup nomount ORACLE instance started. Total System Global Area 818401280 bytes Fixed Size 2217792 bytes Variable Size 507513024 bytes Database Buffers 306184192 bytes Redo Buffers 2486272 bytes SQL> select host_name,status from v$instance; HOST_NAME STATUS -------------------- ------------ oracle-stby STARTED
- The following are the SQL*Net configurations.
With 11g, we can use RMAN duplicate without the need of primary database backup. The RMAN duplicate using the active database feature reads from the original database files. In order to use this feature, we have to perform static registration of the service to the listener. To do this, we configure both the listener and TNS names. The standby database instance must be in the
NOMOUNTstate before theduplicatecommand. In theNOMOUNTstate, the database instance will not self-register with the listener. Another item to note is that you must use a dedicated server to connect when the database is in theNOMOUNTstate.Before we jump into configuration, let's describe static service information. Static service information is normally not required in the
listener.oraconfiguration file. In order to perform duplicate using active database to connect instance inNOMOUNTstatus, we are using static listener entry. The parameters required for static service information areSID_NAME,GLOBAL_DBNAME, andORACLE_HOME.SID_NAME: The Oracle SID is the instance identifier, as in theINSTANCE_NAMEparameter of the parameter fileGLOBAL_DBNAME: TheGLOBAL_DBNAMEparameter is typically a concatenation of theDB_DOMAINandDB_NAMEparameters in the parameter file or the same as theSERVICE_NAMESparameter in the parameter fileORACLE_HOME: It's the installation directory of the Oracle database software
Configure the listener and TNS configuration on both the primary and standby databases. The following is the example of the standby database's
listener.oraconfiguration:LISTENER= (DESCRIPTION= (ADDRESS_LIST= (ADDRESS=(PROTOCOL=tcp) (HOST= oracle-stby)(PORT=1521)) (ADDRESS=(PROTOCOL=ipc)(KEY=extproc)))) SID_LIST_LISTENER = (SID_LIST = (SID_DESC = (SID_NAME = PLSExtProc) (ORACLE_HOME = /u01/app/oracle/product/11.2.0/db_1) (PROGRAM = extproc)) (SID_DESC = (GLOBAL_DBNAME = india_un) (SID_NAME = INDIA) (ORACLE_HOME = /u01/app/oracle/product/11.2.0/db_1)))
The following will be the TNS entry primary database used to connect the standby database:
INDIA =
  (DESCRIPTION =
    (ADDRESS = (PROTOCOL = TCP)(HOST = oracle-stby)(PORT = 1521))
    (CONNECT_DATA =
      (SERVER = DEDICATED)
      (SERVICE_NAME = india_un)))
Tip
PMON automatically registers with the listener listening on the default port, 1521. If the listener is listening from a non-default port, or if this is an RAC database, the
LOCAL_LISTENERparameter must be set to register PMON with the listener. Set theLOCAL_LISTENERparameter to the local listener alias, the name of the listener in thelistener.orafile. Also, theLOCAL_LISTENERvalue has to be resolved using thetnsnames.orafile or in an Oracle Names Server. - Now start the listeners on both the primary and standby servers.
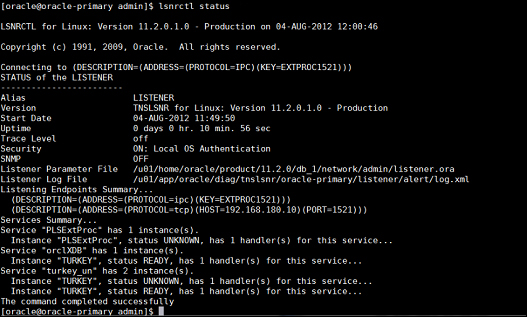
$lsnrctl startWhen the listener is running, check the database accessibility and response time, using
tnspingfrom both primary to standby and standby to primary databases.The registered services with the listener of primary should be similar to the following screenshot:
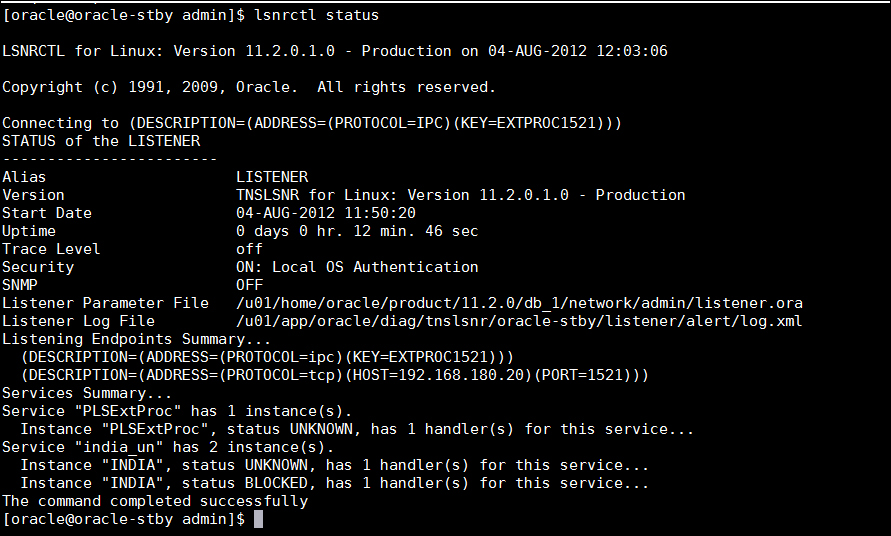
The registered services with the listener of standby are as follows:
- Copy the password file from the primary system to standby. You can find this file under the
$ORACLE_HOME/dbsdirectory with the nameorapwSID. Copy it to the same directory on the standby server and rename correspondingly. - If you have configured the encryption wallet on the primary database, copy the wallet to the standby system. If you have more than one standby database, you must copy these files to every standby location. You can access the encrypted data from standby when the wallet module contains the master encryption key from the primary database.
We're ready to start the RMAN duplicate. Let's revisit the actions that have been performed on the primary and standby systems:
|
Task |
Primary |
Standby |
|---|---|---|
|
Instance status |
Open |
No mount |
|
Archive log mode |
Enabled |
N/A |
|
FRA |
Enabled |
Enabled |
|
Force logging |
Enabled |
N/A |
|
SQL* net configuration |
Configured |
Configured |
|
PFILE/SPFILE |
Exists |
Copied, renamed, and modified |
|
Password file |
Exists |
Copied and renamed |
|
Control file |
Exists |
Will be created automatically (standby CF) |
|
Standby redo logs |
Created |
Will be duplicated |
|
Data files |
Exists |
Will be duplicated |
In order to create a physical standby database, we have several methods depending on the release features. We've already mentioned that we'll use the RMAN duplicate from the active database method. In this method, there's no need to take a backup in primary and copy it on the standby system.
Here is an overview of the other methods used to create a standby database:
- Hot backups: Backups taken from the primary database by executing the
ALTER DATABASE BEGIN BACKUPcommand can be used to create a standby database. - RMAN backups: Full (level 0) RMAN database backups can also be used for the standby configuration.
- Cloud Control: This is the only graphical interface we can use to create a standby database configuration. It offers online duplicates, existing or new RMAN backups, and handles the steps of copying the
init.orafile and the password file.
When creating the active database duplicate, RMAN copies the datafiles directly from the primary database to the standby database over the network; in such cases, the primary database must be opened or mounted. Before we start creating the RMAN duplicate, we start the standby instance in the NOMOUNT status; after successful duplication, RMAN leaves the instance in the MOUNT status.