
GlassFish 4 is the reference implementation of the Java EE 7 specification and as such has fully working implementations of the individual standards. It contains an EJB and Servlet container. GlassFish utilizes the JBoss Weld container for CDI bean types. At the time of writing, the newly revamped website http://glassfish.java.net/ contains many resources for Java EE 7 developers including documentation, PDF files, videos from the Developer Days conferences, and mailing list links.
In the next section we will set up the GlassFish for MySQL on a local workstation.
Download the latest version from the website as a ZIP archive. Unzip into a folder of your choice. You will see the following structure, depending on your Windows or Mac or UNIX preference:
drwxr-xr-x   8 tomanderson  wheel  272 31 May 02:47 bin/
drwxr-xr-x  11 tomanderson  wheel  374 31 May 02:47 glassfish/
drwxr-xr-x   9 tomanderson  wheel  306 31 May 03:38 javadb/
drwxr-xr-x   5 tomanderson  wheel  170 31 May 03:39 mq/
drwxr-xr-x   4 tomanderson  wheel  136 31 May 03:38 pkg/
The bin folder contains the important utility command asadmin (or asadmin.bat). You can start GlassFish by executing the following command:
asadmin start-domain --verbose
This launches GlassFish with a default server in a non-clustered environment with an initial domain (glassfish/domains/domain1). Domains are a way to cluster servers in a managed configuration and further information about them can be found in the GlassFish resources, outside of this book. The --verbose argument is useful for watching debuggable output from the standard output.
You can stop the server at any time with Control-C shortcut in the terminal window. A more elegant approach would be to stop the server from another terminal window. Here is the syntax of this:
asadmin stop-domain
Stop and start the server and with your favorite web browser surf to your machine's http://localhost:8080/, which is the default port number for GlassFish. There is an administration console that allows configuration at http://localhost:4848/. The default username is admin and there is no default password.
It is possible to secure the server by changing the default password with the following administration command. Here it is:
asadmin change-admin-password
Enter the default password, which is empty, and type the brand new one. For secure access outside of the local machine, you will also need to allow secure administration. Here is that command:
asadmin enable-secure-admin
Installing MySQL access in GlassFish first requires the JDBC driver mysql-connector-java-5.1.25-bin.jar being copied to the glassfish/lib folder. Restart the GlassFish server.
Afterwards, configure MySQL access through the administration console. The next part assumes that you have already created a database schema in MySQL, set up the login user, and applied privileges.
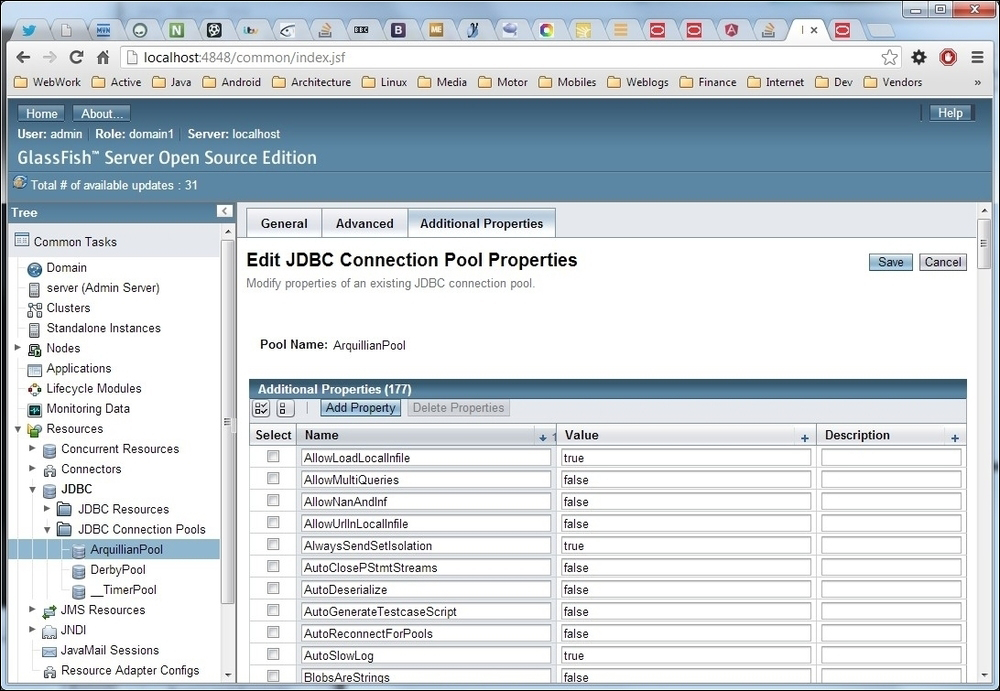
In the administration console, locate the JDBC resource on the left hand side pane of the display page by navigating to Resources | JDBC | JDBC Connection Pool. Create a brand new connection pool.
Enter the Pool Name as ArquillianPool (this field is required). Set the Resource Type to javax.sql.DataSource, which is the non-distributed transactional local resource. Set the Database Driver Vendor to MySQL. Click on the Next button to continue to the next screen.
Apply the following setting in the Additional Properties page:
DatabaseName = arquillian
Password = arquillian
URL = jdbc:mysql://localhost:3306/Arquillian
User = arquillian
There are about 177 different database properties for MySQL driver, so take your time to get the details correct.
Locate the JDBC resource on the left hand side pane of the display page: Resources | JDBC | JDBC Resource. Create a brand new resource. Set the Name as the JNDI lookup destination: jdbc/arquillian. This name is very important because it must be the same as the Resource Injection reference in your code: @Resource("/jdbc/Arquillian").

From the drop-down list for Pool Name, associate the resource with the JDBC Connection Pool: ArquillianPool. Test your connection in the administration console; it should be valid, and therefore usable.
The same tasks can be completed at the command line using the administration utility. It is also applicable to a shell script for automation. Here is the equivalent command to create the JDBC Connection pool:
asadmin create-jdbc-connection-pool
  --datasourceclassname
  com.mysql.jdbc.jdbc2.optional.MysqlConnectionPoolDataSource
  --restype javax.sql.DataSource
  --property User=arquillian:
  Password=arquillian:
  URL=jdbc:mysql://localhost:3306/arquillian
  ArquillianPool
Here is the equivalent command line to create the JDBC Resource:
asadmin create-jdbc-resource
  --connectionpoolid ArquillianPool
  jdbc/arquillian
In line with the Java EE 7 specification, GlassFish defines a couple of default resources. For database connectivity, there is a default Apache Derby database under the JNDI name jdbc/__default. Developers can simply access this as a @PersistenceContext for a JPA entity manager or a @DataSource JDBC reference in the code.
There is also a JMS 2.0 default connection factory under the JNDI name jms/__defaultConnectionFactory. Applications can pull in this resource with a simple @JMSContext annotation.
In should be noted that these default resources are simply for basic enterprise applications, tutorials, and examples. They should not ever be used in a production environment. No doubt serious enterprise applications will require more substantial configurations beyond these couple of default resources.