
This recipe describes how to change the appearance of text in iWork. Some operations are basic, but there are some tricks that can make our life easier and more productive.
Fonts are stored in the application called Font Book . This is also the place to install new fonts.
The word font means a set of types of one particular face and size, while typeface means a particular design of type. They are used interchangeably, so don't be confused. In layman's terms, they mean the same thing—what our text looks like.
When we work with text, we can use menus, keyboard shortcuts, Font Panel, and Text Inspector. So, let's see what each of these can do for us.
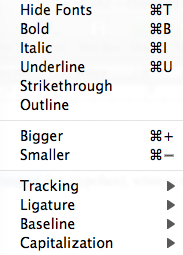
There are three basic styles of text—regular, bold, and italic. Select (highlight) text, click on the Format menu, navigate to Font, and select one of these:
I would recommend using this menu when you begin to familiarize yourself with iWork. It shouldn't take long, because if you have used a Mac word processor before, you will already know these basic operations. If you are switching from Windows, the only major difference is that the Command key takes the place of the Ctrl key.
As Mac users like to point out, "Where Windows users are under Control, Mac users are in Command".
The next natural step is to use shortcuts instead of menus:
Usually, we style text after typing. Select text and then change its appearance. But if we know beforehand how a particular part of text should be styled, we can do it as we type. For example, when using italic style for book or movie titles, or names of newspapers and magazines, we can press Command + I before the beginning of the text and then use the same shortcut after the styled text to switch back to regular.
The main iWork menu is at the top of the screen. At the top of each document, you will see the toolbar, and underneath it, the format bar.
The bold, italic, and underline functions are in the middle of the format bar. Select text and click on an icon to change style. Click on that icon again to undo.
The format bar offers a quick way to change the look of the text in a document.
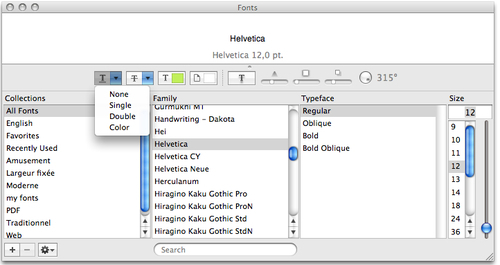
Click on the Font Family tab (it displays the name of the font that is currently in use) to choose from a variety of fonts. All fonts are sorted alphabetically. The separate small group above the thin grey line shows the ones that you have used recently, and the full list is below that grey line.
Some popular font families, for example Helvetica Neue and Myriad Pro, have more typeface variations than just regular, bold, and italic. There may be variations such as light, ultralight, condensed, and black. This offers a greater design advantage for more sophisticated projects, such as brochures, magazines, and posters. To choose a style, click on the Typeface tab to the right of the Font tab and choose a typeface from the drop-down menu.
The Font Panel or Font Window is the real control center for doing anything with fonts and typefaces in a document. To open it, you can choose from the following options:
- Navigating to Format | Font | Show Fonts
- Clicking on Fonts in the toolbar
- Using the shortcut key Command + T
The shortcut is easy to remember if you think of T as representing Text.
The Font Panel shows not only the available fonts, but also additional features and productivity tools, such as multiple underlines and strikethroughs, controls for the color of underlines, and the use of font collections.
To give a portion of the text a double underline, select a passage, click on the first icon, and select Double.
To give a color to the underline, select a passage, click on the first icon, select Color, and when the Colors window opens, choose the color you want.
On the left of the Fonts Panel, you will find the Collections window that shows the various font families. The Collections window has more uses than just to show us what fonts are available:
- If you are still just preparing for a new project, follow these steps:
- Open the Fonts Panel.
- Click on All Fonts, and by moving the slider button up and down, find the font that you'd like to use in your project.
- Click on the picture of the action wheel at the bottom of the panel, and in the drop-down menu, choose Add to Favorites.
- If you have already decided which fonts to use in your project and want to have them handy, follow these steps:
- Click on Favorites in the Font Panel.
- In your text, click on a word typed in the font that you want to use throughout the project.
- Then click on the action wheel and choose Add to Favorites. The font will appear in the Favorites folder.

Special characters, such as technical symbols, arrows, mathematical signs, non-Latin scripts, and musical and zodiac signs are stored in the Character palette. From the screen-top menu, navigate to Edit | Special Characters, to open the palette.
You can also open it through the Fonts Panel. Click on the action wheel at the bottom and choose Characters. If you often need special characters, navigate to System Preferences | International | Input Menu and check Character Palette. It will become available from the screen-top menu, in the top-right corner.