
This format is one of the most commonly used in graphics, especially for digital photographs. It is used for storing and transmitting photos on the Internet. One of the reasons for this is that the format allows varying degrees of compression with little loss of quality. This is what makes JPEGs so attractive for web use. For iWork projects, you may want to make your finished work—a poster, a card, a logo, a flyer, or simply a collage of snapshots from the family holiday—into a JPEG. This recipe shows how to do this.
When you finish working on an iWork project—in Pages, for example—with its wide choice of templates, do the following:
- Choose Print from the File menu, or press Command and type P.
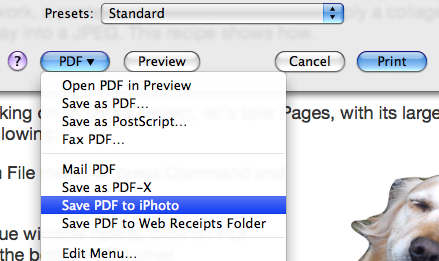
- When the Print dialog opens, click on the PDF drop-down menu in the bottom-left corner.
- Choose Save PDF to iPhoto.
The workflow starts, and after a few seconds iPhoto launches and imports your iWork document as JPEG. In iPhoto, you can edit it, add effects, and store it in albums and folders. From iPhoto, the new JPEG file can be sent as a mail attachment.
Click on the Email button and the computer will compose a draft e-mail message with compression (size) options, from small to actual size, for your image.
This simple method gives a quick and easy way to send out the Pages documents. Directly from iPhoto, you can share images on popular social networks, such as Facebook. If you have a blog or a website, these JPEGs are ready for uploading too.
Printing to iPhoto is probably the easiest and quickest way of making JPEGs from iWork.
There is another method via Preview, which gives more flexibility when creating a JPEG file than simply printing to iPhoto:
- Press Command + P to open the print dialog.
- Click on the Preview button and then click in the bottom of the dialog.
- When a preview of the document opens, check that it looks the way you want your finished document to look, and choose Save As... from the File menu (alternatively use the keyboard shortcut Command + Shift + S).
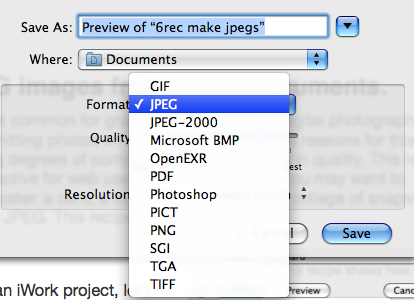
- When the Save As dialog opens, click on the Format drop-down menu and choose JPEG (or whatever format you wish to use). When you choose JPEG, additional options appear. These options allow you to set the quality and resolution of the JPEG. Choose the quality from the drop-down menu and set the resolution by typing the size in the window.
Preview, with its unassuming name, is a powerful but often overlooked application, pre-installed on Mac computers. It reads and makes PDFs, and it allows you to change file formats from one to another. If you already have a PDF or a PNG file created from an iWork document, open it in Preview and save it as a JPEG.
Current versions of Macintosh OS have an added set of tools for Preview, including Alpha and free-draw cropping tools. With these, you can remove the background in photos and make cut-outs. These are powerful graphic design features.