
While iWork is primarily an office productivity suite, its tools make it perfectly possible for us to accomplish large projects, including electronic and printed books.
iWork documents have a number of preset dimensions for popular stationery formats. They are meant to be used for home desktop printers. When you prepare a project for professional printing elsewhere, it is likely that you will have to set custom dimensions for your document. This recipe describes how to do it.
Check the dimensions of your publication with the print shop or web-based publishing service that you are going to use. Usually, paper sizes for various types of books are given in their Help or FAQ sections. While there are a number of standard formats, they vary from country to country and from service to service. A standard paperback can have dimensions of 5 inches x 8 inches or 5 inches x 7.75 inches.
To set the paper size and orientation, perform these steps:
- Open the Page Setup dialog. Use the keyboard shortcut Command + Shift + P or click on the Page Setup button in Document Inspector. You can also navigate to File | Page Setup.
- Click on the Format for drop-down menu in the Page Setup dialog and choose Any Printer or Adobe PDF.
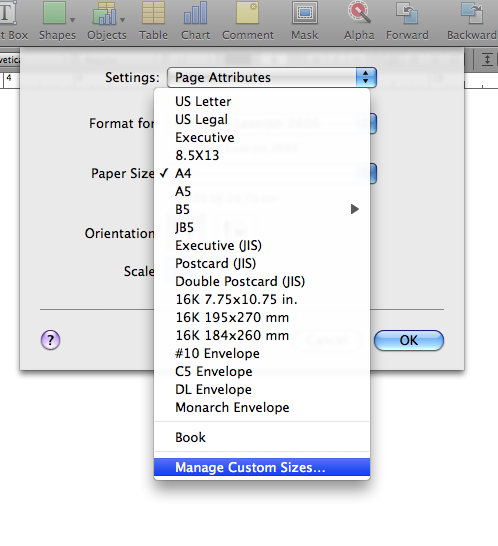
- Click on the Paper Size drop-down menu and choose Manage Custom Sizes.... This opens the Custom Page Sizes dialog:
- Click on the plus sign (+) in the bottom-left corner of the dialog to add a new document format. In Page Size, type in the required dimensions. Under Printer Margins, click on the drop-down menu and choose User defined. In the Top, Bottom, Left, and Right windows type
0(zero). - In the left hand panel, double-click on Untitled to select it and type over the name of your project, for example,
Book: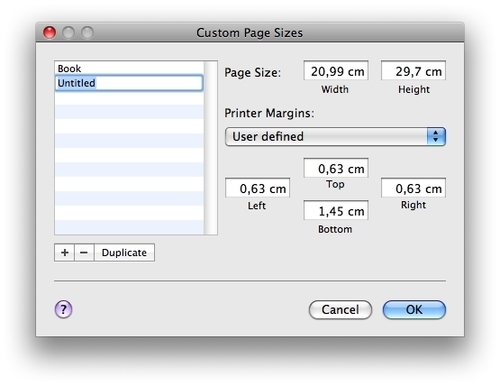
- To save the new dimensions and add them to the paper size menu, click on OK. The Custom Page Sizes dialog will close.
- In the Page Setup dialog, which is still open, click on the Paper Size drop-down menu again and make sure that the new format is chosen. The selected new format will be shown between two thin gray lines below the preset paper dimensions.
- In Scale, make sure that 100% is shown, otherwise the final document will have dimensions that are different from the ones you have set.
In this recipe, we discussed the following properties.
When we set the value for Printer Margins, it does not correspondingly change the value of Document Margins. They are for the final PDF. That's why we set them to 0. Document margins, the empty white area around the body of text and graphics in our document, are set in Document Inspector. Type the value for it under Document Margins. If you are planning to use a web-based service for printing your book, for example, CafePress, follow the instructions for setting dimensions on their website. If you work with a professional print shop, consult them about margins. They may want you to add a 3 mm margin all around your PDF for printers' trim.
One problem that iWork users encounter with PDFs is when the document comes out truncated, that is, only part of the original document is in PDF. To avoid this, in the Print dialog, make sure that Adobe Printer is chosen and under Presets | Current | Paper Handling | Destination Paper Size your chosen paper size is shown.
When preparing a book with iWork, there are many other technical considerations. Here is a checklist of what to take into account:
- Start by deciding on the format. A4 or A5? Or a custom size? Portrait or landscape? Check dimensions with the printing service that will be printing your book professionally. Remember, usually you add 3 mm all around to allow for printers' edge cutting (trimming). Calculate margins carefully, allowing more space if the book is going to be bound. Set dimensions in the iWork document and save it, in order to duplicate it for all other pages of the book.
- Make a map of your book. Design a spreadsheet in Numbers, showing all the chapters and pages. Or design a one- or two-page document with chapters and sections shown as Text Boxes, and write down what goes where. Print the map out, keep the file in the Dock, or put it in the side panel of a folder window, so that you have quick access to it. Mark finished pages as you go—this will save a lot of hassle later. The following screenshot shows the map of a 64-page publication. It is a table designed in Numbers. Colored cells show the front and back cover. Bold vertical strokes separate facing pages. Print it out and mark with a pencil or type the page information on the computer.

- Make sure all files/pages are clearly named (for example, page number, what's on it) and don't change them until the work is finished. It's very easy to lose track of where you are when you work on a large project.
- Make folders for each stage of the work (for example, 1st draft, 2nd draft, 1st proof, 2nd proof, printer's proofs, and so on), and move the finished parts of the book from one folder to the next only when the work is finished.
- Break all work into manageable chunks—front page/cover, back page/cover, contents, index, and sections. Don't work with large files. It is best to work page by page, or with two facing pages. However, for proofing and editing, put everything together in one big document. This is especially important if your book is one continuous body of text, for example, a novel. You can use iWork's powerful proofing tools for cross-checking and referencing.
- Begin designing with two facing pages of the main body of the book and then use them as templates for the rest. Pay special attention to small design elements—lines, clip art, page headers, and footers. They should have the same style and be placed in exactly the same position on the page, throughout the book. Metrics Inspector allows you to fix co-ordinates down to a fraction of a millimeter or inch. Remember that repeating lines, boxes, and clip art are used to align pages when the finished work is assembled for the printing presses.
- Use one or maximum two fonts throughout the book. For headings, sub-headings, and notes, use font variations rather than different fonts, to avoid the whole document looking messy.
- Decide how you are going to deliver finished pages to the printers. Most accept PDFs, and many printers are happy to assemble the pages themselves, but some will ask you to do it. Make sure you have the software to convert iWork documents to press-quality PDFs (for example, Adobe Acrobat) and check the settings with your printers. It is best to establish physical, face-to-face contact with the printers you are going to work with. But if this is not practical, test run sending large files via File Transfer Protocol (FTP) programs, such as Zipper or SendIt.
- Calculate production costs, including packaging and delivery. The weight of paper and type of binding (stapled, ring, or hard spine) affect the final cost and quality. Heavy paper allows for better quality, but can make your publication more expensive and put it into a higher postal tariff bracket. Lighter paper saves on cost, but images may show through on the reverse side of the page, which can upset artists or advertisers. Check with the printers, ask for estimates, and look at samples. Don't be afraid to ask unprofessional-sounding questions. Nobody knows everything.
- Don't rush. Check finished work at least three times for typos and other mistakes, such as wrong page numbers. Invest in professional proofreaders and involve your friends and family. Contents and index pages are especially important—the page number in contents must correspond to the page in the body of the book or magazine. It may seem obvious, but that's where mistakes often occur. It's worth checking the whole finished work for just one element—for instance, page numbers. Go through the whole book to make sure you haven't lost any pages or repeated page numbers. Then take another element, for instance font size of headings, and check that it is the same throughout the book. Then, check co-ordinates of lines, logos, or clip art in headers or footers. They must be the same throughout the book too. This may seem unimportant, but if the style is not consistent, it gives the impression of a sloppy, unprofessional product.
- Make sure you know and understand certain rules that are used in particular types of publications. For example, if you work on an art catalog, you should know that the descriptions of the works of art follow a particular set of rules. Look at the catalog of a reputable fine arts firm and follow their pattern. For example: first, the name of the artist (bold), then the title (regular, in capitals), the date of the work and position of author's signature (italics), media, for example, "oil on canvas" (regular or semi-bold), dimensions (italics), notes (light, smaller font size), provenance (regular font, but indented), suggested price/deposit, and so on.